Showing posts with label Apache. Show all posts

December 31, 2020
Estimated Post Reading Time ~

Apache Tika config in Lucene Index and Query Flow Summary

This post is about the Apache tika config on the Lucene full-text Index and a summary on queries/indexing that we discussed in the past few posts.

Apache Tika is used to detect and extract the text from varying file formats. It consists of a Detector and Parser where Detector is used to detect the file format and Parser will parse the contents of the file.

In Lucene Index, Oak uses the default config which uses

TypeDetector - org.apache.tika.detect.TypeDetector
  • This detector uses the content type available in input metadata to arrive at the content type/mimeType
DefaultParser - org.apache.tika.parser.DefaultParser
  • The composite parser is based on all available specific parser implementations.
  • Eg. PDFParser, MP4Parser, and all other parser implementations available in Apache Tika.
Empty Parser - org.apache.tika.parser.EmptyParser
  • As with the name, it is a dummy parser/ not parses anything
  • Hence defining mime types within Empty Parser is equivalent to excluding them from text extraction.
  • In Default config, compressed assets and images are all excluded from extraction (related mimeType defined within Empty Parser)
Default config file is available here
Given the detectors and parser available in the default config, the most common/possible use case to consider for custom config need is to exclude certain mimeTypes from extraction.
(It will help to reduce the volume of a repository of such indexed data. )

Summary of Queries and Indexing:
When we write functionality related to Query we can go about it as follows:

Query Debugger: (http://localhost:4502/libs/cq/search/content/querydebug.html)
  • Write queries in Query Debugger and execute
  • Use p.limit=-1 to get the complete result sets to check if we are getting expected results.
Explain Query Tool: (Operations -> Diagnosis -> Query Performance)
  • Once the query is framed, execute the same in the Explain Query tool to observe the index used, execution time is taken, query plan, and cost calculation.
The decision on Index:
  • If it is a traversal query and if we foresee the content volume to be huge, consider creating an index.
  • To arrive at the index type to be used, again we need to think of it in a long run. In general, per the adobe docs, Lucene Index is recommended as it can cover many properties under one index definition, flexible and more options to the index definition (in the form of supporting properties).
  • However, if we are looking for accurate results and if the query involves a unique constraint, then we need to consider creating Property Index.
While creating the Index Definition:
  • After deciding on creating the index and hence the index type -> we can start by creating an index definition with its mandatory properties.
  • By understanding the significance of each of the optional/supporting properties, we can make the index definition to be specific and thereby reducing the volume of the content indexed per our need, ultimately leading to faster query execution.
  • For creating Lucene Index, we can make use of Oak Index Definition Generator, by pasting XPath or JCR-SQL2 queries (which we can get using Query Debugger Tool or in CRXDE -> Tools -> Query)
Reindexing:
  • Once when we create a new index definition for the first time, indexing happens as with the persistence in the case of Property Index and on the next AsyncIndexJobUpdate run in the case of Lucene Index
  • Apart from this, when there is a change in index definition any further, it is obvious to trigger a reindex.
  • In the case of Lucene Index, we also have an option of refresh (by using property refresh -> true)
Troubleshooting:
APIs for logging (To be added in Log Support in Felix console on need basis - http://localhost:4502/system/console/slinglog)
  • Queries
    • org.apache.jackrabbit.oak.query
    • com.day.cq.search (If we are using QueryBuilder API/Query predicate logic)
Indexing
    • org.apache.jackrabbit.oak.plugins.index
Async Index Job execution-related
    • org.apache.jackrabbit.oak.plugins.index.AsyncIndexUpdate
MBeans: Available in JMX console (http://localhost:4502/system/console/jmx)
  • IndexStats (async, async-index, fulltext-async) - Separate async job run based on the indexing lane configured in the index definition(async property value indicates the indexer lane) and hence separate MBean for each of it
    • async and fulltext-async are the two possible indexing lanes for Lucene Index
    • async-reindex lane is for reindexing Property Index in an Asynchronous way.
  • LuceneIndex (Lucene Index statistics)
  • PropertyIndexStats (Property Index statistics)
Other Tools related to Queries and Indexing:
Tools -> Operations -> Diagnosis ->
  • Query Performance in Diagnosis also lists Slow Queries and Popular queries in our instance.
  • Index Manager in Diagnosis lists the available indexes in our instance (indexes available under /oak:index)
In case of issues/for access of reports -> Tools -> Operations -> Health Reports ->
  • Asynchronous Indexes
  • Large Lucene Index
Apart from the above high-level flow from a Development standpoint in the process of Query-based functionalities, specific cases for troubleshooting, reindexing scenarios are detailed in Adobe helpx docs.

Source:


By aem4beginner

May 15, 2020
Estimated Post Reading Time ~

How to Test Apache HttpClient in the Context of AEM

If you’ve ever written a proxy servlet in AEM, chances are you’ve used Apache’s HttpComponents library. While a great library, there are not many resources online for how to test it when used inside your code. If you have not seen my post, The Ultimate Code Quality Setup for your AEM project , you should check it out. The test code in this post is written with jUnit5, although most of the concepts here apply to jUnit4 as well. Now onto the problem:

Let’s look at an example servlet that proxies to a hard-coded url.
// VERY dudamentary code to illustrate the point
import java.io.IOException;
import java.net.URI;
import java.net.URISyntaxException;
import javax.servlet.Servlet;
import javax.servlet.ServletException;
import org.apache.http.auth.AuthScope;
import org.apache.http.auth.UsernamePasswordCredentials;
import org.apache.http.client.CredentialsProvider;
import org.apache.http.client.methods.CloseableHttpResponse;
import org.apache.http.client.methods.HttpGet;
import org.apache.http.impl.client.BasicCredentialsProvider;
import org.apache.http.impl.client.CloseableHttpClient;
import org.apache.http.impl.client.HttpClients;
import org.apache.http.util.EntityUtils;
import org.apache.sling.api.SlingHttpServletRequest;
import org.apache.sling.api.SlingHttpServletResponse;
import org.apache.sling.api.servlets.HttpConstants;
import org.apache.sling.api.servlets.ServletResolverConstants;
import org.apache.sling.api.servlets.SlingSafeMethodsServlet;
import org.osgi.framework.Constants;
import org.osgi.service.component.annotations.Component;
@Component(
service = Servlet.class,
property = {
Constants.SERVICE_DESCRIPTION + "=Search Proxy servlet",
ServletResolverConstants.SLING_SERVLET_METHODS + "=" + HttpConstants.METHOD_GET,
ServletResolverConstants.SLING_SERVLET_RESOURCE_TYPES + "="
+ SearchProxyServlet.RESOURCE_TYPE,
ServletResolverConstants.SLING_SERVLET_EXTENSIONS + "=json",
ServletResolverConstants.SLING_SERVLET_SELECTORS + "=searchproxy"
})
public class SearchProxyServlet extends SlingSafeMethodsServlet {
public static final String RESOURCE_TYPE = "some/resource/type";
@Override
protected void doGet(SlingHttpServletRequest slingRequest, SlingHttpServletResponse slingResponse)
throws ServletException, IOException {
// prepare credentials
CredentialsProvider credentialsProvider = new BasicCredentialsProvider();
credentialsProvider.setCredentials(
new AuthScope("search.com", 443),
new UsernamePasswordCredentials("test", "test"));
slingResponse.setContentType("application/json");
try (CloseableHttpClient httpClient =
HttpClients.custom().setDefaultCredentialsProvider(credentialsProvider).build()) {
HttpGet httpGet = new HttpGet(new URI("https://search.com/endpoint.json"));
try (CloseableHttpResponse httpResponse = httpClient.execute(httpGet)) {
slingResponse.getWriter().write(EntityUtils.toString(httpResponse.getEntity()));
}
} catch (URISyntaxException e) {
e.printStackTrace();
}
}
}

As you can see, we are sending a request to https://search.com/endpoint.json so when you write a unit test for this and invoke doGet, a request will always be sent. But we don’t want that, we want to mock that request. You could use PowerMock, but adding that to your project introduces its own problems. PowerMock is intended for experienced developers and excessive use of it may be an indication of bad implementation/architecture.
A better implementation using an OSGI service

We can move the httpClient to its own OSGI service:
package com.ahmedmusallam.service;
import java.io.IOException;
import java.net.URI;
import org.apache.http.client.CredentialsProvider;
import org.apache.http.client.methods.CloseableHttpResponse;
import org.apache.http.client.methods.HttpGet;
import org.apache.http.impl.client.CloseableHttpClient;
import org.apache.http.impl.client.HttpClients;
import org.apache.http.util.EntityUtils;
@Component(
immediate = true,
property = {"label=Http Client Service", "description=A service for making HTTP calls"},
service = HttpClientService.class)
public class HttpClientService {
/** Perform a get request with the provided credentials provider. */
public String doGet(URI uri, CredentialsProvider credentialsProvider) throws IOException {
if (credentialsProvider == null || uri == null) {
return null;
}
try (CloseableHttpClient httpClient =
HttpClients.custom().setDefaultCredentialsProvider(credentialsProvider).build()) {
HttpGet httpGet = new HttpGet(uri);
try (CloseableHttpResponse httpResponse = httpClient.execute(httpGet)) {
return EntityUtils.toString(httpResponse.getEntity());
}
}
}
}

This makes it easier to mock the service or provide our own implementation of it in our test class.
An improved implementation of the proxy servlet:
// Agian, crude impl to illustrate the point
import com.ahmedmusallam.service.HttpClientService;
import java.io.IOException;
import java.net.URI;
import java.net.URISyntaxException;
import javax.servlet.Servlet;
import javax.servlet.ServletException;
import org.apache.http.auth.AuthScope;
import org.apache.http.auth.UsernamePasswordCredentials;
import org.apache.http.client.CredentialsProvider;
import org.apache.http.impl.client.BasicCredentialsProvider;
import org.apache.sling.api.SlingHttpServletRequest;
import org.apache.sling.api.SlingHttpServletResponse;
import org.apache.sling.api.servlets.HttpConstants;
import org.apache.sling.api.servlets.ServletResolverConstants;
import org.apache.sling.api.servlets.SlingSafeMethodsServlet;
import org.osgi.framework.Constants;
import org.osgi.service.component.annotations.Component;
import org.osgi.service.component.annotations.Reference;
@Component(
service = Servlet.class,
property = {
Constants.SERVICE_DESCRIPTION + "=Search Proxy servlet",
ServletResolverConstants.SLING_SERVLET_METHODS + "=" + HttpConstants.METHOD_GET,
ServletResolverConstants.SLING_SERVLET_RESOURCE_TYPES + "="
+ SearchProxyServlet.RESOURCE_TYPE,
ServletResolverConstants.SLING_SERVLET_EXTENSIONS + "=json",
ServletResolverConstants.SLING_SERVLET_SELECTORS + "=searchproxy"
})
public class SearchProxyServlet extends SlingSafeMethodsServlet {
public static final String RESOURCE_TYPE = "some/resource/type";
private HttpClientService httpClientService;
@Reference
public void setHttpClientService(HttpClientService httpClientService) {
this.httpClientService = httpClientService;
}
@Override
protected void doGet(SlingHttpServletRequest slingRequest, SlingHttpServletResponse slingResponse)
throws ServletException, IOException {
// prepare credentials
CredentialsProvider credentialsProvider = new BasicCredentialsProvider();
credentialsProvider.setCredentials(
new AuthScope("test.com", 443),
new UsernamePasswordCredentials("test", "test"));
slingResponse.setContentType("application/json");
try {
String response = httpClientService.doGet(new URI("https://test.com/endpoint.json"), credentialsProvider);
slingResponse.getWriter().write(response);
} catch (URISyntaxException e) {
e.printStackTrace();
}
}
}

Now, this is all good, and we can mock the httpClientService and return a specific string, here is an example test:
import static org.junit.jupiter.api.Assertions.*;
import static org.mockito.Mockito.*;
import com.ahmedmusallam.service.HttpClientService;
import com.ahmedmusallam.utils.AppAemContext;
import io.wcm.testing.mock.aem.junit5.AemContext;
import io.wcm.testing.mock.aem.junit5.AemContextExtension;
import java.io.IOException;
import java.net.URI;
import javax.servlet.ServletException;
import org.apache.http.client.CredentialsProvider;
import org.junit.jupiter.api.BeforeEach;
import org.junit.jupiter.api.Test;
import org.junit.jupiter.api.extension.ExtendWith;
import org.mockito.Mock;
import org.mockito.junit.jupiter.MockitoExtension;
@ExtendWith({AemContextExtension.class, MockitoExtension.class})
class SearchProxyServletTest {
public final AemContext context = AppAemContext.newAemContext();
@Mock
HttpClientService httpClientService = new HttpClientService();
SearchProxyServlet searchProxyServlet = new SearchProxyServlet();
@BeforeEach
void beforeEach() throws IOException {
when(httpClientService.doGet(any(URI.class), any(CredentialsProvider.class))).thenReturn("{}");
searchProxyServlet.setHttpClientService(httpClientService);
}
@Test
void doGet() throws ServletException, IOException {
// cover case where query
searchProxyServlet.doGet(context.request(), context.response());
assertEquals("{}", context.response().getOutputAsString());
}
}
Testing the HttpClientService

All good so far! But what about testing HttpClientService itself? For that, we would need an HTTP server to run before the test class runs and stop right after. I have found a jUnit4 @Rule for such server here: https://gist.github.com/rponte/710d65dc3beb28d97655. However, I’m using jUnit 5. So I’ve converted that rule into a jUnit5 Extension and here it is:

You can also see it in this gist
import com.sun.net.httpserver.HttpHandler;
import com.sun.net.httpserver.HttpServer;
import java.net.InetSocketAddress;
import java.net.URI;
import java.net.URISyntaxException;
import org.apache.http.client.utils.URIBuilder;
import org.junit.jupiter.api.extension.AfterAllCallback;
import org.junit.jupiter.api.extension.BeforeAllCallback;
import org.junit.jupiter.api.extension.ExtensionContext;
/*
* Note: I chose to implement `BeforeAllCallback` and AfterAllCallback
* but not `AfterEachCallback` and `BeforeEachCallback` for performance reasons.
* I wanted to only run one server per test class and I can register handlers
* on a per-test-method basis. You could implement the `BeforeEachCallback` and `AfterEachCallback`
* interfaces if you really need that behavior.
*/
public class HttpServerExtension implements BeforeAllCallback, AfterAllCallback {
public static final int PORT = 6991;
public static final String HOST = "localhost";
public static final String SCHEME = "http";
private com.sun.net.httpserver.HttpServer server;
@Override
public void afterAll(ExtensionContext extensionContext) throws Exception {
if (server != null) {
server.stop(0); // doesn't wait all current exchange handlers complete
}
}
@Override
public void beforeAll(ExtensionContext extensionContext) throws Exception {
server = HttpServer.create(new InetSocketAddress(PORT), 0);
server.setExecutor(null); // creates a default executor
server.start();
}
public static URI getUriFor(String path) throws URISyntaxException{
return new URIBuilder()
.setScheme(SCHEME)
.setHost(HOST)
.setPort(PORT)
.setPath(path)
.build();
}
public void registerHandler(String uriToHandle, HttpHandler httpHandler) {
server.createContext(uriToHandle, httpHandler);
}
}

As you can see, I run an HTTP server before a test class is run, and stop the server after the test class is run.

and this is the code for a JsonSuccessHandler:

You could, of course, write your own simple handler for other types of requests.
package com.ahmedmusallam.extension;
import java.io.IOException;
import java.nio.charset.Charset;
import org.apache.commons.io.IOUtils;
import java.net.HttpURLConnection;
import com.sun.net.httpserver.HttpExchange;
import com.sun.net.httpserver.HttpHandler;
// credit: https://gist.github.com/rponte/710d65dc3beb28d97655#file-httpserverrule-java
public class JsonSuccessHandler implements HttpHandler {
private String responseBody;
private static final String contentType = "application/json";
public JsonSuccessHandler() {}
public JsonSuccessHandler(String responseBody) {
this.responseBody = responseBody;
}
@Override
public void handle(HttpExchange exchange) throws IOException {
exchange.getResponseHeaders().add("Content-Type", contentType);
exchange.sendResponseHeaders(HttpURLConnection.HTTP_OK, responseBody.length());
IOUtils.write(responseBody, exchange.getResponseBody(), Charset.defaultCharset());
exchange.close();
}
}

Now, let’s write the unit test for our HttpClientService:
package com.ahmedmusallam.service;
import static org.junit.jupiter.api.Assertions.*;
import com.ahmedmusallam.extension.HttpServerExtension;
import com.ahmedmusallam.extension.JsonSuccessHandler;
import java.io.IOException;
import java.net.URI;
import java.net.URISyntaxException;
import org.apache.http.client.CredentialsProvider;
import org.apache.http.client.utils.URIBuilder;
import org.apache.http.impl.client.BasicCredentialsProvider;
import org.junit.jupiter.api.Test;
import org.junit.jupiter.api.extension.ExtendWith;
import org.junit.jupiter.api.extension.RegisterExtension;
import org.mockito.Mock;
import org.mockito.junit.jupiter.MockitoExtension;
@ExtendWith(MockitoExtension.class)
class HttpClientServiceTest {
private HttpClientService httpClientService = new HttpClientService();
@RegisterExtension // MUST be static, see: https://junit.org/junit5/docs/current/user-guide/#extensions-registration-programmatic-static-fields
static HttpServerExtension httpServerExtension = new HttpServerExtension();
@Mock
CredentialsProvider credentialsProvider;
@Test
void doGet() throws IOException, URISyntaxException {
assertNull(httpClientService.doGet(null, credentialsProvider));
assertNull(httpClientService.doGet(new URIBuilder().build(), null));
httpServerExtension.registerHandler("/test", new JsonSuccessHandler("{}"));
URI uri = HttpServerExtension.getUriFor("/test");
assertEquals("{}", httpClientService.doGet(uri, new BasicCredentialsProvider()));
}
}

As you can see, I’ve created an HttpServerExtension and registered a handler for path /test with an expected result, then ran my service’s doGet method against that handler and verified the output.

That’s it! You can add more methods to send POST requests and other types of requests to the HttpClientService and test those in the same fashion.


By aem4beginner

Secure Apache from Clickjacking

In this post, I will explain an important Apache2 configuration, this configuration is used to stop clickjacking. I got to know about clickjacking when I was working with a security checklist in AEM.

Q1. What is clickjacking?
Clickjacking, also known as a “UI redress attack”, is when an attacker uses multiple transparent or opaque layers to trick a user into clicking on a button or link to another page when they were intending to click on the top-level page. Thus, the attacker is “hijacking” clicks meant for their page and routing them to another page, most likely owned by another application, domain, or both. If it is still not clear to you then I am attaching a video URL that will explain it in a much better way.

Q2. How to stop clickjacking in the AEM using Apache2 Server?
There is a header configuration named as X-Frame-Options, using this configuration, you can stop the clickjacking.

Q3. What is the syntax of this configuration?
Header set X-Frame-Options: “sameorigin”

Q4. Where do we find this configuration?
In Apache2.4 you have security.conf file in the conf-available directory. In this file, search for X-Frame-Options, it is already present there but commented by default. Now you have two options.

this setting and restart your Apache2 server.
Copy and paste this setting inApache2.conf, uncomment it and restart your Apache server.

In my case, I copied and pasted this setting in apche2.conf file uncommented it and restarted my Apche2 server.

Q5. Apache Server is throwing an error when restarting after this configuration?
It may be possible that you will get an error at the time of starting the Apache2 server, after adding this configuration, the reason is, this configuration requires mod_headers.so module enabled, which is by default disabled. To enable the module and your Apache server will start running successfully.

Q6. How to enable Headers.mod in Apache2 server?
For enabling this module you have a header.load file present in mods-available directory in your Apache2 server. In my case, it is present at /etc/apche2/mods-available. Just do one thing, create a softlink in your mods-enabled folder. If you are an Ubuntu user execute this command

ln –s /etc/apache2/mods–available/header.load /etc/apache2/mods–enabled/headers.load

Now you will see this soft link in your mods-enabled folder. Restart your Apache2 Server.

Q7. How to check whether it’s working or not?
After restarting your Apache2 server, just hit a noncached page via Apache2 Server. Open debugger and check the response header. You will see the X-Frame-Options header field, as shown below

If you get this option on your page it means your configuration is working.


By aem4beginner

April 23, 2020
Estimated Post Reading Time ~

Few lists of Apache We server Security and Harding Tips

v How to disable the directory display in Apache webserver
Environment: Apache Webserver

Solution:
- In the absence of index file by default apache server will list the default content root directories
- We can turn off the directory listing by using Options directive in the httpd.conf or apache2.conf configuration file for any specific directory

1. Open the Httpd.conf or apache2.conf file
Options –Indexes

2. Restart the server
3. Go to website and access for the content root -/var/www/html or /content
4. You must see the Forbiden error(You don’t have permission to access/ on this server.

v How to hide Apache Version and OS Identity from Errors in Apache HTTP server

- When you install apache with source or package through installer like Yum, it displays the version of Apache and OS version in the errors.
- It also shows the module installed in the apache server

Steps to follow in RHEL, CentOS , Fedora, Debian and Ubuntu

1. Open the httpd.conf/apache2.conf file based on the OS
# vim /etc/httpd/conf/httpd.conf (RHEL/CentOS/Fedora)
# vim /etc/apache2/apache2.conf (Debian/Ubuntu)

2. Add the below configuration to httpd.conf/apache2.conf and Save the file
ServerSignature Off
ServerTokens Prod

3. Restart the Server and That’s It
# service httpd restart (RHEL/CentOS/Fedora)
# service apache2 restart (Debian/Ubuntu)

v How to Keep updating Apache Regularly

Environment: Apache Webserver
Solution:
1. Check the apache version by using #httpd –v
2. Run the below command to update the version
# yum update httpd
#apt-get install apache2
3. That’s it! again check for the version of apache post upgrade #httpd -v

v Disable the Unnecessary modules
1. Insert # beginning at the module to comment the unnecessary module for loading

v Disable Apache’s following of Symbolic Links

- By default Apache webserver follows symlinks,
- We can turn off this feature with FollowSymLinks with Options directive.
- Open the httpd.conf file and add the below line.
# Options -FollowSymLinks

- If there is a need for FollowSymLinks feature, can be enabled by writing in the rule in “.htaccess” file from that website.
# Enable symbolic links
# Options +FollowSymLinks
Note: To enable rewrite rules inside “.htaccess” file “AllowOverride All” should be present in the main configuration globally.

v Turn off Server Side Includes and CGI Execution

Environment: Apache
Solution:
- Steps to turn off server side includes (mod_include)
- And CGI execution
- Modify the httpd.conf or apache2.conf file in the main configuration file.
- This can be applied to root directory or specific directory
- Open the main configuration file and add the below details

Options -Includes -ExecCGI

Or

Options -Includes -ExecCGI

- Restart the server. That’s it!.

v Statement: Below directives will help to prevent the DoS attacks and completely cannot be prevented

Environment: Apache webserver
Solution:
- Set the TimeOut:.

- Its default value is 300 secs, set the value to lower depending on the website functionalities.

- This will wait for a certain amount of time to complete the event. post the request will be failed.

- MaxClients:
- The default value is 256, set this value to lower to prevent DoS atatcks
- It allows you to set the no of maximum connection and to be served simultaneously.
- Once the limit crosses the every new connection will be queued up.

- KeepAliveTimeout :
- The default value is 5 sec

- The default value indicates the amount of time server will wait for the subsequent request before closing the connection


- LimitRequestFields: default value is 100, set this value to lower to prevent DoS atatcks


- LimitRequestFieldSize: it helps to set a size limit on the http request headers.

v Use mod_security and mod_evasive Modules to Secure Apache

- Mod_security:
§ It will act as a Firewall for web application and allow to monitor the traffic on a real time basis
§ It also protects the website or web server from brute force attacks
§ Install the Mod_security directive
- Install mod_security on Ubuntu/Debian
o $ sudo apt-get install libapache2-modsecurity
o $ sudo a2enmod mod-security
o $ sudo /etc/init.d/apache2 force-reload

- Install mod_security on RHEL/CentOS/Fedora/
o # yum install mod_security
o # /etc/init.d/httpd restart
- Mod_evasive
§ It handles the DoS
§ it handles the DDoS atatcks
§ It handles the Brute force attacks
§ This module detects three atatcks
o If Multiple requests come to the same page a few times per second.
o If the child process creates more than 50 concurrent requests.
o If temporarily blacklisted IP is trying to make new requests


By aem4beginner

How to hide Apache Version and OS Identity from Errors in Apache HTTP server

Environment: Apache Webserver
- When you install apache with source or package through installer like Yum, it displays the version of Apache and OS version in the errors.
- It also shows the module installed in the Apache server
- It also shows the Port number

Steps to follow in RHEL, CentOS , Fedora, Debian and Ubuntu
1. Open the httpd.conf/apache2.conf file based on the OS
# vim /etc/httpd/conf/httpd.conf (RHEL/CentOS/Fedora)
# vim /etc/apache2/apache2.conf (Debian/Ubuntu)


2. Add the below configuration to httpd.conf/apache2.conf and Save the file
ServerSignature Off
ServerTokens Prod

3. Restart the Server and That’s It
# service httpd restart (RHEL/CentOS/Fedora)
# service apache2 restart (Debian/Ubuntu)


By aem4beginner

How to Disable Directory Listing in Apache Webserver

Environment: Apache Webserver
Solution:
- In the absence of index file by default apache server will list the default content root directories
- We can turn off the directory listing by using Options directive in the httpd.conf or apache2.conf configuration file for any specific directory

1. Open the Httpd.conf or apache2.conf file

Options –Indexes

2. Restart the server
3. Go to website and access for the content root -/var/www/html or /content
4. You must see the Forbidden error(You don’t have permission to access/ on this server.


By aem4beginner

How to upgrade Apache version regularly

Environment: Apache Webserver

Solution:
1. Check the apache version by using #httpd –v
2. Run the below command to update the version
# yum update httpd
#apt-get install apache2
3. That’s it! again check for the version of apache post-upgrade #httpd -v


By aem4beginner

Disable Apache’s following of Symbolic Links

Environment: Apache webserver
- By default Apache webserver follows symlinks,
- We can turn off this feature with FollowSymLinks with Options directive.
- Open the HTTD.conf file and add the below line.
# Options -FollowSymLinks

- If there is a need for FollowSymLinks feature, can be enabled by writing in the rule in the “.htaccess” file from that website.
# Enable symbolic links
# Options +FollowSymLinks
Note: To enable rewrite rules inside the “.htaccess” file “AllowOverride All” should be present in the main configuration globally.


By aem4beginner

Turn off Server Side Includes and CGI Execution in Apache Webserver

Environment: Apache webserver
Solution:
- Steps to turn off server-side includes (mod_include)
- And CGI execution
- Modify the httpd.conf or apache2.conf file in the main configuration file.
- This can be applied to the root directory or specific directory
- Open the main configuration file and add the below details

Options -Includes -ExecCGI

Or

Options -Includes -ExecCGI
- Restart the server. That’s it!.


By aem4beginner

How to Use mod_security and mod_evasive Modules to Secure and Prevent DoS, DDoS and Brute Force attacks in Apache Webserver

Statement: Use mod_security and mod_evasive Modules to Secure Apache
Environment: Apache webserver

Mod_security:
  • It will act as a Firewall for web application and allow to monitor the traffic on a real-time basis
  • It also protects the website or web server from brute force attacks
  • Install the Mod_security directive
- Install mod_security on Ubuntu/Debian
o $ sudo apt-get install libapache2-modsecurity
o $ sudo a2enmod mod-security
o $ sudo /etc/init.d/apache2 force-reload

- Install mod_security on RHEL/CentOS/Fedora/
o # yum install mod_security
o # /etc/init.d/httpd restart
Mod_evasive
  • It handles the DoS
  • It handles the DDoS attacks
  • It handles the Brute force attacks
  • This module detects three attacks
o If Multiple requests come to the same page a few times per second.
o If the child process creates more than 50 concurrent requests.
o If temporarily blacklisted IP is trying to make new requests


By aem4beginner

April 21, 2020
Estimated Post Reading Time ~

How to check whether content is getting served from CDN cache or CDN edge server

Statement - How to check whether the content is getting served from CDN cache or CDN edge server

Solution:
  1. Content-Encoding: gzip This indicates Gzip enabled for the website.
  2. X-Cache: Hit from CloudFront - This indicates when requests are served from the closest CloudFront/CDN edge location.
  3. X-Cache: Miss from CloudFront" when the request is sent to the origin and "Miss" requests might be slower to load because of the additional step of forwarding to the origin.
  4. X-Frame-Options: SAMEORIGIN - provide clickjacking protection by not allowing rendering of a page in a frame. This can include a rendering of a page in a frame, iframe, or object The SAMEORIGIN directive allows the page to be loaded in a frame on the same origin as the page itself.
Domain Name
https://www.abc.com/

Compressed size
5662

Uncompressed size
31897

Was saved by compressing this page with GZIP. 82.25

Header Information

HTTP/1.1 200 OK

Content-Type: text/html; charset=UTF-8

Content-Length: 5662

Connection: keep-alive

Date: Fri, 07 Dec 2017 10:51:12 GMT

Server: Apache

X-Frame-Options: SAMEORIGIN

Cache-Control: public, max-age=0, s-maxage=86400

Accept-Ranges: bytes

Content-Encoding: gzip

x-platform: cf5-3

Vary: Accept-Encoding

Age: 89

X-Cache: Hit from CloudFront

Via: 1.1 68e4011ca1c00bec92bb202e1ddce131.cloudfront.net (CloudFront)

X-Amz-Cf-Id: -fKsscKYxW5jusS5LZ-f3sqIHIG34RJXydvw-JlXczZkF3168snvjQ==


By aem4beginner

April 19, 2020
Estimated Post Reading Time ~

How To Optimize Your Site With GZIP Compression

Compression is a simple, effective way to save bandwidth and speed up your site. I hesitated when recommending gzip compression when speeding up your javascript because of problems in older browsers.

But it’s the 21st century. Most of my traffic comes from modern browsers, and quite frankly, most of my users are fairly tech-savvy. I don’t want to slow everyone else down because somebody is chugging along on IE 4.0 on Windows 95. Google and Yahoo use gzip compression. A modern browser is needed to enjoy modern web content and modern web speed — so gzip encoding it is. Here’s how to set it up.

Wait, Wait, Wait: Why Are We Doing This?
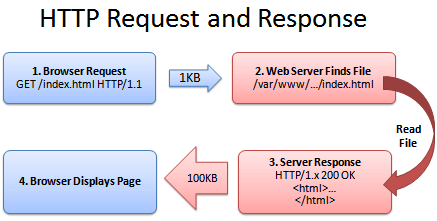
Before we start I should explain what content encoding is. When you request a file like http://www.yahoo.com/index.html, your browser talks to a web server. The conversation goes a little like this:


Browser: Hey, GET me /index.html
Server: Ok, let me see if index.html is lying around…
Server: Found it! Here’s your response code (200 OK) and I’m sending the file.
Browser: 100KB? Ouch… waiting, waiting… ok, it’s loaded.

Of course, the actual headers and protocols are much more formal (monitor them with Live HTTP Headers if you’re so inclined).

But it worked, and you got your file.

So What’s The Problem?
Well, the system works, but it’s not that efficient. 100KB is a lot of text, and frankly, HTML is redundant. Every <html>, <table> and <div> tag has a closing tag that’s almost the same. Words are repeated throughout the document. Any way you slice it, HTML (and its beefy cousin, XML) is not lean.

And what’s the plan when a file’s too big? Zip it!

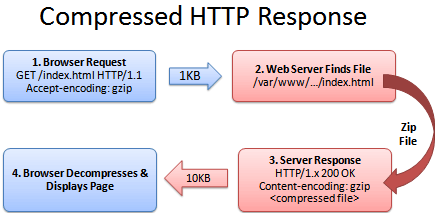
If we could send a .zip file to the browser (index.html.zip) instead of plain old index.html, we’d save on bandwidth and download time. The browser could download the zipped file, extract it, and then show it to user, who’s in a good mood because the page loaded quickly. The browser-server conversation might look like this:


Browser: Hey, can I GET index.html? I’ll take a compressed version if you’ve got it.
Server: Let me find the file… yep, it’s here. And you’ll take a compressed version? Awesome.
Server: Ok, I’ve found index.html (200 OK), am zipping it and sending it over.
Browser: Great! It’s only 10KB. I’ll unzip it and show the user.

The formula is simple: Smaller file = faster download = happy user.

Don’t believe me? The HTML portion of the yahoo home page goes from 101kb to 15kb after compression:


The (Not So) Hairy Details
The tricky part of this exchange is the browser and server knowing it’s ok to send a zipped file over. The agreement has two parts
  • The browser sends a header telling the server it accepts compressed content (gzip and deflate are two compression schemes): Accept-Encoding: gzip, deflate
  • The server sends a response if the content is actually compressed: Content-Encoding: gzip
If the server doesn’t send the content-encoding response header, it means the file is not compressed (the default on many servers). The “Accept-encoding” header is just a request by the browser, not a demand. If the server doesn’t want to send back compressed content, the browser has to make do with the heavy regular version.

Setting Up The Server
The “good news” is that we can’t control the browser. It either sends the Accept-encoding: gzip, deflate header or it doesn’t.

Our job is to configure the server so it returns zipped content if the browser can handle it, saving bandwidth for everyone (and giving us a happy user).

For IIS, enable compression in the settings.

In Apache, enabling output compression is fairly straightforward. Add the following to your .htaccess file

# compress text, html, javascript, css, xml:
AddOutputFilterByType DEFLATE text/plain
AddOutputFilterByType DEFLATE text/html
AddOutputFilterByType DEFLATE text/xml
AddOutputFilterByType DEFLATE text/css
AddOutputFilterByType DEFLATE application/xml
AddOutputFilterByType DEFLATE application/xhtml+xml
AddOutputFilterByType DEFLATE application/rss+xml
AddOutputFilterByType DEFLATE application/javascript
AddOutputFilterByType DEFLATE application/x-javascript

# Or, compress certain file types by extension:
<files *.html>
SetOutputFilter DEFLATE
</files>

Apache actually has two compression options:
  • mod_deflate is easier to set up and is standard.
  • mod_gzip seems more powerful: you can pre-compress content.
Deflate is quick and works, so I use it; use mod_gzip if that floats your boat. In either case, Apache checks if the browser sent the “Accept-encoding” header and returns the compressed or regular version of the file. However, some older browsers may have trouble (more below) and there are special directives you can add to correct this.

If you can’t change your .htaccess file, you can use PHP to return compressed content. Give your HTML file a .php extension and add this code to the top:

In PHP:
<?php if (substr_count($_SERVER[‘HTTP_ACCEPT_ENCODING’], ‘gzip’)) ob_start(“ob_gzhandler”); else ob_start(); ?>
We check the “Accept-encoding” header and return a gzipped version of the file (otherwise the regular version). This is almost like building your own webserver (what fun!). But really, try to use Apache to compress your output if you can help it. You don’t want to monkey with your files.

Verify Your Compression
Once you’ve configured your server, check to make sure you’re actually serving up compressed content.
  • Online: Use the online gzip test to check whether your page is compressed.
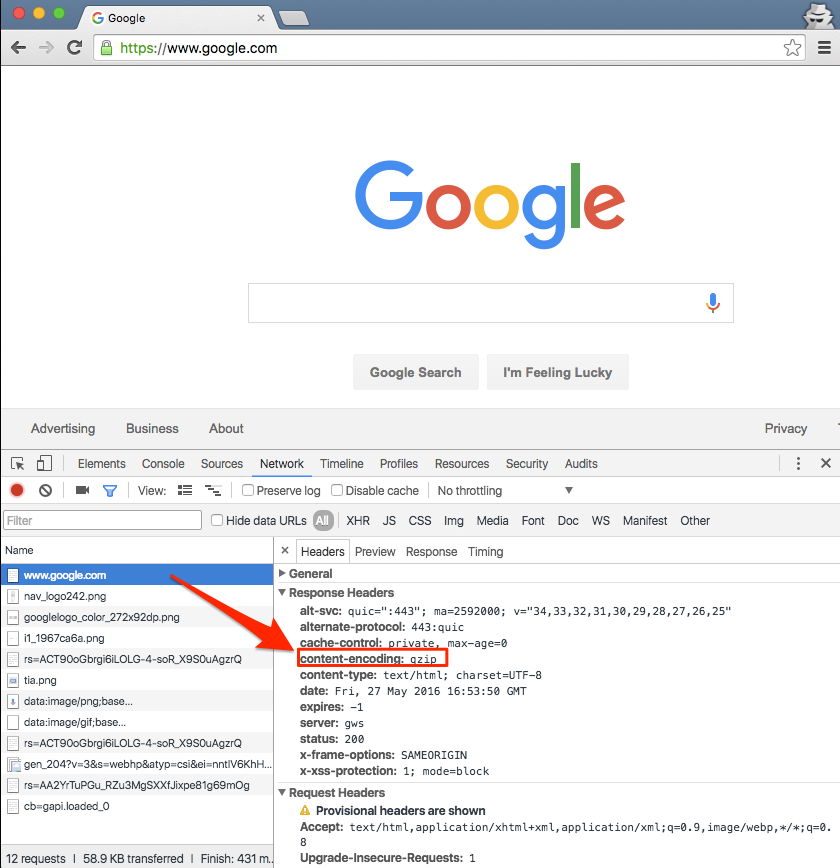
  • In your browser: In Chrome, open the Developer Tools > Network Tab (Firefox/IE will be similar). Refresh your page, and click the network line for the page itself (i.e., www.google.com). The header “Content-encoding: gzip” means the contents were sent compressed.


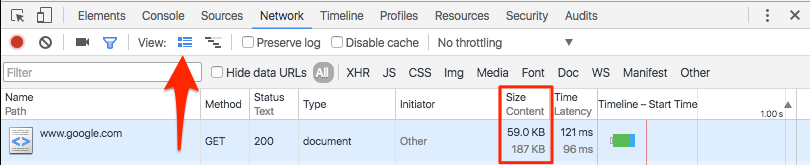
Click the “Use large rows” icon to get more details, including the compressed transfer size and the true content size.


Be prepared to marvel at the results. The instacalc homepage shrunk from 36k to 10k, a 75% reduction in size.

Try Some Examples
I’ve set up some pages and a downloadable example:
  • index.html – No explicit compression (on this server, I am using compression by default ).
  • index.htm – Explicitly compressed with Apache .htaccess using *.htm as a rule
  • index.php – Explicitly compressed using the PHP header
Feel free to download the files, put them on your server and tweak the settings.

Caveats
As exciting as it may appear, HTTP Compression isn’t all fun and games. Here’s what to watch out for:

Older browsers: Yes, some browsers still may have trouble with compressed content (they say they can accept it, but really they can’t). If your site absolutely must work with Netscape 1.0 on Windows 95, you may not want to use HTTP Compression. Apache mod_deflate has some rules to avoid compression for older browsers.

Already-compressed content: Most images, music and videos are already compressed. Don’t waste time compressing them again. In fact, you probably only need to compress the “big 3” (HTML, CSS and Javascript).

CPU-load: Compressing content on-the-fly uses CPU time and saves bandwidth. Usually this is a great tradeoff given the speed of compression. There are ways to pre-compress static content and send over the compressed versions. This requires more configuration; even if it’s not possible, compressing output may still be a net win. Using CPU cycles for a faster user experience is well worth it, given the short attention spans on the web.

Enabling compression is one of the fastest ways to improve your site’s performance. Go forth, set it up, and let your users enjoy the benefits.


By aem4beginner

April 14, 2020
Estimated Post Reading Time ~

Invoking AEM Sling Servlets using Apache HTTP APIs

You can invoke a Sling Servlet deployed within Adobe Experience Manager by using Java APIs located in the org.apache.commons.httpclient.HttpClient package. This Java package contains classes that let you perform HTTP operations such as invoking a Servlet's doGet method. For information about this Java package, see Package org.apache.commons.httpclient.

Assume that you have a business requirement to invoke a deployed AEM Sling Servlet from another AEM service defined within an OSGi bundle. You can perform this use case by using an org.apache.commons.httpclient.HttpClient object.


To read this development article, click https://helpx.adobe.com/experience-manager/using/HttpClient_AEM.html.


By aem4beginner

Configuring Adobe Experience Manager 6 to use Apache Directory Service

You can configure Adobe Experience Manager (AEM) 6 to synchronize user account information from a third-party LDAP service. By configuring AEM to use a third-party LDAP service, you can authenticate LDAP users when logging into AEM. This article describes how to setup Apache Directory service (a popular open-source LDAP service), create a new user, configure AEM 6 to use Apache Directory service, and finally login to AEM with the new user entered into Apache Directory service.

To configure AEM 6 to use LDAP, you configure these OSGi configuration settings:

Apache Jackrabbit Oak LDAP Identity Provider
Apache Jackrabbit Default Sync Handler
Apache Jackrabbit External Login Module

This AEM community article walks you through how to configure AEM 6 to authenticate Apache Directory service users.

To read this development article, click https://helpx.adobe.com/experience-manager/using/configuring-aem6-apache-directory-service.html.


By aem4beginner

April 13, 2020
Estimated Post Reading Time ~

Configuring Adobe CQ to use Apache Directory Service

You can configure Adobe CQ to use a third-party LDAP service that contains user data. By configuring Adobe CQ to use a third-party LDAP service, you can authenticate with Adobe CQ using your user data. That is, you can enter a user located in your LDAP service into CQ login during the login process. This article describes how to setup Apache Directory service, create a new user, configure Adobe CQ to use Apache Directory service, and finally login to Adobe CQ with the new user entered into Apache Directory service.


As shown in the previous illustration, a user can authenticate with Adobe CQ using user data located in Apache Directory service. To configure Adobe CQ to use Apache Directory service, you configure an Adobe CQ configuration file.

Note: To read this entire article, click this link:
https://helpx.adobe.com/experience-manager/using/configuring-cq-apache-directory-service.html


By aem4beginner

April 7, 2020
Estimated Post Reading Time ~

Apache Felix Search Web Console Plugin


You might need to search for the bundles and decompile classes while dealing with the following kind of scenarios:
  • When you’re working on AEM customizations, you would need to have a deeper understanding of OOTB functionalities as it would help in implementing customizations easily. So, you can decompile the OOTB bundles and take a look at how the OOTB functionalities have been implemented.
  • There will be times when you might get NPE or other exceptions coming from the internal AEM APIs and you are clueless about what could be wrong. If you happen to have the JAR of the related the feature you can easily decompile the JAR and take a look at what exactly might be causing the error or debug it.
Hence, having the ability to decompile a JAR can be very helpful in the development or debugging process. Decompiling the JAR is the easy part. However, finding and getting the JAR in AEM can be more difficult.
This searching and decompiling JAR can be easily done using Apache Felix Search Web Console Plugin.
Just have a look at https://github.com/neva-dev/felix-search-webconsole-plugin
This plugin works on OSGi distributions based on Apache Felix such as Apache Sling, Apache Karaf, Apache ServiceMix, etc. and it saves a lot of the time required for debugging purposes.

Plugin features:

Using the above plugin you can:
  • Search for bundles
  • Decompile classes
  • View services
  • Quickly enter configurations.

Download and setup:

To know how to set up this plugin and start using the above features, please go through this README – https://github.com/neva-dev/felix-search-webconsole-plugin/blob/develop/README.md
Once the setup is done, you are ready to explore these awesome features.

Example:

Let us see an example of how we can search and decompile classes.
  • Let us consider the Breadcrumb core component (i.e. /apps/core/wcm/components/breadcrumb/v1/breadcrumb/breadcrumb.html)
You can see from below screenshot that, we will be hitting “com.adobe.cq.wcm.core.components.models.Breadcrumb”. So, let us search for Breadcrumb class and decompile it.

breadcrumb-component-html
Breadcrumb Component


search-result
Search Result
Select the relevant class you are searching for as shown in the above screenshot. You will see three icons in the “Actions” column. They are –
1st icon – Download bundle
2nd icon – Show details
3rd icon – Decompile class
Click on the decompile class icon. You will see the decompiled class as shown in the below screenshot.

decompiled-class
Decompiled class

Source: https://aem.adobemarketingclub.com/apache-felix-search-web-console-plugin/


By aem4beginner

April 1, 2020
Estimated Post Reading Time ~

Why there is no 64-bit Windows Version of the CQ Dispatcher for Apache HTTP Server

Apache HTTP Server does not currently (2.2.21) have a 64-bit version for Windows.  As a result, the CQ Dispatcher for Apache HTTP Server is currently only 32-bit (dispatcher-apache2-windows-x86-4.0.11.zip).

Please note that there is a 64-bit version of the CQ Dispatcher for both Microsoft IIS (dispatcher-iis-windows-x64-4.0.11.zip) as well as Apache HTTP Server on Linux (dispatcher-apache2-linux-x86-64-4.0.11.tgz).
Please also note that the CQ Dispatcher release schedule is not in synch with CQ release schedules, mainly because it does not need to be.


By aem4beginner

Indexing Bogging AEM Down? Disable Apache Tika!

Recently, we were investigating a CPU performance spike issue with an Adobe Experience Manager (AEM) publish server. After some research, we came across logs that indicated indexing had caused the CPU spike.

Adobe Experience Manager is more than just a content management system or an application to serve content to the user’s request. AEM includes more powerful functionality, such as Apache Lucene indexing, which enables full-featured text searches across content in the repository.
Behind the scenes, Apache Lucene fetches the documents in the repository and indexes the content based on the metadata and text content. The index update thread wakes up every five seconds looking for content updates. Apache Lucene uses Apache Tika, a content analysis tool, to get the internal detail of documents like metadata and text in the document to create the indexes.
In a real-world scenario, many companies do not rely on AEM search functionality. Companies opt for enterprise-wide search implementations like Adobe Search and Promote or Apache Solr. In these scenarios, all text parsing is handled by third-party engines. Now the question is, do we need to continue with Apache Tika parsing the documents in AEM? The answer is no. It is not required, and by disabling Apache Tika parsing inside AEM, we can reduce the CPU spike.

So, how do you disable document parsing by Apache Tika inside AEM? You don’t even need to disable the Apache Tika bundles. Just like configuring the parser in XML format, in AEM, we need to do simple configuration under Oak Index Lucene node.
To disable Apache Tika document indexing in AEM, follow these steps:
Open CRXDE lite
Navigate to /oak:index/lucene
Under lucene node create an nt:unstructured node named tika
Under the tika node, create the file node named config.xml
Open the config.xml, add the below entry:

<properties>
<parsers>
<parser class="org.apache.tika.parser.EmptyParser">
<mime>application/zip</mime>
<mime>application/msword</mime>
<mime>application/vnd.ms-excel</mime>
<mime>application/pdf</mime>
</parser>
</parsers>
</properties>

Repeat the step 3 – 5 for /oak:index/damAssetLucene
Now save everything.

In the above example, we are disabling the text extraction from Zip, MS-Word, MS-Excel and PDF files. During indexing, these files will be ignored for text extraction.

Below is the image showing the configuration:

You can find a complete list of content types on the IANA website, add the type you want to exclude in step five. Based on the above example, you can add the list of MIME types that you feel can be ignored for text extraction.
Please leave a comment below if you have any questions about indexing or performance-related issues.


By aem4beginner

Importance of Apache Bench tool ?

Apache Bench is useful for quick and dirty tests of AEM. It is especially useful for testing the capacity of your load-balancer/Dispatcher tier.

For Windows, download Apache HTTP Server (64-bit) from Apache Lounge. Apache Bench will be available in the /bin folder. You can use ab.exe, or abs.exe for HTTPS requests.

The following command will send 20,000 GET requests at a concurrent user level of 400:

abs -r -k -n 20000 -c 400 -H “Accept-Encoding: gzip,deflate” https://stage.test.com/content/en.html

Use the 95th percentile value (reported in milliseconds) for decision making.
The following will upload a JPEG image to DAM at /content/dam/adobetest:

abs -A aemuser:password -n 1 -c 1 -u D:\Photos\IMG_9332.jpg -T image/jpeg https://stage.test.com/content/dam/adobetest/IMG_9332.jpg


By aem4beginner

March 22, 2020
Estimated Post Reading Time ~

AEM Assets Smart Search Capability with Apache Joshua

The latest AEM (AEM 6.4) provides a smart search capability for AEM Assets by translating the search terms. Let us understand more about this here.

What is Apache Joshua Language Packs?
Wiki says "Apache Joshua is a statistical machine translation decoder for phrase-based, hierarchical, and syntax-based machine translation, written in Java". As of now, it has around 64 language packs available.

The new AEM provides smart searches with language translation across AEM content & Assets. This means when we do a search of term 'Man'(English)/'hombre'(Spanish)/'homme'(French) gives the same assets result which avoids the manual content translation.

How it works?
Apache Oak Machine Translation OSGi bundle once installed, helps to check the feasibility of translating a search term utilising registered language packs. On the back-end, the Apache Joshua provides the language packs support.

Steps involved in search translation:
User searches an English/ Non-English term in AEM search box
With the help of registered language packs, the Apache Oak Machine Translation bundle provides a list of translated terms.
Now each translated term is executed as queries to the AEM search index.
The results are collected and displayed to the user
 

Pre-requisites for adding the functionality.
1) Apache Oak Search Machine Translation OSGi bundle must be installed and configured
2) Apache Joshua language packs(Open source) that contain the translation rules (Specific to our needs; If we need Spanish, we need to install Spanish Language Pack)

How to set up 'Smart Translation Search with AEM Assets?
Download and install the Oak Search Machine Translation OSGi bundle
Download and update the Apache Joshua language packs
Restart AEM - Ensure to update heap memory allocation
Update OSGi configurations - To register the language packs via Apache Jackrabbit Oak Machine Translation Fulltext Query Terms Provider

Where do I get the language packs?
https://cwiki.apache.org/confluence/display/JOSHUA/Language+Packs

Where do I get Apache Oak Search Machine Translation OSGi bundle
Maven Repository

Show me the configuration at OSGi Level:
https://helpx.adobe.com/experience-manager/kt/assets/using/smart-translation-search-technical-video-setup.html


By aem4beginner