Showing posts with label Users and groups. Show all posts

May 28, 2021
Estimated Post Reading Time ~

Problem accessing /system/console

HTTP ERROR: 403
Problem accessing /system/console. Reason:

Forbidden
Powered by Jetty://


Solution:
Navigate to /system/console/configMgr
and then search with "Apache Sling Web Console Security Provider" 

Then add your user or your required users group so that you could resolve this issue.


By aem4beginner

March 30, 2021
Estimated Post Reading Time ~

Create a group and user using the Jackrabbit API

I was looking for a concise way to work with users and groups in Sling. Because "everything is content," it's easy to use Sling's REST API to create a user like any other node, but things get a little dicey when you want a bit more flexibility. Enter the Jackrabbit API...

private void createAuthorGroupAndUser(ResourceResolver resolver) {

  try {

    Session session = resolver.adaptTo(Session.class);

    if (session != null && session instanceof JackrabbitSession) {

      // Get our User Manager

      UserManager userManager = ((JackrabbitSession) session).getUserManager();

      ValueFactory valueFactory = session.getValueFactory();

      // Create the Authors group if it doesn't exist already.

      Authorizable authors = userManager.getAuthorizable("authors");

      if (authors == null) {

        authors = userManager.createGroup("authors");

        authors.setProperty("displayName", valueFactory.createValue("Authors"));

      }

      // Create the default author if it doesn't already exist.

      Authorizable author = userManager.getAuthorizable("author");

      if(author == null) {

        author = userManager.createUser("author", "letMeIn");

        author.setProperty("displayName", valueFactory.createValue("Default Author"));

      }

      // Add author member to authors group

      ((Group) authors).addMember(author);

      // Save our session

      session.save();

    }

  } catch (RepositoryException e) {

      LOGGER.error("Could not get the session", e);

  }

}

More Reading

Jackrabbit Wiki - User Management
Jackrabbit API - org.apache.jackrabbit.api.security.user


By aem4beginner

January 4, 2021
Estimated Post Reading Time ~

ACL Packager ACS Commons

SYNOPSIS:
Following is the guide to creating a package containing access control entries that could be copied from one ENV to another. We shall use the ACL packager to package the required things. Using ACL packager we generate a package, then adding extra filters to remove the admin and anonymous users and package it. Later download the package, extract and add Merge mode to the user and group filters, and archive the package. This package can be now used on target machines.

PREREQUISITES:
ACS Commons Package – Can be installed using the guide ACS Commons Installation

GUIDE:
Step-01: Goto Tools > Operations > Configuration [http://localhost:4502/miscadmin]


Step-02: Create an ACL Package


Step-03: Edit the Configuration


Step-04: Step-by-Step explanation


Step-05: Exclude Admin and Anonymous user from the package


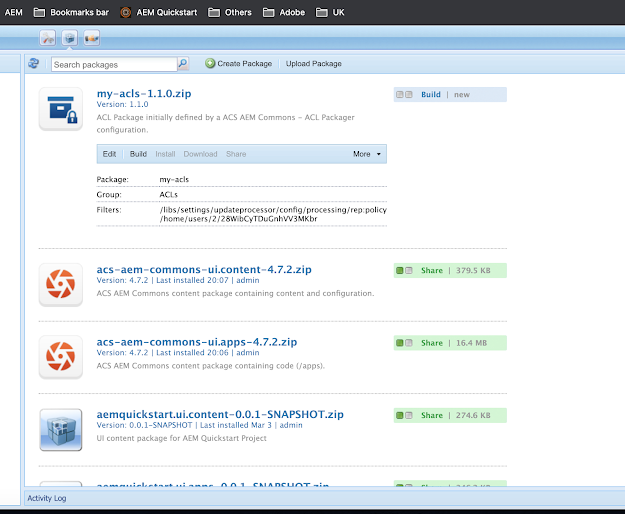
Step-06: Examine the Package on Package Manager


Step-07: Excluding the admin and anonymous users


Step-08: Build the package


Step-09: Successfully Built Package


Step-10: Download Package so that it can be used on the TARGET machines

Step-11: Extract and Edit the download package


Step-12: Edit the filter.xml and add merge mode


Step-13: Re-ZIP and Install on Target Machines


By aem4beginner

January 3, 2021
Estimated Post Reading Time ~

AEM - Restricting CRXDE Access for few users

In AEM, CRXDE access can be disabled by
1. Disabling the required bundles
  • Adobe CRXDE Support (com.adobe.granite.crxde-support)
  • Adobe Granite CRX Explorer (com.adobe.granite.crx-explorer)
  • Adobe Granite CRXDE Lite (com.adobe.granite.crxde-lite)
2. From dispatcher https://helpx.adobe.com/experience-manager/kb/LimitAccessCRXandCRXDE.html

What if CRXDX needs to be disabled/restricted for a few users/groups.

One of the solutions could be to check the user when the user attempts to access CRXDE and block the access or re-route.

Step to Implement the above approach :
1. Create a Sling Filter to check the CRXDE access request.
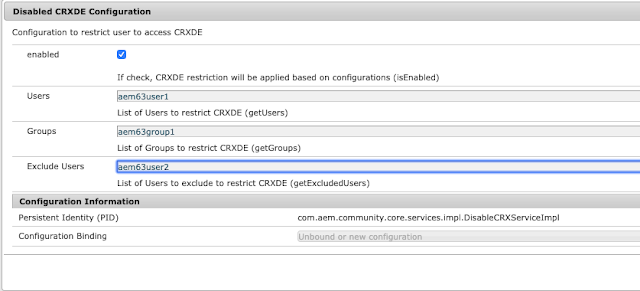
2. Create an OSGi configuration and service to maintain restriction data(Users, groups, excluded user)
3. Create a clientlibs to re-route the user to another page while accessing CRXDE.

In the Sling Filter get the current user and check against service configuration and if found then replace/redirect one of the existing js to our custom clientlibs js.
Custom clientlibs will then take care of blocking CRXDE.

OSGi Configuration


Custom Clientlibs
Create a clientlibs with redirection code
window.location="/aem/start.html"

You can find the code at :
https://github.com/arunpatidar02/aem63app-repo/tree/master/java/crxde


By aem4beginner

January 2, 2021
Estimated Post Reading Time ~

Managing Ghost Users & Repository Growth in AEM

Why do we need to remove users from the Java Content Repository (JCR)?
The answer is simple – we continue to add new users to JCR. As days go by, the size of the repository grows. The child nodes under the “/home/users” path grow. Any query run on the user path will have a performance issue. To increase the performance of the query or traversal of child nodes under the user path, we can remove unwanted nodes. These nodes are ghost user nodes.

What creates ghost user nodes?
  • After registering to the site, a user does not visit the site for an extended period of time. The user node resides in the repository as a ghost.
  • The corporate portal hosted in AEM will have employee information as user nodes. One common scenario occurs when an employee has left the company. Despite the individual leaving, the user node created in AEM will reside as a ghost user node.
  • A user who registered on the website may forget his credentials and subsequently create a new account. When this happens, the old account will remain on the repository as a ghost user node.
Of course, depending on the application, there may be different scenarios unique to that application that cause the creation of ghost user nodes.

How to solve the repository growth caused by ghost user nodes
“Exorcism” on the server? Not exactly. There is a simple solution to remove the unused user nodes.

Factors to consider:
  • Avoid deleting system users and OOTB users.
  • Look closely at users who have not logged in more than 6 months.
  • AEM is often not a single source of user data.
  • If AEM is the single source of user data, consider your corporate policy (in some cases, user data cannot be deleted).
  • Remove the authors who have left the company or are not working in AEM currently.
  • Consider any individual users who are important to the system and company; do not remove them.
What are the options to delete?
  • If the user source is an external system, obtain the list of users who have not logged into AEM in the last six months. Next, run a script to remove those users from AEM publish servers.
  • If the user source is from LDAP, make use of “org.apache.jackrabbit.oak: External Identity Synchronization Management (UserManagement)” JMX Service purgeOrphanedUsers() method to remove ghost users in the repository.
  • Create a JCR query to fetch all the users who have not logged into AEM for a long period of time. Consider the above factors as query parameters.
Sample query:
SELECT * FROM [rep:User] AS s WHERE ISDESCENDANTNODE([/home/users]) AND NOT ISDESCENDANTNODE([/home/users/system]) AND NOT s.”rep:authorizableId” IN (“admin”, “anonymous”,”replication-agent”) AND (s.”jcr:created” < CAST(‘2017-02-20T18:26:49.328-06:00’ AS DATE)) AND s.”rep:externalId” IS NOT NULL

Note: Before running this solution in the production environment, have a comprehensive plan including a detailed backup strategy (should you need it).


By aem4beginner

User Admin Console (Classic UI) & Crashing Browsers

As businesses grow, the number of end-users and groups in Adobe Experience Manager (AEM) tends to increase as well. I recently worked with two clients who are synchronizing users and associating users to the groups through the custom sync handlers to CRX (the content repository in AEM).

Business Analysts (BA) or AEM Admins use the User Admin console and CRX/DE Lite to debug user- or group-related issues. Due to large number of users and groups, when we do a search for a user or group, sometimes it’ll cause the browser to crash. This issue is known to occur with various browsers.

What are the alternative ways to find the user attributes and group information? Query Builder and SQL2 queries come in handy to help you find basic information of the users and groups. Below are two sample queries.

1. Find all attributes of users.
To verify that all attributes have been synchronized correctly through a custom sync handler, we can use the following query:

http://localhost:4503/bin/querybuilder.json?p.hits=full&property=rep:authorizableId&property.value=uid&type=rep:User

Sample:
http://localhost:4503/bin/querybuilder.json?p.hits=full&property=rep:authorizableId&property.value=ryan.palmer@spambob.com&type=rep:User


(click the image to enlarge it)

2. Find all the groups the user is associated with.
Users are associated to groups to view permission-sensitive contents. Group names are used as CUG (Closed User Groups) on the page to allow users to view the page. To verify whether a user is associated to correct group, we can use the following query.

http://localhost:4503/bin/querybuilder.json?p.hits=full&property=rep:members&property.value=uuidvalue&type=rep:Group

Sample:
http://localhost:4503/bin/querybuilder.json?p.hits=full&property=rep:members&property.value=9253def2-e0b5-3b5c-ad02-0f7d79848d83&type=rep:Group

(click the image to enlarge it)

Alternatively, the equivalent SQL2 query can be executed in CRX/DE Lite query tool:

SELECT * FROM [rep:Group] AS s WHERE ISDESCENDANTNODE([/home/groups]) AND s.”rep:members” = CAST(‘uuidvalue’ AS WEAKREFERENCE)

Sample:
SELECT * FROM [rep:Group] AS s WHERE ISDESCENDANTNODE([/home/groups]) AND s.”rep:members” = CAST(‘9253def2-e0b5-3b5c-ad02-0f7d79848d83’ AS WEAKREFERENCE)

(click the image to enlarge it)

Based on the above sample queries, you can build more complex queries to debug user- and group-related issues. AEM’s Query Builder and CRX/DE Lite query tool with JCR query language can save you time and resources when you are exploring CRX repository.


By aem4beginner

Get Ready for New Closed User Group in AEM 6.3

Adobe Experience Manager (AEM) 6.3 ships out with new Closed User Group (CUG) implementation. The new implementation is based on Apache Jackrabbit OAK module named oak-authorization-cug.

The new implementation provides authorization to view content for specific principals with read access to the target node and its subtree, without interfering with other access control lists’ (ACL) permission on the node. What this really means is, in the Authoring environment, we will need to protect a folder tree that has restricted ACLs with certain privileges like read and write. In Publish environment, we don’t need similar ACLs and can provide a tree with authorization to specific principals only, only those principals will be able to view content.

oak-authorization-cug is implemented as pluggable module, and it can be configured through “Apache Jackrabbit Oak CUG Configuration” via AEM Web Console Configuration Manager.


By default, in AEM 6.3 authoring instance, this is disabled. In the publish instance, “CUG Evaluation Enabled” checkbox is checked by default.
CUG Repository Implementation

Prior to AEM 6.3, when CUG is applied on the page, the principal has been added on the content node as shown below.


With AEM 6.3 onwards, CUG is applied as an extension with CugPolicy, which extends PrincipalSetPolicy and JackrabbitAccessControlPolicy. When you apply CUG on a page in the repository, it creates a separate node under the page primary type of rep:CugPolicy with principal name as attribute. This is illustrated below.


CugPolicy includes specific privileges like jcr:read, rep:readProperties and rep:readNodes. In the above example, principal hiking-member will have read access to /content/we-retail/men. Other principals will not have access to “men” page.

Note: Future version of AEM will not support old CUG support, so it is time to use the new CUG implementation.
Backward Compatibility

After seeing the change in implementation for CUG in AEM 6.3, now the question arises regarding backward compatibility for the content migrated from older versions of AEM.

To use the new CUG implementation, we need to change the old CUG applied on the pages. Is it possible to manually go over each page and re-apply CUGs?

AEM 6.3 comes with a CUG Migration tool in the Adobe Experience Manager Web Console. You can find the tool through the following url: http://localhost:4502/system/console/cug-migration

Once you navigate to the migration tool page, you can run the migration process as follows.
Provide the content page under which you need to convert all pages with the old CUG implementation. Then click on the “Perform dry run” button. The dry run will show the list of pages that have the old CUG implementation. See the below image.
Next step is to run the actual migration. Click on the “Perform Migration” button. Once the migration completes, it shows the paths of the page and status as migrated. See below image.

To learn more, here are a couple of links on CUG in AEM 6.3:
Custom User Groups in AEM 6.3
Managing Access with “Closed User Groups” (CUG)


By aem4beginner

Why You Should be Using the Principal Permissions View in AEM

Before AEM 6.5, we really only had one UI to manage user permissions. That’s not to say we couldn’t go to the JCR directly and set ACLs, but the user admin screen was just simpler.

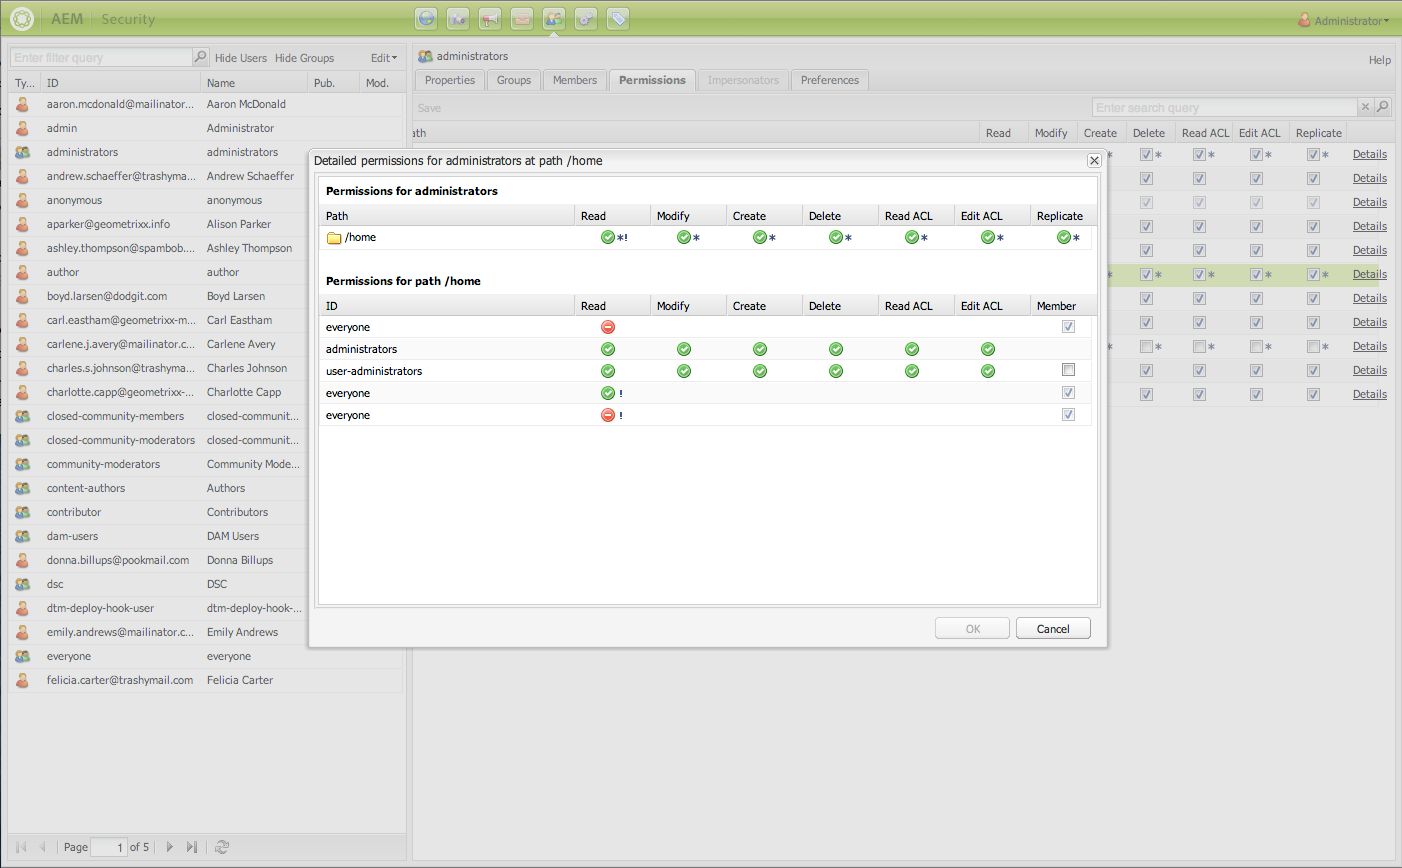
For instance, take this example from the classic user admin console.


Typically, this meant that we would check the root folder to give read to everyone. This is done because an AEM user can’t do much without access to “/bin” which is directly beneath the root node and you can’t directly add permissions to the bin.

This “read” would trickle down to all of the other nodes. So, when you wanted to remove access you uncheck the box, you have now added a “deny” policy.

Have you ever accidentally checked a box, saved, then unchecked? You’ve just created another deny. The only solution to remove it is to go and delete the policy. Even if you delete the user, that deny policy will persist.

Denys not only cause unnecessary clutter, but also makes troubleshooting permissions issues so much more difficult. This was a very unclean approach that we adapted to. Now, we have a better option in AEM to manage permissions.

Touch UI Permissions Console
With the introduction of the Touch UI Permissions Console, you can now set your policies for your Principals. You also have the option of creating exceptions easily through the UI.

Utilizing the example from before, this is how it looks in the permissions console.


You still have the “read” on the root, but now you can create a glob on that node. Rep:glob=”” sets the read permissions to itself only. This means any nodes directly tied to root will be readable but subfolders will be excluded and will not inherit read. This gives you more control over what permissions you need to set without having to worry about “accidental” permissions.

I did the same thing on “/content” because authors will get permissions to specific areas through other groups. Again, no need to create a deny.

Although this isn’t a true Principal Authorization implementation, since under the hood it’s still creating the policies for the paths, it’s a big step forward for managing permissions on a more granular level.

Read more about this on the Adobe website.


By aem4beginner

Creating a Custom YAML file for the Access Control Tool

There may be many reasons to create a custom file, the reason I did it was to include my groups’ members in the YAML output so that I can manage group memberships (whenever I choose to).

What is a YAML File
YAML files aren’t as common in JAVA projects. So, for many of us, we just haven’t had much need to use them. Put simply, a YAML file is just a text-indent formatted file. The amount of indention on an entry dictates its placement in the hierarchy.

My Disclaimer
Before you use anything you create, please test thoroughly. A bad YAML file into the AC Tool can break a lot of things. Please make sure that doesn’t happen to you and keep this in mind when you’re creating your files:

Any users or groups you manage in your configuration file (group_config and user_config sections) must have their ACLs in the same YAML file. If you try to deploy users and groups without their permissions, you may (and probably will) lose the ACLs.

This is documented here:

https://github.com/Netcentric/accesscontroltool/blob/develop/docs/AdvancedFeatures.md

Custom YAML Servlet
You can choose to implement this in many different ways. Since I wrote this code, I actually implemented a custom dashboard. But a servlet is great to start with because you can link to it but you can also use it from other areas within your code, as well as just hitting the URL directly (GET).

The main thing when writing your servlet is really to get the formatting right.

1.) You will likely have three config areas (group_config, user_config, and ac_config). It is possible to not include user_config, but make sure you also don’t generate any ACLs for those users in your YAML.

2.) You will need to indent based on hierarchy. Here are some constants (the netcentric code also uses these)
public static final int DUMP_INDENTATION_KEY = 4;
public static final int DUMP_INDENTATION_FIRST_PROPERTY = 7;
public static final int DUMP_INDENTATION_PROPERTY = 9;
public static final int DUMP_INDENTATION_PROPERTY_SUB = 11;
public static final String YAML_STRUCTURAL_ELEMENT_PREFIX = "- ";


Top-level items do not need an indention (group_config, user_config and ace_config)

Writing the Code
Again, I chose a Servlet because it’s an easy way to get this done, but you can use other methods.

All of the data we need for our files is readily available in AEM.

1.) Generate your group_config section. (I chose to use queries but you can also use the UserManagement API)

Iterator<Resource> groups = resolver.findResources("SELECT * FROM [rep:Group] AS nodes WHERE ISDESCENDANTNODE([/home/groups]) ORDER BY nodes.[rep:principalName]", Query.JCR_SQL2);

Once you have your group Resources you can iterate them and add them to a list. At this point, you can either add the group object or create a custom object told the attributes you plan to use. At the very least you will need the groupID, path,memberOf. As I mentioned before I was doing this to get the members, if you plan to add members also collect the declaredMembers of the group.

This list will later be used to pull the necessary ACL information because remember they should match.

while (groups.hasNext()) {
    <do stuff and add to list>
}


2.) If you’re including System Users, follow the same process and add them to a new List.

Iterator<Resource> userResources = resolver.findResources("SELECT * FROM [rep:SystemUser] AS nodes WHERE ISDESCENDANTNODE([/home/users]) ORDER BY nodes.[rep:principalName]", Query.JCR_SQL2);

You may need to use different paths here, depending on which System Users you plan to include.

3.) Collect the data for your ACLs.
Use the lists you created above to iterate all of the ACLS related to the group and user principles. Do this for each user and group.

Iterator<Resource> repResources = resolver.findResources("SELECT * FROM [rep:ACE] WHERE [rep:principalName]='"+principal+"'", Query.JCR_SQL2);

We use rep: ACE so that we can get all of them at once, but you will need to distinguish between allowing and deny policies. So when you store your data in a LIST, be sure to know how to tell them apart. You can create a custom object and store the information, then add that object to the list.

if(vm.get("jcr:primaryType").toString().equalsIgnoreCase("rep:GrantACE")) {
    type="allow";
}


At the least, you will need the Principle name, type (allow or deny), path, privileges, and restrictions.

Once you have collected all of the data it’s time to write it out.

For each of the above:
1.) Write out the heading and a configuration for each list.
2.) Remember to indent properly.
3.) Test on a local that you’re not too attached to in case of issues.


By aem4beginner

Getting Started with the Netcentric Access Control Tool and Adding Service Users to Your YAML Files

Keeping permissions in sync across environments is an issue for most organizations. In AEM, you can export permissions using packages but this becomes a tedious process if you need to do this on a regular basis.

I won’t say that the AC Tool solves the problem completely but it’s a good place to start. In future posts, I will tell you how to extend the functionality to give you more control over what you need for your specific organization.

What this tool does give you is a way to retrieve your permission information from your environments in the form of YAML files. It also provides an installation hook to deploy your YAML files to environments based on run modes. This means that you can have permissions for all of your environments in one code repository, it will only deploy the relevant permissions to the targeted environments with the matching run modes.

This is already a huge step forward from the manual process.

Installation
There are two packages you will need for installation. The first is the AC Tool package, the second is the oak index file for the same version. Though the index file is optional, it’s recommended for those who have a large number of groups. Personally, I don’t see a reason for not installing it either way.

One thing you want to keep in mind is that you should install the package only once per environment. This means you do not want to make a part of your regular code deployment, which can cause issues with your deployments.

Creating YAML Files
Once you have the packages installed you can access the tool in two ways, either through the JMX console or through the tools navigation in AEM Tools Console.


Using the Netcentric Dashboard can pull the latest dump file or upload a package with your YAML files for testing.

Deploying Updates


Once you have your files retrieved and modified for import you can deploy them to your environment; remember, this is run mode based so make sure your run modes are valid for the environment you’re targeting. If you are only deploying to a single environment, you don’t have to use run modes.

To deploy you can create a maven project that packages your YAML file structure. If you add the Netcentric hook, it will automatically take effect. If you would rather double-check things, leave out the hook, and use the “Apply” feature in the Netcentric Dashboard for your changes to take effect. Remember to put in the path to your YAML files before you try to apply the updates.


This configuration will deploy only to environments with an author and a localdev run mode.

Once you have deployed your files, you can check the logs to see if it successfully updated the permissions you expected. If you aren’t seeing anything in the logs, you may want to check the package installation to make sure it was successful. If there are any errors in the YAML files, it will create an error and stop the installation.

Tips
  1. Whenever possible, don’t redeploy OOTB system users or groups. There’s really no need to unless you’re using them for a specific reason.
  2. Don’t create new users other than test users or system users.
  3. Do use this tool for removing obsolete users and groups. This way you can remove them from all environments consistently.

Netcentric AC Tool – Adding Service Users to Your YAML Files

By default, these files do not contain any user information, however, the tool does give you a pretty easy way to include these by using an OSGi configuration. The only drawback to this approach is that you can’t change it without changing the config. In the next post, I’ll show you how to create your own custom servlet to generate a custom YAML file.

In AEM, go to the Configuration Web Console (<host:port>/system/console/configMgr). Then, open the “AC Tool Dump Service” configuration. Check the box by “Include users in dumps”. Also note that even though it says “users”, it only includes Service Users, not regular users. Hopefully, they will rename it to say Service Users, as it’s a bit misleading.


Save your changes. What this does is adds a new section to your YAML files called “user_config”, and it includes service users’ information. It also adds service user ACLs to the ace_config section of the file.

References:
You can find more information on the AC Tool, including example files on their Github website.

https://github.com/Netcentric/accesscontroltool

Installation package files and oak index files are managed in maven, which can be found here:

https://repo1.maven.org/maven2/biz/netcentric/cq/tools/accesscontroltool/accesscontroltool-package/

https://repo1.maven.org/maven2/biz/netcentric/cq/tools/accesscontroltool/accesscontroltool-oakindex-package/


Source:


By aem4beginner

December 10, 2020
Estimated Post Reading Time ~

ACL Issues and fix

Enable asset “Share Link” for users
  • Config: Provide Edit ACL access on the assets
Allow users to reset password
  • Issue: In AEM 6.5, an internal server error occurs, when users (with no modified access on groups) access their profiles via Coral UI.
  • Fix: Provide jcr:modifyProperties privilege on /home/groups.
Enable assets reports for user groups other than OOTB administrators.
Manage access to links in the Global navigation panel / Tools Menu.
Allow “Force Check-In” on assets for the custom user groups.
  • Provide jcr:all access on assets to the user group.


By aem4beginner

AEM Permission Management

About
APM (AEM Permission Management) is an AEM based tool focused on streamlining the permission configuration. It provides a rich UX console tailored for administrators. They can write human readable scripts that handle user/group creation/deletion and permissions application, both in bulk. Through it's flexible grammar, exposed API, and high extensibility it vastly improves permission-based implementations.

Features
  • DSL (Domain Specific Language) that makes the script human readable.
  • Auditability for all permission scheme changes.
  • Support for glob regexp access, that's not available OOTB.
  • Bulk changes for whole permission schemes.
  • HTTP API access for better CI/CD implementations.
  • Backend Java API for use of permission-based project features.
Compatibility
This page identifies the versions of Adobe Experience Manager with which a particular version of AEM Permission Management is compatible.
                    AEM 6.3    AEM 6.4    AEM 6.5
APM 5.x.x                                         x
APM 4.x.x         x                 x            x
APM 3.2.x                            x
APM 3.1.x                            x
APM 3.0.x         x 

Getting started
To start using APM an AEM in version at least 6.3 is required. The latest AEM packages are available here. Download both packages cq-actions-msg-replication and apm, and install them using CRX Package Manager.

How to use
Open APM dashboard http://localhost:4502/apm.html, and start using the tool. For more information visit user guide.

Documentation
  • UI - quick tour for APM user's interface.
  • Grammar - syntax of APM scripts, and description of main actions.
  • Permissions - actions used for adding and revoking access to resources.
  • Launchers - configuring auto execution of scripts.
  • Backend API - executing scripts from backend services.
  • Custom actions - implement your own action.
What's new?
APM 5.0.0
  • Introduction of ANTLR 4.
  • New way of registering actions (no regex, just friendly annotations).
  • Improvements in UI (especially in script's editor and viewer).
  • Introduction of new launchers (auto execution of scripts after package installation).
  • Code separated in several modules (cleaner API).


By aem4beginner

November 6, 2020
Estimated Post Reading Time ~

Configuring AEM User Permissions and Access

I remember the first user permission story I had to complete — Design and Implement User Permission Matrix. My task, in a nutshell, was to create user groups, organize user groups, assign permissions as well as create users. It sounded straight forward until I started work and found myself spending way more time than I expected myself to take.

Two Different Interfaces To Configure User Permissions
There’s the Classic UI View and the Touch UI View. The latter was only introduced in late 2019.
Classic UI Permissions View

I initially chose to work on Classic UI because I would not have to go into three separate pages, unlike the Touch UI view:

For Classic UI, you just have to go into
For Touch UI, you would have to go into
I created user groups and users successfully, hooray! Permissions were in a mess though, as it turns out. The reason was…

Seemingly Harmless Unchecks on Classic UI
Classic UI Permissions Granting

You would think that if contributors do not have to access templates which are under the path, conf/templates, you just have to uncheck that box. What that does, in reality, is to create an explicit deny.

And what’s wrong with explicit deny, you may ask.

Explicit Denies Will Be Inherited When Assigning a User to Multiple Roles
If this specific user is part of the Contributors Group which has conf/templates denied and also part of Template Editors Group which has conf/templates checked, he/she will end up not being able to access conf/templates due to that explicit deny.

Then, what to do right?

Use Principal Permissions View on Touch UI and Get This Counterintuitive Rule in Your Head
Just do not explicitly allow a path if you do not want it to be allowed — eg. if I never explicitly allow /conf/templates for contributors, AEM will assume that it is not allowed and achieve a “deny” effect without an explicit deny.

That way, if this specific user is part of the Contributors Group which has conf/templates implicitly denied, and also part of Template Editors Group which has conf/templates allowed, this user will be able to achieve the highest level of permissions among the user groups he/she is assigned to, as expected.

There May Be Some Cases Where You Need Explicit Denies. Don’t Forget About The Explicit Allows
There may be cases you need to apply some restrictions to some supergroup (etc. Pizza Company Non-Admin Super User Group) which has many user groups. You would need to ensure that the alternative user group (etc. Pizza Company Admin Super User Group) has explicit allows for overriding purposes.

Thereafter, if a user is part of a non-admin sub-group as well as an admin sub-group, this user will not be affected by the explicit denies due to the explicit allows and be able to achieve the highest level of permissions among the user groups he/she is assigned to, as expected.

You Would Also Need Absolute Path (Or Substring of Absolute Path) to Allow/Block The Path, Yet There Are URLs That Cannot Be Found
Sample Detailed Look at ACL with its Paths Defined

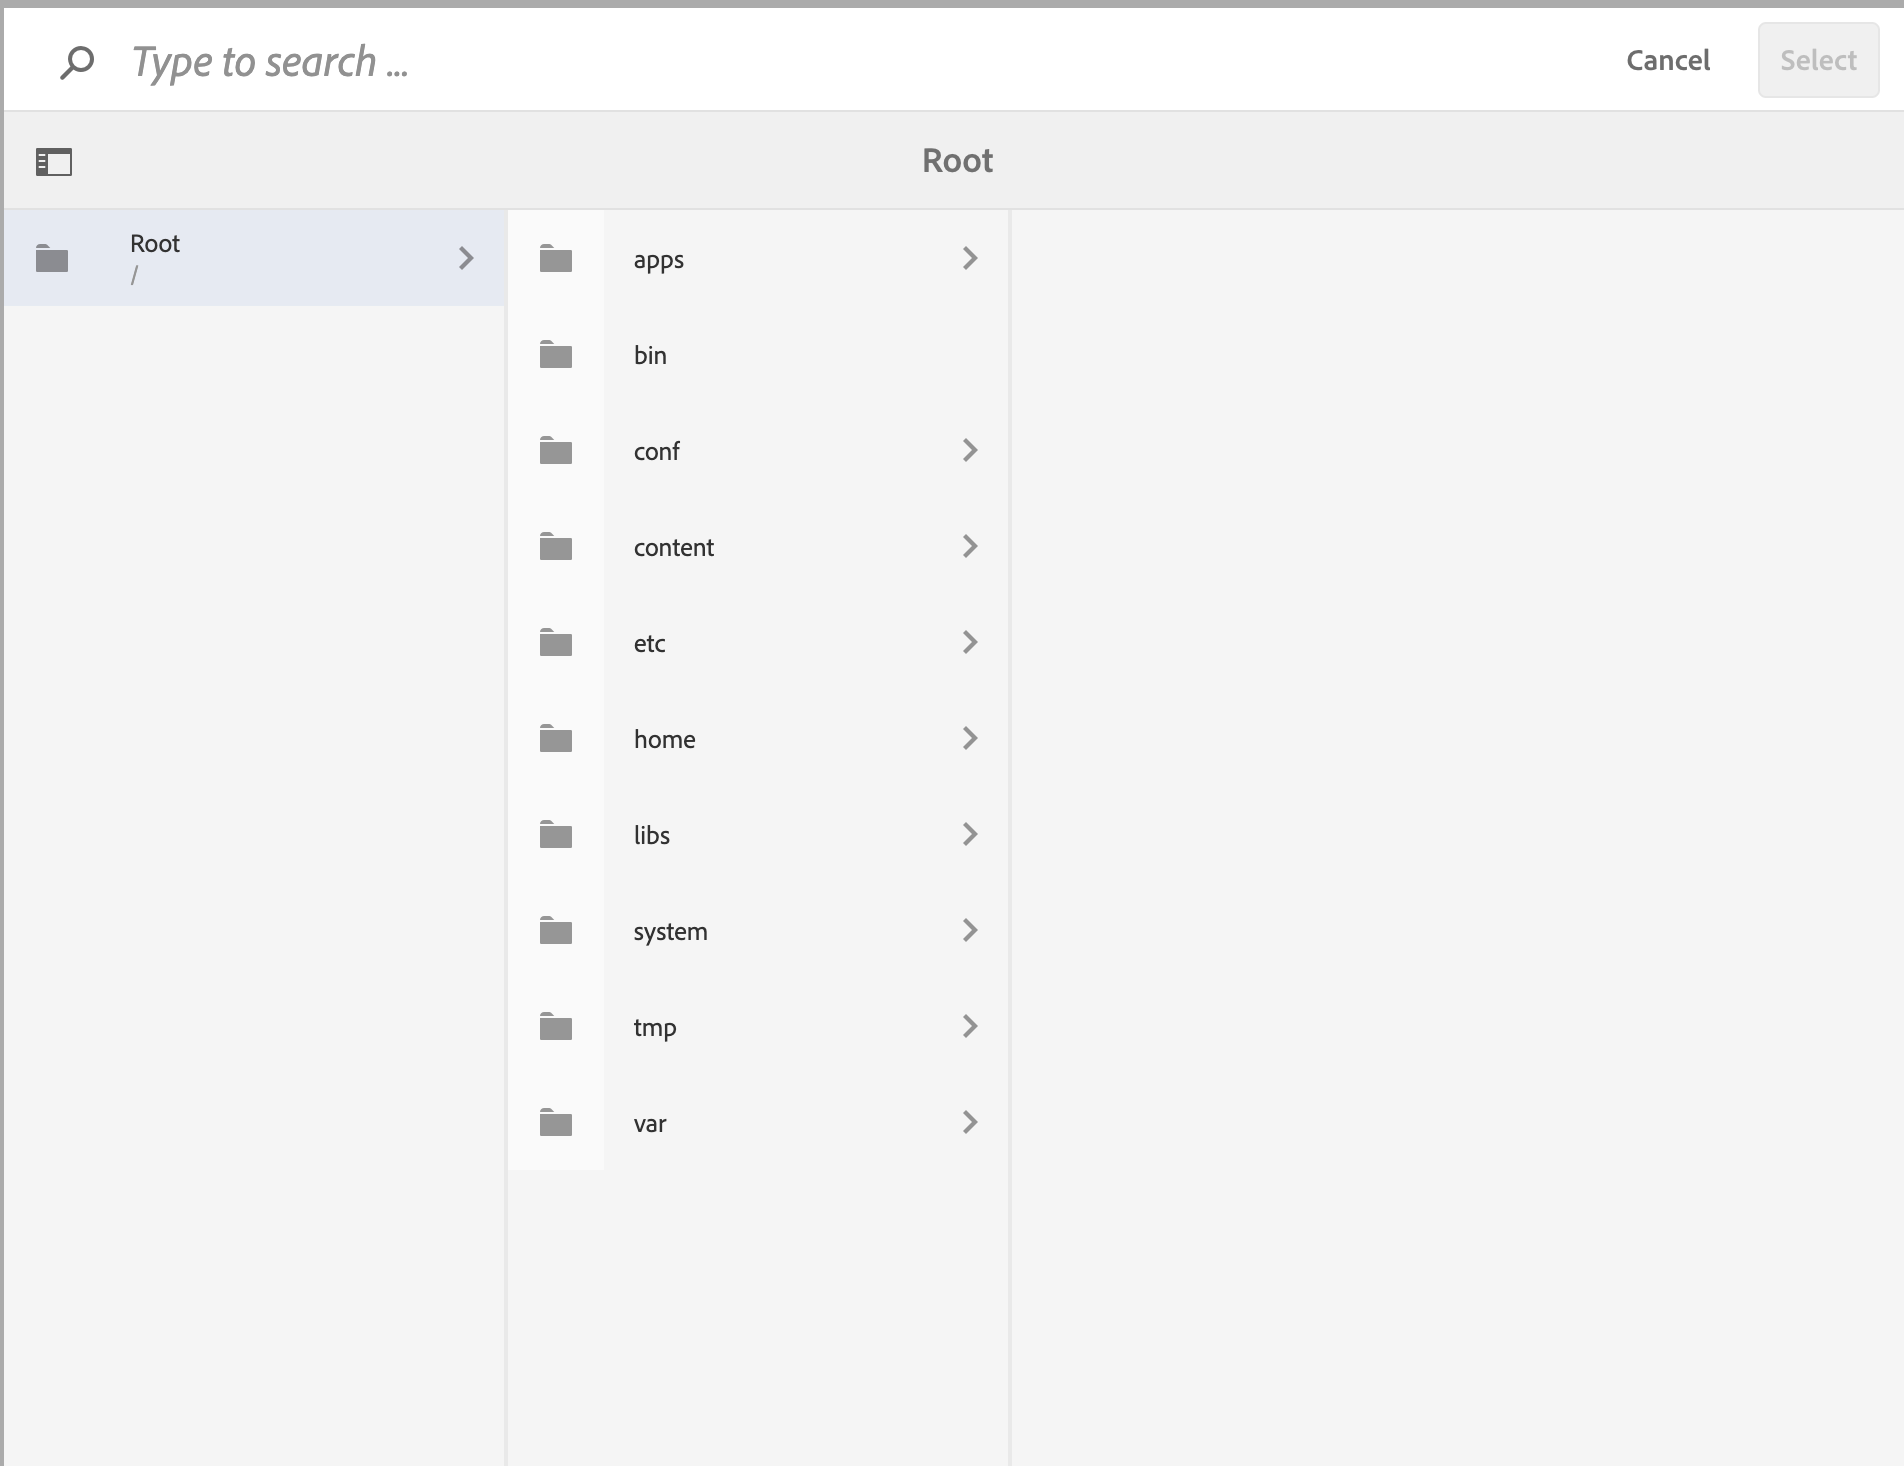
File Navigator When Configuring User Permissions

There are some pages that are the likes of localhost:4502/communities/sites but you would realize from the file navigator that the path does not exist. That means that it is a vanity URL and not an actual path.

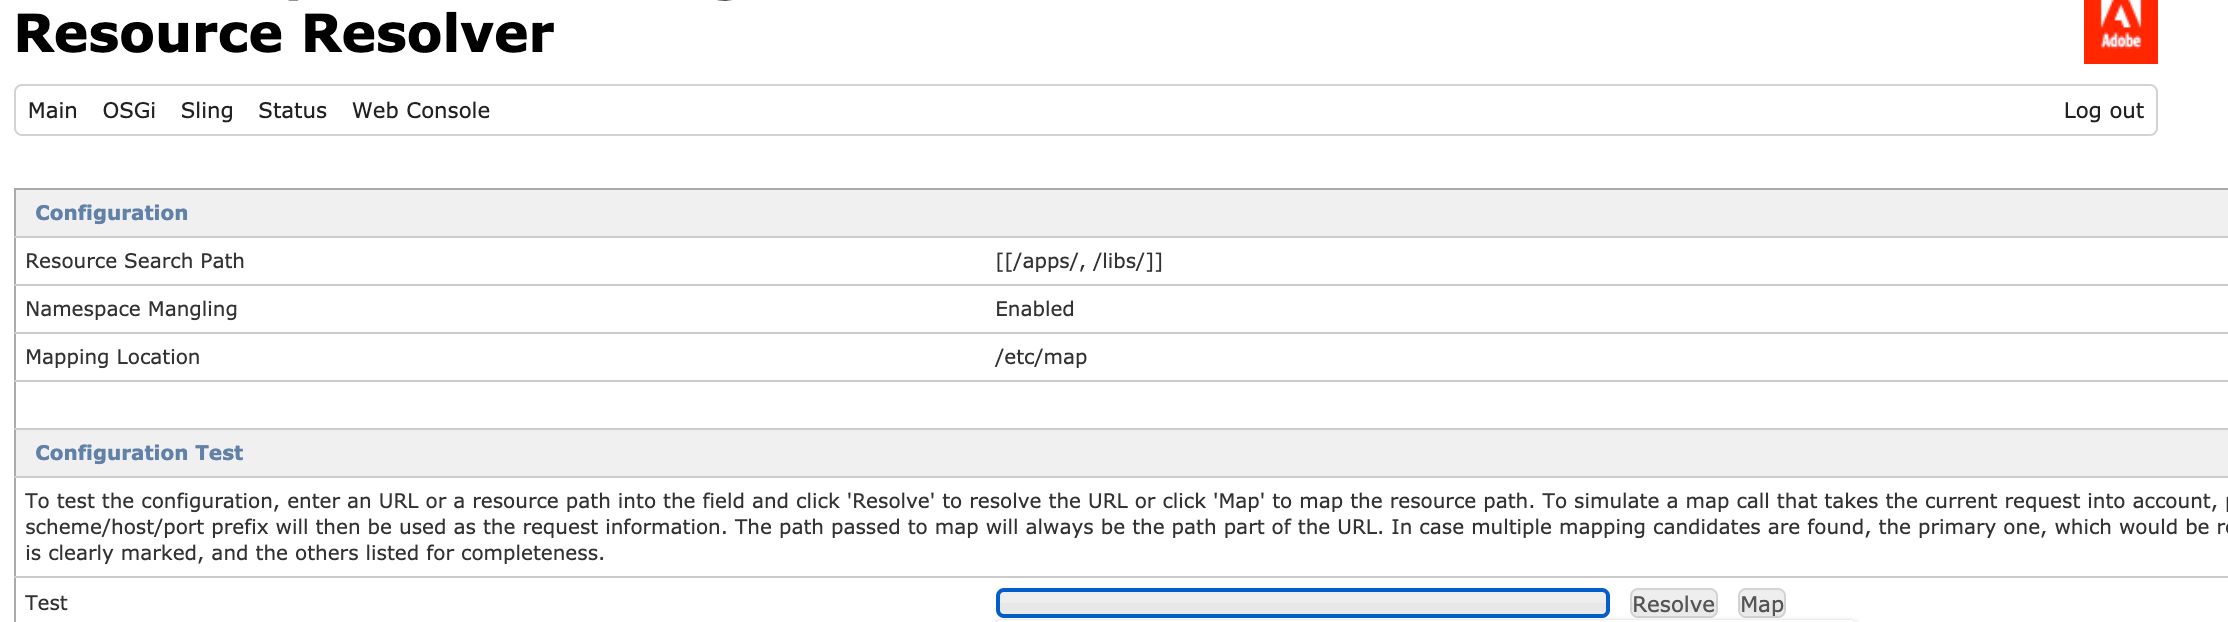
To find its actual path, go to localhost:4502/system/console/jcrresolver and then copy and paste the vanity path — you will then be able to find the actual path. For the case of the communities, they are found under the path localhost:4502/libs/social/xxx.

JCR Resolver View

As you can see, this new path you got from the JCR Resolver does exist in the file navigator. We can then proceed with our allows/denies.

I Literally Had A Nightmare Each Time I Work on User Permissions
Coding over configurations, anytime. At least I don’t have to go “Why is it designed like that”.

It also does not help that there are so few conversations about AEM User Permissions and Access — that is also one of the strongest reasons why I have decided to write about this.


By aem4beginner

October 1, 2020
Estimated Post Reading Time ~

Migrate AEM user to another AEM instance

We create users in the AEM DEV instance and need to move those users to higher environments. We can create a package using an ACL packager.

Download the ACS AEM commons packages
Install the packages into AEM using the package manager
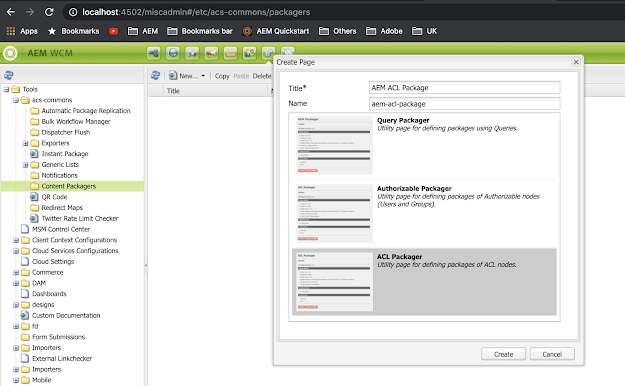
Navigate to AEM > Operations > Configuration
Expand Tools > Content Packagers and create a new page

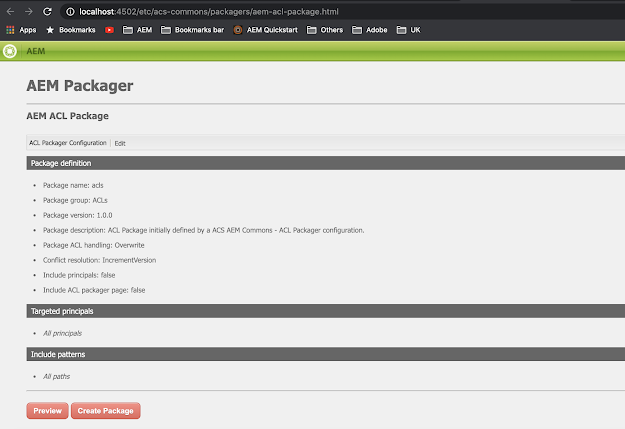
Double click on the new page.


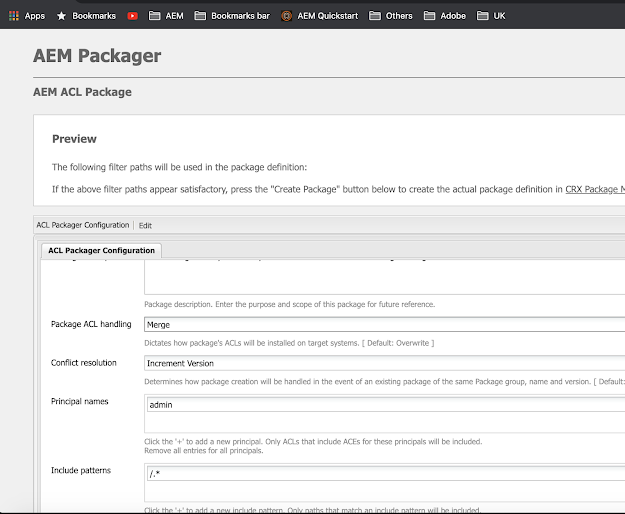
Click on edit to add the user we want to create a package.


Update below configs
Package ACL handling: Merge
Principal names: add the user name i.e admin
Include patterns: /.*
Include principals: enable the checkbox to add the user node path (/home/****) along with ACLs.

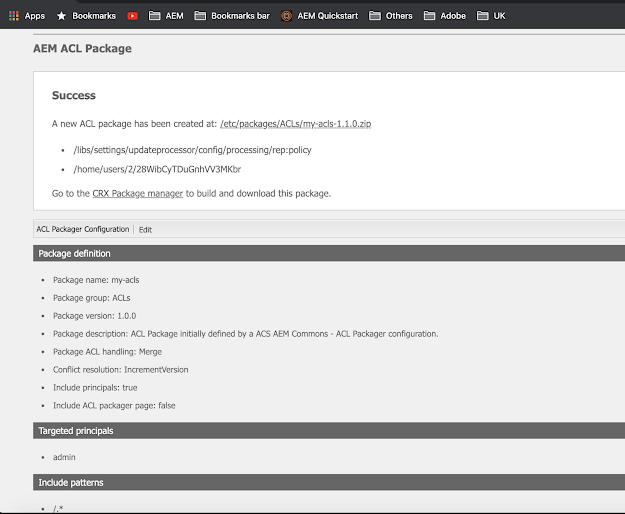
Click Ok and preview the paths in the package. Click on Create Package.


Goto package manager to see the newly created package.


By aem4beginner