Showing posts with label Cache. Show all posts

January 4, 2021
Estimated Post Reading Time ~

How to recompile component JSPs in AEM via Felix Console

In the latest versions of AEM, there is a new feature available, which can be used to recompile the component JSPs.

This helps in resolving issues like:
- Latest changes not available on package install
- ClassNotFound exception on package install

This functionality can be accessed by:
Login to Felix Console and go to Sling >> JSP OR directly go to <aem-domain>/system/console/slingjsp
Click on the Recompile JSPs button


By aem4beginner

How to recompile clientlibs and invalidate cache?

The clientlibs in AEM consist of JS and CSS and in some instances they get cached; which as would be obvious; causes issues.
To remove this cache and rebuild the clientlibs, the following link is quite useful:

<domain-name>/libs/granite/ui/content/dumplibs.rebuild.html

There are individual buttons to invalidate the cache and rebuild the libraries on this page.
For faster access, there is a query parameter for each process that can be appended to the URL:

Invalidate Caches: ?invalidate=true
Rebuild Libraries: ?rebuild=true


By aem4beginner

January 2, 2021
Estimated Post Reading Time ~

Clearing AEM’s JSP Cache in your Jenkins Build

AEM really likes caching your compiled JSPs. This can be a problem as you are developing code, especially when working on dependencies. Every so often you may forget to include a dependency in a bundle or include the wrong version. Because of AEM’s JSP caching, even after fixing your dependency, you may see something like this:

Image 

As a developer, this is annoying, but if this same problem occurs in integration or another environment, it causes significantly more extra work as the team will need to determine what is the problem and what caused it while having to potentially review many commits by different developers.

How to Clear AEM’s JSP Cache
To keep this from happening, you can automatically clear the JSP cache in AEM as part of your build. Apache Sling offers a simple console to do this at http://localhost:4502/system/console/slingjsp and you can easily invoke it with the following cURL command:

curl -u admin:admin 'http://localhost:4502/system/console/slingjsp' -X POST -v

Integration JSP Cache Clearing to the Build
To make this happen, add this as an additional Execute Shell build step in your build configuration. Given, this Jenkins build example:


Your updated configuration should look like this:


After adding this to your build you should see something like this:
[INFO] ------------------------------------------------------------------------ [INFO] BUILD SUCCESS [INFO] ------------------------------------------------------------------------ [INFO] Total time: 01:20 min [INFO] Finished at: 2016-08-10T16:04:05+00:00 [INFO] Final Memory: 48M/192M [INFO] ------------------------------------------------------------------------ [finn] $ /bin/sh -xe /tmp/hudson1194504770954027729.sh + curl -u admin:PASSWORD http://ec2-IP.compute-1.amazonaws.com:4502/system/console/slingjsp -X POST -v * About to connect() to ec2-IP.compute-1.amazonaws.com port 4502 (#0) * Trying IP... connected * Connected to ec2-IP.compute-1.amazonaws.com (172.31.18.125) port 4502 (#0) * Server auth using Basic with user 'admin' > POST /system/console/slingjsp HTTP/1.1 > Authorization: Basic CODE > User-Agent: curl/7.19.7 (x86_64-redhat-linux-gnu) libcurl/7.19.7 NSS/3.19.1 Basic ECC zlib/1.2.3 libidn/1.18 libssh2/1.4.2 > Host: ec2-IP.compute-1.amazonaws.com:4502 > Accept: */* > % Total % Received % Xferd Average Speed Time Time Time Current Dload Upload Total Spent Left Speed 0 0 0 0 0 0 0 0 --:--:-- --:--:-- --:--:-- 0< HTTP/1.1 302 Found < Date: Wed, 10 Aug 2016 16:04:05 GMT < Set-Cookie: felix-webconsole-locale=en;Path=/system/console;Expires=Tue, 05-Aug-2036 16:04:05 GMT < Expires: Thu, 01 Jan 1970 00:00:00 GMT < Location: http://ec2-IP.compute-1.amazonaws.com:4502/system/console/slingjsp?reset < Content-Length: 0 < 0 0 0 0 0 0 0 0 --:--:-- --:--:-- --:--:-- 0 0 0 0 0 0 0 0 0 --:--:-- --:--:-- --:--:-- 0* Connection #0 to host ec2-IP.compute-1.amazonaws.com left intact * Closing connection #0 Finished: SUCCESS

Hopefully, this helps anyone else running into problems with JSP caching in AEM.


By aem4beginner

December 28, 2020
Estimated Post Reading Time ~

Caching Experience Fragment Techniques in AEM Sites 6.5

This article explains different techniques to handle cache invalidation with AEM experience fragments.
  • This topic will cover some of the questions that have been asked:
  • What are the most efficient ways to cache AEM Experience Fragments in AEM?
  • What are different ways to cache AEM Experience Fragments in AEM?
  • What are the caching strategies for AEM Experience Fragments in AEM?
1. Server-Side Rendering, utilizing the out of the box (OOTB) AEM experience fragment component

Utilizing the OOTB experience fragment component, the experience fragment will be rendered and cached as a part of the HTML page.


Pros:
  • Easy to include experience fragments to editable templates and pages.
Cons:
  • Publishing changes for experience fragments will not automatically flush all the pages that are referencing the experience fragment.
  • For large sites, flushing all pages with the experience fragment reference may cause performance issues in the live production sites.
Solution to the Cons:
  • Schedule a re-activation time for the experience fragment. The time set should be when the site has the lowest traffic would be the best option.
  • Create a custom replication agent to invokes all the flush agent(s) that are registered within the publish instance. Flush all the pages that reference the experience fragment; adding a minor throttling mechanism if required. The mechanism should re-fetch all pages after the flush.
2. Javascript Request and HTML Rendering
Creating a custom experience fragment component that uses javascript to request for the experience fragment HTML path. On success, inject and render the experience fragment’s HTML’s structure to the page.


Pros:
  • All pages referencing the updated experience fragment will not need to be flushed.
  • All pages referencing the updated experience fragments will surface new content on the page immediately.
  • Flushing all pages with the updated experience fragment is not required.
Cons:
  • Components defined in the experience fragment that are relying on the site’s javascript will not be working as expected.
My Solution to the Cons:
  • Only allow experience fragments that do not rely on javascript to be allowed in the custom javascript experience fragment component; define the parsys that only allows specific components that do not depend on javascript like slideshows.
3. Sling Dynamic Include (SDI) Component Rendering
Sling Dynamic Include replaces specific and defined components with different types of include tags (apache include tags) and therefore allows to put dynamic content into a page cached by the dispatcher.

Configure Sling Dynamic Include on both AEM Publish and Apache Web Servers. The SDI AEM install exposes an OSGI configuration that allows you to target specific components that will be converted to SDI include tags in the publish mode. When a page is being requested from the Apache Web Server, the resolved page with the SDI includes tag will request the JCR path from the targeted components (experience fragment) and will cache the HTML in the webserver. The page with SDI includes tags will include the experience fragment HTML (cached) to the final rendered page. In summary, the render of the final page will include the experience fragment as one HTML file.


Pros:
  • All pages referencing the updated experience fragment will not need to be flushed.
  • All pages referencing the updated experience fragments will surface new content on the page immediately.
  • Flushing all pages with the updated experience fragment is not required.
Cons:
  • If an author unpublishes an experience fragment unexpectedly, the apache web server will display an error directly onto the page.
My Solution to the Cons:
  • To restrict all users from unpublishing experience fragments.
  • To create a custom approval workflow invoked in the “author” instance, where all pages referencing the targeted unpublished experience fragment should have the experience fragment removed, and re-published; upon approval.
Summary
In summary, for my recommendation, it really depends on the sizing, performance uptake, and business requirements of the site. If the size of the site’s content is extra-large, then the SDI and XF Javascript options would be ideal. If the size of the site is particularly small, then flush by reference would be ideal.


By aem4beginner

September 19, 2020
Estimated Post Reading Time ~

How to clear script cache in AEM

At some point you may face the issue where your AEM page is not getting loaded and following errors getting printed in error log file.

Errors:
*ERROR* [182.75.136.107 [1589236795135] GET /content/jorvee/tools/en_us/gen-tool-10-10.html HTTP/1.1] com.day.cq.wcm.core.impl.WCMDeveloperModeFilter Error during include of SlingRequestPathInfo: path='/content/jorvee/tools/en_us/gen-tool-10-10/jcr:content', selectorString='null', extension='html', suffix='null'org.apache.sling.api.SlingException: Cannot get DefaultSlingScript: java.io.IOException: java.util.concurrent.TimeoutException: Idle timeout expired: 60000/60000 ms

OR 

*ERROR* [0:0:0:0:0:0:0:1 [1531894023650] GET /content/we-retail/us/en/user/smartlist.html HTTP/1.1] com.day.cq.wcm.core.impl.WCMDeveloperModeFilter Error during include of SlingRequestPathInfo: path='/content/jorvee/tools/en_us/gen-tool-10-10/jcr:content', selectorString='null', extension='html', suffix='null'
org.apache.sling.api.SlingException: Cannot get DefaultSlingScript: Identifier com.adobe.cq.wcm.core.components.models.Page cannot be correctly instantiated by the Use API

Resolution:
To solve this issue we need to clear the cached HTML and JS files from AEM.
Solution 1:
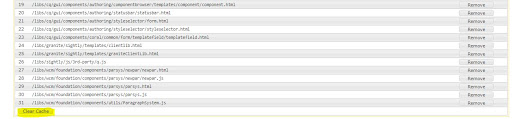
Browse the "Adobe Experience Manager Web Console Script Cache Status" http://localhost:4502/system/console/scriptcache
at the bottom of the page there is a "Clear Cache" button, click on the button to clear all the above listed cached scripts. You may also clear one by one if you doesn't want to clear all of them. To remove the individual script click on the remove button next to that script in right. 
Adobe Experience Manager Web Console Script Cache Status

Solution 2:
Restart your AEM environment.

Source: https://rashidjorvee.blogspot.com/2020/05/clear-script-cache-in-aem.html 


By aem4beginner

May 19, 2020
Estimated Post Reading Time ~

How Load Balancing & Caching Delivers Content to Your Customers Faster

Nothing is worse than trying to pull up a site and it just doesn’t load. We’ve all had that spinning wheel just keep spinning and spinning, and it seems like the page will never load completely. The speed of your site can be crucial to your business, especially when you are requiring the user to enter information or purchase a product.

A slow site not only frustrates users but can hurt the credibility of your business. After all, if your site can’t load, what makes the user think they would trust you with their money or delivering a product to them.

There are many ways you can speed up your site, from optimizing the code, asynchronously loading content, optimizing images, caching content, etc. Perhaps the approach that has the most impact is caching content that is requested frequently. One of Adobe Experience Manager’s (AEM) most important features is the dispatcher, which is its caching and load balancing tool.

Load Balancing
Let’s first discuss exactly what load balancing is. Consider a scenario when there is a flood of requests coming in for a page on your website. Load balancing evenly distributes the requests across the network so that no single server or device is overwhelmed. AEM’s dispatcher works in a similar way and spreads the requests across multiple AEM instances. This ensures that each instance has fewer requests to process and in-turn improves the response time. Now the question is, how does the dispatcher decide which AEM instance to talk to? The dispatcher keeps internal statistics about how fast each AEM instance processes documents. Based on the scores, the dispatcher estimates which instance will provide the quickest response time when responding to a request and reserves the necessary computation time on that instance.

Cache
Caching content is another important part of speeding up the load time of your site. Think of the cache as a storage compartment for your documents. But why is this so important and why do we need it? We already have our documents stored in the JCR or a database, right? The location and the strategy for storing documents in the cache makes it fast and efficient. The cache sits inside the dispatcher and is optimized to serve documents that are requested frequently. When the document is requested for the very first time it is retrieved from the content repository and served to the user, as well as stored in the cache. When subsequent requests for the same page come in, the page is served faster since the resource doesn’t need to be pulled out of the large content repository due to it being available in the cache.Thus, the dispatcher can be used to cache documents for better performance of your site.

Security
Another important feature of the dispatcher is its security. Adobe Experience Manager (AEM) provides a security checklist explained here that ensures your AEM installation is secure when deployed. We’ll highlight some of the important aspects. One important aspect, and perhaps the most basic, is to make very little information about your system available to the users. You can use /filter property to decide what should be cached by the dispatcher. For example, change the caching rules to limit caching to the expected mime types, such as gif, html, pdf, js, ppt. In addition, the selectors are a very useful utility in AEM. But if not done correctly, the attacker can flood the dispatcher cache. The dispatcher cache treats each combination of selectors like a different page and caches it separately. If there is no limit on what can be cached, then all the selectors will be cached and fill your cache directory. This means that every request will be forwarded to the AEM instance and response time is high.

The dispatcher is another one of the many useful tools in the AEM toolkit. This is particularly beneficial because of how fast you can get load balancing and cache set up. You don’t have to install tons of server software and go through a million different hoops and configuration options to get it tuned and set up properly. Instead, you install it on a supported web server, install the dispatcher module, configure the dispatcher, and configure AEM so that content updates invalidate the cache. It’s important to note that proper setup can help you handle thousands upon thousands of requests and never slow down your site, and you shouldn’t get that dreaded spinning wheel that just keeps spinning and spinning.


By aem4beginner

May 15, 2020
Estimated Post Reading Time ~

AEM Dispatcher Cache Invalidation for Multiple Cache Farms

Imagine you have an Adobe Experience Manager set up hosting multiple websites. This is where AEM really shines and is common practice at most companies that host their websites with AEM.

Imagine you have an Adobe Experience Manager set up hosting multiple websites. This is where AEM really shines and is common practice at most companies that host their websites with AEM. The problems occur when there is also a different content structure in AEM for each website, along with different needs for cache settings and so on.

Setting up the webserver
Setting up a web server with the Adobe Experience Manager (AEM) dispatcher module for all your websites is pretty simple when you have the same configuration for all virtual hosts regarding statsfilelevel, publish servers (renders), cache (docroot) directory and invalidation rules.

Here is what an example set up might look like:
2 or more publish instances
2 or more web servers with the dispatcher module sharing the same configuration
a load balancer in front of the dispatcher web servers
the flush request (to invalidate the cache with the flush replication agent) is triggered by the author instance

AN EXAMPLE FOR A MULTIPLE DISPATCHER WEB SERVER SETUP
And these are the requirements for the above-mentioned setup:
divide your cache directories (docroot) for each website/dispatcherfarm
For example due to security requirements.
have different settings or statsfilelevel for each website/dispatcherfarm
Due to different content structures in AEM.
have different settings for invalidation and caching rules for each website / dispatcherfarm
Your websites may have different cache settings for pictures or html or other resources.

Further restrictions for setting up the webserver

For the configuration of the flush agent, you cannot use the domain name of the load balancer.
Because of the load balancer in front of your dispatcher webservers, you will never know which web server cache will be invalidated this way.
You could work with custom headers at that point, so the load balancer can determine to which server the request should be sent, but that may be a long way if you do not have full control of the load balancer yourself.

For these requirements, you need to split up the dispatcher configuration in multiple farms. You can use the hostname globbing in the dispatcher module to determine how the request should be handled.

The setup and the solution I describe here may be a very special case regarding the setup and number of restrictions, but I may not be the only one running into it.

Solution for this setup
Luckily the invalidation request serves as the CQ-Path header (that represents the CRX path of the content that should be flushed) which we can use to determine which website's cache directory should be invalidated.
We configure our flush replication agent to point to the dispatcher web server. One for every webserver instance.
So now we know the content path and the website it belongs to.
Changing the host header for the invalidation request in the web server will do the rest and the invalidation will work properly.

The solution in technical details
The following config can easily be added to the webserver configuration as it is processed before the request hits the dispatcher module.

With the LocationMatch we will only treat requests for the invalidation so we do not interfere with regular requests that serve the content.
With SetEnvIf we set the environment variable FLUSH_HOST depending on the CQ-Path header to the value of the domain name of the website.
This can be easily extended for a large number of domains and will work as long as the content path is different for each of the domains.

<LocationMatch "^/dispatcher/invalidate.cache$">
     # domain A
     SetEnvIf CQ-Path “.*/content-path-of-domain-A/.*" FLUSH_HOST=domain-A
     RequestHeader set Host %{FLUSH_HOST}e env=FLUSH_HOST
     # domain B
     SetEnvIf CQ-Path “.*/content-path-of-domain-B/.*" FLUSH_HOST=domain-B
     RequestHeader set Host %{FLUSH_HOST}e env=FLUSH_HOST
 </LocationMatch>

This solution eliminates the need to set up more web server instances than necessary to fulfil the requirements mentioned in this article. The AEM dispatcher set up is also described in detail on the Adobe Website.


By aem4beginner

May 12, 2020
Estimated Post Reading Time ~

Dispatcher Farms and Cache Invalidation

One thing to be aware of when using multiple farms configuration in the dispatcher is the anatomy of cache invalidation requests.

Cache invalidation requests are sent to the URL /dispatcher/invalidate.cache of the dispatcher. On receiving this request dispatcher checks for the CQ-Handle http header field which contains the path of the resource to be invalidated and performs the invalidation based on the configuration on the dispatcher.

When dispatcher is configured with multiple farms, it’s natural to expect that the invalidation request matches the farm based on the resource that is invalidated. But this does not happen.
Invalidation request tries to match the farm based on URL of the invalidation request which is
/dispatcher/invalidate.cache

The configuration in the matching farm identified for this URL is used for invalidation behavior. Since the invalidation URL for all the resources in AEM is the same, all invalidation requests irrespective of the resource being invalidated picks up the same matching farm.

This poses a challenge in having different invalidation configuration based on the resource being invalidated

URL Rewrite using CQ-Handle
One simple solution to handle this is to use URL rewrite on Apache to pre-pend the value from the CQ-Handle header field to the URL. This would prefix the URL with the path of the resource being flushed.

When this URL gets processed by dispatcher, it would pick up the matching farm based on the path of the resource being flushed and uses that farm configuration for invalidation


By aem4beginner

Disabling Dispatcher Cache for selective clients

Can dispatcher cache be disabled for selected clients?
In a recent project we ran into this scenario. We wanted to have automated testing to validate if the content cached in the dispatcher matches with the content served from AEM.

The tricky part is that the automated test runs on a desktop which cannot directly connect to the publish instance. The request to get the content served from AEM should also be routed through the dispatcher.

We were looking for a solution by which the client can set a flag to indicate if the response needs to be served from the cache or be fetched directly from AEM

Query Parameter to our rescue
We handled this using a query parameter. The query parameter (we called it ignoreCache) would be set for requests that needs to fetch the response directly from AEM.

The dispatcher configuration
Setup the /ignoreUrlParams section of dispatcher configuration to not ignore the 'ignoreCache' parameters

/ignoreUrlParams
{
#Configuration as needed
...
#Add line to deny ignoreCache parameter
/0099 { /glob "ignoreCache" /type "deny" }
}


With this configuration done, the dispatcher would ignore caching & serving from its cache, all the requests with the parameter ‘ignoreCache’ included. Such requests gets passed it to an AEM renderer instance for processing.

Now all that remains to be done is to write test cases to make two requests one with the 'ignoreCache' parameter & another without this parameter and compare the response of these two requests to validate the content served from AEM against the one served from dispatcher cache

Using Cookies
Another option is to set 'ignoreCache' as a cookie. But the dispatcher configuration does not support using cookies to differentiate the requests for handling.

In this case use URL rewrite feature of Apache to fetch this cookie if set and add it as a URL parameter before the request is passed on to the dispatcher.

Once the URL parameter is set, the ignoreUrlParams configuration kicks in to make sure that all requests with this parameter set are fetched directly from AEM and not served from cache.


By aem4beginner

Dispatcher Cache Invalidation – A Race condition to be aware of

The default option for configuring dispatcher cache flushing is to configure the flush agents on the Author similar to the replication agent configuration. Have one flush agent configured for each dispatcher in the environment.

When a content gets activated, a request gets queued for each dispatcher flush agent configured and cache flush requests would be sent to the dispatcher based on the queue items asynchronously.

This is a simple configuration to do and maintain with all the configuration getting managed on the Author. But be aware that this way of dispatcher cache flushing might lead to a race condition.

This is because both the replication and dispatcher cache flushing happens asynchronously and the order of completion of each event is not guaranteed.

Consider a simple scenario where we have one author, one publisher and one dispatcher in the configuration. When a page is activated, requests for replication to publisher and flushing for the dispatcher cache gets placed and are processed asynchronously.

Now with the order of processing of these two events not guaranteed, it would result in one of the following two possibilities
  • Replication to the publisher happens first followed by the flushing of dispatcher cache
  • Flushing of dispatcher cache happens first followed by the replication to the publisher
The first scenario is the desired behavior, but the second scenario could result in a race condition if between the flushing of dispatcher cache and replication to the publisher, a user request happens for the resource being flushed

This scenario is depicted in the below diagram where a user request happens in-between dispatcher cache flushing and replication to publisher

In this scenario the user request is forwarded to the publisher as the content for the requested resource on dispatcher is already flushed. Now the publisher would serve the older version for the content as replication for the modified content has not happened on the publisher yet.

The dispatcher would consider this version as new content and use it for all subsequent requests and would not be aware of subsequent replication completion on the publisher side.

For this reason, for any non-trivial application its highly recommended to configure the dispatcher flush agents on the publisher side and trigger the flush action from publisher through chain replication mechanism.

The same scenario with dispatcher flush agents configured on the publish instance is depicted in the diagram below


In this case, requests from the user between step 1 & 2 would get the older version of the content from cache. Step 2 would flush the dispatcher cache and requests made after step 2 will fetch the new content from publish and cache it for subsequent requests, thus eliminating the race condition

Configuring the flush agents on publishers is not without its challenges.


By aem4beginner

Dispatcher - Cache Invalidation

Many of us might probably have met the situation when dispatcher serves an old version of code. This article describes how to avoid this while still using the dispatcher caching possibilities.
Invalidation is a mechanism for pointing obsolete cached resources. There are some tools for automatic invalidation and manual invalidation. But firstly let’s set the initial configuration for the invalidation section of the dispatcher configuration file then study how invalidation works at the low level and finally return to study tools for invalidation.

Invalidation section initial settings

Inside /cache section there is /invalidate block which determines cached files that may be automatically invalidated when content is updated. For example, the following configuration invalidates all HTML pages:
/cache
{
    /invalidate
    {
        /0000  { /glob "*" /type "deny" }
        /0001  { /glob "*.html" /type "allow" }
    }
}
With automatic invalidation, the dispatcher doesn’t delete cached files after updating content but checks their validity when they are next requested. Documents in the cache that are not auto-invalidate will remain in the cache until a content update explicitly deletes them. For our demonstration purposes let’s allow all the cache to be invalidated automatically:
/cache
{
    /invalidate
    {
        /0000  { /glob "*" /type "allow" }
    }
}
Restart httpd server after updating /invalidate section for using new changes.

Invalidation in depth

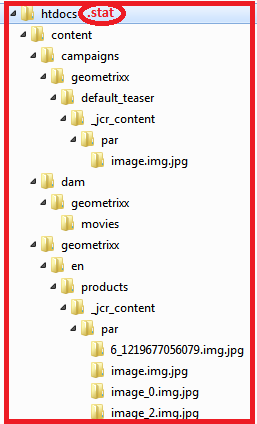
At the low-level dispatcher uses special empty files that are named by default “.stat”. By default setting is used /statfileslevel “0” which means that there is only one stat-file is used and is placed at the root of the htdocs directory. If modification time of stat file is newer than the modification time of the resource then dispatcher considers such resources are obsolete or are invalidated.
For example, we have the next cached resources after requesting the page http://localhost/content/geometrixx/en/products.html :
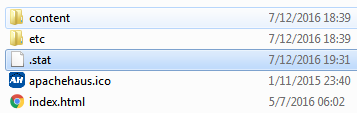
Let’s invalidate them by the low-level mechanism of the stat-files. Create an empty file with name “.stat” at the root of your htdocs directory:
You may see that stat-file modification time is newer than cached resource modification time. That means for the dispatcher that all resources are obsolete. This is an invalidation mechanism at a low level in depth. After creating such stat-file if we will visit again the page http://localhost/content/geometrixx/en/products.html then requested cached resources will be updated:

This example demonstrates a default invalidation scheme with /statfileslevel “0”. Let’s study how we may configure invalidation more detailed with the help of /statfileslevel setting.

Setting /statfileslevel

You may use /statfileslevel property of the dispatcher configuration file to selectively invalidate cached files according to their path. There are some rules for /statfileslevel property mechanism:
  • Dispatcher creates .stat files in each folder from the docroot folder down to the level that you specify. The docroot folder is level 0.
  • When a file is updated dispatcher locates the folder on the file path that is at the statfileslevel and invalidates all files below that folder.
  • If the level of the updated file is less than statfileslevel then all files in such folder are invalidated. Files below that folder are not invalidated.
  • When a file is updated then all files from the file folder up to the root level inclusive will be invalidated.
For a better understanding of the /statfileslevel rules let’s consider a couple examples. Our default demonstration case with /statfileslevel “0” is looked like that:

There is only one stat-file at the root folder of our docroot. And the scope of responsibility of that stat-file is all file-tree under htdocs. If any file from this tree has older modification time then stat-file modification time then dispatcher consider such file is invalidated.
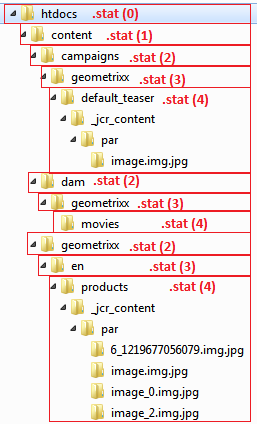
If we set /statfileslevel “4” then invalidation works like that:
There are stat-files at all levels from 0 (root) to 4 inclusive.
Stat-files at levels less than 4 have the scope of responsibility with the only directory with this stat-file. That means if stat-file inside content/geometrixx/en folder is newer than any file from this folder then such file is invalidated but the validation of all files from all other folders is determined by other stat-files. Stat-files at the level with a value of statfileslevel property (level 4 in our case) only have the scope of responsibility with all underlying tree which begins from a folder with this stat-file and expands down to lower levels of the file tree. That means that if stat-file inside content/geometrixx/en/products folder has modification time newer than any file from the underlying tree including products folder then dispatcher considers such file is invalidated. Validation of all files which are not located in this file tree is determined by other stat-files.

Automatic invalidation and flush agents

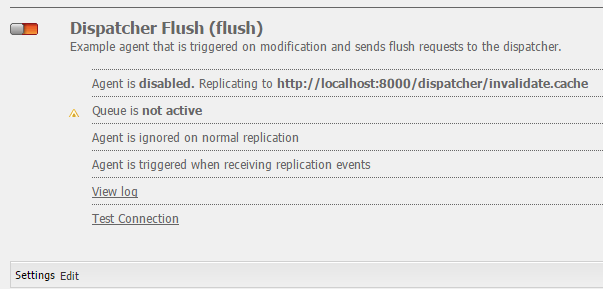
For automatic invalidation purposes, you may enable author or publish flush agents. It’s recommended to use publish flush agent for more robust auto-invalidation because using author flush agent may cause next issues:
  • The Dispatcher must be reachable from the authoring instance. If your network (e.g. the firewall) is configured such that access between the two is restricted this may not be the case.
  • Publication and cache invalidation takes place at the same time. Depending on the timing a user may request a page just after it was removed from the cache and just before the new page is published. AEM now returns the old page and the Dispatcher caches it again. This is more of an issue for large sites.

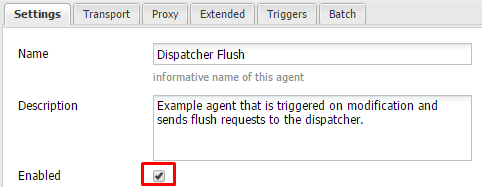
To enable your publish flush agent click “Edit” button and set “Enabled” checkbox:

Update URI port on the Transport tab and set it value to 80:

Save your updates and you will see that publish flush agent has been enabled:

Manual invalidation requests

You may send next requests manually for invalidation your cached resources:
  • for delete cached files
    POST /dispatcher/invalidate.cache HTTP/1.1
    CQ-Action: Activate
    CQ-Handle: path-pattern
    Content-Length: 0
    
  • for delete and recache files
    POST /dispatcher/invalidate.cache HTTP/1.1
    CQ-Action: Activate 
    Content-Type: text/plain
    CQ-Handle: path-pattern
    Content-Length: numchars in bodypage_path0
    Page_path1
    …
    Page_pathn
    

Summary

Finally, we know the invalidation mechanism in-depth, flush agents for auto-invalidation when publishing pages, and requests for manual invalidation.
Detailed and useful documentation you can find on these pages:


By aem4beginner

May 11, 2020
Estimated Post Reading Time ~

AEM Dispatcher. Part 3: Enabling Cache


Caching is the key to performance, but also source of many issues when configured incorrectly. In this part I will give an overview and useful practical details on how to correctly setup caching for local development environment and where to look for cached files.

By default resources will be cached if the following conditions are satisfied:
HTTP request method is GET;
Request URL has extension (for example, .html or .xml);
Request URL has no query string (there are no parameters after extension);
Request has no “Authorization” header (unless AllowAuthorized is 1).

Settings are configured in the dispatcher configuration file. In our demonstration case this file is conf/dispatcher.any. The configuration file contains a series of single valued or multivalued properties that control behavior of the dispatcher:
property names are prefixed with a forward slash (“/”);
multi-valued properties enclose child items using braces (“{}”);
comments begin from ‘#’ symbol.

Renders
Renders are AEM instances from which dispatcher receives content that may be cached. Renders are the first thing we will define in our configuration file. If you define more than one render, the dispatcher will automatically balance the load among these AEM instances. In our case we will set only one render: publish AEM instance.
    /renders
      {
      /rend01
        {
        /hostname "localhost"
        /port "4503"
        }
      }

You may restart httpd and check that dispatcher is able to request resources from publish AEM instance. For example, if you have http://localhost:4503/content/geometrixx/en.html working then the dispatcher version of this page should be available at http://localhost/content/geometrixx/en.html. Note that we don’t set the port in request url because the dispatcher (more precisely, httpd) works on port 80 which is default for all browsers.

Filters
The /filter section specifies HTTP requests that dispatcher can accept. All other requests are sent back to the web server with a 404 error code (page not found). Let’s allow access to all the resources for our demonstration case. 

/filter 
 { /0001 { /type "allow" /glob "*" } }
Filters types: “allow” or “deny”.

Globs will be compared against the entire request line, e.g.:
/0001 { /type "allow" /glob "* /index.html *" }

This glob matches request “GET /index.html HTTP/1.1” but not “GET /index.html?a=b HTTP/1.1”.

Instead of “globs” you may use separate “url”, “method”, “protocol”, “extension” to define your filter In addition to “url” you may use “path”, “selectors”, “extension”, “suffix”.

When a request fits multiple filter patterns then only the last filter pattern is applied.

After defining your filters you may restart httpd and check that dispatcher has access to all resources of the publish instance. Of course you should deny access to some resources for security reasons in production environment.

Cache
Cache section determines resources that will be cached by dispatcher. This section has number of the rules which are quite similar to the filters rules, with a few additional settings. For example, /docroot determines location of the directory where cached files are stored. The value must be the exact same path as the document root of the web server so that dispatcher and the web server can handle the same files.

For our demonstration let’s set docroot and allow caching of all resources which are received from our render (publish instance):

    /cache
      {
      /docroot "/Apache22/htdocs"
      /rules
        {
        /0000
          {
          /glob "*"
          /type "allow"
          }
        }
      }

After these changes you may restart httpd, open new private browser window for unauthorized access without using “Authorization” header (Chrome ctrl+shift+n, firefox ctrl+shift+p) and go to : http://localhost/content/geometrixx/en/products.html. Cached resources should appear inside htdocs directory. Resources have the url-like hierarchy: directories form paths and static html-files contain rendered content.

Headers
You saw that cached html files contain only html content. But what should we do if we want to cache response headers received from renders? For example, if response from renders contains “Content-Type” header which determines encoding, the html content may not be displayed correctly without the header. That’s what the /headers block inside /cache sections is designed for. Let’s cache some common and useful headers:
/cache
{
      /headers
        {
        "Cache-Control"
        "Content-Disposition"
        "Content-Type"
        "Expires"
        "Last-Modified"
        "X-Content-Type-Options"
        }
}
After changing headers in your dispatcher configuration file delete all cache from htdocs directory and restart httpd, and then open http://localhost/content/geometrixx/en/products.html. Finally you will find not only the cached html-file products.html in htdocs/content/geometrixx/en directory but also products.html.h. This *.h file contains headers for the cached html-file.

Summary
You can quickly enable cache with the defining the following initial settings in the dispatcher configuration file:
set renders;
set filters;
set htdocs and rules for cache sections;
set headers for storing http-headers.

For detailed and useful documentation go to: https://docs.adobe.com/docs/en/dispatcher/disp-config.html


By aem4beginner

AEM Dispatcher. Part 4: Cache invalidation


Many of us might probably have met the situation when dispatcher serves an old version of code. This article describes how to avoid this while still using the dispatcher caching possibilities.

Invalidation is mechanism for pointing obsolete cached resources. There are some tools for automatic invalidation and manual invalidation. But firstly let’s set initial configuration for invalidation section of the dispatcher configuration file then study how invalidation works at the low level and finally return to study tools for invalidation.
Invalidation section initial settings

Inside /cache section there is /invalidate block which determines cached files that may be automatically invalidated when content is updated. For example, the following configuration invalidates all HTML pages:

/cache
{
    /invalidate
    {
        /0000  { /glob "*" /type "deny" }
        /0001  { /glob "*.html" /type "allow" }
    }
}

With automatic invalidation dispatcher doesn’t delete cached files after updating content but checks their validity when they are next requested. Documents in the cache that are not auto-invalidated will remain in the cache until a content update explicitly deletes them. For our demonstration purposes let's allow all the cache to be invalidated automatically:

/cache
{
    /invalidate
    {
        /0000  { /glob "*" /type "allow" }
    }
}

Restart httpd server after updating /invalidate section for using new changes.
Invalidation in depth

At the low level dispatcher uses special empty files which are named by default “.stat”. By default setting is used /statfileslevel "0" which means that there is only one stat-file is used and is placed at the root of htdocs directory. If modification time of stat file is newer than modification time of the resource then dispatcher consider such resource are obsolete or are invalidated.

For example we have the next cached resources after requesting the page http://localhost/content/geometrixx/en/products.html :


Let’s invalidate them by the low level mechanism of the stat-files. Create empty file with name “.stat” at the root of your htdocs directory:


You may see that stat-file modification time is newer than cached resources modification time. That means for the dispatcher that all resources are obsolete. This is invalidation mechanism at the low level in depth. After creating such stat-file if we will visit again the page http://localhost/content/geometrixx/en/products.html then requested cached resources will be updated:


This example demonstrates default invalidation scheme with /statfileslevel "0". Let’s study how we may configure invalidation more detailed with help of /statfileslevel setting.
Setting /statfileslevel

You may use /statfileslevel property of the dispatcher configuration file to selectively invalidate cached files according to their path. There are some rules for /statfileslevel property mechanism:
Dispatcher creates .stat files in each folder from the docroot folder down to the level that you specify. The docroot folder is level 0.
When a file is updated dispatcher locates the folder on the file path that is at the statfileslevel and invalidates all files below that folder.
If level of the updated file is less than statfileslevel then all files in such folder are invalidated. Files below that folder are not invalidated.
When a file is updated then all files from file folder up to the root level inclusive will be invalidated.

For better understanding of the /statfileslevel rules let’s consider a couple examples. Our default demonstration case with /statfileslevel “0” is looked like that:


There is only one stat-file at the root folder of our docroot. And the scope of responsibility of that stat-file is all file-tree under htdocs. If any file from this tree has older modification time then stat-file modification time then dispatcher consider such file is invalidated.

If we set /statfileslevel “4” then invalidation works like that:


There are stat-files at all levels from 0 (root) to 4 inclusive.

Stat-files at levels less than 4 have the scope of responsibility with only directory with this stat-file. That means if stat-file inside content/geometrixx/en folder is newer than any file from this folder then such file is invalidated but validation of all files from all other folders is determined by other stat-files. Stat-files at the level with value of statfileslevel property (level 4 in our case) only have the scope of responsibility with all underlying tree which begins from folder with this stat-file and expands down to lower levels of the file tree. That means that if stat-file inside content/geometrixx/en/products folder has modification time newer than any file from underlying tree including products folder then dispatcher considers such file is invalidated. Validation of all files which is not located in this file tree is determined by other stat-files.
Automatic invalidation and flush agents

For automatic invalidation purposes you may enable author or publish flush agents. It’s recommended to use publish flush agent for more robust auto-invalidation because using author flush agent may cause next issues:
The Dispatcher must be reachable from the authoring instance. If your network (e.g. the firewall) is configured such that access between the two is restricted this may not be the case.
Publication and cache invalidation take place at the same time. Depending on the timing a user may request a page just after it was removed from the cache and just before the new page is published. AEM now returns the old page and the Dispatcher caches it again. This is more of an issue for large sites.

Publish flush agent is located at http://localhost:4503/etc/replication/agents.publish/flush.html


To enable your publish flush agent click “Edit” button and set “Enabled” checkbox:


Update URI port on the Transport tab and set it value to 80:


Save your updates and you will see that publish flush agent has been enabled:

Manual invalidation requests

You may send next requests manually 
for invalidation your cached resources:
  • POST /dispatcher/invalidate.cache HTTP/1.1
    CQ-Action: Activate
    CQ-Handle: path-pattern
    Content-Length: 0
    
  • for delete and recache files
    POST /dispatcher/invalidate.cache HTTP/1.1
    CQ-Action: Activate 
    Content-Type: text/plain
    CQ-Handle: path-pattern
    Content-Length: numchars in bodypage_path0
    Page_path1
    …
    Page_pathn
Summary
Finally we know invalidation mechanism in depth, flush agents for auto-invalidation when publishing pages and requests for manual invalidation.

Detailed and useful documentation you can find on these pages:
http://docs.adobe.com/docs/en/dispatcher/disp-config.html
http://docs.adobe.com/docs/en/dispatcher/page-invalidate.html


By aem4beginner

May 10, 2020
Estimated Post Reading Time ~

Programmatic Cache Invalidation in AEM 6

There are three ways of doing it.

1. By sending post request to the dispatcher cache invalidation URL as follows.
HttpClient client = new HttpClient();
  HostConfiguration configuration = new HostConfiguration();
                // This uri is http://dispatcherhost:dispatcherport/dispatcher/invalidate.cache
                // Without this host configuration there will be and exception with the message "Host is null"
  configuration.setHost(uri);
  client.setHostConfiguration(configuration);
  PostMethod post = new PostMethod(uri);
                // CQ-Action:Delete will delete the cache from dispatcher.
                // For cache invalidation Activate action should be used.
  post.setRequestHeader("CQ-Action", "Activate");
                // pagePath specifies the page that needs to be invalidated
  post.setRequestHeader("CQ-Handle", pagePath);
  StringRequestEntity body = new StringRequestEntity(pagePath, null, null);
  post.setRequestEntity(body);
  post.setRequestHeader("Content-length",String.valueOf(body.getContentLength()));
  client.executeMethod(post);
  post.releaseConnection();

2. Using DispatcherFlusher provided by ACS commons.
First make reference to DispatcherFlusher

       @Reference
       private DispatcherFlusher dispatcherFlusher;

Next make use of it to flush the cache

             dispatcherFlusher.flush(getResourceResolver(repo.loginAdministrative(null)), pagePath);

3. FlushService (Available in AEM 6.2+ versions)
FlushService flushService = sling.getService(Replicator.class);
             flushService.sendFlushUrl("admin",FlushService.FlushType.IMMEDIATE_FLUSH, pagePath,FlushService.RefetchType.IMMEDIATE_REFETCH,new String[] {pagePath});


By aem4beginner

May 5, 2020
Estimated Post Reading Time ~

Avoid Page Caching in AEM through Request Headers

The Adobe AEM/CQ5 dispatcher is the caching and load balancing tool for AEM/CQ5. This module simply takes the response body from requests made into the AEM instances and saves them as files that then the httpd can deliver.

The dispatcher can be configured to allow requests to be either cached or sent directly to the AEM instance.
By default the Dispatcher configuration is stored in the dispatcher.any text file, though you can change the name and location of this file during installation. The configuration file contains a series of single-valued or multi-valued properties that control the behavior of the Dispatcher.

In general you decide what is cached and what not by defining a set of rules: the keyword “allow” means to cache the page and “deny” not to cache it.

The dispatcher will never cache requests without extension, requests with a query string, non-GET requests and if properly configured requests with an authentication header.

There are several ways of disallowing the dispatcher cache for a page, the one examined in this post avoids caching by sending a specific instruction in the request header of the page.

AVOID PAGE CACHING VIA REQUEST HEADERS
With the Dispatcher release 4.0.0 (and higher) a new header named “Dispatcher: no-cache” is available for page requests. This header informs the dispatcher not to cache the response. The command will then be removed by the dispatcher before forwarding the response to the client.

In AEM in order to disable caching in the dispatcher via request headers, you need to add the header “Dispatcher: no-cache”. So for instance you can add the following code in your JSP:

<%
response.setHeader("Dispatcher", "no-cache");
%>
<span style="font-weight: 400;">As of today, Sightly does not support a direct implementation of this command.</span>

As of today, Sightly does not support a direct implementation of this command.

There are two ways you can achieve this. The first is a workaround which consists in creating a small JSP script with the command seen previously and include it as a sly command in page:

<sly data-sly-include="no-cache.jsp" />

The second approach requires a bit more of effort but results in a more clean solution and consists in using an API routine which can provide a JavaScript interface for accessing and manipulating the request part of the HTTP.
There exists some already developed API with these features such as Fetch API or it can be developed internally since it could be a very wide used approach throughout projects.
The Sightly command in this case would become:

<sly data-sly-use="<api-path>" />

With “api-path” enabling the usage of the JS API defined and a JS Script in the page activating the request header.

CONSIDERATIONS
Dispatcher default policies avoid caching of dynamic pages automatically.
Anyhow it may be necessary to extend those rules to pages that normally would be cached. This is possible by setting the rules inside dispatcher.any file buta more flexible and agile solution can be achieved following the technique described in this article.

In fact, the request header approach allows to reason in terms of page/template, or even components (for instance, a specific component dragged in a page may trigger the no cache directive) and hence to define a set of dynamic pages without any considerations in terms of paths or locations.

AUTHORS
Francesco Crispiatico, Jonas Magdaleno, Marco Pasini

BIBLIOGRAPHY

https://docs.adobe.com/docs/en/dispatcher/disp-config.html
https://helpx.adobe.com/experience-manager/kb/DispatcherNoCache.html

Source: https://aemcorner.com/aem-avoid-page-caching-through-request-headers/


By aem4beginner

AEM & Akamai Integration


To better understand the integration between both technologies, let’s have first a quick overview on what is Akamai.

WHAT IS AKAMAI?
Akamai is a CDN (Content Delivery Network) that has servers all over the world, delivering the content of a website and caching that part of the content that doesn’t need to be constantly updated.

Beyond AEM, as CDN, among Akamai’s pros we can find some remarkable points:
  1. Faster delivering content: Is not the same that an user access to the website servers than could access to Akamai. In Akamai the content is available in closer servers and cached.
  2. Better balancing of the content: apply an Internet-centric approach to global load balancing and real-time fail-over. Designed to ensure high availability and responsiveness to user requests.
  3. Safety: put another wall between the user and your website.
  4. Improve user experience: Due to previous points the user has a better experience when requests content.
INTEGRATION WITH AEM
Currently, there are no tools that helps on the integration of Akamai & AEM. Akamai can be customized, so it also depends on how you implement your website.

There are a few options that can be used to integrate Akamai with AEM (it doesn’t mean that there are others):

A first option is to let Akamai decide what is and what isn’t cached based on URL rules (that you can configure). In this model you point the DNS for your website to Akamai and it decides if the request is subject to caching or not. Requests not subject to caching then pass through to your systems (AEM dispatchers will take care if should handle own caching or serve from publish instance).

But most of the clients uses a TTL approach to flushing Akamai cache rather than trying to invalidate it because the benefits aren’t worth costs ,especially if you’re using dispatcher.

The TTL (Time To Live) tells the CDN server, in this case Akamai, ​how long to wait before checking for a changed/updated version of the file​, and tells a web browser how long it should keep a file locally cached on the computer before requesting the file again. Generally, all pages from a site has the same TTL, let’s say 10 minutes, but in every site it can be configured some paths exclude from cache or a different TTL.

For example, pages that are constantly updated, will have a lower TTL (less than 10 minutes) but pages that are only updated once a day or a week, can have a higher TTL (3 hours for example).

So the way on how it works will be:
  1. A page is activated on AEM.
  2. AEM dispatcher invalidate the cache for this document.
  3. After reach TTL again, the page is invalidated on Akamai servers.
It is hard to find the best approach to integrate AEM & Akamai, because Akamai works with “time” and AEM with manual invalidation of the content. This means that, for example, when a page is activated, it is invalidated on dispatcher as well. But on Akamai remains the older version of the page till the TTL finish again.

Disptacher configuration is also involved, because a page invalidation can invalidate more content due to the statfile (we will talk about this on other posts ). This “extra” content invalidated on dispatcher won’t be invalidated on Akamai and it would be needed to clean the cache of this content manually or using an API.

Keep working on find a way to handle it…

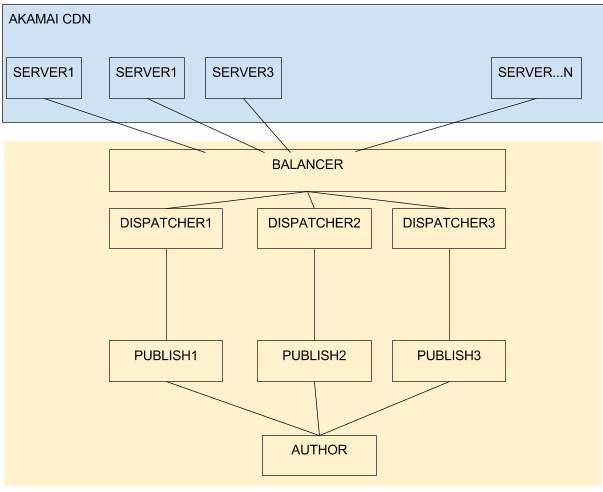
This is an image that represents the integration of AEM & Akamai:


PROS, CONS AND TAKE IN ACCOUNT
Some of the benefits of having Akamai working with AEM: beyond all pros that a CDN can give us, AEM will be less stressed and Publish instances/dispatchers will work less and have more stability.

On the other hand the users will have a possible delay on view on new contents and possible mis-alignments between Akamai servers due to TTL (Higher is the TTL and higher is the possibility to have misalignments on servers).

Some points to take also in account:
  1. Akamai cache also query string parameters → useful for search pages with query string (use a low TTL)
  2. Statlevel → When a page is invalidated, other pages are invalidated on dispatcher as well but not on Akamai. Two options to see the invalidation on Akamai: wait for TTL, invalidate manually or through an API.
DO YOU REALLY NEED AKAMAI?
Unless you have a lot of money and want to waste it, the thing really depends on the traffic of your website.

Use a CDN for a website that will be focused only on local target, let’s say just a country, is kind of useless. On the other hand if the website expects to hold a crowd over the world could be a good idea, improving speed, traffic, safety and user-experience.

AUTHORS
Francesco Crispiatico, Jonas Magdaleno, Marco Pasini


By aem4beginner