Showing posts with label SonarQube. Show all posts

March 23, 2021
Estimated Post Reading Time ~

AEM Sonar Integration

Usually in any of the projects, code quality plays an important role not only in the performance of your site as well as to detect bugs, but code also smells, and security vulnerabilities. In this article, I am going to discuss how we can set up sonar on our local instance to get all the issues fixed up before we merge our code.

Follow the below steps to integrate Sonar Qube Server with Code Branch:
1) Download Sonar Qube version 7.7 https://www.sonarqube.org/downloads/ ( Version compatible with Java 8)

2) Unzip the package, go inside the folder \bin\windows-x86-64 (Windows), and run StartSonar.bat.

3) Once up Sonar will be running on port 9000. (default port)

4) Now go the pom.xml of core branch of your project and add the following changes:

a) 
<properties>
    <sonar.host.url>http://localhost:9000</sonar.host.url>
</properties>


b) 
<plugin>
<groupId>org.sonarsource.scanner.maven</groupId>
<artifactId>sonar-maven-plugin</artifactId>
<version>3.6.0.1398</version>
<executions>
<execution>
<phase>verify</phase>
<goals>
<goal>sonar</goal>
</goals>
</execution>
</executions>
</plugin>


5) Now run mvn clean install on the core branch and check the sonar, you will be able to see all the changes of Sonar.

Note: Do not commit changes on point 4. I don’t want changes in pom.xml, run command mvn sonar:sonar

Additionally download and install the sonar lint eclipse plugin to have inbuilt code issues identified. This will give additional help to identify the quality issues upfront.


By aem4beginner

January 4, 2021
Estimated Post Reading Time ~

Sonarqube Installation on Ubuntu 16.04

Procedure
We shall build a cloud machine on GCP [ Google Cloud Platform ] add the DNS configuration to CloudFlare and create VPN Pool for Firewall configurations on GCP.

Installation Guide
Step-01: Update the Package Cache
sudo apt-get update
sudo apt-get -y upgrade

Step-02: Install Oracle Java JDK
sudo add-apt-repository ppa:webupd8team/java
sudo apt-get update
sudo apt install oracle-java8-installer

Step-03: Install postgresql DB
sudo sh -c 'echo "deb http://apt.postgresql.org/pub/repos/apt/ lsb_release -cs-pgdg main" >> /etc/apt/sources.list.d/pgdg.list'
wget -q https://www.postgresql.org/media/keys/ACCC4CF8.asc -O - | sudo apt-key add -
sudo apt-get -y install postgresql postgresql-contrib
sudo systemctl start postgresql
sudo systemctl enable postgresql

Step-04: Change the password for the default PostgreSQL user
sudo passwd postgres

Step-05: Create new user for sonar
su - postgres
createuser sonar
# switch to postgresql prompt
psql
ALTER USER sonar WITH ENCRYPTED password 'StrongPassword';
CREATE DATABASE sonar OWNER sonar;
\q

Step-06: Download Sonar
wget https://sonarsource.bintray.com/Distribution/sonarqube/sonarqube-7.6.zip
sudo unzip sonarqube-7.6.zip -d /opt
sudo mv /opt/sonarqube-7.6 /opt/sonarqube
sudo nano /opt/sonarqube/conf/sonar.properties
sonar.jdbc.username=sonar
sonar.jdbc.password=StrongPassword
sonar.jdbc.url=jdbc:postgresql://localhost/sonar

Step-07: Install Sonarqube system service
sudo vim /etc/systemd/system/sonar.service

[Unit]
Description=SonarQube service
After=syslog.target network.target

[Service]
Type=forking

ExecStart=/opt/sonarqube/bin/linux-x86-64/sonar.sh start
ExecStop=/opt/sonarqube/bin/linux-x86-64/sonar.sh stop

User=root
Group=root
Restart=always

Step-08: Start and enable sonar service
sudo systemctl start sonar
sudo systemctl enable sonar
sudo systemctl status sonar

Step-09: Nginx Reverse Proxy for sonar
server {
    listen 80;
    server_name sonarqube.domain.com;

    location / {
        proxy_pass http://127.0.0.1:9000/;
    }
}

Step-10: Access Sonar 
Access soanr at
sonarqube.domain.com, default username/password are admin/admin


By aem4beginner

December 10, 2020
Estimated Post Reading Time ~

About AEM Rules for SonarQube

Purpose
As we all know, SonarQube is a great tool that helps us increase quality of our codebase. However, it does apply mainly to general Java issues. As we know, we can hurt ourselves much more doing AEM. Adobe Experience Manager is a comprehensive content management platform solution for building websites, mobile apps and forms. This tool is intended to find common bugs and bad smells specific for AEM development. Documentation of each rule is available from SonarQube interface after plugin installation.

Prerequisites
Each release has its own prerequisites section, for more information please check releases page.

Installation
Custom Dockerfile
Following Dockerfile uses official Sonarqube 7.9 image and download AEM Rules 1.0-RC2 to plugin directory.

FROM sonarqube:7.9-community AS aemrulesqube79 RUN curl -Lk -o $SONARQUBE_HOME/extensions/plugins/aemrules-1.0-RC2.jar https://github.com/Cognifide/AEM-Rules-for-SonarQube/releases/download/v1.0-RC2/aemrules-1.0-RC2.jar

Community image
This is already prepared solution thanks to @ahmed-musallam.

docker run --rm -p 9000:9000 ahmedmusallam/sonarqube-aem:latest

This solution is for those who would like to start testing theirs code within aem rules and sonarqube. It contains SonarQube v 7.7, aem rules v 0.11 and predefined quality gates. If you would like to participate in our Aem Rules development, please refer to wiki page to get into.

Update Center
Go to your SonarQube instance administration console and open Update Center. Find AEM Rules for SonarQube plugin and click install!

Manual
  1. Download aemrules-x.y.jar or build AEM Rules for SonarQube plugin.
  2. Paste it into sonarqube/extensions/plugins directory.
  3. Restart SonarQube.
  4. Go to rules section and activate AEM rules in your profile.
Usage
Use of the plugin does not differ much from regular SonarQube analysis. However, as rules are often tied to a certain AEM version and its components (Felix, Sling), we've introduced the aemVersion analysis property.

Each rule defines supported AEM version or version range. Most of the rules are universal. By providing the AEM version parameter, you can instruct the Sonar Runner to only use only a subset of rules applicable to a particular AEM version. When the parameter is not provided then a default AEM version is used (currently 6.4)

Running analysis
When running analysis, pass sonarRunner.aemVersion property with your AEM version. The format is as follows:

sonarRunner.aemVersion=<MAJOR_VERSION>.<MINOR_VERSION>

Runing with Maven
mvn sonar:sonar -DsonarRunner.aemVersion=6.4

Runing with Gradle (See Gradle AEM Plugin)
gradlew sonarQube -DsonarRunner.aemVersion=6.4

Rule set
Below you will find descriptions of all rules available in AEM Rules for SonarQube plugin.

AEM Good practices
AEM-1 Use predefined constant in annotation instead of hardcoded value.
- Use constants available in AEM instead of repeating inline literals.

AEM-2 Use predefined constant instead of hardcoded value.
- Use constants available in AEM instead of repeating inline literals.

AEM-5 getContentResource() is not null checked
- Always null check the return value of getContentResource(). It is possible to get a null if a jcr:content node does not exist in the repository.

AEM-8 Prefer cleaner @SlingServlet annotation.
- Prefer cleaner @SlingServlet annotation over @Properties approach. Do not mix up both approaches.

AEM-15 Usage of synchronized keyword should be avoided if possible.
- Usage of synchronized keyword should be avoided if possible. Check if using synchronized can be replaced with more sophisticated solution.

AEM-17 No mutator methods invoked on ModifiableValueMap
- ModifiableValueMap should be replaced by ValueMap if no mutator methods are invoked.

AEM-19 Implicit search strategy used in Sling Query
- SearchStrategy can have negative performance impact if mismatched. Therefore developer should always make informed decision and define strategy explicitly.

HTL Good practices
HTL-1 Wrong placement of the HTL Attribute.
- Always Place HTL Attributes After the Ones that are Part of the Markup.

HTL-2 HTL Templates should be placed in separate files.
- HTL Templates should be placed in separate files. This helps to understand which code is meant to render a component and which code is re-used as a template.

HTL-3 Use Explicit Names in Loops
- HTL provides implicit variables in data-sly-list and data-sly-repeat blocks. Try to avoid them and use explicit names clarifying the role of the objects instead.

HTL-4 Name and re-use Repeating Conditions
- Consider caching data-sly-test conditions and reduce code duplication.

HTL-5 Usage of HTML comments should be avoided if possible
- If you want to place comments regarding your code, make sure they don't display to the end users.

HTL-6 HTL automatically recognises the context for HTML output
- HTL uses uri display context as default for src, poster, manifest, href, formaction, data, cite, action attributes

HTL-7 Style and script tags display context definition is mandatory

HTL-8 Event attribute attributes must have display context defined

HTL-9 Inline styles must have display context defined

HTL-10 Use sly tags over redundant markup.
- HTL attributes should be wrapped in sly tags to avoid superfluous markup.

HTL-11 Use existing HTML elements instead of adding extra sly tags.
- HTL attributes should be included in HTML markup without additional SLY tags.

HTL-12 Use the most restrictive HTL context possible.
- For data attributes HTL applies HTML escaping.

HTL-13 Avoid using 'unsafe' display context.
- 'unsafe' display context disables XSS protection completely.

HTL-14 HTL expressions in HTML comments should have defined context.
- HTML comments automatically implies 'comment' markup context.

HTL-15 Use Camel Case in identifiers:
- variable names
- template names

Source:


By aem4beginner

May 15, 2020
Estimated Post Reading Time ~

The Ultimate Code Quality Setup for Your AEM Project

If you’re a developer or come from a development background, you’ve seen a lot of bad code in your career. It’s just part of the learning experience… we all wrote bad code at some point in time and learned from it.

src: xkcd comics

I can’t cure bad code.
That’s something to be fixed through a code review process. What this post does is show you a few maven plugins you can take advantage of to automate things like:
  1. Known bug detection via SpotBugs and PMD
  2. Java StyleGuide Enforcement via CheckStyle
  3. Code coverage report generation via Clover
The Lineup
SpotBugs
SpotBugs is a program that uses static analysis to look for bugs in Java code.
SpotBugs checks for more than 400 bug patterns. Bug descriptions can be found here
We will be using the SpotBugs Maven Plugin.

PMD
PMD is a static source code analyzer. It finds common programming flaws like unused variables, empty catch blocks, unnecessary object creation, and so forth. It’s mainly concerned with Java and Apex but supports six other languages.
A list of PMD’s java rules can be found here.
We will be using the PMD Maven Plugin.

CheckStyle
Checkstyle is a development tool to help programmers write Java code that adheres to a coding standard. It automates the process of checking Java code to spare humans of this boring (but important) task. This makes it ideal for projects that want to enforce a coding standard.

We will be using the CheckStyle Maven Plugin and using the Google Java Style Guide with it, you can also configure Sun’s Java Style if you like.

Clover
Clover was an Atlassian offering, you know them as the people behind Jira. In 2017, Atlassian open sourced Clover. We will be using Clover to generate code coverage reports for unit tests. We will also add jUnit5 and aem-mock dependencies for reference.

SonarQube and SonarLint
SonarQube is a standalone server that can analyze your project for all types of bugs/code smells. If you do not wish to set up a server, you can use SonarLint which provides multiple IDE plugins that will analyze your code similar to how SonaqQube would. It is not a replacement to a full SonarQube server but can be used in conjunction or by itself. This is especially important if you are on AMS; since the Adobe AMS Cloud Manager runs SonarQube for code quality.

The Setup
I assume you have a working Maven AEM project and know how to add maven dependencies.

Let’s start by adding the dependencies we need. You can add this to your parent POM.

The versions I am using here are the latest as of this post.

Make sure you are using maven-surefire-plugin v2.22.0 or later as it supports jUnit5.

<build>
....
<pluginManagement>
<plugins>
...
<plugin>
<artifactId>maven-surefire-plugin</artifactId>
<version>2.22.0</version>
</plugin>
<plugin>
<groupId>org.apache.maven.plugins</groupId>
<artifactId>maven-pmd-plugin</artifactId>
<version>3.9.0</version>
</plugin>
<plugin>
<groupId>org.openclover</groupId>
<artifactId>clover-maven-plugin</artifactId>
<version>4.3.0</version>
</plugin>
<plugin>
<groupId>com.github.spotbugs</groupId>
<artifactId>spotbugs-maven-plugin</artifactId>
<version>3.1.6</version>
</plugin>
<plugin>
<groupId>org.apache.maven.plugins</groupId>
<artifactId>maven-site-plugin</artifactId>
<version>3.7.1</version>
</plugin>
<plugin>
<groupId>org.apache.maven.plugins</groupId>
<artifactId>maven-project-info-reports-plugin</artifactId>
<version>3.0.0</version>
</plugin>
<plugin>
<groupId>org.apache.maven.plugins</groupId>
<artifactId>maven-checkstyle-plugin</artifactId>
<version>3.0.0</version>
<dependencies>
<dependency>
<groupId>com.puppycrawl.tools</groupId>
<artifactId>checkstyle</artifactId>
<version>8.12</version>
</dependency>
</dependencies>
</plugin>
...
</plugins>
<build>
....
<pluginManagement>

Then to your <dependencies> add the following:
<!-- TESTING -->
<dependency>
<groupId>org.junit.vintage</groupId>
<artifactId>junit-vintage-engine</artifactId>
<version>5.2.0</version>
<scope>test</scope>
</dependency>
<dependency>
<groupId>io.wcm</groupId>
<artifactId>io.wcm.testing.aem-mock</artifactId>
<version>2.2.16</version>
<scope>test</scope>
</dependency>
<dependency>
<groupId>org.mockito</groupId>
<artifactId>mockito-all</artifactId>
<version>1.10.19</version>
<scope>test</scope>
</dependency>
<dependency>
<groupId>org.apache.felix</groupId>
<artifactId>org.apache.felix.http.servlet-api</artifactId>
<version>1.1.2</version>
<scope>provided</scope>
</dependency>
<!-- // TESTING -->
We are using jUnit5 and aem-mock. I won’t cover those two, as they are both well documented and easy to work with.

Now that our plugins are defined, we are going to add them to our core or bundle maven submodule, you know the one. We are going to do so by adding a new Maven profile called codeQuality that is enabled by default:

I have chosen a profile so that it can be easily disabled when needed. This is particularly helpful when in initial active development and not yet concerned with quality.


<!-- ============================================ -->
<!-- C O D E Q U A L I T Y P R O F I LE -->
<!-- ============================================= -->
<profiles>
<profile>
<id>codeQuality</id>
<!--
Active by default. use `-P-codeQuality` to deactivate it.
Note the prefix `-` which disables the `codeQuality` profile
Combine it with other profiles using CVS. Example: `-P-codeQuality,autoInstallPackage`
-->
<activation>
<activeByDefault>true</activeByDefault>
</activation>
<properties>
<!--
log in color, if terminal supports ANSI escape sequences
see: https://confluence.atlassian.com/clover/using-test-optimization-in-maven-170492714.html
-->
<ansi.color>true</ansi.color>
</properties>
<!-- Code Quality Reporting -->
<reporting>
<plugins>
<plugin>
<groupId>org.apache.maven.plugins</groupId>
<artifactId>maven-pmd-plugin</artifactId>
<configuration>
<skipEmptyReport>false</skipEmptyReport>
<printFailingErrors>true</printFailingErrors>
<!-- Dont use cache here, the lifesycle for `site` goal wont support it-->
<analysisCache>false</analysisCache>
<targetJdk>1.8</targetJdk>
</configuration>
<reportSets>
<reportSet>
<reports>
<report>pmd</report>
</reports>
</reportSet>
</reportSets>
</plugin>
<plugin>
<groupId>com.github.spotbugs</groupId>
<artifactId>spotbugs-maven-plugin</artifactId>
<configuration>
<xmlOutput>true</xmlOutput>
<trace>true</trace>
</configuration>
<reportSets>
<reportSet>
<reports>
<report>spotbugs</report>
</reports>
</reportSet>
</reportSets>
</plugin>
<plugin>
<groupId>org.apache.maven.plugins</groupId>
<artifactId>maven-checkstyle-plugin</artifactId>
<configuration>
<encoding>UTF-8</encoding>
<failsOnError>true</failsOnError>
<failOnViolation>true</failOnViolation>
<violationSeverity>warning</violationSeverity>
<includes>src/**\/*.java</includes>
<configLocation>google_checks.xml</configLocation>
</configuration>
<reportSets>
<reportSet>
<reports>
<report>checkstyle</report>
</reports>
</reportSet>
</reportSets>
</plugin>
<plugin>
<groupId>org.apache.maven.plugins</groupId>
<artifactId>maven-jxr-plugin</artifactId>
<version>2.5</version>
</plugin>
<plugin>
<groupId>org.openclover</groupId>
<artifactId>clover-maven-plugin</artifactId>
<reportSets>
<reportSet>
<reports>
<report>clover</report>
</reports>
</reportSet>
</reportSets>
</plugin>
</plugins>
</reporting>
<!-- Code Quality Execution -->
<build>
<plugins>
<plugin>
<groupId>org.apache.maven.plugins</groupId>
<artifactId>maven-checkstyle-plugin</artifactId>
<configuration>
<encoding>UTF-8</encoding>
<failsOnError>true</failsOnError>
<failOnViolation>true</failOnViolation>
<violationSeverity>warning</violationSeverity>
<includes>src/**\/*.java</includes>
<configLocation>google_checks.xml</configLocation>
</configuration>
<executions>
<execution>
<id>checkstyle</id>
<goals>
<goal>check</goal>
</goals>
</execution>
</executions>
</plugin>
<plugin>
<groupId>com.github.spotbugs</groupId>
<artifactId>spotbugs-maven-plugin</artifactId>
<configuration>
<xmlOutput>true</xmlOutput>
<trace>true</trace>
</configuration>
<executions>
<execution>
<id>spotbugs</id>
<goals>
<goal>check</goal>
</goals>
</execution>
</executions>
</plugin>
<plugin>
<groupId>org.apache.maven.plugins</groupId>
<artifactId>maven-pmd-plugin</artifactId>
<configuration>
<printFailingErrors>true</printFailingErrors>
<analysisCache>true</analysisCache>
<targetJdk>1.8</targetJdk>
</configuration>
<executions>
<execution>
<!-- run inverfy phase to allow analysis cache to work properly -->
<goals>
<goal>check</goal>
</goals>
</execution>
</executions>
</plugin>
<!--
Clover configs to run Optimize, Report, Log and Check
see: https://confluence.atlassian.com/clover/best-practices-for-maven-171180506.html
-->
<plugin>
<groupId>org.openclover</groupId>
<artifactId>clover-maven-plugin</artifactId>
<configuration>
<targetPercentage>90%</targetPercentage>
<debug>true</debug>
</configuration>
<executions>
<execution>
<id>clover.inst</id>
<phase>validate</phase>
<goals>
<!--
Instrumentation changes source code, we need to use instrument-test
because it forks a custom build lifecycle, runs only to the test phase
If we use a goal that does not fork, it will affect other plugins like PMD and findbugs
see: http://openclover.org/doc/maven/4.2.0/plugin-info.html
-->
<goal>instrument-test</goal>
</goals>
</execution>
<execution>
<id>clover.check</id>
<!--
In the verify phase, we can generate the report, log results
and check coverage against configured targetPercentage.
see: http://openclover.org/doc/maven/4.2.0/plugin-info.html
-->
<phase>verify</phase>
<goals>
<goal>clover</goal>
<goal>log</goal>
<goal>check</goal>
</goals>
</execution>
</executions>
</plugin>
</plugins>
</build>
</profile>
</profiles>

For the most part, the options for each plugin are self-explanatory. I added comments next to the ones that needed explaining.

And yeah, it is long, but that’s maven’s fault ¯_(ツ)_/¯ I can hear you screaming…
Let’s run it!

Now onto the good part! run it! mvn clean install will run the build with codeQuality profile enabled by default if you need to disable it run mvn clean install -P-codeQuality

If you need to disable code quality and apply another profile, like autoInstallPackage you can do so with mvn clean install -P-codeQuality,autoInstallPackage Read more about deactivating profiles in the “Deactivating a profile” section in the maven docs

By default when code quality is enabled, any bug or style error will cause the build to fail, this is by default so that your CI fails when a violation is committed into source code.

Generating reports
To generate your reports, run mvn site, this will generate reports for all our plugins, you can view the report by opening: target/site/project-reports.html


Gotchas
The Maven Build Lifecycle
When working with maven plugins, you have to beware of the maven build lifecycle since some plugins may alter the generated source, like in the case of Clover where instrumentation is necessary.

In the case of Clover, we used the instrument-test goal, which will form a new build lifecycle; so that the instrumented source does not get deployed to your AEM instance. As a side effect, unit tests will run twice. You can fix this by moving Clover to its own profile and activating that Clover profile separately from your main build.

Balancing those plugins can be tough, but a good understanding of the maven build lifecycle is key.

Reports
Some plugins may not generate any reports if you do not have anything in your src/main/java (no java code). Also, if a plugin is not in the <reporting> section, a report will not be generated with mvn site


By aem4beginner

May 10, 2020
Estimated Post Reading Time ~

What is code coverage?

You just pushed your code, it was a new feature and you are proud that your code coverage is 100%. Is it safe to say since the coverage is 100% that you didn’t introduce bugs? I believe you can't.

So what is the coverage?
Code coverage gives you an indication on how much lines and/or branches of your code are covered with tests. Code coverage of 70% tells you that 70% of your lines of code are touched and executed with the tests. It therefore also means that 30% isn't tested. Coverage distinguishes 4 different aspects:
  1. Statements, are all if-paths taken?
  2. Branches, are all if-else paths taken?
  3. Functions, are all methods called and executed?
  4. Lines, are all lines executed?
And what isn't covered?
Code coverage isn’t a goal. It should be used as a tool to achieve a goal; better tests. The coverage doesn’t reflect the code quality, it just tells you how many lines are covered by a test. A piece of code with a coverage of 100% could have as many bugs as code without the tests.

Code coverage barely reflects the quality of code. Of course, when it is well tested the development spent some time reflecting and refactoring his / her code to be testable, but you can’t conclude that code quality is reflected in code. Business rules could be implemented wrong, or your code has some flaws in one specific browser.

Code coverage barely reflects the quality of tests. It just tells you the coverage of the tests, nothing more. Your test could be false positives and always succeed or your test tests the wrong aspects of your code.

How should I deal with the coverage?
Now you know what code coverage isn’t you probably think, so why should I use it then? Code coverage helps you and your develop a team, for example, it requires every developer to do the minimal effort of testing.

It also helps you to be a better developer. When you write your own code and you know you have to test it you’ll notice that your code will be more clean and easy to understand to make it easier to test.


By aem4beginner

April 26, 2020
Estimated Post Reading Time ~

SonarQube PDF report generation - Code Review

Sonarcube 4.5.7 version.
The pdf report plugin 1.4 version from.
Copy and paste the pdf report plugin to ../extensions/plugins/
Start the server by running ../bin/StartSonar.bat.


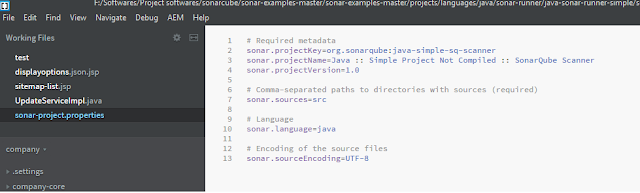
Once the server is up, create a sonar-project.properties file in either root path or sub-module of the codebase.

o Eg: root path: ../GIT clone/<Parent folder>/
o Sub module path: ../GIT clone/<Parent folder>/<module>
Sample sonar-project.properties file
# Required metadata
sonar.projectKey=org.sonarqube:java-simple-sq-scanner
sonar.projectName= <<Give any name>>
sonar.projectVersion=1.0

# Comma-separated paths to directories with sources (required)
sonar.sources=src

# Language
sonar.language=java


# Encoding of the source files

sonar.sourceEncoding=UTF-8


PDF can be viewed in different ways:
Go to codebase path either root or module folder from the command prompt and run mvn sonar:sonar
PDF will be generated in target/sonar/ folder.
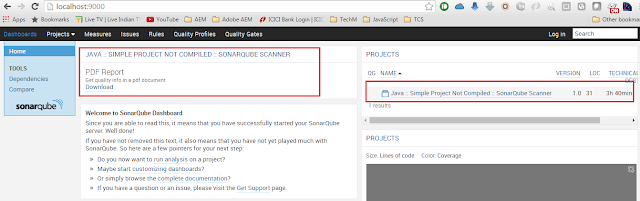
o Goto Sonarcube server http://localhost:9000 and login as admin/admin.
§ In dashboard add a widget called Pdf Report. Rerun mvn sonar:sonar from the command prompt


In the PDF report widget, you can see the generated pdf.


By aem4beginner

April 7, 2020
Estimated Post Reading Time ~

How to integration SonarQube and JaCoCo

SonarQube Report

Why is code quality important?

Code quality is important for overall software quality as it impacts how safe, secure, and reliable your codebase is. Poorly written code is always more expensive to maintain. Tools such as SonarLint and SonarQube etc. can be used to measure and analyze the quality of code.

What is SonarQube?

SonarQube (formerly known as Sonar) is an open-source platform for continuous inspection of code. It ensures code quality, reliability, and maintainability over the life-span of the project. It supports 25+ languages such as Java, C/C++, C#, PHP, Flex, Groovy, JavaScript, Python, PL/SQL, COBOL, etc., It offers reports like:
  • Duplicated code
  • Dead code
  • Inappropriate coding standards
  • Unit tests – Code coverage
  • Code complexity
  • Potential bugs
  • Commented code etc.,

Prerequisites

You must have Java installed on your machine.
For more information on the hardware requirements and supported platforms, click here.

Installation

  1. Download the SonarQube Community Edition.
  2. Unzip it to the local drive.
  3. Start the SonarQube Server and follow the below steps.
  4. Go to the installation directory and execute the StartSonar.bat file.
    Note: On other operating systems, execute ./sonar.sh
  5. By default, the SonarQube runs on the port 9000.
  6. Go to http://localhost:4502 with admin credentials listed below and you are all good to analyze your first project.
    Username =admin; Password=admin.Note: If your instance fails to start, check your logs to find the cause.

How to integrate your MAVEN project with SonarQube?

To analyze your project, you need to integrate your MAVEN project with SonarQube. Add the below plugin and profile to your project’s parent pom.xml.


<build>
<plugins>
<plugin>
<groupId>org.sonarsource.scanner.maven</groupId>
                <artifactId>sonar-maven-plugin</artifactId>
                <version>3.6.0.1398</version>
</plugin>
     </plugins>
</build>
 <profiles>
            <profile>
                         <id>sonar</id>
                         <activation>
                                     <property>
                                                 <name>sonar.login</name>
                                     </property>
                         </activation>
                         <properties>
                                     <sonar.host.url>
                                                http://localhost:9000
                                     </sonar.host.url>
                         </properties>
            </profile>
</profiles>

How to generate the SonarQube report?

Now that you’ve integrated SonarQube with your maven project, execute the below command to generate the SonarQube report.
“mvn clean install sonar:sonar”

Sample reports will look like this:SonarQube Report

How to exclude files from the SonarQube report?

To exclude files from SonarQube report, add sonar exclusion rules as shown below:
<properties>
<sonar.exclusions>
                        *.xml
            </sonar.exclusions>
            <sonar.test.exclusions>
                         src/test/java/**
            </sonar.test.exclusions>
<properties>

Notes:
1. sonar.exclusions
: It will exclude all the xml files in your project from SonarQube report.
2. sonar.test.exclusions: SonarQube will report issues like inappropriate coding standards etc., in your unit test classes. If you like to exclude your unit test cases from the SonarQube report, you can put them in sonar.test.exclusions.

Code coverage

If you want to measure the code coverage percentage, you can use the JaCoCo Maven plugin which is an actively developed line coverage tool. You can also generate reports. SonarQube will reuse and import these reports.

JaCoCo + SonarQube integration

Below are the steps to integrate JaCoCo with SonarQube –
  • Add JaCoCo configuration in project’s parent pom.xml

    <!– Jacoco – Code Coverage Plugin –>
    <plugin>
                <groupId>org.jacoco</groupId>
        <artifactId>jacoco-maven-plugin</artifactId>
        <version>0.8.4</version>
        <executions>
                <execution>
                 <goals>
                <goal>prepare-agent</goal>
                </goals>
            </execution>
            <execution>
                <id>generate-code-coverage-report</id>
                <phase>test</phase>
                <goals>
                      <goal>report</goal>
                 </goals>
            </execution>
        </executions>
    </plugin>
  • Execute “mvn clean install sonar:sonar” command.
  • Check your SonarQube dashboard for the code coverage report.
    You will see a report as shown in the above screenshot.

How to exclude files from the code coverage reports?

To exclude files from the code coverage report, add sonar coverage exclusion rules as shown below:

<properties>
<sonar.coverage.exclusions>
                        **/**.js,
                         **/**.jsp,
                        src/main/java/com/myproject /vo/*.java
            </sonar.coverage.exclusions>
<properties>

Note: This will exclude all js, jsp and all java files under com.myproject.vo from code coverage report.

Source: https://aem.adobemarketingclub.com/sonarqubejacoco-integration/


By aem4beginner