Showing posts with label Website. Show all posts

February 2, 2021
Estimated Post Reading Time ~

Efficiently load JavaScript with defer and async

When loading a script on an HTML page, you need to be careful not to harm the loading performance of the page. Depending on where and how you add your scripts to an HTML page will influence the loading time
When loading a script on an HTML page, you need to be careful not to harm the loading performance of the page.

A script is traditionally included in the page in this way:
<script src="script.js"></script>

whenever the HTML parser finds this line, a request will be made to fetch the script, and the script is executed.

Once this process is done, the parsing can resume, and the rest of the HTML can be analyzed.

As you can imagine, this operation can have a huge impact on the loading time of the page.

If the script takes a little longer to load than expected, for example, if the network is a bit slow or if you’re on a mobile device and the connection is a bit sloppy, the visitor will likely see a blank page until the script is loaded and executed.

The position matters
When you first learn HTML, you’re told script tags live in the <head> tag:
<html> 
 <head> 
     <title>Title</title> 
     <script src="script.js"></script> 
 </head> 
 <body> 
 ... 
 </body> 
</html>

As I told you earlier, when the parser finds this line, it goes to fetch the script and executes it. Then, after it’s done with this task, it goes on to parse the body.

This is bad because there is a lot of delays introduced. A very common solution to this issue is to put the script tag at the bottom of the page, just before the closing </body> tag.

In doing so, the script is loaded and executed after all the page is already parsed and loaded, which is a huge improvement over the head alternative.

This is the best thing you can do if you need to support older browsers that do not support two relatively recent features of HTML: async and defer.

Async and Defer
Both async and defer are boolean attributes. Their usage is similar:
<script async src="script.js"></script>
<script defer src="script.js"></script>

if you specify both, async takes precedence on modern browsers, while older browsers that support defer but not async will fallback to defer.

For the support table, check caniuse.com for async https://caniuse.com/#feat=script-async and for defer https://caniuse.com/#feat=script-defer

These attributes only make sense when using the script in the head portion of the page, and they are useless if you put the script in the body footer like we saw above.

Performance comparison
No, defer or async, in the head
Here’s how a page loads a script without either defer or async, put in the head portion of the page:


The parsing is paused until the script is fetched, and executed. Once this is done, parsing resumes.

No, defer or async, in the body
Here’s how a page loads a script without defer or async, but at the end of the body tag, just before it closes:


The parsing is done without any pauses, and when it finishes, the script is fetched and executed. Parsing is done before the script is even downloaded, so the page appears to the user way before the previous example.

With async, in the head
Here’s how a page loads a script with async, put in the head tag:


The script is fetched asynchronously, and when it’s ready the HTML parsing is paused to execute the script, then it’s resumed.

With defer, in the head
Here’s how a page loads a script with defer, put in the head tag:


The script is fetched asynchronously, and it’s executed only after the HTML parsing is done.

Parsing finishes just like when we put the script at the end of the body tag, but overall the script execution finishes well before because the script has been downloaded in parallel with the HTML parsing.

So this is the winning solution in terms of speed 🏆

Blocking parsing
async blocks the parsing of the page while defer does not.

Blocking rendering
Neither async nor defer guaranteeing anything on blocking rendering. This is up to you and your script (for example, making sure your scripts run after the onLoad) event.

domInteractive
Scripts marked defer are executed right after the domInteractive event, which happens after the HTML is loaded, parsed and the DOM is built.

CSS and images at this point are still to be parsed and loaded.

Once this is done, the browser will emit the domComplete event, and then onLoad.

domInteractive is important because its timing is recognized as a measure of perceived loading speed. See the MDN for more.

Keeping things in order
Another case pro defer: scripts marked async are executed in casual order when they become available. Scripts marked defer are executed (after parsing completes) in the order in which they are defined in the markup.

Just tell me the best way
The best thing to do to speed up your page loading when using scripts is to put them in the head, and add a defer attribute to your script tag:
<script defer src="script.js"></script>

This is the scenario that triggers the faster domInteractive event.

Considering the pros of defer is seems a better choice over async in a variety of scenarios.

Unless you are fine with delaying the first render of the page, make sure that when the page is parsed the JavaScript you want is already executed.

Download my free JavaScript Beginner's Handbook

More browser tutorials:
Source:


By aem4beginner

December 29, 2020
Estimated Post Reading Time ~

How to include JavaScript for an AEM Website

Adding behavior to a form, button, list of items, or page scroll are some examples of front-end user interactions that we as developers must implement, to enable user rich experiences. How do we add behaviors to a page? JavaScript! JavaScript is the technology used to add user rich experiences for a website.

AEM website can include & run front-end JavaScript logic like all other websites. Note, There’s nothing special about an AEM web page, as an AEM page rendered output is nothing but a standard HTML document; there’s no magic or surprises.

In this article, we will explore the 4 techniques of how we can include JavaScript within a webpage.

Including JavaScript By:
1. HTML Event Attributes

HTML possesses the capability to let events trigger actions in a browser, for example, executing JavaScript logic when a user clicks, hovers, drags, or keypress an element on a page. These events include onclick, onmouseout, ondrag, oncopy, etc…

Use Case:
Quickly way to add interactions to a unique HTML element on the page, as a proof of concept. Then later implement the same functionality with a front-end JavaScript application with tests.

Examples:
<div class="back-to-top" onclick="window.scrollTo(0,0);"> // Execute a JavaScript when this button is clicked
<a href="#" onmouseover="window.alert('mouse over')">Test</a> // Execute a JavaScript when moving the mouse pointer over the <a> tag
<a href="#" onmouseout="window.alert('mouse out')">Test</a> //Execute a JavaScript when moving the mouse pointer out of the <a> tag
<input type="text" name="fullname" onkeydown="window.alert('key down')"> // Execute a JavaScript when a user presses a key
<input type="text" name="fullname" onkeyup="window.alert('key released')"> // Execute a JavaScript when a user releases a key
<input type="text" name="fullname" onfocus="window.alert('focused')"> // Execute a JavaScript when the input field is focused (selected)
<input type="text" name="fullname" onblur="window.alert('blurred')"> // Execute a JavaScript when the input field is blurred (unselected)


2.Inline JavaScript
Inline JavaScript can be executed by using <script> tag inside the <head> or <body> of the HTML document object model (DOM). Instead of specifying the source(src=”…”) of the JavaScript file in the <script> tag, JavaScript code can be written within the Script tag.

Use Case:
Supporting Adobe Analytics’s Data Layer JSON schema configuration values, based on the context of the page.

Examples:
<!DOCTYPE html>  
<html>  
    <head>  
        <title>Inline JavaScript Example</title>  
    </head>
    <body>  
        <h1 id="intro">Hello  World</div>  
        <script type="text/javascript">
            var digitalDataLayer = {
                environment: {
                    environmentVersion: "6.0.5.1",
                    environmentName: "production",
                    siteName: "SourcedCode.com",
                    statusCode: 200
                },
                target: {},
                page: {
                    pageInfo: {
                        pageName: "home",
                        pageReferrer: document.referrer,
                        pageSiteSection: "homepage",
                        pageSiteSubsection: "",
                        pageType: "homepage",
                        pageURL: "https://www.sourcedcode.com"
                    }
                }
            }
        </script>  
    </body>  
</html>

3. Internal Client Libraries JavaScript
This is the HTML document that references the internal JavaScript file (compiled from client libraries).

The most common way to declare CSS styles and JavaScript behavior to an AEM website is the use of AEM client libraries. A Client library is very specific to AEM where it is simply a configuration declaring which CSS, JS, Resource files to be bundled; a client library can also bundle other client library configurations, and it has the capability to minify and debug. It is by choice and the preferred way that all AEM sites utilize client libraries to define a website.

Use Case:
  • Serving JS and CSS from source files in AEM.
  • Serving organized JS and CSS from different client libraries in AEM.
  • Stitching multiple client libraries to be served in a single CSS or JS file.
Example – HTL loading CSS & JS using a Helper Template:
<!DOCTYPE html>  
<html>  
    <head>  
        <title>Client Librbary JavaScript file</title>  
        <!--/* Load sourcedcode libraries, css */-->
        <sly data-sly-use.clientlib="/libs/granite/sightly/templates/clientlib.html"/>
        <sly data-sly-call="${clientlib.css @ categories='sourcedcode.utils,sourcedcode.site'}"/>
    </head>  
    <body>  
        ...
        ...
        <!--/* Load sourcedcode libraries, js */-->
        <sly data-sly-use.clientlib="/libs/granite/sightly/templates/clientlib.html"/>
        <sly data-sly-call="${clientlib.js @ categories='sourcedcode.utils,sourcedcode.site'}"/>
    </body>  
</html>

Example – Result of Rendered Page:
<!DOCTYPE html>  
<html>  
    <head>  
        <title>Client Librbary JavaScript file</title>  
        <script src="/etc.clientlibs/my-site/clientlibs/clientlibs-utils.css"></script>
        <script src="/etc.clientlibs/my-site/clientlibs/clientlibs-site.css"></script>
    </head>  
    <body>  
        ...
        ...
        <script src="/etc.clientlibs/my-site/clientlibs/clientlibs-utils.js"></script>
        <script src="/etc.clientlibs/my-site/clientlibs/clientlibs-site.js"></script>
    </body>  
</html>

4. External JavaScript
This is the HTML document that references the external JavaScript file.
Use Case:
  • Referencing the Adobe Dynamic Tag Manager (DTM) library to support Adobe DTM features.
  • Referencing to the Adobe Analytics library, to support Adobe Analytics features.
  • Referencing third-party libraries, to support libraries features.
Example:
<!DOCTYPE html>  
<html>  
    <head>  
        <title>External Librbary JavaScript file</title>  
        <link rel="stylesheet" href="https://maxcdn.bootstrapcdn.com/bootstrap/4.0.0/css/bootstrap.min.css">
    </head>  
    <body>  
        ...
        ...
        <script src="https://maxcdn.bootstrapcdn.com/bootstrap/4.0.0/js/bootstrap.min.js"></script>
    </body>  
</html>


By aem4beginner

December 28, 2020
Estimated Post Reading Time ~

3 Different Ways to Embed Custom Fonts in AEM Sites

In this article, we will go through three different ways how you can embed custom fonts in an AEM site.

1. Embed Custom Font using Google Fonts, CDN
Embed a custom font is by using Google Fonts. Google Fonts can be quickly installed into your project by using the @import CSS rule. Utilizing the out of the box setup, you are prescribed to Google Font’s CDN. The lifecycle management of the fonts embedded onto your AEM site will be dependant on Google Font’s CDN servers.

There are hundreds of free fonts offered by Google. Simply visit the Google Font’s website to request which fonts you wish to use on your website. Next, obtain the @import CSS configuration that is offered by the webpage.

Embedding font via @import URL:
<style type="text/css">

@import URL("https://fonts.googleapis.com/css2?family=Roboto:ital,wght@0,100;0,300;1,100&display=swap");

div, span, applet, object, iframe,
h1, h2, h3, h4, h5, h6, p, blockquote, pre,
a, abbr, acronym, address, big, cite, code,
del, dfn, em, font, img, ins, kbd, q, s, samp,
small, strike, strong, sub, sup, tt, var,
dl, dt, dd, ol, ul, li,
fieldset, form, label, legend,
table, caption, tbody, tfoot, thead, tr, th, td, .tab-item, input,
button, select, textarea {
font-family: "Roboto", sans-serif;
font-size: 1rem;
font-weight: 300;
}
</style>


2. Embed Custom Font using Adobe Fonts, CDN
Embed a custom font is by using Adobe Fonts, where fonts can be quickly installed into your project by using the @import CSS rule. After logging into Adobe Font’s, you can create a new project where you can select different fonts from Adobe Font’s collection to be used in your website. Retrieve the “embed code” CDN path from your Adobe Font’s project, and you are well on your way.


Next, obtain the @import CSS configuration that is offered by the webpage.

Embedding font via @import URL:
<style type="text/css">

@import URL("https://use.typekit.net/mqs3rg.css");

div, span, applet, object, iframe,
h1, h2, h3, h4, h5, h6, p, blockquote, pre,
a, abbr, acronym, address, big, cite, code,
del, dfn, em, font, img, ins, kbd, q, s, samp,
small, strike, strong, sub, sup, tt, var,
dl, dt, dd, ol, ul, li,
fieldset, form, label, legend,
table, caption, tbody, tfoot, thead, tr, th, td, .tab-item, input,
button, select, textarea {
font-family: "Roboto", sans-serif;
font-size: 1rem;
font-weight: 300;
}
</style>


3. Embed Font via AEM Client Library Static Asset
The most common way to embed a custom font for an AEM project is to store web-safe font files directly into a client library. The fonts are then referenced by the CSS stylesheet, where the font file paths are the proxied client libraries URI. Using the CSS rule, @font-face, we are able to configure custom fonts for an AEM project.


Embedding font via @font-face URL:
<style type="text/css">
@font-face {
font-family: "Roboto";
src: url("/etc.clientlibs/sourcedcode/clientlibs/clientlib-site/resources/fonts/roboto-bold.otf") format("truetype");
font-style: normal;
font-weight: 700;
}

@font-face {
font-family: "Roboto";
src: url("/etc.clientlibs/sourcedcode/clientlibs/clientlib-site/resources/fonts/roboto-medium.otf") format("truetype");
font-style: normal;
font-weight: 500;
}

@font-face {
font-family: "Roboto";
src: url("/etc.clientlibs/sourcedcode/clientlibs/clientlib-site/resources/fonts/roboto-regular.otf") format("truetype");
font-style: normal;
font-weight: 300;
}

div, span, applet, object, iframe,
h1, h2, h3, h4, h5, h6, p, blockquote, pre,
a, abbr, acronym, address, big, cite, code,
del, dfn, em, font, img, ins, kbd, q, s, samp,
small, strike, strong, sub, sup, tt, var,
dl, dt, dd, ol, ul, li,
fieldset, form, label, legend,
table, caption, tbody, tfoot, thead, tr, th, td, .tab-item, input,
button, select, textarea {
font-family: "Roboto", sans-serif;
font-size: 1rem;
font-weight: 300;
}
</style>


By aem4beginner

November 6, 2020
Estimated Post Reading Time ~

Accessibility patterns all front-end developers should know

Image shamelessly was stolen from https://www.umaryland.edu/web-accessibility/

Who is Accessibility for?
Accessibility can mean many different things. In general, when we talk about web accessibility, we are referring to users with a physical, visual, or auditory disability, but accessibility can span many more things. Each type of disability has a huge spectrum on how it impacts users, for example, a person with significant vision impairment might expect to be able to easily scale up the font size, and so would a person who misplaced their glasses that morning.

Why Does Accessibility Matter?
Web accessibility is important because all users expect great experiences on the web. It is important to create inclusive experiences so that our websites are usable by everyone. Following accessibility best practices also can have a significant impact on the user experience for all users. 

For example:
  • Accommodating users with a physical impairment who cannot use a mouse will also benefit a user whose mouse batteries just died
  • Using proper contrast ratios will make your site more readable by everyone
  • Building accessible forms are important for users with screens readers and will also make them work better with browser autofill
  • When was the last time you tried using your website on a smart TV or game console? These are extreme examples, but users will use a wide range of devices, from small phones, tablets, to massive ultra-wide displays.
Accessibility has also become an important legal requirement, with high profile lawsuits like Domino’s getting significant national attention. If your website is popular and not accessible, it is not a matter of if, but when you will be sued. I have personally worked at two companies that needed to completely pivot to address potential lawsuits.

Lastly, accessibility is becoming more and more important for SEO crawlers.

So, what can you do as a front end developer to keep your site accessible?
At the bare minimum:

  • Use semantic html, and use it properly
  • Use chrome’s built-in accessibility tools
  • Install the axe chrome extension
  • Run Lighthouse audits for accessibility on code changes.
Together, these will help you prevent, catch, and fix a significant amount of issues. You’ll also learn about why they’re important to fix! Accessibility doesn’t need to be hard or time-consuming. In my experience, most accessibility problems come from a lack of understanding (eg “it works on my MacBook when I add a click handler to this div”).

With that said, here’s a list of very specific accessibility features that I think all front end developers should know. If you follow these guidelines, it will not make your website fully WCAG accessible, but it will make a huge difference. These are all techniques I have learned on the job working through accessibility problems.

Semantic HTML
Don’t use divs to build all of your layouts, instead consider using semantic html. Some of the big ones are: nav to build your navigation, use the footer to build your footer, use section to wrap blocks on content, and use articles to wrap articles.

Fonts
Don’t use tiny fonts! In general, the smallest font size you should be using is 12px, but strive for keeping the majority of content at 16px.
Don’t use px to define your font sizes! Instead, define your font sizes using rem units. In general, you can think of 1rem = 16px.
Rem units allow users to resize font sizes using their device and/or browser. Fonts defined using pixel values will only resize if a user explicitly zooms in or out of a page.

Focus
Ensure focus states can clearly be seen. In general, focus states will work unless you intentionally break them. Never remove outlines without creating your own focus indicators (I will probably block your PR if I an outline: 0).

Generally, it’s recommended to keep the default focus states, so that users who depend on them will have a consistent experience across different sites. Links, buttons, inputs, and all other interactive elements should have clear focus states.

Color Contrast
Ensure all content meets WCAG 2 color contrast. This is a simple tool from WebAIM for checking colors. Having accessible colors generally starts with having accessible branding guidelines, so make sure your design and branding teams are on board.

Buttons
  • Do not use divs as buttons. Divs are not focusable and do not activate on key presses. If you absolutely have to use a div or other non-interactive element, be sure to add role="button", tabindex="0", and a keypress handler to trigger the same click functionality when the enter key is pressed.
  • Do not use anchors as buttons. Links are not buttons, they are links.
  • Aim for 40px by 40px tap targets, so that users will not accidentally mis-click neighboring elements.
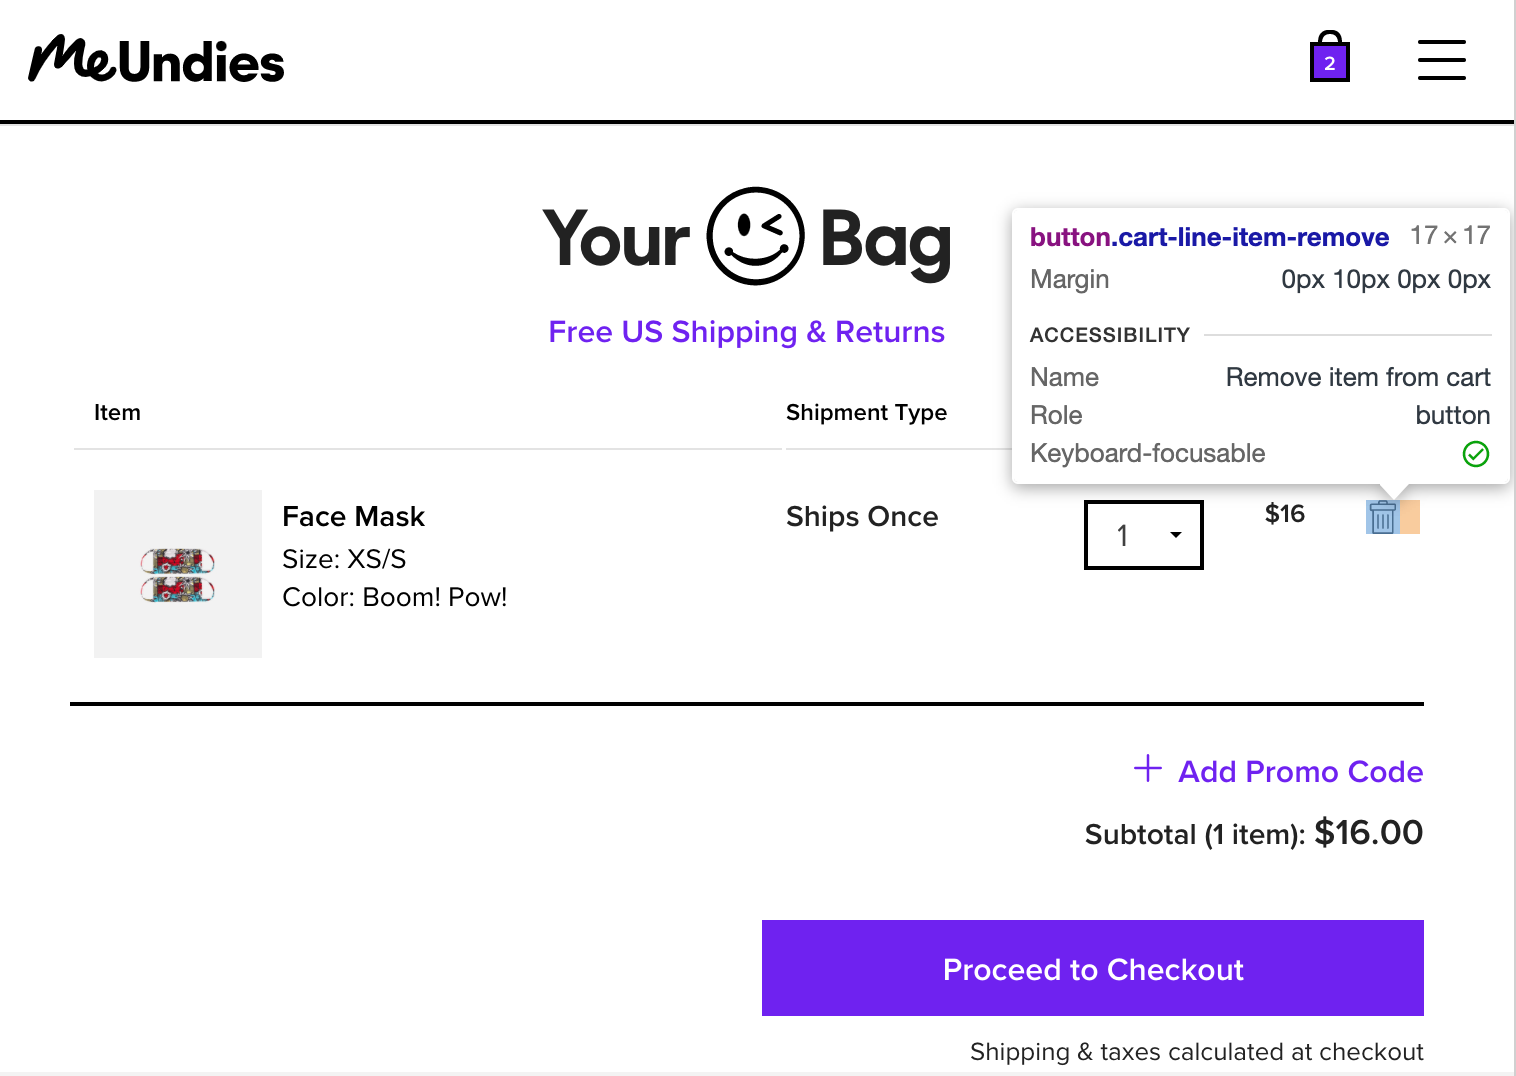
  • Add aria labels to buttons without text. When buttons do not have text, briefly describe their action using an aria-label. For example, a button that looks like a trash can on a shopping cart page might look like this:<button aria-label="Remove item from cart" class="trash-icon" />

An example of accessible trash can button (although it would be nice if the tap target size was a little larger).

Links
Do not use links as buttons or buttons as links
Ensure all links have a valid href. If your link doesn’t have an `href`, ask yourself why you are using a link. Not including an href may also affect your SEO ranking.

Images and Pictures
Use alt text if the image conveys meaning. For most images, you should have descriptive alt text that states what the image shows. For infographics and charts, the alt text should describe the infographic or chart.
If an image is purely decorative, such as borders, dividers, and abstract shapes, use alt="" to convey that the image does not convey meaning.
Avoid using images with text. Instead, try to position text over images. This can be difficult and is not always possible, so be sure to include alt text for images with text.

Videos

Videos should have descriptive captions, however, I’ve never personally had to implement this. Godspeed trying to make accessible videos.

Lists
When creating lists in html, make sure that your ol and ul tags only haveli as their direct descendants.
Don’t add interactivity to li elements. Instead, place a button or an element inside the li.

Headings
Use headings in order without skipping levels — headings aren’t for styling, they are meant for creating an outline of your page.
Use an h1 at the top of your page, and use h2 through h6 in order to describe sections
Only use one h1 tag on a page
MDN has a very useful “usage notes” section on headings here

For an example on how to use skip links, refer WebAIMs page and example here

Modals
Modals are intrusive, are usually not accessible, and can be tricky to get right. At the minimum, modals should do the following:
Close when pressing escape.
The focus should be trapped within the modal. If a modal has 4 interactive elements, tab selecting should only cycle between all four elements.
*bonus* to be even more accessible, consider using role="alertdialog"and aria-modal="true".
Be sure to check out this great example from w3
If you are using React, consider using a react-modal or another library that handles accessibility out of the box.

Testing Accessibility
First, make sure that the features and flows you are building can be done fully without a mouse. Users should be able to use tab navigation to perform the same tasks, with clear focus states.

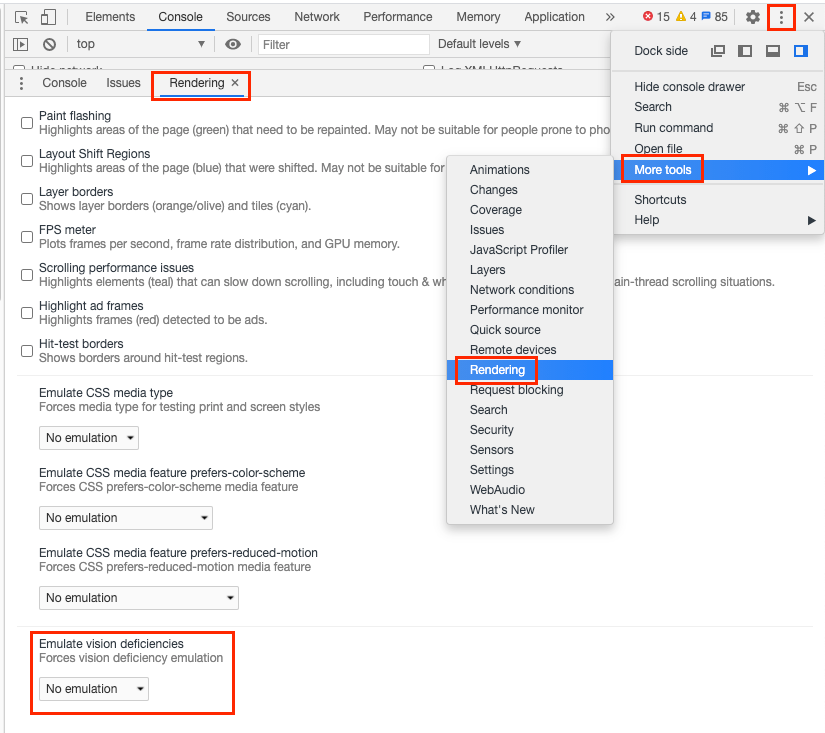
Second, periodically test your application using Chrome’s built-in vision deficiencies simulator. To view the page with simulated vision issues in Chrome:

Chrome Dev Tools -> kebab menu -> More Tools -> Rendering -> Emulate Vision Deficiencies
How to access the somewhat hidden vision deficiencies menu in Chrome dev tools.

Third, periodically test your application using a screen reader or other voice over software. If you are using a mac, you can use the built-in voiceover utility. There are also Chrome extensions, such as Chrome Vox, for adding voiceover support.

How do you make accessibility fun?
In the past, I’ve worked at places where non-developers were given specific tasks to do without a mouse or with their monitor turned off. In your next retro or demo, you can challenge a product manager to perform a feature end to end using a voiceover. This can be a fun way to bring accessibility to the front of everyone’s mind, and drive empathy for ensuring that accessibility is prioritized as part of the core user experience.

Dark Mode & Theming
Consider adding a dark/light mode. Modern browsers even have an API for detecting device preference. For even more control, there are tools like Accessible that allow users to “theme” pages, to address their own individual needs.

Skip Links
Skip links are rare but are a cool, useful feature that is not that hard to build.

Create invisible skip link components to skip large blocks of content, so that users can quickly navigate a page. Upon focus, the skip link becomes visible and allows a user to skip a block of content. Skip links are often used to skip long navigation links directly to the main content section.


By aem4beginner

October 1, 2020
Estimated Post Reading Time ~

Hide /content root path in publish and website domains

How do we hide the '/content/sitename' from the URL?
It is always good to hide the content path from the public domain or publish server urls. Let us see one of the best approaches for the same.

Say we have our website in below domain URL,
https://[websitename.com]/content/sitename/fr/home.html

And hosted AEM with below URL,
http://<hostname>:<port>/content/sitename/fr/home.html

As a best practice and recommended option, we have to ensure the '/content/sitename' is hidden from appearing in the public domain.

Here I am going to explain one of the best approaches to achieving the same. To achieve this, we will have to configure things on both publish and dispatcher.

Configurations on PUBLISH:

Configuring the Apache Sling Resource Resolver Factory to ensure the URLs are re-written at the PUBLISH server.

Apache Sling Resource Resolver Factory - add below configurations under section - 'URL Mapping'

/content/sitename/(.*)</$1
/content/sitename/fr$1>/fr(.*)

Once you save the configuration and hit the webpage with http://<hostname>:<port>/fr/home.html, you will be able to see the home page over publishing instance(without /content/sitename).

Note: After saving, it takes some time to auto-restart the relevant bundles.

Configurations on DISPATCHER:

Now we are able to hit the publish server without a content path. Now let us see how this can be achieved over dispatcher or the publish domain URL.

Step1: Ensure the 'mod_rewrite' module is loaded in apache.
#
# This file loads most of the modules included with the Apache HTTP
#
LoadModule rewrite_module modules/mod_rewrite.so

Step 2: To do this set 'DispatcherUseProcessedURL' property to 1 - This will ensure the dispatcher using processed URLS.
<IfModule disp_apache.c>
# This is enabled to ensure re-writes taking effect
DispatcherUseProcessedURL 1
</IfModule>

Step 3: Now update the virtual host file and add the below rules in it.(Usually, this configuration file sits in the conf.d module)
<IfModule mod_rewrite.c>

RewriteEngine on
RewriteRule ^(.+)/$ $1

#shorten the URL
RewriteRule ^/content/sitename/(.*).html$ $1.html [R,L]
#Redirect the fr to the root folder to the home page

RewriteRule ^/?$ fr/home.html [R,L]

Now after restarting the Apache and hit the public domain URL
https://[websitename.com]/fr/home.html, you can see the home page is loading.


By aem4beginner

May 26, 2020
Estimated Post Reading Time ~

How to Improve Your Website Performance | The Performance Testing Guide

How do you improve your website performance? What actions do you take when it’s not going north? More importantly, how do you make sense of a spike in website traffic and sustain it? What tools help you carry out website performance testing? Let’s explore all these areas together in this blog post.

Imagine you open your analytics dashboard like every other day. But today is different! Today, you notice the number of visitors has touched a new high. Sure brings a smile on your face. You continue tracking it and it keeps increasing. However, after a few hours it suddenly drops all of a sudden.

You wonder what happened and try to understand the events that unfolded. Why the drop in visits? You discover that your colleague had started a cool promotion, which brought in an unusual amount of traffic. This increased the website load multifold and the site could not take the load and crashed.

A poor show, in spite of the excellent job by your marketing team.

What could have been done to avoid such a situation. How could you have offered a better customer experience through excellent website usability? And avoided the drop in site visitors, and perhaps sales?

Website performance testing is the answer to unanticipated site load.

What is Website Performance Testing?
Triple “S” check is a must for public facing websites looking to improve website performance.
Speed – Determines whether the application responds quickly.
Scalability – Determines maximum user load the software application can handle.
Stability – Determines if the application is stable under varying loads.

And all three can be measured using performance testing.

Performance testing is the investigation done either to determine or to prove the response time, scalability and performance of a website. This ensures the website performs well under the expected regular workload, at peak load and uncover inconsistencies across different operating systems or devices.

The goal of performance testing is not to find bugs but to eliminate performance bottlenecks and tune the system for maximum load. This is also to determine the maximum threshold the website can take.

Common Performance Problems
Poor Response Time:

Once the user performs an action and she has to wait for so long before the response is provided. This can lead to poor user experience and high exit rate.

Poor Load Distribution:
Poor load distribution can cause slow response time by incorrectly assigning new site visitors to hanged up servers. If too many people are on the same server, they’re going to experience difficulties, even if the overall system is well under capacity. Check the sites of some of the big players and you will notice the site loads in a flash of moments.
Types of Performance Testing
Load Test:
Generally, a load test is conducted to understand the behavior of a system under the specific expected load. It helps identify the maximum operating capacity of an application as well as any bottlenecks and determine which element is causing degradation. For example, if the number of users increases then how much CPU, memory will be consumed, what is the network and bandwidth response time.

It also helps in measuring the response time, throughput rates, and resource-utilization levels, and to identify the breaking point, and the peak load the website can handle.

This can answer specific performance related questions. Like, what is the maximum number of users that can use the system without any impact on performance and acceptable response time?

Stress Test:
Stress testing refers to the testing of a website to determine whether its performance is satisfactory under any extreme and unfavourable conditions. These conditions may occur as a result of heavy network traffic, process loading and maximum requests for resource utilization. Stress testing enables to identify how the website behaves under extreme load conditions.

This will answer questions like what is the maximum peak load the system can handle and determine if the system will perform sufficiently if the current load goes well above the expected maximum limits?

Soak/Endurance Test:
This is usually done to determine if the system can sustain the continuous expected load. This helps in detecting potential memory leaks and utilization. Also to check the performance degradation when the system is being used for long duration.

This can answer questions like, if the promotion becomes very popular and the load of system is way beyond for a very long duration, can the system handle such situations?

Spike Test:
Spike testing is a subset of stress testing. A spike test is a type of performance test focused on determining reaction to a sudden large spikes in the load generated by users.

This lets you know if the system can handle a sudden spike of users when a competitor promotion results in users visiting your site because you’re already running similar promotions.

Tools
Lots of performance testing tools are available for different types of tests and it is quite difficult to cover all types of test using one.

Jmeter is one of the renowned open source tool designed to load test functional behavior and measure performance.

Let’s explore more about Jmeter and its functioning in the upcoming blog.

Meet User Expectations with Proper Performance Testing
Performance Testing is a must before the website goes to market as poor performance and inconsistent behavior of the site may lead to inadequate reputation, poor user experience and will not meet the sales goals.

It’s a must to perform performance testing at the initial stages of building a website and regularly at different intervals. Analytics can help monitor the peak loads and help plan to improve website performance. This can go a long way in building customer trust, relation, and not only retain but expand the customer base.


By aem4beginner

May 10, 2020
Estimated Post Reading Time ~

How to Create a Fully Featured Internet Website in AEM

This tutorial enables you to create a fully-featured website with Adobe Experience Manager (AEM). The website will be based on a generic website and is targeted primarily at web developers. All development will take place within an author environment.
This tutorial describes how to:
  1. Install AEM.
  2. Access CRXDE Lite (the development environment).
  3. Set up the project structure in CRXDE Lite.
  4. Create the template, component, and scripts used as the basis for creating content pages.
  5. Create the root page for your website and then content pages.
  6. Create the following components for use on your pages:
    • Top Navigation
    • List Children
    • Logo
    • Image
    • Text-Image
    • Search
  7. Include various foundation components.
Download the final result
To follow along with the tutorial rather than performing the exercises, download website-1.0.zip. This file is an AEM content package that contains the results of this tutorial. Use the Package Manager to install the package to your author instance.
NOTE: Installing this package will overwrite any resources on your authoring instance that you have created using this tutorial.

Website content package

Installing the Adobe Experience Manager

To install an AEM instance for developing your website, follow the instructions for setting up a deployment environment with author and publish instances, or perform a generic installation. The generic installation involves downloading the AEM Quickstart JAR file, placing the license.properties file in the same directory as the JAR file and double-clicking the JAR file.
After you have installed AEM, access the CRXDE Lite development environment by clicking the CRXDE Lite link on the Welcome page:
Note: The URL of CRXDE Lite for an AEM authoring instance that is installed locally using the default port is http://localhost:4502/crx/de/.

Setting up the project structure in CRXDE Lite

Use CRXDE Lite to create the mywebsite application structure in the repository:
  1. In the tree on the left side of CRXDE Lite, right-click the /apps folder and click Create > Create Folder. In the Create Folder dialog, type mywebsite as the folder name and click OK.
  2. Right-click the /apps/mywebsite folder and click Create > Create Folder. In the Create Folder dialog, type components as the folder name and click OK.
  3. Right-click the /apps/mywebsite folder and click Create > Create Folder. In the Create Folder dialog, type templates as the folder name and click OK.
    The structure in the tree should now look something like this:
  4. Click Save All.

Setting up the Design

In this section, you create the design for your application using the Designer tool. The design provides CSS and image resources for your web site.
Note
Click the following link to download mywebsite.zip. The archive contains the static.css and image files for your design.
Sample static.css file and images
  1. On the AEM Welcome page, click Tools. (http://localhost:4502/libs/cq/core/content/welcome.html)
  2. In the folder tree, select the Designs folder and then click New > New Page. Type mywebsite as the title and click Create.
  3. If the mywebsite item does not appear in the table, refresh the tree or the table.
  4. Using WebDAV access to the URL at http://localhost:4502, copy the sample static.css file and images folder from the downloaded mywebsite.zip file into the /etc/designs/mywebsite folder.

Creating the Contentpage Template, Component, and Script

In this section, you create the following:
  • The contentpage template that will be used to create content pages in the example website
  • The contentpage component that will be used to render pages of content
  • The contentpage script

Creating the Contentpage Template

Create a template to use as the basis of the web pages of your site.
A template defines the default content of a new page. Complex websites may use several templates for creating the different types of pages in the site. In this exercise, all pages are based on one simple template.
  1. In the folder tree of CRXDE Lite, right-click /apps/mywebsite/templates and click Create > Create Template.
  2. In the Create Template dialog, type the following values and then click Next:
    • Label: contentpage
    • Title: My Website Content Page Template
    • Description: This is my Website Content Page Template
    • Resource Type: mywebsite/components/contentpage
    Use the default value for the Ranking property.
    The resource type identifies the component that renders the page. In this case, all pages created using the contentpage template are rendered by the mywebsite/components/contentpage component. 
  3. To specify the paths of the pages that can use this template, click the plus button and type /content(/.*)? in the text box that appears. Then, click Next.
    The value of the allowed path property is a regular expression. Pages that have a path that matches the expression can use the template. In this is the case the regular expression matches the path of the /content folder and all subpages.
    When an author creates a page below /content, the contentpage template appears in a list of available templates to use.
  4. Click Next in the Allowed Parents and Allowed Children panels and click OK. In CRXDE Lite, click Save All.

Creating the Contentpage Component

Create the component that defines the content and renders the pages that use the contentpage template. The location of the component must correspond with the value of the Resource Type property of the contentpage template.
  1. In CRXDE Lite, right-click /apps/mywebsite/components and click Create > Component.
  2. In the Create Component dialog, type the following property values:
    • Label: contentpage
    • Title: My Website Content Page Component
    • Description: This is My Website Content Page Component
    The location of the new component is /apps/mywebsite/components/contentpage. This path corresponds with the resource type of the contentpage template (minus the initial /apps/ part of the path).
    This correspondence connects the template to the component and is critical to the correct functioning of the website.
  3. Click Next until the Allowed Children panel of the dialog appears, and then click OK. In CRXDE Lite, click Save All.
    The structure now looks as follows:

Developing the Contentpage Component Script

Add code to the contentpage.jsp script to define the page content.
  1. In CRXDE Lite, open the file contentpage.jsp in /apps/mywebsite/components/contentpage. The file contains the following code by default:
    1
    2
    3
    4
    5
    6
    7
    8
    9
    10
    11
    12
    <%--
    My Website Content Page Component component.
    This is My Website Content Page Component.
    --%><%
    %><%@include file="/libs/foundation/global.jsp"%><%
    %><%@page session="false" %><%
    %><%
    /* TODO add you code here */
    %>
  2. Copy the following code and paste it in contentpage.jsp after the default code:
     <%@ page language="java" contentType="text/html; charset=ISO-8859-1"
    pageEncoding="ISO-8859-1"%>
    <!DOCTYPE html PUBLIC "-//W3C//DTD HTML 4.01 Transitional//EN"
    "http://www.w3.org/TR/html4/loose.dtd">
    <html>
    <head>
    <meta http-equiv="Content-Type" content="text/html; charset=ISO-8859-1">
    <title>My title</title>
    </head>
    <body>
    <div>My body</div>
    </body>
    </html>
  3. Click Save All to save your changes.

Creating your Website Page and Content Pages

In this section, you create the following pages which all use the contentpage template: My Website, English, Products, Services, and Customers.
  1. On the AEM Welcome page (http://localhost:4502/libs/cq/core/content/welcome.html), click Websites.
  2. In the folder tree, select the Websites folder and then click New > New Page.
  3. In the Create Page window, enter the following:
    • Title: My Website
    • Name: mywebsite
    • Select the My Website Content Page Template
  4. Click Create. In the folder tree, select the /Websites/My Website page and click New > New Page.
  5. In the Create Page dialog, enter the following property values and then click Create:
    • Title: English
    • Name: en
    • Select the My Website Content Page Template
  6. In the folder tree, select the /Websites/My Website/English page and click New > New Page.
  7. In the Create Page dialog, enter the following property values and then click Create:
    • Title: Products
    • Select the My Website Content Page Template
  8. In the folder tree, select the /Websites/My Website/English page and click New > New Page.
  9. In the Create Page dialog, enter the following property values and then click Create:
    • Title: Services
    • Select the My Website Content Page Template
  10. In the folder tree, select the /Websites/My Website/English page and click New > New Page.
  11. In the Create Page dialog, enter the following property values and then click Create:
    • Title: Customers
    • Select the My Website Content Page Template
    Your structure looks as follows:
  12. To link your pages to the mywebsite design, in CRXDE Lite, select the /content/mywebsite/en/jcr:content node. On the Properties tab, type the following values for a new property and then click Add:
    • Name: cq:designPath
    • Type: String
    • Value: /etc/designs/mywebsite
  13. In a new web browser tab or window, open http://localhost:4502/content/mywebsite/en/products.html to see the Products page:

Enhancing the Contentpage Script

This section describes how to enhance the contentpage script using the AEM foundation component scripts and by writing your own scripts.
The Products page will look as follows:

Using the Foundation Page Scripts

In this exercise, you configure your pagecontent component so that its supertype is the AEM Page component. Because components inherit the features of their supertype, your pagecontent inherits the scripts and properties of the Page component.
For example, in your component JSP code, you can reference the scripts that the supertype component provides as though they are included in your component.
  1. In CRXDE Lite, add a property to the /apps/mywebsite/components/contentpage node.
    1. Select the /apps/mywebsite/components/contentpage node.
    2. At the bottom of the Properties tab, type the following property values and then click Add:
      • Name: sling:resourceSuperType
      • Type: String
      • Value: foundation/components/page
    3. Click Save All.
  2. Open the contentpage.jsp file under /apps/mywebsite/components/contentpage and replace the existing code with the following code:
    <%@include file="/libs/foundation/global.jsp"%><%
    %><%@page session="false" contentType="text/html; charset=utf-8" %><%
    %><!DOCTYPE HTML PUBLIC "-//W3C//DTD HTML 4.01//EN" "http://www.w3.org/TR/html4/strict.dtd">
    <html>
    <cq:include script="head.jsp"/>
    <cq:include script="body.jsp"/>
    </html>
  3. Save your changes.
  4. In your browser, reload the Products page. It looks as follows:
    Open the page source to see the javascript and HTML elements that the head.jsp and body.jsp scripts generated. The following script snippet opens Sidekick when you open the page:
CQ.WCM.launchSidekick("/content/mywebsite/en/products",
{propsDialog: "/libs/foundation/components/page/dialog",
locked: false locked: false
});

Using your own scripts

In this section, you create several scripts that each generate a part of the page body. You then create the body.jsp file in the pagecontent component to override the body.jsp of the AEM Page component. In your body.jsp file, you include your scripts that generate the different parts of the page body.
Tip: When a component includes a file that has the same name and relative location as a file in the component's supertype, it is called overlaying.
  1. In CRXDE Lite, create the file left.jsp under /apps/mywebsite/components/contentpage:
    1. Right-click the node /apps/mywebsite/components/contentpage, then select Create then Create File.
    2. In the window, type left.jsp as the Name and click OK.
  2. Edit the file left.jsp to remove the existing content and replace with the following code:
    1
    2
    3
    4
    5
    6
    <%@include file="/libs/foundation/global.jsp"%><%
    %><div class="left">
    <div>logo</div>
    <div>newslist</div>
    <div>search</div>
    </div>
  3. Save the changes.
  4. In CRXDE Lite, create the file center.jsp under /apps/mywebsite/components/contentpage:
    1. Right-click the node /apps/mywebsite/components/contentpage, select Create, then Create File.
    2. In the dialog box, type center.jsp as Name and click OK.
  5. Edit the file center.jsp to remove the existing content and replace it with the following code:
    1
    2
    3
    4
    5
    6
    <%@include file="/libs/foundation/global.jsp"%><%
    %><div class="center">
    <div>trail</div>
    <div>title</div>
    <div>parsys</div>
    </div>
  6. Save the changes.
  7. In CRXDE Lite, create the file right.jsp under /apps/mywebsite/components/contentpage:
    1. Right-click the node /apps/mywebsite/components/contentpage, select Create, then Create File.
    2. In the dialog box, type right.jsp as Name and click OK.
  8. Edit the file right.jsp to remove the existing content and replace with the following code:
    1
    2
    3
    4
    <%@include file="/libs/foundation/global.jsp"%><%
    %><div class="right">
    <div>iparsys</div>
    </div>
  9. Save the changes.
  10. In CRXDE Lite, create the file body.jsp under /apps/mywebsite/components/contentpage:
  11. Edit the file body.jsp to remove the existing content and replace with the following code:
    <%@include file="/libs/foundation/global.jsp"%><%
    %><body>
    <div id="CQ">
    <div class="topnav">topnav</div>
    <div class="content">
    <cq:include script="left.jsp" />
    <cq:include script="center.jsp" />
    <cq:include script="right.jsp" />
    </div>
    <div class="footer">
    <div class="toolbar">toolbar</div>
    </div>
    </div>
    </body>
  12. Save the changes.
  13. In your browser, reload the Products page. It looks as follows:

Creating the Top Navigation Component

In this section, you create a component that displays links to all top-level pages of the website to ease navigation. This component content appears at the top of all pages that are created using the contentpage template.
In the first version of the top navigation component (topnav), the navigation items are text links only. In the second version, you implement topnav with image navigation links.
Your top navigation will look as follows:

Creating the Top Navigation Component

  1. In CRXDE Lite, right-click /apps/mywebsite/components, select Create, then Create Component.
  2. In the Create Component window, enter the following:
    • Label: topnav
    • Title: My Top Navigation Component
    • Description: This is My Top Navigation Component 
  3. Click Next until you come to the last window where you click OK. Save your changes.

Creating the Top Navigation Script with Textual Links

Add the rendering script to topnav to generate text links to child pages:
  1. In CRXDE Lite, open the file topnav.jsp under /apps/mywebsite/components/topnav.
  2. Replace the code that is thereby copying and pasting the following code:
     <%@include file="/libs/foundation/global.jsp"%><%
    %><%@ page import="java.util.Iterator,
    com.day.text.Text,
    com.day.cq.wcm.api.PageFilter, com.day.cq.wcm.api.Page" %><%
    /* get starting point of navigation */
    Page navRootPage = currentPage.getAbsoluteParent(2);
    if (navRootPage == null && currentPage != null) {
    navRootPage = currentPage;
    }
    if (navRootPage != null) {
    Iterator<Page> children = navRootPage.listChildren(new PageFilter(request));
    while (children.hasNext()) {
    Page child = children.next();
    %><a href="<%= child.getPath() %>.html"><%=child.getTitle() %></a><%
    }
    }
    %>

Including Top Navigation in the Contentpage Component

To include topnav in your contentpage component:
  1. In CRXDE Lite, open the body.jsp under /apps/mywebsite/components/contentpage and replace:
    1
    <div class="topnav">topnav</div>
    with:
    1
    <cq:include path="topnav" resourceType="mywebsite/components/topnav" />
  2. Save the changes.
  3. In your browser, reload the Products Page. The top navigation appears as follows:

Enhancing Pages with Subtitles

The Page component defines properties that enable you to provide subtitles for pages. Add subtitles that provide information about the page content.
  1. In your browser, open the Products page.
  2. On the Sidekick Page tab, click Page Properties.
  3. On the Basic tab of the dialog, expand More Titles and Description, and for the Subtitle property, type what we do. Click OK.
  4. Repeat the previous steps to add the subtitle about our services to the Services page.
  5. Repeat the previous steps to add the subtitle of the trust we earn to the Customer page.
    Tip: In CRXDE Lite, select the /content/mywebsite/en/products/jcr:content node to see that the subtitle property is added.

Enhance Top Navigation by Using Image Links

Enhance the rendering script of the topnav component to use image links instead of hypertext for the navigation controls. The image includes the title and subtitle of the link target.
This exercise demonstrates Sling's request processing. The topnav.jsp script is modified to call a script that dynamically generates images to use for the page navigation links. In this exercise, Sling parses the URL of image source files to determine the script to use to render the images.
For example, the source for the image link to the Products page could be http://localhost:4502/content/mywebsite/en/products.navimage.png. Sling parses this URL to determine the resource type and the script to use to render the resource:
  1. Sling determines the path of the resource to be /content/mwebysite/en/products.png.
  2. Sling matches this path with the /content/mywebsite/en/products node.
  3. Sling determines the sling:resourceType of this node to be mywebsite/components/contentpage.
  4. Sling finds the script in this component that best matches the URL selector (navimage) and files name extension (png).
In this exercise, Sling matches these URLs to the /apps/mywebsite/components/contentpage/navimage.png.java script that you create.
  1. In CRXDE Lite, open the topnav.jsp under /apps/mywebsite/components/topnav. Locate the content of the anchor element (line 14):
    1
    <%=child.getTitle() %>
  2. Replace the anchor content with the following code:
    1
    <img alt="<%= child.getTitle() %>" src="<%= child.getPath() %>.navimage.png">
  3. Save the changes.
  4. Right-click the /apps/mywebsite/components/contentpage node and click Create > Create File.
  5. In the Create File window, like Name, type navimage.png.java.
    The .java file name extension indicates to Sling that the Apache Sling Scripting Java Support should be used to compile the script and create a servlet.
  6. Copy the following code into navimage.png.java. The code extends the AbstractImageServlet class:
    • AbstractImageServlet creates an ImageContext object that stores the properties of the current resource.
    • The parent page of the resource is extracted from the ImageContext object. The page title and subtitle are then obtained.
    • ImageHelper is used to generate the image from the navimage_bg.jpg file of the site design, the page title, and the page subtitle.

    package apps.mywebsite.components.contentpage;
    import java.awt.Color;
    import java.awt.Paint;
    import java.awt.geom.Rectangle2D;
    import java.io.IOException;
    import javax.jcr.RepositoryException;
    import com.day.cq.wcm.api.Page;
    import com.day.cq.wcm.api.PageManager;
    import com.day.cq.wcm.api.components.Component;
    import com.day.cq.wcm.api.designer.Designer;
    import com.day.cq.commons.SlingRepositoryException;
    import com.day.cq.wcm.commons.WCMUtils;
    import com.day.cq.wcm.commons.AbstractImageServlet;
    import com.day.cq.commons.ImageHelper;
    import com.day.image.Font;
    import com.day.image.Layer;
    import org.apache.sling.api.SlingHttpServletRequest;
    import org.apache.sling.api.SlingHttpServletResponse;
    import org.apache.sling.api.resource.Resource;
    import org.apache.sling.api.servlets.SlingSafeMethodsServlet;
    /**
    * Renders the navigation image
    */
    public class navimage_png extends AbstractImageServlet {
    protected Layer createLayer(ImageContext ctx)
    throws RepositoryException, IOException {
    PageManager pageManager = ctx.resolver.adaptTo(PageManager.class);
    Page currentPage = pageManager.getContainingPage(ctx.resource);
    /* constants for image appearance */
    int scale = 6;
    int paddingX = 24;
    int paddingY = 24;
    Color bgColor = new Color(0x004a565c, true);
    /* obtain the page title */
    String title = currentPage.getTitle();
    if (title == null) {
    title = currentPage.getName();
    }
    /* format the title text */
    title = title.toUpperCase();
    Paint titleColor = Color.WHITE;
    Font titleFont = new Font("Myriad Pro", 10 * scale, Font.BOLD);
    int titleBase = 10 * scale;
    /* obtain and format the page subtitle */
    String subtitle = currentPage.getProperties().get("subtitle", "");
    Paint subtitleColor = new Color(0xffa9afb1, true);
    Font subTitleFont = new Font("Tahoma", 7);
    int subTitleBase = 20;
    /* create a layer that contains the background image from the mywebsite design */
    Designer dg = ctx.resolver.adaptTo(Designer.class);
    String imgPath = new String(dg.getDesignPath(currentPage)+"/images/navimage_bg.jpg");
    Layer bg = ImageHelper.createLayer(ctx.resolver.resolve(imgPath));
    /* draw the title text (4 times bigger) */
    Rectangle2D titleExtent = titleFont.getTextExtent(0, 0, 0, 0, title, Font.ALIGN_LEFT, 0, 0);
    Rectangle2D subtitleExtent = subTitleFont.getTextExtent(0, 0, 0, 0, subtitle, Font.ALIGN_LEFT, 0, 0);
    /* ensure subtitleExtent is wide enough */
    if ( subtitle.length() > 0 ) {
    int titleWidth = (int)titleExtent.getWidth() / scale;
    if ( subtitleExtent.getWidth() > titleWidth && subtitleExtent.getWidth() + 2 * paddingX >
    bg.getWidth() ) {
    int charWidth = (int)subtitleExtent.getWidth() / subtitle.length();
    int maxWidth = (bg.getWidth() > titleWidth + 2 * paddingX ? bg.getWidth() - 2 * paddingX : titleWidth);
    int len = (maxWidth - ( 2 * charWidth) ) / charWidth;
    subtitle = subtitle.substring(0, len) + "...";
    subtitleExtent = subTitleFont.getTextExtent(0, 0, 0, 0, subtitle, Font.ALIGN_LEFT, 0, 0);
    }
    }
    int width = Math.max((int) titleExtent.getWidth(), (int) subtitleExtent.getWidth());
    /* create the text layer */
    Layer text = new Layer(width, (int) titleExtent.getHeight() + 40, new Color(0x01ffffff, true));
    text.setPaint(titleColor);
    text.drawText(0, titleBase, 0, 0, title, titleFont, Font.ALIGN_LEFT | Font.ALIGN_BASE, 0, 0);
    text.resize(text.getWidth() / scale, text.getHeight() / scale);
    text.setX(0);
    text.setY(0);
    if (subtitle.length() > 0) {
    /* draw the subtitle normal sized */
    text.setPaint(subtitleColor);
    text.drawText(0, subTitleBase, 0, 0, subtitle, subTitleFont, Font.ALIGN_LEFT | Font.ALIGN_BASE, 0, 0);
    }
    /* merge the image and text layers */
    text.setY(paddingY);
    text.setX(paddingX);
    text.setBackgroundColor(bgColor);
    int bgWidth = bg.getWidth();
    if ( text.getWidth() + 2 * paddingX > bgWidth ) {
    bgWidth = text.getWidth() + 2 * paddingX;
    bg.resize(bgWidth, bg.getHeight());
    }
    bg.merge(text);
    return bg;
    }
    }
  7. Save the changes.
  8. In your browser, reload the Products page. The top navigation now appears as follows:

Creating the List Children Component

Create the listchildren component that generates a list of page links that include the title, description, and date of pages (for example, product pages). The links target the child pages of the current page, or of a root page that is specified in the component dialog.

Creating Product Pages

Create two pages located below the Products page. For each page, which describes two specific products, you set a title, a description, and a date.
  1. In the folder tree of the Websites page, select the Websites/My Website/English/Products item and click New > New Page.

  2. In the dialog enter the following property values and then click Create:
    • Title: Product 1.
    • Name: product1.
    • Select My Website Content Page Template

  3. Create another page below Products using the following property values:

    • Title: Product 2
    • Name: product2
    • Select My Website Content Page Template

  4. In CRXDE Lite, set a description and a date for the Product 1 page:

    1. Select the /content/mywebsite/en/products/product1/jcr:content node.
    2. In the Properties tab, enter the following values:
      • Name: jcr:description
      • Type: String
      • Value: This is a description of the Product 1!.
    3. Click Add.
    4. In the Properties tab, create another property using the following values:
      • Name: date
      • Type: String
      • Value: 02/14/2008
      • Click Add.
    5. Click Save All.

  5. In CRXDE Lite, set a description and a date for the Product 2 page:
    1. Select the /content/mywebsite/en/products/product2/jcr:content node.
    2. In the Properties tab, enter the following values:
      • Name: jcr:description
      • Type: String
      • Value: This is a description of the Product 2!.
    3. Click Add.
    4. In the same text boxes, replace the previous values with the following values:
      • Name: date
      • Type: String
      • Value: 05/11/2012
      • Click Add.
    5. Click Save All.

Creating the List Children Component

To create the listchildren component:
  1. In CRXDE Lite, right-click /apps/mywebsite/components, select Create, then Create Component.
  2.  In the dialog enter the following property values and then click Next:
    • Label: listchildren.
    • Title: My Listchildren Component.
    • Description: This is My Listchildren Component.
  3. Continue clicking Next until the Allowed Children panel appears, and then click OK.

Creating the List Children Script

Develop the script for the listchildren component.
  1. In CRXDE Lite, open the file listchildren.jsp under /apps/mywebsite/components/listchildren.
  2. Replace the default code with the following code:
     <%@include file="/libs/foundation/global.jsp"%><%
    %><%@ page import="java.util.Iterator,
    com.day.cq.wcm.api.PageFilter"%><%
    /* Create a new Page object using the path of the current page */
    String listroot = properties.get("listroot", currentPage.getPath());
    Page rootPage = pageManager.getPage(listroot);
    /* iterate through the child pages and gather properties */
    if (rootPage != null) {
    Iterator<Page> children = rootPage.listChildren(new PageFilter(request));
    while (children.hasNext()) {
    Page child = children.next();
    String title = child.getTitle() == null ? child.getName() : child.getTitle();
    String date = child.getProperties().get("date","");
    %><div class="item">
    <a href="<%= child.getPath() %>.html"><b><%= title %></b></a>
    <span><%= date %></span><br>
    <%= child.getProperties().get("jcr:description","") %><br>
    </div><%
    }
    }
    %>
  3. Save the changes.

Creating the List Children Dialog

Create the dialog that is used to configure the listchildren component properties.
  1. Create the dialog node under the listchildren component:
    1. In CRXDE Lite, right-click the /apps/mywebsite/components/listchildren node and click Create > Create Dialog.
    2. In the dialog, enter the following property values and click OK
      • Label: dialog
      • Title: Edit Component and click OK.
    With the following properties:
  2. Select the /apps/mywebsite/components/listchildren/dialog/items/items/tab1 node.
  3. In the Properties tab, change the value of the title property to List Children
  4. Select the tab1 node and click Create > Create Node, enter the following property values, and click OK:
    • Name: items
    • Type: cq:WidgetCollection
  5. Create a node below the items node using the following property values:
    • Name: listroot
    • Type: cq:Widget
  6. Add properties for the listroot node to configure it as a text field. Each row in the following table represents a property. When finished, click Save All.
    NameTypeValue
    fieldLabelStringPath of list root
    nameString./listroot
    xtypeStringtextfield

Including List Children in the Contentpage Component

In order to include the listchildren component in your contentpage component, proceed as follows:
  1. In CRXDE Lite, open the file left.jsp under /apps/mywebsite/components/contentpage and locate the following code (line 4):
    <div>newslist</div>
  2. Replace that code with the following code:
    1
    <cq:include path="newslist" resourceType="mywebsite/components/listchildren" />
  3. Save the changes.

Viewing List Children in a Page

To see the full operation of this component you can view the Products page:
  • when the parent page ("Path of list root") is not defined.
  • when the parent page ("Path of list root") is defined.
  1. In your browser, reload the Products Page. The listchildren component appears as follows:
  2. As Path of list root, enter: /content/mywebsite/en. Click OK. The listchildren component on your page now looks as follows:

Creating the Logo Component

Create a component that displays the company logo and provides a link to the home page of the site. The component contains a design-mode dialog so that property values are stored in the site design (/etc/designs/mywebsite):
  • The property values apply to all instances of the component that are added to pages that use the design.
  • The properties can be configured using an instance of the component that is on a page that uses the design.
Your design-mode dialog contains properties for setting the image and the link path. The logo component will be placed on the upper left side of all pages on the website.
It will look as follows:
Note: Adobe Experience Manager provides a more full-featured logo component (/libs/foundation/components/logo).

Creating the Logo Component Node

To create the logo component, follow the steps:
  1. In CRXDE Lite, right-click /apps/mywebsite/components, select Create, then Create Component.
  2.  In the Create Component dialog enter the following property values and then click Next:
    • Label: logo.
    • Title: My Logo Component.
    • Description: This is My Logo Component.
  3. Click Next until you reach the final panel of the dialog and then click OK.

Creating the Logo Script

This section describes how to create the script to display the logo image with a link to the homepage.
  1. In CRXDE Lite, open the file logo.jsp under /apps/mywebsite/components/logo.
  2. The following code creates the link to the site home page and adds a reference to the logo image. Copy the code to logo.jsp:
    <%@include file="/libs/foundation/global.jsp"%><%
    %><%@ page import="com.day.text.Text,
    com.day.cq.wcm.foundation.Image,
    com.day.cq.commons.Doctype" %><%
    /* obtain the path for home */
    long absParent = currentStyle.get("absParent", 2L);
    String home = Text.getAbsoluteParent(currentPage.getPath(), (int) absParent);
    /* obtain the image */
    Resource res = currentStyle.getDefiningResource("imageReference");
    if (res == null) {
    res = currentStyle.getDefiningResource("image");
    }
    /* if no image use text link, otherwise draw the image */
    %>
    <a href="<%= home %>.html"><%
    if (res == null) {
    %>Home<%
    } else {
    Image img = new Image(res);
    img.setItemName(Image.NN_FILE, "image");
    img.setItemName(Image.PN_REFERENCE, "imageReference");
    img.setSelector("img");
    img.setDoctype(Doctype.fromRequest(request));
    img.setAlt("Home");
    img.draw(out);
    }
    %></a>
  3. Save the changes.

Creating the Logo Design Dialog

Create the dialog for configuring your logo component in Design mode. Design-mode dialog nodes must be named design_dialog.
  1. Create the dialog node under the logo component:
    1. Right-click the /apps/mywebsite/components/logo node and click Create > Create Dialog.
    2. Type the following property values and then click OK:
      • Label: design_dialog
      • Title: Logo (Design)
  2. Right-click the tab1 node in the design_dialog branch and click Delete. Click Save All.
  3. Under the design_dialog/items/items node, create a new node named img of type cq:Widget. Add the following properties and then click Save All:
    NameTypeValue
    fileNameParameterString./imageName
    fileReferenceParameterString./imageReference
    nameString./image
    titleStringImage
    xtypeStringhtml5smartimage

Creating the logo render script

Create the script that retrieves the logo image and writes it to the page.
  1. Right-click the logo component node and click Create > Create File to create the script file named img.GET.java.
  2. Open the file, copy the following code into the file, and then click Save All:
package apps.mywebsite.components.logo;
import java.io.IOException;
import java.io.InputStream;
import javax.jcr.RepositoryException;
import javax.jcr.Property;
import javax.servlet.http.HttpServletResponse;
import com.day.cq.wcm.foundation.Image;
import com.day.cq.wcm.commons.RequestHelper;
import com.day.cq.wcm.commons.WCMUtils;
import com.day.cq.wcm.commons.AbstractImageServlet;
import com.day.cq.commons.SlingRepositoryException;
import com.day.image.Layer;
import org.apache.commons.io.IOUtils;
import org.apache.sling.api.SlingHttpServletRequest;
import org.apache.sling.api.SlingHttpServletResponse;
import org.apache.sling.api.resource.Resource;
import org.apache.sling.api.resource.ValueMap;
import org.apache.sling.api.servlets.SlingSafeMethodsServlet;
/**
* Renders an image
*/
public class img_GET extends AbstractImageServlet {
protected Layer createLayer(ImageContext c)
throws RepositoryException, IOException {
/* don't create the layer yet. handle everything later */
return null;
}
protected void writeLayer(SlingHttpServletRequest req,
SlingHttpServletResponse resp,
ImageContext c, Layer layer)
throws IOException, RepositoryException {
Image image = new Image(c.resource);
image.setItemName(Image.NN_FILE, "image");
image.setItemName(Image.PN_REFERENCE, "imageReference");
if (!image.hasContent()) {
resp.sendError(HttpServletResponse.SC_NOT_FOUND);
return;
}
/* get pure layer */
layer = image.getLayer(false, false, false);
/* do not re-encode layer, just spool */
Property data = image.getData();
InputStream in = data.getStream();
resp.setContentLength((int) data.getLength());
String contentType = image.getMimeType();
if (contentType.equals("application/octet-stream")) {
contentType=c.requestImageType;
}
resp.setContentType(contentType);
IOUtils.copy(in, resp.getOutputStream());
in.close();
resp.flushBuffer();
}
}

Adding the Logo Component to the Contentpage Component

  1. In CRXDE Lite, open the left.jsp under /apps/mywebsite/components/contentpage fileand locate the following line of code:
    <div>logo</div>
  2. Replace that code with the following line of code:
    <cq:include path="logo" resourceType="mywebsite/components/logo" />
  3. Save the changes.
  4. In your browser, reload the Products page. The logo looks as follows, though currently it only shows the underlying link:

Setting the Logo Image in a Page

This section describes how to set an image as your logo using the design mode dialog.
  1. With the Products page open in your browser, click the Design button at the bottom of Sidekick to enter design mode.
  2. In the Design of the logo bar, click Edit to use the dialog to edit the settings for the logo component.
  3. In the dialog, click in the panel of the Image tab, browse for the logo.png image that you extracted from the mywebsite.zip file, and click OK.
  4. Click the triangle on the Sidekick title bar to return to Edit mode.
  5. In CRXDE Lite, go to the following node to see the stored property values:
    /etc/designs/mywebsite/jcr:content/contentpage/logo

Including the Breadcrumb Component

In this section, you include the breadcrumb (trail) component, which is one of the foundation components.
  1. In CRXDE Lite, browse to /apps/mywebsite/components/contentpage, open the file center.jsp and replace:
    <div>trail</div>
    with:
    1
    <cq:include path="trail" resourceType="foundation/components/breadcrumb" />
  2. Save the changes.
  3. In your browser, reload the Products 1 page. The trail component looks as follows:

Including the Title Component

In this section, you include the title component, which is one of the foundation components.
  1. In CRXDE Lite, browse to /apps/mywebsite/components/contentpage, open the file center.jsp and replace:
    <div>title</div>
    with:
    1
    <cq:include path="title" resourceType="foundation/components/title" />
  2. Save the changes.
  3.  In your browser, reload the Products page. The title component looks as follows: 
    Note: You can set a different Title and the Type/Size in edit mode.

Including the Paragraph System Component

The paragraph system (parsys) is a significant part of a website as it manages a list of paragraphs. It enables authors to add paragraph components to the page and provides structure.
Add the parsys component (one of the foundation components) to your contentpage component.
  1. In CRXDE Lite, browse to /apps/mywebsite/components/contentpage, open the file center.jsp and locate the following line of code:
    <div>parsys</div>
  2. Replace that line of code with the following code, then save the changes:
    <cq:include path="par" resourceType="foundation/components/parsys" />
  3.  In your browser, refresh the Products page. It now has the parsys component, which is seen as follows:

Creating the Image Component

Create a component that displays an image in the paragraph system. To save time, the image component is created as a copy of the logo component with some property changes.
Note
Adobe Experience Manager provides a more full-featured image component (/libs/foundation/components/image).

Creating the Image Component

  1. Right click the /apps/mywebsite/components/logo node and click Copy.
  2. Right-click the /apps/mywebsite/components node and click Paste.
  3. Right-click the Copy of logo node, click Rename, delete the existing text and type image.
  4. Select the image component node, and change the following property values:
    • jcr:title: My Image Component.
    • jcr:description: This is My Image Component.
  5. Add a property to the image node with the following property values:
    • Name: componentGroup
    • Type: String
    • Value: MyWebsite
  6. Below the image node, rename the design_dialog node to dialog.
  7. Rename logo.jsp to image.jsp.
  8. Open img.GET.java and change the package to apps.mywebsite.components.image.

Creating the Image Script

This section describes how to create the image script.
  1. Open /apps/mywebsite/components/image/image.jsp
  2. Replace the existing code with the following code, then save the changes:
    <%@include file="/libs/foundation/global.jsp"%><%
    %><%@ page import="com.day.cq.commons.Doctype,
    com.day.cq.wcm.foundation.Image,
    com.day.cq.wcm.api.components.DropTarget,
    com.day.cq.wcm.api.components.EditConfig,
    com.day.cq.wcm.commons.WCMUtils" %><%
    /* global.jsp provides access to the current resource through the resource object */
    Image img = new Image(resource);
    img.setItemName(Image.NN_FILE, "image");
    img.setItemName(Image.PN_REFERENCE, "imageReference");
    img.setSelector("img");
    img.setDoctype(Doctype.fromRequest(request));
    img.setAlt("Home");
    img.draw(out); %>
  3. Save the changes.

Creating the Image cq:editConfig Node

The cq:editConfig node type enables you to configure certain behaviors of components when editing their properties.
In this section, you use a cq:editConfig node to enable you to drag assets from Content Finder into your image component.
  1. In CRXDE Lite, under the node /apps/mywebsite/components/image, create a new node as follows:
    • Name: cq:editConfig.
    • Type: cq:EditConfig.
  2. Under the node cq:editConfig, create a new node as follows:
    • Name: cq:dropTargets.
    • Type: cq:DropTargetConfig.
  3. Under the node cq:dropTargets, create a new node as follows:
    • Name: image.
    • Type: nt:unstructured.
  4. In CRXDE set the properties as follows:
NameTypeValue
acceptStringimage/(gif|jpeg|png)
groupsStringmedia
propertyNameString./imageReference

Adding the icon

In this section, you add the icon to appear beside the image component when it is listed in Sidekick:
  1. In CRXDE Lite, right-click the file /libs/foundation/components/image/icon.png and select Copy.
  2. Right-click the node /apps/mywebsite/components/image and click Paste, then click Save All.

Using the Image Component

In this section, you will view the Products page and add your image component to the paragraph system.
  1. In your browser, reload the Products page.
  2. In the Sidekick, click the design mode icon.
  3. Click the Edit button to edit the design dialog of par.
  4. In the dialog, a list of Allowed Components is shown; navigate to MyWebsite, select the My Image Component and click OK.
  5. Return to edit mode.
  6. Double-click the parsys frame (on Drag components or assets here). The Insert New Component and Sidekick selectors look as follows:

Including the Toolbar Component

In this section, you include the toolbar component, which is one of the foundation components.
You have several options, in edit mode as well as design mode.
  1. In CRXDE Lite, navigate to /apps/mywebsite/components/contentpage, open the body.jsp file and locate the following code:
    <div class="toolbar">toolbar</div>
  2. Replace that code with the following code, and then save the changes.
    <cq:include path="toolbar" resourceType="foundation/components/toolbar"/>
  3. In the folder tree of the AEM Websites page, select Websites/My Website/English, then click New > New Page. Specify the following property values and click Create:
    • Title: Toolbar
    • Select My Website Content Page Template
  4. In the list of pages, right-click the Toolbar page and click Properties. Select Hide In Navigation, and click OK.
    The Hide in Navigation option prevents the page from appearing in navigation components, such as topnav and listchildren.

  5.  Under Toolbar, create the following pages:
    • Contacts
    • Feedback
    • Login
    • Search
  6. In your browser, reload the Products page. It looks as follows:

Creating the Search Component

In this section, you create the component to search for content on the website. This search component can be placed in the paragraph system of any page (for example, on a specialized search result page).
Your search input box will look as follows on the English page:

Creating the Search Component

  1. In CRXDE Lite, right-click /apps/mywebsite/components, select Create, then Create Component.
  2. Use the dialog to configure the component:
    1. One first panel, specify the following property values:
      • Label: search
      • Title: My Search Component
      • Description: This is My Search Component
      • Group: MyWebsite
    2. Click Next., then click Next again.
    3. On the Allowed Parents panel, click the + button and type */parsys.
    4. Click Next and then click OK.
  3. Click Save All.
  4. Copy the following nodes and paste them to the apps/mywebsite/components/search node:
    • /libs/foundation/components/search/dialog
    • /libs/foundation/components/search/i18n
    • /libs/foundation/components/search/icon.png
  5. Click Save All.

Creating the Search Script

This section describes how to create the search script:
  1. Open the /apps/mywebsite/components/search/search.jsp file.
Copy the following code to search.jsp:
<%@ page import="com.day.cq.wcm.foundation.Search,com.day.cq.tagging.TagManager" %>
  1. <%@include file="/libs/foundation/global.jsp" %><%
  2. %><cq:setContentBundle/><%
  3. Search search = new Search(slingRequest);
  4. String searchIn = (String) properties.get("searchIn");
  5. String requestSearchPath = request.getParameter("path");
  6. if (searchIn != null) {
  7. /* only allow the "path" request parameter to be used if it
  8. is within the searchIn path configured */
  9. if (requestSearchPath != null && requestSearchPath.startsWith(searchIn)) {
  10. search.setSearchIn(requestSearchPath);
  11. } else {
  12. search.setSearchIn(searchIn);
  13. }
  14. } else if (requestSearchPath != null) {
  15. search.setSearchIn(requestSearchPath);
  16. }
  17. pageContext.setAttribute("search", search);
  18. TagManager tm = resourceResolver.adaptTo(TagManager.class);
  19. %><c:set var="trends" value="${search.trends}"/><%
  20. %><center>
  21. <form action="${currentPage.path}.html">
  22. <input size="41" maxlength="2048" name="q" value="${fn:escapeXml(search.query)}"/>
  23. <input value="<fmt:message key="searchButtonText"/>" type="submit" />
  24. </form>
  25. </center>
  26. <br/>
  27. <c:set var="result" value="${search.result}"/>
  28. <c:choose>
  29. <c:when test="${empty result && empty search.query}">
  30. </c:when>
  31. <c:when test="${empty result.hits}">
  32. <c:if test="${result.spellcheck != null}">
  33. <p><fmt:message key="spellcheckText"/> <a href="<c:url value="${currentPage.path}.html"><c:param name="q" value="${result.spellcheck}"/></c:url>"><b><c:out value="${result.spellcheck}"/></b></a></p>
  34. </c:if>
  35. <fmt:message key="noResultsText">
  36. <fmt:param value="${fn:escapeXml(search.query)}"/>
  37. </fmt:message>
  38. </c:when>
  39. <c:otherwise>
  40. <p class="searchmeta">Results ${result.startIndex + 1} - ${result.startIndex + fn:length(result.hits)} of ${result.totalMatches} for <b>${fn:escapeXml(search.query)}</b>. (${result.executionTime} seconds)</p>
  41. <br/>
  42. <div class="searchresults">
  43. <div class="results">
  44. <c:forEach var="hit" items="${result.hits}" varStatus="status">
  45. <div class="hit">
  46. <a href="${hit.URL}">${hit.title}</a>
  47. <div class="excerpt">${hit.excerpt}</div>
  48. <div class="hiturl"> ${hit.URL}<c:if test="${!empty hit.properties['cq:lastModified']}"> - <c:catch><fmt:formatDate value="${hit.properties['cq:lastModified'].time}" dateStyle="medium"/></c:catch></c:if> - <a href="${hit.similarURL}"><fmt:message key="similarPagesText"/></a>
  49. </div></div>
  50. </c:forEach>
  51. </div>
  52. <br/>
  53. <div class="searchRight">
  54. <c:if test="${fn:length(trends.queries) > 0}">
  55. <p><fmt:message key="searchTrendsText"/></p>
  56. <div class="searchTrends">
  57. <c:forEach var="query" items="${trends.queries}">
  58. <a href="<c:url value="${currentPage.path}.html"><c:param name="q" value="${query.query}"/></c:url>"><span style="font-size:${query.size}px"><c:out value="${query.query}"/></span></a>
  59. </c:forEach>
  60. </div>
  61. </c:if>
  62. <c:if test="${result.facets.languages.containsHit}">
  63. <p>Languages</p>
  64. <c:forEach var="bucket" items="${result.facets.languages.buckets}">
  65. <c:set var="bucketValue" value="${bucket.value}"/>
  66. <c:set var="label" value='<%= new java.util.Locale((String) pageContext.getAttribute("bucketValue")).getDisplayLanguage(request.getLocale()) %>'/>
  67. <c:choose>
  68. <c:when test="${param.language != null}">${label} (${bucket.count}) - <a href="<cq:requestURL><cq:removeParam name="language"/></cq:requestURL>">remove filter</a></c:when>
  69. <c:otherwise><a title="filter results" href="<cq:requestURL><cq:addParam name="language" value="${bucket.value}"/></cq:requestURL>">${label} (${bucket.count})</a></c:otherwise>
  70. </c:choose><br/>
  71. </c:forEach>
  72. </c:if>
  73. <c:if test="${result.facets.tags.containsHit}">
  74. <p>Tags</p>
  75. <c:forEach var="bucket" items="${result.facets.tags.buckets}">
  76. <c:set var="bucketValue" value="${bucket.value}"/>
  77. <c:set var="tag" value="<%= tm.resolve((String) pageContext.getAttribute("bucketValue")) %>"/>
  78. <c:if test="${tag != null}">
  79. <c:set var="label" value="${tag.title}"/>
  80. <c:choose>
  81. <c:when test="<%= request.getParameter("tag") != null && java.util.Arrays.asList(request.getParameterValues("tag")).contains(pageContext.getAttribute("bucketValue")) %>">${label} (${bucket.count}) - <a href="<cq:requestURL><cq:removeParam name="tag" value="${bucket.value}"/></cq:requestURL>">remove filter</a></c:when>
  82. <c:otherwise><a title="filter results" href="<cq:requestURL><cq:addParam name="tag" value="${bucket.value}"/></cq:requestURL>">${label} (${bucket.count})</a></c:otherwise>
  83. </c:choose><br/>
  84. </c:if>
  85. </c:forEach>
  86. </c:if>
  87. <c:if test="${result.facets.mimeTypes.containsHit}">
  88. <jsp:useBean id="fileTypes" class="com.day.cq.wcm.foundation.FileTypes"/>
  89. <p>File types</p>
  90. <c:forEach var="bucket" items="${result.facets.mimeTypes.buckets}">
  91. <c:set var="bucketValue" value="${bucket.value}"/>
  92. <c:set var="label" value="${fileTypes[bucket.value]}"/>
  93. <c:choose>
  94. <c:when test="<%= request.getParameter("mimeType") != null && java.util.Arrays.asList(request.getParameterValues("mimeType")).contains(pageContext.getAttribute("bucketValue")) %>">${label} (${bucket.count}) - <a href="<cq:requestURL><cq:removeParam name="mimeType" value="${bucket.value}"/></cq:requestURL>">remove filter</a></c:when>
  95. <c:otherwise><a title="filter results" href="<cq:requestURL><cq:addParam name="mimeType" value="${bucket.value}"/></cq:requestURL>">${label} (${bucket.count})</a></c:otherwise>
  96. </c:choose><br/>
  97. </c:forEach>
  98. </c:if>
  99. <c:if test="${result.facets.lastModified.containsHit}">
  100. <p>Last Modified</p>
  101. <c:forEach var="bucket" items="${result.facets.lastModified.buckets}">
  102. <c:choose>
  103. <c:when test="${param.from == bucket.from && param.to == bucket.to}">${bucket.value} (${bucket.count}) - <a href="<cq:requestURL><cq:removeParam name="from"/><cq:removeParam name="to"/></cq:requestURL>">remove filter</a></c:when>
  104. <c:otherwise><a title="filter results" href="<cq:requestURL><cq:removeParam name="from"/><cq:removeParam name="to"/><c:if test="${bucket.from != null}"><cq:addParam name="from" value="${bucket.from}"/></c:if><c:if test="${bucket.to != null}"><cq:addParam name="to" value="${bucket.to}"/></c:if></cq:requestURL>">${bucket.value} (${bucket.count})</a></c:otherwise>
  105. </c:choose><br/>
  106. </c:forEach>
  107. </c:if>
  108. <c:if test="${fn:length(search.relatedQueries) > 0}">
  109. <br/><br/><div class="related">
  110. <fmt:message key="relatedSearchesText"/>
  111. <c:forEach var="rq" items="${search.relatedQueries}">
  112. <a href="${currentPage.path}.html?q=${rq}"><c:out value="${rq}"/></a>
  113. </c:forEach></div>
  114. </c:if>
  115. </div>
  116. <c:if test="${fn:length(result.resultPages) > 1}">
  117. <div class="pagination">
  118. <fmt:message key="resultPagesText"/>
  119. <c:if test="${result.previousPage != null}">
  120. <a href="${result.previousPage.URL}"><fmt:message key="previousText"/></a>
  121. </c:if>
  122. <c:forEach var="page" items="${result.resultPages}">
  123. <c:choose>
  124. <c:when test="${page.currentPage}">${page.index + 1}</c:when>
  125. <c:otherwise>
  126. <a href="${page.URL}">${page.index + 1}</a>
  127. </c:otherwise>
  128. </c:choose>
  129. </c:forEach>
  130. <c:if test="${result.nextPage != null}">
  131. <a href="${result.nextPage.URL}"><fmt:message key="nextText"/></a>
  132. </c:if>
  133. </div>
  134. </c:if>
  135. </div>
  136. </c:otherwise>
  137. </c:choose>
Save the changes.

Including a Search Box in the Contentpage Component

To include a search input box in the left section of your contentpage, proceed as follows:
  1. In CRXDE Lite, open the file left.jsp under /apps/mywebsite/components/contentpage and locate the following code (line 2):
    %><div class="left">
  2. Insert the following code before that line:
    %><%@ page import="com.day.text.Text"%><%
    %><% String docroot = currentDesign.getPath();
    String home = Text.getAbsoluteParent(currentPage.getPath(), 2);%><%
  3. Locate the following line of code:
    <div>search</div>
  4. Replace that code with the following code, and then save the changes.
    <div class="form_1">
    <form class="geo" action="<%= home %>/toolbar/search.html" id="form" >
    <p>
    <input class="geo" type="text" name="q"><br>
    <a href="<%= home %>/toolbar/search.html" class="link_1">advanced search</a>
    </p>
    </form>
    </div>
  5.  In your browser, reload the Products page. The search component looks as follows:

Including the Search Component in the Search Page

In this section, you add your search component to the paragraph system.
  1. In your browser, open the Search page.
  2. In the Sidekick, click the design mode icon.
  3. In the Design of par block (below the Search title), click Edit.
  4. In the dialog, scroll down to the My Websites group, select My Search Component, and click OK.
  5. On Sidekick, click the triangle to return to edit mode.
  6. Drag the My Search Component from the Sidekick into the parsys frame. It looks as follows:
  7. Navigate to your Products page. Search for customers in the input box and press Enter. You are redirected to the Search page. Switch to preview mode: the output is in a similar format as the following:

Including the Iparsys Component

In this section, you include the Inheritance Paragraph System (iparsys) component, which is one of the foundation components. This component enables you to create a structure of paragraphs on a parent page, and have child pages inherit the paragraphs.
For this component, you can set several parameters in both edit mode and design mode.

  1. In CRXDE Lite, navigate to /apps/mywebsite/components/contentpage, open the file right.jsp and replace:
    <div>iparsys</div>
    with:
    <cq:include path="rightpar" resourceType="foundation/components/iparsys" />
  2. Save the changes.
  3. In your browser, reload the Products page. The whole page looks as follows:
Source: http://www.blogjava.net/Noah/articles/400946.html


By aem4beginner