Showing posts with label Postman. Show all posts

December 28, 2020
Estimated Post Reading Time ~

How to make a simple HTTP POST request to AEM with a HTTP Rest Client, Postman

During development in the AEM author instance, you would like to test your servlet using an HTTP Rest Client such as Postman. When making a POST request on the Rest Client, you will experience 2 errors. An authentication error, and a 403 forbidden error.

What’s Happening?
Firstly, in a typical development approach, you will be working on your author developers instance. Your Rest Client is making a POST request on the author instance, http://localhost:4502. You will get an authentication error.

Secondly, your POST request is being filtered and restricted by the “Apache Sling Referrer Filter” and “Adobe Granite CSRF Filter”. By default, the Apache Sling Referrer Filter blocks any incoming POST requests, and the Adobe Granite CSRF Filter blocks any incoming POST requests without the CSRF-Token token in the header.

How to solve this?
We can solve this issue by including basic auth type in Postman, then allowing incoming POST requests in the Apache Sling Referrer Filter OSGI configurations, and remove the requirement of the CSRF-Token in the Adobe Granite CSRF Filter OSGI configurations.

Resource – Simple Servlet:
Step 1: Configure Basic Auth in Postman
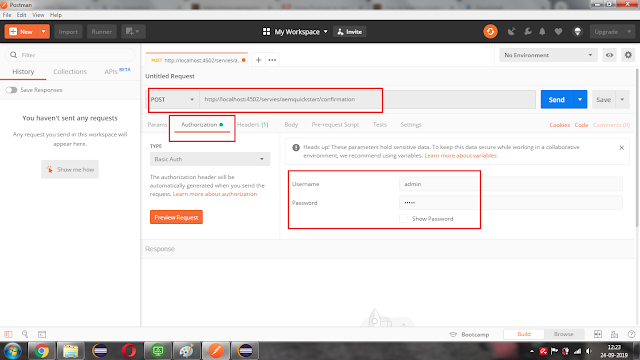
Launch Postman, then navigate to the Authentication tab. Ensure type is set to “Basic Auth”, and username and password are set to “admin”; this is the default username and password for the administrator user while developing on the author instance.


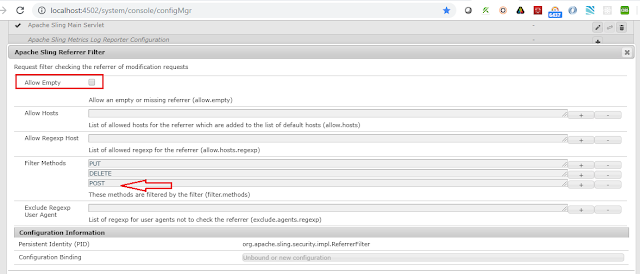
Step 2: Configure Apache Sling Referrer Filter
  • Enable allow empty
  • Remove the POST method from filters
In OSGI configurations (http://localhost:4502/system/console/configMgr), locate “Apache Sling Referrer Filter”. Enable the allowed empty property, and remove the post method from the filter property.


Step 3: Configure Adobe Granite CSRF Filter
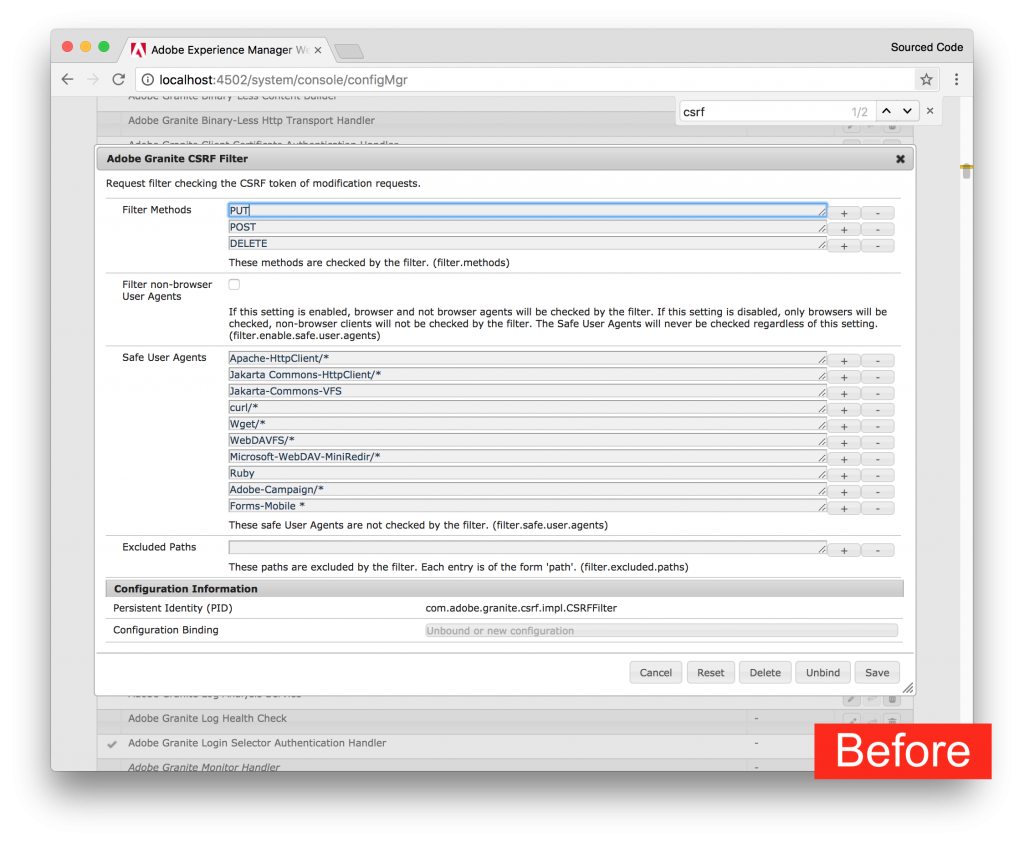
  • Remove the POST method from filters
In OSGI configurations (http://localhost:4502/system/console/configMgr), locate “Adobe Granite CSRF Filter”. Remove the post method from the filter property.


Note:
  • After making configurations to the two OSGI configurations, you should be able to make a POST request from your HTTP REST Client to your AEM instance.
  • For production, set Apache Sling Referrer Filter and Adobe Granite CSRF Filter settings back to default. Unless if you are giving access to other servers to make POST requests to your AEM application.


By aem4beginner

October 1, 2020
Estimated Post Reading Time ~

Access AEM servlet in postman

When you make a POST request to your local AEM author instance, the request will be filtered and restricted by "Apache Sling Referrer Filter" and "Adobe Granite CSRF Filter". Incoming POST requests without the CSRF-Token in the header will be blocked by "Apache Sling Referrer Filter" and "Adobe Granite CSRF Filter".

Steps to configure:
  1. Navigate to ConfigMgr
  2. Search for 'Apache Sling Referrer Filter'
  3. Remove the POST method from the filter.
  4. Check the "Allow Empty" checkbox and click on Save.


Search for "Adobe Granite CSRF Filter"
Remove the POST method from the filter.
Click on Save.


Click here to download the postman and install it.

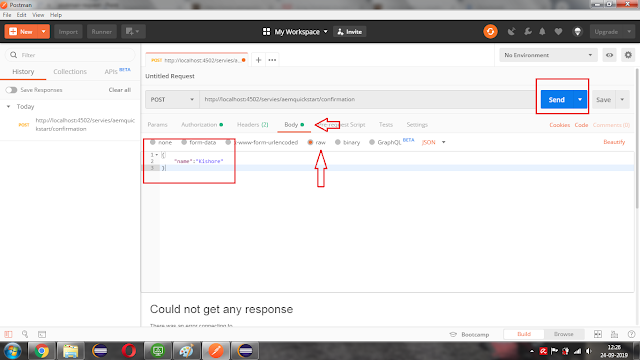
Open the Postman app and do the following steps.
  • A select method as POST
  • Enter AEM servlet URL.
  • Navigate to the "Authorization" tab and enter username and password.
  • Enter required "Headers"

Enter request in the body tab and hit the Send button.


By aem4beginner

August 31, 2020
Estimated Post Reading Time ~

Basic Authentication in Postman

In postman navigation we learned that we need Authorization for accessing secured servers. Authorization is the most important part while working with secured servers, which is most likely to happen. We will learn about
Authorization and Authentication
Authorization vs Authentication
Need for Authorization
Basic Authentication in Postman

What is Authorization?
The meaning of authorization can be seen as a question which is, are we eligible to access a secured resource on the Server? If the answer is yes, then in technical terms we can say that we are Authorized to access the resource. If the answer is No, we can say that we are not authorized to access the resource. For example, let us say you have added yours and your sister’s fingerprint in your phone. You and your sister can open the same mobile phone, which means only you and your sister are authorized to open the phone and see the data. Similarly, while there could be many APIs in a company or a project. It is not necessary that everyone will have access on all the APIs. Only authorized people can access the secured APIs.

Authorization Vs Authentication
Authorization and Authentication are two closely related terms. These two terms can also be confusing at first. In this section, we will clear the confusion about these two terms.

Authentication is a process of presenting your credentials to the system and the system validating your credentials. These credentials tell the system about who you are. This enables the system to ensures and confirm a user’s identity. Here system can be anything, it can be a computer, phone, bank or any physical office premises.

Whereas Authorization is a process of allowing or denying someone from accessing something, once Authentication is done. So in layman terms Authentication tells who you are while Authorization tells what you can do.

When a person accesses the server with the key/password, the server checks whether the person is available in directory and is also associated with the same key/password. If it is, you are good to go (Authentication). If you have access to the resource, then you will be granted access to the resource (Authorized).


We will see the following short example to tell you how does a server reject an unauthorized person.

Authorization using Postman
Checking Authorization
For this chapter, we will be using the endpoint https://postman-echo.com/basic-auth

1.Create a GET request and enter the endpoint as https://postman-echo.com/basic-auth


Press send and look at the response


Note: The status code is 401 which corresponds to unauthorized access and the response message says Unauthorized.

The status code and response from the server indicate that we are not authorized to access the API we are trying to access(See Responses tutorial to learn more). Later in the tutorial, we will try to access the same API using the credentials as we discussed in the last section.

Need for Authorization
In the last section, we discussed that a resource owner does not allow access to the resources to everyone in the company. This is because it can lead to a possible security breach. If I allow an intern to access my database apis then inadvertently he can change the data and that data can be lost forever which can come as a cost to the company. There are numerous reasons possible for the same. Maybe a person changes the data for money or a person can leak the data to another company. Authorization plays a very important role in deciding the accesses and tightening the security. Let us see the different types of Authentication available to us.

Basic Access Authentication / HTTP Basic Authentication
A Basic Access Authentication is the most simple and basic type of authorization available. It requires just a username and password for checking the authorization of any person (That is why we say basic access authentication). The username and password are sent as header values in the Authorization header. While using basic authentication we add the word Basic before entering the username and password. These username and password values should be encoded with Base64 otherwise the server won’t be able to recognize it. We will follow these steps to check whether we can access the same API we used above or not

Checking authorization using credentials
1. Enter the endpoint https://postman-echo.com/basic-auth in GET request.
2. Go to Headers


3. Enter the following key-value pairs in Header
Authorization: Basic postman:password


Note: We are using the username as postman and password as the password

4. Press Send and see the response box and status code.


It still says 400, Bad Request. (This part we have already covered in the Responses Chapter under Status codes and their meaning.) Can you guess why? If you remember what we learned in the last section, a basic access authentication requires a username and password to be encoded in Base64 but here we just sent the username and password in plain text. As a result, the server returned a 400, Bad Request status code. Before we move forward it will be beneficial to understand what Base64 encoding is.

What is Base64 encoding?
Encoding is used in the authentication because we don’t want our data to be transmitted directly over the network. There are numerous reasons for that. Network scanners can read your Request and retrieve the Username and Password sent without encoding. Also, bits and bytes transmitted directly can be considered as inbuilt command bits by the modem or other equipment in the network chain. For example, if there is an inbuilt command of 0101101010 which means reset to the modem then while transmitting we have may want to get a data sequence of 001101010010110101011020. Here the modem might interpret it as a reset command and will reset itself. In order to avoid such problems, it is beneficial to encode the data.

We use base64 particularly because it transmits the data into the textual form and sends it in an easier form such as HTML form data. We use Base64 particularly because we can rely on the same 64 characters in any encoding language that we use. Although we can use higher base encoding methods also but they are very hard to convert and transmit which wastes time unnecessarily.

Coming back to the original problem of sending a Base64 encoded string in the Authorization header. We have two ways in front of us for creating a Base64 encoded string:
  • Through third-party website
  • Through Postman
We will see both of the options one by one. For now, follow the steps for accessing the api by decoding from a third-party website.

Authenticating by encoding through a third party website
1. Go to https://www.base64encode.org/


Note: There are thousands of websites available for the same purpose. You can use anyone just make sure you encode to the same value as us. Also, we are using Microsoft Edge as the browser, though it should not make any difference.

2. Paste in the box the following values
postman:password


3. Press Encode.


4. Copy the encoded text.


Note: Do not use space between any two texts or symbols. postman: password will encode to a different value while postman: the password will encode to a different one. Needless to say, both will be considered wrong. Use postman: password only.

5. Go to the postman app and instead of postman: password, paste the encoded value


6. Press send and see the value of the response box and the status code.


200 OK, authenticated means we have provided correct credentials and now we are authorized to access the data.

Authenticating by encoding through Postman
Instead of going to a third-party website, we will try to encode using Postman.

1. Erase the key-value pair that we entered earlier so that it now has no values.


2. Go to the authorization tab


3. Select Basic Auth in the Type dropdown


4. Enter username as postman and password as the password


5. Press Preview Request


6. Go to Header and see that Postman has converted the username and password for you.


7. Press send and voila! we are authenticated.


Source: https://www.toolsqa.com/postman/basic-authentication-in-postman/


By aem4beginner

Postman Navigation

Postman Navigation
Now that we have installed Postman on our system, we will navigate through the UI of Postman in this Chapter. We will become familiar with the terminologies and features that Postman offers.

Postman navigation can be divided into four UI structures as shown below.


Sidebar section
History
Collections
Header section
New
Import
Interceptor
Sync
Builder section: These items will help users create a new Request. We will learn about these items in details in the coming chapters
Tabs
HTTP Method type
URL bar
Header’s list
Response section: It is filled only when to invoke a REST request. This section will be populated with the details of the received Response. We will learn more about it in the coming chapters. Now let us see individual sections in detail.

PostMan – Left Sidebar Section
The sidebar is a very important part of the Postman. The sidebar has two main parts or tabs which are History and Collections.
History Tab

Postman records the history of your API request just like any other web browser automatically. As soon as you invoke a REST request, it is saved in history and can be seen below the History Tab. It comes in handy when you have to search for some particular request that you entered in the past without entering again.


Collections
The concept of grouping requests is called Collections and each Collection is displayed under the Collection Tab. As shown in the image below. A collection in Postman can be imagined similar to a folder in your system. You create a folder, for example, movies, and keep movies in it so that you know where all your movies are. Similarly in Postman, we save the similar kind of requests under some collection name (that we define) and when we open any collection we get all the Requests under that heading, As shown in the below image


Postman – Header Section

The below image shows just the Header of the Postman application.


The header has the following items
New

Choosing this option will let you choose what “new” you want to start. For example, a collection would open the panel where you can enter a new collection to start and its corresponding requests. Selecting “request” in New will open the request panel where you can enter and save the requests into the collection of your choice. The new option lets you create the following:
Request
Collection
Environment
Documentation
Mock Server
Monitor

Import
The import option lets you import files of different formats. Importing means choosing the files located in your system or through a link and running it through Postman. As can be seen from the image it allows you to import a Postman Collection, Environment, Curl command, etc. Importing a collection is the most common among all.


Interceptor
Recall we learned that if you are installing the application from chrome then a separate interceptor is required for the proxy server. This interceptor is inbuilt in the native app. You can set a proxy server here to capture all the API requests that you send through your browser. A proxy server can be used to capture all the requests that you send through your browser or from your phone or any other system.


Sync
Sync option is for synchronizing the API requests that you have sent on any machine to the Postman cloud. When you are working in Postman and making changes or sending requests, if you Sync is on, it will automatically be saved in your Postman’s cloud storage. This way you can have them saved and whenever you sign in on a different machines to use Postman, they will automatically appear. This feature requires you to sign in (If you did not during the installation part).


Postman – Builder Section
A builder part of the Postman is basically what a cpu is to a computer. It is the main part that controls all the functionalities and methods to be incorporated inside the API.


A builder part has the following main parts:
Request Type:
Endpoint Address Bar:
Params: This option lets the user define different Query Parameters for the request.
Request Type

This is the request type method for the API. It indicates the type of HTTP Request that has been sent. There are different kinds of requests which we will discuss as we proceed further, but just to know, there are four main types of requests namely GET ,POST. PUT and DELETE.

Endpoint Address Bar
This is the box, besides the request type option, to enter the EndPoint (API). It acts just like a browser with a similar interface for the New tab. We enter our required endpoint into the bar which is our main URL.

Params
Params are the parameter option that allows us to write the parameters of the URL. The parameters are embedded into a URL and are very important to get the desired result. They also help us in getting efficient usage of memory and bandwidth. This will be discussed in a complete chapter later on.

Authorization
The authorization process verifies whether you have permission to access the data you want from the server. Not all data is available for everyone inside a company, so there lies the solution as Authorization. With the authorization, the server first checks whether the data you are asking for can be shown to you. If it can be, you get the desired response.

Header
A header in the HTTP request or response is the additional information that is needed to be conveyed between the client-server. HTTP headers are mainly intended for the communication between the server and the client in both directions.

Postman – Response Section
A response box is a box that shows the response from the server that we receive after requesting through API. A response box has many options in it, which won’t be feasible to explain it here in this chapter. In the coming chapters, you will learn about the response, although if you want you can visit the chapter here.


By aem4beginner

API Testing with Postman

This tutorial is completely designed for you to understand Postman even though you have never heard of Postman or let say API. Since Postman is an API testing tool, we must know what is an API. So in this tutorial, we will explore the different topics around API such as
  1. What is an API
  2. API Testing
  3. Role of A software tester in API testing
  4. API Testing and Unit Testing.
  5. Area for covering your test
Starting with the first, we will start our journey now with learning about APIs.

What is an API?
API stands for Application Programming Interface. Talking in technical terms an API is a set of procedures, functions, and other points of access which an application, an operating system, a library, etc., makes available to programmers in order to allow it to interact with other software. Didn’t get it? Well, neither did I. Let’s break these terms and explore more about APIs.

Taking an analogy here, let say you went to a restaurant. There is no waiter present, so you need to see the menu lying on the table and then make a request to the kitchen where the chef will prepare the dish for you. But it does not always work that way. What if the dish is not available? You will have to go to your seat again and decide something else. There will be many customers present in the restaurant which will slow the process of the chef since now he will be listening to the orders instead of preparing them. Also, how can we forget we live in this multilingual world? What if you do not understand the chef’s language? We need a waiter here. A waiter is what can be seen as an API in the internet world. The waiter will come and take your requests, give it to the chef, and then in response bring back the food. This waiter is bilingual and speaks both of your (chef and you) languages fluently. What if the dish is not available? Well, the waiter knows beforehand you made the wrong request, so he will tell you then and there on the table that the food item is not available. How much time and energy is saved? This is exactly what an API does.


As we visually depict the above analogy using an image, we can see that you are working as a user in the API world. You make the requests while the waiter works as an API who is an intermediary and takes the request to the appropriate server. This server will be processing your request and responding back to you. As said above, your server or application is the chef who is in the kitchen. He will process your request, cook your desired food, and present it back to you as a response. The methods and parameters will be discussed in detail later but here in the analogy, you can think of it as the special requests you make according to your taste and liking. For example, you order something from the menu and describe explicitly that it should be extra spicy. This will help the chef to cook according to your demands.

An API takes your requests from the device and fetch the response from the server. Today, API is everywhere. We have achieved so much through APIs, it’s hard to count. If you are into computer science or the IT industry, there is no escape from APIs. APIs help you fetch a particular response according to the particular request. For example, while you are booking a flight, you will require specific flight results according to the source, destination, and departure date, and maybe some other variables. For this, you might have to visit different airlines to check their different price. But through APIs, this is not so difficult. Through different APIs of different airlines, we can get the response of each and every airline for that specific query at one place like GoIbibo does. Maybe now you must have got the idea of how vastly APIs are used today. We all are connected through APIs. All the services that are offered online are mostly through API. As I said, APIs are everywhere

API Testing
So now that we have established what an API is and why APIs are critical to modern interconnected, globally distributed applications and services, it is important to understand why API testing is critical.

API testing creates a more reliable code. But historically, testing would take place at the GUI level. When a developer would finish their work, they would hand it off to the QA engineer. The engineers had limited time so they would test the code at the highest level – the GUI. This would cover both front-end and back-end development.

This worked for manual testing and for the beginning of automation testing but isn’t right for the age of agile and continuous testing. GUI testing is too brittle, GUI automated scripts break easily and more time-consuming. But more importantly, when the application is underdeveloped, teams can’t wait for the entire system to be updated and the GUI to be ready before testing occurs.

In the age of agile, testing must take place at a lower level, i.e at the API level as early as possible. Developers can even do it themselves. API’s can be tested even when the GUI of the application is not yet ready. On top of that API tests, because of “API contracts”, can even be created before development is complete.


An API or rather all the API present in the software/application should be tested perfectly. This is the job of a software tester and bears a huge responsibility. A perfect working API leads to a perfectly working application. Testing the API solves a lot of issues in the application which may arise at some point of time in the future. There is much software available for API Testing and one such software is Postman.

Roles & Responsibilities of a Software tester for testing API’s
As an API tester, you should have good architectural knowledge of various web services, REST, SOAP, and Micro Services.
Should able to use all the web methods like GET, POST, DELETE, etc
Validate the response, response time, error code
Able to validate the XML and JSON body by using Json parsers
Must know to use OAuth and OAuth2 authentication mechanisms
Load and Security testing on web services
Able to read and understand the API documentation
Able to derive a good number of test cases and scenarios.
Should be good in SQL queries to validate API and DB data elements
Become a master in a tool of your own choice SOAP UI and Postman are not Automation tools. Rest Assured, Rest Sharp, Node modules are the open source libraries for API testing.

API Testing and Unit Testing
API testing and unit testing are considered the same thing by some testers but actually, it is different. Unit testing is done by the Developers or by Test Engineers and is done on a class by class basis or at the single component level. The motive is to verify whether the module delivers the required functionality. The development team monitors unit testing activity and makes necessary changes wherever required. A major emphasis is on the fact whether each unit or module works perfectly fine in isolation. That is, dependency should be least to ensure a robust module design.


On the other hand, API testing is basically black box testing which is simply concerned with the final output of the system under test. API tests are executed only after the build is ready and portray the system as a whole as it is the user interface that an end user will interact with.

API testing primarily aims to test the business logic layer of the system’s architecture. API testing is primarily handled by the QA team, which requires them to run any API on top of a particular build meant to serve a specific purpose.

API testing also tests the unit as part of a system, while unit testing typically tests the unit in relative isolation from the rest of the system. Hence API testing is also ended to end testing. This simply means when we test the complete software in API testing then the modules which make that software are also tested, obviously. But when we do unit testing, we focus only on the functionality of that module and see its working which is completely isolated from the rest of the modules/software.

Area for covering your test
When we test any API through a tool, we face a lot of errors normally. These errors are not only related to the only APIs but can vary from software error to server error. This makes the job of a software tester more important and wide than it seems. Since the software is built and delivered in steps, the same goes for testing it. When software is in development stage, the tests and cases are built accordingly. This helps the developers to see any errors of server or network etc. The same goes for any other stage of software such as the production stage in which you evolve and upgrade those test cases. The area for covering your tests should be as wide as possible. It should cover every little possibility of the failure so that the software is built of premium quality and the feedback team receives minimum tickets.


By aem4beginner

List of HTTP status codes

This is a list of Hypertext Transfer Protocol (HTTP) response status codes. Status codes are issued by a server in response to a client's request made to the server. It includes codes from IETF Request for Comments (RFCs), other specifications, and some additional codes used in some common applications of the HTTP. The first digit of the status code specifies one of five standard classes of responses. The message phrases shown are typical, but any human-readable alternative may be provided. Unless otherwise stated, the status code is part of the HTTP/1.1 standard (RFC 7231).[1]

The Internet Assigned Numbers Authority (IANA) maintains the official registry of HTTP status codes.[2]

All HTTP response status codes are separated into five classes or categories. The first digit of the status-code defines the class of response, while the last two digits do not have any classifying or categorization role. There are five classes defined by the standard:
1xx informational response – the request was received, continuing process
2xx successful – the request was successfully received, understood, and accepted
3xx redirection – further action needs to be taken in order to complete the request
4xx client error – the request contains bad syntax or cannot be fulfilled
5xx server error – the server failed to fulfill an apparently valid request

1xx Informational response
An informational response indicates that the request was received and understood. It is issued on a provisional basis while request processing continues. It alerts the client to wait for a final response. The message consists only of the status line and optional header fields, and is terminated by an empty line. As the HTTP/1.0 standard did not define any 1xx status codes, servers must not[note 1] send a 1xx response to an HTTP/1.0 compliant client except under experimental conditions.[3]
100 Continue The server has received the request headers and the client should proceed to send the request body (in the case of a request for which a body needs to be sent; for example, a POST request). Sending a large request body to a server after a request has been rejected for inappropriate headers would be inefficient. To have a server check the request's headers, a client must send Expect: 100-continue as a header in its initial request and receive a 100 Continue status code in response before sending the body. If the client receives an error code such as 403 (Forbidden) or 405 (Method Not Allowed) then it shouldn't send the request's body. The response 417 Expectation Failed indicates that the request should be repeated without the Expect header as it indicates that the server doesn't support expectations (this is the case, for example, of HTTP/1.0 servers).[4]
101 Switching Protocols The requester has asked the server to switch protocols and the server has agreed to do so.[5]
102 Processing (WebDAV; RFC 2518)
A WebDAV request may contain many sub-requests involving file operations, requiring a long time to complete the request. This code indicates that the server has received and is processing the request, but no response is available yet.[6] This prevents the client from timing out and assuming the request was lost.
103 Early Hints (RFC 8297)
Used to return some response headers before the final HTTP message.[7]

2xx Success
This class of status codes indicates the action requested by the client was received, understood, and accepted.[2]
200 OK Standard response for successful HTTP requests. The actual response will depend on the request method used. In a GET request, the response will contain an entity corresponding to the requested resource. In a POST request, the response will contain an entity describing or containing the result of the action.[8]
201 Created The request has been fulfilled, resulting in the creation of a new resource.[9]
202 Accepted The request has been accepted for processing, but the processing has not been completed. The request might or might not be eventually acted upon, and may be disallowed when processing occurs.[10]
203 Non-Authoritative Information (since HTTP/1.1)The server is a transforming proxy (e.g. a Web accelerator) that received a 200 OK from its origin, but is returning a modified version of the origin's response.[11][12]
204 No Content The server successfully processed the request, and is not returning any content.[13]
205 Reset Content The server successfully processed the request, asks that the requester reset its document view, and is not returning any content. [14]
206 Partial Content (RFC 7233) The server is delivering only part of the resource (byte serving) due to a range header sent by the client. The range header is used by HTTP clients to enable resuming of interrupted downloads, or split a download into multiple simultaneous streams.[15]
207 Multi-Status (WebDAV; RFC 4918) The message body that follows is by default an XML message and can contain a number of separate response codes, depending on how many sub-requests were made.[16]
208 Already Reported (WebDAV; RFC 5842) The members of a DAV binding have already been enumerated in a preceding part of the (multistatus) response, and are not being included again.
226 IM Used (RFC 3229) The server has fulfilled a request for the resource, and the response is a representation of the result of one or more instance-manipulations applied to the current instance.[17]

3xx Redirection
This class of status code indicates the client must take additional action to complete the request. Many of these status codes are used in URL redirection.[2]

A user agent may carry out the additional action with no user interaction only if the method used in the second request is GET or HEAD. A user agent may automatically redirect a request. A user agent should detect and intervene to prevent cyclical redirects.[18]
300 Multiple Choices Indicates multiple options for the resource from which the client may choose (via agent-driven content negotiation). For example, this code could be used to present multiple video format options, to list files with different filename extensions, or to suggest word-sense disambiguation.[19]
301 Moved Permanently This and all future requests should be directed to the given URI.[20]
302 Found (Previously "Moved temporarily") Tells the client to look at (browse to) another URL. 302 has been superseded by 303 and 307. This is an example of industry practice contradicting the standard. The HTTP/1.0 specification (RFC 1945) required the client to perform a temporary redirect (the original describing phrase was "Moved Temporarily"),[21] but popular browsers implemented 302 with the functionality of a 303 See Other. Therefore, HTTP/1.1 added status codes 303 and 307 to distinguish between the two behaviours.[22] However, some Web applications and frameworks use the 302 status code as if it were the 303.[23]
303 See Other (since HTTP/1.1) The response to the request can be found under another URI using the GET method. When received in response to a POST (or PUT/DELETE), the client should presume that the server has received the data and should issue a new GET request to the given URI.[24]
304 Not Modified (RFC 7232) Indicates that the resource has not been modified since the version specified by the request headers If-Modified-Since or If-None-Match. In such case, there is no need to retransmit the resource since the client still has a previously-downloaded copy.[25]
305 Use Proxy (since HTTP/1.1) The requested resource is available only through a proxy, the address for which is provided in the response. For security reasons, many HTTP clients (such as Mozilla Firefox and Internet Explorer) do not obey this status code.[26]
306 Switch Proxy No longer used. Originally meant "Subsequent requests should use the specified proxy."[27]
307 Temporary Redirect (since HTTP/1.1) In this case, the request should be repeated with another URI; however, future requests should still use the original URI. In contrast to how 302 was historically implemented, the request method is not allowed to be changed when reissuing the original request. For example, a POST request should be repeated using another POST request.[28]
308 Permanent Redirect (RFC 7538) The request and all future requests should be repeated using another URI. 307 and 308 parallel the behaviors of 302 and 301, but do not allow the HTTP method to change. So, for example, submitting a form to a permanently redirected resource may continue smoothly.[29]

4xx Client errors
This class of status code is intended for situations in which the error seems to have been caused by the client. Except when responding to a HEAD request, the server should include an entity containing an explanation of the error situation, and whether it is a temporary or permanent condition. These status codes are applicable to any request method. User agents should display any included entity to the user.[30]
400 Bad Request The server cannot or will not process the request due to an apparent client error (e.g., malformed request syntax, size too large, invalid request message framing, or deceptive request routing).[31]
401 Unauthorized (RFC 7235) Similar to 403 Forbidden, but specifically for use when authentication is required and has failed or has not yet been provided. The response must include a WWW-Authenticate header field containing a challenge applicable to the requested resource. See Basic access authentication and Digest access authentication.[32] 401 semantically means "unauthorised",[33] the user does not have valid authentication credentials for the target resource.Note: Some sites incorrectly issue HTTP 401 when an IP address is banned from the website (usually the website domain) and that specific address is refused permission to access a website.[citation needed]
402 Payment Required Reserved for future use. The original intention was that this code might be used as part of some form of digital cash or micropayment scheme, as proposed, for example, by GNU Taler,[34] but that has not yet happened, and this code is not widely used. Google Developers API uses this status if a particular developer has exceeded the daily limit on requests.[35] Sipgate uses this code if an account does not have sufficient funds to start a call.[36] Shopify uses this code when the store has not paid their fees and is temporarily disabled.[37] Stripe uses this code for failed payments where parameters were correct, for example blocked fraudulent payments.[38]
403 Forbidden The request contained valid data and was understood by the server, but the server is refusing action. This may be due to the user not having the necessary permissions for a resource or needing an account of some sort, or attempting a prohibited action (e.g. creating a duplicate record where only one is allowed). This code is also typically used if the request provided authentication by answering the WWW-Authenticate header field challenge, but the server did not accept that authentication. The request should not be repeated. 
404 Not Found The requested resource could not be found but may be available in the future. Subsequent requests by the client are permissible.
405 Method Not Allowed A request method is not supported for the requested resource; for example, a GET request on a form that requires data to be presented via POST, or a PUT request on a read-only resource.
406 Not Acceptable The requested resource is capable of generating only content not acceptable according to the Accept headers sent in the request.[39] See Content negotiation.
407 Proxy Authentication Required (RFC 7235) The client must first authenticate itself with the proxy.[40]
408 Request Timeout The server timed out waiting for the request. According to HTTP specifications: "The client did not produce a request within the time that the server was prepared to wait. The client MAY repeat the request without modifications at any later time."[41]
409 Conflict Indicates that the request could not be processed because of conflict in the current state of the resource, such as an edit conflict between multiple simultaneous updates.
410 Gone Indicates that the resource requested is no longer available and will not be available again. This should be used when a resource has been intentionally removed and the resource should be purged. Upon receiving a 410 status code, the client should not request the resource in the future. Clients such as search engines should remove the resource from their indices.[42] Most use cases do not require clients and search engines to purge the resource, and a "404 Not Found" may be used instead.
411 Length Required The request did not specify the length of its content, which is required by the requested resource.[43]
412 Precondition Failed (RFC 7232) The server does not meet one of the preconditions that the requester put on the request header fields.[44][45]
413 Payload Too Large (RFC 7231) The request is larger than the server is willing or able to process. Previously called "Request Entity Too Large".[46]
414 URI Too Long (RFC 7231) The URI provided was too long for the server to process. Often the result of too much data being encoded as a query-string of a GET request, in which case it should be converted to a POST request.[47] Called "Request-URI Too Long" previously.[48]
415 Unsupported Media Type (RFC 7231) The request entity has a media type that the server or resource does not support. For example, the client uploads an image as image/svg+xml, but the server requires that images use a different format.[49]
416 Range Not Satisfiable (RFC 7233) The client has asked for a portion of the file (byte serving), but the server cannot supply that portion. For example, if the client asked for a part of the file that lies beyond the end of the file.[50] Called "Requested Range Not Satisfiable" previously.[51]
417 Expectation Failed The server cannot meet the requirements of the Expect request-header field.[52]
418 I'm a teapot (RFC 2324, RFC 7168) This code was defined in 1998 as one of the traditional IETF April Fools' jokes, in RFC 2324, Hyper Text Coffee Pot Control Protocol, and is not expected to be implemented by actual HTTP servers. The RFC specifies this code should be returned by teapots requested to brew coffee.[53] This HTTP status is used as an Easter egg in some websites, such as Google.com's I'm a teapot easter egg.[54][55]
421 Misdirected Request (RFC 7540) The request was directed at a server that is not able to produce a response[56] (for example because of connection reuse).[57]
422 Unprocessable Entity (WebDAV; RFC 4918) The request was well-formed but was unable to be followed due to semantic errors.[16]
423 Locked (WebDAV; RFC 4918) The resource that is being accessed is locked.[16]
424 Failed Dependency (WebDAV; RFC 4918) The request failed because it depended on another request and that request failed (e.g., a PROPPATCH).[16]
425 Too Early (RFC 8470) Indicates that the server is unwilling to risk processing a request that might be replayed.
426 Upgrade Required The client should switch to a different protocol such as TLS/1.0, given in the Upgrade header field.[58]
428 Precondition Required (RFC 6585) The origin server requires the request to be conditional. Intended to prevent the 'lost update' problem, where a client GETs a resource's state, modifies it, and PUTs it back to the server, when meanwhile a third party has modified the state on the server, leading to a conflict.[59]
429 Too Many Requests (RFC 6585) The user has sent too many requests in a given amount of time. Intended for use with rate-limiting schemes.[59]
431 Request Header Fields Too Large (RFC 6585) The server is unwilling to process the request because either an individual header field or all the header fields collectively are too large.[59]
451 Unavailable For Legal Reasons (RFC 7725) A server operator has received a legal demand to deny access to a resource or to a set of resources that includes the requested resource.[60] The code 451 was chosen as a reference to the novel Fahrenheit 451 (see the Acknowledgements in the RFC).

5xx Server errors
The server failed to fulfill a request.[61]

Response status codes beginning with the digit "5" indicate cases in which the server is aware that it has encountered an error or is otherwise incapable of performing the request. Except when responding to a HEAD request, the server should include an entity containing an explanation of the error situation, and indicate whether it is a temporary or permanent condition. Likewise, user agents should display any included entity to the user. These response codes are applicable to any request method.[62]
500 Internal Server Error A generic error message, given when an unexpected condition was encountered and the no more specific message is suitable.[63]
501 Not Implemented The server either does not recognize the request method, or it lacks the ability to fulfill the request. Usually, this implies future availability (e.g., a new feature of a web-service API).[64]
502 Bad Gateway The server was acting as a gateway or proxy and received an invalid response from the upstream server.[65]
503 Service Unavailable The server cannot handle the request (because it is overloaded or down for maintenance). Generally, this is a temporary state.[66]
504 Gateway Timeout The server was acting as a gateway or proxy and did not receive a timely response from the upstream server.[67]
505 HTTP Version Not Supported The server does not support the HTTP protocol version used in the request.[68]
506 Variant Also Negotiates (RFC 2295) Transparent content negotiation for the request results in a circular reference.[69]
507 Insufficient Storage (WebDAV; RFC 4918) The server is unable to store the representation needed to complete the request.[16]
508 Loop Detected (WebDAV; RFC 5842) The server detected an infinite loop while processing the request (sent instead of 208 Already Reported).
510 Not Extended (RFC 2774) Further extensions to the request are required for the server to fulfill it.[70]
511 Network Authentication Required (RFC 6585) The client needs to authenticate to gain network access. Intended for use by intercepting proxies used to control access to the network (e.g., "captive portals" used to require agreement to Terms of Service before granting full Internet access via a Wi-Fi hotspot).[59]

Unofficial codes
The following codes are not specified by any standard.
103 Checkpoint Used in the resumable requests proposal to resume aborted PUT or POST requests.[71]
218 This is fine (Apache Web Server) Used as a catch-all error condition for allowing response bodies to flow through Apache when ProxyErrorOverride is enabled. When ProxyErrorOverride is enabled in Apache, response bodies that contain a status code of 4xx or 5xx are automatically discarded by Apache in favor of a generic response or a custom response specified by the ErrorDocument directive.[72]
419 Page Expired (Laravel Framework) Used by the Laravel Framework when a CSRF Token is missing or expired.
420 Method Failure (Spring Framework) A deprecated response used by the Spring Framework when a method has failed.[73]
420 Enhance Your Calm (Twitter) Returned by version 1 of the Twitter Search and Trends API when the client is being rated limited; versions 1.1 and later use the 429 Too Many Requests response code instead.[74] The phrase "Enhance your calm" comes from the 1993 movie Demolition Man, and its association with this number is likely a reference to cannabis.[citation needed]
430 Request Header Fields Too Large (Shopify) Used by Shopify, instead of the 429 Too Many Requests response code, when too many URLs are requested within a certain time frame.[75]
450 Blocked by Windows Parental Controls (Microsoft) The Microsoft extension code indicated when Windows Parental Controls are turned on and are blocking access to the requested webpage.[76]
498 Invalid Token (Esri) Returned by ArcGIS for Server. Code 498 indicates an expired or otherwise invalid token.[77]
499 Token Required (Esri) Returned by ArcGIS for Server. Code 499 indicates that a token is required but was not submitted.[77]
509 Bandwidth Limit Exceeded (Apache Web Server/cPanel) The server has exceeded the bandwidth specified by the server administrator; this is often used by shared hosting providers to limit the bandwidth of customers.[78]
526 Invalid SSL Certificate Used by Cloudflare and Cloud Foundry's gorouter to indicate failure to validate the SSL/TLS certificate that the origin server presented.
529 Site is overloaded Used by Qualys in the SSLLabs server testing API to signal that the site can't process the request.[79]
530 Site is frozen Used by the Pantheon web platform to indicate a site that has been frozen due to inactivity.[80]
598 (Informal convention) Network read timeout error Used by some HTTP proxies to signal a network read timeout behind the proxy to a client in front of the proxy.[81]

Internet Information Services
Microsoft's Internet Information Services (IIS) web server expands the 4xx error space to signal errors with the client's request.
440 Login Time-out The client's session has expired and must log in again.[82]
449 Retry With The server cannot honor the request because the user has not provided the required information.[83]
451 Redirect Used in Exchange ActiveSync when either a more efficient server is available or the server cannot access the users' mailbox.[84] The client is expected to re-run the HTTP AutoDiscover operation to find a more appropriate server.[85]

IIS sometimes uses additional decimal sub-codes for more specific information,[86] however these sub-codes only appear in the response payload and in the documentation, not in the place of an actual HTTP status code.

nginx
The nginx web server software expands the 4xx error space to signal issues with the client's request.[87][88]
444 No Response Used internally[89] to instruct the server to return no information to the client and close the connection immediately.
494 Request header too large Client sent the too large request or a too-long header line.
495 SSL Certificate Error An expansion of the 400 Bad Request response code, used when the client has provided an invalid client certificate.
496 SSL Certificate Required An expansion of the 400 Bad Request response code, used when a client certificate is required but not provided.
497 HTTP Request Sent to HTTPS Port An expansion of the 400 Bad Request response code, used when the client has made an HTTP request to a port listening for HTTPS requests.
499 Client Closed Request Used when the client has closed the request before the server could send a response.

Cloudflare
Cloudflare's reverse proxy service expands the 5xx series of error space to signal issues with the origin server.[90]
520 Web Server Returned an Unknown Error The origin server returned an empty, unknown, or unexplained response to Cloudflare.[91]
521 Web Server Is Down The origin server has refused the connection from Cloudflare.522 Connection Timed OutCloudflare could not negotiate a TCP handshake with the origin server.
523 Origin Is Unreachable Cloudflare could not reach the origin server; for example, if the DNS records for the origin server are incorrect.
524 A Timeout Occurred Cloudflare was able to complete a TCP connection to the origin server but did not receive a timely HTTP response.
525 SSL Handshake Failed Cloudflare could not negotiate an SSL/TLS handshake with the origin server.
526 Invalid SSL Certificate Cloudflare could not validate the SSL certificate on the origin web server.
527 Railgun Error Error 527 indicates an interrupted connection between Cloudflare and the origin server's Railgun server.[92]
530 Error 530 is returned along with a 1xxx error.[93]

AWS Elastic Load Balancer
Amazon's Elastic Load Balancing adds a few custom 4xx return codes

460
The client closed the connection with the load balancer before the idle timeout period elapsed. Typically when client timeout is sooner than the Elastic Load Balancer's timeout.[94]

463

The load balancer received an X-Forwarded-For request header with more than 30 IP addresses.[94]


By aem4beginner

Response in Postman

In this tutorial we will understand how to deal with Response in Postman.

What is Response?
A Response is a message that is received by the server in return to a Request that we send. When we request something, the server acts upon the request and sends back a packet of the requested information. A response depends on the request mainly. Every request has a different kind of response and it is very important that we extract useful information from all of the responses. Postman has a beautiful interface for response and is very user-friendly. We can see a lot of information in the Postman for any response without doing much effort, or any if I might say.

Understanding Response in Postman
Talking about Response in Postman, the Response user interface contains lots of different things. We will deal with them in detail in this tutorial. The user interface has the following information blocks
Response Status and Information
Response Body
Response Cookies
Response Header

Let’s start by getting a response for www.google.com which looks like this:


Response Status and Information
Status Code :

A status code tells you the status of the request. There can be a lot of mistakes in the request and without looking at the status code, we might not always get what went wrong to our request. Sometimes, there can be a typing mistake in the URL or there can be a problem at the server side, status code help us know about what went wrong (if something went wrong). There are different status codes and each of them has a different meaning.

You can learn about the complete list of status code here.


Status code 200 OK means that the request was correct and the desired response has been sent to the client. Now, change the url to http://restapi.demoqa.com/utilities/weatherfull/city/hyderabd . Press Send and see the status code now.


It says 400 BAD REQUEST. It is so because we have changed the name of the city from Hyderabad to Hyderabd. This means the request was not correct, hence the bad request response. Similarly, you can see other status codes also for different requests.


Time
Time is the duration which the response took after we sent the request and received the response. This is very important sometimes because many projects have Service Level Agreements(SLA) for the time it should take a web service to return a response, this time can be a used to determine the SLA of the web service endpoint.


NOTE: The time given here is not the actual time that the request will take. It is just approximate but almost what it would be because there are a lot of things that Postman do after getting a response such as formatting and dividing Headers and cookies separately. As the additional work by Postman can be roughly considered as a constant time (WebServiceTime + Constant processing time by Postman). Therefore, it is an approximate of the time and is proportional to what the actual time will be. So you can consider this as actual time as well.

Size

Size is just the response size when it will be saved inside the memory. This response size is the size of complete response and headers and cookies and everything that has been sent along with the response.


NOTE: The response size that is shown in the Postman is approximate response size and not the exact size.

Response Body
A body depicts the body of the response, which is the main response content, that has been sent from the server. In this case as you can see it is a web page code being sent to us as a response. Now, there lies three ways ahead of us to look at this response:


Pretty
Pretty is a prettier version of the content being sent. The content is prettier as it is more readable. It has coloured key words and different colours have different meanings. This makes a code more readable and look nicer. This formatting is done by the Postman itself after getting the code.


Raw
Once you click on Preview you will get just the plain view of the content, as received from the server. It is just a raw version of the code without any colourful keywords. By looking at this code you might get why the other code is called “Pretty“.


Preview
Preview of the code will show you the preview of the page, had the page been run inside a browser. Click on preview and you will see the exact page as you would have seen inside a browser. So this would let you know the response preview without visiting the browser.


Format Type
As discussed above, a request has a defined response to it as defined by the Content-Type header. That response can be in any format. For example, in this case we have the response as a HTML code file.


Postman is smart enough to detect the response type and show you in the desired format, but sometimes Postman can also make a mistake. For example, use http://restapi.demoqa.com/utilities/weatherfull/city/hyderabad to get a response.

You will see that we have received a status code 200 and still there is no response. This is because Postman has failed to recognize the format of the response and is expecting an HTML file as seen in the dropdown.

Select Text in dropdown and you will be able to see the response now.


Sometimes, the server sends the response in two or more different formats. The type of response will be visible to its corresponding format type.

Note: Content-Type header defines the format of the response. For e.g. the Content-Type header may say that the response is Json, however the content being sent is XML or a malformed Json. In that case Postman will not be able to do much. Take it as an exercise to understand why Postman is not able to understand the format of response returned by http://restapi.demoqa.com/utilities/weatherfull/city/hyderabad

Copy Response
The icon with two rectangles that you see in the corner is used for copying the complete response to the clipboard which is very handy to send the response to your teammates or using afterwards.


Cookie
Cookies are the small files that are related to the server files (website pages). Once you visit a website for the first time, a cookie is downloaded on the client’s machine. This cookie contains the information which can be used by the same website when you visit again. This helps the website to get you the specific response and specific information based on your last visit. In postman, we can clearly see the cookies that have been sent from the server as a response. This makes it easy for the client to see what cookies are being saved inside his browser. We cannot manipulate this cookie since they are sent from the server, Postman is used just to separate it from the response and have a clear view.


Header

Headers in a HTTP request or response is the additional information that is transferred to the user or the server. In postman, the headers can be seen in the Headers tab.


Once you click on the header you can see different information such as below. Although, every entry in the Headers tab is a header item we will just take a look at the most important ones.
Content-Type: This is the content type of the response. In the above example when we used www.google.com the content type is given as text/html because the response is being sent in the HTML which is one of the options.
Date: This option shows the date, day, and time of the response along with the time zone.
Server: This option tells the name of the server which has responded to the request. In the above example, the server name is shown as gws which corresponds to Google Web Server.
Cookie expires time: As the name suggests, this option tells the expire time of the cookie that has been sent along with the response.


By aem4beginner