Showing posts with label Workflow. Show all posts

January 23, 2021
Estimated Post Reading Time ~

How can I list only project specific workflow in dropdown list of "start workflow"

I am using AEM 6.4 want to list only project specific workflow in drop down list of "start workflow" and hide the out of the box workflows. Please suggest the best possible approach.

Solution:
Just add Workflow: System tag in the page properties of the OOTB workflow models. So it will hide all the OOTBS workflows from the drop-down list of Start Workflow option and it will only show the workflow models which do not contains workflow:System tag.

http://localhost:4502/libs/cq/workflow/admin/console/content/models.html

Here is the official documentation from Adobe in case if you want more on this https://helpx.adobe.com/in/experience-manager/kb/hide-workflow-models-start-workflow-list.html


By aem4beginner

How to hide the workflow models for certain groups or a user in AEM 6.5?

Question:
Any Idea How to hide the workflow models for certain groups or a user in AEM 6.5?
runtime workflows are updated in /var/workflow/models,
In useradmin console I am unable to set permission to specific workflow model because workflowmodel is in /var/workflow/model is xml file and NOT having
mixnTypes: rep:AccessContrallable property.
Adding the system tag to workflowmodel hides the workflow model for all users but to specific group

my use case is I want hide workflow name in the dropdown option in start workflow when specific group members trigger workflow

Solution:
1. creating custom workflow under /conf/global/setting/workflow/model/projectname/workflowmodel(projectname is sling:folder with mixinType: rep:AccessControllable

2. create workflow model above folder and sync

3. created runtime workflow under /var/workflow/model/projectname/workflowmodel

4. goto useradmin console update permission specific group(allow/deny) to workflowmodel in /var/workflow/model/projectname/workflowmodel


By aem4beginner

January 3, 2021
Estimated Post Reading Time ~

Sling – Feature Flags in AEM

Sometimes we need to implement site toggle or feature toggle in the website to enable or disable certain functionality like maintenance banner, chat, etc.
For this kind of functionality, AEM developers generally go for OSGi config, where they can create properties and use those properties to toggle.

But AEM already has such a feature which is called Feature Flags.

Feature Flags
Feature Flags are used to select whether a particular feature is enabled or not. This allows to continuously deploy new features of an application without making them globally available yet.

Features may be enabled based on various contextual data:
  • Time of Day
  • Segmentation Data (gender, age, etc.), if available
  • Request Parameter
  • Request Header
  • Cookie Value
  • Static Configuration
  • Other Configurations
Feature flags can be provided by registering org.apache.sling.featureflags.Feature services. Alternatively, feature flags can be provided by factory configuration with factory PID org.apache.sling.featureflags.Feature

More info at https://sling.apache.org/documentation/the-sling-engine/featureflags.html

Creating Features by registering org.apache.sling.featureflags.Feature services
Java API Docs–

https://helpx.adobe.com/experience-manager/6-3/sites/developing/using/reference-materials/javadoc/org/apache/sling/featureflags/package-summary.html

@Component(service = Feature.class, immediate = true)
public class AuthorFeature implements Feature {

@Override
public String getDescription() {
return "mysite-author description2";
}

@Override
public String getName() {
return "mysite-author2";
}

@Override
public boolean isEnabled(ExecutionContext ec) {
boolean isValid = false;

// Evaluate value of flag and return true or false
return isValid;
}


where isEnabled methods check whether the feature is enabled for the given execution context.

Creating a static feature flag by factory configuration
Static feature flag can be created from OSGi Configuration
http://localhost:4502/system/console/configMgr

Configuration Name - Apache Sling Configured Feature
(There are 2 configurations with the same name use 2nd one to create a new feature flag)


for example, AEM Content Services Feature Flag is a kind of sling feature flag.

Access feature flags in the code
Both Custom and Static feature flags can be accessed inside Servlet, HTL, or inside other components by creating a reference of Feature service(org.apache.sling.featureflags.Features).

@Reference
private Features features;


Feature service has the below method, which returns true or false based on feature flag value in the given execution context.

features.isEnabled("mysite-author2")

Code Example - 1
Below Servlet get all the feature flag and shows their enable states
https://github.com/arunpatidar02/aem63app-repo/blob/master/java/GetFeaturesServlet.java


Code Example - 2
Creating custom flags that would be enabled if either user is the admin or belongs to some Author groups.
https://github.com/arunpatidar02/aem63app-repo/blob/master/java/AuthorFeature.java

Above service check the user against Author groups, these author groups can be hard-coded or can be stored in config or in JCR. For this example I've saved Author groups in CRXDE in below node /apps/AEM63App/tools/features/my-author2, group multi-valued property have all the groups for which this feature flag should return true.


Where can feature flag be used in AEM?
Can be used to toggle application features.
e.g.
if(features.isEnabled("mysite-author2")) {
// do something
}

Can be used to show hide granite fields e.g. components dialog field or action button in AEM application header e.g. Create Page, Share Assets, delete a page, etc...

Granite provides various options to render or not item based on render types. More info
https://helpx.adobe.com/experience-manager/6-3/sites/developing/using/reference-materials/granite-ui/api/jcr_root/libs/granite/ui/components/coral/foundation/renderconditions/index.html

Except for features options, others are not that dynamics static for example
https://helpx.adobe.com/experience-manager/6-3/sites/developing/using/reference-materials/granite-ui/api/jcr_root/libs/granite/ui/components/coral/foundation/renderconditions/feature/index.html

Not
/libs/granite/ui/components/foundation/renderconditions/not
The condition that renders the component when all of the sub-conditions are false.

Or

/libs/granite/ui/components/coral/foundation/renderconditions/or
The condition that renders the component when any of the sub-conditions is deciding the component should be rendered.

Privilege
/libs/granite/ui/components/coral/foundation/renderconditions/privilege
A condition that decides based on AccessControlManager#hasPrivileges(String, Privilege[]).

Simple
/libs/granite/ui/components/coral/foundation/renderconditions/simple
A condition that takes a simple boolean for the decision.

Feature
/libs/granite/ui/components/coral/foundation/renderconditions/feature
A condition that decides based on Sling’s Feature Flag.

Privilege uses AccessControlManager, which enables the following
Privilege discovery: Determining the privileges that a user has in relation to a node.
Assigning access control policies: Setting the privileges that a user has in relation to a node using access control policies specific to the implementation.
more info https://docs.adobe.com/docs/en/spec/jcr/2.0/16_Access_Control_Management.html
Privilege type rendition check user against JCR privileges e.g. jcr:write,jcr:modifyProperties,jcr:addChildNodes, jcr:readAccessControl,jcr:modifyAccessControl etc. If the user doesn't have those privilege for that node it won't be rendered.

But In AEM the user set and their roles are not very limited if you restrict the user for a feature he/she may be blocked for another, so there might be consequences using Privilege rendition just for hiding items or action buttons.

So alternative if this using Features renditions which can be more dynamic and can be adapt by the developer based on the requirement, for example in Code Example - 2, I've created a flag to hide a dialog item if the user is not an admin or not belongs to some groups and used in renditions


a product-type dropdown will be visible if mysite-author2 feature evaluate true in the current context(which is if a user is admin or part of my-reviewer or administrator groups)


Dialog for admin looks like below :


For user who is not an admin or part of those 2 groups


Similarly, all the other granite items can also be rendered based on the above. e.g. Lock item is hidden for some users for which the feature flag is not enabled.


Can be used with Workflow Launcher...

Features
A list of features to be enabled. Select the required feature(s) using the dropdown selector.
Disabled Features
A list of features to be disabled. Select the required feature(s) using the dropdown selector.

References:

https://sling.apache.org/documentation/the-sling-engine/featureflags.html
https://helpx.adobe.com/experience-manager/6-3/sites/developing/using/reference-materials/granite-ui/api/jcr_root/libs/granite/ui/components/coral/foundation/renderconditions/index.html


By aem4beginner

January 2, 2021
Estimated Post Reading Time ~

The Power of Transient Workflow in AEM

When a workflow executes in Adobe Experience Manager (AEM), it stores workflow runtime information in the JCR repository under the instance node. This feature is useful when auditing is required on each step of the workflow status. The downside of this feature is the growth of the repository size, as a large repository can eventually inhibit performance and cause disk space loss issues.

AEM provides out-of-the-box (OOTB) Adobe Granite Workflow Purge to clear nodes under the instance node. This workflow purge activity needs to be scheduled on periodic basis. The workflow purge schedule task runs takes quite a long time, which leads to timeout where not all archived workflow is purged.

Here’s where transient workflow comes into play. What exactly does Transient Workflow work? It doesn’t save any of the runtime information relating to the workflow (whereas the payload related information and processing logic that creates assets are persisted to JCR).

So what is the benefit of this transient workflow? We do not need to worry about repository growth, as it contributes to a lower number of TarMK files and faster offline compaction. Transient workflows do not create child nodes under an instance node. When Adobe Granite Workflow Purge scheduled task runs, it has fewer archived workflows to purge, so it won’t timeout.

Here’s a simple demonstration of the transient workflow feature within Adobe Digital Asset Management (DAM) Update Asset Workflow.

Before making DAM Update Asset Workflow transient:


Upload a PDF asset to the DAM folder. After completion of the workflow, inspect the workflow console archive tab – you will see the workflow instance. Open the history of the completed workflow instance to see all persisted workflow steps.


Now verify the same CRXDE. Under /etc/workflow/instance you will see the instance.


Next, make the same DAM Update Asset Workflow a transient workflow, and then look at the results:


Now upload a PDF asset to the DAM folder. After completion of the workflow, inspect the workflow console archive tab. You will not see the instance of the workflow because the transient workflow won’t be saved under the /etc/workflow/instances node.


Note: There are use cases that require one workflow to be non-transient and other workflow to be transient. You can implement not only the OOTB workflow as transient, you can make your custom workflow be the transient workflow as well.


By aem4beginner

Features That Will Make You Love AEM 6.3 Workflows

In earlier releases of Adobe Experience Manager (AEM), there’s no way of knowing whether the editing page is in the workflow process. Authors need to go into the workflow inbox to look and see if they have any pages/items assigned as part of the workflow. With the release of AEM 6.3, Adobe has increased productivity with faster workflow-related tasks and the ability to notify authors about the workflow during page editing. 

Whether the page is added to the workflow through launcher, workflow payload, or start a workflow, editing authors will see the workflow notifications on the page (until the workflow completes all the stages).

Once an author opens the page during workflow execution, they may see a blue bar on the page with the following message:


This notification indicates this page is under workflow and there are actions that need to be performed by authors (or any other user group) who are part of this workflow participant steps. On the right side of the notification, there will be a number with arrows for navigation if this page is subject to more than one workflow. Authors can navigate using arrows and perform the actions on the selected workflow.

On the notifications, authors may see links that require actions to be completed for workflow. Those actions include:

Complete: Authors can complete an item to allow the workflow to progress to the next step. In a normal workflow process, authors will use this action to go to the next step.

On this action you can indicate:
  1. Next Step: the next step to be taken; you can select from a list provided
  2. Comment: if required
Step Back: This step is optional; not all the workflows will have this step. If you discover that a step, or series of steps, needs to be repeated you can step back. This allows you to select a step that occurred earlier in the workflow for reprocessing. The workflow returns to the step you specify then proceeds from there.

On this action you can indicate:
  1. Previous Step: the step to be returned to; you can select from a list provided
  2. Comment: if required
Delegate: If a step has been assigned to you, but for any reason, you are unable to take action, you can delegate the step to another user or group.

On this action you can indicate:
  1. User: the user you want to delegate to; you can select from a list provided
  2. Comment: if required
View Details: View the details of the workflow work item and take appropriate actions. The workflow details are shown in tabs and appropriate actions are available in the toolbar. One cool feature of the workflow info tab is staged. If workflow stages have been configured for the model, you can view the progress according to these in the workflow info tab.

I will demonstrate how to create stages as a workflow modeler and display them to the participant users in the workflow. Let’s take a simple OOTB workflow request for activation and add stages.

1. Edit this workflow from Workflow -> Models -> Select Request for Activation
2. Click Page Properties from the sidekick
3. Click the Stages tab and add stages Approve Content, Create Version, Waiting for activation, and Activate page using Add item

4. Click OK
5. Click on Each participant or process step and set the stage to an appropriate value in Common -> Workflow Stage Field
6. Save the workflow
7. Log in to the sites console
8. Open any page and Select Start Workflow from Side Kick
9. Select Request for Activation Workflow and click Start Workflow
10. You may see a notification with the following message:
11. Click on View details ->Workflow info tab
12. You can see the different stages of the workflow. The stage you are in is highlighted in blue, and lines from the start to the current stage are displayed in bold. Stages that need to be completed are shown as a dotted lines.


By aem4beginner

December 28, 2020
Estimated Post Reading Time ~

How to enable/disable AEM Workflow Launchers

Adobe Experience Manager (AEM) Assets ships with a number of default workflows and media handlers to operate on assets. Examples of these operations are generating thumbnail renditions, parsing Microsoft word documents, asset metadata extraction, etc…

During appropriate understanding, we may need to disable workflow launchers services; always remember to re-enable after disabling these services.

1. Disable AEM Workflow Launchers
a. Open the AEM system console component page:
http://localhost:4502/system/console/components

b. Use Google Chrome, Firefox, or other browsers to quickly find text on a page. Control(or CMD on Mac) + F to find the fully qualified java name below. Click on the “stop” button to disable each workflow service.

com.adobe.granite.workflow.core.launcher.WorkflowLauncherImpl
com.adobe.granite.workflow.core.launcher.WorkflowLauncherListener

This is an example of how the services will look when they are found:

You will be redirected to the services detail page when the stop button has been clicked on. Refresh the package, and you will be redirected back to the component services list page: 


2. Disable AEM Workflow Launchers with cURL
Use the cUrl command to “disable” AEM workflow launchers:

curl -u admin:admin 'http://localhost:4502/system/console/components/com.adobe.granite.workflow.core.launcher.WorkflowLauncherImpl' --data 'action=disable'

curl -u admin:admin 'http://localhost:4502/system/console/components/com.adobe.granite.workflow.core.launcher.WorkflowLauncherListener' --data 'action=disable'


3. Enable AEM Workflow Launchers
a. Open the AEM system console component page:
http://localhost:4502/system/console/components

b. Use Google Chrome, Firefox, or other browsers to quickly find text on a page. Control(or CMD on Mac) + F to find the fully qualified java name below. Click on the “start” (play) button to disable each workflow service.

com.adobe.granite.workflow.core.launcher.WorkflowLauncherImpl
com.adobe.granite.workflow.core.launcher.WorkflowLauncherListener

This is an example of how the services will look when they are found: 


You will be redirected to the services detail page when the start button has been clicked on. Refresh the package, and you will be redirected back to the component services list page: 


4. Enable AEM Workflow Launchers with cURL
Use the cUrl command to “enable” AEM workflow launchers:

curl -u admin:admin 'http://localhost:4502/system/console/components/com.adobe.granite.workflow.core.launcher.WorkflowLauncherImpl' --data 'action=enable'

curl -u admin:admin 'http://localhost:4502/system/console/components/com.adobe.granite.workflow.core.launcher.WorkflowLauncherListener' --data 'action=enable''action=enable'


By aem4beginner

October 2, 2020
Estimated Post Reading Time ~

Request to Complete Move Operation Workflow in AEM

Today I will talk about an OOTB workflow provided by AEM which is “Request to Complete Move Operation” Workflow.


A little Background:
Usually, to maintain a website from the content-authoring point of view, we maintain two
groups one is content-authors and the other is content-approvers.

Content-authors: This group is used to do content authoring and don’t
have replication access. which means they can not publish the pages and make them live.
Content-approvers: The people in this group review the content and publish the pages.
Ideally, they used to have all the permission which content-authors are having with
additional permission of replicating the pages.

How to Move operation work and it’s behavior:
If the approver (or anybody having replication access) is doing the move operation-
1. If the page is not published anytime before, then the move operation will only happen in the author and the page will not be get published until the approver really publishes it.

2. If the page is already published then the move operation happens in author and publish both. Ex: If page P, in A hierarchy, is already published and the approver is moving it to B hierarchy, then the Page P  from A hierarchy will get deleted from the author as well as publish and the page P will start appearing in B hierarchy in the live site.

When the workflow (request to move operation) gets triggered??
If the move operation is done by content-authors (not having replication permission) then the
OOTB workflow “request to move operation” gets triggered. Now approver
has to approve the workflow to make it function like the above-mentioned move operation.

Client Concern:
There are so many content-authors, which are constantly moving pages from one place
to another and there is a lot of “request to move operation” inbox notification for approvers.
Clients don't want this workflow to be there, because there are hundreds of pages for which they are doing content pop and not living soon. They are still deciding hierarchy and in this process, they keep on moving pages. In such scenarios, there are always so many workflows running.

What will happen If we remove the workflow :
If the content-author moves the published pages, then this movement will happen in author
only and then how I will make this move operation available in the publish server.
Ex: If page P, in A hierarchy, is already published and the author is moving it to B hierarchy,
then the Page from A hierarchy will get deleted and will start showing in B hierarchy in author.
If they ask the approver to publish the page P from B Hierarchy, then the old page “P” is
still available in A hierarchy in the publish server and will never get deleted so we suggested
the client not remove this workflow.

How we can solve client issue:
What we suggested is, We will add one step in the workflow which will check if the page
is published/unpublished. If the page is unpublished, we will end the workflow, else the request
will go to the content-approver and the workflow will be executed like it is happening right now.

Product Bug:
We are having author/approve groups in place for our AEM servers. Ideally, content authors
don't have replication permission and because of this when the author moves a page the
"Request to Complete Move Operation" workflow is triggered. 

Now take an example if the Page "P(Considering that the page is already being published and visible on live site)" is under the "A" Hierarchy and an author trying to move it under the "B" hierarchy Then the workflow triggers.

If without completing the workflow, the approver publishes the "P" page sitting under "B" hierarchy,
then the workflow “request to move operation” workflow instance is also getting aborted and
now on the live site "P" page can be seen under A and B both hierarchies and there is no
another way to delete the "P" page from "A" hierarchy,


Note: Because the page is already being moved to the B hierarchy, so in author "A" hierarchy doesn’t have a "P" page anymore. So approver can’t unpublish the old page.
The issue is when an approver publishes the page, they don't even check if the "Request to Complete Move Operation" is running for that particular page and if they publish the pages, then there is no way to delete the old page (P under Hierarchy A) in publishing server.

I raised it as a Day Care ticket and will update here if Adobe comes up with any solution.

Workaround Solution by providing guidelines:
1. We can make a guideline for content-authors not to move the page but to ask content-approvers to do that to avoid so many notifications for move operation or to avoid the workflow enhancement.

2. We can ask content-approvers that before publishing a published page, at least check if there is any move operation workflow for that page running or not. If it is running, Complete that in place of publishing the page.
Once an approver opens the page during workflow execution, they may see a blue bar on the page with the following message:


But again guidelines can’t stop human error, So if
  • If content-authors are moving the pages then Be ready by completing so many workflows or make the workflow enhancement to solve this issue.
  • if content-approvers are publishing the page for which the move operation is already running, be ready to delete the pages in prod publish servers by going in CRXDE.
I know this is a long and very theoretical but I hope it is a good and interesting read for you.

Source: http://www.sgaemsolutions.com/2020/04/request-to-complete-move-operation.html


By aem4beginner

AEM Workflow: Request for Deletion Workflow in AEM

Request for Deletion is an AEM OOTB Workflow. In this blog, we will talk about,
1. What is a request for the deletion workflow?
2. How it works?
3. What are the challenges with this workflow?

Request for Deletion Workflow: This workflow gets initiated when the content-authors don’t have replicate permissions and try to delete a page.

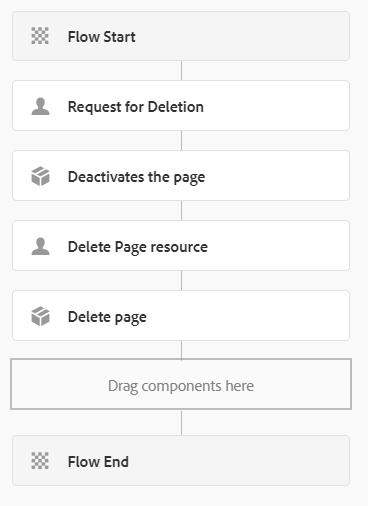
Request for Deletion OOTB workflow has four steps:

Fig1: OOTB Request for Deletion Workflow

Step1: When an author deletes a page, the "Request for Deletion" step gets executed and it initiates a notification to the administrators by default (you can change it to approver group).
Step2: When the approver approves the request, the page gets deactivated from the publisher.
Step3: Again a request goes to the administrator or content-approvers to take the approval to delete the page in the author instance.
Step4: When the request gets approved, the page gets deleted from the author server.

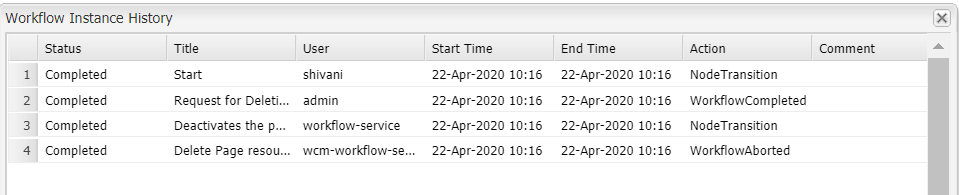
Product Bug: When the author deletes the page, a request for deletion notification is visible to the approver inbox, but after the approver approves the request and workflow completes the deactivation of page step, the workflow itself aborted after step2.

Because of this issue, the page is getting deactivated from publishing but the page is not getting deleted from author CRXDE and because of that all the pages authors deleted in author instance are not visible in Sites console but still sitting in CRXDE.

Fig2: Request for Deletion workflow history to show aborted scenario

I raised it as a daycare and this is what they replied.
Solution: “I looked at the code that gets triggered in this event (an event handler). What it actually does is, trigger a Request for deletion workflow with system user wcm-workflow-service, when the user deleting the page does not have enough permission.

Now if you provide delete and replicate permission to that user "wcm-workflow-service" at the /content level the workflow is getting completed successfully.
Always remember that Request for deletion workflow has two participant steps, so you need to approve twice, once for deactivating the page, then for the deletion of the resource step.”

And the above-mentioned solution worked for me.

Fig2: Request for Deletion workflow history after fixing permissions

Note: I face the above issue in AEM 6.5.2, so I am not sure what all AEM version has this
issue. So check accordingly.

Client Concern:
Deletion is a very crucial activity that can lead to loss of content/pages if done unintentionally. That’s why AEM provided approvals at two levels. But in our project, the client concern was that it’s quite annoying for the content-authors when they just delete an unpublished page from the author, for this also it asks for two-level approvals.

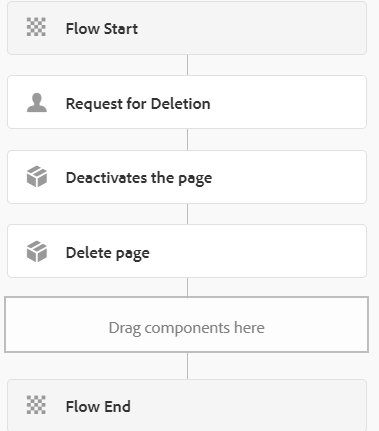
So here we removed the second level approval by considering that if the approver approved at the first step, it means that he really doesn't want that page/content in the author as well as publish. And I think it really makes sense too as it is very difficult to manage so many approvals also.

Fig4: Workflow model after removing the approval step

Note: Always remember, before you hand over the production server to content-authors, always decide the workflow for a request for deletion, make the authors aware about it and test it once because after authors start authoring, and you face this kind of product bug, where pages still exist in author after deletion, you have to fix them by going to the crx and this is hectic task also for a developer and authors.

Source: http://www.sgaemsolutions.com/2020/04/aem-workflow-request-for-deletion.html


By aem4beginner

Workflow Purge Scheduler

There are various situations while working on a project where workflows become unmanageable and a multitude of workflow instances get triggered. This can lead to various problems which must be resolved in order to maintain a healthy state of the server and uplift the performance of the website. In this blog, we will discuss such situations and remedial actions to purge the workflows on a periodic basis with the help of some features.

Use Case:
Many situations such as content syncing, content migration, development issues, bulk execution, or some unpredictable situations lead to a massive number of workflow instances running concurrently on an environment. This can lead to performance issues for that particular server.

One such situation occurred while doing a content syncing from one environment to another. When DAM was synced, it triggered an abundance of workflow instances of ‘DAM Update Asset’ and ‘Dam Metadata WriteBack’ as various assets were being added to the DAM folder of content. DAM Update Asset workflow gets triggered on adding a new asset to the DAM. This initiated an uncountable number of workflow instances pertaining to these two workflows which had a performance impact on the server.

Why should we purge unwanted or completed workflow instances?
A multitude of concurrently running workflow instances leads to performance issues on the server. It is essential to purge these instances so as to manage the size of the JCR repository. Running instances pose a performance threat but even completed workflow instances should also be purged as nodes in the repository get accumulated and it is beneficial to clean them up for the long run to manage disk space and performance. The bloated repository will also have an impact on the queries that are run to search the workflow hierarchies. So, workflow purging should be set as one of the maintenance tasks that must be carried out repeatedly.

Workflow Purge Scheduler
Workflow Purge Scheduler is categorized as Sling Service Factory so we can create an instance of the same. It is a configuration that we can configure in Felix Console and manage the workflow purge scheduling as per the requirements.
  1. Log into Apache web console, host:port/system/console/configMgr
  2. Search for ‘Adobe Granite Workflow Purge Configuration’ which can help in managing the purge schedule of the workflow instances. Since this is a Service Factory so we can create multiple instances of this configuration to cater to different criteria parallelly. For example, we can run this scheduler on different models setting different age/ time for a workflow after which it will be marked for purging. To add another instance of this configuration, click on the ‘+’ sign in front of the original configuration. The factory PID for this configuration instance will be ‘com.adobe.granite.workflow.purge.Scheduler’. Note that the PID of this instance will be set when the configuration instance is saved. It will be assigned with a unique ID appended to the Factory PID of the configuration like com.adobe.granite.workflow.purge.Scheduler-myidentifier where myidentifier is a unique id.
  3. Configure this to set up the scheduler to purge the workflows. It has the following fields:
    1. Job Name: This name is given to the particular purge instance. This is a descriptive name.
    2. Workflow Status: It is a dropdown with options ‘Completed’ and ‘Running’. Choose which status of workflows to purge.
    3. Models to purge: It is multifield in which can set different models to purge. We can configure the ids of the models that are selected for a purge. If left blank, it will be effective on all the models. For example, workflow model id is in the form of ‘/etc/workflow/models/dam/update_asset/jcr:content/model’ for DAM Update Asset Workflow. It can be seen from host:port/libs/cq/workflow/content/console.html.
    4. Workflow Age: It is a field to enter the number of days after which the workflow(s) will be purged.


We can make this configuration as a part of the codebase by adding the config file to the codebase. It will be in the form of an XML file placed inside /apps/config node. Note that the name of the XML file should be the same as the name of the PID that is of the configuration in Felix console ‘com.adobe.granite.workflow.purge.Scheduler.xml’. If we make an instance of the ‘Workflow Purge Scheduler’ then PID should be something similar to: ‘com.adobe.granite.workflow.purge.Scheduler.config.[some-arbitrary-id].xml’.

We can add an entry to the XML file giving the default value of the fields that will be sent as a part of the code package.
<?xml version="1.0" encoding="UTF-8"?> 
<jcr:root xmlns:sling="http://sling.apache.org/jcr/sling/1.0" xmlns:jcr="http://www.jcp.org/jcr/1.0" 
jcr:primaryType="sling:OsgiConfig" 
scheduledpurge.name="DAM Purge" 
scheduledpurge.workflowStatus="Running" scheduledpurge.modelIds="‘/etc/workflow/models/dam/update_asset/jcr:content/model " 
scheduledpurge.daysold="1" />

Workflow Remover
There might be situations when we do not require a regular service or a scheduler for purging the workflows but need to remove workflow instances on a particular instance. This might be the scenario during content sync when multiple instances of a workflow get triggered and need to be cleaned up at one time. ACS (Adobe Consulting Services) AEM Commons provides the functionality of Workflow Remover which is a user interface to remove some unwanted instances of workflows as per the requirement.
  1. Navigate to Tools and go to ACS AEM Commons. Click on Workflow Remover.
  2. Configure this to set up the scheduler to purge the workflows. It has the following fields:
  • Status: Any status among Completed, Aborted, Running, Suspended or Stale can be selected.
  • Payload Paths: We enter regex expressions to match the payload path of the workflow.
  • Batch Size: To decide the JCR batch size in which removal of the workflow will take place. The default value is 1000.
  • Max Duration: Enter time in minutes to force terminate the workflow removal process. We can set it 0 to disable it. We can leave it blank for no such limit of this workflow removal process.
  • Workflows older than Workflow instances must be created before older than the date specified here.
  • Workflow Models: It lists all the workflow models that can be removed. If no option is selected specifically by the user, then all the workflow models are eligible for removal meeting the criteria defined.


Workflow Remover of ACS AEM Commons can be set as a scheduled service too in the configuration given as ‘ACS AEM Commons- Workflow Instance Removal- Scheduled Service’ in the Felix Console.

It needs to be configured similar to the UI given in Tools. It has the following fields:
  1. Cron Expression: Cron expression at which the removal scheduled service will run.
  2. Workflow Status: It is a multifield to enter the status of workflows that needs to be removed using this scheduled service. (ABORTED, COMPLETED, STALE, SUSPENDED, RUNNING). ABORTED and COMPLETED are by default.
  3. Workflow models are paths till jcr:content/models of a particular workflow that needs to be removed using this service.
  4. Payload Patterns: This is a regex expression which when matched with the given payload removed that particular workflow instance. Example: /content/dam/.*/.*\.mp4(/.*)?
  5. Older than UTC TS: This field is used to specify time in milliseconds to remove workflow instances which are older than this UTC Time.
  6. Batch Size: This pertains to removal of workflow nodes as defined by the batch size. The default size is 1000.
  7. Max duration: It defines the maximum time (in minutes) till when this workflow process will keep on executing. It defaults to 0 which means that there is no limit for this workflow scheduler to run and remove the workflow instances.


Similar to Workflow Purge Configuration, it can be entered as the part of the codebase as an XML file in the config node in apps.

So, there are two configurations and UI in Tools with the help of which we can purge the workflow instances automatically without manual work to make the performance consistent and repository clear of unwanted workflow instances.

Hope this helps you all at some point in the project to kill multiple unwanted workflow instances.

Ref:
https://adobe-consulting-services.github.io/acs-aem-commons/features/workflow-remover/index.html

Source: https://www.argildx.com/technology/workflow-purge-scheduler/


By aem4beginner

How to Trigger a Workflow in AEM using Event Listener

Trigger a Workflow in AEM
We can trigger a workflow in AEM 6.2 when a DAM Asset is created, modified, or deleted within a given path. In this article, we will explore triggering workflows from our code based on events in the JCR.

Suppose you have a workflow that creates custom renditions of assets in addition to the default AEM renditions when the asset is under “/content/dam/ProjectName/images/”. You would have set up two workflow launchers for triggering this workflow: one with event type as “Node Create” and one with “Node Modified”. We can also achieve the same functionality through our code, without touching the GUI.

Requirements
When assets are moved into a certain folder structure in DAM, trigger a workflow that creates a 100px X 100px thumbnail of our image.

Fig 1: Before Moving the asset, no custom thumbnail.


Fig 2: Desired result after moving the asset, the new thumbnail.
Analysis

The intuitive thought is that when an asset is moved, a new node is created in the new location and the old one is deleted. However, experience shows that AEM does not create a new node in the destination folder on Node Move. We know this because the ‘jcr:Created’ property does not change. AEM does not even change the last modified date.
Fig 3: Creation Timestamp Before Moving the Asset.


Fig 4: Creation Timestamp is the same after moving.
Fig 5: Modification Timestamp Before Moving the Asset.


Fig 6: Modification Timestamp is the same after moving.
What if we copy the asset?

On copying the asset, a new version of the same is created. This triggers the Node Creation launcher.


Fig. 7: No versions before copying the asset.


Fig. 8: Version created after copy-pasting the asset. 

Approach
Event Listeners

AEM supports observation, which enables us to receive notifications of persistent changes to the workspace. A persisted change to the workspace is represented by a set of one or more events. Each event reports a single simple change to the structure of the persistent workspace in terms of an item added, changed, moved, or removed. There are thus 7 possible events at the JCR level, viz:

  1. Node Added
  2. Node Moved
  3. Node Modified
  4. Node Removed
  5. Property Added
  6. Property Removed
  7. Property Changed

We connect with the observation mechanism by registering an event listener with the workspace. An event listener is a class implementing the EventListener interface, that responds to the stream of events to which it has been subscribed. An event listener is added to a workspace with:

void ObservationManager.
addEventListener(EventListener listener,
int eventTypes,
String absPath,
boolean isDeep,
String[] uuid, String[] nodeTypeName,
boolean noLocal)

(A detailed explanation of each parameter is given with the code example in the package as well as at the end of this article) As defined by the EventListener interface, the listener must provide an implementation of the onEvent method:

void EventListener.onEvent(EventIterator events)

When an event occurs that falls within the scope of the listener, the repository calls the onEvent method invoking our logic which processes/respond to the event. In our case, we will register an event listener to listen for “Node Moved” events under “/content/dam/images” so that when an asset is moved to that folder, our workflow can be triggered.
Implementation

When the component is activated, the activate(…) method is called. It contains a call to ObservationManager.addEventListener(…) for registering the event listener. The deactivate(…) method contains logic for deregistering the event listener, and is triggered when the bundle is being stopped.

When the relevant event occurs, the onEvent(…) method is called, which contains logic for processing the event. In our case, we trigger a workflow in AEM.

The following is the relevant code from ThumbnailNodeMovedListener.java:

protected void activate(ComponentContext ctx) {
try { . . .
// Building the parameters for adding the event listener
// Whether the subfolders of the given path should also be watched
boolean isDeep = true; 

// Only events whose associated node has one of the UUIDs in this list will be
// received. If this parameter is null then no UUID-related restriction is
// placed on events received.

String[] uuid = null;

// Only events whose associated node has one of the node types (or a subtype of
// one of the node types) in this list will be received. If this parameter is
// null then no node type-related restriction is placed on events received.
String[] nodeTypeName = null;

// If noLocal is true, then events generated by the session through which the
// listener was registered are ignored. Otherwise, they are not ignored.
boolean noLocal = true;

// Registering the event listener
observationManager.addEventListener(this, Event.NODE_MOVED, ASSET_UPDATE_PATH, isDeep, uuid, nodeTypeName,

noLocal);

}
}

public void onEvent(EventIterator itr) {
while (itr.hasNext()) {
Event currentEvent = itr.nextEvent();
try { . . .

// Create a workflow session
WorkflowSession wfSession = workflowService.getWorkflowSession(localSession);

// Get the workflow model
WorkflowModel wfModel = wfSession.getModel(THUMBNAIL_WORKFLOW_PATH);

// Get the Workflow data. The first parameter in the newWorkflowData method is
// the payloadType. Just a fancy name to let it know what type of workflow it is
// working with.

WorkflowData wfData = wfSession.newWorkflowData(JCR_PATH, currentEvent.getPath()+ORIGINAL_RENDITION_RELATIVE_PATH);

// Start the Workflow. wfSession.startWorkflow(wfModel, wfData);
}

Download this code (including the workflow):

Build it usingmvn clean install -PautoInstallPackage

N.B: Creating a workflow is not part of this tutorial, and therefore a ready workflow has been provided in the code package. However, if you want to learn how to create custom workflows, here is an excellent resource. 

References
Adobe Consulting Services. (2018, March 20). acs-aem-samples/SampleJcrEventListener.java at master · Adobe-Consulting-Services/acs-aem-samples. Retrieved from Github: https://github.com/Adobe-Consulting-Services/acs-aem-samples/blob/master/bundle/src/main/java/com/adobe/acs/samples/events/impl/SampleJcrEventListener.java

Day Software AG. (2018, March 20). JCR 2.0: 12 Observation (Content Repository for Java Technology API v2.0). Retrieved from Adobe Docs: https://docs.adobe.com/docs/en/spec/jcr/2.0/12_Observation.html

FAQs
What is an event listener?

An event listener is a procedure or function in a program that waits for an event to occur. 

What are some examples of an event in a computer program?
Some simple examples of an event are users clicking or moving the mouse, pressing a key on the keyboard, or network activity. 

What are the workflow launchers?
A workflow launcher is a standard way to invoke or trigger a workflow based on conditions. The workflow launcher monitors changes in the content repository to launch workflows dependent on the location and resource type of the changed node. 

Source: https://www.argildx.com/technology/triggering-a-workflow-using-event-listeners-in-aem/


By aem4beginner

Workflow in AEM – Beginners’ Journey to Create a Workflow

In this blog, we will take a beginner’s journey on how to create a workflow in AEM, a launcher, and custom steps involved in it.

Let us begin by understanding workflows.

What is a workflow in AEM?
In AEM, a workflow is a well-defined series of steps that allows users to automate the activities in the CMS instance. It consists of various steps, including people (participants), procedures (process), or some tools. The workflow can either be sequential or parallel when multiple procedures can run parallel to each other. In short, an workflow in AEM is similar to a flowchart that describes the series of procedures to be executed by multiple participants to achieve the desired outcome.

There are many out-of-the-box workflow models readily available for use and we can even write custom workflows that can be tailored as per the business needs of the company.

There are a plethora of use cases for writing workflows depending on the business needs.

For example, the process of publishing a page can be customized and tailored for the inclusion of some special participants that need to approve the request for activation or send a mail after approval or rejection.

What are the workflow models?
A workflow model is a container or blueprint of the workflow that combines the workflow steps and link them logically.
  • It has a start and an end node (plus an optional participant step) by default.
  • It can contain different nodes and the transitions that link them. The workflow nodes can get any input from the author or can do processing via Java code or ECMA scripts.
  • Workflow payload is an important term that is considered as a resource on which workflow will perform its functions.
List of workflows can be seen on http://<host>:<port>/libs/cq/workflow/content/console.html

Figure 1: AEM Workflow Console


Figure 2: Tabs in the Workflow Console

These are the tabs that contain information about the workflows.
  • Models have workflow models having the title of the workflow, version, description, and model id.
  • Instances list the active instances of workflows with status (running, suspended, etc.), initiator, start time, workflow model, payload associated with the workflow.
  • The archive contains the history of all the workflow instances. It contains the status (completed, aborted, etc.), initiator, start and end time, workflow model, payload, workflow title, etc.
  • Launcher contains the launchers of workflow models that trigger the initiation of workflows automatically on some action. It contains fields such as event type (created, deleted, modified), node type, globbing or path specified for the action of the node, condition, workflow model that needs to be triggered, description, the value of enabled, exclusion list, run modes.
  • Failure shows failed instances of workflow on which some error occurred during execution. The issues can be fixed and workflow instances can be resumed.
  • Examples of workflow in AEM
Let’s have a look at one of the practical examples of workflow in AEM. To create a new workflow we can add the title and the name (cannot contain spaces) of the workflow by clicking on the New tab.


Figure 3: Create a new Workflow Model

Thereafter, we can edit the workflow created to customize it. This is the default view of the workflow wherein there is a start and an end node with a default participant step.

Figure 4: By default view of the workflow

We can view the logical layout of the workflow in the console whereas to see the node structure stored for the workflow we can see /etc/workflow/models/sample_workflow.

Figure 5: Node structure of workflow in CRX

It contains metadata about the workflow stored in JCR. We can notice flow and model nodes. It has the nodes between the start and end nodes present in the workflow. The model node has all the steps added in the workflow marked as nodes along with the transitions they have between them. We can see the metadata of node 6 in the snapshot since it is a process step having the title as Publish Page.

We can see the running instance of the workflow under /etc/workflow/instance path in CRX.

Figure 6: Nodes in the trigger workflow instance

This is an example of trigger workflow having data (metadata and payload of which workflow instance is working upon), history, metadata of a particular step, and work Items associated with the workflow.

Workflow Nodes
There are many workflow nodes that can be dragged and dropped such as the Participant step, process step, and split, or split, dialog participant step, form participant step, container step, goto step, etc.
1. PARTICIPANT STEP: In this step, the user can give
Title and description and select a user or a group.
The email option will send an email in the inbox of the user/group.

Figure 7: Participant Step

2. PROCESS STEP: In this step
The common tab can contain the title and description of the process step.
There are timeout settings too in which we can set the timeout limit of the workflow after which the timeout handler will start its execution.
In the process tab, we select the process from the dropdown (We can add our own process in the list using java).

We have to check the option of Handler Advance so as to allow the workflow process step to proceed to the next step after performing its task.
There is another field named as Arguments in which we can pass the arguments to the process step for function and task.

Figure 8: Process Step

Now, to add our own process in the list we have to make a workflow process and register it as a service in java and can add the logical code that will execute on this process step.
@Component(immediate = true, enabled= true, metatype = true) @Service(WorkflowProcess.class) 
@Property(name = "process.label", value = "Create Page Service", propertyPrivate = true) public class TriggerWorkflow implements WorkflowProcess { 

@Override 
public void execute(WorkItem workItem, WorkflowSession workflowSession, MetaDataMap args) throws WorkflowException {

This code snippet shows the basic skeleton of a workflow process that is required for the process step.
@Component will register our Java class as a component with the properties that enables it immediately and helps it get the metadata provided by the execute method of WorkflowProcess class.
@Service will register our Java class as a service to be used in the Workflow process.
@Properties will add certain properties such as process.label which will show our class in the process list of the process step. The value of this property will be shown in the drop-down list.

The Java class should implement the WorkflowProcess interface and give definitions to execute methods. This method provides three arguments namely WorkItem, WorkflowSession, MetaDataMap.
WorkItem defines the currently started java process. It contains the data of the workflow and can be fetched using this argument such as Id, workflow, workflow data, etc. We can access the workflow object using this. We can get the payload of the data using a method of work-item.
String payload = workItem.getWorkflowData().getPayload().toString();

WorkflowSession controls the workflow by providing methods that can deploy, complete, create, start, stop, resume, suspend, retrieve, complete workflow models, instances, or user/groups. We can start another workflow using the workflow sessions of the current workflow.
MetadataMap is a Map<String, Object> of properties that are entered in the dialog of the process step. We can fetch the list of the arguments from the metadata map.

There can be many other types of steps that can be configured within the workflow and can be tailored using java code, scripts, parameters, etc. to provide the desired functionality.

3. An OR SPLIT can be used to introduce branching in the workflow with which only one branch of the workflow can be activated (conditional) based on the script which is mentioned in the dialog.
The user can give either the path of the script or can write ECMA script in the given tab. The Common tab has an option to select the number of branches required in the OR Split.


Figure 9: OR Split (marked with green)


Figure 10: ECMA script written for branch 1 (set as a default route).

We can write different conditions for branch 2 or can upload a script.
4. AND SPLIT wherein all the branches go parallelly and we can execute tasks for multiple processing.
5. A CONTAINER STEP can allow another workflow to be executed as a child of the current workflow. This workflow is a sub-workflow that can be instantiated. Another way of performing the same action is via Java code where we can start a workflow using workflow sessions.
WorkflowModel workflowModel = workflowSession.getModel("/etc/workflow/models/childworkflow/jcr:content/model"); WorkflowData workflowData = workflowSession.newWorkflowData("JCR_PATH", "/content/bhf/poc/sampleWorkflowPage"); workflowSession.startWorkflow(workflowModel, workflowData);

This code snippet gets the model of the child workflow that needs to be invoked. Thereafter, the data of the workflow is created which is used to start the workflow in the current session.
6. GOTO STEP traverses between the steps in the workflow based on the result of the ECMA script. It can be used to implement the use case of looping in the workflow process.
7. DIALOG PARTICIPANT STEP is a special scenario of participant step where the user/group needs to give some information that is to be used in the workflow.
  • The additional step in this step is to provide a path of the dialog. We have to make that dialog in CRX (/etc/workflows/dialog) and provide the path of that dialog to receive the input from the selected user/group.
  • The structure of the dialog should be cq:dialog type. This data can be stored in the form of payload (when we set the value of the property as ./jcr:content/nodename) which can be overwritten in subsequent uses of this dialog.
  • The data can also be stored with the work item (when the value is node name) metadata and is persisted with subsequent use of dialog.
Workflow Launchers
Workflow launchers can be used to trigger the workflow based on some events that can be specified in the launcher. We can add a launcher under the Launcher tab.


Figure 11: Creation of Launcher for Workflow in AEM
  • Event type can be either created, modified, or deleted i.e. the action on which the launcher will trigger the workflow mentioned.
  • the node type is for the type of the node on which the launcher will apply to start the workflow.
  • The path specifies the path on which this action will be applied during the workflow initiation i.e. on which the launcher of the workflow will be applied.
  • The condition tab determines the condition to be applied when the workflow is launched. This is optional in case a user wants to start the launcher based on a specific condition only.
  • Workflow Launcher needs to be associated with a workflow model so that it can be determined that what will be triggered with the help of this launcher.
  • The description can be set and activate should be enabled to enable the launch of the workflow launcher.
  • Exclude list is a comma-separated list of JCR events or items to be ignored via workflow triggering.
  • Run modes in this dialog is to specify the server on which this will be applied to (author, publish, author & publish).


By aem4beginner