Showing posts with label Email Notification. Show all posts

January 3, 2021
Estimated Post Reading Time ~

AEM - Custom Template'd Email

AEM provides OOTB email templates to send emails for workflow notification, completion, etc.
But those templates are plain text and cannot provide rich UI and limited to few dynamic properties.
Example - OOTB workflow notification email template contains plain text and other variables like an event, workitem, user, host properties, etc.

More info about Email Templates for Workflow Notification at https://helpx.adobe.com/experience-manager/6-3/sites/administering/using/notification.html#ConfiguringtheWorkflowEmailNotificationService


Custom Email
Custom Email Service/Servlet/Process Step:You can create a utility/Servlet/workflow Process, whichever trigger the email, and use com.day.cq.mailer.MessageGatewayService to send a template-based email.

Add Below dependencies in POM. or check dependencies using dependency finder at http://localhost:4504/system/console/depfinder

Pom dependencies

Create a utility class, In this class inject MessageGatewayService service using Reference annotation and Create a map with all the dynamic properties.

e.g.
@Reference
private MessageGatewayService messageGatewayService;

final Map<String, String> parameters = new HashMap<String, String>();
parameters.put("title", "Demo Email");

Create org.apache.commons.mail.HtmlEmail class object with template and map parameters.

HtmlEmail email = mailTemplate.getEmail(StrLookup.mapLookup(parameters), HtmlEmail.class);

Find the below Servlet Example for complete code -
https://github.com/arunpatidar02/aem63app-repo/blob/master/java/email/HTMLEmailServlet.java

Custom Email template.txtYou can create a custom HTML5 template like an HTML page and save it as .txt in CRX repository wherever you want.
All the variable values can be replaced with properties set in the code e.g. ${title}

Example template available at
https://github.com/arunpatidar02/aem63app-repo/blob/master/java/email/html5-template.txt

OSGi Config to Send an email:For AEM to be able to send emails, the Day CQ Mail Service needs to be properly configured. Please check at
https://helpx.adobe.com/experience-manager/6-3/sites/administering/using/notification.html#configmail

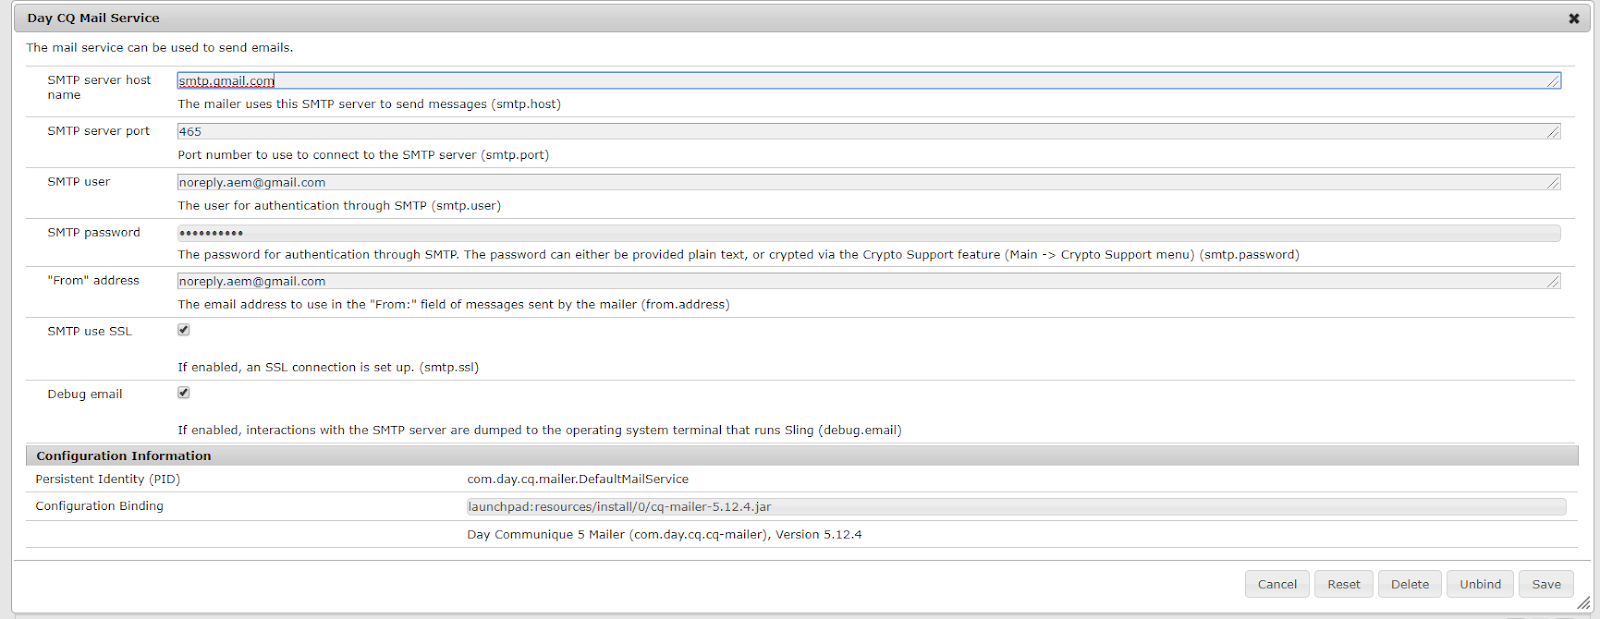
Sample configuration for sending email using Gmail SMTP server

That’s it. Find the sample email trigger by https://github.com/arunpatidar02/aem63app-repo/blob/master/java/email/HTMLEmailServlet.java servlet.


Find the complete code used in this blog at Github.


By aem4beginner

May 15, 2020
Estimated Post Reading Time ~

Send an Email for approval to the admin in a CQ5/AEM page publishing workflow

The Problem
You want to send an email to the admin for approval or rejection and after approval, the page should be activated and send an email to the author of activation and workflow should be complete but if rejected than send an email to the initiator of rejection and workflow should not be completed until the page approved using workflow.

In this post, I will show you all the required step and configurations which we have to do. For sending an email to the admin on the click of activating, Firstly you have to deny the permission of the replication of that author. Now when you click on the activate button you will find a pop up like this:


It means your request for an activation workflow has been launched.

Note: It is applied till AEM 6.0 version above this version (AEM 6.1 & AEM 6.2) Activate button will be disabled So, In that case, we can not activate from siteadmin for this, we have to go on that particular page for activating the page.

Now if you will see in the admin inbox, you will find that request for activation workflow is in running condition.
Now we have to change this model according to our requirements.
Go to the workflow by logging in to the admin interface:
http://localhost:4502/libs/cq/workflow/content/console.html
And search for Request for Activation model in the model tab.


Double click on this model and delete all steps and drop your Dialog participant step and double click on this step you will find a pop up like this:


To Know about Dialog Participant Step click here:
In this popup, there are three tabs Common, User/Group and Dialog.
In first tab, there are two widgets title and description. Here you can give title and description of your step.
In second tab, there are two widgets User/Group and Email.
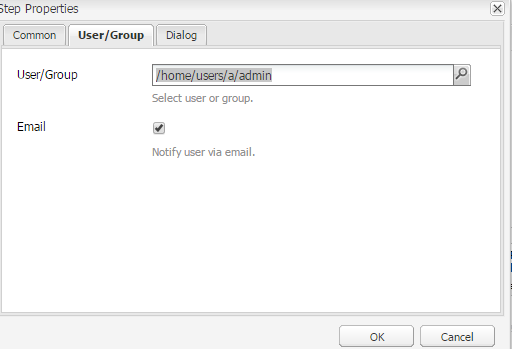
Select admin in user and tick on the Email if you want to send the mail to the admin inbox.

Note:
If you want to send the mail to the gmail of admin than you have to give the gmail id to the admin from the useradmin console.


In third tab you have to select the path of your dialog which you have created for the dialog participant step.
In my case I select the path: /etc/workflow/dialogs/approval/dialog

Now click on OK. your dialog participant step has been created.
Now if we activate the page, an email will send to the admin inbox and gmailId. Admin will select this step and click on the complete tab than a dialog will open with the drop down. Admin will select approve or reject from the drop down than this value will be save into the workitem.


Till now, workflow not complete this was only for our dialog participant step confirmation that it is working fine or not.

So go back our workflow model and drop the process step below the dialog participant step.This step is used for fetch the value of dilaog input from the workitem and set this property on the workflow metedata.To do this we have to write an ECMA script with some code as given below:

var name;
var history = workflowSession.getHistory(workItem.getWorkflow());

for (var index = history.size() – 1; index >= 0; index–) {
var previous = history.get(index);
var tempRejectApprove = previous.getWorkItem().getMetaDataMap().get(‘name’);
if ((tempRejectApprove != ”)&&(tempRejectApprove != null)) {
name = tempRejectApprove;
break;
}
}


workItem.getWorkflowData().getMetaData().put(‘name’, name);
In my case I created a script named as relpaceDialogValue.ecma. Location of this file will be /etc/workflow/scripts/replaceDialogvalue.ecma

Now when we select from the process step drop down, this script will show and select it.

Because of this script, your dialog value will be saved on workflow metadata.
Now below this process step, we have to drop the OR Split process and select the 2 branches. In the first branch script, we have to write the script which is given below:

function check() {
var match = ‘approve’;
if (workflowData.getMetaData().get(‘name’) == match) {
return true;
} else {
return false;
}
}

In the Second Branch we have to write this code:
function check() {
var match = ‘rejected’;
if (workflowData.getMetaData().get(‘name’) == match) {
return true;
} else {
return false;
}
}

If the branch 1 will return true then workflow move on left side. If Branch 1 return false or branch2 return true then workflow will move on right side.
Note:
Before the OR Step I have to use Process step because we can not access the value of the dialog from workItem in to the OR Split process there is an error that “workitem is not defined” because OR Split process does not have workitem object so I have to use process Step.

Step for left split:
Now one more process step drop in to the left split.


Double click on this step and go to the process tab and select activate page from the drop down.


This process step will activate the page after selection by the admin as approve from the inbox as select the dropdown.
Below this step drop one more process step for sending the mail to the initiator.


Double click on this step and select the custom process step (custom step for approval) for sending the mail to the initiator.


Code for this step is given below:
package com.havells.services;

import java.util.List;

import javax.jcr.RepositoryException;

import org.slf4j.Logger;
import org.slf4j.LoggerFactory;
import org.apache.felix.scr.annotations.Component;
import org.apache.felix.scr.annotations.Service;
import org.apache.felix.scr.annotations.Properties;
import org.apache.felix.scr.annotations.Property;
import org.apache.felix.scr.annotations.Reference;
import org.apache.jackrabbit.api.security.user.Authorizable;
import org.apache.jackrabbit.api.security.user.UserManager;
import org.apache.sling.api.resource.ResourceResolver;
import org.apache.sling.commons.osgi.PropertiesUtil;
import org.osgi.framework.Constants;

import com.adobe.granite.workflow.WorkflowException;
import com.adobe.granite.workflow.WorkflowSession;
import com.adobe.granite.workflow.exec.HistoryItem;
import com.adobe.granite.workflow.exec.WorkItem;
import com.adobe.granite.workflow.exec.Workflow;
import com.adobe.granite.workflow.exec.WorkflowProcess;
import com.adobe.granite.workflow.metadata.MetaDataMap;
import com.day.cq.mailer.MessageGateway;
import com.day.cq.mailer.MessageGatewayService;

import org.apache.commons.mail.Email;
import org.apache.commons.mail.SimpleEmail;

//This is a component so it can provide or consume services
@Component
@Service
@Properties({
@Property(name = Constants.SERVICE_DESCRIPTION, value = “Test Email workflow process implementation.”),
@Property(name = Constants.SERVICE_VENDOR, value = “Adobe”),
@Property(name = “process.label”, value = “Custom Step for approval”) })
public class CustomStepForApproval implements WorkflowProcess {

protected final Logger log = LoggerFactory.getLogger(this.getClass());

@Reference
private MessageGatewayService messageGatewayService;

public void execute(WorkItem workitem, WorkflowSession wfsession,
MetaDataMap metaDataMap) throws WorkflowException {

ResourceResolver resolver = wfsession.adaptTo(ResourceResolver.class);
UserManager userManager = resolver.adaptTo(UserManager.class);

Workflow workflow = workitem.getWorkflow();
String payload = (String) workitem.getWorkflowData().getPayload();
String initiator = workitem.getWorkflow().getInitiator();

Authorizable authorizable = null;
String userEmail = null;
try {
authorizable = userManager.getAuthorizable(initiator);
} catch (RepositoryException e1) {
// TODO Auto-generated catch block
e1.printStackTrace();
}
try {
userEmail = PropertiesUtil.toString(authorizable.getProperty(“profile/email”), “”);
} catch (RepositoryException e1) {
// TODO Auto-generated catch block
e1.printStackTrace();
}

String temp = null;
List<HistoryItem> list = wfsession.getHistory(workflow);

for(int index = list.size()-1; index >=1; index–){
HistoryItem previous = list.get(index);
temp = (String) previous.getWorkItem().getMetaDataMap().get(“name”);
}

try {

MessageGateway<Email> messageGateway;

Email email = new SimpleEmail();

String emailToRecipients = userEmail;
//String emailCcRecipients = “abc@gmail.com”;

email.addTo(emailToRecipients);
//email.addCc(emailCcRecipients);
email.setSubject(“AEM Custom Step”);
email.setFrom(“gkgauravkumar445@gmail.com”);

if(temp .equals(“approve”)){
email.setMsg(“This message is to inform you that the CQ content has been approved and activated which Payload path is = “+ payload);
}else{
email.setMsg(“This message is to inform you that the CQ content has been Rejected Please modify it which Payload path is = “+ payload);
}

// Inject a MessageGateway Service and send the message
messageGateway = messageGatewayService.getGateway(Email.class);

// Check the logs to see that messageGateway is not null
messageGateway.send((Email) email);
}

catch (Exception e) {
e.printStackTrace();
}
}

}

Step for Right Split:
In the right split, I will drop a process step for sending the mail of rejection to the initiator.


Double click on this step and select the custom process step (custom step for approval) for sending the mail to the initiator.


Now below this step drop Dynamic Participant Step.
About Dynamic Participant Step, I discussed in my last blog click here.


Double click on this step and select the custom dynamic participant step (workflow participant chooser) for assign to the initiator.

Don’t forget to mark the email. Because of this, the mail will be sent to the initiator inbox.

Now click OK. Now because of this step, the mail will be sent to the initiator inbox and from the inbox, the initiator will click on the complete tab.

Now Below this step, we will drop the GoTo Step. And select the Dialog Participant Step from the drop-down for which the next will be executed as a Dialog Participant Step.

To know Goto Step Click here
This process will continue until the admin will not approve the page.
So the final model will look like this:


By aem4beginner

Mailing Issue in AEM with Gmail SMTP Configuration

In this post, I will sort out small but important issues that most of the developer faced while they are doing mailing service configuration in AEM with Gmail SMTP settings. Here is the problem description-
“Author has done email configuration in AEM with Gmail SMTP configuration values, all configuration values are right but email functionality is still not working”

In this post, I will show you, all required steps for Email configuration in AEM and also tell you if you miss any step then what error you will get. So let’s start.

Step 1.
Go to Felix Console —> Configuration Tab —> search for Day CQ Mail Service
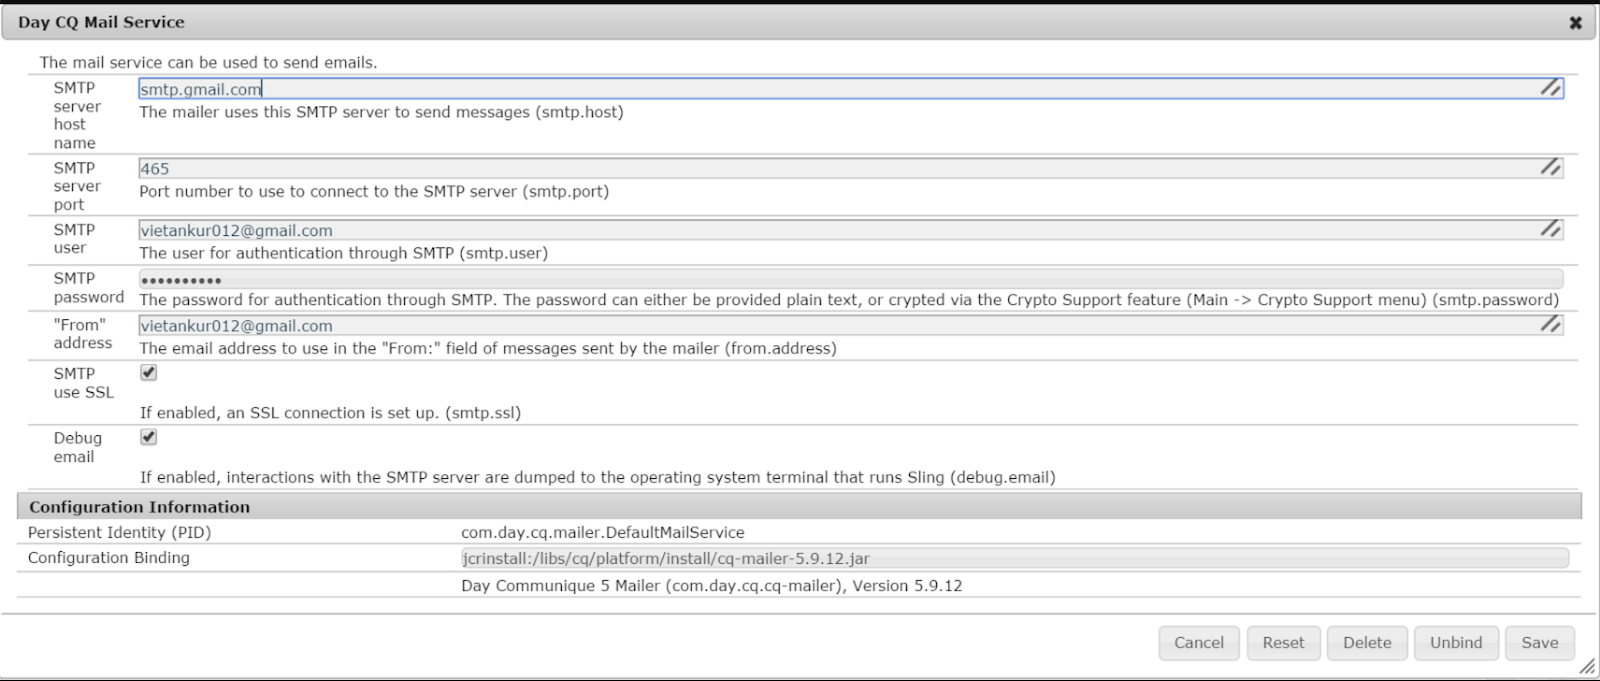
Click on this configuration, fill the values as shown below-


If you are using port 465 then you have to select SMTP use SSL checkbox else mailing will not work because, for 465 port, this configuration is mandatory.

Step 2:
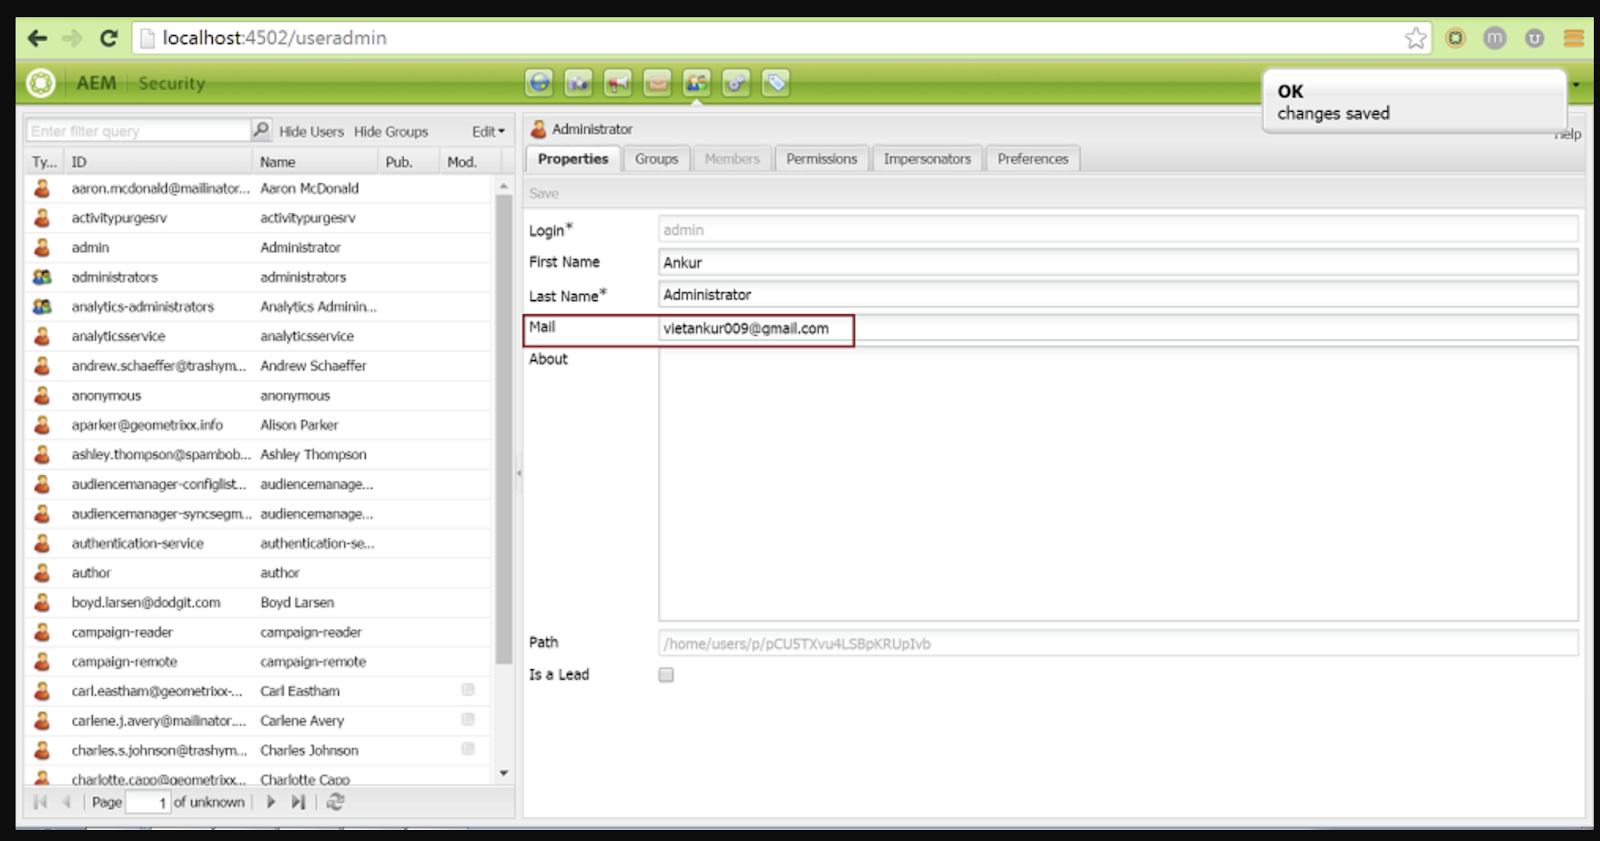
You need to set the email Id for users.
Go to useradmin console, here is the URL – http://localhost:4502/useradmin

Add email Id for that user, for example, I am doing for admin user as shown below.


Don’t forget to save this modification.

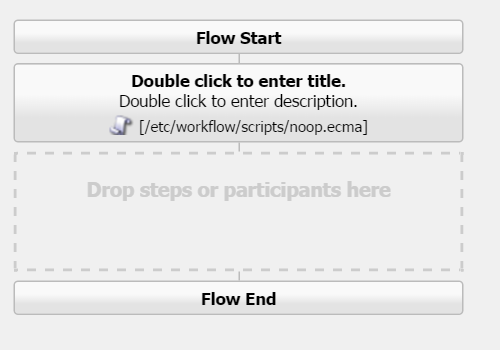
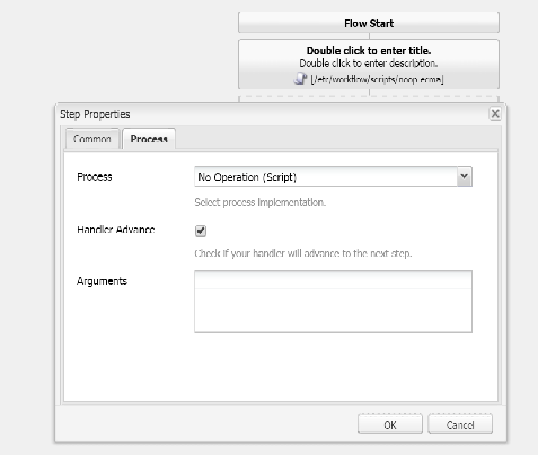
I will test the mailing service using a test workflow. There is only one process step with no operation (Script) process. Here are the workflow images.


Save your workflow.
open any geometrixx page.
Go to the workflow tab
Select test workflow
Click on start
Check your user mail account.

Have you got the mail?

Some Answers – Yes
Some Answers – No


Why no?
Either you have entered the wrong credentials or you are getting an exception. For exception check error.log file. If you are getting an error as described below-

com.day.cq.workflow.impl.email.EMailNotificationService error while sending email for null: org.apache.commons.mail.EmailException: Sending the email to the following server failed : smtp.gmail.com:25

Then you need to make a small change at your Gmail account security settings.
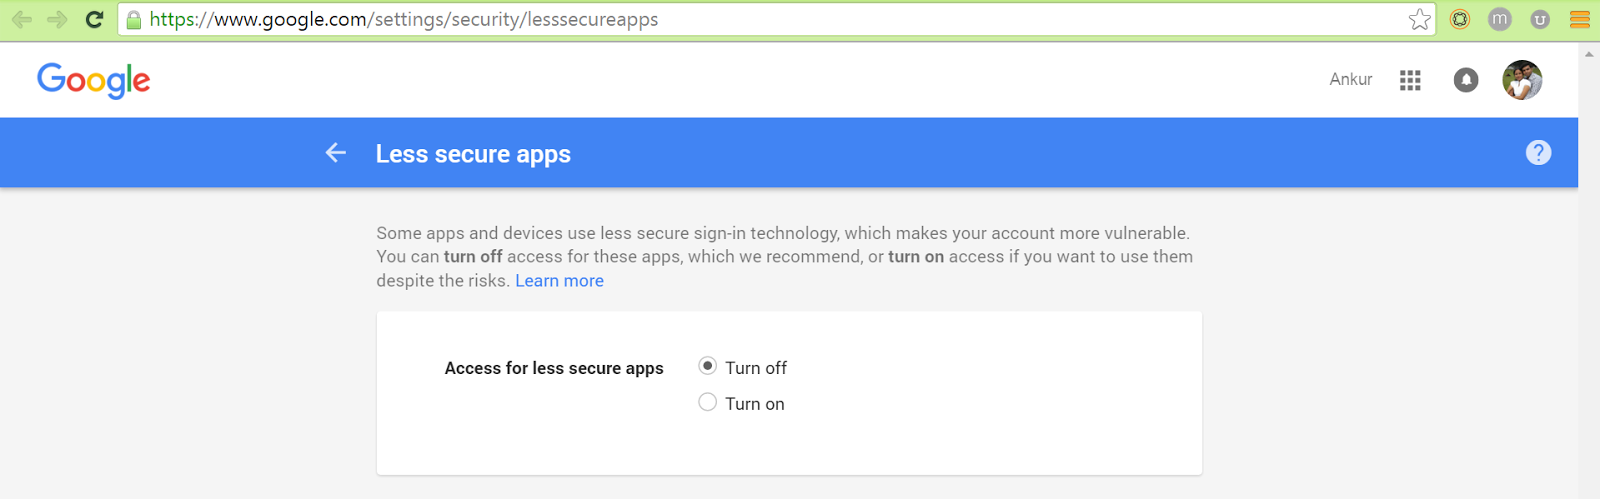
For that go to – https://www.google.com/settings/security/lesssecureapps

You will get a screen, as shown below-


Turn On this setting and test your workflow again. Now you are able to see notification mail in your Gmail account.


By aem4beginner

May 11, 2020
Estimated Post Reading Time ~

Custom Template'd Email in AEM

AEM provides OOTB email templates to send emails for workflow notification, completion, etc.
But those templates are plain text and cannot provide rich UI and limited to few dynamic properties.
Example - OOTB workflow notification email template contains plain text and other variables like an event, workitem, user, host properties, etc.

More info about Email Templates for Workflow Notification at https://helpx.adobe.com/experience-manager/6-3/sites/administering/using/notification.html#ConfiguringtheWorkflowEmailNotificationService

Custom Email
Custom Email Service/Servlet/Process Step:
You can create a utility/Servlet/workflow Process, whichever trigger the email and use com.day.cq.mailer.MessageGatewayService to send template based email.

Add Below dependencies in POM. or check dependencies using dependency finder at http://localhost:4504/system/console/depfinder


Pom dependencies
Create a utility class, In this class inject MessageGatewayService service using Reference annotation and Create a map with all the dynamic properties.

e.g.
@Reference
private MessageGatewayService messageGatewayService;

final Map<String, String> parameters = new HashMap<String, String>();
parameters.put("title", "Demo Email");

Create org.apache.commons.mail.HtmlEmail class object with template and map parameters.

HtmlEmail email = mailTemplate.getEmail(StrLookup.mapLookup(parameters), HtmlEmail.class);

Find the below Servlet Example for complete code -
https://github.com/arunpatidar02/aem63app-repo/blob/master/java/email/HTMLEmailServlet.java

Custom Email template.txt 
You can create a custom HTML5 template like an HTML page and save it as .txt in CRX repository wherever you want.
All the variable values can be replaced with properties set in the code e.g. ${title}

Example template available at
https://github.com/arunpatidar02/aem63app-repo/blob/master/java/email/html5-template.txt

OSGi Config to Send an email: 
For AEM to be able to send emails, the Day CQ Mail Service needs to be properly configured. Please check at
https://helpx.adobe.com/experience-manager/6-3/sites/administering/using/notification.html#configmail


Sample configuration for sending email using Gmail SMTP server
That’s it. Find the sample email trigger by https://github.com/arunpatidar02/aem63app-repo/blob/master/java/email/HTMLEmailServlet.java servlet.

Find the complete code used in this blog at Github.


By aem4beginner

May 9, 2020
Estimated Post Reading Time ~

How to send Email notifications template in AEM

The process involves three steps.

We can send an email template by using the workflow also. But this is the process without using the workflow.
For this,

1) We need to interact with the form, for the values which are required to pass to the mail template.
2)Sending the values to the servlet by using Ajax call
3)Interact with the servlet and inject values into the mail template using the appropriate methods.

Here is the code to sending an email template.

package com.test.mailtemp;

/*
*Author SONYC
*
*/
import java.util.HashMap;
import java.util.Map;
import java.io.*;
import java.util.ArrayList;
import javax.jcr.Node;
import javax.jcr.Session;
import javax.mail.MessagingException;
import javax.mail.internet.AddressException;
import javax.mail.internet.InternetAddress;
import javax.servlet.ServletException;
import javax.servlet.Servlet;
import com.day.cq.commons.mail.MailTemplate;
import com.day.cq.mailer.MessageGateway;
import com.day.cq.mailer.MessageGatewayService;
import org.apache.commons.lang.text.StrLookup;
import org.apache.commons.mail.EmailException;
import org.apache.commons.mail.HtmlEmail;
import org.apache.felix.scr.annotations.*;
import org.apache.sling.api.resource.Resource;
import org.apache.sling.api.resource.ResourceResolver;
import org.apache.sling.api.resource.ResourceResolverFactory;
import org.apache.sling.api.SlingHttpServletRequest;
import org.apache.sling.api.SlingHttpServletResponse;
import org.apache.sling.jcr.api.SlingRepository;
import org.apache.sling.api.servlets.*;
import org.slf4j.Logger;
import org.slf4j.LoggerFactory;

@SuppressWarnings({"deprecation", "serial"})
@Component
@Service(Servlet.class)
@Properties(value = {
    @Property(name = "sling.servlet.paths", value = "/bin/emaitempcall.html")
})
public class mailtemp extends SlingAllMethodsServlet{ 
   
    private static final Logger log = LoggerFactory.getLogger(mailtemp.class);    
    ArrayList<InternetAddress> emailRecipients = new ArrayList<InternetAddress>();  
    @Reference
    private MessageGatewayService messageGatewayService;   
    @Reference
    private MessageGateway<HtmlEmail> messageGateway;   
    @Reference
    private ResourceResolverFactory serviceRef;
    private ResourceResolver resResolve = null;   
    String param1,param2=null;   
    private Session session;  
   
    @Reference
    public SlingRepository repository;
   
    @Override
    protected void doGet(SlingHttpServletRequest request, SlingHttpServletResponse response) throws ServletException,IOException {       
        init(request, response);
    }
   
    @Override
    protected void doPost(SlingHttpServletRequest request, SlingHttpServletResponse response) throws ServletException,IOException {       
        init(request, response);
    }
   
    @SuppressWarnings("static-access")
    private void init(SlingHttpServletRequest request, SlingHttpServletResponse response ){    
     
            //Additional code here regaring the value updation in repository/any functionality
     mailCall(param1, param2);         
    }   
    public void mailCall(String param1, String param2){      
        try{
        session = repository.loginAdministrative(null);
        Resource templateRsrc;
        HtmlEmail email = new HtmlEmail();
        String msg = "Hello, Our testing has completed here you got the mail !!!";

        Map<String, String> mailTokens = new HashMap<String, String>();
        mailTokens.put("subject", "Testing the mail template");
        mailTokens.put("param1", param1);
        mailTokens.put("param2", param2);
        mailTokens.put("thanks", "Thanks");
        mailTokens.put("author", "SONY C.");       
        mailTokens.put("message",msg);  
         
            templateRsrc = serviceRef.getAdministrativeResourceResolver(null).getResource("/etc/workflow/email");
            templateRsrc = templateRsrc.getChild("templatestructure.html");
            final MailTemplate mailTemplate = MailTemplate.create(templateRsrc.getPath(), session);
            String recipientName = "sonycharan004@gmail.com";
            String sendTo = "sonycharan004@gmail.com";
            String recName = "Sony C";
        
            mailTokens.put("contactName", "Dear "+recipientName);

            emailRecipients.add(new InternetAddress(sendTo) );
            email = mailTemplate.getEmail(StrLookup.mapLookup(mailTokens),HtmlEmail.class);
            email.setTo( emailRecipients );
        
            messageGateway = this.messageGatewayService.getGateway(HtmlEmail.class);
            messageGateway.send(email);
        
        }
        catch (AddressException e) {           
            e.printStackTrace();
        }catch (MessagingException e) {          
            e.printStackTrace();        
        } catch (EmailException e) {         
            e.printStackTrace();
        }
        catch(Exception e)  {
            e.printStackTrace();         
        }finally{
        session.logout();
        }
    }
   
}

II)As mentioned above we need to create a mail template in the path "/etc/workflow/email"  and under this create a file named "templatestructure.html"

Template Structure would be----

<!DOCTYPE html PUBLIC "-//W3C//DTD XHTML 1.0 Transitional//EN" "http://www.w3.org/TR/xhtml1/DTD/xhtml1-transitional.dtd">

<html xmlns="http://www.w3.org/1999/xhtml">
<head>
 <title>Tempate Demo</title>
</head>
<body topmargin="0" bottommargin="0">

Dear  ${contactName},

Sub: ${subject},
${message}.
And your text will be  ${param1}, ${param2}.
Thanks for Using my blog!!! For further updates please be in touch with <a href="http://sonycharan.blogspot.in/">Sonycharan blogspot</a>.

Thanks,
${author}.

<p style="margin:10px 10px 10px 0; padding:0px; line-height:20px;"><font style="font-family:Arial;color:#fefeff;font-size:11px;">
© 2013 SonyBlog. All rights reserved.</font></p> 
</body>
</html>


By aem4beginner

April 27, 2020
Estimated Post Reading Time ~

How to send the HTML email using Velocity template in AEM/Adobe CQ5

This post will explain the steps required to send HTML email in Adobe CQ5 using the Velocity template.

Configure mail service:
Go to the Felix Console - http://localhost:4502/system/console/configMgr
Search for Day CQ Mail Service
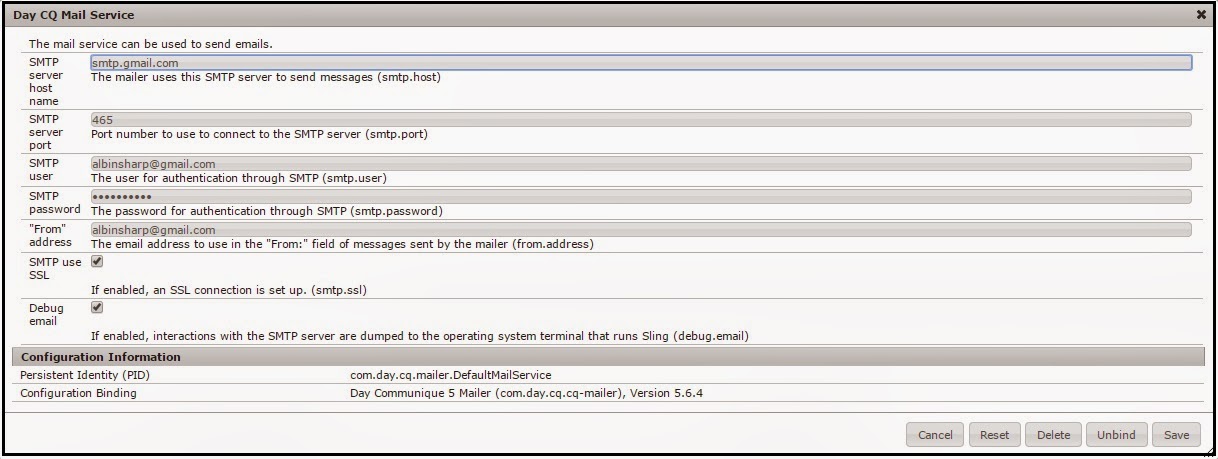
Enter the email server details as shown below and save the data (Here I am using Gmail server details).

velocity1

Email Template:
Create the email template as html file and store it in repository - /etc/email/template/emailTemplate.html (change the path accordingly)
<!DOCTYPE html PUBLIC "-//W3C//DTD XHTML 1.0 Transitional//EN"
"http://www.w3.org/TR/xhtml1/DTD/xhtml1-transitional.dtd">
<html xmlns="http://www.w3.org/1999/xhtml" xml:lang="en" lang="en">
    <body>
       Hi ${firstName} ${lastName}</br>
       This is the sample mail.
       <ul>
   #foreach( $data in $dataList )
    <li>$data</li>
   #end
       </ul>
    </body>
</html>
Maven dependencies to the POM.xml:
<dependency>
   <groupId>com.day.cq</groupId>
   <artifactId>cq-mailer</artifactId>
   <version>5.4.0</version>
   <scope>provided</scope>
</dependency>

<dependency>
 <groupId>org.apache.velocity</groupId>
 <artifactId>velocity</artifactId>
 <version>1.6.2</version>
</dependency>
Import-Package configuration in POM.xml bundle plugin:
        *,
 org.apache.xerces.dom;resolution:=optional,org.apache.xerces.parsers;resolution:=optional,
 oracle.xml.parser;resolution:=optional, oracle.xml.parser.v2;resolution:=optional,
 org.jaxen;resolution:=optional, org.jaxen.jdom;resolution:=optional,
 org.apache.xml.resolver;resolution:=optional,org.apache.xml.resolver.helpers;resolution:=optional,
 org.apache.xml.resolver.tools;resolution:=optional,org.apache.tools.ant.launch;resolution:=optional,
 org.apache.tools.ant.taskdefs.optional;resolution:=optional,org.apache.tools.ant.util.optional;resolution:=optional,
 org.apache.avalon.framework.logger;resolution:=optional,sun.misc;resolution:=optional,
 sun.rmi.rmic;resolution:=optional,sun.tools.javac;resolution:=optional,org.apache.bsf;resolution:=optional,
 org.apache.env;resolution:=optional,org.apache.bcel.classfile;resolution:=optional,kaffe.rmi.rmic;resolution:=optional,
 com.sun.jdmk.comm;resolution:=optional,com.sun.tools.javac;resolution:=optional,javax.jms;resolution:=optional,
 antlr;resolution:=optional,antlr.collections.impl;resolution:=optional,org.jdom;resolution:=optional,
 org.jdom.input;resolution:=optional,org.jdom.output;resolution:=optional,com.werken.xpath;resolution:=optional,
 org.apache.tools.ant;resolution:=optional,org.apache.tools.ant.taskdefs;resolution:=optional,
 org.apache.log;resolution:=optional,org.apache.log.format;resolution:=optional,org.apache.log.output.io;resolution:=optional,

 <plugin>
 <groupId>org.apache.felix</groupId>
 <artifactId>maven-bundle-plugin</artifactId>
 <extensions>true</extensions>
 <configuration>
 <instructions>
 <Bundle-Activator>com.tr.commerce.connector.activator.Activator
 </Bundle-Activator>
 <Import-Package>
 *,
 org.apache.xerces.dom;resolution:=optional,org.apache.xerces.parsers;resolution:=optional,
 oracle.xml.parser;resolution:=optional, oracle.xml.parser.v2;resolution:=optional,
 org.jaxen;resolution:=optional, org.jaxen.jdom;resolution:=optional,
 org.apache.xml.resolver;resolution:=optional,org.apache.xml.resolver.helpers;resolution:=optional,
 org.apache.xml.resolver.tools;resolution:=optional,org.apache.tools.ant.launch;resolution:=optional,
 org.apache.tools.ant.taskdefs.optional;resolution:=optional,org.apache.tools.ant.util.optional;resolution:=optional,
 org.apache.avalon.framework.logger;resolution:=optional,sun.misc;resolution:=optional,
 sun.rmi.rmic;resolution:=optional,sun.tools.javac;resolution:=optional,org.apache.bsf;resolution:=optional,
 org.apache.env;resolution:=optional,org.apache.bcel.classfile;resolution:=optional,kaffe.rmi.rmic;resolution:=optional,
 com.sun.jdmk.comm;resolution:=optional,com.sun.tools.javac;resolution:=optional,javax.jms;resolution:=optional,
 antlr;resolution:=optional,antlr.collections.impl;resolution:=optional,org.jdom;resolution:=optional,
 org.jdom.input;resolution:=optional,org.jdom.output;resolution:=optional,com.werken.xpath;resolution:=optional,
 org.apache.tools.ant;resolution:=optional,org.apache.tools.ant.taskdefs;resolution:=optional,
 org.apache.log;resolution:=optional,org.apache.log.format;resolution:=optional,org.apache.log.output.io;resolution:=optional,

 </Import-Package>
 <Bundle-SymbolicName>email-template
 </Bundle-SymbolicName>
 <Bundle-Vendor>Albin</Bundle-Vendor>
 <Bundle-Category>email</Bundle-Category>
 <Embed-Directory>dependencies</Embed-Directory>
 <Embed-Transitive>true</Embed-Transitive>
 </instructions>
 </configuration>
 </plugin>


Make sure the below plugin is configured in pom.xml(to add the dependencies to bundle classpath)
<plugin>
 <groupId>org.apache.felix</groupId>
 <artifactId>maven-bundle-plugin</artifactId>
 <version>2.3.7</version>
 <configuration>
 <instructions>
 <Embed-Dependency>*;scope=compile|runtime</Embed-Dependency>
 <Embed-Directory>OSGI-INF/lib</Embed-Directory>
 <Embed-Transitive>true</Embed-Transitive>
 </instructions>
 </configuration>
 </plugin>
Create the Email servlet:
Create a servlet to send the email with the provides details.
import java.io.IOException;
import java.io.InputStream;
import java.io.InputStreamReader;
import java.io.StringWriter;
import java.util.ArrayList;


import javax.jcr.Node;
import javax.jcr.Session;
import javax.mail.internet.InternetAddress;
import javax.servlet.Servlet;
import javax.servlet.ServletException;

import org.apache.commons.mail.HtmlEmail;
import org.apache.felix.scr.annotations.Component;
import org.apache.felix.scr.annotations.Reference;
import org.apache.felix.scr.annotations.Service;
import org.apache.felix.scr.annotations.sling.SlingServlet;
import org.apache.sling.api.SlingHttpServletRequest;
import org.apache.sling.api.SlingHttpServletResponse;
import org.apache.sling.api.servlets.SlingAllMethodsServlet;
import org.apache.sling.jcr.api.SlingRepository;
import org.apache.velocity.VelocityContext;
import org.apache.velocity.app.Velocity;
import org.slf4j.Logger;
import org.slf4j.LoggerFactory;

import com.day.cq.mailer.MessageGateway;
import com.day.cq.mailer.MessageGatewayService;

@SuppressWarnings({ "serial" })
@Component(metatype = false)
@SlingServlet(name = "EmailServlet", description = "EmailServlet", methods = "GET", generateComponent =false, paths = "/services/EmailServlet")
@Service(Servlet.class)

public class EmailService extends SlingAllMethodsServlet
{
 private static final Logger LOG = LoggerFactory.getLogger(EmailService.class);

 @Reference
 private SlingRepository repository;

 @Reference
 private MessageGatewayService messageGatewayService;
 @Override
 protected void doGet(SlingHttpServletRequest request,
 SlingHttpServletResponse response) throws ServletException,
 IOException {


 String results = sendMail("albinsharp@gmail.com", "albinsharp@gmail.com");
            if (results != null && results.equalsIgnoreCase("success")) {
                   response.getWriter().write("Email Send Successfully");
            } else {
                   response.getWriter().write(results);
            }        
 }

 public String sendMail(String fromAddress, String toEmailAddress) {
 ArrayList<InternetAddress> emailRecipients = new ArrayList<InternetAddress>();
 Session session = null;
 String templateLink = "/etc/email/template/mailtemplate.html";
 String result="success";
 try {
 session = repository.loginAdministrative(null);
 String templateReference = templateLink.substring(1)+"/jcr:content";

 Node root = session.getRootNode();
 Node jcrContent = root.getNode(templateReference);
 InputStream is = jcrContent.getProperty("jcr:data").getBinary().getStream();
 InputStreamReader reader = new InputStreamReader(is);
 VelocityContext context = new VelocityContext();
 context.put("firstName", "Albin");
 context.put("lastName", "Issac");

 ArrayList<String> dataList=new ArrayList<String>();
 dataList.add("Test1");
 dataList.add("Test2");
 dataList.add("Test3");

 context.put("dataList", dataList);

 StringWriter swOut = new StringWriter();
 Velocity.evaluate(context, swOut, "LOG", reader);

 LOG.info("Email content.."+swOut.toString());

            HtmlEmail email = new HtmlEmail();
             
             emailRecipients.add(new InternetAddress(toEmailAddress));
             email.setCharset("UTF-8");
             email.setFrom(fromAddress);
             email.setTo(emailRecipients);
             email.setSubject("This is the test mail");
             email.setHtmlMsg(swOut.toString());
             MessageGateway<HtmlEmail> messageGateway =        this.messageGatewayService.getGateway(HtmlEmail.class);
             messageGateway.send(email);
             emailRecipients.clear();      
    } catch (Exception e) {
 result="Error in sending Email.."+e.getMessage(); 
 }finally
 {
 session.logout();
 } 
 return result;
 } 
}


By aem4beginner

Sending mail through Java API with Gmail server in AEM

This post will explain the steps required to send mail in Adobe Experience Manager(AEM) through Java API with the Gmail server.

Configure mail service: Go to the Felix Console - http://localhost:4502/system/console/configMgr
Search for Day CQ Mail Service
Enter the Gmail server details as shown below and save the data.

SMTP Server Host - smtp.gmail.com
SMTP Server Port - 465
SMTP User - your gmail username
SMTP Password - your password
From Address - your email
SMTP Use SSL - true
 
You may need to enable the access for less secure apps in google account - https://www.google.com/settings/security/lesssecureapps

Email Template: Create the email template as text file and store it in the repository - /etc/email/template/emailTemplate.txt (change the path accordingly)


Create the Email servlet: Create a servlet to send the email with the provides details.

import java.io.BufferedInputStream;
import java.io.ByteArrayOutputStream;
import java.io.IOException;
import java.io.InputStream;
import java.util.ArrayList;

import javax.jcr.Node;
import javax.jcr.Session;
import javax.mail.internet.InternetAddress;
import javax.servlet.Servlet;
import javax.servlet.ServletException;

import org.apache.commons.mail.HtmlEmail;
import org.apache.felix.scr.annotations.Component;
import org.apache.felix.scr.annotations.Reference;
import org.apache.felix.scr.annotations.Service;
import org.apache.felix.scr.annotations.sling.SlingServlet;
import org.apache.sling.api.SlingHttpServletRequest;
import org.apache.sling.api.SlingHttpServletResponse;
import org.apache.sling.api.servlets.SlingAllMethodsServlet;
import org.apache.sling.jcr.api.SlingRepository;
import org.slf4j.Logger;
import org.slf4j.LoggerFactory;

import com.day.cq.mailer.MessageGateway;
import com.day.cq.mailer.MessageGatewayService;

@SuppressWarnings({ "serial" })
@Component(metatype = false)
@SlingServlet(name = "EmailServlet", description = "EmailServlet", methods = "POST", generateComponent =false, paths = "/services/EmailServlet")
@Service(Servlet.class)
public class EmailServlet extends SlingAllMethodsServlet {

private static final Logger LOG = LoggerFactory.getLogger(EmailServlet.class);

@Reference
private MessageGatewayService messageGatewayService;
@Reference
public SlingRepository repository;

@Override
protected void doGet(SlingHttpServletRequest request,
SlingHttpServletResponse response) throws ServletException,
IOException {
doPost(request, response);
}

@Override
protected void doPost(SlingHttpServletRequest request,
SlingHttpServletResponse response) throws ServletException,
IOException {
String results = sendEmail(request);
if (results != null && results.equalsIgnoreCase("success")) {
response.getWriter().write("success");
} else {
response.getWriter().write("fail");
}
}

public String sendEmail(SlingHttpServletRequest request) {

ArrayList<InternetAddress> emailRecipients = new ArrayList<InternetAddress>();
Session session = null;
String results = "Success";

String fromAddress=request.getParameter("fromAddress");
String toAddress=request.getParameter("toAddress");

String firstName=request.getParameter("firstName");
String lastName=request.getParameter("lastName");

String templateLink=request.getParameter("templateLink");

try {
session = repository.loginAdministrative(null);
String templateReference = templateLink.substring(1)+ "/jcr:content";

Node root = session.getRootNode();
Node jcrContent = root.getNode(templateReference);
InputStream is = jcrContent.getProperty("jcr:data").getBinary().getStream();

BufferedInputStream bis = new BufferedInputStream(is);
ByteArrayOutputStream buf = new ByteArrayOutputStream();
int resultNumber = bis.read();
while (resultNumber != -1) {
byte b = (byte) resultNumber;
buf.write(b);
resultNumber = bis.read();
}

String bufString = buf.toString();
LOG.info("template.."+bufString);
bufString = bufString.replace("${firstName}", firstName);
bufString = bufString.replace("${lastName}", lastName);
LOG.info("mesage.."+bufString);
HtmlEmail email = new HtmlEmail();

emailRecipients.add(new InternetAddress(toAddress));
email.setCharset("UTF-8");
email.setFrom(fromAddress);
email.setTo(emailRecipients);
email.setSubject("This is the test mail");
email.setHtmlMsg(bufString);
MessageGateway<HtmlEmail> messageGateway = this.messageGatewayService.getGateway(HtmlEmail.class);
messageGateway.send(email);
emailRecipients.clear();

} catch (Exception e) {
results = "fail";
LOG.info("e.getMessage"+e.getMessage());
e.printStackTrace();
} finally {
if(session != null) {
session.logout();
}
}
return results;
}
}

The email can be sent now by invoking the servlet with the required details.

fromAddress=admin@albinsblog.com
toAddress=testmail@gmail.com
firstName=Albin
lastName=Issac
templateLink=/etc/email/template/emailTemplate.txt


By aem4beginner

April 22, 2020
Estimated Post Reading Time ~

Mail to Send on Account Creation, password reset and confirm password to the end user in AEM 6.4

Solution:
Go to this path: http://localhost:4502/etc/security/accountmgr.html
Click on the edit to change the email id, subject, and body


To change the email id and other details in CRXDE level, key in this path in the search path: /etc/security/accountmgr/jcr:content/requestnewaccount


By aem4beginner

April 20, 2020
Estimated Post Reading Time ~

Publishing an Email from AEM to Email Service Providers Silverpop & ExactTarget

Solution:
You can publish newsletters to e-mail services such as ExactTarget and Silverpop Engage. This document describes how to configure AEM to publish a newsletter to these e-mail services.

Note:
You need to configure the service provider before you can create and publish an email. See Configuring ExactTarget and Configuring Silverpop Engage for more information.

To publish your email to the email service provider, you need to perform the following steps:
  • Create an email.
  • Apply the Email Service configuration to the email.
  • Publish the email.
Creating an Email
An email or newsletter that you want to publish to an e-mail service can be created under a campaign using the Geometrixx Newsletter template.
You can also use the Geometrixx Outdoors E-Mail template. Sample email/newsletter-based on the Geometrixx Outdoors E-Mail template are available at http://localhost:4502/cf#/content/campaigns/geometrixx-outdoors/e-mails.html.

To create a new email that is published to the configured e-mail service:
  • Go to Websites and then Campaigns. Select a campaign.
  • Click New to open the Create Page window.
  • Enter the title, name, and select the Geometrixx Newsletter template from the list of available templates.
  • Click Create.
  • Open the created email.
  • Switch to design mode to select the components you want to display in the sidekick.
  • Switch to edit mode and start adding content (text, images, email tools, personalization variables, and so on) to your email.
Authoring an email
Adding ExactTarget Email Tools to your email
The Email Tools component for ExactTarget can add more email functionality to your email/newsletter.
  • Open an email to be published to ExactTarget.
Add the component ET - Email Tools to your page using the sidekick. Open the component in Edit mode.


Select an option from the Options menu:
Physical Mailing Address (Required)This component inserts the physical mailing address
of your organization in your email.
Profile Center (Required)The profile center is a webpage where subscribers can
 enter and maintain the personal information that you
keep about them.
View Email as a Web PageThis component allows the user to view the email as
a webpage.
Privacy PolicyThis component inserts the link to your privacy
policy in the email.
Unsubscribe CenterGives the option to the user to unsubscribe from
your mailing list.
Subscription CenterA subscription center is a web page where a
subscriber can control
the messages they receive from your organization.
Track Email OpensA hidden component that allows you to use the
ExactTarget tracking feature.
Note:
The Options drop-down menu is only populated if ExactTarget configuration is applied to the email. See Applying Email Service Configuration to Email Settings for more information.
  • Publish the email to ExactTarget.
The email with the email tools is available for use in the configured ExactTarget account.

Note:
The URLs within the email tools are replaced (in the received email) by their actual values only when an email is sent using Simple Send or Guided Send but not Test Send.

Two of the email tools are required: Physical Mailing Address (Required) and Profile Center (Required). When the email is published to ExactTarget, these two email-tools are added to the bottom of every mail by default.

Adding Text and Personalization tool to your e-mail
You can add personalized fields in an email by adding the Text and Personalization component to the page:
  • Open the e-mail to be published to your e-mail service.
Add the component Text & Personalization from the sidekick. This component is the part of newsletter group. Open this component in the edit mode.
  • Add the required personalized field to the text by selecting the field from the drop-down menu and clicking Insert.
  • Click OK to finish.
Applying E-mail Service Configuration to E-mail Settings
To apply your E-mail service configuration to a newsletter:
  • Create an E-mail Service configuration.
  • Open your email/newsletter.
  • Open the email/newsletter settings by either clicking Settings or by clicking Page Properties in the sidekick.
Click Add Service in the Cloud Services tab. You see the list of services. Select your required configuration - either ExactTarget or Silverpop - from the list from the drop-down list.


  • Click OK.
Publishing Emails to Email Service
Emails/Newsletters can be published to your E-mail Service by following these steps:
  • Open the email.
  • Before publishing an email, make sure you have applied the correct configuration to your email.
  • Click Publish. This opens the Publish Newsletter To E-mail Service Provider window.
  • Fill in the Newsletter Name field. The email/newsletter is published to the E-mail Service Provider with this name. In case an email name is not provided, then the email is published using the page name of the newsletter in AEM.
  • Click Publish.

  • If successful, AEM confirms you can view the email in ExactTarget or Silverpop Engage.
Note:
If an email/newsletter is published with the same name as that of an email/newsletter already published, then the earlier email/newsletter is not replaced. Instead, a new email/newsletter is created with the same name (the IDs of two newsletters are, however, different).
Publishing the email/newsletter to E-mail Service Provider also publishes the email/newsletter to the AEM publish instance.

Updating A Published E-mail
The Update button on the Publish dialog box lets you update a newsletter already published to an E-mail Service Provider. In case the newsletter has not yet been published and the Update button is clicked, a Newsletter is not published message displays.
To update a published email:

Open the email/newsletter that has previously been published to an e-mail service provider that you want to re-publish after making changes to the email/newsletter.

Click Publish. The Publish Newsletter to Email Service Provider window displays. Click Update.

To check if the email/newsletter has been updated on ExactTarget, click View Published Email. This takes you to the published email in ExactTarget.
To check if the email/newsletter has been updated on Silverpop Email Service, visit the Silverpop Engage site.


By aem4beginner

April 19, 2020
Estimated Post Reading Time ~

GMAIL SMTP server setup in AEM

Use Case: How to setup email configuration in AEM with GMAIL SMTP server

Solution:
Go to the Felix Console: http://localhost:4502/system/console/configMgr
Search for Day CQ mail Service and click on edit.

Enter the below details:
SMTP Server Host --> smtp.gmail.com
SMTP Server Port --> 465
SMTP User --> your username (i.e. abc@gmail.com)
SMTP Password --> your password
From Address --> your email
SMTP Use SSL --> true
Click on save.


By aem4beginner

Sending Email with the Adobe CQ API

Sending emails through Adobe CQ can be easy, however there really isn't an example which brings the entire process together. This blog post will guide you through the process of configuring Adobe CQ to send email, creating a component for sending email, creating an email template and finally creating a servlet which will send the email.

First, though, what are the benefits of the Adobe CQ Email API? The Adobe CQ API provides a method for sending emails through a centrally configured service. You can send emails of multiple types and you can even create authorable templates so developers do not need to be involved in creating and updating email templates.

Configuring CQ Mail Service
The first step to sending emails through Adobe CQ is to configure the Day CQ Mail Service. To do this, log into to the OSGi Console at {server}:{port}/system/console/configMgr and look for a service called Day CQ Mail Service. Select the service and you should see a screen like the below:

Enter all of the relevant information for your current SMTP provider. If you don't have or can't easily get SMTP set up within your organization, a Gmail account works for testing.

Once you have the Day CQ Mail Service configured you should be able to send emails through Adobe CQ. If, later on you run into problems with getting a null Message Gateway, you probably entered something incorrectly here.

Creating an Email Component
If you haven't read up on creating components, please do so now.

Create a new component called contact and set the following as the JSP code:

<%@page import="com.day.cq.wcm.api.WCMMode" %>
<cq:includeClientLib categories="email.sample" />
<cq:setContentBundle />
<form name="contact" id="contact" action="${resource.path}.email.html" method="get">
<fieldset>
<legend><fmt:message key="Contact Us" /></legend>
<label for="email"><fmt:message key="Email" /></label>
<input type="email" id="email" name="email" />
<label for="subject"><fmt:message key="Subject" /></label>
<input type="text" id="subject" name="subject" />
<label for="message"><fmt:message key="Message" /></label>
<textarea id="message" name="message"></textarea>
<input type="submit" value="<fmt:message key="Submit" />" />
</fieldset>
</form>
<c:if test="<%= WCMMode.fromRequest(request) == WCMMode.EDIT %>">
<h3>Success Message</h3>
<cq:include path="success" resourceType="foundation/components/textimage" />
<br style="clear:both"/>
<h3>Failure Message</h3>
<cq:include path="fail" resourceType="foundation/components/textimage" />
</c:if>


This component will render out a simple form for the user to submit their contact information. And when in author mode it will display text and image components for the author to enter the success and failure messages. We can then style and add JavaScript to the form as needed.

In the dialog for the component, create two fields, the first being a pathfield for the author to select the email template to use for the contact form and the second being a multifield of email address for the recipients of the email.

Creating the Email Template
Once you have created the email component, it's time to create the email template. CQ will use this template to create the email instance to send, you can think of it like a mail merge template.

The templates are simple text files. They begin with email headers, followed by a blank line, followed by the content of the email. The content of the email will be send out as the HTML and Text versions of the email.

Below is an example of an email to send for our contact form. All of the text in the format ${SOMEVALUE} will be replaced with the variable matching the name inside the brackets. These variables can be passed in through the request or retrieve programatically. One of the tricky things is, if you have multiple recipients, you cannot use the headers to specify them. Each header is interpreted as a single value, so you will get an exception if you put multiple emails in the to, from, cc or bcc fields.

From: admin@myco.com
Subject: Contact Form Submission

We have received a contact request with the information below:
<br/>
Email: ${email}
<br/>
Subject: ${subject}
<br/>
Message: ${message}


Once you have created your email template, upload it into a folder under /etc/notifications using the CQ Tools manager.

Creating the HTML Email Servlet
Once you have created the template, create the form which will send the email. Start off the class with a reference to the MessageGatewayService. This service will be used to retrieve the message gateway.

@Reference
private MessageGatewayService messageGatewayService;


Next, load the parameters from the request. The map of parameters will be used to replace all of the variables in the email template. You can also programatically set parameters here as well.

@SuppressWarnings("unchecked")
final Enumeration<String> parameterNames = request.getParameterNames();
final Map<String, String> parameters = new HashMap<String, String>();
while (parameterNames.hasMoreElements()) {
final String key = parameterNames.nextElement();
parameters.put(key, request.getParameter(key));
}


Then retrieve the Email Template from our configuration value in the component instance.

String template = properties.get("emailTemplate","/notset");
Resource templateRsrc = request.getResourceResolver().getResource(template);
if (templateRsrc.getChild("file") != null) {
templateRsrc = templateRsrc.getChild("file");
}
if (templateRsrc == null) {
throw new IllegalArgumentException("Missing template: " + template);
}


And create a Mail Template from the template file. You can then pass in the properties as an Apache Commons StrLookup. The String Lookup will be used to replace all of the variables in the template with the values from the request.

final MailTemplate mailTemplate = MailTemplate.create(templateRsrc.getPath(),
templateRsrc.getResourceResolver().adaptTo(Session.class));
final HtmlEmail email = mailTemplate.getEmail(StrLookup.mapLookup(properties),
HtmlEmail.class);


Since the email template does not gracefully handle multiple recipients, we will loop through the recipients specified in the component instance and add them individually to the email.

log.debug("Adding recipients");
final String[] recipients = properties.get("recipients", new String[0]);
for (final String recipient : recipients) {
email.addTo(recipient);
}


Once this is all complete, retrieve the HTML Email Message Gateway and send the email.

this.messageGateway = this.messageGatewayService.getGateway(HtmlEmail.class);
this.messageGateway.send(email);


Based on whether or not the sending of the email succeeded, we can retrieve the appropriate message we set on the page and write the message to the response.

String result = "success";
if(!succeeded){
result = "fail";
}
final Resource message = request.getResource().getChild(result);
if (message != null) {
response.getWriter().write(message.adaptTo(ValueMap.class).get("text", ""));
} else {
log.error("Message text for " + result + " not set");
}


Once you create the servlet, you should be able to send emails from your Contact component. You will want to do further validation than is shown in this example and probably make the contact form work with AJAX.

Hopefully, you can now appreciate how easy and powerful the Adobe CQ Email API is and how it can be useful on your next project.


By aem4beginner