Showing posts with label DTM. Show all posts

May 26, 2020
Estimated Post Reading Time ~

AEM-DTM-Target Integration. Simplified! – Part1

AEM-DTM-Target integration takes advantage of the tremendous extensibility of AEM. The primary aim is to integrate AEM with Adobe Target to enable the creation and delivery of personalized experiences for specific audiences. However, using DTM as a technology bridge will facilitate the integration of AEM with Target.

Let’s start by introducing the three solutions in Adobe Experience Cloud.
AEM – Adobe Experience Manager (AEM) is a web content management system with powerful features to manage, organize, and deliver enterprise content with a best-in-class experience. AEM came to Adobe with the acquisition of Day Software in 2010, earlier it was known as Day CQ (Communique). For this article, we are using the AEM 6.3 version.

DTM – Dynamic Tag Management(DTM) is a solution that offers tools to integrate Adobe Experience Cloud solutions as well as third-party solutions like Google Analytics etc. DTM used to be known as ‘Satellite’ before Adobe acquired it in 2013.
Target – Adobe Target is a personalization solution of the Adobe Experience Cloud suite, which delivers the personalization of content based on different types of rules. Target came to Adobe with the acquisition of Omniture in 2009. In this article, we are going to demonstrate the Target VEC (Visual Enhanced Composer) capabilities.

Architecture:
AEM can be integrated with Target directly without using DTM. However, it’s recommended to use DTM in between due to the listed benefits:
Efficiency –DTM allows you to optimize the loading time of multiple tools and marketing tags.
Reduced Cost – Minimise the development cost as once Data Layer is in place multiple solutions can leverage the same.
Flexibility – DTM allows you to quickly test and optimize tags without being bound by release cycles.
Multiple Sites – Using DTM you can manage multiple sites from a single console.

AEM is usually connected with DTM using AEM Cloud Services and Target is connected to DTM using Experience Cloud configuration. Here is the relevant diagram for AEM-DTM-Target integration.

Request Flow for AEM-DTM-Target Integration:

How a request flows from AEM to Target via DTM:
AEM starts rendering a site page.
The site has a DTM script attached along with Data Layer. DTM script is associated with a relevant property. Data Layer is discussed below.
DTM Property has Target added to it, which raises a request to Target and share the required data.
Target pushes its response back to the AEM instance using mbox.js. Note: Now mbox.js has a newer and updated alternative which is known as at.js
AEM page got Target response which gets rendered on the page.
Fig: Diagram of the request flow in AEM-DTM-Target Integration.

Data Layer:
As you might have noticed in the request flow the AEM site has got the DTM Script and Data Layer associated. The data layer is a W3C standard to store values in javascript objects. The data layer is created at AEM and consumed by DTM to get the required data from the AEM instances and push it to any solution like Analytics, Target, etc. We are going to create a sample data layer below in the DTM Rules section.

DTM Setup:
To get access to DTM, one has to raise the request with Adobe Client Care with proper information. Once the access is granted, go to https://dtm.adobe.com and log in with the credentials provisioned by Client Care.

To start with DTM, create a new property with the URL of the website. Thereafter add the required tools in the property like Adobe Analytics or Adobe Target. In AEM configuration, we are going to use the same DTM Property in order to integrate the AEM with Analytics, Target, etc.

For this article, we are going to add Adobe Target as we need to carry out AEM-DTM-Target integration. To do this, we need Client Code which will be provided by Client Care, or alternatively, you can try adding using Experience Cloud membership.
Fig: DTM property creation.
Fig: Addition of relevant tool or solution to DTM property.

Fig: Adding Target as a tool in DTM property.

DTM Rules:
In the above steps, you have created a new DTM property and added Target as a tool in the same property. Now you need to know how to play with data, DTM uses the data layer to get the data from the AEM instances. For example, using Target you need to render the homepage of your website based on the browser, location, devices, etc or you can also get user-specific details like age, gender, interests, etc. Hence you need to get all such information from AEM in the data layer. 

For example, here is the data layer:
var dataLayer = {} dataLayer.page = { pageInfo: { pageName: document.title, url: document.location } }

Once the data-layer is all set, fetch the values from the data layer and set it in DTM data elements. We use these data elements in different types of rules. DTM has got three types of rules:
1. Event-Based Rule – Rules executed when a visitor interacts with on-page elements.
2. Page Load Rule – Rules executed when a visitor loads the page.
3. Direct Call Rule – Rules executed when you want to tell DTM to do something specifically.
Fig: DTM Rules

Creating a data element using the data layer is quite straightforward. You can see the below screenshot, here we have created a new data element Page Title which is mapped with the pageName field of the data layer created above.


Fig: Data Elements

DTM Workflow:
Every property in DTM follows a standard workflow. Workflow has got three steps:
Creation of property and rules.
Approve the newly added and modified rules.
Publish the property to make the changes live.

AEM-DTM Integration:
There are two ways to integrate DTM with AEM:

Using Cloud Services
Embed JS

Using Cloud Services:
Using the AEM admin console, go to Tools > Deployment > Cloud Services. Find ‘Dynamic Tag Management and click on ‘Configure now’. Provide a Title and Name of the configuration keeping the Parent Configuration field intact. Enter the details below:
Property
Description
API Token
The value of the API Token property of your Dynamic Tag Management user account. AEM uses this property to authenticate with Dynamic Tag Management.
Company
The company with which your login ID is associated.
Property
The name of the Web Property that you created for managing the tags for your AEM site.
Include Production Code on Author
Select this option to cause the AEM author and publish instances to use the production version of the Dynamic Tag Management libraries.
When this option is not selected, the Staging Settings apply to the author instance, and the Production Settings apply to the publish instance.

There is an option to self-host the DTM libraries which means AEM will host the DTM libraries if this option is checked, if we want to use the libraries from the cloud then we should uncheck this option. Here we are using a later one.
Embed JS:

Go to the DTM Console using https://dtm.adobe.com and click on the relevant property.
Go to the Embed tab, copy the Header and Footer staging script, go to the AEM author instance and copy the script in the header and footer of the website respectively. Similarly, copy the header and footer production script and put it in the AEM publish instance.

Let’s say you have integrated DTM with AEM using one of the above-mentioned methods, and assign the DTM config to the root of your site using AEM Sites console.
DTM-AEM Connection Test:

Now you need to test whether the DTM script is getting loaded with your website. In the browser, try to open any page of your website where you have assigned the DTM config and open the browser console. If the “_satellite” object exists then it means the DTM script is getting loaded. You can also try retrieving the data elements that you have created in DTM using “_satellite.dataElements”. If you are able to find all the details, you are good to go.

If the _satellite object doesn’t exist, it means the page doesn’t have the DTM header/footer script. You can view the source of the page to confirm the same.


Fig: Satellite Object


Fig: Satellite Data Elements

DTM Debugging Tools:
In DTM we play with different types of scenarios and scripts, hence we might need to check if the scripts are working fine and in order, they are getting executed.
There are a couple of browser plugins that proved to be quite useful for debugging.

Launch Switch:
It enables the logging into the console and as well as we can test the changes using a staging script, before making the changes live.

There are two buttons available on the plugin console. Tweaking them will do the following:
Debug: It enables the logging of the rules, you can also add the logs using _satellite.notify(“info”).
Staging: It will enable the changes you have made in the property that you have not published. This is used for testing the changes before making them live.

Download URL for Chrome: https://chrome.google.com/webstore/detail/launch-and-dtm-switch/nlgdemkdapolikbjimjajpmonpbpmipk
Fig: Launch Switch Plugin.

Tagtician:
It shows detailed information about all the DTM Rules.
Download URL Chrome: https://chrome.google.com/webstore/detail/tagtician-for-adobe-dtm/hiaoiehpkillodoeillmodjcadmfmcbg
Fig: All the DTM rules detailed in Tagtician.

Reference:
Adobe DTM Documentation: https://marketing.adobe.com/resources/help/en_US/dtm/

This is the first part of “AEM-DTM-Target Integration. Simplified!” where you have learned how to set up DTM, create DTM property and data elements, integrate DTM with AEM, and debug DTM. In Part 2, you will learn how to create different types of rules in DTM, use these rules to share the information to Target, Target activities, Target audience, and how to use Target VEC (Visual Enhanced Composer) along with the Target debugging tweaks.


By aem4beginner

May 15, 2020
Estimated Post Reading Time ~

Debugging Adobe Dynamic Tag Management (DTM)

Debugging Adobe Dynamic Tag Management, as with everything in the (marketing) technology world, means there will be a point where debugging is a must.

Adobe Analytics is a powerful tool to analyse almost anything that can be tracked on a website. Unfortunately, any additional, customised code and feature increases the risk of introducing bugs as well.

Setting up the debugging environment
We already briefly discussed the advantages of DTM and how to include it into a digital marketing platform in a prior article on our blog. Once DTM is set up and all the necessary rules that help tracking the right data are defined, the fun begins: Seeing them in action. When testing if everything works the way it should two things need to be considered:
The rule is firing successfully
The variables are mapped correctly

In order to properly manage to monitor this you need a packet analyser (or network analyser). Don't get intimidated though, you have one installed already, and you love to watch youtube with it.

Yes, your browser most surely has a packet analyser already built in. It's normally the "network" tab of the “web console” or “developer tools” of your preferred browser. The name changes from one browser to another, but you should be able to find it in the browser's options. Also, there are some add-ons and plug-ins that can also do the same thing.

For simplicity, I'll stick with Google Chrome's console (which you can bring up by hitting F12 on a PC, or ⌥⌘j on a Mac), and the Adobe Marketing Cloud Debugger plugin. Follow the instructions on Adobe's website to set everything up correctly.

Enough with the tools, let's start debugging
To make things a bit more visual let's think of an example: you set a “Page Load Rule” with a condition to fire for all pages that contain the word “marketing” in the URL. Now, you load the specific page and want to know if your rule fired or not. You have a couple of ways of knowing this:

First approach to see if a rule fired:
Set at least one variable in the “Adobe Analytics” section of the DTM rule; for example the Page Name. Now go to the Chrome's console, and in the “network” tab, look for a request to the Adobe Analytics servers. Pro tip: all request to Adobe Analytics have “/ss/” in the URL, so you can filter these out with the search function.


Setting the Page Name Variable in DTM


Filtering out Adobe Analytics requests in Google Developer Tools
The image above shows that the rule fired successfully. Now, you can click on the result, see the contents of it, and confirm that the pageName came through as you set it.

For better usability you can use the "Adobe Marketing Cloud Debugger". It shows the content of the requests in a better and easier to read way. This is how our request looks like on the debugger tool:


Using the Adobe Marketing Debugger Tool to see if a rule is fired
By looking at the request on the debugger, you can easily confirm that your variables are mapped correctly, too. In this case we are only setting page name, but of course here you can also check your evars, props, events and other system or configuration variables.

If you want to use DTM for any tool other than Adobe Analytics, you can still check if the rule fired successfully using the method we described above. But to control if the variables were mapped correctly and a more in depth analysis you should get some advice on how to debug that specific tool that you are using.

The quick check to see if a rule is fired:
Another very simple hack to see if a rule is fired or not is using Javascript. You can add a short script to your DTM rule that will inform you once a rule is fired. Simply go to the “Javascript / Third Party Tags” section of the DTM rule and add a very simple new script: console.log(“Marketing Page Rule Fired”);


Adding JavaScript to a DTM rule
Adding the right script to display notifications in the browser console

“Console logs” are vastly used for debugging code. All they do is to display anything you want in your browser console. In this case we only want it to display the text “Marketing Page Rule Fired” as soon as the rule is triggered. If the rule fires, you will see something like below on your console:


Seeing the page rule fired in the browser's console

Making Adobe DTM work
Now you know how to debug your rules and confirm that your variables are mapped correctly. As mentioned above, the same thing can be achieved with several other tools, like the Firefox's console, firebug + omnibug, Httpfox, or other browsers' consoles.

Source: https://www.netcentric.biz/insights/2015/09/debugging-adobe-dynamic-tag-management--dtm-.html


By aem4beginner

April 28, 2020
Estimated Post Reading Time ~

Issue while integrating AEM with Dynamic Tag Management(DTM) through HTTP Proxy

The below exception is thrown while integrating Adobe Experience Manager(AEM) with Dynamic Tag Management(DTM)


08.05.2017 14:06:35.894 *ERROR* [10.208.56.253 [1494270332788] POST /etc/cloudservices/dynamictagmanagement/test/jcr:content.companies.json HTTP/1.1] com.adobe.cq.dtm.impl.util.DTMConfigurationUtil Failed to obtain a response from the DTM API Server.
org.apache.http.conn.ConnectTimeoutException: Connect to api.omniture.com:443 [api.omniture.com/192.243.232.77] failed: Connection timed out
at org.apache.http.impl.conn.HttpClientConnectionOperator.connect(HttpClientConnectionOperator.java:138)
at org.apache.http.impl.conn.PoolingHttpClientConnectionManager.connect(PoolingHttpClientConnectionManager.java:318)
at org.apache.http.impl.execchain.MainClientExec.establishRoute(MainClientExec.java:363)
at org.apache.http.impl.execchain.MainClientExec.execute(MainClientExec.java:219)
at org.apache.http.impl.execchain.ProtocolExec.execute(ProtocolExec.java:195)
at org.apache.http.impl.execchain.RetryExec.execute(RetryExec.java:86)
at org.apache.http.impl.execchain.RedirectExec.execute(RedirectExec.java:108)
at org.apache.http.impl.client.InternalHttpClient.doExecute(InternalHttpClient.java:184)
at org.apache.http.impl.client.CloseableHttpClient.execute(CloseableHttpClient.java:82)
at org.apache.http.impl.client.CloseableHttpClient.execute(CloseableHttpClient.java:106)
at com.adobe.cq.dtm.impl.util.DTMConfigurationUtil.callDTMApi(DTMConfigurationUtil.java:210)
at com.adobe.cq.dtm.impl.servlets.DTMCompaniesServlet.doPost(DTMCompaniesServlet.java:58)

Caused by: java.net.ConnectException: Connection timed out
at java.net.PlainSocketImpl.socketConnect(Native Method)
at java.net.AbstractPlainSocketImpl.doConnect(AbstractPlainSocketImpl.java:339)
at java.net.AbstractPlainSocketImpl.connectToAddress(AbstractPlainSocketImpl.java:200)
at java.net.AbstractPlainSocketImpl.connect(AbstractPlainSocketImpl.java:182)
at java.net.SocksSocketImpl.connect(SocksSocketImpl.java:392)
at java.net.Socket.connect(Socket.java:579)
at org.apache.http.conn.ssl.SSLConnectionSocketFactory.connectSocket(SSLConnectionSocketFactory.java:239)
at org.apache.http.impl.conn.HttpClientConnectionOperator.connect(HttpClientConnectionOperator.java:123)
... 138 common frames omitted

Based on the analysis the Dynamic Tag Management(DTM) cloud connector is not using the the proxy server details configured to establish the connection.

This is the defect with the connector, raise a ticket with Adobe support team to receive the fix.

As a temporary fix update DTMConfigurationUtil.java in bundle - /libs/cq/cloudservices/install/cq-dtm-0.1.8.jar to support proxy server while establishing the connectivity.

DTMConfigurationUtil.java - callDTMApi

HttpHost proxy = new HttpHost("proxy.com",80);
RequestConfig config = RequestConfig.custom().setProxy(proxy).build();
apiRequest.setConfig(config);

This post is written based on the AEM version AEM 6.1 SP1.


By aem4beginner

April 24, 2020
Estimated Post Reading Time ~

How To Natively Integrate AEM 6 With Adobe DTM


A lot of my day to day work is with Adobe Experience Manager (AEM), which is a pretty large and complicated product. As a software developer, one thing that I miss when I’m working with AEM is that the answers I’m looking for are often not Google-able. Maybe I’m spoiled, but I’m used to having solutions spoon-fed to me via Stack Overflow.

I do have the official documentation from Adobe that I can refer to, but it’s pretty dense and I’m more of a visual learner. What I want to do with this guide is create something so basic and simple, anyone could do it (including myself). I love pictures so you’ll see a lot of those here. But don’t just look at the pictures. Some of the (admittedly boring) text of this blog post will contain important information for your integration.

I am by no means an AEM or Adobe DTM (Dynamic Tag Management) expert, so I welcome all feedback on this post. Or, if you just learned something that helped you out, I’d encourage you to share it with your friends/co-workers.

I apologize in advance for my photoshop skills (or lack thereof). You can pretend I recruited some random 10-year-old to help with this article. Fortunately, my co-workers were pretty supportive, as you can see in the image to the right.

One final note: the images do appear small, but if you click them they will appear bigger.

Now let’s get started:


The first thing you’re going to want to do is boot up and visit your AEM Author instance. In my case I’ll be working with my local instance, so the URL will be http://localhost:4502.

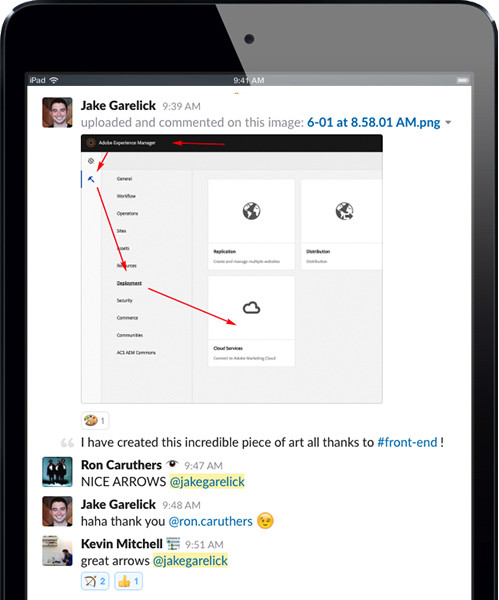
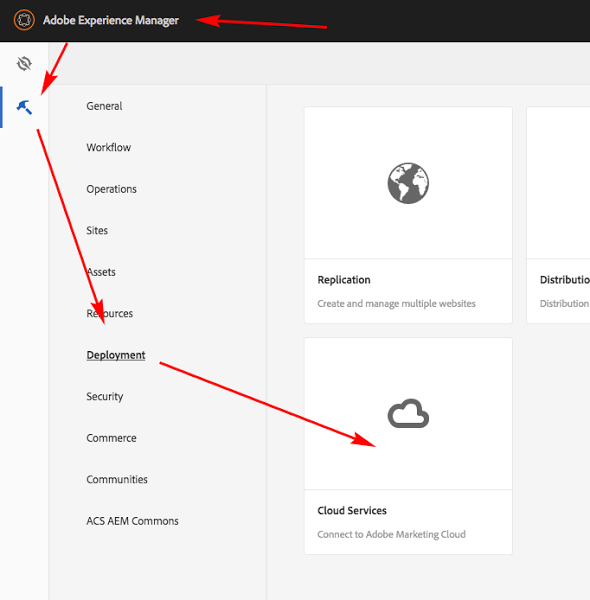
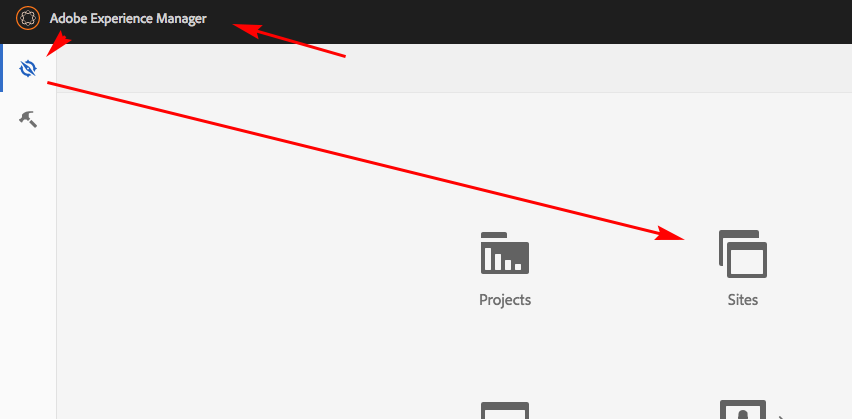
Click Adobe Experience Manager on the navigation bar, then the hammer icon (Tools), then Deployment, and Cloud Services.


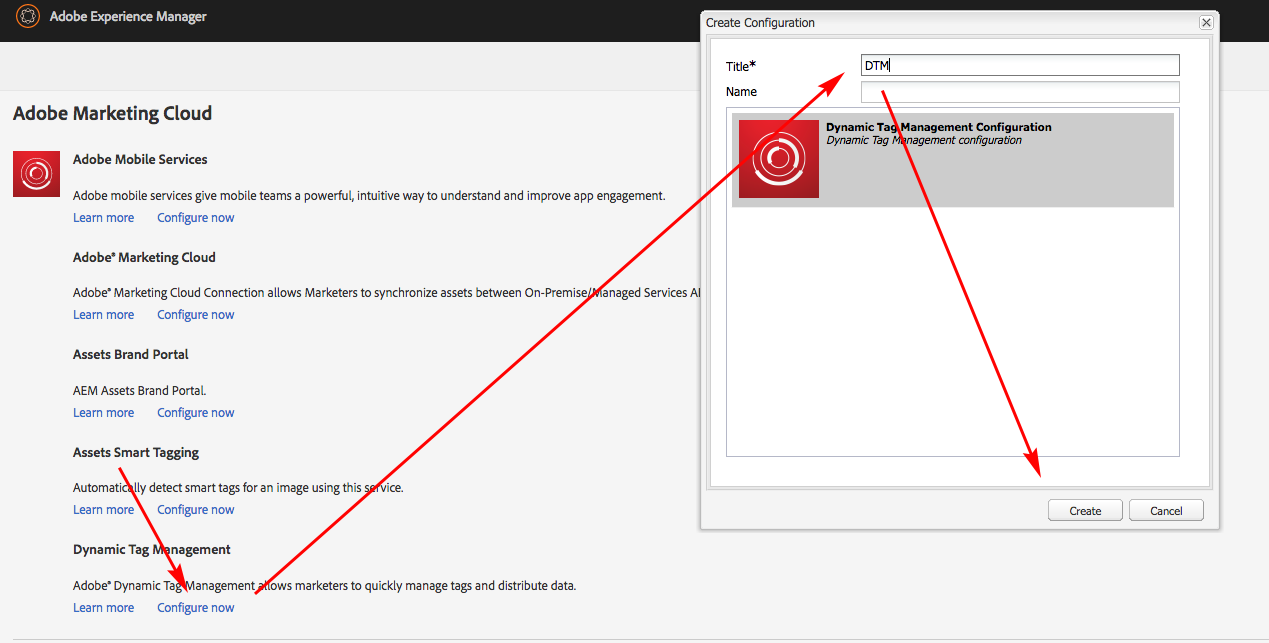
Next you will be brought to the Cloud Services page. Go to the Dynamic Tag Management section, and click Configure Now. A window will open and you will be able to select a title and a name.

Sidenote: In case you’re curious about the difference, the value of the title will be set to the jcr:title property of the cloud service configuration’s jcr:content node and the name will set the name of the cloud service configuration node. If you leave the name blank, the node’s name will just be set to the title, in kebab case (just-like-this). I usually just stick with DTM as the title of my cloud service configuration.

When you’re done, click Create.


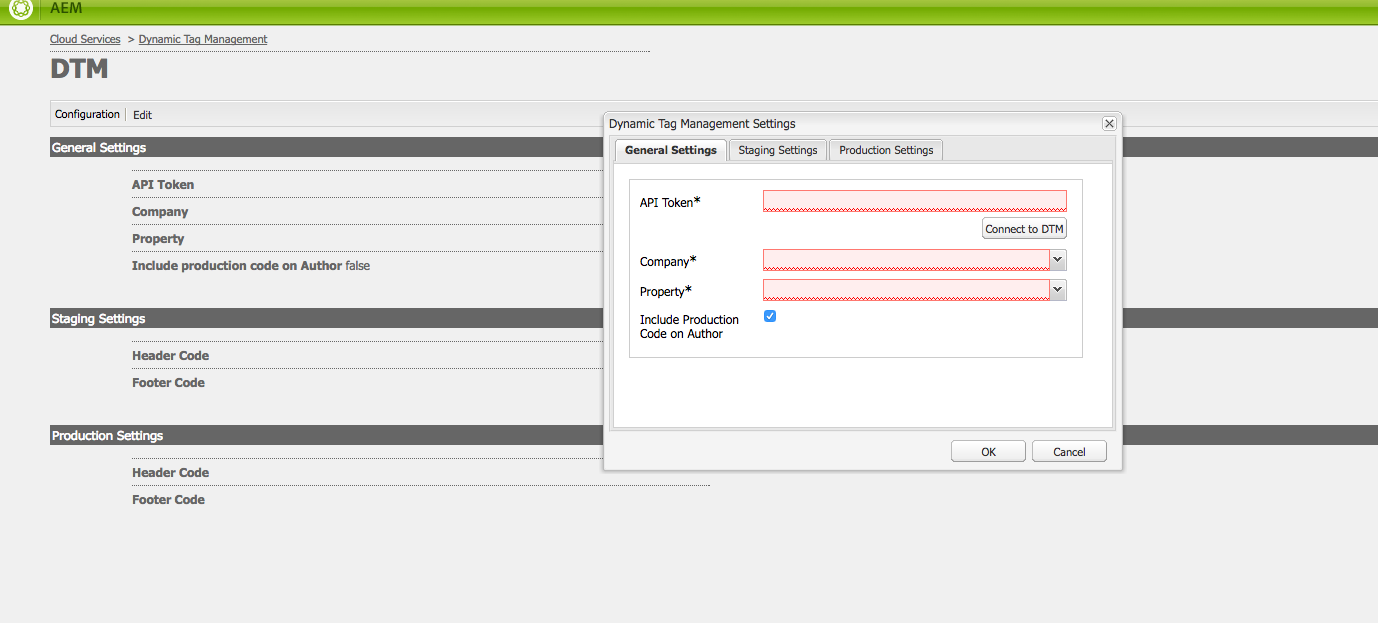
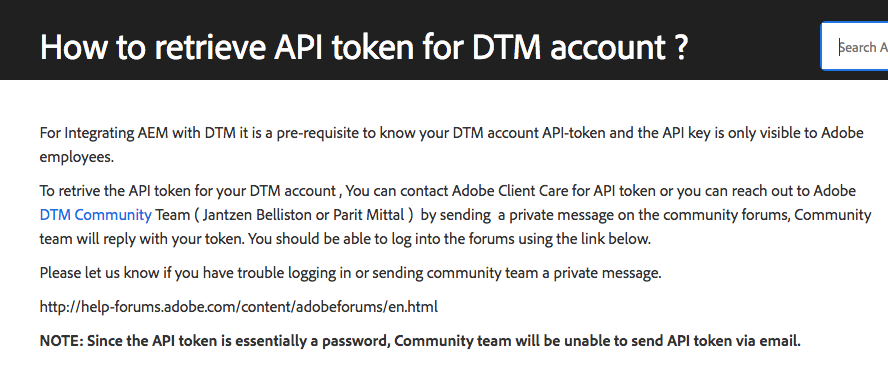
Next you will be directed to a new page in the Classic UI. This is where you will insert your API token you can request from Adobe Client Care. You can view more information on that here, but I also added an image in case the link breaks.


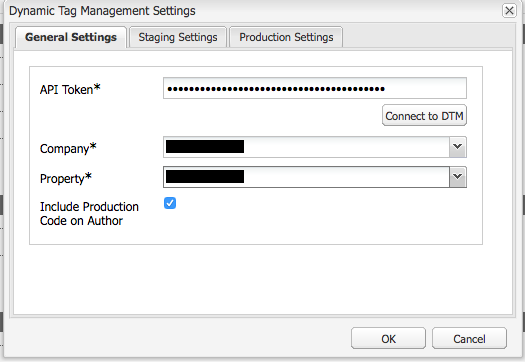
After inserting your API token, click Connect to DTM to populate the Company and Property dropdown.

Sidenote: If you’re a consultant working with a client, make sure to use the client’s API token, not yours, otherwise they will have access to every property that you have access to (not good!).

The Include Production Code on Author checkbox shown in this window is hopefully self-explanatory, it just means that if it is checked, it will load whatever code is located under the Production Settings tab on the author instance. Make sure this is unchecked unless you want to be tracking authors (probably not)


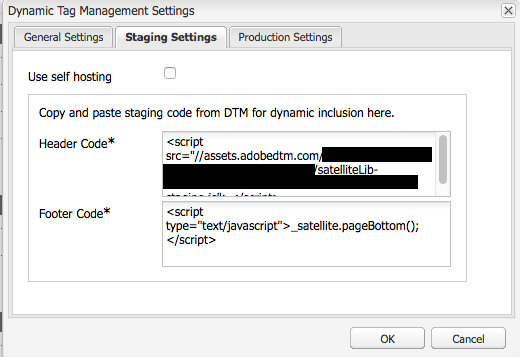
Next, go into the Staging Settings tab and uncheck Use self hosting (unless you actually want to use self hosting, in which case this guide won’t help you). Do the same for Production Settings.

IMPORTANT: If you are adding DTM to a development, staging, or NON-PRODUCTION server, you need to do the following:
Copy the contents of the Header Code text field under the Staging Settings tab.
Paste it into the Header Code text field under the Production Settings tab.

This will always load the DTM staging library on non-production servers, which is what you want. Users will be doing testing on the servers, and you DO NOT want development or staging testing information to be sent to a production report suite.

Finally, click OK and the page will refresh with all your updated settings.


Whew, you’re almost done. Now you just need to add the cloud service configuration to your site’s root page, and then publish it. Go back to the homepage, then click Adobe Experience Manager, then the compass symbol (Navigation), then Sites.


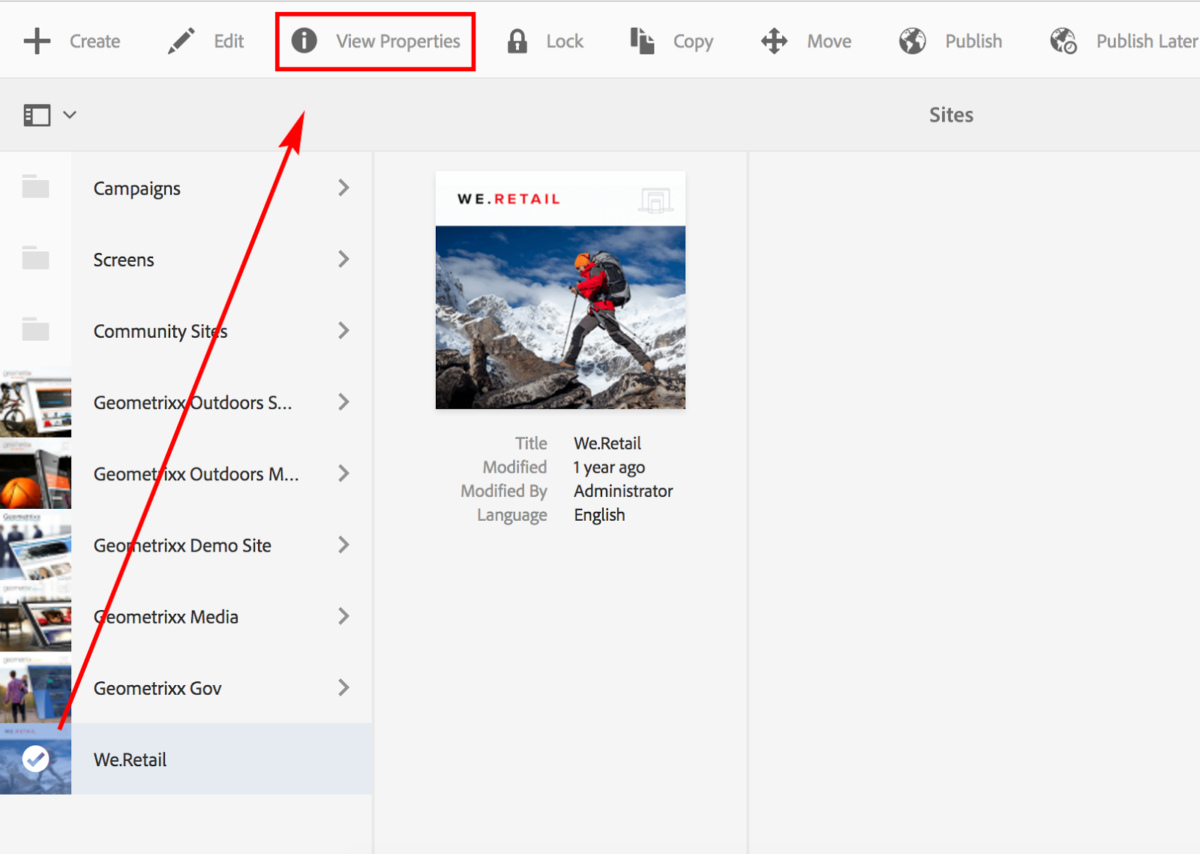
Click the thumbnail of your desired root page.


You will now see a bar appear at the top of your window. Click on View Properties.


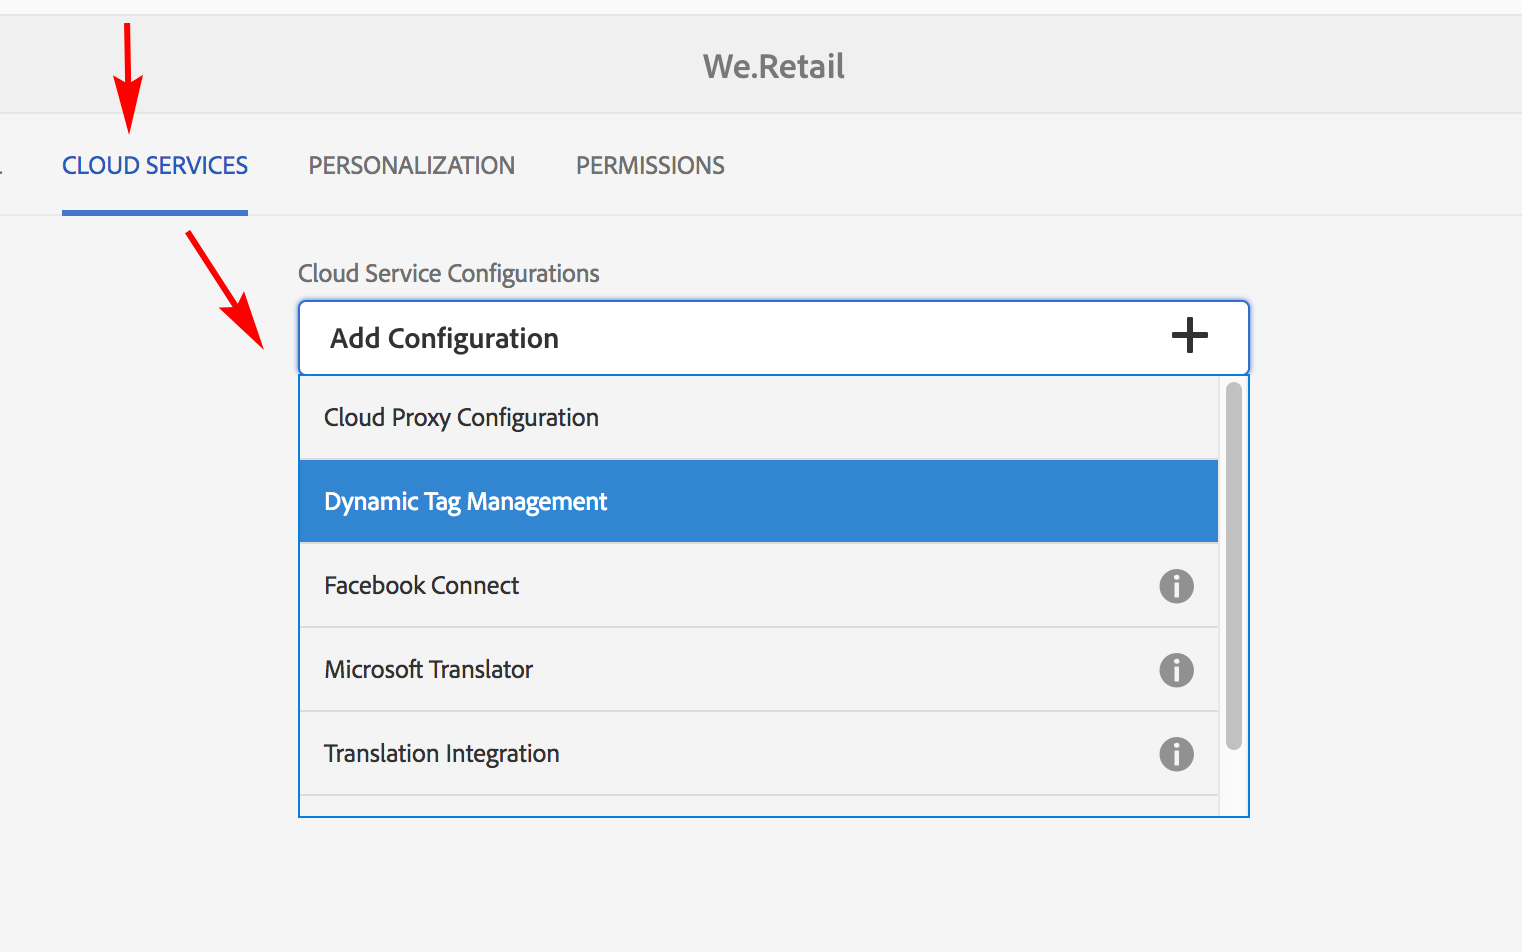
Click the Cloud Services tab, then the Add Configuration dropdown, and select Dynamic Tag Management.


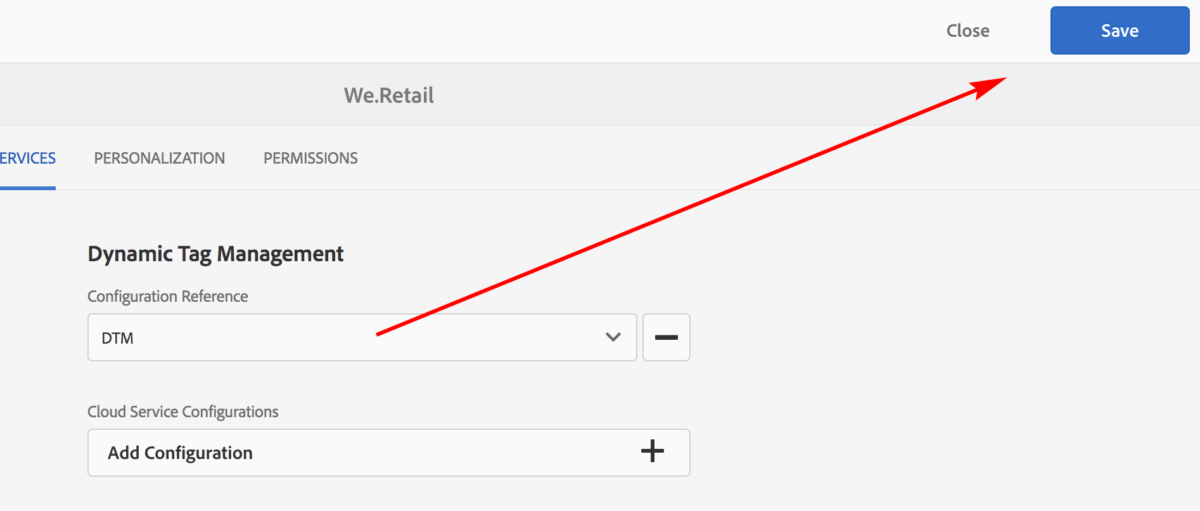
The dropdown should automatically show your cloud service configuration that you set up. Click Save, then Close


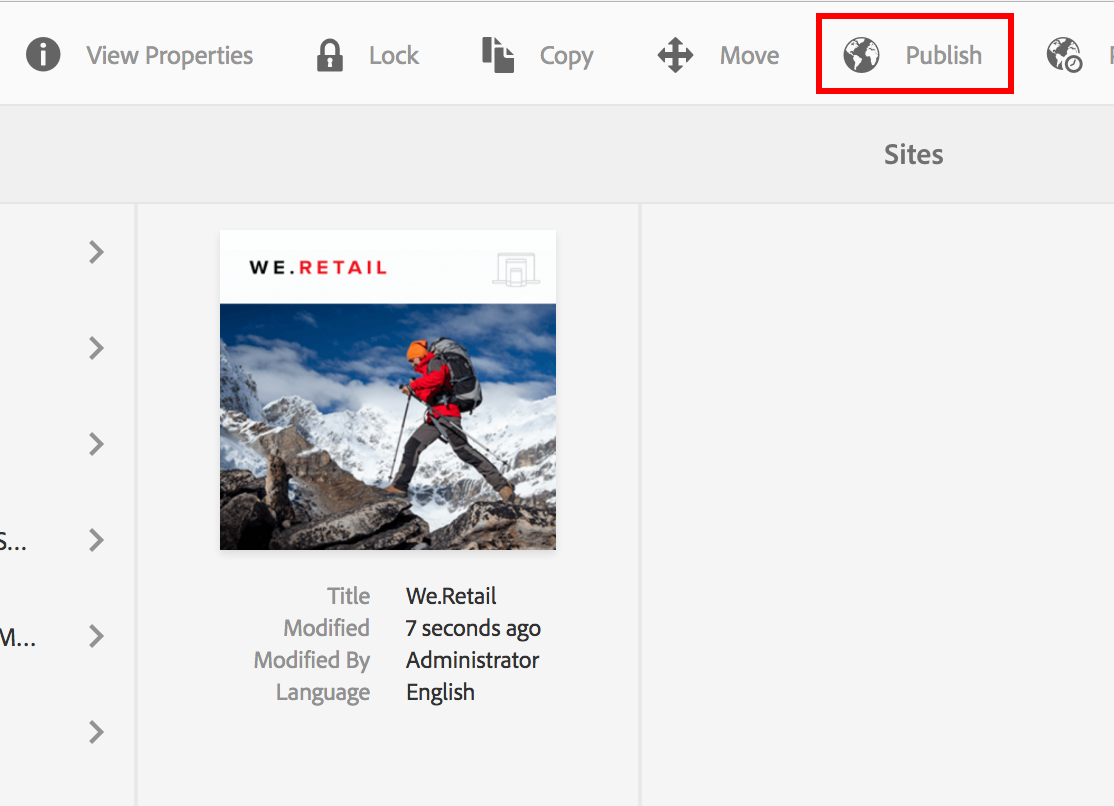
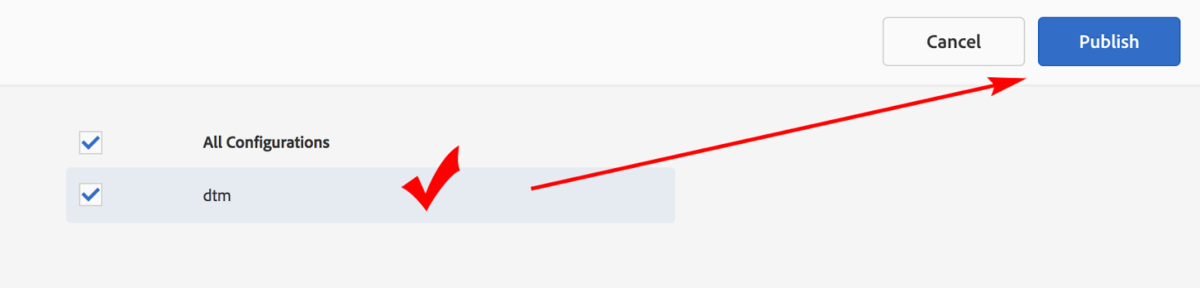
Click the thumbnail of the root page again to bring up the bar, and click Publish.


You will be brought to a screen that looks similar to the one on the left. If it looks right to you, click Publish.

Congratulations! You should now have AEM integrated with Adobe DTM.

A big thank you to Rob Catalano and Kevin Haag for editing and polishing this post, and thank you for reading!


By aem4beginner

April 21, 2020
Estimated Post Reading Time ~

Integrating Dynamic Tag Management with Adobe Experience Manager

Solution:
Advantages of DTM:

  • Use Dynamic Tag Management web properties to track AEM sites.
  • Dynamic Tag Management enables marketers to manage tags for collecting data, and distribute data across digital marketing systems.
  • For example, use Dynamic Tag Management to collect usage data for your AEM website and distribute the data for analysis in Adobe Analytics or Adobe Target.
Assuming you have an author instance of AEM running, there are the three majors steps you need to perform to add the DTM code on your site via the cloud-hosted services integration:
  1. Create web property in DTM
  2. Configure AEM DTM Integration
  3. Embed DTM code in a specific AEM site
1. CREATE DTM WEB PROPERTY
To create a web property in DTM, login to dtm.adobe.com and click on ‘Add Property check the first two options to enable approving and publishing multiple rules at once:
  • Allow Multi-Rule Approvals
  • Enable Selective Publish
Leave the rest to defaults. DTM is flexible enough to let you change the settings later on.

Navigate to your company page, then click Add Property.


2. Fill in the fields:

Element
Description
Name
The name of your property.
URL
The base URL of the property.
This site spans multiple domains
You can add and remove domains if you want visitor data to persist between domains.
This setting lets you specify how you would like to track traffic moving between your associated subdomains or domains.
Note: If you do not intend to integrate an analytics tool, this step is unnecessary and does not affect processing.

3. (Optional) Configure Advanced Settings.

Element
Description
Allow Multi-Rule Approvals
Allows multiple rules for this property to be approved at one time. (The default approval allows only single-rule approval.)
Enable Selective Publish
Specifies whether to allow users to selectively publish approved rules. (This is the default option.)
Tracking Cookie Name
Overrides the default tracking cookie name. You can customize the name that dynamic tag management uses to track your opt-out status for receiving other cookies.
Tag Timeout
Specifies how long dynamic tag management waits for a tag to fire before timing out.
Anchor Delay
Specifies how long dynamic tag management waits for tags to fire on clicked links before moving to the next page. The default value is 100 milliseconds.
Longer delays improve tracking accuracy. Adobe recommends a delay of 500 milliseconds or less, which the user will not perceive.

Delete a web property
Delete a web property from dynamic tag management.
Note: Property removal cannot be reversed. The requestor must be an admin-level user. This request cannot be undone.
Navigate to the Overview page for the desired property.

Click Edit Property > Remove Property, then confirm the removal of the property.


2. SETUP DTM CONNECTION FROM AEM
In your AEM instance, go to Tools > Operations > Cloud > Cloud Services. Look for Dynamic Tag Management.
For adding the first configuration, click configure now

If one or more configurations are already added, Click Show configurations then go on to add a new or modify the existing one.

To create a configuration, provide an appropriate title and name (optional) and hit create.

Once a configuration is created, there are three types of settings you need to configure:
General Settings –

  • API Token: AEM requires this property to authenticate with DTM. This is provided by Adobe/DTM client care.
  • Company – It appears when you provide the API token and hit ‘Connect to DTM’. Simply select it from the drop-down.
  • Property – Select the DTM property you created for analytics implementation on AEM
  • Include Production Code on Author – It is recommended to uncheck this option. This allows you to have the staging code on Author and test the DTM rules before publishing.
Staging Settings –
  • Use self-hosting – Uncheck this option. For the purpose of this blog, I am using the cloud-hosted solution, which is recommended and simplest to use.
  • Header Code – If you have entered the API token, this will be auto populated with staging header code of the selected DTM property.
  • Footer Code – This code is same irrespective of the DTM property you select and is pre-populated for you even before making the DTM connection.
Production Settings –
For cloud-hosted solution, these are same as the Staging settings. Just make sure, there is no ‘-staging’ suffix in JS for Header code.

NOTE: Even though, Header and Footer code for both staging and production are auto-populated once you connect to DTM but it is pretty easy to retrieve them from DTM in case you want to verify. Simply navigate to the Embed tab of your DTM property.
3. EMBED DTM CODE IN A SPECIFIC SET OF AEM WEBPAGES
Once you have configured the AEM DTM connection, it is simply a matter of selecting the right configuration from the list.
Login to AEM author instance; navigate to the site/set of pages where you want to embed the DTM code, and then right click to select Properties –

Go to Cloud Services > Add Service > Select ‘Dynamic Tag Management’
Configuration created in step 2 will be available in the drop-down. Select the configuration to embed the DTM property code to the site and hit ‘OK’ to save.

References: 


By aem4beginner

DTM Architecture

Solution:
The following illustration shows how the DTM architecture components work together to effectively deploy and manage tools, tags, and scripts on your site.


Architecture
The primary components of the DTM technical architecture include the web management application, the staging and production JavaScript libraries, and the embed code.

The web management application is the online interface that you log in to and use to manage your DTM implementation.

A web-property in DTM is a collection of tools, rules, and data element configurations.

Each web property is associated with one staging JavaScript library and one production JavaScript library. These libraries are generated by the web application and contain the unique set of configurations in that web property.

Reference:
https://marketing.adobe.com/resources/help/en_US/dtm/get_started.html


By aem4beginner

April 18, 2020
Estimated Post Reading Time ~

AEM DTM Integration: Step-by-Step Process

The purpose of this blog is to go over the AEM DTM Integration process step by step, using the recommended configuration options. There is documentation available for integration by Adobe here. Although, for someone who is integrating AEM DTM for the first time or with limited knowledge of one or the other, it is quite overwhelming to be exposed to the technicalities of all the available options at once. This post will also elaborate and expand on embedding DTM code on various experiences built within a single AEM instance. I hope this blog helps in simplifying the process for you.

Assuming you have an author instance of AEM running, there are the three majors steps you need to perform to add the DTM code on your site via the cloud-hosted services integration:
  1. Create web property in DTM
  2. Configure AEM DTM Integration
  3. Embed DTM code in a specific AEM site 
Create DTM web property
Let me start with a brief description of ‘Dynamic Tag Management’ (DTM). It is Adobe's Tag Management solution that allows you to set up rules to control when data is collected, where it goes, and how it is organized. With DTM, you can deploy any tag on any number of pages without dealing with rigid templates. It provides much more flexibility over old school analytics implementation in terms of developer involvement, future enhancements and custom metrics tracking.

To create a web property in DTM, login to dtm.adobe.com and click on ‘Add Property’. Fill in the required fields – Name and URL. In Advanced settings, I usually check the first two options to enable approving and publishing multiple rules at once:
  • Allow Multi-Rule Approvals
  • Enable Selective Publish 
Leave the rest to defaults. DTM is flexible enough to let you change the settings later on.


Setup DTM connection from AEM
In your AEM instance, go to Tools > Operations > Cloud > Cloud Services. Look for Dynamic Tag Management.

For adding the first configuration, click configure now


If one or more configurations are already added, Click Show configurations then go on to add a new or modify the existing one.


To create a configuration, provide an appropriate title and name (optional) and hit create.


Once a configuration is created, there are three types of settings you need to configure:

General Settings:

  • API Token: AEM requires this property to authenticate with DTM. This is provided by Adobe/DTM client care.
  • Company – It appears when you provide the API token and hit ‘Connect to DTM’. Simply select it from the drop-down.
  • Property – Select the DTM property you created for analytics implementation on AEM
  • Include Production Code on Author – It is recommended to uncheck this option. This allows you to have the staging code on Author and test the DTM rules before publishing. 


Staging Settings:
  • Footer Code – This code is the same irrespective of the DTM property you select and is pre-populated for you even before making the DTM connection.
  • Use self-hosting – Uncheck this option. For the purpose of this blog, I am using the cloud-hosted solution, which is recommended and simplest to use.
  • Header Code – If you have entered the API token, this will be auto-populated with a staging header code of the selected DTM property.


Production Settings:
For cloud-hosted solutions, these are the same as the Staging settings. Just make sure, there is no ‘-staging’ suffix in JS for Header code.

NOTE: Even though Header and Footer code for both staging and production are auto-populated once you connect to DTM it is pretty easy to retrieve them from DTM in case you want to verify. Simply navigate to the Embed tab of your DTM property.


Embed DTM code in a specific set of AEM webpages
All the hard work is done, now it is time to get the reward! Once you have configured the AEM DTM connection, it is simply a matter of selecting the right configuration from the list.

Log in to AEM author instance; navigate to the site/set of pages where you want to embed the DTM code, and then right-click to select Properties –


Go to Cloud Services > Add Service > Select ‘Dynamic Tag Management’

The configuration created in step 2 will be available in the drop-down. Select the configuration to embed the DTM property code to the site and hit ‘OK’ to save.


References:
https://docs.adobe.com/docs/en/aem/6-1/administer/integration/marketing-cloud/dtm.html
http://www.6dglobal.com/blog/aem-dtm-integration-2016-08-16


By aem4beginner

April 14, 2020
Estimated Post Reading Time ~

Integrating Adobe Experience Manager with with Adobe Analytics, Target and DTM

You can create Adobe Experience Manager (AEM) solutions that integrate with these Digital Marketing products: Adobe Analytics, Target, and Dynamic Tag Manager (DTM). Adobe Analytics is the industry-leading solution that provides digital marketers with one place to measure, analyze, and optimize integrated data from all online initiatives across multiple marketing channels. It provides marketers with actionable, real-time web analytics intelligence about digital strategies and marketing initiatives.

Adobe Target is a personalization solution that lets you easily identify content through tests that are easy to execute. Therefore, you can deliver the best experience to your web visitors.

DTM Dynamic Tag Manager is a Digital Marketing cloud service that allows a marketer to manage Adobe and third-party tags used for tracking or other analytic purposes. It is done through client-side scripting that injects tag related code throughout the pages of the site.

By using these products together, you can build engaging solutions that let you deliver the best content to a given web site visitor. That is, you display content from AEM DAM that meets the interest of the visitor. This development article walks you through how to build a solution that uses AEM, Analytics, Target, and DTM.

The following illustration provides an overview of the Marketing Cloud solutions used in this article.

To read this AEM 6.2 community article, click https://helpx.adobe.com/experience-manager/using/integrate-digital-marketing-solutions.html.


By aem4beginner

Integrating Adobe Experience Manager 6.1 with Activation - Dynamic Tag Management

You can integrate Adobe Experience Manager (AEM) with the Digital Cloud Service named Activation (formally named Dynamic Tag Management). Activation is a Digital Marketing cloud service that allows a marketer to manage Adobe and third-party tags used for tracking or other analytic purposes. It is done through client-side scripting that injects tag related code throughout the pages of the site. For example, you can inject JavaScript code into all footers and headers that belong to AEM pages.

You define rules in the Activation web client, as shown in this illustration.


The previous illustration shows an Activation rule named TestOnLoadChrome. This rule is basically an event handler that is fired when a page is opened. The condition is define so that this rule fires only when the browser is Chrome. The logic that is defined is simply JavaScript that creates a pop-up message.

alert("Hello Chrome");

Once you define and approve Activation rules using the Activation web client, you can embed these rules into AEM web pages. When this rule is embedded into an AEM web page, this rule is fired when an AEM web page is opened in Chrome, as shown in this illustration.


To read this development article, see https://helpx.adobe.com/experience-manager/using/dtm.html.


By aem4beginner