Showing posts with label OAuth. Show all posts

May 8, 2020
Estimated Post Reading Time ~

Securing your microservices with OAuth 2.0. Building Authorization and Resource server

We live in a world of microservices. They give us an easy opportunity to scale our application. But as we scale our application it becomes more and more vulnerable. We need to think of a way of how to protect our services and how to keep the wrong people from accessing protected resources. One way to do that is by enabling user authorization and authentication. With authorization and authentication, we need a way to manage credentials, check the access of the requester and make sure people are doing what they suppose to.

When we speak about Spring (Cloud) Security, we are talking about Service authorization powered by OAuth 2.0. This is how it exactly works:


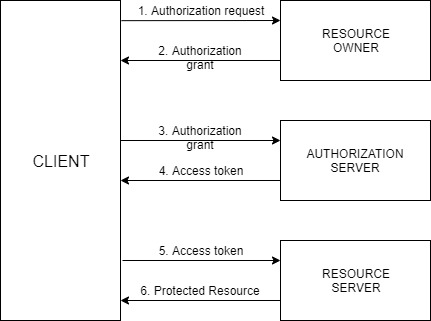
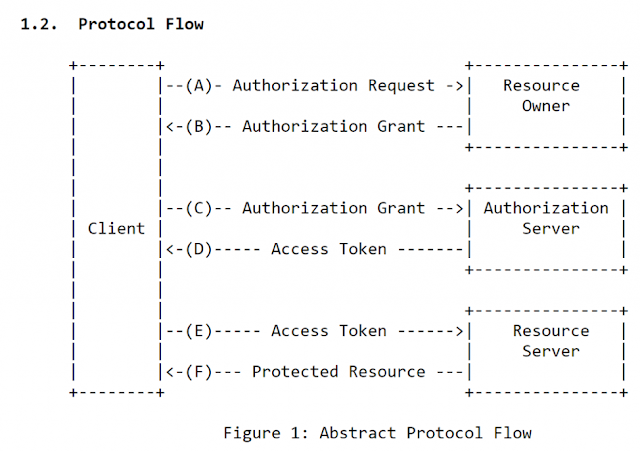
The actors in this OAuth 2.0 scenario that we are going to discuss are:
  1. Resource Owner – Entity that grants access to a resource, usually you!
  2. Resource Server – Server hosting the protected resource
  3. Client – App making protected resource requests on behalf of a resource owner
  4. Authorization server – server issuing access tokens to clients
The client will ask the resource owner to authorize itself. When the resource owner will provide an authorization grant with the client will send the request to the authorization server. The authorization server replies by sending an access token to the client. Now that the client has access token it will put it in the header and ask the resource server for the protected resource. And finally, the client will get the protected data.

Now that everything is clear about how the general OAuth 2.0 flow is working, let’s get our hands dirty and start writing our resource and authorization server!

Building OAuth2.0 Authorization server
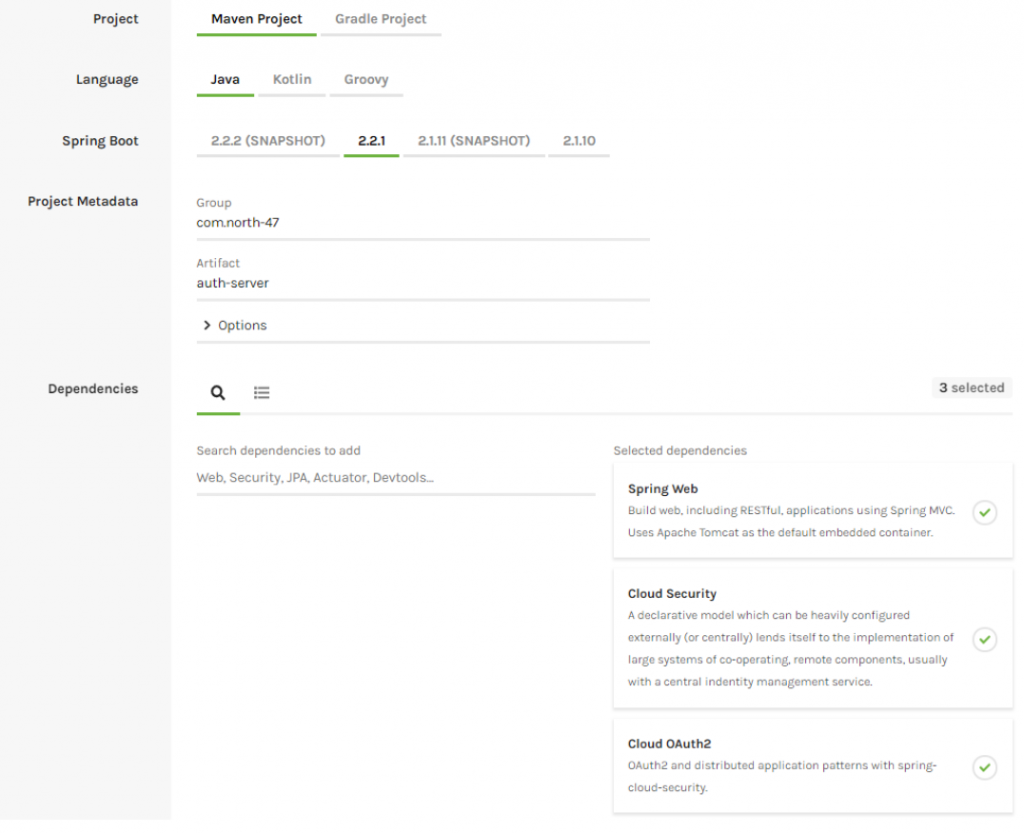
Let’s start by creating our authorization server using the Spring Initializr. Create a project with the following configuration:
  • Project: Maven Project
  • Artefact: auth-server
  • Dependencies: Spring Web, Cloud Security, Cloud OAuth2

Download the project, copy it into your workspace and open it via your IDE. Go to your main class and add the @EnableAuthorizationServer annotation.

@SpringBootApplication
@EnableAuthorizationServer
public class AuthServerApplication {
    public static void main(String[] args) {
        SpringApplication.run(AuthServerApplication.class, args);
    }
}


Go to the application.properties file and make the following modification:
  • Change the server port to 8083
  • Set the context path to be “/api/auth”
  • Set the client id to “north47”
  • Set the client secret to “north47secret”
  • Enable all authorized grant types
  • Set the client scope to read and write
server.port=8083

server.servlet.context-path=/api/auth

security.oauth2.client.client-id=north47
security.oauth2.client.client-secret=north47secret
security.oauth2.client.authorized-grant-types=authorization,password,refresh_token,password,client_credentials
security.oauth2.client.scope=read,write

The client id is a public identifier for applications. The way that we used it is not a good practice for the production environment. It is usually a 32-character hex string so it won’t be so easy guessable.

Let’s add some users into our application. We are going to use in-memory users and we will achieve that by creating a new class ServiceConfig. Create a package called “config” with the following path: com.north47.authserver.config and in there create the above-mentioned class:

@Configuration
public class ServiceConfig extends GlobalAuthenticationConfigurerAdapter {
 
    @Override
    public void init(AuthenticationManagerBuilder auth) throws Exception {
        auth.inMemoryAuthentication()
                .withUser("filip")
                .password(passwordEncoder().encode("1234"))
                .roles("ADMIN");
    }
 
    @Bean
    public BCryptPasswordEncoder passwordEncoder() {
        return new BCryptPasswordEncoder();
    }
}

With this we are defining one user with username: ‘filip’ and password: ‘1234’ with a role ADMIN. We are defining that BCryptPasswordEncoder bean so we can encode our password.

In order to authenticate the users that will arrive from another service we are going to add another class called UserResource into the newly created package resource (com.north47.autserver.resource):

@RestController
public class UserResource {
 
    @RequestMapping("/user")
    public Principal user(Principal user) {
        return user;
    }
}

When the users from other services will try to send a token for validation the user will also be validated with this method.

And that’s it! Now we have our authorization server! The authorization server is providing some default endpoints which we are going to see when we will be testing the resource server.

Building Resource Server
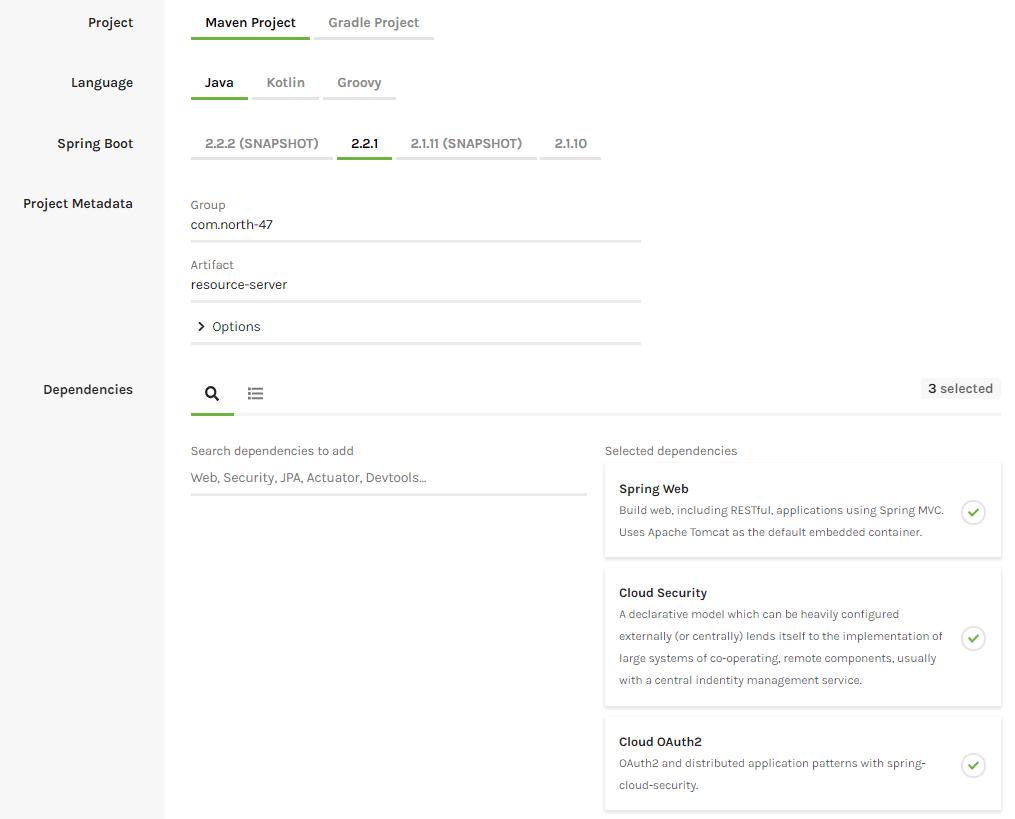
Now let’s build our resource server where we are going to keep our secure data. We will do that with the help of the Spring Initializr. Create a project with the following configuration:
  • Project: Maven Project
  • Artefact: resource-server
  • Dependencies: Spring Web, Cloud Security, Cloud OAuth2


Download the project and copy it in your workspace. First, we are going to create our entity called Train. Create a new package called domain into com.north47.resourceserver and create the class there.

public class Train {

    private int trainId;
    private boolean express;
    private int numOfSeats;

    public Train(int trainId, boolean express, int numOfSeats) {
        this.trainId = trainId;
        this.express = express;
        this.numOfSeats = numOfSeats;
    }

   public int getTrainId() {
        return trainId;
    }

    public void setTrainId(int trainId) {
        this.trainId = trainId;
    }

    public boolean isExpress() {
        return express;
    }

    public void setExpress(boolean express) {
        this.express = express;
    }

    public int getNumOfSeats() {
        return numOfSeats;
    }

    public void setNumOfSeats(int numOfSeats) {
        this.numOfSeats = numOfSeats;
    }

}

Let’s create one resource that will expose an endpoint from where we can get the protected data. Create a new package called resource and there create a class TrainResource. We will have one method only that will expose an endpoint behind we can get the protected data.

@RestController
@RequestMapping("/train")
public class TrainResource {

    @GetMapping
    public List<Train> getTrainData() {
 
        return Arrays.asList(new Train(1, true, 100),
                new Train(2, false, 80),
                new Train(3, true, 90));
    }
}

Let’s start the application and send a GET request to http://localhost:8082/api/services/train. You will be asked to enter a username and password. The username is user and the password you can see from the console where the application was started. By entering this credentials will give the protected data.

Let’s change the application now to be a resource server by going to the main class ResourceServerApplication and adding the annotation @EnableResourceServer.

@SpringBootApplication
@EnableResourceServer
public class ResourceServerApplication {
 
    public static void main(String[] args) {
        SpringApplication.run(ResourceServerApplication.class, args);
    }
}

Go to the application properties file and do the following changes:
server.port=8082
server.servlet.context-path=/api/services
security.oauth2.resource.user-info-uri=http://localhost:8083/api/auth/user


What we have done here is:
Changed our server port to 8082
Set context path: /api/services
Gave user info URI where the user will be validated when he will try to pass a token

Now if you try to get the protected data by sending a GET request to http://localhost:8082/api/services/train the server will return to you a message that you are unauthorized and that full authentication is required. That means that without a token you won’t be able to access the resource.

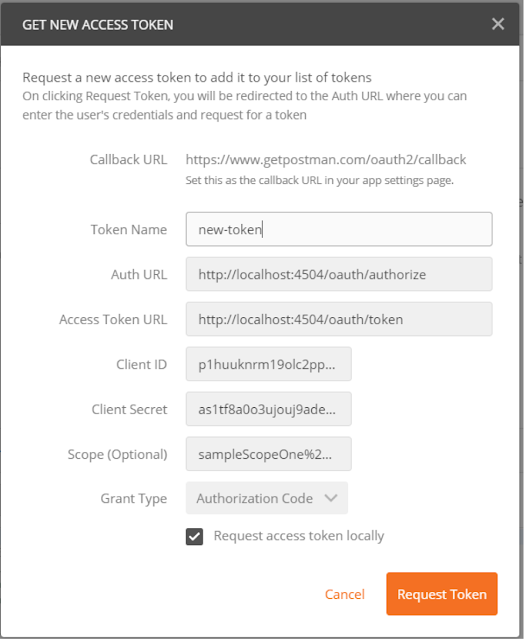
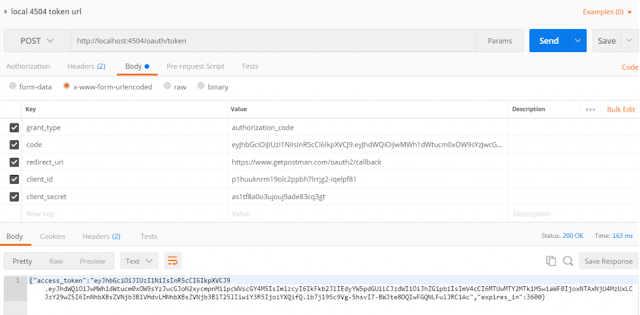
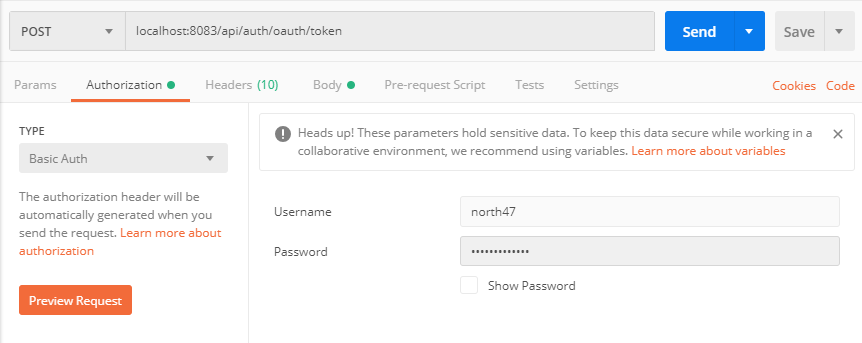
So that means that we need a fresh new token in order to get the data. We will ask the authorization server to give us a token for the user that we previously created. Our client in this scenario will be the postman. The authorization server that we previously created is exposing some endpoints out of the box. To ask the authorization server for a fresh new token send a POST request to the following URL: localhost:8083/api/auth/oauth/token.

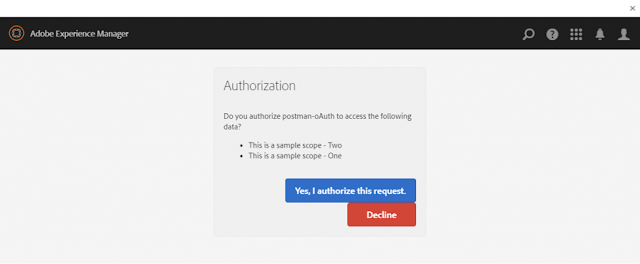
As it was said previously that postman in this scenario is the client that is accessing the resource, it will need to send the client credentials to the authorization server. Those are the client id and the client secret. Go to the authorization tab and add as a username the client id (north47) and the password will be the client secret (north47secret). On the picture below is presented how to set the request:


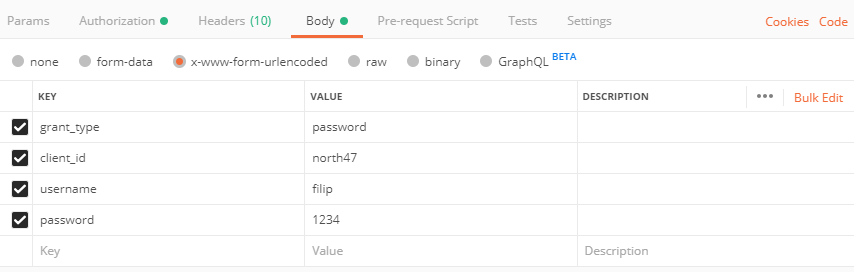
What is left is to say the username and password of the user. Open the body tab and select x-www-form-urlencoded and add the following values:
  • key: ‘grant_type’, value: ‘password’
  • key: ‘ client_id’, value: ‘north47’
  • key: ‘ username’, value: ‘filip’
  • key: ‘password’, value ‘1234’


Press send and you will get a response with the access_token:

{
    "access_token": "ae27c519-b3da-4da8-bacd-2ffc98450b18",
    "token_type": "bearer",    "refresh_token": "d97c9d2d-31e7-456d-baa2-c2526fc71a5a",    "expires_in": 43199,    "scope": "read write"
}


Now that we have the access token we can call our protected resource by inserting the token into the header of the request. Open postman again and send a GET request to localhost:8082/api/services/train. Open the header tab and here is the place where we will insert the access token. For a key add “Authorization” and for value add “Bearer ae27c519-b3da-4da8-bacd-2ffc98450b18”.


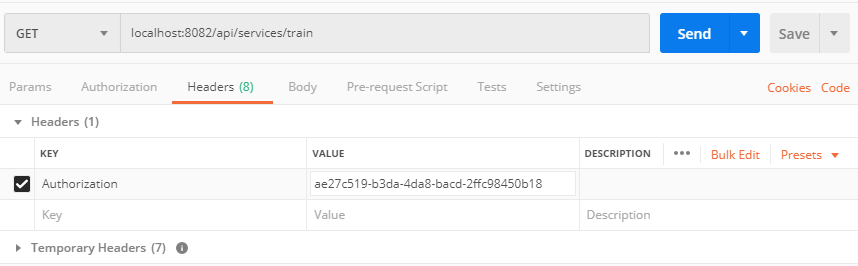
And there it is! You have authorized itself and got a new token which allowed you to get the protected data.

You can find the projects in our repository:
Resource server
Authorization server

Source: 
https://www.north-47.com/knowledge-base/securing-your-microservices-with-oauth-2-0-building-authorization-and-resource-server/


By aem4beginner

May 5, 2020
Estimated Post Reading Time ~

Adobe Granite OAuth Authentication Handler


Introduction
OAuth is an authentication protocol that allows you to approve one application interacting with another on your behalf without giving away your password.

Every day new websites launch offering services that tie together functionality from other sites, typically using some API.

OAuth started in 2006 in Twitter labs when they start to think on delegate authentication on their API to build new integrated applications, without asking users to share their Twitter usernames and passwords with all those services.

Ever since two main OAuth specification has been defined:
  • OAuth 1.0 in 2007 and a derived OAuth 1.0a
  • OAuth 2.0
Nowadays most of the web applications that share their API with other services use these protocols allowing growing new applications or new integrated services using an authentication delegation.

Things like IFTTT or Microsoft Flow can’t exist without this protocol.

Using OAuth in Adobe AEM
If you want to delegate user authentication in AEM to Facebook or Twitter or whatever service offering an OAuth endpoint you can but you need to get your hands dirty.

There is an available implementation OOTB for Twitter and Facebook and a good guide on how to configure it in Adobe official documentation (https://docs.adobe.com/docs/en/aem/6-2/administer/communities/social-login.html )

However knowing how Granite Authentication works, you can implement also your preferred provider.

In this topic, we cover the steps you need to follow to add a new oauth provider.

The general com.adobe.granite.auth.oauth.impl.OAuthAuthenticationHandler uses the concept of Provider to delegate the oauth flow to whatever service you are using.

In the following image from system console you can see that out of the box there are two providers already configured :


These are the mentioned Facebook and Twitter provider.

In order to use a new Provider you need:
  1. Create a new bundle in which you implements the Provider class
  2. Create an app on the provider in order to obtain the clientId and clientSecret
  3. Add a new configuration for the OAuthAuthenticationHandler using this data
  4. Use the configId of the previous step to create an authentication URL
Be sure to enable the oauth authentication handler in the osgi console by opening Adobe Granite OAuth Authentication Handler configuration and save it (without any change!)

Get hands dirty
In this example, we want to use the Open Bank Project API that implements an OAuth1.0a flow.

After creating a new AEM project (with the Adobe AEM Archetype) add a new class like this one :

@Service({Provider.class})
@Component(metatype=true, label="%auth.oauth.provider.opb.name", description="%auth.oauth.provider.opb.description")
@Properties(
{
@org.apache.felix.scr.annotations.Property(name="oauth.provider.id", value={"opb"}),
@org.apache.felix.scr.annotations.Property(name="opb.api.base.url", value={""})
}
)
@Reference(name="providerExtension", referenceInterface=ProviderExtension.class, bind="bindProviderExtension", unbind="unbindProviderExtension", cardinality=ReferenceCardinality.OPTIONAL_MULTIPLE, policy=ReferencePolicy.DYNAMIC)
public class OpenBankProvider implements Provider{

...........SKIPPED......

@Activate
  protected void activate(ComponentContext componentContext)
    throws Exception
  {
    this.name = OsgiUtil.toString(componentContext.getProperties().get("service.description"), "");
    
    this.id = OsgiUtil.toString(componentContext.getProperties().get("oauth.provider.id"), "");
    
    this.opb_base_url = OsgiUtil.toString(componentContext.getProperties().get("opb.api.base.url"), "");
    this.api=new OpenBankAPI(this.opb_base_url);
    
    this.log.debug("activating provider id {}", this.id);
  }

 public Api getApi()
  {
    return this.api;
  }
...........SKIPPED......
}


that define your new osgi component.

One of the methods you need to define is the getApi that returns to the OAuth Authentication Handler an object of class org.scribe.builder.api.Api.

Scribe is a great java library, very useful when you need to delegate authentication to OAuth providers. It is now at version 4.0 and has already the basic API object for the major providers (about 30 )…Suddenly there is no Open Bank API and moreover, the version supported in AEM is the 1.3 (where is defined the interface org.scribe.builder.api.Api that you need to implements).

In order to proceed add this dependencies in your pom:

<dependency>
  <groupId>com.adobe.granite</groupId>
  <artifactId>com.adobe.granite.scribe</artifactId>
  <version>1.3.0.B002</version>
</dependency>

Now you can add your new OpenBankAPI class that implements org.scribe.builder.api.Api. Actually, Scribe provides also default abstract classes (one for the oauth1.0a e one for oauth2.0) that you can extend.

public class OpenBankAPI extends DefaultApi10a {
private final Logger log = LoggerFactory.getLogger(getClass());
String baseUrl = "";

public OpenBankAPI(String baseUrl) {
super();
this.baseUrl = baseUrl;
}

@Override
public String getAccessTokenEndpoint() {
return baseUrl + "/oauth/token";
}

@Override
public String getRequestTokenEndpoint() {
return baseUrl + "/oauth/initiate";
}

@Override
public String getAuthorizationUrl(Token token) {
return baseUrl + "/oauth/authorize?oauth_token=" + token.getToken();
}

}

The main role of OpenBankAPI is to define the relative path of the provider endpoints. See also some other example here

The other methods in OpenBankProvider that you need to implements are mainly involved in how you need to parse and use user data: what you need to do when creating the user or update the user…..a full example for Linkedin Provider is available here

After deploying your new bundle you can configure in system console the baseUrl for your api in the auth.oauth.provider.opb.name section (add localization for this label too!). These are general property available for the provider and nothing specific for a single-use (like clientId)

After obtaining clientId and clientSecret from your provider ( for open bank api you need to go here, register your application and use consumerKey and consumerSecret), you can add a new configuration for the Adobe Granite OAuth Application and Provider.

In the form all parameters are self-explanatory, by the way in this first step you need to set clientId and clientSecret:


After saving the form a configId will be applied to this configuration.

Write down this id because this is what you need to add it in the url to activate our authentication.

The Adobe Granite OAuth Authentication Handler gets invoked when you request an URL that ends with /j_security_check. It checks that a parameter configId is in the request and if is available an Oauth Provider is selected using this configId

To check that all is working correctly put your browser to :
http://localhost:4502/j_security_check?configid=op4da2dbc7a22ad11bacb8e39ef92929 with your configid value.

This should redirect your browser to the provider authentication form.

AUTHORS
Marco Re


By aem4beginner

April 28, 2020
Estimated Post Reading Time ~

Exposing the AEM resources through OAuth

This post will explain the approach to expose the resources through OAuth in Adobe Experience Manager(AEM).

Refer https://www.albinsblog.com/2017/05/how-to-get-basic-profile-details-of-user-through-oauth.html for the basic configurations to expose the resources through OAuth.

Exposing /etc/designs/geometrixx/static.css through OAuth

Configure the "Allowed Scope" as "/etc/designs/geometrixx"(based on the resource that should be exposed) in "Adobe Granite OAuth Resource Server"


The OAuth Authentication handler is not enabled by default and it looks to be an product defect.


Save the configurations(without any change) of "Adobe Granite OAuth Server Authentication Handler" to enable the handler (Perform the same step for previous post also)


Authorize the user:http://localhost:4502/libs/granite/oauth/content/authorization.html?client_id=fjgsnsbnlqgp5l3ck67oseb0f9-eucn-1ub&scope=/etc/designs/geometrixx&redirect_uri=http:__localhost:8080/test

Receive the access token using the code received:curl -H "Content-Type: application/x-www-form-urlencoded" -d "code=eyJhbGciOiJIUzI1NiIsInR5cCI6IkpXVCJ9.eyJhdWQiOiJmamdzbnNibmxxZ3A1bDNjazY3b3NlYjBmOS1ldWNuLTF1YiIsInN1YiI6ImFkbWluIiwiZXhwIjoxNDk5MjkyNzQ0LCJpYXQiOjE0OTkyOTIxNDQsInNjb3BlIjoiL2V0Yy9kZXNpZ25zL2dlb21ldHJpeHgifQ.5ex1DvYLhYdoKjUvpscbyUpL5CWc02gjcpyPMJAPpMs&grant_type=authorization_code&redirect_uri=http://localhost:8080/test&client_id=fjgsnsbnlqgp5l3ck67oseb0f9-eucn-1ub&client_secret=r83jf37qc2jj4ggo8hmhcoqcc8" http://localhost:4502/oauth/token

Receive the Resource using the access token received:curl -H "Authorization: Bearer eyJhbGciOiJIUzI1NiIsInR5cCI6IkpXVCJ9.eyJhdWQiOiJmamdzbnNibmxxZ3A1bDNjazY3b3NlYjBmOS1ldWNuLTF1YiIsImlzcyI6IkFkb2JlIEdyYW5pdGUiLCJzdWIiOiJhZG1pbiIsImV4cCI6MTQ5OTI5NTc4NywiaWF0IjoxNDk5MjkyMTg3LCJzY29wZSI6Ii9ldGMvZGVzaWducy9nZW9tZXRyaXh4In0.LfZxnZTL38bqHJaVJvcraLzaBu5axfdhuVQz7WFGLoE" http://localhost:4502/etc/designs/geometrixx/static.css


The below step should be followed for publisher(assuming anonymous access is enabled) - Enable the authentication for the resource /etc/designs/geometrixx


By aem4beginner

How to get the basic profile details of a user in external clients through OAuth - AEM

This post will explain the approach to get the basic profile details of a user through OAuth - AEM/Adobe CQ5

Configure the OAuth client - Adobe Experience Manager(AEM):Login to AEM through Admin credential
Access - http://localhost:4502/libs/granite/oauth/content/clients.html and click on "Create a new app" or "Add New Client"


Enter Client ID and "Redirect URI" - The URL to which the user will be redirected after successful authorization(external client URL)


Redirect the user to below URL to authorize the user with AEM

http://localhost:4502/oauth/authorize?response_type=code&client_id=<Client Id from OAuth client>&scope=profile&redirect_uri=<The URL to which the user will be redirected after authorization>

User will be prompted to login if already not logged in and after successful login user will be redirect to a page to authorize the request.

After successful authorization the user will be redirected to the service URL configured in the OAuth client with the code.

http://localhost:4502/oauth/authorize?response_type=code&client_id=lkeadg8fol2h6or98sutint8l0-eucn-1ub&scope=profile&redirect_uri=http://localhost:8080/test

http://localhost:8080/test?code=eyJhbGciOiJIUzI1NiIsInR5cCI6IkpXVCJ9.eyJhdWQiOiJiaGVhamE1bnEwMmcxa2xjZnVwYzcxYzlsMS1sd3I3d3ZobCIsInN1YiI6ImFsYmluIiwiZXhwIjoxNDkzOTI2Mjc3LCJpYXQiOjE0OTM5MjU2NzcsInNjb3BlIjoicHJvZmlsZSJ9.cGGuC2UoSyR3vrl8abVZtgZt-3-6y-wuohEVJxitBJs&state=null

The state parameter sent in the request will be send back in the response by AEM - this can be used to verify the authenticity of the request and response(This will help to stop Cross Site Request Forgery (XRSF).)

http://localhost:4502/oauth/authorize?response_type=code&client_id=lkeadg8fol2h6or98sutint8l0-eucn-1ub&scope=profile&redirect_uri=http://localhost:8080/test&state=Albintest

http://localhost:8080/test?code=eyJhbGciOiJIUzI1NiIsInR5cCI6IkpXVCJ9.eyJhdWQiOiJiaGVhamE1bnEwMmcxa2xjZnVwYzcxYzlsMS1sd3I3d3ZobCIsInN1YiI6ImFsYmluIiwiZXhwIjoxNDkzOTI2Mjc3LCJpYXQiOjE0OTM5MjU2NzcsInNjb3BlIjoicHJvZmlsZSJ9.cGGuC2UoSyR3vrl8abVZtgZt-3-6y-wuohEVJxitBJs&state=Albintest


Receive the access token:After authorization AEM will redirect the user to the URL specified as redirect URL in the OAuth client, connect to the token endpoint in the service with the code received in the URL to fetch the access token.

http://localhost:4502/oauth/token

POST
Content-Type: application/x-www-form-urlencoded

Input Parameters:
code= The code received from the previous response
grant_type=authorization_code
redirect_uri=Redirect URI from OAuth client configuration
client_id= Client Id from OAuth client configuration
client_secret=Client Secret from OAuth client configuration

e.g. through CURL
curl -H "Content-Type: application/x-www-form-urlencoded" -d "code=eyJhbGciOiJIUzI1NiIsInR5cCI6IkpXVCJ9.eyJhdWQiOiJiaGVhamE1bnEwMmcxa2xjZnVwYzcxYzlsMS1sd3I3d3ZobCIsInN1YiI6ImFsYmluIiwiZXhwIjoxNDkzOTI2Mjc3LCJpYXQiOjE0OTM5MjU2NzcsInNjb3BlIjoicHJvZmlsZSJ9.cGGuC2UoSyR3vrl8abVZtgZt-3-6y-wuohEVJxitBJs&grant_type=authorization_code&redirect_uri=http://localhost:8080/test&client_id=lkeadg8fol2h6or98sutint8l0-eucn-1ub&client_secret=f4sv6cv4s91qqskbtconja37lc" http://localhost:4502/oauth/token

{"access_token":""eyJhbGciOiJIUzI1NiIsInR5cCI6IkpXVCJ9.eyJhdWQiOiJiaGVhamE1bnEwMmcxa2xjZnVwYzcxYzlsMS1sd3I3d3ZobCIsImlzcyI6IkFkb2JlIEdyYW5pdGUiLCJzdWIiOiJhbGJpbiIsImV4cCI6MTQ5MzkyOTgzNywiaWF0IjoxNDkzOTI2MjM3LCJzY29wZSI6InByb2ZpbGUifQ.jkmQzy7exD5ShcX-CneX-YYY0WzC7OHGN8WHLb_Zkqg","expires_in":3600}

Receive the profile data:Connect to the profile endpoint with the access token received in the previous step to fetch the basic user profile data.

http://localhost:4502/libs/oauth/profile

GET
Authorization: Bearer <access token>

e.g. through CURL
curl -H "Authorization: Bearer eyJhbGciOiJIUzI1NiIsInR5cCI6IkpXVCJ9.eyJhdWQiOiJiaGVhamE1bnEwMmcxa2xjZnVwYzcxYzlsMS1sd3I3d3ZobCIsImlzcyI6IkFkb2JlIEdyYW5pdGUiLCJzdWIiOiJhbGJpbiIsImV4cCI6MTQ5MzkyOTgzNywiaWF0IjoxNDkzOTI2MjM3LCJzY29wZSI6InByb2ZpbGUifQ.jkmQzy7exD5ShcX-CneX-YYY0WzC7OHGN8WHLb_Zkqg" http://localhost:4502/libs/oauth/profile

{"path":"/home/users/a/nNZl6ouZfBrbxReawJfm/profile","user":{"authorizableId":"albin"},"gender_xss":"male","gender":"male","aboutMe_xss":"test","aboutMe":"test","email_xss":"albin.issac@gmail.com","email":"albin.issac@gmail.com","state_xss":"MN","state":"MN","familyName_xss":"Issac","familyName":"Issac","country_xss":"United States","country":"United States","givenName_xss":"Albin","givenName":"Albin"}

This post is written based on the AEM version AEM 6.1 SP1

The "Adobe Granite OAuth Server Authentication Handler" is not enabled by default, we need to enable it.


By aem4beginner

March 25, 2020
Estimated Post Reading Time ~

AEM as OAuth Server – Part 2 – Testing OAuth


In this blog, we will look at how to these our OAuth Client Setup using Postman.

Configurations needed in the AEM server to accept Post Requests from outside.

This is done just for testing purposes. This configuration must not be applied to any production environments since with this configuration, we are opening the AEM server to accept post requests from outside. In regular environments usually, this is controlled by using safe user agents or allowed clients. In this case, we are just opening up the server to accept Posts so we can test if out OAuth client setup is working okay.

To do that, access these 2 configs – For Sling Referrer Filter and CSRF Filter and remove the “POST” method from the filter and save.

http://localhost:4504/system/console/configMgr/org.apache.sling.security.impl.ReferrerFilter

http://localhost:4504/system/console/configMgr/com.adobe.granite.csrf.impl.CSRFFilter

This step is needed because the OAuth Token request is a post request and in order for the postman to successfully make this call, the AEM server should accept it.
Using Out of the box set up in Postman

Create a new request in postman where the user is trying to access one of the endpoints – for eg: /bin/oauth/sample/one. The servlet for this endpoint is available in the previous blog.

Try this request without any login/authorization – It should load the login page as shown below.


Now for Authorization, choose, OAuth 2.0 :


Callback Url: https://www.getpostman.com/oauth2/callback
Token Name: new-token
Auth URL: http://localhost:4504/oauth/authorize
Access Token URL: http://localhost:4504/oauth/token
Client Id: To be taken from the OAuth client that was setup
Client Secret: To be taken from the OAuth client that was setup

Scope: Whatever scopes were setup. This is a sample: sampleScopeOne%20sampleScopeTwo – Notice that when there are multiple scopes they need to be separated by space (encoded as %20)

Grant Type – Authorization code.

On clicking on getting token button, It will first try to open the Authorization screen that prompts the user to accept the access. If the user is not logged in to AEM, then it will first ask the user to login and then show the authorization screen. After the user clicks on Accept in the AEM Authorization screen, we can see a new entry in postman for the token.


Postman gives an option to add the token to the URL or to the header. AEM OAuth implementation accepts the token only in the header and not in the URL.


On clicking on “Use Token”, the token returned would get added in the header with Key – Authorization, and entry “Bearer” and then the token. Sometimes, the token will not get added properly and the header would show “Bearer undefined”, as shown below, in this case, we have to manually test it out.


Once the Bearer is added to the Authorization header, access the sample one scope endpoint. Now it should let the user through.
Testing Step by Step.

In case Postman does not add the access token generated to the header properly, we can test the authorization call and the token call manually.
Call the Authorization URL

For this first, we call the Authorization URL passing all the necessary parameters. This is a get call.

http://localhost:4504/oauth/authorize?client_id=p1huuknrm19olc2ppbh7lrrjg2-iqelpf81&scope=sampleScopeOne%20sampleScopeTwo&response_type=code&redirect_uri=https://www.getpostman.com/oauth2/callback

This opens the Authorization page ( If the user is not logged in then first prompts for login and then shows the authorization page). After clicking on accept, it returns the authorization code to the redirect URL. The response would be like this.


https://app.getpostman.com/oauth2/callback?code=eyJhbGciOiJIUzI1NiIsInR5cCI6IkpXVCJ9.eyJhdWQiOiJwMWh1dWtucm0xOW9sYzJwcGJoN2xycmpnMi1pcWVscGY4MSIsInN1YiI6ImFkbWluIiwiZXhwIjoxNTAxNjU4NjE3LCJpYXQiOjE1MDE2NTgwMTcsInNjb3BlIjoic2FtcGxlU2NvcGVUd28sc2FtcGxlU2NvcGVPbmUiLCJjdHkiOiJjb2RlIn0.q9dqSPEgrFZoUWrWyHPDgw2RUxIhdB3UTO_aztkSa3g&state=null

Out of this, the value in “code=” is our authorization code.

It is possible to analyze this authorization code which us a JSON Web Token for details here: https://www.jsonwebtoken.io/

This is a sample where we have placed this JWT from the previous URL :

eyJhbGciOiJIUzI1NiIsInR5cCI6IkpXVCJ9.eyJhdWQiOiJwMWh1dWtucm0xOW9sYzJwcGJoN2xycmpnMi1pcWVscGY4MSIsInN1YiI6ImFkbWluIiwiZXhwIjoxNTAxNjU4NjE3LCJpYXQiOjE1MDE2NTgwMTcsInNjb3BlIjoic2FtcGxlU2NvcGVUd28sc2FtcGxlU2NvcGVPbmUiLCJjdHkiOiJjb2RlIn0.q9dqSPEgrFZoUWrWyHPDgw2RUxIhdB3UTO_aztkSa3g


Note that category of code implies that this is an authorization code (not an access token)
Call the access token URL

The request for access token URL is a post request and can be made through Postman.

This is a sample


URL: http://localhost:4504/oauth/token

grant_type : authorization_code

code: authorization code returned by the previous URL. In this case :

eyJhbGciOiJIUzI1NiIsInR5cCI6IkpXVCJ9.eyJhdWQiOiJwMWh1dWtucm0xOW9sYzJwcGJoN2xycmpnMi1pcWVscGY4MSIsInN1YiI6ImFkbWluIiwiZXhwIjoxNTAxNjU4NjE3LCJpYXQiOjE1MDE2NTgwMTcsInNjb3BlIjoic2FtcGxlU2NvcGVUd28sc2FtcGxlU2NvcGVPbmUiLCJjdHkiOiJjb2RlIn0.q9dqSPEgrFZoUWrWyHPDgw2RUxIhdB3UTO_aztkSa3g

redirect_uri : https://www.getpostman.com/oauth2/callback
client_id: client id of the OAuth client.
client_secret: Client secret of the OAuth client.

This call if successful, returns the results in this format :

{"access_token":"eyJhbGciOiJIUzI1NiIsInR5cCI6IkpXVCJ9.eyJhdWQiOiJwMWh1dWtucm0xOW9sYzJwcGJoN2xycmpnMi1pcWVscGY4MSIsImlzcyI6IkFkb2JlIEdyYW5pdGUiLCJzdWIiOiJhZG1pbiIsImV4cCI6MTUwMTY2MTk1MSwiaWF0IjoxNTAxNjU4MzUxLCJzY29wZSI6InNhbXBsZVNjb3BlVHdvLHNhbXBsZVNjb3BlT25lIiwiY3R5IjoiYXQifQ.lb7j19Sc9Vg-5hsvI7-BWJte8DQIwFGQNLFulJRC1Ac","expires_in":3600}

This token can also be placed in https://www.jsonwebtoken.io/ to check out details.

Here is a sample :

Place the access token in Request Header – Authorization

Place the access token received in request header under “Authorization” as shown below :


and now send the request. The request now sends the appropriate response, since we have a valid access token returned in the OAuth flow.


Note the user id in this case is something like : This is the OAuth user id that AEM creates on an OAuth login – oauth-cA1CRJluFLNQGFwIQD8etJWB-7Ivsh5-gV9cS91j7bl.QfiQXYiojI5R3YiwiIl52TlB3bjNVZsBXbhNHLvdHVlB3bjNVZsBXbhNnI6ISZw92YzJCLxUzM4UjNxATNxojI0FWaiwSM1kTM2YTMwUTM6ICc4VmIsIibp1GZhJiOiIWdzJCLiUGdp5WYydEIlJ2bkFkI6IyczlmIsISM4YGcsVWcp1iMnpmcyx2NoJGcwJzYs9WOx0mcutWd1hWMwJiOiQWdhJye.9JCVXpkI6ICc5RnIsIiN1IzUIJiOicGbhJye
How to get the logged in user using the OAuth User Id

This is just an extra snippet, which is not related to testing, however, maybe be useful. On successful login using OAuth, the OAuth login is different from the user login who authorized it.

Using the OAuth userid, it is possible to retrieve the actual user who logged in and authorized the request.

This is a sample which is from the decompiled jar that contains AEM’s OAuth server implementation.

public static String getJwtFromUserId(String userId) {
    return new StringBuilder(userId.substring("oauth-
    ".length())).reverse().toString();
}

public static String getSubject(String accessToken) {
    JWT jwt = (JWT) new JWTReader().read(accessToken);
    return jwt.getClaimsSet().getSubject();
}
public static String getSubjectUsingOAuthUserId(String oAuthUserId) {
    String subjectUserId = null;
    String accessToken = getJwtFromUserId(oAuthUserId);
    subjectUserId = getSubject(accessToken);
    return subjectUserId;
}

Sample Project for AEM as OAuth server implementation

This is a sample maven-AEM project that has OAuth Scopes and necessary configs in them.

oAuthExample


By aem4beginner

March 22, 2020
Estimated Post Reading Time ~

AEM as OAuth Server – Part 1 – Setting Up Scopes

Usually, when we want to implement OAuth in AEM, our requirements are that a user should be able to use their Facebook or Google account to show certain details- like profile pic from their social account in the AEM webpage. In these cases, AEM is an OAuth Client and Facebook or Google is the OAuth server. Here the user in AEM is prompted to log in to Facebook or Google and authorize AEM to access parts of their Facebook profile or Google account (known as scope of access).

This requirement that is described here is the opposite of that – We have a client who needs the authorization to access part of the AEM content. In this case, AEM is the OAuth server.

OAuth 2.0 Authorization Framework
This is the OAuth 2.0 Authorization Framework: https://tools.ietf.org/html/rfc6749
Roles in OAuth Authentication is described here: https://tools.ietf.org/html/rfc6749#section-1.1
Protocol Flow – Authorization Grant method is described here: https://tools.ietf.org/html/rfc6749#section-1.3.1

Adobe’s Granite OAuth2 Server Implementation
Details about Adobe’s Granite OAuth2 Server implementation that we should know: This is as told by Adobe Support –
This is a partial implementation of The OAuth 2.0 Authorization Framework (RFC 6749) (http://tools.ietf.org/html/rfc6749)
In particular, it (currently) implements only the Authorization Code Grant flow (http://tools.ietf.org/html/rfc6749#section-4.1). It also implements ONLY the “Authorization Request Header Field” (http://tools.ietf.org/html/rfc6750#section-2.1), while the “Form-Encoded Body Parameter” and “URI Query Parameter” are not implemented.
These are the existing documents available for AEM as OAuth Server which gives us insights on how we should go about implementing Scopes and our Rest APIs, however, these are for AEM 6.0 and cannot be applied completely for 6.2 since the Granite OAuth2 server implementation has changed.
· https://docs.adobe.com/ddc/en/gems/oauth-server-functionality-in-aem—embrace-federation-and-unlea.html
· https://docs.adobe.com/content/ddc/en/gems/oauth-server-functionality-in-aem—embrace-federation-and-unlea/_jcr_content/par/download/file.res/OAuth_Server_functionality_in_AEM%207%2023%2014.pdf

How to set up AEM as the OAuth Server
Setup OAuth Client in AEM

OAuth clients can be set up here : Tools -> Security -> OAuth clients.
Once an OAuth client is set up, the client id and client secret are auto-generated.
Please note that the redirect url needs to be set exactly as provided by the client. Apart from the client id and client secret, redirect url is one of the parameters that is used to validate an OAuth client and it must exactly match.
This is a sample client that was set up with the tool “Postman” as the client.

In order to get the callback url of postman for OAuth –
Create a new request in Postman and for Authorization Type use – OAuth 2.0. This shows an option – “Get New Access Token”
The following pop up appears when we click on it. The first entry is the callback url. We will look at all the entries in detail in later sections.


The Callback Url for Postman is: https://www.getpostman.com/oauth2/callback
Setup a client using this callback url.


After clicking on Create Client ID, the client id and client secret are auto-generated by AEM.


Now an Oauth Client for Postman is set up in the AEM server.
Enable Adobe Granite OAuth Server Authentication Handler
We have to make sure that the Adobe Granite OAuth Server Authentication Handler configuration is enabled (com.adobe.granite.oauth.server.auth.impl.OAuth2ServerAuthenticationHandler)

http://localhost:4504/system/console/configMgr/com.adobe.granite.oauth.server.auth.impl.OAuth2ServerAuthenticationHandler


Set up Scopes that the client should be able to access
Implement Scope
Scopes have to be coded by implementing com.adobe.granite.oauth.server.Scope.
Scope implementation Example

package com.techaspect.oAuthExample.core.oauth.scope;

import javax.servlet.http.HttpServletRequest;
import org.apache.jackrabbit.api.security.user.User;
import com.adobe.granite.oauth.server.Scope;

public class SampleScopeOne implements Scope {

@Override
public String getDescription(HttpServletRequest httpServletRequest) {
return "This is a sample scope - One";
}

@Override
public String getEndpoint() {
return "/bin/oauth/sample/one";
}

@Override
public String getName() {
return "sampleScopeOne";
}

@Override
public String getResourcePath(User user) {
return "/content/dam/sample/one";
}

}

Implement OAuth2ResourceServer
To set up scopes, the com.adobe.granite.oauth.server.OAuth2ResourceServer has to be re-implemented. This interface has a method – public Map<String, Scope> getAllowedScopes() which should return the new scopes as needed.
Example of OAuth2ResourceServer implementation

package com.techaspect.oAuthExample.core.oauth.impl;

import java.util.HashMap;
import java.util.Map;

import org.apache.felix.scr.annotations.Component;
import org.apache.felix.scr.annotations.Property;
import org.apache.felix.scr.annotations.Service;
import org.slf4j.Logger;
import org.slf4j.LoggerFactory;

import com.adobe.granite.oauth.server.OAuth2ResourceServer;
import com.adobe.granite.oauth.server.Scope;
import com.techaspect.oAuthExample.core.oauth.scope.SampleScopeOne;
import com.techaspect.oAuthExample.core.oauth.scope.SampleScopeTwo;

@Component(label = "SampleOAuth2ResourceServerImpl - OAuth Resource Server", description = "OAuth Resource Server", metatype = true, immediate = true)
@Service
public class OAuth2ResourceServerSampleImpl implements OAuth2ResourceServer {

@Property(intValue = 20000)
private static final String RANKING = "service.ranking";

private static final Logger LOG = LoggerFactory.getLogger(OAuth2ResourceServerSampleImpl.class);
private static Map<String, Scope> allowedScopes = createMap();

private static Map<String, Scope> createMap() {
Map<String, Scope> myMap = new HashMap<String, Scope>();
myMap.put("sampleScopeOne", new SampleScopeOne());
myMap.put("sampleScopeTwo", new SampleScopeTwo());
return myMap;
}

@Override
public Map<String, Scope> getAllowedScopes() {

if(LOG.isDebugEnabled()) {
LOG.debug("List of allowed scopes from getAllowedScopes() : ");
for (Map.Entry<String, Scope> entry : allowedScopes.entrySet())
{
LOG.debug("Allowed Scope : " + entry.getKey() + " : " + entry.getValue().getEndpoint());
}
}

return allowedScopes;
}
}

Sample Endpoint
package com.techaspect.oAuthExample.core.servlets;

import java.io.IOException;

import javax.servlet.Servlet;
import javax.servlet.ServletException;

import org.apache.sling.api.SlingHttpServletRequest;
import org.apache.sling.api.SlingHttpServletResponse;
import org.apache.sling.api.servlets.HttpConstants;
import org.apache.sling.api.servlets.SlingAllMethodsServlet;
import org.apache.sling.api.servlets.SlingSafeMethodsServlet;
import org.osgi.framework.Constants;
import org.osgi.service.component.annotations.Component;

/**
* Servlet that writes some sample content into the response. It is mounted for
* all resources of a specific Sling resource type. The
* {@link SlingSafeMethodsServlet} shall be used for HTTP methods that are
* idempotent. For write operations use the {@link SlingAllMethodsServlet}.
*/
@Component(service = Servlet.class, property = { Constants.SERVICE_DESCRIPTION + "=Simple Demo Servlet",
"sling.servlet.methods=" + HttpConstants.METHOD_GET, "sling.servlet.paths=" + "/bin/oauth/sample/one" })
public class SampleOAuthTestServlet extends SlingSafeMethodsServlet {

private static final long serialVersionUID = 4077423361846561555L;

@Override
protected void doGet(final SlingHttpServletRequest req, final SlingHttpServletResponse resp)
throws ServletException, IOException {

resp.setContentType("text/plain");
resp.getWriter().write("SampleOAuthTestServlet - 1 - /bin/oauth/sample/one!! : User ID : "
+ req.getResourceResolver().getUserID());
}
}
Authorization and Token URLs for OAuth in AEM
Authorization url : /oauth/authorize
Token Url : /oauth/token
Example :
Authorization url

http://localhost:4504/oauth/authorize?client_id=p1huuknrm19olc2ppbh7lrrjg2-iqelpf81&scope=sampleScopeOne%20sampleScopeTwo&response_type=code&redirect_uri=https://www.getpostman.com/oauth2/callback

Token Url
The token call is a post request and would be something like this. The code is the code Json Web Token – JWT returned by the authorization endpoint.
We will see this in more detail in the Testing Blog.


Disable default implementation of OAuth2ResourceServer
Ideally, after implementing the Scopes and implementing the OAuth2ResourceServer, we should be done and should be ready to test the setup, however, there is one more small step that needs to be done.
In the previous step, we have re-implemented/customized com.adobe.granite.oauth.server.OAuth2ResourceServer to return the new custom scopes. We have set the ranking of this new implementation of OAuth2ResourceServer to 20,000, hoping that this implementation will definitely override the default implementation of OAuth2ResourceServer (which is com.adobe.granite.oauth.server.impl.OAuth2ResourceServerImpl).

However, this is not the case.
The default implementation of OAuth2ResourceServer has to be disabled before our implementation is picked up by the OAuth2AuthorizationEndpointServlet.
Here are more details :
Before doing this step (disabling of the default implementation of OAuth2ResourceServer ) try to access the Authorization url: It would return 400 Bad requests with the reason that the scope is invalid. However, the scope is correct as per our custom implementation.

http://localhost:4504/oauth/authorize?client_id=p1huuknrm19olc2ppbh7lrrjg2-iqelpf81&scope=sampleScopeOne%20sampleScopeTwo&response_type=code&redirect_uri=https://www.getpostman.com/oauth2


To troubleshoot this a bit, check out the OAuth2AuthorizationEndpointServlet. Notice that the reference for oAuth2ResourceServer is still the default – com.adobe.granite.oauth.server.impl.OAuth2ResourceServerImpl. This default implementation does not have the new scopes that we implemented. This is the reason the authorization url/endpoint returns the invalid scope message.

http://localhost:4504/system/console/components/com.adobe.granite.oauth.server.impl.OAuth2AuthorizationEndpointServlet


Check out the default implementation of OAuth2ResourceServer – OAuth2ResourceServerImpl. We have to disable this so that OAuth2AuthorizationEndpointServlet refers to our implementation of OAuth2ResourceServer

http://localhost:4504/system/console/components/com.adobe.granite.oauth.server.impl.OAuth2ResourceServerImpl


Disable this default implementation.

After disabling the default implementation of OAuth2ResourceServer, again see the OAuth2AuthorizationEndpointServlet. Notice that, now the reference for oAuth2ResourceServer refers to our custom implementation.

http://localhost:4504/system/console/components/com.adobe.granite.oauth.server.impl.OAuth2AuthorizationEndpointServlet


Now try the Authorization url again: Now it shows the authorization screen asking for our approval. The description of the scopes we setup is shown here.

http://localhost:4504/oauth/authorize?client_id=p1huuknrm19olc2ppbh7lrrjg2-iqelpf81&scope=sampleScopeOne%20sampleScopeTwo&response_type=code&redirect_uri=https://www.getpostman.com/oauth2/callback


And now we are done with setting up an OAuth client and setting up scopes and are ready to test this out.


By aem4beginner