Showing posts with label Security. Show all posts

January 4, 2021
Estimated Post Reading Time ~

How To Use Crypto Support In AEM To Encrypt/Decrypt Data?

While working with AEM, sometimes we have requirements to call third-party APIs/Services. Configurations related to these APIs/Services like username, passwords, client id/secrets, API keys are usually stored in a code repository in the form of OSGi configuration. This sensitive information should be stored encrypted rather than in plain-text format.

This is possible through the OOTB AEM Crypto Support bundle. This bundle provides services for encrypting and decrypting the confidential/secured data through system-wide keys (hmac and master files).

What are the Features of Crypto Support?
  • Decryption happens at runtime.
  • No one can decrypt the data through the UI. There’s no UI to decrypt the encrypted data. So, the information remains secure.
What are hmac/master keys?
  • Encryption/decryption happens through keys (hmac and master files).
  • These keys get generated during the first startup of the AEM instance.
  • In older versions of AEM (< 6.3), these files are stored under /etc/key but recent AEM versions have these files on the file system under crx-quickstart.
  • These keys are unique for every AEM instance.
How to encrypt data using Crypto Support?
In order to encrypt a string, follow the below steps:

1. Navigate to /system/console/crypto. The console looks like below:
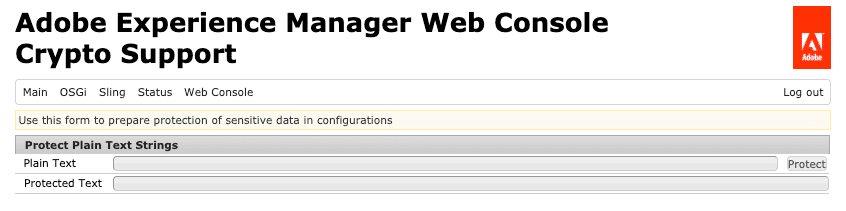

2. Enter the plain-text string in the “Plain Text” field and click on “Protect”.

3. An alphanumeric value will get generated in the “Protected Text” field.
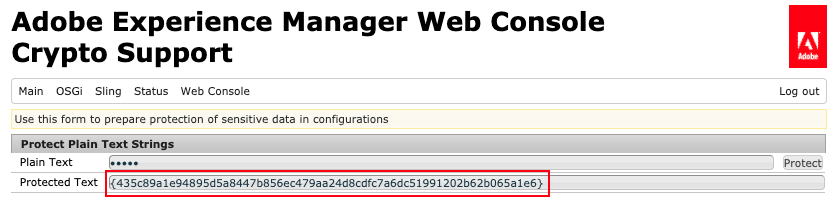

4. Copy above alphanumeric value including curly brackets. For e.g. {435c89a1e94895d5a8447b856ec479aa24d8cdfc7a6dc51991202b62b065a1e6}

5. Go to the codebase and put the above value in your OSGi config like below


Note:
1. Clicking on “Protect” again, will generate a new alphanumeric value. So, just click once and copy the alphanumeric value and put it in the codebase.

2. The encrypted value generated for the same plain-text string will differ from one AEM instance to another instance because keys are unique to each instance. We will talk about how to sync keys between the environments in our next blog.
How to decrypt data using Crypto Support:

@Reference

private CryptoSupport cryptoSupport;

public String getDecryptedValue(final String encryptedText) {

return cryptoSupport.isProtected(encryptedText)

? cryptoSupport.unprotect(encryptedText)

: encryptedText;

}

Note: For encrypted data, which is stored in OSGi configuration, we don’t need to call the “unprotect” method explicitly as you see above. AEM has a Configuration Plugin to decrypt OSGi configuration properties. This plugin automatically decrypts and returns the plain-text string.


By aem4beginner

Crypto Support In AEM (Syncing Keys Among AEM Instances)

Crypto Support is based on keys (hmac and master files) which are unique for each AEM instance. Encrypted text generated for the same plain-text string on one AEM instance will be different from another instance. This can raise alarms in cases where we have the same OSGi configuration values shared among Author and Publish instances under the same topology.

For e.g. /apps/my-project/config.prod/com.day.cq.mailer.DefaultMailService.xml.

Here SMTP password for Default Mail Service will be same across all Prod AEM instances. So, in order to make sure that the same encrypted value works on all Prod instances, we will have to sync hmac and master files among Prod Author and Publish instances.

Locating keys (hmac and master files):
Follow below steps to locate your keys:
1. Navigate to /system/console/bundles and look for the “Adobe Granite Crypto Support” bundle. [Symbolic Name: com.adobe.granite.crypto]

2. Note the bundle ID.

3. Navigate to file system: /crx-quickstart/launchpad/felix/bundle<id>/data [Note: here <id> is the bundle ID from step 2]

4. Open the “storage” file. This file contains just one single line:

a. JCR i.e. files are stored in JCR under /etc/key.

b. Bundle i.e. files are stored on a file system.

Note: If you have always upgraded your AEM instance using in-place upgrade, then these keys are going to be under /etc/key and there’s no harm in keeping these keys under /etc/key even though latest versions of AEM have moved the keys from JCR to file system (crx-quickstart). We had upgraded AEM for one of our clients from 5.6.1 to 6.1 and a few years later again from 6.1 to 6.3. The client is using Crypto Support and their keys are stored in /etc/key. If at all needed, you can move the keys from JCR to the file system and vice versa.

Syncing keys:
If keys are stored under /etc/key:

1. Create a package of /etc/key from the source instance and install this package on the target instance.

2. OR go to CRXDE, select node /etc/key; click on the Replication tab and press the Replication button.

3. Restart target AEM instance.

If keys are stored on the file system:

1. On the source instance, navigate to /system/console/bundles and look for the “Adobe Granite Crypto Bundle Key Provider” bundle. [Symbolic Name: com.adobe.granite.crypto.file]

2. Note the bundle ID.

3. Navigate to file system: /crx-quickstart/launchpad/felix/bundle<id>/data [Note: here <id> is the bundle ID from step 2]

4. Copy hmac and master files from the above directory.

5. Follow steps 1-3 on the target instance.

6. Replace hmac and master files on target instance from the source instance hmac and master (copied in step 4).

7. Restart target AEM instance.

Note: You can avoid restarting instances, rather you can restart the Crypto bundle “com.adobe.granite.crypto”. The catch here is – if you restart the Crypto bundle through the OSGi console, the regular AEM login fails. So, it’s better to restart this bundle through the CURL command.

Stopping the bundle:
curl -u admin:<admin_password>

http://<host>:<port>/system/console/bundles/com/adobe.granite.crypto -F action=stop

Starting the bundle:
curl -u admin:<admin_password>

http://<host>:<port>/system/console/bundles/com.adobe.granite.crypto -F action=start

Issues post hmac/master files sync:
If your target AEM repository had SSO/SAML integration, it will stop working after hmac/master files are synced from the source instance.

SSO/SAML integration works based on the trust store and key store. Passwords for trust store and key store are stored in an encrypted format in the repository under “keystorePassword” at below locations:

1. /etc/truststore
2. /home/users/system/authentication-service/keystore

You just need to the re-encrypt trust store and key store passwords and update “keystorePassword” properties at both the locations. This will resolve the issue.


By aem4beginner

January 2, 2021
Estimated Post Reading Time ~

AEM SSL Enablement

This is an Adobe Experience Manager (AEM) task-specific to enabling HTTP over SSL to employ more secure connections to AEM environments. The steps in this document are specific to configuring the Author instance: Secure client connections to the author instance specifically the connectivity from Dispatcher to the rendered Author instance. At a high-level, we are trying to achieve the following connectivity flow:

Content Authors – SSL Connection—Author Dispatcher—SSL Connection—Author AEM

Prerequisites
The following are the required prerequisites for enabling SSL within AEM:

1. SSL Certificate
SSL Certificate, self-signed for development and signed CRT for production implementation

2. Private Key
Private key pertaining to the SSL certificate and in DER format

3. Apache Dispatcher Module w/ SSL support, latest web module from Adobe

dispatcher-apache2.4-4.2.2.sohttps://www.adobeaemcloud.com/content/companies/public/adobe/dispatcher/dispatcher.html

Technical Steps
The following are the steps for installing the SSL certificate in an AEM Author instance:

1. It is highly recommended to configure HTTPS now in any AEM Author instance and as part of this initiative; AEM lists “Configure HTTPS” as an active task that needs to be performed.


2. Click on the “Configure HTTPS” task and click on open to start the wizard. A service user called ssl-service has been created for this feature.


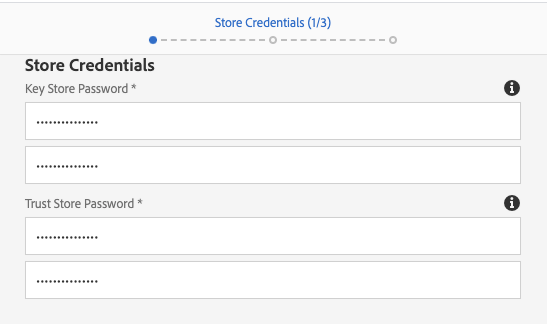
3. Type in a Key Store and Trust Store passwords. These are the Store credentials for the ssl-service system user's key store that will contain the private key and trust store for the HTTPS listener.


4. Upload the associated private key and internal signed CSR for the SSL connection.


5. Select the HTTPS port. 8443 is the default TCP port for Author AEM HTTPS listener.

6. You should get a success page stating that “SSL Successfully Configured”


Validation
To validate that the proper certificate has been installed, please perform the following steps:

1. Go to AEM User Management and look for the service user, ssl-service.
2. In the Account Settings section, make sure that the status is set to “active”. Click on “Manage KeyStore” to view the certificate


3. Confirm that the Certificate Subject, Issuer, and Expiry date are consistent with the CRT that was installed.

Dispatcher/Apache Webserver
The following are the steps for installing the update dispatcher module and configuring the dispatcher to use the secure SSL channel:

1. Validate you have the right version of the dispatcher. If not, upload the updated dispatcher-apache2.4-4.2.2.so to the webserver (dispatcher).

2. Edit dispatcher.any file to use secure channel and SSL port


3. Restart Apache
4. Validate to test.


By aem4beginner

AEM Security Checklist

After doing an AEM installation, one of the next steps is to make sure that your installation is secured. The following are some critical recommendations on what you need to check to make sure that your AEM is indeed secured. This list is based on Adobe's Security Checklist.

This is a PDF version of the list for you to print out and use as a guide when you're doing your own checklist:
The following are the security checklist that can be performed and other notes if it pertains to the specific security task:

Main Security Measures

1

Run AEM in Production Ready Mode


2

Enable HTTPs


3

Install Security Hotfixes


4

Change Default Passwords for AEM and OSGi Console Admin Accounts


5

Implement Custom Error Handler (review 404 and 500 response codes)


6

Dispatcher Security Checklist (this is discussed in details in another blog post)


Verification Steps

7

Configure replication and transport users


8

Check if Example Content is Present


9

Check if the CRX development bundles are present


10

Check if the Sling development bundle is present


11

Check for Cross-Site Request Forgery Protection


OSGi Settings and Configurations

12

Adobe Granite HTML Library Manager


13

Day CQ WCM Debug Filter


14

Day CQ WCM Filter


15

Apache Sling Java Script Handler


16

Apache Sling JSP Script Handler


17

Configure Sling to Prevent Denial of Service (DoS) Attacks


18

Disable WebDAV


Adobe AEM Dashboard – Health Reports (All status: OK or Warn but does not impact the environment)

19

Resource Search Path Errors


20

System Maintenance


21

Replication Queue


22

Log Errors


23

Active Bundles


24

Response Performance


25

Query Performance


26

Query Traversal Limits


27

Sling Jobs


28

Synchronized Clocks


29

Code Cache Health CHeck


30

Disk Space


31

Observation Queue Length


32

Asynchronous Indexes


33

Scheduler Health Check


34

Large Lucene Indexes


35

Sling/Granite Content Access Check


Adobe AEM Security Dashboard (All status: OK or Warn but does not impact the environment)

36

Deserialization Firewall Attach API Readiness


37

Deserialization Firewall Functional


38

Deserialization Firewall Loaded


39

Authorizable Node Name Generation


40

CRXDE Support


41

DavEx Health Check


42

Default Login Accounts


43

Sling Get Servlet


44

CQ Dispatcher Configuration


45

Example Content Packages


46

CQ HTML Library Manager


47

Replication and Transport Users


48

Sling Java Script Handler


49

Sling JSP Script Handler


50

Sling Referrer Filter


51

SSL Configuration


52

User Profile Default Access


53

WCM Filter Configurations


54

WebDAV Access


55

Web Server Configuration


Adobe AEM Dashboard – Diagnosis

56

Status


57

Thread Dump


58

Heap Dump


59

Log Messages


60

Index Manager


61

User Sync Diagnostics


By aem4beginner

2 Common Concurrency Pitfalls in AEM and How to Avoid Them

Concurrency issues are both disastrous and difficult to detect in non-production loads. They are more difficult to reproduce than most bugs because they specifically rely on multiple operations happening at/around the same time, which is difficult to reproduce in development or local environment.

Since concurrency bugs are hard to find and diagnose, we should be vigilant to patterns that cause them and be especially careful in writing certain types of code, which is more likely to have concurrency issues. I’ve done a number of audits and hundreds of code reviews and there are two common patterns where concurrency issues are prevalent. They are:
  1. Member variables of OSGi Services
  2. Repository Updates in Workflows / Async-Tasks
Let’s unpack each pattern, understand how it can lead to concurrency issues, and discuss the concurrency-issue-free replacement.

Member Variables in OSGi Services

In most Java coding, it’s pretty safe to have member variables. Member variables are fields scoped to an Object, which can then have access modifiers so that only the class, it’s package members, extending classes or the public ecosystem can modify it. Pretty standard Object-Oriented Programming!

When you lay OSGi Services over top, this gets a bit more interesting.

OSGi Services in many ways act like singletons instead of regular classes. When you fetch a Service in OSGi, you are not getting a new instance of the service class, but the Component class instance registered for the Service interface.

This distinction is important! Because the Service instance is shared, any member variables are also shared between invocations of the service. One of the most common places I’ve seen issues with this is Sling Servlets. Since they are registered as OSGi Services, you cannot use member variables in a Sling Servlet.

Let’s see a simple example of this issue. I’ll create a simple servlet which uses a member variable to store user submitted information:

@Component(service=Servlet.class, 
 property={ 
Constants.SERVICE_DESCRIPTION + "=Concurrency Demo Servlet", "sling.servlet.methods=" + HttpConstants.METHOD_GET, 
 "sling.servlet.paths="+ "/bin/concurrencyservlet.dangerzone" 
 }) 

public class ConcurrentServlet extends SlingSafeMethodsServlet {

private static final long serialVersionUid = 1L;
private String lastValue;

@Override
protected void doGet(final SlingHttpServletRequest req,

final SlingHttpServletResponse resp) throws ServletException, IOException {
String val = req.getParameter(“value”);
resp.setContentType(“text/plain”);
resp.getWriter().write(“Current Value = ” + val+”\n”);
resp.getWriter().write(“Last Value = ” + lastValue);
lastValue = val;

}
}


Here’s an example of the servlet in action:


As you can see, the lastValue member variable is shared between requests. Imagine instead, this was a credit card number or Personally Identifiable Information!

Fixing Member Variables in OSGi Service
The simplest fix is to not use member variables in OSGi Services! If you have multiple fields you want to save and pass to methods, creating a simple POJO can help to make this easier so you’re not passing in a large number of parameters.

Repository Updates in Workflows / Async-Tasks

The AEM repository is the ultimate global variable. Its state is shared across all of the code accessing the repository and when you write code that will not execute in predictable order/time and relies on the state of the repository, it can be difficult to ensure that you’re not going to run into concurrency issues.

For example, let’s say you had a process that worked as follows:


This process will work great when each invocation is allowed to complete before the next starts, but what happens if it kicks off by two different workflows at the same time? Or 10? Or 100? Imagine you have this process running on two pages, PageA and PageB, both of which reference each other.

The process starts on PageA which gathers that PageB references PageA, then runs the move. At the same time, PageB starts and notes that PageA references PageB and moves. Now that the move is complete, the process for PageA looks for PageB for references, but the page is no longer on the same path! Same thing with PageB when it tries to update references on PageA.

Depending on the timing and data, this process will work sometimes but fail other times, which makes the diagnosis even more difficult.

Resolving Repository Update Concurrency Issues
When you are making changes to the repository which may cause concurrency issues like the one described above, you need to make sure the entire process is completed before it starts the next update. There are two ways to ensure this:
  • Synchronize the Code – Add thread synchronization to ensure that the code is not run in parallel. The downside here is that you have to be careful to avoid locking issues which can cause the whole process to get blocked.
  • Add the Items to a Queue – This will add more code and makes this process asynchronous, but processing the items in a single queue ensures that you will not have concurrent access or locking issues.
The correct approach will depend on your needs and requirements, but the idea is the same — make sure that only one “item” is processed at a time.

In Conclusion
Concurrency issues are challenging to identify, but knowing these common issues gives you a starting place to look to make sure your code is not affected by concurrency bugs.


By aem4beginner

Proactive Monitoring of AEM in Adobe Managed Services with Sling Health Checks

Sling Health Checks provide a basis for monitoring a job and AEM’s Health Reports console provides an intuitive, visual representation of the status of the Sling Health Checks for administrators.


Proactive monitoring, on the other hand, requires a machine-readable status.

Ideally, we want an alert goes off in a NOC whenever a job fails or reports an unusual status. That way, we can be immediately alerted to the issue instead of having to wait until it is noticed by a customer or support engineer.

Using the Sling Health Checks along with a Nagios script, you can institute proactive monitoring of your AEM jobs and application by your Adobe Managed Services Customer Success Engineering team.

The first step is to enable an endpoint to monitor the Sling Health Checks by configuring the Sling Health Check Servlet.

Next, create the Sling Health Checks, as I previously covered in the Anatomy of the Ideal Background Job. Sling Health Checks can be used for other parts of your application as well, not just background jobs, so you may want to implement monitoring on services or servlets to ensure your website is functioning correctly.

Once you have your Sling Health Check defined, create a script for Nagios to execute to monitor the Health Check. This script should return a status of 0 if the Health Check is in an OK state and non-0 if not.

Here’s an example script created by my most recent project’s excellent Customer Support Engineer Jasmeet Dhiman:
#!/bin/bash
#
#check_doctor
#"Doctor Import"
#"Health Library Import"
#"Locations Import"
#
#This script if Doctor Import service is working as expected.
#
# Author: Jasmeet Dhiman
set -o pipefail
export HOME=/home/nagios
STATUS=$(curl -s -u admin:"$(/bin/pass CQ_Admin)" 'http://localhost:4502/system/health?tags=client,author&combineTagsWithOr=false&httpStatus=WARN:418&httpStatus=ERROR:500&format=json' | jq -r '.results[0].status')
NAME=$(curl -s -u admin:"$(/bin/pass CQ_Admin)" 'http://localhost:4502/system/health?tags=client,author&combineTagsWithOr=false&httpStatus=WARN:418&httpStatus=ERROR:500&format=json' | jq -r '.results[0].name')
echo $STATUS | grep OK > /dev/null 2>&1
if [ $? == 0 ]
then
  ERROR=0
else
  echo $STATUS | grep WARN > /dev/null 2>&1
  if [ $? == 0 ]
  then
    ERROR=1
  else
    ERROR=2
  fi
fi
EXITMESSAGE="The current status of ${NAME} is ${STATUS}"
echo $EXITMESSAGE
exit $ERROR
This script reads the results of the Sling Health Checks to find the status of a single job and then reports the status of that job.

Now that you have the script and Health Check, you can update your Run Book and work with the Adobe Managed Services team to get it all deployed and configured. In the Run Book, you will need to provide the contact procedures and information if any of the Health Checks enter an error state.

Once you have the Health Check monitoring in place with AMS Nagios, Adobe Managed Services will get alerts any time the Health Check goes into an Error or Warning state.


By aem4beginner

October 2, 2020
Estimated Post Reading Time ~

Major Vulnerabilities and Security Issues in AEM

While working with AEM, There are many security concerns which we need to take care of at the Apache level to stop the attacker by attacking the website.
There are few security Headers that are required to provide security at the Apache level.

1. X-XSS Protection: X-XSS-Protection header can prevent some level of XSS (cross-site-scripting) attacks.

<IfModule mod_headers.c>
<FilesMatch "\.(htm|html)$">
#Force XSS (should be on by default in most browsers anyway)
Header always set X-XSS-Protection "1; mode=block"
</FilesMatch>
</IfModule>

There are four possible ways you can configure this header.
0: XSS filter disabled 1: XSS filter enabled and sanitized the page if attack detected 1;mode=block XSS filter enabled and prevented rendering the page if attack detected 1;report=http://example.com/report_URI XSS filter enabled and reported the violation if attack detected
Note: We will use 1:mode=block to implement this security. This needs to be put in publishing.vhost files for every domain.

2. HTTP Strict Transport Security: HSTS (HTTP Strict Transport Security) header to ensure all communication from a browser is sent over HTTPS (HTTP Secure). This prevents HTTPS click through prompts and redirects HTTP requests to HTTPS. Before implementing this header, you must ensure all your website page is accessible over HTTPS else they will be blocked.

Header always set Strict-Transport-Security "max-age=63072000; includeSubdomains;"

Note: AMS Users can just uncomment it base_rewrite_rules file. Enable it only if the server is on HTTPS.

3. X-Frame-Options: Use the X-Frame-Options header to prevent Clickjacking vulnerability on your website. By implementing this header, you instruct the browser not to embed your web page in frame/iframe.

<IfModule mod_headers.c>
Header merge X-Frame-Options SAMEORIGIN
"expr=%{resp:X-Frame-Options}!='SAMEORIGIN'"
</IfModule>

Note: Put X-XSS Protection and X-Frame-Options in <IfModule mod_headers.c>.

4. Content Security Policy: Prevent XSS, clickjacking, code injection attacks by implementing the Content Security Policy (CSP) header in your web page HTTP response.The idea of this is that you can define all the third party domains from where you want to load anything on your website. So if an attacker injects anything from www.attacker.com and this domain is not in the list of content security policy, then those requests will not load on a page and you can see exceptions in the console.

In the below example, you need to use your website domain in place of we-retail.com.

Header always set content-security-policy "script-src blob: data: 'unsafe-inline'
'unsafe-eval' 'self' we-retail.com https://www.facebook.com https://www.google-analytics.com https://assets.adobedtm.com"

Note: To implement this security, if anytime you want to load and use any third-party libraries, you always need to add the domain in this configuration.

Source: http://www.sgaemsolutions.com/2020/01/major-vulnerabilities-and-security.html


By aem4beginner

October 1, 2020
Estimated Post Reading Time ~

Common security vulnerabilities identified as part of AEM projects

Whenever an AEM project goes Live, there are a set of scans that happens to ensure that the website adheres to a set of security & performance guidelines.
The security/ penetration tests usually get scheduled a few days ahead of any AEM go live. Below given the set of issues identified as part of AEM websites normally.


Horizontal Privilege Escalation Vulnerability
Usually, by horizontal privilege escalation, hackers remain on the same general user privilege level but gain access data of other accounts or processes that should be unavailable to the current account or process.

Host Header Injection Vulnerability
Normally a header is used by a web server to decide which website should process the received HTTP request. Whenever many websites are hosted on the same IP address, the webserver uses the value of this header to forward the HTTP request to the correct website for processing. This poses as a vulnerability.

Email Flooding Attack
In general, sending large volumes of email to an email address so that the mailbox gets overflowed, overwhelm the server where the email address is hosted in a denial-of-service attack. Thus a wrong impression screen to distract the attention from important email messages indicating a security breach.

HTML Injection Vulnerability
HTML injection generally occurs when the vulnerability inside any website that occurs when the user input is not correctly sanitized or the output is not encoded and the attacker is able to inject valid HTML code into a vulnerable web page. If these methods are provided with untrusted input, then there is a high risk of XSS, specifically HTML injection issues. If strings are not correctly sanitized the problem could lead to XSS based HTML injection.

Session Replay Attack
These kinds of attacks, known as playback attacks or replay attacks, are network attacks that maliciously repeat or delay a valid data transmission. A hacker can do this by intercepting a session and stealing a user’s unique session ID. Now, the hacker is able to behave himself or herself as an authorized user on-site and will be granted full access to do anything that the authorized user can do on a website.

Stored XSS via File Upload Vulnerability
Such scripts are possibly vulnerable to XSS (Cross-site scripting). The web application allows file upload of any type & was able to upload a file containing HTML content or various file extensions. When HTML files are allowed, XSS payload can be injected in the file uploaded.

Web Server Banner Disclosure
When we are running a web server, it often shows the others what type of server it is, its version number, and the operating system. This information is available in header fields and can be acquired using a web browser to make a simple HTTP request to any web application. It is often called the webserver banner

Concurrent Logins Allowed
Parallel logins. Interactive logins at desktops and laptops, a system administrator cannot, therefore, prevent a given user from going up to one computer, logging on there, letting somebody work like him, or just leaving the computer unattended, and then walking up to another computer and logging on there. This causes a data leak.

Email Harvesting
A process of obtaining a large number of e-mail addresses through various online sources like website hacking. They obtain a list of emails, either by purchase or theft, of valid email addresses for the purpose of sending bulk emails or Spam.

Vulnerable JQuery version in use

The old version of Jquery causes a threat to the websites.

Content Spoofing Vulnerability
Content Spoofing or Content Injection is one of the common web security vulnerabilities. It allows the end-user of the vulnerable web application to spoof or modify the actual content on the web page. The user might use the security loopholes in the website to inject the content that they wish to the target website. When an application does not properly handle user-supplied data, an attacker can supply content to a web application, typically via a parameter value, that is reflected back to the user.

Missing Secure and "Http Only" Flag from cookie
This is an additional flag included in a Set-Cookie HTTP response header. If supported by the browser, using the HttpOnly flag when generating a cookie helps mitigate the risk of client-side script accessing the protected cookie. If a browser that supports HttpOnly detects a cookie containing the HttpOnly flag, and client-side script code attempts to read the cookie, the browser returns an empty string as the result. This causes the attack to fail by preventing the malicious (usually XSS) code from sending the data to an attacker's web

[Set-Cookie: <name>=<value>[; <Max-Age>=<age>] [; expires=<date>][; domain=<domain_name>] [; path=<some_path>][; secure][; HttpOnly]]

Cookie Path Set to Root
Many of the browsers don’t allow to set cookies at the root level. set the cookie path attribute to application-defined folder

SameSite Cookie Attribute Not Set
The 'SameSite' attribute tells browsers when and how to fire cookies in first- or third-party situations. This attribute is used by a variety of browsers to identify whether or not to allow a cookie to be accessed.

Improper Error/Exception Handling Vulnerability
Improper error handling arises when security mechanisms fail to deny access until it is specifically granted. This may occur as a result of a mismatch in policy and coding practice. It may also result from code that lacks appropriate error handling logic. For example, a system may grant access until it's denied (deny all, then allow individually).

Improper Session Management The issue is because session tokens are not handled in a proper way. While some of it might be intentional, enough care should be taken to add some kind of validation for the user. Because of the way mobile applications are used, many developers allow long or non-expiring user sessions or use session tokens that are too predictable.

Session Timeout is not set Properly
As a standard process, the application should invalidate a session after a predefined idle time has passed (a timeout) and provide users the means to invalidate their own sessions, (logout). These simple measures help to keep the lifespan of a session ID as short as possible. To protect against Insufficient Session Expiration attacks, the logout function should be easily visible to the user, explicitly invalidate a user’s session, and disallow reuse of the session token.

Missing Security Headers
Security HTTP headers are a fundamental part of website security. Once implemented, they protect against the types of attacks that a site is most likely to come across. These headers protect against XSS, code injection, clickjacking, etc.

There are third-party services to enable the security scan. A thorough scan and identify and fix all the major critical items should be a must included item in any AEM project delivery.

Source: https://www.aemtutorial.info/2020/04/common-security-vulnerabilities.html


By aem4beginner

May 26, 2020
Estimated Post Reading Time ~

How to Secure Apache from Clickjacking

I will explain how to secure Apache from clickjacking with an important Apache2 configuration. I first came across clickjacking while working with a security checklist in AEM. Let’s understand what clickjacking is and how we can prevent clickjacking attacks in AEM.

Q1. What is clickjacking?
Clickjacking, also known as a “UI redress attack”, is when an attacker uses multiple transparent or opaque layers to trick a user into clicking on a button or link to another page when they were intending to click on the top-level page. Thus, the attacker is “hijacking” clicks meant for their page and routing them to another page, most likely owned by another application, domain, or both.

If you’re still not clear about this concept then watch the video below.

Q2. How to stop clickjacking in AEM through the Apache2 Server?
Use X-Frame-Options, the header configuration, to prevent clickjacking attacks in AEM.

Q3. What is the syntax of this configuration?
Header set X-Frame-Options: “sameorigin”

Q4. Where do we find the X-Frame-Options configuration?
In Apache2.4 you have security.conf file in a conf-available directory. In this file, search for X-Frame-Options, it is already present there but commented by default. Now you have two options.

Uncomment this setting and restart your Apache2 server.
Copy and paste this setting in apache2.conf file, uncomment it and restart your Apache server.

While learning how to secure apache from clickjacking, I copied and pasted this setting in apache2.conf file uncommented it and restarted my Apache2 server.

Q5. Apache Server is throwing an error when restarting after this configuration?
It may be possible that you will get an error at the time of starting the Apache2 server, after adding this configuration. The reason is that this configuration requires mod_headers.so module enabled, which is disabled by default. So enable mod_headers.so module and your Apache server will start running successfully.

Q6. How to enable Headers.mod in Apache2 server?
For enabling this module you have a header. load file present in mods-available directory in your Apache2 server. In my case, it is present at /etc/apche2/mods-available. Just do one thing, create a softlink in your mods-enabled folder. If you are an Ubuntu user execute this command-
ln -s /etc/apache2/mods-available/header.load /etc/apache2/mods-enabled/headers.load

Now you will see this soft link in your mods-enabled folder. Restart your Apache2 Server.

Q7. How to check whether the configuration is working or not?
After restarting the Apache2 server, just hit a non-cached page via Apache2 Server. Open debugger and check the response header. You will see the X-Frame-Options header field as shown below.

If you get this option on your page it means your configuration is working well and you’ve learned how to secure apache from clickjacking.


By aem4beginner

May 20, 2020
Estimated Post Reading Time ~

Protect SSH Server from Brute Force Attack

Other than remote login, there are various useful things you can do with ssh, like running a remote command, multiplexing connections to save on server resources, setting up ssh aliases to save you some keystrokes, and so forth.

Recently, when my partner logged on a recently created CentOS server hosted at Digital Ocean, he saw the following messages:
Last failed login: Tue Jul 29 16:27:31 EDT 2014 from stuff2share.net on ssh:notty 

There were 20 failed login attempts since the last successful login
Clearly that wasn't us trying to log in. Obviously, there was some malicious user(s) likely trying to enter our server with brute-force attacks. We were under a ssh brute force attack. Such malicious scan is not uncommon these days. It came just a couple days after our new server was up.

I learned a few good ways to prevent this:
References
SSH Brute Force – The 10 Year Old Attack That Still Persists
SSH Passwordless Login Using SSH Keygen in 5 Easy Steps
Fail2Ban
HOW TO: SSH Aliases
Running Commands on a Remote Linux / UNIX Host


By aem4beginner

Tighten Up Security in Production CQ Environment

Production CQ instances deserve a tighter security policy. OOTB CQ is too loose in security. For example, you don't need to open your production for client software like CRXDE to access it, nor do you want to open up WebDAV if not necessary. Most importantly, the default password of the superuser 'admin' has got to be changed, which is not a straightforward process as you'd expect. 

In this post, I outlined specific steps that I took to tighten up the security of our CQ Author and Publish nodes in a production environment. If you are planning to launch a public-facing CQ, you can go through the same checklist.

Preliminary Checks
You shouldn't have to do this because the following should be the default when you install CQ. However, in the production environment, it doesn't hurt to check again just in case.

1. Make sure 'everyone' is not accidentally allowed to read/write/etc on all nodes. Log in as 'anonymous' (without password needed) should see nothing. Even better, remove the 'anonymous' users completely.

Log in as 'admin', 
go to CRXDE Lite, 
highlight/node, then 'Access Control Tab', 
make sure NO 'Allow' access control entry is tied to the principle 'everyone'. If so, remove them.

2. Also, check 'anonymous' is not associated with any allow ACL. However, do not remove this user as once misleadingly suggested by Adobe somewhere. If you remove 'anonymous' users, the login page for all users won't work anymore. If you had accidentally removed 'anonymous' user and can no longer log yourself back into CQ, simply restart CQ and the 'anonymous' user will be automatically recreated.

Actionable Security Checklist
CQ comes in loose in terms of security after the default installation. 

Things like the demo websites are those you definitely don't need in your production environment. 

Because you'll not be developing in your production environment, you shouldn't need your CQ instance to support CRXDE, a pre-packaged stand-alone Eclipse application. You should have such support turned off in the production environment. The same applies to WebDAV access[http://dev.day.com/docs/en/crx/current/how_to/webdav_access.html]. If you're running stable in a production environment, the read and write access from your desktop to the content repository through WebDAV should be turned off.

On the front of user privilege, particularly the user Publish Agent act upon by default if the 'admin' user. Such user may be too powerful and you'd like to designate other user accounts with less (but enough) privilege to act upon by the Publish agent. 

In general, on the production, you'd generated the least amount of unnecessary logs on the file system. Similarly, you want to reveal the least amount of user-facing script (css, javascript, etc.) through compression and minimization.

Lastly, remember to change your default 'admin' password and apply the latest security patch from Adobe for CQ.

Steps to take:
1. Applicable to both Author and Publish nodes, uninstall example package (e.g. cq-geometrixx-all-pkg-5.6.12.zip package).
Go to http://<host>:<port>/welcome.html
Goto Package Manager
Search for 'cq-geometrixx-all-pkg'
select more
uninstall
2. Applicable to both Author and Publish nodes, stop the CRXDE Support bundle.

Go to http://<host>:<port>/welcome.html
Web Console > OSGi Bundle
search for 'Adobe CRXDE Support com.day.crx.crxde-support'
Click on stop
Note: Stop and start OSGi bundles do not require CQ to be restarted afterward to take effect. If a bundle is stopped and goes back into its OSGi 'resolved' state, the status will remain 'resolved' even after a CQ restart.

3. Applicable to Author node, create/assign Replication User and Transport user for Publish Agent.

1. On Author node, create a user named 'replication-user' with permissions to read from nodes that are to be replicated from.
2. On Publish node, create a user named 'transport-user' with permissions to create/write to nodes that are to be published/replicated to.
3. On Author node, put 'replication-user' to the settings of Publish Agent as the Agent User ID; put 'transport-user' to the settings of Publish Agent as the Transport User.
4. On Publish node, put 'transport-user' of Author node to the setting of Publish Agent as the Agent User ID.
4. Applicable to Publish node, disable WebDAV by stopping related bundles.

Go to http://<host>:<port>/welcome.html
Web Console > OSGi Bundle
search for 'dav'
Click on stop for 'org.apache.sling.jcr.webdav'
Click on stop for 'org.apache.sling.jcr.davex'
Note: Stop 'org.apache.sling.jcr.davex' will cause CRXDE Lite to NOT display node structure.

5. Restrict access via Dispatcher.
Refer to this and this.
6. Applicable to ALL instances, install the latest CQ5.6.1 Security Hotfix to prevent DoS attack.

Go to your local CQ Package Share to find and search for package(s) name with 'security hotfix' for your installed CQ version, download it (e.g. cq-5.6.1-hotfix-3306.zip) and install it.
7. Applicable to Publish node, set/modify some OSGi settings to reveal the least information.

Go to http://<host>:<port>/welcome.html
Select Web Console > OSGi Configuration
Find and change the following OSGi configuration ...

Day CQ HTML Library Manager:
enable Minify (to remove CRLF and whitespace characters).
enable Gzip (to allow files to be gzipped and accessed with one request).
disable Debug
disable Timing

Day CQ WCM Filter:
set WCM Mode to "disabled"

Apache Sling GET Servlet:
uncheck 'enable JSON' and 'enable XML' (to disable JSON and XML renderer)

Apache Sling Java Script Handler:
disable Generate Debug Info

Apache Sling JSP Script Handler:
disable Generate Debug Info
disable Mapped Content
Note: Saving the above OSGi settings different than the default values will generate extra configuration nodes under one of the following places to hold the configuration with non-default values:

http://<server>:<port>/crx/de/index.jsp#/apps/system/config
http://<server>:<port>/crx/de/index.jsp#/apps/sling/config

8. Applicable to both Author and Publish nodes, change 'admin' pwd using Granite Operations - Users console.

Notes:

a. CQ Admin and CRX Admin account are one of the same, whereas the OSGi/Web Console Admin account (by default is inactive) is a different account.
b. To change the CQ/CRX Admin password, use Granite Operations - Users console.
c. To change OSGi/Web Console Admin password set, use Web Console > Configuration, look for 'Apache Felix OSGi Management Console', then edit.
d. OSGi/Web Console Admin password setting is not in effect at all (the default) if the "Apache Sling Web Console Security Provider" bundle is in active status. If needed, stop the "Apache Sling Web Console Security Provider" bundle so #c will be in effect.
e. To add more users to be able to access OSGi/Web Console, simply add users and groups to the configuration of the "Apache Sling Web Console Security Provider" bundle.
f. The following curl command is the #b equivalent:
curl -u admin:admin -F rep:password="newadminpwd" -F :currentPassword="admin" http://localhost:4502/home/users/a/admin.rw.html

9. Applicable to Author node, re-enter the Admin password for the Replication User for Publish Agent.

If you change the password of Publish node, then you have to reenter the corresponding user password set on the Author node for the Publish Agent, or your replication triggered from the Author node will always fail.


10. Applicable to both Author and Publish nodes, remove out-of-the-box sample user 'author' whose default password is 'author'. This user is not necessary.

11. Applicable to Author node, remove feature links on the welcome screen (see below) for users of specific groups.


12. Applicable to Author node, remove buttons from Websites window (welcome.html > Websites) for specific users/groups.

To edit ACL permissions for a group, traverse to /libs/wcm/core/content/siteadmin/actions/, then uncheck the checkboxes(Read/Modify/Create etc) for each of activate, deactivate and workflow nodes, then save.


before:


after - the Activate and Deactivate buttons is no longer showing:

13. Applicable to Author node, block unused features on Project Console/Screen (http://<host>:<port>/projects.html) for specific users/groups via controlling the read privilege on nodes under /libs/cq/gui/content/common/links/, under which nodes' existence will in terms control what shows on the left of the following screen:


and nodes under /libs/cq/core/content/tools/jcr:content/content/items/tools/ to control what links shows on the welcome.html page under Tools: 


There are some nodes' (e.g. jcr:content) ACLs they do not show on useradmin (http://<host>:<post>/useradmin) so they can't be seen and be edited using useradmin. Instead, you have to use CRXDE Lite. For example, to modify ACL for nodes under /libs/cq/core/content/tools/jcr:content/content/items/tools/ you have to use CRXDE Lite:Here's an example,


Also, just to be safe, if you really want to surely disallow features of Tools shown on Project Console/Screen (projects.html), remove the read permission from the following nodes:

/libs/granite/security/content/ - to disable Tools > Granite Operations > user/group management (somehow it's different from CQ Operation > user/group management)
/etc/packages/ - to disable Tools > Granite Operations > Packages
/libs/cq/workflow/content/console/ - to disable Tools > CQ Operations > Workflows
/etc/reports/ - to disable Tools > CQ Operations > Reports
/etc/replication/agents.[author|publish] - to disable Tools > CQ Operations > Replication
/libs/launches/ - to disable Tools > Authoring > Launches

14. Further review/revoke unnecessary ACL edit permissions for users/groups.
Don't give out ACL edit permission to users who can only read the node. If they have Edit ACL permission, they can make the node not accessible to you too, which is not what you want. To revoke ACL edit permission:


References
CRX Security Checklist
Security Checklist
Replication
Customize buttons on Day CQ pages


By aem4beginner