This article helped us a ton: How to enable XMP write-back on 64-bit RedHat Linux
Showing posts with label XML. Show all posts
Showing posts with label XML. Show all posts
March 30, 2021
Estimated Post Reading Time ~
XML Write-Back
There's a tiny little XML write-back issue on 64-bit Linux systems. You will get odd behavior with assets if you don't fix it. Things like errors when creating renditions, errors when tiring to update metadata, etc.
This article helped us a ton: How to enable XMP write-back on 64-bit RedHat Linux
This article helped us a ton: How to enable XMP write-back on 64-bit RedHat Linux

By
aem4beginner

December 29, 2020
Estimated Post Reading Time ~
How to Convert Adobe’s Granite UI 1.0 Documentation to XML
As an AEM developer, we must prepare Touch UI dialogues within code, in the XML format. When it comes to reading the Granite UI 1.0 Documentation, it can be confusing; especially for new AEM developers. These new AEM developers are confused by how properties within the documentation are mapped and converted to XML entries.
This document will help you understand how properties within the Granite UI 1.0 documentation are mapped and converted to XML entries.
This article will focus on how to convert the Granite UI textfield component documentation to XML format.
Understanding Adobe’s Granite UI 1.0 Documentation, textfield component:
Before we jump straight to the code examples, let us understand how to convert Adobe’s Granite UI 1.0 Documentation to XML. When looking at a Granite UI 1.0 form component’s documentation, textfield component, we are presented with this page:

This document will help you understand how properties within the Granite UI 1.0 documentation are mapped and converted to XML entries.
This article will focus on how to convert the Granite UI textfield component documentation to XML format.
Understanding Adobe’s Granite UI 1.0 Documentation, textfield component:
Before we jump straight to the code examples, let us understand how to convert Adobe’s Granite UI 1.0 Documentation to XML. When looking at a Granite UI 1.0 form component’s documentation, textfield component, we are presented with this page:
We can see a couple of sections of the page:
Once we understand the configurations and properties for the textfield form component, with XML, we can create a textfield component with the following. Note that the sling resource has a primary type of jcr:primaryType=”nt:unstructured”, as follows:
<labelTextfield
jcr:primaryType="nt:unstructured"
sling:resourceType="granite/ui/components/coral/foundation/form/textfield"/>
b. Plug in the Necessary Properties to our textfield Form Component:
Next, using the Granite UI 1.0 documentation, we can simply plug in the necessary properties to our form component, sling resource.

Based on our requirements, we can copy properties from the Granite UI 1.0 documentation into our newly created component, within the XML:
<labelTextfield
jcr:primaryType="nt:unstructured"
sling:resourceType="granite/ui/components/coral/foundation/form/textfield"
fieldLabel="Label: labelTextfield"
name="./labelTextfield"
value="{String}Default Text"
emptyText="Show placeholder text when input field is empty."
disabled="{Boolean}false"
required="{Boolean}true"
autocomplete="off"
autofocus="{Boolean}true"
validation=""
maxlength="{Long}100"/>
Question: Example Hierarchy Explained
- The component’s sling:resourceType reference.
- The details & description of the current form component. From what we can see, the textfield form element extends from the Field, abstract component; extended Field component also makes more property configuration available to the form component.
- The available configuration and properties for the form component.
Once we understand the configurations and properties for the textfield form component, with XML, we can create a textfield component with the following. Note that the sling resource has a primary type of jcr:primaryType=”nt:unstructured”, as follows:
<labelTextfield
jcr:primaryType="nt:unstructured"
sling:resourceType="granite/ui/components/coral/foundation/form/textfield"/>
b. Plug in the Necessary Properties to our textfield Form Component:
Next, using the Granite UI 1.0 documentation, we can simply plug in the necessary properties to our form component, sling resource.
Based on our requirements, we can copy properties from the Granite UI 1.0 documentation into our newly created component, within the XML:
<labelTextfield
jcr:primaryType="nt:unstructured"
sling:resourceType="granite/ui/components/coral/foundation/form/textfield"
fieldLabel="Label: labelTextfield"
name="./labelTextfield"
value="{String}Default Text"
emptyText="Show placeholder text when input field is empty."
disabled="{Boolean}false"
required="{Boolean}true"
autocomplete="off"
autofocus="{Boolean}true"
validation=""
maxlength="{Long}100"/>
Question: Example Hierarchy Explained
q: How can translate hierarchy examples diagrams within the Granite UI 1.0 Documentation?
Example in such diagrams:
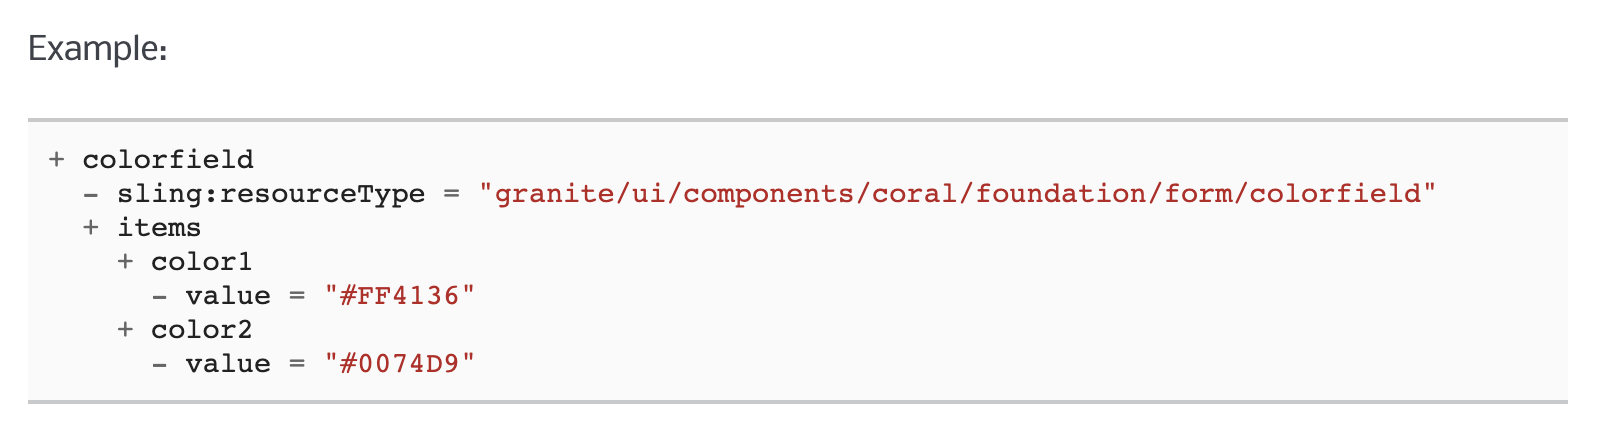
Translated XML, looks like:
<color
jcr:primaryType="nt:unstructured"
sling:resourceType="granite/ui/components/coral/foundation/form/colorfield"
name="./color">
<items jcr:primaryType="nt:unstructured">
<color1
jcr:primaryType="nt:unstructured"
value="#FF4136"/>
<color2
jcr:primaryType="nt:unstructured"
value="#0077D9"/>
</items>
</color>
Conclusion
I hope this article has been helpful. Other than the Granite UI 1.0 Text Field form component. There are many other form components you would be using based on your requirements. Have a play with all the form components available in the Granite UI 1.0 library. They are listed here:
Components:
Example in such diagrams:
Translated XML, looks like:
<color
jcr:primaryType="nt:unstructured"
sling:resourceType="granite/ui/components/coral/foundation/form/colorfield"
name="./color">
<items jcr:primaryType="nt:unstructured">
<color1
jcr:primaryType="nt:unstructured"
value="#FF4136"/>
<color2
jcr:primaryType="nt:unstructured"
value="#0077D9"/>
</items>
</color>
Conclusion
I hope this article has been helpful. Other than the Granite UI 1.0 Text Field form component. There are many other form components you would be using based on your requirements. Have a play with all the form components available in the Granite UI 1.0 library. They are listed here:
Components:
By
aem4beginner
AEM Granite UI 1.0 Form Component’s XML Reference Guide
This AEM Granite UI 1.0 Form Component’s XML Reference Guide provides code snippets to help developers speed up their AEM Touch UI development. This quick reference includes the most used Granite UI form components with plug and plays XML examples.
sling:resourceType: cq/gui/components/authoring/dialog/fileupload
Documentation: https://helpx.adobe.com/experience-manager/6-3/sites/developing/using/reference-materials/granite-ui/api/jcr_root/libs/granite/ui/components/coral/foundation/form/fileupload/index.html
Note:
If you want to understand how to convert Granite UI 1.0 Form Components from Adobe’s documentation to XML format, have a look at the article. The article provides a step by step and easy to understand guide.
References:
1. CheckboxGranite UI 1.0, Touch UI XML Example:
<isChecked
jcr:primaryType="nt:unstructured"
sling:resourceType="granite/ui/components/coral/foundation/form/checkbox"
fieldLabel="isChecked?"
name="./isChecked"
text="isChecked flag"
uncheckedValue="{Boolean}false"
value="{Boolean}true"/>
sling:resourceType: granite/ui/components/coral/foundation/form/checkbox
Documetation: https://helpx.adobe.com/experience-manager/6-5/sites/developing/using/reference-materials/granite-ui/api/jcr_root/libs/granite/ui/components/coral/foundation/form/checkbox/index.html
If you want to understand how to convert Granite UI 1.0 Form Components from Adobe’s documentation to XML format, have a look at the article. The article provides a step by step and easy to understand guide.
References:
1. CheckboxGranite UI 1.0, Touch UI XML Example:
<isChecked
jcr:primaryType="nt:unstructured"
sling:resourceType="granite/ui/components/coral/foundation/form/checkbox"
fieldLabel="isChecked?"
name="./isChecked"
text="isChecked flag"
uncheckedValue="{Boolean}false"
value="{Boolean}true"/>
sling:resourceType: granite/ui/components/coral/foundation/form/checkbox
Documetation: https://helpx.adobe.com/experience-manager/6-5/sites/developing/using/reference-materials/granite-ui/api/jcr_root/libs/granite/ui/components/coral/foundation/form/checkbox/index.html
2. Text FieldGranite UI 1.0, Touch UI XML Example:
<textfield-example
jcr:primaryType="nt:unstructured"
sling:resourceType="granite/ui/components/coral/foundation/form/textfield"
fieldLabel="textfield-example"
name="./example"
value="{String}Default Text"
emptyText="Show placeholder text when input field is empty."
disabled="{Boolean}false"
required="{Boolean}true"
autocomplete="off"
autofocus="{Boolean}true"
validation=""
maxlength="{Long}100"/>
<textfield-example-brandSlogan
jcr:primaryType="nt:unstructured"
sling:resourceType="granite/ui/components/coral/foundation/form/textfield"
fieldLabel="Brand Slogan"
required="{Boolean}true"
name="./brandSlogan"/>
sling:resourceType: granite/ui/components/coral/foundation/form/textfield
Documentation: https://helpx.adobe.com/experience-manager/6-4/sites/developing/using/reference-materials/granite-ui/api/jcr_root/libs/granite/ui/components/coral/foundation/form/textfield/index.html
<textfield-example
jcr:primaryType="nt:unstructured"
sling:resourceType="granite/ui/components/coral/foundation/form/textfield"
fieldLabel="textfield-example"
name="./example"
value="{String}Default Text"
emptyText="Show placeholder text when input field is empty."
disabled="{Boolean}false"
required="{Boolean}true"
autocomplete="off"
autofocus="{Boolean}true"
validation=""
maxlength="{Long}100"/>
<textfield-example-brandSlogan
jcr:primaryType="nt:unstructured"
sling:resourceType="granite/ui/components/coral/foundation/form/textfield"
fieldLabel="Brand Slogan"
required="{Boolean}true"
name="./brandSlogan"/>
sling:resourceType: granite/ui/components/coral/foundation/form/textfield
Documentation: https://helpx.adobe.com/experience-manager/6-4/sites/developing/using/reference-materials/granite-ui/api/jcr_root/libs/granite/ui/components/coral/foundation/form/textfield/index.html
3. Text Area
Granite UI 1.0, Touch UI XML Example:
<textarea-example-description
jcr:primaryType="nt:unstructured"
sling:resourceType="granite/ui/components/coral/foundation/form/textarea"
fieldLabel="Description"
name="./description"
value=""
emptyText="A hint to the user of what can be entered in the field."
disabled="{Boolean}false"
required="{Boolean}true"
autocomplete="off"
autofocus="{Boolean}false"
maxlength="{Long}160"
rows="100"
resize="both">
sling:resourceType: granite/ui/components/coral/foundation/form/textarea
Documentation: https://helpx.adobe.com/experience-manager/6-3/sites/developing/using/reference-materials/granite-ui/api/jcr_root/libs/granite/ui/components/coral/foundation/form/textarea/index.html
<textarea-example-description
jcr:primaryType="nt:unstructured"
sling:resourceType="granite/ui/components/coral/foundation/form/textarea"
fieldLabel="Description"
name="./description"
value=""
emptyText="A hint to the user of what can be entered in the field."
disabled="{Boolean}false"
required="{Boolean}true"
autocomplete="off"
autofocus="{Boolean}false"
maxlength="{Long}160"
rows="100"
resize="both">
sling:resourceType: granite/ui/components/coral/foundation/form/textarea
Documentation: https://helpx.adobe.com/experience-manager/6-3/sites/developing/using/reference-materials/granite-ui/api/jcr_root/libs/granite/ui/components/coral/foundation/form/textarea/index.html
4. Path Field
Granite UI 1.0, Touch UI XML Example:
<pathfield-example-logoPath
jcr:primaryType="nt:unstructured"
sling:resourceType="granite/ui/components/coral/foundation/form/pathfield"
fieldLabel="Logo Path"
name="./logoPath"
required="true"
rootPath="/content/dam"/>
sling:resourceType: granite/ui/components/coral/foundation/form/pathfield
<pathfield-example-logoPath
jcr:primaryType="nt:unstructured"
sling:resourceType="granite/ui/components/coral/foundation/form/pathfield"
fieldLabel="Logo Path"
name="./logoPath"
required="true"
rootPath="/content/dam"/>
sling:resourceType: granite/ui/components/coral/foundation/form/pathfield
5. Multifield
Granite UI 1.0, Touch UI XML Example:
sling:resourceType: granite/ui/components/coral/foundation/form/multifield
// Multifield Empty Body
<multifieldParent
jcr:primaryType="nt:unstructured"
sling:resourceType="granite/ui/components/coral/foundation/form/multifield"
fieldLabel="Multifield Config">
<multifield
jcr:primaryType="nt:unstructured"
sling:resourceType="granite/ui/components/coral/foundation/container"
name="./multifield">
<items jcr:primaryType="nt:unstructured">
<fieldset
jcr:primaryType="nt:unstructured"
jcr:title="Items"
sling:resourceType="granite/ui/components/coral/foundation/form/fieldset">
<items jcr:primaryType="nt:unstructured">
...
</items>
</fieldset>
</items>
</field>
</multifieldParent>
// Navigation Links
<navigationLinksMultifield
jcr:primaryType="nt:unstructured"
sling:resourceType="granite/ui/components/coral/foundation/form/multifield"
fieldLabel="Navigation Links">
<navLinks
jcr:primaryType="nt:unstructured"
sling:resourceType="granite/ui/components/coral/foundation/container"
name="./navLinks">
<items jcr:primaryType="nt:unstructured">
<fieldset
jcr:primaryType="nt:unstructured"
jcr:title="Link Field Set Items"
sling:resourceType="granite/ui/components/coral/foundation/form/fieldset">
<items jcr:primaryType="nt:unstructured">
<linkLabel
jcr:primaryType="nt:unstructured"
sling:resourceType="granite/ui/components/coral/foundation/form/textfield"
fieldLabel="Link Label"
name="./linkLabel"
required="true"/>
<linkPath
jcr:primaryType="nt:unstructured"
sling:resourceType="granite/ui/components/coral/foundation/form/pathfield"
fieldLabel="Link Path"
name="./linkPath"
required="true"
rootPath="/content"/>
<linkTarget
jcr:primaryType="nt:unstructured"
sling:resourceType="granite/ui/components/coral/foundation/form/select"
fieldLabel="CTA Link Target"
name="./linkTarget">
<items jcr:primaryType="nt:unstructured">
<self
jcr:primaryType="nt:unstructured"
selected="{Boolean}true"
text="Same Page"
value="_self"/>
<blank
jcr:primaryType="nt:unstructured"
text="New Tab"
value="_blank"/>
</items>
</linkTarget>
</items>
</fieldset>
</items>
</navLinks>
</navigationLinksParent>
sling:resourceType: granite/ui/components/coral/foundation/form/multifield
6. Select
Granite UI 1.0, Touch UI XML Example:
sling:resourceType: granite/ui/components/coral/foundation/form/select
Documentation: https://helpx.adobe.com/experience-manager/6-4/sites/developing/using/reference-materials/granite-ui/api/jcr_root/libs/granite/ui/components/coral/foundation/form/select/index.html
<linkTarget
jcr:primaryType="nt:unstructured"
sling:resourceType="granite/ui/components/coral/foundation/form/select"
fieldLabel="CTA Link Target"
name="./linkTarget">
<items jcr:primaryType="nt:unstructured">
<self
jcr:primaryType="nt:unstructured"
selected="{Boolean}true"
text="Same Page"
value="_self"/>
<blank
jcr:primaryType="nt:unstructured"
text="New Tab"
value="_blank"/>
</items>
</linkTarget>
sling:resourceType: granite/ui/components/coral/foundation/form/select
Documentation: https://helpx.adobe.com/experience-manager/6-4/sites/developing/using/reference-materials/granite-ui/api/jcr_root/libs/granite/ui/components/coral/foundation/form/select/index.html
7. Radio
GroupGranite UI 1.0, Touch UI XML Example:
sling:resourceType: granite/ui/components/coral/foundation/form/radiogroup
Documentation: https://helpx.adobe.com/experience-manager/6-3/sites/developing/using/reference-materials/granite-ui/api/jcr_root/libs/granite/ui/components/coral/foundation/form/radiogroup/index.html
<radiogroup-example-columns
jcr:primaryType="nt:unstructured"
sling:resourceType="granite/ui/components/coral/foundation/form/radiogroup"
deleteHint="{Boolean}true"
fieldLabel="Type"
name="./columns"
vertical="{Boolean}false">
<items jcr:primaryType="nt:unstructured">
<columns1
jcr:primaryType="nt:unstructured"
checked="{Boolean}true"
text="1 Column"
value="1"/>
<columns2
jcr:primaryType="nt:unstructured"
text="2 Columns"
value="2"/>
<columns3
jcr:primaryType="nt:unstructured"
text="3 Columns"
value="3"/>
</items>
</radiogroup-example-columns>
sling:resourceType: granite/ui/components/coral/foundation/form/radiogroup
Documentation: https://helpx.adobe.com/experience-manager/6-3/sites/developing/using/reference-materials/granite-ui/api/jcr_root/libs/granite/ui/components/coral/foundation/form/radiogroup/index.html
8. Number Field
Granite UI 1.0, Touch UI XML Example:
<numberfield-example-ageRestriction
jcr:primaryType="nt:unstructured"
sling:resourceType="granite/ui/components/coral/foundation/form/numberfield"
fieldLabel="Age Restriction"
min="{Long}1"
max="{Double}200"
name="./ageRestriction"
disabled="{Boolean}false"
step="1"
value=""/>
sling:resourceType: granite/ui/components/coral/foundation/form/numberfield
Documentation: https://helpx.adobe.com/experience-manager/6-3/sites/developing/using/reference-materials/granite-ui/api/jcr_root/libs/granite/ui/components/coral/foundation/form/numberfield/index.html
<numberfield-example-ageRestriction
jcr:primaryType="nt:unstructured"
sling:resourceType="granite/ui/components/coral/foundation/form/numberfield"
fieldLabel="Age Restriction"
min="{Long}1"
max="{Double}200"
name="./ageRestriction"
disabled="{Boolean}false"
step="1"
value=""/>
sling:resourceType: granite/ui/components/coral/foundation/form/numberfield
Documentation: https://helpx.adobe.com/experience-manager/6-3/sites/developing/using/reference-materials/granite-ui/api/jcr_root/libs/granite/ui/components/coral/foundation/form/numberfield/index.html
9. File Upload
Granite UI 1.0, Touch UI XML Example:
Note: How to disable the file upload, browser button, granite UI component’s upload feature will be to set the allowUpload property to false, indicated in the examples below.
Note: How to disable the file upload, browser button, granite UI component’s upload feature will be to set the allowUpload property to false, indicated in the examples below.
<fileupload-example-file
jcr:primaryType="nt:unstructured"
sling:resourceType="cq/gui/components/authoring/dialog/fileupload"
autoStart="{Boolean}false"
class="cq-droptarget"
fieldLabel="Image asset"
fileNameParameter="./fileName"
fileReferenceParameter="./fileReference"
mimeTypes="[image/gif,image/jpeg,image/png,image/tiff,image/svg+xml]"
multiple="{Boolean}false"
name="./file"
title="Upload Image Asset"
uploadUrl="${suffix.path}"
useHTML5="{Boolean}true"/>
// disable allow upload
<fileupload-example-downloadAsset
jcr:primaryType="nt:unstructured"
sling:resourceType="cq/gui/components/authoring/dialog/fileupload"
allowUpload="{Boolean}false"
autoStart="{Boolean}false"
class="cq-droptarget"
fieldLabel="Download Asset"
fileNameParameter="./fileName"
fileReferenceParameter="./fileReference"
mimeTypes="[image/*,video/*,audio/*,.pdf,.doc,.zip,.txt]"
multiple="{Boolean}false"
name="./downloadAsset"
title="Upload Asset"
uploadUrl="${suffix.path}"
useHTML5="{Boolean}true"/>
sling:resourceType: cq/gui/components/authoring/dialog/fileupload
Documentation: https://helpx.adobe.com/experience-manager/6-3/sites/developing/using/reference-materials/granite-ui/api/jcr_root/libs/granite/ui/components/coral/foundation/form/fileupload/index.html
10. Color Picker
Granite UI 1.0, Touch UI XML Example:
Note: the variant properties can be set for two different outcomes; “default” allows the authors to insert custom hex values, while the set value of “swatch” does not allow custom hex selection.
sling:resourceType: granite/ui/components/coral/foundation/form/colorfield
Documentation: https://helpx.adobe.com/experience-manager/6-3/sites/developing/using/reference-materials/granite-ui/api/jcr_root/libs/granite/ui/components/coral/foundation/form/colorfield/index.html
Note: the variant properties can be set for two different outcomes; “default” allows the authors to insert custom hex values, while the set value of “swatch” does not allow custom hex selection.
//swatch example
<colorfield-swatch-example-brandColor
jcr:primaryType="nt:unstructured"
sling:resourceType="granite/ui/components/coral/foundation/form/colorfield"
fieldLabel="Brand Color"
name="./brandColor"
emptyText="Please choose a color"
disabled="{Boolean}false"
required="{Boolean}true"
variant="swatch"
autogenerateColors="off"
showDefaultColors="{Boolean}false"
showProperties="{Boolean}false"
showSwatches="{Boolean}true">
<items jcr:primaryType="nt:unstructured">
<color1
jcr:primaryType="nt:unstructured"
value="#FF4136"/>
<color2
jcr:primaryType="nt:unstructured"
value="#0077D9"/>
</items>
</colorfield-swatch-example-brandColor>
//properties example (choosing colors from a color wheel
<colorfield-properties-example-brandColor
jcr:primaryType="nt:unstructured"
sling:resourceType="granite/ui/components/coral/foundation/form/colorfield"
fieldLabel="Brand Color"
name="./brandColor"
emptyText="Please choose a color"
disabled="{Boolean}false"
required="{Boolean}true"
variant="default"
autogenerateColors="off"
showDefaultColors="{Boolean}false"
showProperties="{Boolean}true"
showSwatches="{Boolean}false"/>
sling:resourceType: granite/ui/components/coral/foundation/form/colorfield
Documentation: https://helpx.adobe.com/experience-manager/6-3/sites/developing/using/reference-materials/granite-ui/api/jcr_root/libs/granite/ui/components/coral/foundation/form/colorfield/index.html
By
aem4beginner
May 27, 2020
Estimated Post Reading Time ~
Disabling the XML and JSON render in AEM
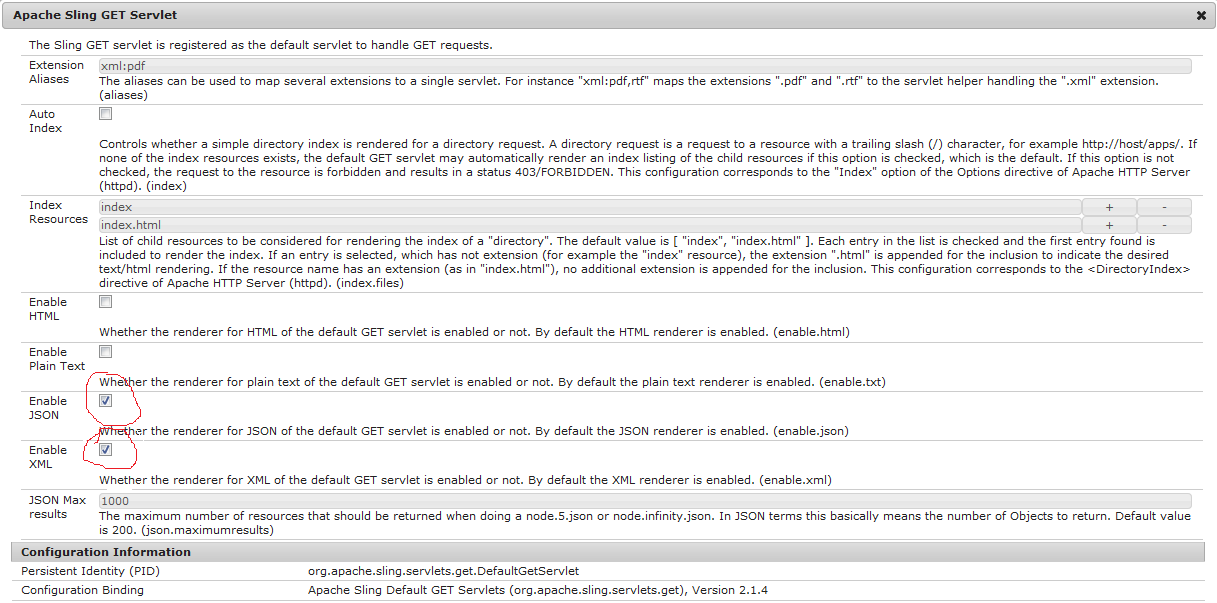
To disable the XML or JSON renderer, navigate to the OSGI configuration manager at the following URL:
http://localhost:4502/system/console/configMgr
Click on Apache Sling GET Servlet, uncheck “Enable XML” and Enable JSON, then click save.
http://localhost:4502/system/console/configMgr
Click on Apache Sling GET Servlet, uncheck “Enable XML” and Enable JSON, then click save.
By
aem4beginner
May 13, 2020
Estimated Post Reading Time ~
Using post.jar for posting JSON, CSV, XML data on Solr
In my last few post, I discussed “Dashboard introduction & how to post data on Apache Solr via its dashboard screen” & also provides many examples for the same. In that approach, I can post only one record at a time i.e. I am not able to post data using different files having differently formatted records like JSON, XML, CSV.
Agenda for this post
Agenda for this post
- How to post XML data in the form of an XML file using a post.jar file?
- How to post CSV data in the form of a CSV file using a post.jar file?
- How to post JSON data in the form of a JSON file using a post.jar file?
How to post XML data in the form of an XML file using a post.jar file?
Apache java comes with an inbuilt jar file for document posting. This file is present at
<parent-directory>/solr-4.7.2/example/exampledocs
This exampledocs directory has many XML files for demo purposes.
How to post XML document files using this jar file.
just create an XML file with given records.
<add>
<doc>
<field name=”id”>Solr105</field>
<field name=”name”>Solr 105</field>
<field name=”address”>House No – 100, LR Apache, 40702</field>
<field name=”comments”>Apache Solr comment 1</field>
<field name=”popularity”>101</field>
<field name=”counts”>1</field>
</doc>
<doc>
<field name=”id”>Solr106</field>
<field name=”name”>Solr 106</field>
<field name=”address”>House No – 100, LR Apache, 40702</field>
<field name=”comments”>Apache Solr comment 2</field>
<field name=”popularity”>100</field>
<field name=”counts”>2</field>
<field name=”dynamicField_i”>It is dynamically genrated field.</field>
</doc>
<doc>
<field name=”id”>Solr107</field>
<field name=”name”>Solr 107</field>
<field name=”address”>House No – 100, LR Apache, 40702</field>
<field name=”comments”>Apache Solr It’s Cool.</field>
<field name=”popularity”>109</field>
<field name=”counts”>3</field>
<field name=”dynamicField_i”>It is dynamically genrated field.</field>
</doc>
</add>
Save this file as dummy.xml under <solr>/example/exampledocs directory.
Go to exampledocs directory using command prompt & execute –
java -jar post.jar dummy.xml
For multiple XML files use –
java -jar post.jar dummy.xml dummy1.xml
For all XML files present in working directory use-
java -jar post.jar *.xml
SimplePostTool version 1.5
Posting files to base url http://localhost:8983/solr/update using content-type application/xml.
POSTing file dummy.xml
1 file indexed.
COMMITting Solr index changes to http://localhost:8983/solr/update.
Time spent: 0:00:00.547
it means your data XML document has been indexed on Apache Solr. just go to your dashboard screen
select collection1 -> query-> Click on Execute Query Button
you will get a screen just like.

Syntax of XML file
<add></add> it behaves a the parent of all the records/entities i.e. Root Element.
<doc><doc> it denotes one record/entity to be added on Apache solr.
<field></field> it denotes the property of a record/entity.
“All required fields mentioned in schema.xml must present for all <doc> element in file”.
Let’s consider, If your second <doc></doc> element doesn’t fully fill this restriction then for the first record will be updated, and then it does nothing with all other records in that file. i.e. after exception it stop reading your document, so be care full with your required fields and document provided to Apache Solr for data updation.
How to post CSV data in the form of a CSV file using a post.jar file?
first create a CSV file at /example/exampledocs/ directory using these records-
id,name,address,comments,popularity,counts,dynamicField_i
“Solr110″,” Solr 110″,” House No – 100, LR Apache”,” Apache Solr comment 1″,110,110,” dynamic solr 110″
“Solr111″,” Solr 111″,” House No – 100, LR Apache”,” Apache Solr comment 1″,111,111,” dynamic solr 111″
“Solr112″,” Solr 112″,” House No – 100, LR Apache”,” Apache Solr comment 1″,112,112,” dynamic solr 112″
“Solr113″,” Solr 113″,” House No – 100, LR Apache”,” Apache Solr comment 1″,113,113,” dynamic solr 113″
save this file as dummy.csv –
Go to /example/exampledocs directory using command prompt & execute
java -Durl=http://localhost:8983/solr/update/csv -Dtype=text/csv -jar post.jar dummy.csv
For multiple CSV files use –
java -Durl=http://localhost:8983/solr/update/csv -Dtype=text/csv -jar post.jar dummy.csv dummy1.csv
For all CSV files present in working directory use-
java -Durl=http://localhost:8983/solr/update/csv -Dtype=text/csv -jar post.jar *.csv
you will get on the console a success message as –
SimplePostTool version 1.5
Posting files to base url http://localhost:8983/solr/update/csv using content-type text/csv.
POSTing file dummy.csv
1 file indexed.
COMMITting Solr index changes to http://localhost:8983/solr/update/csv.
Time spent: 0:00:00.577
it means your data CSV document has been indexed in Apache Solr. just go to your dashboard screen
select collection1 -> query-> Click on Execute Query Button
your screen looks like-

Congrats your CSV document has been posted successfully.
How to post JSON data in form of a JSON file using post.jar file?
first create a JSON file at /example/exampledocs/ directory using these records
[{
“id”:”Solr115″,
“name”:”Solr 115″,
“address”:”House No – 100, LR Apache, 40702″,
“comments”:”Apache Solr comment 1″,
“popularity”:115,
“counts”:115
},
{
“id”:”Solr116″,
“name”:”Solr 116″,
“address”:”House No – 100, LR Apache, 40702″,
“comments”:”Apache Solr comment 1″,
“popularity”:116,
“counts”:116
},
{
“id”:”Solr117″,
“name”:”Solr 117″,
“address”:”House No – 100, LR Apache, 40702″,
“comments”:”Apache Solr comment 1″,
“popularity”:117,
“counts”:117
}]
save this file as dummy.json –
Go to /example/exampledocs directory using command prompt & execute given command
java -Durl=http://localhost:8983/solr/update/json -Dtype=application/json -jar post.jar dummy.json
For multiple JSON files use –
java -Durl=http://localhost:8983/solr/update/json -Dtype=application/json -jar post.jar d1.json d2.json
For all JSON files present in working directory use-
java -Durl=http://localhost:8983/solr/update/json -Dtype=application/json -jar post.jar *.json
you will get on the console a success message as –
SimplePostTool version 1.5
Posting files to base url http://localhost:8983/solr/update/json using content-type application/json.
POSTing file dummy.json
1 file indexed.
COMMITting Solr index changes to http://localhost:8983/solr/update/json.
Time spent: 0:00:00.535
it means your data JSON document has been indexed in Apache Solr. just go to your dashboard screen select collection1 -> query-> Click on Execute Query Button your screen looks like this post.jar file provides you some more parameters with <add> tag in the XML file. I will discuss them in my later posts.
Apache java comes with an inbuilt jar file for document posting. This file is present at
<parent-directory>/solr-4.7.2/example/exampledocs
This exampledocs directory has many XML files for demo purposes.
How to post XML document files using this jar file.
just create an XML file with given records.
<add>
<doc>
<field name=”id”>Solr105</field>
<field name=”name”>Solr 105</field>
<field name=”address”>House No – 100, LR Apache, 40702</field>
<field name=”comments”>Apache Solr comment 1</field>
<field name=”popularity”>101</field>
<field name=”counts”>1</field>
</doc>
<doc>
<field name=”id”>Solr106</field>
<field name=”name”>Solr 106</field>
<field name=”address”>House No – 100, LR Apache, 40702</field>
<field name=”comments”>Apache Solr comment 2</field>
<field name=”popularity”>100</field>
<field name=”counts”>2</field>
<field name=”dynamicField_i”>It is dynamically genrated field.</field>
</doc>
<doc>
<field name=”id”>Solr107</field>
<field name=”name”>Solr 107</field>
<field name=”address”>House No – 100, LR Apache, 40702</field>
<field name=”comments”>Apache Solr It’s Cool.</field>
<field name=”popularity”>109</field>
<field name=”counts”>3</field>
<field name=”dynamicField_i”>It is dynamically genrated field.</field>
</doc>
</add>
Save this file as dummy.xml under <solr>/example/exampledocs directory.
Go to exampledocs directory using command prompt & execute –
java -jar post.jar dummy.xml
For multiple XML files use –
java -jar post.jar dummy.xml dummy1.xml
For all XML files present in working directory use-
java -jar post.jar *.xml
SimplePostTool version 1.5
Posting files to base url http://localhost:8983/solr/update using content-type application/xml.
POSTing file dummy.xml
1 file indexed.
COMMITting Solr index changes to http://localhost:8983/solr/update.
Time spent: 0:00:00.547
it means your data XML document has been indexed on Apache Solr. just go to your dashboard screen
select collection1 -> query-> Click on Execute Query Button
you will get a screen just like.
Syntax of XML file
<add></add> it behaves a the parent of all the records/entities i.e. Root Element.
<doc><doc> it denotes one record/entity to be added on Apache solr.
<field></field> it denotes the property of a record/entity.
“All required fields mentioned in schema.xml must present for all <doc> element in file”.
Let’s consider, If your second <doc></doc> element doesn’t fully fill this restriction then for the first record will be updated, and then it does nothing with all other records in that file. i.e. after exception it stop reading your document, so be care full with your required fields and document provided to Apache Solr for data updation.
How to post CSV data in the form of a CSV file using a post.jar file?
first create a CSV file at /example/exampledocs/ directory using these records-
id,name,address,comments,popularity,counts,dynamicField_i
“Solr110″,” Solr 110″,” House No – 100, LR Apache”,” Apache Solr comment 1″,110,110,” dynamic solr 110″
“Solr111″,” Solr 111″,” House No – 100, LR Apache”,” Apache Solr comment 1″,111,111,” dynamic solr 111″
“Solr112″,” Solr 112″,” House No – 100, LR Apache”,” Apache Solr comment 1″,112,112,” dynamic solr 112″
“Solr113″,” Solr 113″,” House No – 100, LR Apache”,” Apache Solr comment 1″,113,113,” dynamic solr 113″
save this file as dummy.csv –
Go to /example/exampledocs directory using command prompt & execute
java -Durl=http://localhost:8983/solr/update/csv -Dtype=text/csv -jar post.jar dummy.csv
For multiple CSV files use –
java -Durl=http://localhost:8983/solr/update/csv -Dtype=text/csv -jar post.jar dummy.csv dummy1.csv
For all CSV files present in working directory use-
java -Durl=http://localhost:8983/solr/update/csv -Dtype=text/csv -jar post.jar *.csv
you will get on the console a success message as –
SimplePostTool version 1.5
Posting files to base url http://localhost:8983/solr/update/csv using content-type text/csv.
POSTing file dummy.csv
1 file indexed.
COMMITting Solr index changes to http://localhost:8983/solr/update/csv.
Time spent: 0:00:00.577
it means your data CSV document has been indexed in Apache Solr. just go to your dashboard screen
select collection1 -> query-> Click on Execute Query Button
your screen looks like-
Congrats your CSV document has been posted successfully.
How to post JSON data in form of a JSON file using post.jar file?
first create a JSON file at /example/exampledocs/ directory using these records
[{
“id”:”Solr115″,
“name”:”Solr 115″,
“address”:”House No – 100, LR Apache, 40702″,
“comments”:”Apache Solr comment 1″,
“popularity”:115,
“counts”:115
},
{
“id”:”Solr116″,
“name”:”Solr 116″,
“address”:”House No – 100, LR Apache, 40702″,
“comments”:”Apache Solr comment 1″,
“popularity”:116,
“counts”:116
},
{
“id”:”Solr117″,
“name”:”Solr 117″,
“address”:”House No – 100, LR Apache, 40702″,
“comments”:”Apache Solr comment 1″,
“popularity”:117,
“counts”:117
}]
save this file as dummy.json –
Go to /example/exampledocs directory using command prompt & execute given command
java -Durl=http://localhost:8983/solr/update/json -Dtype=application/json -jar post.jar dummy.json
For multiple JSON files use –
java -Durl=http://localhost:8983/solr/update/json -Dtype=application/json -jar post.jar d1.json d2.json
For all JSON files present in working directory use-
java -Durl=http://localhost:8983/solr/update/json -Dtype=application/json -jar post.jar *.json
you will get on the console a success message as –
SimplePostTool version 1.5
Posting files to base url http://localhost:8983/solr/update/json using content-type application/json.
POSTing file dummy.json
1 file indexed.
COMMITting Solr index changes to http://localhost:8983/solr/update/json.
Time spent: 0:00:00.535
it means your data JSON document has been indexed in Apache Solr. just go to your dashboard screen select collection1 -> query-> Click on Execute Query Button your screen looks like this post.jar file provides you some more parameters with <add> tag in the XML file. I will discuss them in my later posts.
By
aem4beginner
May 10, 2020
Estimated Post Reading Time ~
Storing JSON string in .content.xml
Given the JSON string of:
{ "firstname" : "Owen", "lastname" : "Bringino", "country" : "Philippines" }
If the above JSON string will be assigned as property value inside an XML document, then it will be encoded as:
"{"firstname":"Owen","lastname":"Bringino",
"country":"Philippines"}"
However, you may need to explicitly cast it to String when defined inside .content.xml as shown in the code snippet below:
<jcr:root ...>
<jcr:content ...>
<record jcr:primaryType="nt:unstructured"
member= "{String}{"firstname":"Owen",
"lastname":"Bringino",
"country":"Philippines"}" />
</jcr:content>
</jcr:root>
Without the {String} type hint, you may not be able to see the "member" property in JCR/CRXDE after deployment or upload.
{ "firstname" : "Owen", "lastname" : "Bringino", "country" : "Philippines" }
If the above JSON string will be assigned as property value inside an XML document, then it will be encoded as:
"{"firstname":"Owen","lastname":"Bringino",
"country":"Philippines"}"
However, you may need to explicitly cast it to String when defined inside .content.xml as shown in the code snippet below:
<jcr:root ...>
<jcr:content ...>
<record jcr:primaryType="nt:unstructured"
member= "{String}{"firstname":"Owen",
"lastname":"Bringino",
"country":"Philippines"}" />
</jcr:content>
</jcr:root>
Without the {String} type hint, you may not be able to see the "member" property in JCR/CRXDE after deployment or upload.
By
aem4beginner
April 26, 2020
Estimated Post Reading Time ~
XML Documentation Add-On for Adobe Experience Manager
Adobe recently launched a new Add-On Package to Adobe Experience Manager, specifically targeted at bringing technical communication closer to Adobe Experience Manager. The new package is being marketed as “XML Documentation Add-on for Adobe Experience Manager” and on Adobe.com. The Add-On provides the capability of managing DITA content and publishing it from AEM. If you have ever worked on Technical Documentation, you would be conversant with DITA. For a very long time, AEM did not have a solution for natively handling Technical Communication content. However, this Add-On seems to be a step in this direction. It will open doors for large enterprises that manage documentation in DITA to publish directly via AEM without having to go through the conversion process – which was one-off and had to be repeated.
Apart from the basic ability to publish DITA content, Adobe seems to be positioning this as a CCMS (Component Content Management System). This is very interesting and intriguing. In some form, AEM with its components was already a Component Content Management System. However, AEM has always pushed the envelope when it comes to web and connected experiences. It would be really interesting to see how this evolves and helps promotes content reuse. There was a key feature added in AEM 6.2 called Content Fragments, which could also be looked at as a step in the direction of content reuse. From a strategy perspective, it is very clear that Content reuse is something that Adobe is now serious about.
What I like the most is the idea of a single Content Management System for both Marketing and Technical Communication. It is a huge benefit for large enterprises and system integrators like us offering the following key benefits:
Apart from the basic ability to publish DITA content, Adobe seems to be positioning this as a CCMS (Component Content Management System). This is very interesting and intriguing. In some form, AEM with its components was already a Component Content Management System. However, AEM has always pushed the envelope when it comes to web and connected experiences. It would be really interesting to see how this evolves and helps promotes content reuse. There was a key feature added in AEM 6.2 called Content Fragments, which could also be looked at as a step in the direction of content reuse. From a strategy perspective, it is very clear that Content reuse is something that Adobe is now serious about.
What I like the most is the idea of a single Content Management System for both Marketing and Technical Communication. It is a huge benefit for large enterprises and system integrators like us offering the following key benefits:
- Standardizations of content platform and processes: Enterprises can now think about putting AEM at the center of all things Content. They can invest in building standardized content workflows and processes across the organization – Review workflows, SEO/SEM workflows, Translation workflows, and publishing workflows. This opens up immense opportunities for standardization.
- Reduction in Costs: Develop once and use across all sites and content. No duplication of assets (templates); look and feel, etc. Integrate once and with one platform. Integration of other services like Analytics, SEO/SEM, personalization, translation is a huge effort and cost. By having one platform, we are saying that it needs to be done once.
- Consistency: There is consistency at both levels – for users of the Platform and end customers. For authors (marketing content authors and Technical documentation authors), it is the same system. The experience is consistent and the same. The reports and processes are the same. For an end customer, it is going to provide a consistent experience when they move from the Marketing section to the Help and Learning section. We are already seeing the boundaries blur and this is going to help even more.
- Upsell Opportunities: One trend that we see in the market is the option to upsell offering while you are struggling with a problem – In-context Upsell offers. One single platform opens up the possibility of sharing Technical Documentation insights with the marketing side of the house to provide Upsell offers.
The more I think about this option, the more excited I get. I am going to peel this onion in the next few days and will continue to share insights here in this blog.
By
aem4beginner
April 22, 2020
Estimated Post Reading Time ~
Increase Cache Size parameter in workspace.xml of AEM
How to Increase Cache Size parameter in workspace.xml
Place below configuration in cache section of searindex elements
Workspace.xml
Place below configuration in cache section of searindex elements
Workspace.xml
Under SearchIndex class where values is ="com.day.crx.query.lucene.LuceneHandler"
param name is ="cacheSize" value="100000"
Repository.xml
param name is ="cacheSize" value="100000"
Repository.xml
Where PersistenceManager class is of type ="com.day.crx.persistence.tar.TarPersistenceManager"
param name is ="bundleCacheSize" and value is ="512"
Workspace.xml
Where PersistenceManager class is ="com.day.crx.persistence.tar.TarPersistenceManager"
And param name is ="bundleCacheSize" value is ="512"
Note: applicable to AEM 5.6.1/5.4
param name is ="bundleCacheSize" and value is ="512"
Workspace.xml
Where PersistenceManager class is ="com.day.crx.persistence.tar.TarPersistenceManager"
And param name is ="bundleCacheSize" value is ="512"
Note: applicable to AEM 5.6.1/5.4
By
aem4beginner
April 20, 2020
Estimated Post Reading Time ~
What is XML Documentation Add-on for Adobe Experience Manager
By making Adobe Experience Manager DITA-aware, XML Documentation Add-on extends its capabilities and transforms it into a full-fledged, enterprise-class DITA Component Content Management System (CCMS).
It provides all core CCMS functions such as version management, review and approval, search, translation management, and content readiness reports.
1. Being built on a mature platform like Adobe Experience Manager, you automatically get access to advanced features like configurable workflow management, project and task management, translation management, integration with Adobe Marketing Cloud, and other components. It also gives you easy access to other Adobe solutions like Adobe Analytics, Adobe Experience Manager Communities, Adobe Experience Manager Forms, Adobe Experience Manager Mobile and Scene7.
2. With XML Documentation Add-on for Adobe Experience Manager, it is now possible to host technical content on the same platform as the marketing content. This will help create consistent user experiences for pre- and post-sales content. It also opens up the possibility to use DITA to create marketing content, improving content reuse, single-sourcing, manageability, etc.
3. The solution gives you advanced reporting to easily assess content readiness before publishing the content. You can check for all the critical issues like broken links and references, review and approval status, translation status. This can help you perform a comprehensive sanity check in the final stages before your content goes out.
Best-in-class Multichannel Publishing of DITA Content

To publish DITA content to AEM Sites, you no longer need to manage multiple systems, thereby reducing your total cost of ownership. Since Adobe Experience Manager can now handle DITA content natively, it can render DITA content without requiring any conversion, increasing content velocity.
The solution allows publishing to a variety of popular formats like AEM Sites, AEM Mobile, PDF and Responsive HTML5, mobile apps, EPUB and even Amazon Kindle. Moreover, the output is completely customizable to incorporate your brand and integrate seamlessly with your publishing ecosystem. The output can also be personalized to deliver relevant content to achieve customer delight.
Industry-leading Translation Management and Localization Support

With built-in connectors for leading translation providers, no human intervention is required after you send off the content for translation. The translated content comes back seamlessly into the repository for your review. It reduces the time and effort needed to keep your content up-to-date. With ways to identify and translate only modified content, it significantly reduces localization costs. You can also selectively publish content, thereby achieving continual updates of your content in less time.
Built-in DITA Web Editor

The built-in web editor that comes with the add-on has an intuitive word-processing interface, which provides an easy entry for subject matter experts, casual contributors, and reviewers who might not be trained to use DITA. The contributed content is saved as valid DITA content, thereby easing the work for the authors. It also provides web-based review and approval workflows to help authors and reviewers collaborate efficiently.
Integration with Adobe FrameMaker (2015 release)

FrameMaker (2015 release, with Update 4) is fully integrated with the solution to enable offline authoring. You can carry out version management, search and review management on the repository from within FrameMaker itself.
Extensive Tag Management Support for Personalized Output

Leverage the extensive tag management support in Experience Manager to apply relevant tags on DITA source content. Use these tags to provide end-users with highly personalized content experiences.
Benefits at a glance
It provides all core CCMS functions such as version management, review and approval, search, translation management, and content readiness reports.
1. Being built on a mature platform like Adobe Experience Manager, you automatically get access to advanced features like configurable workflow management, project and task management, translation management, integration with Adobe Marketing Cloud, and other components. It also gives you easy access to other Adobe solutions like Adobe Analytics, Adobe Experience Manager Communities, Adobe Experience Manager Forms, Adobe Experience Manager Mobile and Scene7.
2. With XML Documentation Add-on for Adobe Experience Manager, it is now possible to host technical content on the same platform as the marketing content. This will help create consistent user experiences for pre- and post-sales content. It also opens up the possibility to use DITA to create marketing content, improving content reuse, single-sourcing, manageability, etc.
3. The solution gives you advanced reporting to easily assess content readiness before publishing the content. You can check for all the critical issues like broken links and references, review and approval status, translation status. This can help you perform a comprehensive sanity check in the final stages before your content goes out.
Best-in-class Multichannel Publishing of DITA Content
To publish DITA content to AEM Sites, you no longer need to manage multiple systems, thereby reducing your total cost of ownership. Since Adobe Experience Manager can now handle DITA content natively, it can render DITA content without requiring any conversion, increasing content velocity.
The solution allows publishing to a variety of popular formats like AEM Sites, AEM Mobile, PDF and Responsive HTML5, mobile apps, EPUB and even Amazon Kindle. Moreover, the output is completely customizable to incorporate your brand and integrate seamlessly with your publishing ecosystem. The output can also be personalized to deliver relevant content to achieve customer delight.
Industry-leading Translation Management and Localization Support
With built-in connectors for leading translation providers, no human intervention is required after you send off the content for translation. The translated content comes back seamlessly into the repository for your review. It reduces the time and effort needed to keep your content up-to-date. With ways to identify and translate only modified content, it significantly reduces localization costs. You can also selectively publish content, thereby achieving continual updates of your content in less time.
Built-in DITA Web Editor
The built-in web editor that comes with the add-on has an intuitive word-processing interface, which provides an easy entry for subject matter experts, casual contributors, and reviewers who might not be trained to use DITA. The contributed content is saved as valid DITA content, thereby easing the work for the authors. It also provides web-based review and approval workflows to help authors and reviewers collaborate efficiently.
Integration with Adobe FrameMaker (2015 release)
FrameMaker (2015 release, with Update 4) is fully integrated with the solution to enable offline authoring. You can carry out version management, search and review management on the repository from within FrameMaker itself.
Extensive Tag Management Support for Personalized Output
Leverage the extensive tag management support in Experience Manager to apply relevant tags on DITA source content. Use these tags to provide end-users with highly personalized content experiences.
Benefits at a glance
- End-to-end DITA Solution
- Single CMS for marketing and technical content with lower maintenance overheads
- Consistent user experience for pre- and post-sales content
- Web-Based Content Collaboration via a Topic Editor, Map Editor, and Content Review and Approval workflows
- Full integration with Adobe FrameMaker 2015 for offline authoring
- Higher content velocity and lower cost of ownership for Adobe Experience Manager Publishing
- Customizable and personalized multi-channel publishing
- Fully integrated translation workflows with cost reduction and faster time to market
- Advanced reporting for assessing content readiness
- Access to tools in the Adobe Marketing Cloud
By
aem4beginner
April 10, 2020
Estimated Post Reading Time ~
Import XML data into AEM
Hi everyone, in this post, we will see how can we import XML data into AEM.
Sometimes, we have an XML file in the system from which we need to import or sometimes we have XML data exposed via a URL. We will see both methods.
As you see, we have attributes for reading the XML file's path and the URL where the XML is stored. We also have the path where we need to import the XML data in crx/de. Apart from these parameters, we have a field to enter cron expression which will be used to control how frequently will this scheduler run.
As you can see, we have a mechanism to run the scheduler via activate(), modified() and deactivate() methods.
Inside the run() method which will run based on the value of the cron expression, we are calling XMLReaderService and XMLWriterService to read and write the XML data respectively.
These two services are defined in the following sections.
Here we have two methods, one for reading data from the file where we using java.io API to read file and JAXB API to convert XML data to our Products model class which is defined below.
In the other method, we are using URLConnection API to read the data from the URL defined above. After reading the data, we are transforming it again into our model classes.
Once the XML data is converted into the model object then it is returned back to the sling scheduler where it is consumed by our XMLWriter service to write data into JCR.
Sometimes, we have an XML file in the system from which we need to import or sometimes we have XML data exposed via a URL. We will see both methods.
Design
We will be creating the following to make this work -
- OSGi configuration - This will capture the location of the XML file and the URL which is exposing the XML data. It will also let us define the location in crx/de, where we want to import the data.
- Sling Scheduler - This scheduler will run periodically and read both file and URL to fetch the data. You can have more control over this by defining an AEM component etc or a separate console.
- XML Reader Service - This OSGi service will be invoked by the scheduler and will read/parse the data from file/URL using JAXB (Java Architecture for XML binding) library.
- XML Writer Service - This OSGi service will make use of JCR Node APIs to write parsed XML data into crx/de at the specified location.
XML Data Source
You can find the XML file which is used as a datasource is present here.
The URL which is being used as a datasource is here.
Both of these datasources have actually the same data - one in the form of file and other as a URL.
Battle with code
So, without further ado, let's see the code in action.
- Create an OSGi service
package org.redquark.aem.xmlreader.core.configurations;
import org.osgi.service.metatype.annotations.AttributeDefinition;
import org.osgi.service.metatype.annotations.AttributeType;
import org.osgi.service.metatype.annotations.ObjectClassDefinition;
/**
* @author Anirudh Sharma
*
*/
@ObjectClassDefinition(
name = "Red Quark XML Reader",
description = "This configuration lets us read XML file from the system or XML response from a URLl̥")
public @interface XMLReaderConfiguration {
@AttributeDefinition(
name = "Scheduler name",
description = "Name of the scheduler",
type = AttributeType.STRING)
public String name() default "XML Reader Scheduler";
@AttributeDefinition(
name = "Enabled",
description = "Flag to enable/disable a scheduler",
type = AttributeType.BOOLEAN)
public boolean enabled() default true;
@AttributeDefinition(
name = "Cron expression",
description = "Cron expression used by the scheduler",
type = AttributeType.STRING)
public String cronExpression() default "0 * * * * ?";
@AttributeDefinition(
name = "XML file path",
description = "Path of the XML file on the system",
type = AttributeType.STRING)
public String xmlFilePath();
@AttributeDefinition(
name = "XML response URL",
description = "URL from where XML response is to be read",
type = AttributeType.STRING)
public String xmlResponseURL();
@AttributeDefinition(
name = "JCR path",
description = "Path in the JCR to store data",
type = AttributeType.STRING)
public String jcrPath();
}
As you see, we have attributes for reading the XML file's path and the URL where the XML is stored. We also have the path where we need to import the XML data in crx/de. Apart from these parameters, we have a field to enter cron expression which will be used to control how frequently will this scheduler run.
package org.redquark.aem.xmlreader.core.configurations;
import org.osgi.service.metatype.annotations.AttributeDefinition;
import org.osgi.service.metatype.annotations.AttributeType;
import org.osgi.service.metatype.annotations.ObjectClassDefinition;
/**
* @author Anirudh Sharma
*
*/
@ObjectClassDefinition(
name = "Red Quark XML Reader",
description = "This configuration lets us read XML file from the system or XML response from a URLl̥")
public @interface XMLReaderConfiguration {
@AttributeDefinition(
name = "Scheduler name",
description = "Name of the scheduler",
type = AttributeType.STRING)
public String name() default "XML Reader Scheduler";
@AttributeDefinition(
name = "Enabled",
description = "Flag to enable/disable a scheduler",
type = AttributeType.BOOLEAN)
public boolean enabled() default true;
@AttributeDefinition(
name = "Cron expression",
description = "Cron expression used by the scheduler",
type = AttributeType.STRING)
public String cronExpression() default "0 * * * * ?";
@AttributeDefinition(
name = "XML file path",
description = "Path of the XML file on the system",
type = AttributeType.STRING)
public String xmlFilePath();
@AttributeDefinition(
name = "XML response URL",
description = "URL from where XML response is to be read",
type = AttributeType.STRING)
public String xmlResponseURL();
@AttributeDefinition(
name = "JCR path",
description = "Path in the JCR to store data",
type = AttributeType.STRING)
public String jcrPath();
}
- Creating a sling scheduler
package org.redquark.aem.xmlreader.core.schedulers;
import org.apache.sling.commons.scheduler.ScheduleOptions;
import org.apache.sling.commons.scheduler.Scheduler;
import org.osgi.service.component.annotations.Activate;
import org.osgi.service.component.annotations.Component;
import org.osgi.service.component.annotations.Deactivate;
import org.osgi.service.component.annotations.Modified;
import org.osgi.service.component.annotations.Reference;
import org.osgi.service.metatype.annotations.Designate;
import org.redquark.aem.xmlreader.core.configurations.XMLReaderConfiguration;
import org.redquark.aem.xmlreader.core.models.ProductList;
import org.redquark.aem.xmlreader.core.services.XMLReaderService;
import org.redquark.aem.xmlreader.core.services.XMLWriterService;
import org.slf4j.Logger;
import org.slf4j.LoggerFactory;
/**
* @author Anirudh Sharma
*
*/
@Component(immediate = true, service = Runnable.class)
@Designate(ocd = XMLReaderConfiguration.class)
public class XMLReaderScheduler implements Runnable {
// Logger
private final Logger log = LoggerFactory.getLogger(this.getClass());
// Id of the scheduler based on its name
private int schedulerId;
// Scheduler instance injected
@Reference
private Scheduler scheduler;
// XMLReaderService is injected
@Reference
private XMLReaderService xmlReaderService;
// XMLWriterService is injected
@Reference
private XMLWriterService xmlWriterService;
// Path of the XML file
private String filePath;
// URL of the XML response
private String url;
// Flag to check if the scheduler is enabled
private boolean isEnabled;
// Path where data is to be stored in JCR
private String jcrPath;
/**
* Activate method to initialize stuff
*
* @param xmlReaderConfiguration
*/
@Activate
protected void activate(XMLReaderConfiguration xmlReaderConfiguration) {
schedulerId = xmlReaderConfiguration.name().hashCode();
filePath = xmlReaderConfiguration.xmlFilePath();
url = xmlReaderConfiguration.xmlResponseURL();
isEnabled = xmlReaderConfiguration.enabled();
jcrPath = xmlReaderConfiguration.jcrPath();
}
/**
* Modifies the scheduler id on modification
*
* @param xmlReaderConfiguration
*/
@Modified
protected void modified(XMLReaderConfiguration xmlReaderConfiguration) {
// Removing scheduler
removeScheduler();
// Updating the scheduler id
schedulerId = xmlReaderConfiguration.name().hashCode();
// Again adding the scheduler
addScheduler(xmlReaderConfiguration);
}
/**
* This method deactivates the scheduler and removes it
*
* @param xmlReaderConfiguration
*/
@Deactivate
protected void deactivate(XMLReaderConfiguration xmlReaderConfiguration) {
// Removing the scheduler
removeScheduler();
}
/**
* This method removes the scheduler
*/
private void removeScheduler() {
log.info("Removing scheduler: {}", schedulerId);
// Unscheduling/removing the scheduler
scheduler.unschedule(String.valueOf(schedulerId));
}
/**
* This method adds the scheduler
*
* @param schedulerConfiguration
*/
private void addScheduler(XMLReaderConfiguration xmlReaderConfiguration) {
// Check if the scheduler is enabled
if (isEnabled) {
// Scheduler option takes the cron expression as a parameter and run accordingly
ScheduleOptions scheduleOptions = scheduler.EXPR(xmlReaderConfiguration.cronExpression());
// Adding some parameters
scheduleOptions.name(xmlReaderConfiguration.name());
scheduleOptions.canRunConcurrently(false);
// Scheduling the job
scheduler.schedule(this, scheduleOptions);
log.info("Scheduler added");
} else {
log.info("Scheduler is disabled");
}
}
/**
* Overridden run method to execute Job
*/
@Override
public void run() {
if (isEnabled) {
ProductList productList = null;
// Reads XML data from a file in the system
if (filePath != null && !filePath.isEmpty()) {
productList = xmlReaderService.readXMLFromFile(filePath);
xmlWriterService.writeXMLToJCR(productList, jcrPath, "file");
}
// Reads XML data from a response
if (url != null && !url.isEmpty()) {
productList = xmlReaderService.readXMLFromURL(url);
xmlWriterService.writeXMLToJCR(productList, jcrPath, "url");
}
}
}
}
package org.redquark.aem.xmlreader.core.schedulers;
import org.apache.sling.commons.scheduler.ScheduleOptions;
import org.apache.sling.commons.scheduler.Scheduler;
import org.osgi.service.component.annotations.Activate;
import org.osgi.service.component.annotations.Component;
import org.osgi.service.component.annotations.Deactivate;
import org.osgi.service.component.annotations.Modified;
import org.osgi.service.component.annotations.Reference;
import org.osgi.service.metatype.annotations.Designate;
import org.redquark.aem.xmlreader.core.configurations.XMLReaderConfiguration;
import org.redquark.aem.xmlreader.core.models.ProductList;
import org.redquark.aem.xmlreader.core.services.XMLReaderService;
import org.redquark.aem.xmlreader.core.services.XMLWriterService;
import org.slf4j.Logger;
import org.slf4j.LoggerFactory;
/**
* @author Anirudh Sharma
*
*/
@Component(immediate = true, service = Runnable.class)
@Designate(ocd = XMLReaderConfiguration.class)
public class XMLReaderScheduler implements Runnable {
// Logger
private final Logger log = LoggerFactory.getLogger(this.getClass());
// Id of the scheduler based on its name
private int schedulerId;
// Scheduler instance injected
@Reference
private Scheduler scheduler;
// XMLReaderService is injected
@Reference
private XMLReaderService xmlReaderService;
// XMLWriterService is injected
@Reference
private XMLWriterService xmlWriterService;
// Path of the XML file
private String filePath;
// URL of the XML response
private String url;
// Flag to check if the scheduler is enabled
private boolean isEnabled;
// Path where data is to be stored in JCR
private String jcrPath;
/**
* Activate method to initialize stuff
*
* @param xmlReaderConfiguration
*/
@Activate
protected void activate(XMLReaderConfiguration xmlReaderConfiguration) {
schedulerId = xmlReaderConfiguration.name().hashCode();
filePath = xmlReaderConfiguration.xmlFilePath();
url = xmlReaderConfiguration.xmlResponseURL();
isEnabled = xmlReaderConfiguration.enabled();
jcrPath = xmlReaderConfiguration.jcrPath();
}
/**
* Modifies the scheduler id on modification
*
* @param xmlReaderConfiguration
*/
@Modified
protected void modified(XMLReaderConfiguration xmlReaderConfiguration) {
// Removing scheduler
removeScheduler();
// Updating the scheduler id
schedulerId = xmlReaderConfiguration.name().hashCode();
// Again adding the scheduler
addScheduler(xmlReaderConfiguration);
}
/**
* This method deactivates the scheduler and removes it
*
* @param xmlReaderConfiguration
*/
@Deactivate
protected void deactivate(XMLReaderConfiguration xmlReaderConfiguration) {
// Removing the scheduler
removeScheduler();
}
/**
* This method removes the scheduler
*/
private void removeScheduler() {
log.info("Removing scheduler: {}", schedulerId);
// Unscheduling/removing the scheduler
scheduler.unschedule(String.valueOf(schedulerId));
}
/**
* This method adds the scheduler
*
* @param schedulerConfiguration
*/
private void addScheduler(XMLReaderConfiguration xmlReaderConfiguration) {
// Check if the scheduler is enabled
if (isEnabled) {
// Scheduler option takes the cron expression as a parameter and run accordingly
ScheduleOptions scheduleOptions = scheduler.EXPR(xmlReaderConfiguration.cronExpression());
// Adding some parameters
scheduleOptions.name(xmlReaderConfiguration.name());
scheduleOptions.canRunConcurrently(false);
// Scheduling the job
scheduler.schedule(this, scheduleOptions);
log.info("Scheduler added");
} else {
log.info("Scheduler is disabled");
}
}
/**
* Overridden run method to execute Job
*/
@Override
public void run() {
if (isEnabled) {
ProductList productList = null;
// Reads XML data from a file in the system
if (filePath != null && !filePath.isEmpty()) {
productList = xmlReaderService.readXMLFromFile(filePath);
xmlWriterService.writeXMLToJCR(productList, jcrPath, "file");
}
// Reads XML data from a response
if (url != null && !url.isEmpty()) {
productList = xmlReaderService.readXMLFromURL(url);
xmlWriterService.writeXMLToJCR(productList, jcrPath, "url");
}
}
}
}
Inside the run() method which will run based on the value of the cron expression, we are calling XMLReaderService and XMLWriterService to read and write the XML data respectively.
These two services are defined in the following sections.
- XMLReaderService
This service will read the data from both the sources i.e. from the file and the URL. Below is the code for the same -
package org.redquark.aem.xmlreader.core.services.impl;
import java.io.BufferedReader;
import java.io.File;
import java.io.InputStreamReader;
import java.io.StringReader;
import java.net.URL;
import java.net.URLConnection;
import java.nio.charset.Charset;
import javax.xml.bind.JAXBContext;
import javax.xml.bind.JAXBException;
import javax.xml.bind.Unmarshaller;
import org.osgi.service.component.annotations.Component;
import org.redquark.aem.xmlreader.core.models.ProductList;
import org.redquark.aem.xmlreader.core.services.XMLReaderService;
import org.slf4j.Logger;
import org.slf4j.LoggerFactory;
/**
* @author Anirudh Sharma
*/
@Component(immediate = true, service = XMLReaderService.class)
public class XMLReaderServiceImpl implements XMLReaderService {
// Logger
private final Logger log = LoggerFactory.getLogger(this.getClass());
// JAXB instance
private JAXBContext jaxbContext;
// JAXB Unmarshaller
private Unmarshaller unmarshaller;
@Override
public ProductList readXMLFromFile(String filePath) {
ProductList productList = null;
try {
// Creating a file object from the XML file
File file = new File(filePath);
jaxbContext = JAXBContext.newInstance(ProductList.class);
unmarshaller = jaxbContext.createUnmarshaller();
productList = (ProductList) unmarshaller.unmarshal(file);
} catch (Exception e) {
log.error(e.getMessage(), e);
}
return productList;
}
@Override
public ProductList readXMLFromURL(String responseURL) {
URLConnection urlConnection = null;
InputStreamReader inputStreamReader = null;
StringBuilder builder = new StringBuilder();
ProductList productList = null;
try {
URL url = new URL(responseURL);
urlConnection = url.openConnection();
if (urlConnection != null) {
urlConnection.setReadTimeout(30 * 1000);
}
if (urlConnection != null && urlConnection.getInputStream() != null) {
inputStreamReader = new InputStreamReader(urlConnection.getInputStream(), Charset.defaultCharset());
BufferedReader bufferedReader = new BufferedReader(inputStreamReader);
if (bufferedReader != null) {
int eof;
while ((eof = bufferedReader.read()) != -1) {
builder.append((char) eof);
}
bufferedReader.close();
}
}
inputStreamReader.close();
} catch (Exception e) {
log.error(e.getMessage(), e);
}
String xmlResponse = builder.toString();
xmlResponse = xmlResponse.substring(xmlResponse.indexOf("\n") + 1);
try {
jaxbContext = JAXBContext.newInstance(ProductList.class);
unmarshaller = jaxbContext.createUnmarshaller();
productList = (ProductList) unmarshaller.unmarshal(new StringReader(xmlResponse));
} catch (JAXBException e) {
log.info(e.getMessage(), e);
}
return productList;
}
}
Here we have two methods, one for reading data from the file where we using java.io API to read file and JAXB API to convert XML data to our Products model class which is defined below.
In the other method, we are using URLConnection API to read the data from the URL defined above. After reading the data, we are transforming it again into our model classes.
Once the XML data is converted into the model object then it is returned back to the sling scheduler where it is consumed by our XMLWriter service to write data into JCR.
- XMLWriterService
This OSGi gets the transformed object and writes the data present in it to our JCR.
package org.redquark.aem.xmlreader.core.services.impl;
import java.util.HashMap;
import java.util.List;
import java.util.Map;
import javax.jcr.Node;
import javax.jcr.RepositoryException;
import javax.jcr.Session;
import org.apache.sling.api.resource.LoginException;
import org.apache.sling.api.resource.ResourceResolver;
import org.apache.sling.api.resource.ResourceResolverFactory;
import org.osgi.service.component.annotations.Component;
import org.osgi.service.component.annotations.Reference;
import org.redquark.aem.xmlreader.core.models.Product;
import org.redquark.aem.xmlreader.core.models.ProductList;
import org.redquark.aem.xmlreader.core.services.XMLWriterService;
import org.slf4j.Logger;
import org.slf4j.LoggerFactory;
/**
* @author Anirudh Sharma
*/
@Component(immediate = true, service = XMLWriterService.class)
public class XMLWriterServiceImpl implements XMLWriterService {
// Logger
private final Logger log = LoggerFactory.getLogger(this.getClass());
// Injecting ResourceResolverFactory
@Reference
private ResourceResolverFactory resourceResolverFactory;
// JCR session
private Session session;
/**
* This method writes XML data to the JCR repository
*/
@Override
public void writeXMLToJCR(ProductList productList, String jcrPath, String from) {
log.info("Writing XML data to nodes from: {}", from);
try {
// Getting the session
session = getSession();
// Getting root node of the CRX repository
Node root = session.getRootNode();
// Getting the reference of the node under which we need to create our nodes
Node xmlNode = root.getNode(jcrPath);
// Parent node of all the children nodes which are represented by individual
// XML items
Node xmlDataNode = null;
// Checks if the source is from XML file and the node is already present
if (from.equalsIgnoreCase("file") && !xmlNode.hasNode("xml_file_products")) {
xmlDataNode = xmlNode.addNode("xml_file_products", "sling:OrderedFolder");
}
// Checks if the source is from URL and the node is already present
if (from.equalsIgnoreCase("url") && !xmlNode.hasNode("xml_url_products")) {
xmlDataNode = xmlNode.addNode("xml_url_products", "sling:OrderedFolder");
}
// Setting the title of the node
if (xmlDataNode != null) {
xmlDataNode.setProperty("jcr:title", "Products");
} else {
return;
}
// Getting the products from ProductList
List < Product > products = productList.getProduct();
// Iterate for each item present in the XML file
for (Product product: products) {
Node currentNode = null;
if (!xmlDataNode.hasNode("product_" + product.getProductId())) {
currentNode = xmlDataNode.addNode("product_" + product.getProductId(), "nt:unstructured");
} else {
currentNode = xmlDataNode.getNode("product_" + product.getProductId());
}
// Setting properties of the node
currentNode.setProperty("Product_ID", product.getProductId());
currentNode.setProperty("SKU", product.getSku());
currentNode.setProperty("Name", product.getName());
currentNode.setProperty("Product_URL", product.getProductUrl());
currentNode.setProperty("Price", product.getPrice());
currentNode.setProperty("Retail_Price", product.getRetailPrice());
currentNode.setProperty("Thumbnail_URL", product.getThumbnailUrl());
currentNode.setProperty("Search_Keywords", product.getSearchKeywords());
currentNode.setProperty("Description", product.getDescription());
currentNode.setProperty("Category", product.getCategory());
currentNode.setProperty("Category_ID", product.getCategoryId());
currentNode.setProperty("Brand", product.getBrand());
currentNode.setProperty("Child_SKU", product.getChildSku());
currentNode.setProperty("Child_Price", product.getChildPrice());
currentNode.setProperty("Color", product.getColor());
currentNode.setProperty("Color_Family", product.getColorFamily());
currentNode.setProperty("Color_Swatches", product.getColorSwatches());
currentNode.setProperty("Size", product.getSize());
currentNode.setProperty("Shoe_Size", product.getShoeSize());
currentNode.setProperty("Pants_Size", product.getPantsSize());
currentNode.setProperty("Occassion", product.getOccassion());
currentNode.setProperty("Season", product.getSeason());
currentNode.setProperty("Badges", product.getBadges());
currentNode.setProperty("Rating_Avg", product.getRatingAvg());
currentNode.setProperty("Rating_Count", product.getRatingCount());
currentNode.setProperty("Inventory_Count", product.getInventoryCount());
currentNode.setProperty("Date_Created", product.getDateCreated());
}
// Saving the changes to JCR
session.save();
} catch (RepositoryException e) {
log.error(e.getMessage(), e);
}
}
private Session getSession() {
try {
// Map for service user details
Map < String, Object > xmlReaderMap = new HashMap < > ();
xmlReaderMap.put(ResourceResolverFactory.SUBSERVICE, "xmlReaderSubservice");
// Getting ResourceResovler
ResourceResolver resourceResolver = resourceResolverFactory.getServiceResourceResolver(xmlReaderMap);
// Getting the session by adapting the resourceResolver
session = resourceResolver.adaptTo(Session.class);
} catch (LoginException e) {
log.error(e.getMessage(), e);
}
return session;
}
}
- Model classes
Below are our model classes (these classes are based on my datasource - you need to create your model classes as per your datasource). These model classes use @XmlRootElement(name = "Products") and @XmlRootElement(name = "Product") to define the XML tag they are reading.
package org.redquark.aem.xmlreader.core.models;
import java.io.Serializable;
import java.util.List;
import javax.xml.bind.annotation.XmlAccessType;
import javax.xml.bind.annotation.XmlAccessorType;
import javax.xml.bind.annotation.XmlElement;
import javax.xml.bind.annotation.XmlRootElement;
/**
* @author Anirudh Sharma
*
*/
@XmlRootElement(name = "Products")
@XmlAccessorType(XmlAccessType.FIELD)
public class ProductList implements Serializable {
// Generated serialVersionUID
private static final long serialVersionUID = -7423990858185520203 L;
// Instance of one product
@XmlElement(name = "Product")
private List < Product > product;
public ProductList() {
super();
}
/**
* @param product
*/
public ProductList(List < Product > product) {
super();
this.product = product;
}
/**
* @return the product
*/
public List < Product > getProduct() {
return product;
}
/**
* @param product
* the product to set
*/
public void setProduct(List < Product > product) {
this.product = product;
}
/**
* Overridden toString() method
*/
@Override
public String toString() {
return "ProductList [product=" + product + "]";
}
}
============================================
package org.redquark.aem.xmlreader.core.models;
import java.io.Serializable;
import javax.xml.bind.annotation.XmlAccessType;
import javax.xml.bind.annotation.XmlAccessorType;
import javax.xml.bind.annotation.XmlElement;
import javax.xml.bind.annotation.XmlRootElement;
/**
* @author Anirudh Sharma
*
*/
@XmlRootElement(name = "Product")
@XmlAccessorType(XmlAccessType.FIELD)
public class Product implements Serializable {
/**
* Generated serialVersionUID
*/
private static final long serialVersionUID = -2525852165658067914 L;
@XmlElement(name = "Product_ID")
private String productId;
@XmlElement(name = "SKU")
private String sku;
@XmlElement(name = "Name")
private String name;
@XmlElement(name = "Product_URL")
private String productUrl;
@XmlElement(name = "Price")
private double price;
@XmlElement(name = "Retail_Price")
private double retailPrice;
@XmlElement(name = "Thumbnail_URL")
private String thumbnailUrl;
@XmlElement(name = "Search_Keywords")
private String searchKeywords;
@XmlElement(name = "Description")
private String description;
@XmlElement(name = "Category")
private String category;
@XmlElement(name = "Category_ID")
private String categoryId;
@XmlElement(name = "Brand")
private String brand;
@XmlElement(name = "Child_SKU")
private String childSku;
@XmlElement(name = "Child_Price")
private String childPrice;
@XmlElement(name = "Color")
private String color;
@XmlElement(name = "Color_Family")
private String colorFamily;
@XmlElement(name = "Color_Swatches")
private String colorSwatches;
@XmlElement(name = "Size")
private String size;
@XmlElement(name = "Shoe_Size")
private String shoeSize;
@XmlElement(name = "Pants_Size")
private String pantsSize;
@XmlElement(name = "Occassion")
private String occassion;
@XmlElement(name = "Season")
private String season;
@XmlElement(name = "Badges")
private String badges;
@XmlElement(name = "Rating_Avg")
private double ratingAvg;
@XmlElement(name = "Rating_Count")
private int ratingCount;
@XmlElement(name = "Inventory_Count")
private int inventoryCount;
@XmlElement(name = "Date_Created")
private String dateCreated;
/**
* @return the productId
*/
public String getProductId() {
return productId;
}
/**
* @param productId
* the productId to set
*/
public void setProductId(String productId) {
this.productId = productId;
}
/**
* @return the sku
*/
public String getSku() {
return sku;
}
/**
* @param sku
* the sku to set
*/
public void setSku(String sku) {
this.sku = sku;
}
/**
* @return the name
*/
public String getName() {
return name;
}
/**
* @param name
* the name to set
*/
public void setName(String name) {
this.name = name;
}
/**
* @return the productUrl
*/
public String getProductUrl() {
return productUrl;
}
/**
* @param productUrl
* the productUrl to set
*/
public void setProductUrl(String productUrl) {
this.productUrl = productUrl;
}
/**
* @return the price
*/
public double getPrice() {
return price;
}
/**
* @param price
* the price to set
*/
public void setPrice(double price) {
this.price = price;
}
/**
* @return the retailPrice
*/
public double getRetailPrice() {
return retailPrice;
}
/**
* @param retailPrice
* the retailPrice to set
*/
public void setRetailPrice(double retailPrice) {
this.retailPrice = retailPrice;
}
/**
* @return the thumbnailUrl
*/
public String getThumbnailUrl() {
return thumbnailUrl;
}
/**
* @param thumbnailUrl
* the thumbnailUrl to set
*/
public void setThumbnailUrl(String thumbnailUrl) {
this.thumbnailUrl = thumbnailUrl;
}
/**
* @return the searchKeywords
*/
public String getSearchKeywords() {
return searchKeywords;
}
/**
* @param searchKeywords
* the searchKeywords to set
*/
public void setSearchKeywords(String searchKeywords) {
this.searchKeywords = searchKeywords;
}
/**
* @return the description
*/
public String getDescription() {
return description;
}
/**
* @param description
* the description to set
*/
public void setDescription(String description) {
this.description = description;
}
/**
* @return the category
*/
public String getCategory() {
return category;
}
/**
* @param category
* the category to set
*/
public void setCategory(String category) {
this.category = category;
}
/**
* @return the categoryId
*/
public String getCategoryId() {
return categoryId;
}
/**
* @param categoryId
* the categoryId to set
*/
public void setCategoryId(String categoryId) {
this.categoryId = categoryId;
}
/**
* @return the brand
*/
public String getBrand() {
return brand;
}
/**
* @param brand
* the brand to set
*/
public void setBrand(String brand) {
this.brand = brand;
}
/**
* @return the childSku
*/
public String getChildSku() {
return childSku;
}
/**
* @param childSku
* the childSku to set
*/
public void setChildSku(String childSku) {
this.childSku = childSku;
}
/**
* @return the childPrice
*/
public String getChildPrice() {
return childPrice;
}
/**
* @param childPrice
* the childPrice to set
*/
public void setChildPrice(String childPrice) {
this.childPrice = childPrice;
}
/**
* @return the color
*/
public String getColor() {
return color;
}
/**
* @param color
* the color to set
*/
public void setColor(String color) {
this.color = color;
}
/**
* @return the colorFamily
*/
public String getColorFamily() {
return colorFamily;
}
/**
* @param colorFamily
* the colorFamily to set
*/
public void setColorFamily(String colorFamily) {
this.colorFamily = colorFamily;
}
/**
* @return the colorSwatches
*/
public String getColorSwatches() {
return colorSwatches;
}
/**
* @param colorSwatches
* the colorSwatches to set
*/
public void setColorSwatches(String colorSwatches) {
this.colorSwatches = colorSwatches;
}
/**
* @return the size
*/
public String getSize() {
return size;
}
/**
* @param size
* the size to set
*/
public void setSize(String size) {
this.size = size;
}
/**
* @return the shoeSize
*/
public String getShoeSize() {
return shoeSize;
}
/**
* @param shoeSize
* the shoeSize to set
*/
public void setShoeSize(String shoeSize) {
this.shoeSize = shoeSize;
}
/**
* @return the pantsSize
*/
public String getPantsSize() {
return pantsSize;
}
/**
* @param pantsSize
* the pantsSize to set
*/
public void setPantsSize(String pantsSize) {
this.pantsSize = pantsSize;
}
/**
* @return the occassion
*/
public String getOccassion() {
return occassion;
}
/**
* @param occassion
* the occassion to set
*/
public void setOccassion(String occassion) {
this.occassion = occassion;
}
/**
* @return the season
*/
public String getSeason() {
return season;
}
/**
* @param season
* the season to set
*/
public void setSeason(String season) {
this.season = season;
}
/**
* @return the badges
*/
public String getBadges() {
return badges;
}
/**
* @param badges
* the badges to set
*/
public void setBadges(String badges) {
this.badges = badges;
}
/**
* @return the ratingAvg
*/
public double getRatingAvg() {
return ratingAvg;
}
/**
* @param ratingAvg
* the ratingAvg to set
*/
public void setRatingAvg(double ratingAvg) {
this.ratingAvg = ratingAvg;
}
/**
* @return the ratingCount
*/
public int getRatingCount() {
return ratingCount;
}
/**
* @param ratingCount
* the ratingCount to set
*/
public void setRatingCount(int ratingCount) {
this.ratingCount = ratingCount;
}
/**
* @return the inventoryCount
*/
public int getInventoryCount() {
return inventoryCount;
}
/**
* @param inventoryCount
* the inventoryCount to set
*/
public void setInventoryCount(int inventoryCount) {
this.inventoryCount = inventoryCount;
}
/**
* @return the dateCreated
*/
public String getDateCreated() {
return dateCreated;
}
/**
* @param dateCreated
* the dateCreated to set
*/
public void setDateCreated(String dateCreated) {
this.dateCreated = dateCreated;
}
/**
* Overridden toString() method
*/
@Override
public String toString() {
return "Product [productId=" + productId + ", sku=" + sku + ", name=" + name + ", productUrl=" + productUrl +
", price=" + price + ", retailPrice=" + retailPrice + ", thumbnailUrl=" + thumbnailUrl +
", searchKeywords=" + searchKeywords + ", description=" + description + ", category=" + category +
", categoryId=" + categoryId + ", brand=" + brand + ", childSku=" + childSku + ", childPrice=" +
childPrice + ", color=" + color + ", colorFamily=" + colorFamily + ", colorSwatches=" + colorSwatches +
", size=" + size + ", shoeSize=" + shoeSize + ", pantsSize=" + pantsSize + ", occassion=" + occassion +
", season=" + season + ", badges=" + badges + ", ratingAvg=" + ratingAvg + ", ratingCount=" +
ratingCount + ", inventoryCount=" + inventoryCount + ", dateCreated=" + dateCreated + "]";
}
}
Configuring
Now build the maven package and install the bundle in ./system/console in AEM. After doing this -
- Navigate to the ./system/console/configMgr and search for Red Quark XML Reader config. Open it and end the required details (specific to your project) as below
 |
| Red Quark XML Reader |
Here we have put in the cron expression, XML file path, XML URL and the JCR path to store the data. Please note that there is no "/" before content. If you wish to give "/" then you can change the code accordingly in our XMLWriterServiceImpl class.
Also, refer to the article in case you find some difficulty in running the scheduler.
- Now, once the configuration is saved, XML data will be imported in JCR and will look like below
 |
| XML data imported in JCR |
Conclusion
Congratulations!! we have successfully imported XML data into JCR and I hope you enjoyed this post.
You can find the complete code of this project on my GitHub. Feel free to fork or open issues, if any.
By
aem4beginner