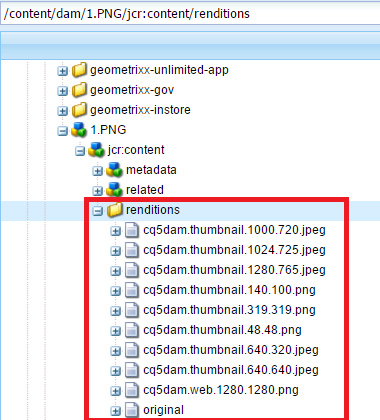
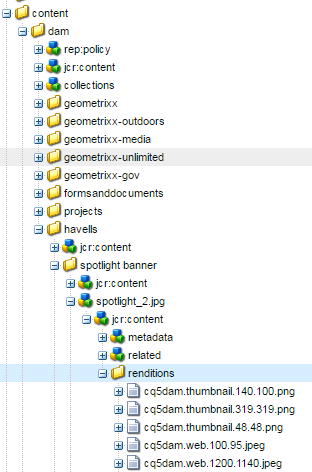
Showing posts with label Image Rendition. Show all posts

May 26, 2020
Estimated Post Reading Time ~

Smart Crop: Intelligent Image Crop in AEM

What makes websites vibrant and attractive across all touchpoints? When your images, videos and other assets are well customized and come together like the pieces of a solved puzzle, your website experience is elevated. Images optimized for all target devices improve the responsiveness of your website. If your site is on AEM, the different image features are automatically handled by AEM DAM. However, the limited image rendition capabilities of DAM might make your image lose its effectiveness on certain devices.

DAM Asset Update Workflow creates only three renditions for uploaded images, which are not always enough in real-life projects where you need banner images, carousel images, card images, thumbnails, etc. This workflow can be updated to include some custom renditions but a lot of effort is required.

Smart Crop helps you improve your image renditions to create responsive designs. It is an intelligent image handling feature in AEM that crops your images while preserving the area of interest.

Avoid Custom Workflow and the Manual Tasks of Creating DAM Image Renditions
We’ve all faced the hassle of using inefficient tools to crop images exactly the way we want. The custom algorithms let you crop only in fixed combinations like from the top left, etc. In the process, your relevant logos, banners and other elements in the background might get cropped. You are left to manually grind for minutes and sometimes hours trying to get the image right for different small-screen devices and card sizes. Even harder if you are working on a bulk quantity.

Smart Crop is a rockstar in such scenarios. This feature lets you easily create custom renditions for image cards or banners by preserving the focal point in the image. Authors can now edit more images quickly without all the hassle of custom workflow steps or tedious manual image adjustments.

So, What’s this Smart Crop Feature?
Smart Crop leverages Adobe Sensei technology to automatically crop the images based on the focal point of the image. For example, if an image has a mountain view and a person, and you want them in your final cropped image. Through this image crop feature, all your renditions will contain the person (or part of the person) and some parts of the mountain depending on the dimension. This feature helps in creating quality experiences for users on all touchpoints. Adobe Sensei automatically judges the image and tries to find points of interest by preserving the important parts of the image. It also enables authors to adjust the smart cropped renditions in place to fit the target devices.

How to use Smart Crop
To smart crop an image, you’ll need to start your AEM instance in Dynamic media scene7 mode.

To know how to start dynamic media in S7 mode, refer to this
The following demonstration is on AEM 6.4 SP3
This image crop feature automatically works from the Scene7 server by delivering the necessary image for the screen size.

To create smart cropped images, you need to create an image profile for Smart Crop.

1. Navigate to Tool > Assets > Image profiles
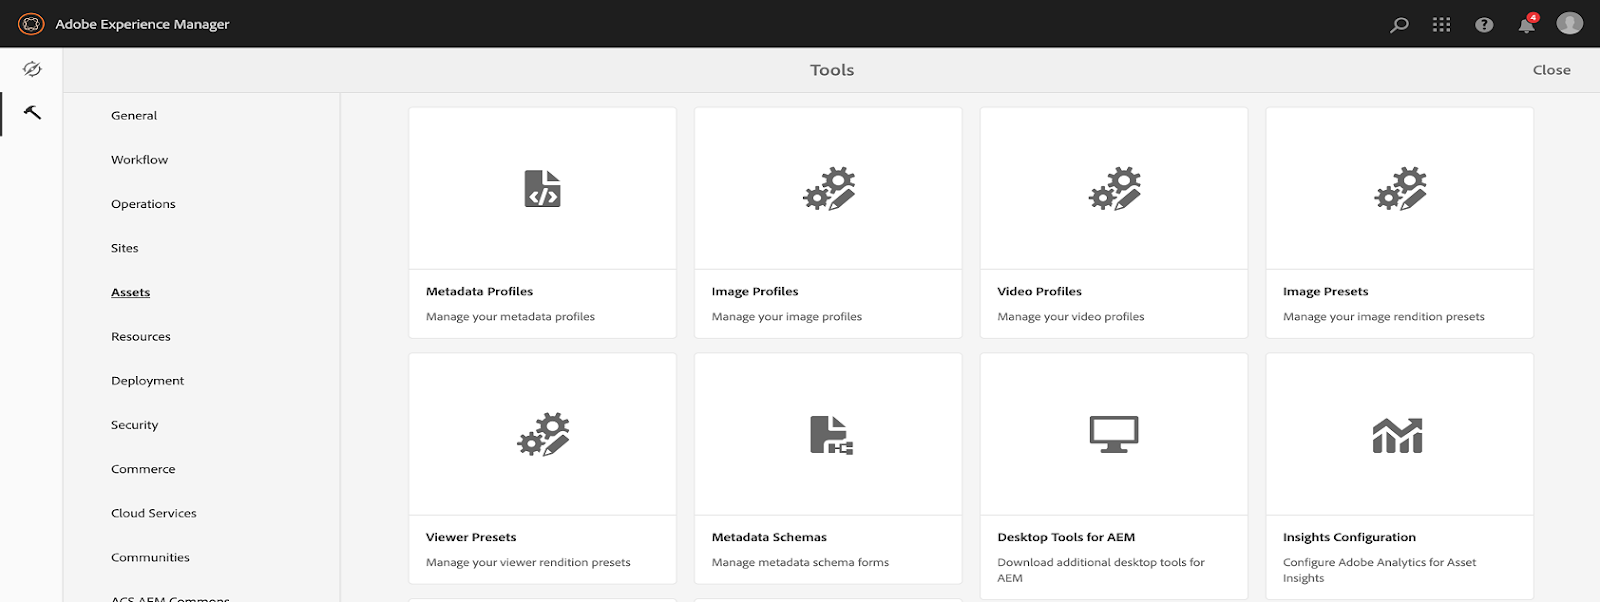
2. Create a new image profile. Select Smart Crop as Type in Cropping Options. By default, it gives the dimensions of large, medium and small sizes.
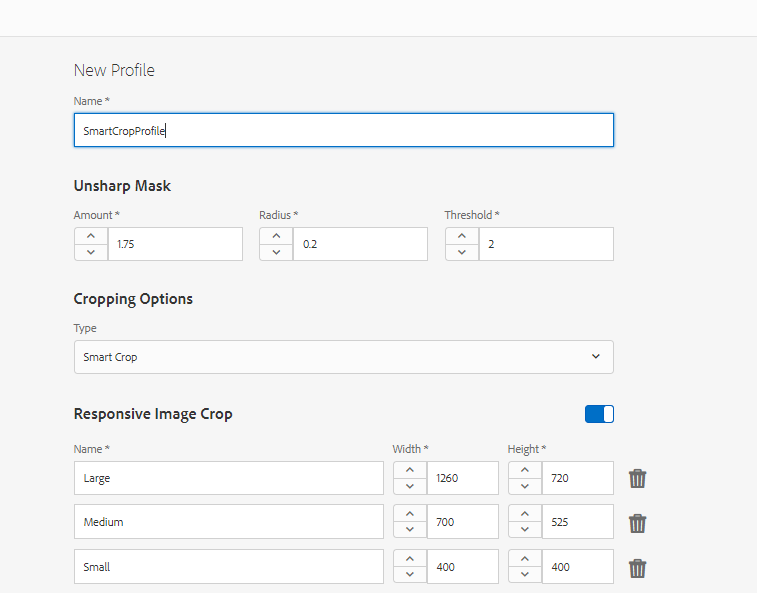

3. You can create a custom responsive image crop by introducing extra-small (for cards) or extra-large image sizes (for banner or carousel images) and provide respective dimensions for them. We can also choose an option for Color and Image Swatch (for products). This automatically detects the prominent color in the image and creates a swatch for the product.
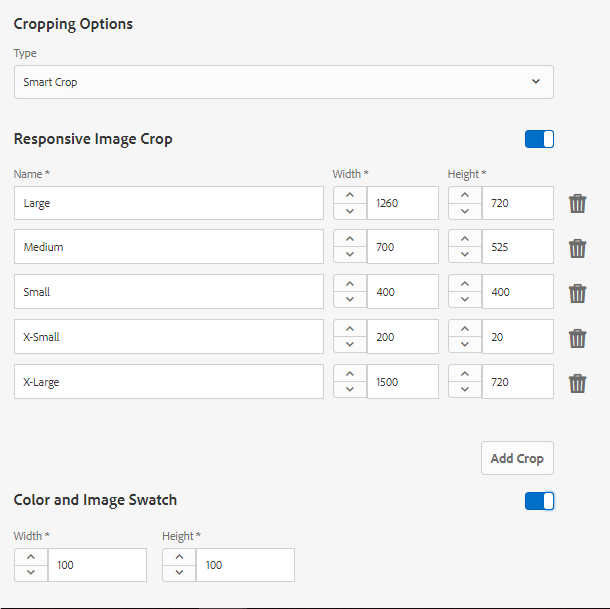

4. After creating the Image Profile, you need to apply this profile to a folder where all the images will be uploaded. Select the Image Profile and click on Apply Processing Profile to folder(s). Select folder(s) and click Apply.
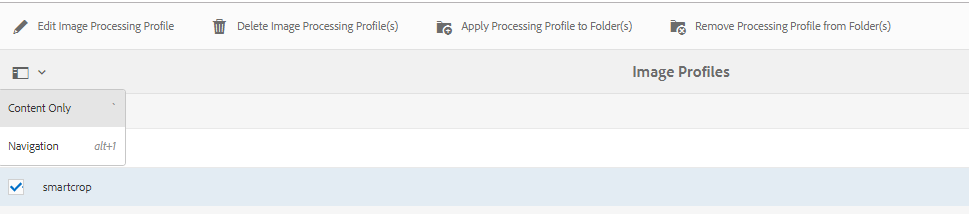
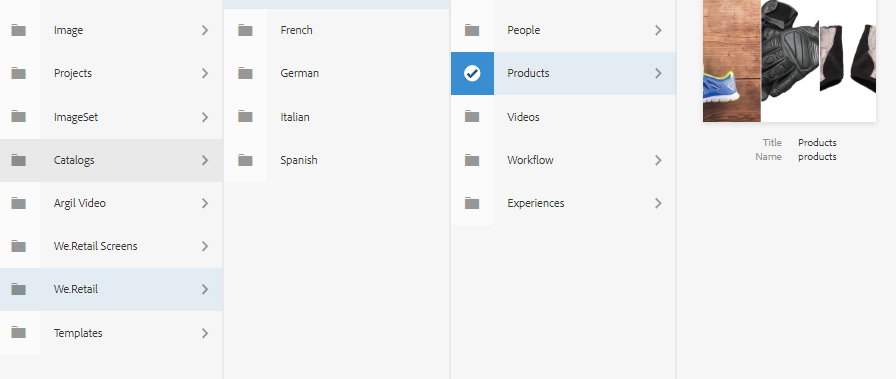


5. The images uploaded in that folder will generate smart crop renditions.
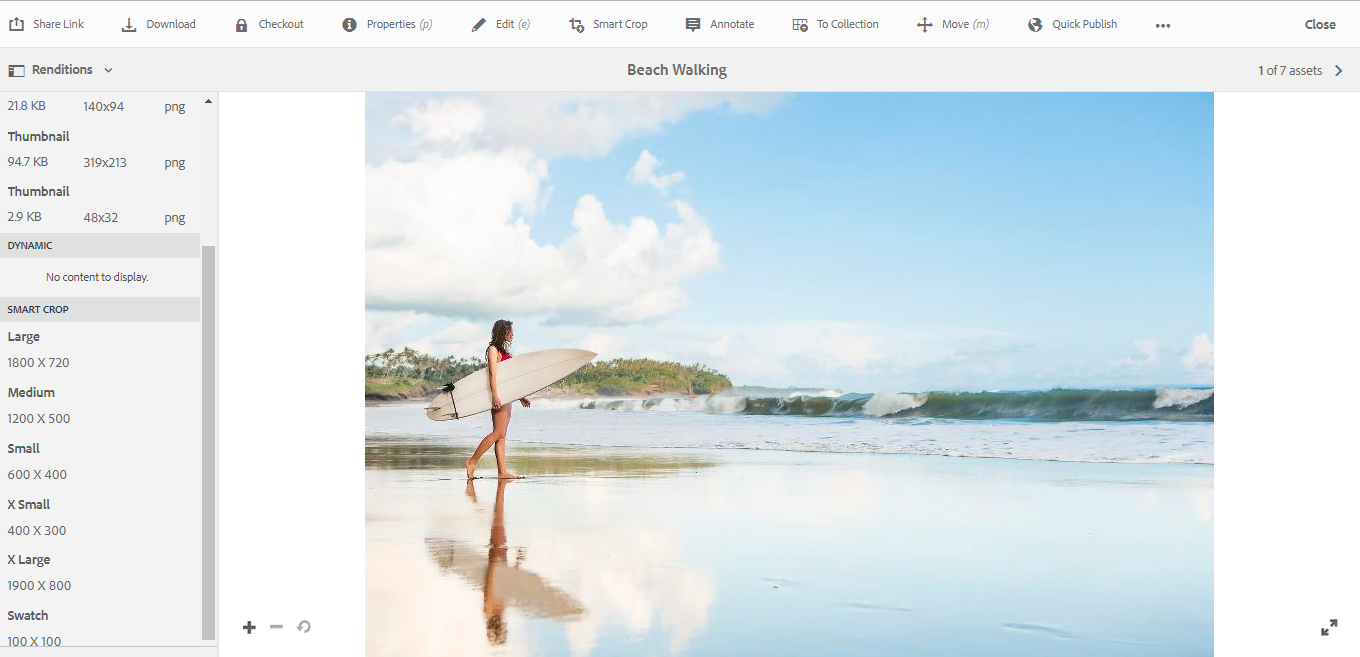

6. Smart Cropped renditions can also be manually adjusted in the editor to further customize the view of the renditions. Click on the Smart Crop option in the menu to open smart crop edits.
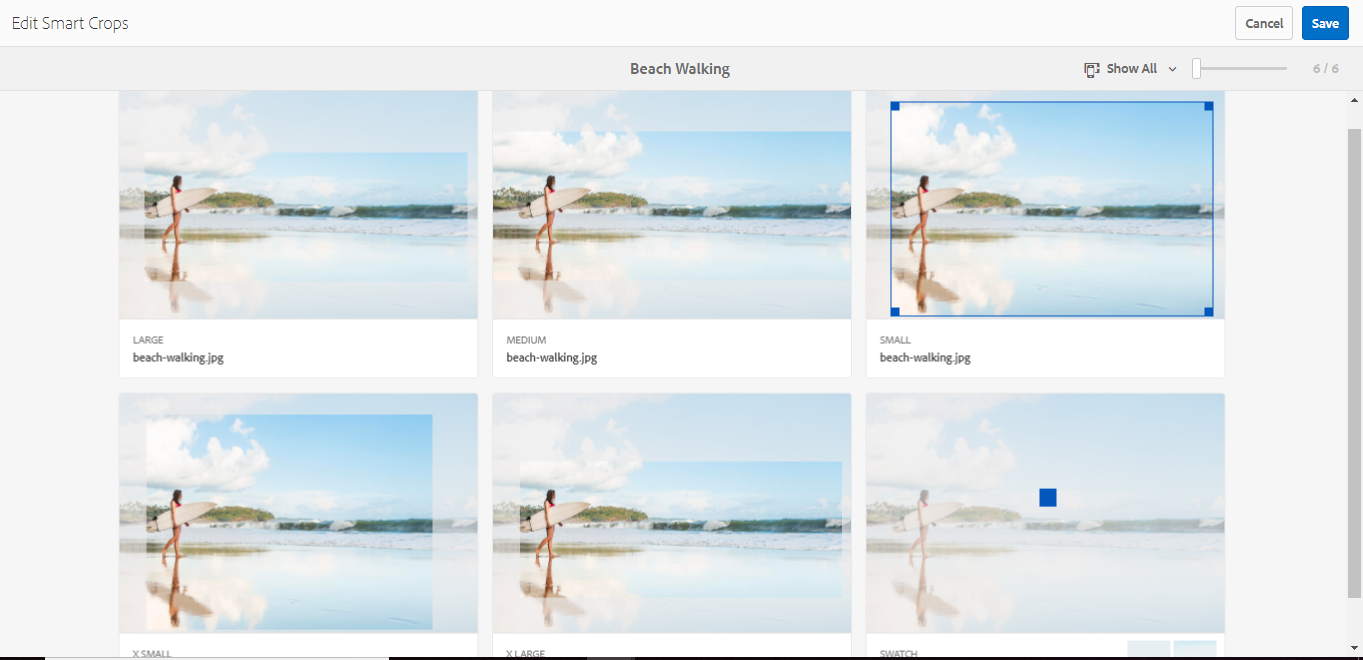

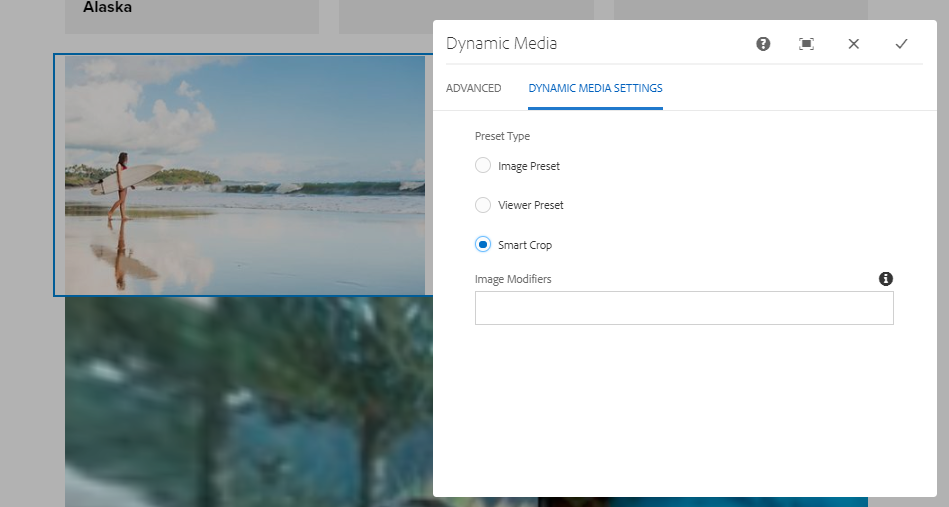
7. You can use these images on the page in the Dynamic Media component from the Dynamic Media group. Drag and drop this component and add the relevant image (with smart cropped renditions) to it. Open the dialog and go to the Dynamic Media Settings tab and choose Smart Crop in Preset Type. You can also add Image Modifiers i.e. extra parameters to be sent to the Scene7 server for some image effects.

How Will Your Organization Benefit from Using this Intelligent Image Crop Feature?
Smart crop can either be applied to a single asset or used for bulk editing of assets in a folder. Authors can customize smart cropped renditions for better coverage of focal points using editing layout.

It can also detect available bandwidth and screen size of the device and can optimize the images for delivery. This can dramatically reduce the size of the file.
Smart cropped images rendered via dynamic media are smooth, with no quality loss, and can drive an enriched user experience with faster loading.
An added advantage of smart cropped images is that they can be used outside AEM as well.

Challenges with Smart Crop
While using the smart crop feature in a few projects, we found it challenging to use this feature in custom components of the project. Use this feature in the dynamic media components for the best results. Design custom components like dynamic media components to use the smart crop feature.

Another pre-requisite for images to be smart cropped is that the original uploaded image should have dimensions greater than as mentioned in the image profile. In other cases, extra white space may be added for fitting the image profile dimensions.

Prospects of Smart Crop
Smart Video Cropping is also being introduced in AEM 6.5 to enable users to create suitable video sizes that fit different devices by keeping the focal point in the frame. Adobe Sensei will automatically track the point-of-interests and crop the images to optimize it for all devices.

So, Adobe Sensei has empowered authors by introducing artificial intelligence and machine learning through Smart Crop to enrich media and content on websites.

Look at other ways to improve your brand digital experience using AEM through integrations like AEM-DTM-Target integration.


By aem4beginner

May 15, 2020
Estimated Post Reading Time ~

Renditions Creation for the Image

In this post, I will explain how to create different types of renditions for the image in Adobe CQ5.

When we upload the images in the DAM, Adobe CQ5 creates the renditions of an image that includes the different sizes of the same image. This can be helpful when we need to create thumbnails or similar views of large or high-resolution images.


If we want to create the renditions according to us than we have to configure the DAM Asset workflow.
For this, We have to go this path:
http://localhost:4502/etc/workflow/models/dam/update_asset.html

At this path, we will see the page like this image-


Now, Go to the edit mode and double click on the thumbnail creation step.

After clicking the thumbnail creation step, We will find a pop up like this:


Now, We have to go on the process tab, in the process tab of the step we can add custom rendition values. After this save the workflow.


Now, while uploading the image, the configured thumbnails will be created.


By aem4beginner

Named Transform Image Servlet (Image Renditions on the Fly)

Purpose:
Many web site designs demands consistency of images based on their use within components. For example, a panoramic spotlight may demand the image be 960 x 400, and bio picture must be 100 x 100 and greyscale.

Some times we have some images on which we can not use image renditions generated by out of the box because of their cropped size. In that case we have to use our different types of dimensions for different types of component.

The ACS AEM Commons Named Transform Image Servlet allows specific image transforms to be defined centrally via OSGI configurations. These image transforms can be easily invoked via parameterized HTTP GET requests to image resources in AEM.

So let see about ACS AEM Commons provided Image Transformers and how to use these transformers and what will the effect of these on images.

Supported “image-y” resources
Almost any “image-like” resource can be requested using the named transform URI parameterization, and the underlying image will be derived and rendered using the transformation parameters.
Pages (cq:Page):
HTTP GET /content/acme/article.transform/feature/image.png
Image component resources:
HTTP GET /content/acme/article/_jcr_content/image.transform/feature/image.png
DAM Assets (dam:Asset):
HTTP GET /content/dam/images/dog.jpg.transform/feature/image.jpg
DAM Asset Renditions”
HTTP GET /content/dam/images/dog.jpg/jcr:content/renditions/thumbnail.jpg.transform/feature/image.jpg
“Raw” Binary Images (nt:file or nt:resource):
HTTP GET /etc/designs/acme/images/cat.png.transform/feature/image.jpg

1. Resize:
Resizes the image to the specified width and/or height.
Name
  • Resize
Params
  • width=[width in px]
  • height=[height in px]Example
Example
  • resize:width=200
  • resize:height=300
  • resize:width=400&height=400
How to use:
Define any number of sling:OsgiConfig’s, each representing a differently named transform

/apps/mysite/config/com.adobe.acs.commons.images.impl.NamedImageTransformerImpl-myTransformName.xml

<?xml version="1.0" encoding="UTF-8"?> <jcr:root xmlns:sling="http://sling.apache.org/jcr/sling/1.0" xmlns:cq="http://www.day.com/jcr/cq/1.0" xmlns:jcr="http://www.jcp.org/jcr/1.0" xmlns:nt="http://www.jcp.org/jcr/nt/1.0" jcr:primaryType="sling:OsgiConfig" name="my-transform" transforms="[resize:width=400&height=400]"/>


Get the URI to a supported resource (see above) to transform
add the .transform extension (append this even if the resource is named with an extension; like a DAM asset)
Add an initial suffix segment that matches your transform name (Ex. /my-transform)
Add a final suffix segment of /image.<image-format-extension> OR /img.<image-format-extension>

Resulting in
<img src=”/content/mysite/article/_jcr_content/image.transform/my-transform/image.png”/>
or
<img src=”/content/dam/images/dog.jpg.transform/my-transform/img.png”/>

The below DAM Asset image has been resizes as defined by the custom defined my-transform transform rule set.

bc http://localhost:4502/content/dam/we-retail/en/activities/hiking/hiking_5.jpg.transform/my-transform/image.jpg

Resized Image


Original Image

2. Bounded Resize (v1.8.0+)
Resizes the image but will not resize past maximum dimension constraints. Accepts two Integer params: height and width. Either width or height will scale to the parameterized limit. The other dimension scale automatically to maintain the original aspect ratio. If the original image is smaller than the configured dimensions the image won’t be resized. Upscale param can be set to true to allow upscaling smaller images.

Name
  • bounded-resize
Params
  • width=[width in px]
  • height=[height in px]
  • upscale=true/false
Example
  • bounded-resize:width=200
  • bounded-resize:height=300
  • bounded-resize:width=400&height=400&upscale=true
How to use:

The below DAM Asset image has been resizing as defined by the custom-defined my-transform-bounded transform rule set.

bc. http://localhost:4502/content/dam/we-retail/en/activities/hiking/hiking_5.jpg.transform/my-transform-bounded/image.jpg


Bounded-resize

3. Crop
Crops the image to the specified bounds.
Name
  • crop
Params
  • bounds=[x,y,width,height]
  • smart=[boolean] Defaults to true. Smart bounding will attempt to shift the specified crop-zone to fit within the image dimensions if the crop-zone falls outside the images dimensions.
Example
  • crop:bounds=0,10,300,350
  • crop:bounds=0,10,300,350&smart=false
  • crop:bounds=25%,0,50%,100%
  • Relative cropping available since v2.8.0/3.4.0
How to use:
The below DAM Asset image has been cropped as defined by the custom defined my-transform-crop transform rule set.

http://localhost:4502/content/dam/we-retail/en/activities/hiking/hiking_5.jpg.transform/my-transform-crop/image.jpg
4. Greyscale
Converts the image to greyscale.

Name
.greyscale

Params
.None

Example
.greyscale
If we want to use all configs in single transform rule than we can use it. config will be like this:


The below DAM Asset image has been resizes, cropped and greyscaled as defined by the custom defined my-transform-all transform rule set.


Note: Order matters when defining your image transformation rules. For example, a resize then crop can yield significantly different results than a crop then resize.


By aem4beginner

May 8, 2020
Estimated Post Reading Time ~

How to Generate Renditions For EPS and AI Files

Below are the steps to generate Thumbnails and Renditions for EPS and AI files.
PreRequisite

AEM requires GhostScript and ImageMagick installed on the server to generate thumbnails and renditions for EPS and AI files. Follow the below url for the installation process.

How-to install FFMPEG, GhostScript, and Imagemagick on AEM Server
Step-by-step guide

Below are the steps to generate Thumbnails and Renditions for EPS and AI files.
  1. Install
  2. AEM Menu > Workflows > Models > DAM Update Asset > Edit
  3. Edit the workflow step “EPS Thumbnails (powered by ImageMagick)”
  4. If you cannot find this, you can add from the sidekick. “DAM Workflow > Command line” and add details as shown in attachment.
  5. Under “Commands” > Add item
  6. For PNG: convert -density 100 ${filename} cq5dam.rendition.png
  7. For JPEG: convert -colorspace RGB -flatten -density 300 ${filename} cq5dam.rendition.jpg
  8. SAVE workflow
  9. Upload any EPS or AI and see under “renditions


By aem4beginner

April 27, 2020
Estimated Post Reading Time ~

Dispatcher caching issue while displaying the image renditions in AEM

We are using the image renditions to display the images for different devices in Adobe Experience Manager(AEM).

The HTML5 Adaptive image is used as shown below to display the images for different devices.

<img src="/content/dam/Albin/Untitled.jpg" srcset="/content/dam/Albin/Untitled.jpg/jcr:content/renditions/cq5dam.thumbnail.319.319.png 1x,/content/dam/Albin/Untitled.jpg" alt="Sample Image">

/content/dam/Albin/Untitled.jpg - Original image
/content/dam/Albin/Untitled.jpg/jcr:content/renditions/cq5dam.thumbnail.319.319.png - Rendition for 1x devices.


If the image is first accessed from the mobile devices then Untitled.jpg folder is created to cache the renditions image(rendition images will be matched for mobile devices) - /content/dam/Albin/Untitled.jpg/jcr:content/renditions/cq5dam.thumbnail.319.319.png

While the image is getting accessed from desktop browsers then the dispatcher will try to return the folder Untitled.jpg as an image(/content/dam/Albin/Untitled.jpg - original image will be matched for desktop browsers) so the image link will be broken in browser.

On the other hand, if the image is first accessed from desktop browser then dispatcher caches Untitled.jpg as image. The subsequent request to the renditions image will not find the images in dispatcher cache so the image will be retrieved from the publisher for rendering(rendition images will not be cached in this scenario as untitled.jpg is created as an image).

Refer the following post To resolve the issue
https://www.albinsblog.com/2015/04/how-to-use-html5-adaptive-image-in-AdobeCQ5.html


By aem4beginner

How to create different renditions for the Image in AEM/Adobe CQ5?

While uploading the images to the DAM, AEM will create renditions of an image that include different sizes of the same image.This can be helpful when we need to create thumbnails or smaller views of large, high-resolution images.


We can configure the DAM Update Asset workflow to create the different renditions.

Login to http://localhost:4502/etc/workflow/models/dam/update_asset.html
In the workflow model select the thumbnail creation step and edit, in the process tab of the step we can add custom rendition values.
Save the workflow


While uploading the images, the configured thumbnails will be created.


By aem4beginner

April 8, 2020
Estimated Post Reading Time ~

Rendition Watermarker

Purpose
This process overlays the named watermark image onto the named rendition in the lower left corner. Currently, only one position is supported (lower left). Future enhancements may include the ability to add custom text (e.g. “Private”), text/image rotation, opacity, flexible image placement (i.e. top-left, bottom-right, top-right, center) and exact placement.

How to Use
Store your watermark file in CQ. This can either be a DAM asset or just an nt:file node.
Update the DAM Update Asset workflow (/etc/workflow/models/dam/update_asset) and add a custom process step at any point after the rendition you want to watermark has been generated.
  • Open the DAM Update Asset workflow
  • Insert a new Process step, Workflow/Process Step

Edit the Process Step
  • Title: Add watermark to image
  • On the Process tab, select “Add Watermark to Rendition” from the Process drop down.

3. Check the Handler Advance option
4. Two arguments are required
  • renditionName: The name of the rendition to modify, e.g. “cq5dam.web.1280.1280”
  • watermark: The repository path of the watermark. If this is a simple nt:file node, it is just the path to the node. If it is a DAM asset, it is the path to the original rendition, e.g. /content/dam/geometrixx/icons/target.png/jcr:content/renditions/original.

  • Click OK and then “Save” the workflow.
A full configuration example might have all the following:
watermark:/content/dam/geometrixx/icons/draft.png/jcr:content/renditions/original,renditionName:cq5dam.web.1280.1280

This places the draft.png image in the lower left of the 1280x1280 rendition of any image file loaded into the DAM.


By aem4beginner

April 3, 2020
Estimated Post Reading Time ~

Servlet to remove renditions at certain path in CQ5

You see a lot of space is being taken by dam assets that are uploaded on a daily basis and want to claim some of that disk space. This need can arrive when the authors of your system do not care about renditions other than the original one they submitted. So, how would you remove the renditions other than the original one?

Here is the servlet code to do the same. The code written below expects a path like /content/dam -> don’t give such a path because all your renditions might get removed. Concentrate on blocks where a large number of images are submitted and give them as paths. I am using QueryBuilder API to search for the rendition folder and then I iterate over each node and remove them and finally, I save the session and phew!! all the renditions other than original ones are deleted.

An example URI to run the sample code below will be like this.
http://localhost:4502/bin/removerenditions?path=/content/dam/yourpath

@SlingServlet(paths = "/bin/removerenditions", metatype = true, methods = {

 "GET",
 "POST"
})
public class RemoveRenditionServlet extends AbstractPredicateServlet {
 private Session session;
 @Reference
 private QueryBuilder builder;
 public void doGet(final SlingHttpServletRequest slingHTTPrequest, final SlingHttpServletResponse response) throws IOException {
  try {
   ResourceResolver resourceResolver = slingHTTPrequest.getResourceResolver();
   String path = slingHTTPrequest.getParameter("path");
   session = resourceResolver.adaptTo(Session.class);
   Map < String, String > map = new HashMap < String, String > ();
   map.put("path", path);
   map.put("property", "jcr:primaryType");
   map.put("property.1_value", "nt:folder");
   Query query = builder.createQuery(PredicateGroup.create(map), session);
   SearchResult result = query.getResult();
   List < Hit > hits = result.getHits();
   for (Hit hit: hits) {
    Resource renditionResource = resourceResolver.resolve(hit.getPath());
    Iterator < Resource > reneditionIterator = renditionResource.listChildren();
    while (reneditionIterator.hasNext()) {
     Resource specificResource = reneditionIterator.next();
     Node renditionNode = specificResource.adaptTo(Node.class);
     if (!renditionNode.getName().equals("original")) {
      renditionNode.remove();
     }
    }
   }
   session.save();
   session.logout();
  } catch (Exception e) {
   e.printStackTrace();
  }
 }
}

Reference: https://cqwemblog.wordpress.com/2013/12/07/servlet-to-remove-rendition-at-certain-path-in-cq5/


By aem4beginner

April 2, 2020
Estimated Post Reading Time ~

Which one of the thumbnail renditions does content finder image utilizes?

The out of the box default image content finder has two views. Namely,
  • Mosaic View: Uses the rendition 100*140
  • List View: Uses 48*48 renditionTo display custom renditions define your own lens OR modify ContentFinderTab by overlaying. 

Example of the Mosaic view attached in the screenshot to change the methods to use particular rendition.


/libs/cq/ui/widgets/source/widgets/wcm/ContentFinderTab.js


By aem4beginner

March 30, 2020
Estimated Post Reading Time ~

Image Rendition with Cropping in AEM 6.2

"DAM Update Asset" is a default workflow that is triggered whenever any asset is uploaded into the DAM. This workflow helps to limit the size and quality of the image displayed.

Why Image Renditions are required:
  • Using different size images on the websites.
  • Images for different devices or viewPort.
  • Reducing the page load time. Existing Workflow Scenario:
Steps to create Custom Rendition:
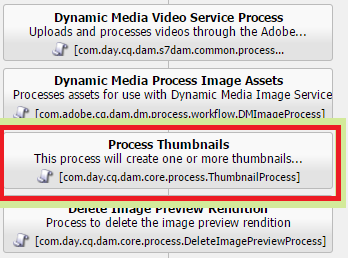
  • Go to the "DAM update asset" workflow
  • Select "Process Thumbnails" Step.

Fig- Select and edit the Process Thumbnail Step

Add custom renditions as per your requirements

Fig - Add the Size of Rendition in Thumbnail Multifield

Cropping: In the existing “DAM Update Asset” workflow image renditions are getting generated for different resolutions by resizing the images, but here cropping for the assets is not happening. However the need was to crop the image uniformly(top, bottom, left, right).

To achieve this, follow the below steps:
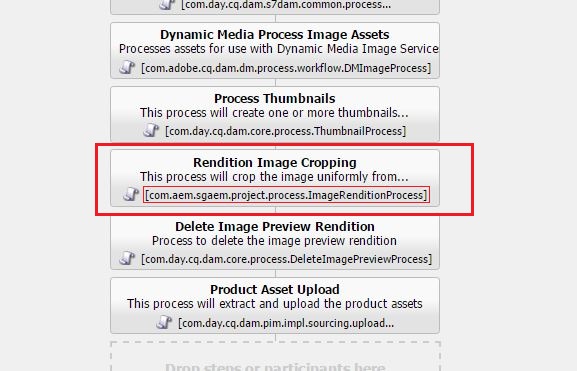
  • Add Custom process(Rendition Image Cropping) step after “Process Thumbnail”.
  • Edit the Rendition Image Cropping process step.
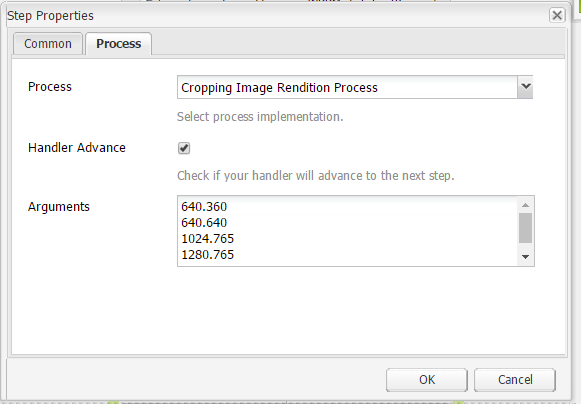
  • Select the Process Tab.
  • Add the Workflow Process (Image Rendition Cropping Workflow Process).

Fig- Add the New Process Step and Select the

Custom Image Rendition Workflow process in the Process Tab

In the Process, tab Configure the rendition size in the Arguments field.

Fig- Configure The rendition size in the Arguments Section

Arguments: The custom workflow takes the arguments as input, fetch the original image size and crop the image from top, bottom, left and right.
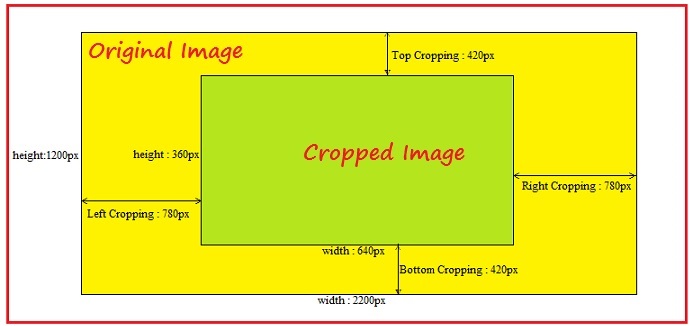
Example: Let’s suppose the original size of the image is "2200*1200" and the required image size is "640*360".
  • Reduce the image from left and right equally ( 780px) to make the width as 640.
  • Reduce the image from top and bottom equally ( 420px) to make the height as 320.

Fig- Sample Image showing the cropping concept

Check the below code for Image Rendition Process:

package com.aem.sgaem.project.process;

import com.adobe.granite.workflow.WorkflowSession;
import com.adobe.granite.workflow.exec.WorkItem;
import com.adobe.granite.workflow.exec.WorkflowProcess;
import com.adobe.granite.workflow.metadata.MetaDataMap;
import com.aem.sgaem.project.services.ResourceResolverUtil;
import com.aem.sgaem.project.utils.StringUtil;
import com.day.cq.commons.ImageHelper;
import com.day.image.Layer;
import java.awt.Rectangle;
import java.util.List;
import javax.jcr.Node;
import org.apache.felix.scr.annotations.Component;
import org.apache.felix.scr.annotations.Property;
import org.apache.felix.scr.annotations.Reference;
import org.apache.felix.scr.annotations.Service;
import org.apache.sling.api.resource.Resource;
import org.apache.sling.api.resource.ResourceResolver;
import org.slf4j.Logger;
import org.slf4j.LoggerFactory;

@Component(immediate = true, enabled = true, metatype = true)
@Service(value = WorkflowProcess.class)
@Property(name = "process.label", value = "Cropping Image Rendition Process", propertyPrivate = true)
public class ImageRenditionProcess implements WorkflowProcess {

private static final String PROCESS_ARGS = "PROCESS_ARGS";
private static final String EMPTY = "";
private static final String JCR_CONTENT = "/jcr:content";
private static final String CQ5_DAM_THUMBNAIL = "cq5dam.thumbnail.";
private static final String JPEG_EXTENSION = ".jpeg";
private static final String JPEG_MIME_TYPE = "image/jpeg";
private final Logger LOGGER = LoggerFactory.getLogger(ImageRenditionProcess.class);

@Reference
private ResourceResolverUtil resourceResolverUtil;

private int requiredWidth;
private int requiredHeight;
private int originalWidth;
private int originalHeight;
private int cropWidth;
private int cropHeight;

/* This execute method crop the images as per the workflow Arguments */

public void execute(WorkItem workItem, WorkflowSession workflowSession, MetaDataMap metaDataMap) {

LOGGER.debug("START OF execute METHOD");
ResourceResolver resourceResolver = resourceResolverUtil.getResourceResolver();
String payload = workItem.getWorkflowData().getPayload().toString();
String processArgument = metaDataMap.get(PROCESS_ARGS, EMPTY);
Resource dataResource = resourceResolver.getResource(payload + JCR_CONTENT);

if (dataResource != null) {

Resource parentOfParentRes = getExactParent(dataResource, 2);
if (parentOfParentRes != null) {
Node node = parentOfParentRes.adaptTo(Node.class);
if (node != null) {
Double quality = 90.0;
try {
if (!EMPTY.equals(processArgument)) {
List<String> args = StringUtil.splitWithNewLine(processArgument);
for (String arg : args) {
Layer originalLayer = ImageHelper.createLayer(dataResource);
ImageHelper.saveLayer(getLayer(originalLayer, payload, arg), JPEG_MIME_TYPE,
quality, node, CQ5_DAM_THUMBNAIL + arg + JPEG_EXTENSION, true);
}
}
} catch (Exception exception) {
LOGGER.error(exception.getCause().toString());
} finally {
resourceResolverUtil.closeResourceResolver(resourceResolver);
}
}
}
}

LOGGER.debug("END OF execute METHOD");
}

private Layer getLayer(Layer layer, String payload, String size) {

LOGGER.debug("START OF getLayer METHOD");
String[] splitSize = size.split("\\.");
requiredWidth = (EMPTY).equals(splitSize[0]) ? 0 : Integer.parseInt(splitSize[0]);
requiredHeight = (EMPTY).equals(splitSize[1]) ? 0 : Integer.parseInt(splitSize[1]);
originalWidth = layer.getWidth();
originalHeight = layer.getHeight();
requiredWidth = originalWidth > requiredWidth ? requiredWidth : originalWidth;
requiredHeight = originalHeight > requiredHeight ? requiredHeight : originalHeight;
cropWidth = originalWidth > requiredWidth ? (originalWidth - requiredWidth) / 2 : 0;
cropHeight = originalHeight > requiredHeight ? (originalHeight - requiredHeight) / 2 : 0;
if (originalWidth > requiredWidth || originalHeight > requiredHeight) {
layer = cropImage(layer, payload);
}
LOGGER.debug("END OF getLayer METHOD");
return layer;
}

private Layer cropImage(Layer layer, String payload) {

LOGGER.debug("START OF cropImage METHOD");
String rectCSV = "0,0," + (requiredWidth + cropWidth) + "," + (requiredHeight + cropHeight);
Rectangle rect = ImageHelper.getCropRect(rectCSV, payload);
layer.crop(rect);
layer.rotate(180.00);
rectCSV = "0,0," + requiredWidth + "," + requiredHeight;
rect = ImageHelper.getCropRect(rectCSV, payload);
layer.crop(rect);
layer.rotate(180.00);
LOGGER.debug("END OF cropImage METHOD");
return layer;
}

private Resource getExactParent(Resource resource, int level) {
for (int i = 0; i < level; i++) {
resource = resource.getParent();
}
return resource;
}
}

You can see all the renditions like this:

Fig - Renditions Created Under Dam Hierarchy


By aem4beginner