Showing posts with label Assets/DAM. Show all posts

January 2, 2021
Estimated Post Reading Time ~

Creating a Taxonomy

Taxonomy is a categorization framework used to identify or tag content. It sets the foundation for classification using a controlled vocabulary which leads to better findability and easier information management. A taxonomy should be agreed upon by business and content owners, and flexible enough to respond to changing business needs.

Using the Taxonomy Features in AEM Assets

Let’s get nomenclature out of the way. In AEM, taxonomy is referred to as “tagging” or “tags.” And a top-level set of tags is referred to as a “namespace.” These tags can be applied as metadata on an asset or page. In AEM, you can manage tags here: /libs/cq/tagging/gui/content/tags.html/etc/tags

For help on using tags in AEM, see: https://helpx.adobe.com/experience-manager/6-3/sites/authoring/using/tags.html

For help on administering tags in AEM, see: https://helpx.adobe.com/experience-manager/6-3/sites/administering/using/tags.html

Tips for Assembling a Taxonomy
Tip #1: Taxonomies are both internal-facing and external facing. To assemble a list of namespaces, think about how the organization classifies the documents or assets that will be stored in the DAM. Categories like Fund Type, Region, or Audience might be appropriate for a financial institution. Whereas for a manufacturer, Brand, Product Family, and Year are typical.

Tip #2: Facets enable the categorization of nested, independent categories, allowing the author to narrow the choices, making it easier to navigate the taxonomy tree. It’s likely the organization already has a hierarchy of products, for instance, that can be adopted as nested facets in a namespace, so be sure to look internally first, especially with the marketing department.

Tip #3: When identifying metadata, look for patterns that might be better represented as taxonomy. This also reduces the number of metadata fields and can lead to better identification of content.

More Perficient posts about taxonomy:


By aem4beginner

Understanding AEM Metadata Schemas

Metadata is defined as data that provides information about other data. In AEM, metadata is used to describe assets and content for information purposes, findability, and delivery. Simple examples might be the title of a photograph, shot date, and photographer.

AEM allows the grouping of metadata using Metadata Schemas. These schemas can be applied at the folder level, allowing a large amount of control over the metadata captured (or required) on specific groups of assets. See also 5 Tips for Creating a Unified Folder Structure.

But with control comes responsibility. When creating an enterprise asset management system from scratch, especially where there has never been one in the organization, there can be a tendency to go overboard on metadata collection. A grandiose vision often follows with schemas so large and complex that management becomes a chore and impedes the ability of asset curators to efficiently perform their duties.

Tips for Creating Metadata Schemas
Keep it simple. Here are some tips that will help you create metadata schemas that are descriptive, but simple to manage.

Tip #1 – When gathering the business required metadata to build a schema, brainstorm, and try to capture everything, then try to de-duplicate and reduce the list to the minimum required. Look at sample schemas to get an idea of what others use.

Tip #2 – Try to match the business required metadata to existing IPTC properties, existing AEM properties, and use tags as much as possible for data that fits into a controlled list. See Creating a Taxonomy.

Tip #3 – Try to keep mandatory metadata properties to a minimum, and on a single tab if possible. This will make data entry faster for the asset curator, but still, capture the minimum metadata needed to complete asset ingestion.

What is IPTC and XMP?

IPTC Core in Adobe Bridge

In the 1990s the International Press Telecommunications Council (IPTC) created a common set of metadata attributes known as the Information Interchange Model (IIM). While IIM has largely been superseded by the Extensible Markup Platform (XMP), Adobe’s standardized approach to metadata, XMP includes the IPTC Core schema and is understood by most imaging software, including Adobe Bridge and Adobe Photoshop.

Prior to AEM 6.3, displaying most IPTC metadata in AEM required manually creating metadata schemas. However, in 6.3, Adobe introduced two new schemas to handle IPTC out-of-the-box. In general, it’s a good idea to understand what is available and not re-create elements from scratch in other custom metadata models.

IPTC Core in AEM

What is the Dublin Core?
If you look at an asset’s raw metadata fields in AEM using CRXDE, you will notice many starts with the dc or the Dublin Core namespace. The Dublin Core Schema is a set of standardized metadata elements that have also been adopted by XMP.


Helpful Links
Here are a few helpful links that give more background on metadata. Study them before your next project!
AEM Metadata: https://helpx.adobe.com/experience-manager/6-3/assets/using/metadata.html
AEM Metadata Schemas: https://helpx.adobe.com/experience-manager/6-3/assets/using/metadata-schemas.html
XMP: https://www.adobe.com/products/xmp.html
IPTC Standards: https://iptc.org/standards/
Dublin Core: http://dublincore.org/


By aem4beginner

December 30, 2020
Estimated Post Reading Time ~

AEM search function 6.5

In 6.5 tagged an asset and then I tried to go to the site's console and search for a particular term. I presume this Omnisearch from the sites console should automatically also bring up tagged assets as well as pages?

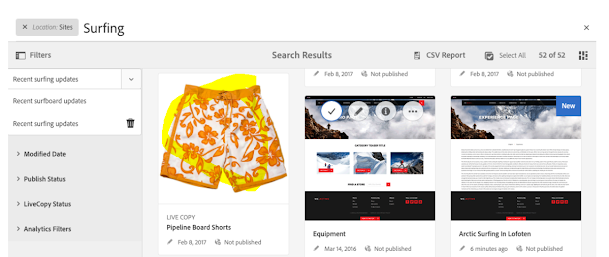
Right now only bringing up pages and no tagged assets. Is there some extra development we need to do? At the bottom of this document https://docs.adobe.com/help/en/experience-manager-65/authoring/essentials/search.html, there is a pipeline board shorts assets that came up. So I wondered why ours isn't bringing up the assets as well.

Solution:
Firstly about the screenshot you have attached. In the screenshot, the "Pipeline Board shorts" card you see is not an asset but a live copy which is also a page.

If you just want to search by term and search all assets and pages, you can try this.

1. Go to sites and select filters, it will open up the search bar like this:


2. Now remove the "Location:Sites" filter from the search bar, the screen will appear like this:


3. Now whatever search you will enter here will bring you both assets and pages


You can get a list of assets and pages tagged with a particular tag in a classic way:

1. Go to http://localhost:4502/tagging

2. Go to the tag and right-click on it


3. Select the list option and it will show you all the pages/assets tagged with this particular tag.


By aem4beginner

December 28, 2020
Estimated Post Reading Time ~

How to Serve Static Assets in AEM as Client Library Resources

This article provides step by step instructions on how to create a client library, to only serve structural static assets as client library resources. Resources from this article will build upon the latest maven AEM Project Archetype, and the instructions below will demo the configuration setup within the code.

Instructions
1. Create a cq:ClientLibraryFolder node
JCR Path: /apps/sourcedcode/clientlibs/cllienlib-site
Separate code from content and configuration to maximize project file organization and separation of concerns, Adobe recommends to place client libraries under /apps and expose these client libraries via the path, /etc.clientlibs, by leveraging the allowProxy property.

<?xml version="1.0" encoding="UTF-8"?>
<jcr:root xmlns:cq="http://www.day.com/jcr/cq/1.0" xmlns:jcr="http://www.jcp.org/jcr/1.0"
jcr:primaryType="cq:ClientLibraryFolder"
allowProxy="{Boolean}true"
categories="sourcedcode.site"/>


When allowedProxy is enabled, we instead of accessing the client library from /apps/sourcedcode/clientlibs/cllienlib-site, we can access the cliebt library from the proxy servlet via /etc.clientlibs/sourcedcode/clientlibs/cllienlib-site.

2. Create an nt:folder node named “resources”
JCR Path: /apps/sourcedcode/clientlibs/cllienlib-site/resources
By convention, the client library “resource” folder is named as “resources”; naming is very important if structural static assets are planned to be served from a client library. This setup allows structural static assets to be accessed via the proxy.
Example: /etc.clientlibs/sourcedcode/clientlibs/cllienlib-site/resources/tick.svg


3. Place the assets under the “resources” folder
In this example, we will only insert one asset image, tick.svg.
JCR Path: /apps/sourcedcode/clientlibs/cllienlib-site/resources/tick.svg


4. Build and Upload into AEM
This default maven profile should be a part of the maven AEM Project Archetype.

mvn clean install -PautoInstallPackage -Padobe-public


Results: Review the JCR
A successful project builds and deployment should make JCR node resources available in the AEM environment.


Results: Access the Asset(s)
The images can be resolvable via the proxy servlet, replacing /apps with /etc.clientlibs.
Visit: http://localhost:4502/etc.clientlibs/sourcedcode/clientlibs/cllienlib-site/resources/tick.svg


By aem4beginner

Strategy to Consider when Migrating a Large Amount of Assets into an AEM author Instance

One of my biggest strategies to consider when migrating a large number of assets to production live AEM author instance is to enable/disable the workflow launchers.

Every time when a new asset is installed (via the package manager) or uploaded into AEM, the OOTB (out of the box) AEM workflow launchers will be triggered. During the operation/processing of these assets, the author instance will start consuming the CPU, and the environment may be slowed down, depending on the number of assets being processed at the time.

Since all your assets have already been processed by another AEM author environment, it would not make sense for each asset to again be processed; this will be a waste of usage of the CPU.

I am recommending that if a large amount of AEM DAM assets (that already been processed, zipped in a content package) are being installed via package manager into a production live environment, to inform or disable all authors to stop authoring within a time frame. Within the time frame, disable the workflow launchers and install the assets into the production AEM instance. Finally, re-enable the workflow launchers after all assets have been successfully installed.


By aem4beginner

December 10, 2020
Estimated Post Reading Time ~

AEM Asset Reports

With AEM Assets, you can generate a variety of reports around your digital assets. Standard reports available:
  • Upload
  • Download
  • Expiration
  • Modification
  • Publish
  • Brand Portal publish
  • Disk Usage
  • Files
  • Link Share
Generating Reports:
  • Details on how to generate reports are available at link
  • User could also add additional columns to report as described at link
  • When a report is generated, you are notified through an email (optional) and an inbox notification. You can view, download, or delete a report from the report listing page, where all previously generated reports are displayed.
Note: you would need an OSGi configuration to generate asset download report. All other reports would work OOTB.

Generate asset download report:
Before you can generate an Asset Downloaded report, ensure that the Asset Download service is enabled.
  • From the web console (http://%5Bserver name]:[port name]/system/console/configMgr), open the Day CQ DAM Event Recorder configuration:
  • Select the Asset Downloaded (DOWNLOADED)option in Event Types if not already selected. Uncheck all other event types if selected.
  • Select “Enables this service”. Save the configuration.
  • Assets downloaded henceforth will be captured in reports.


What asset download reports captures?
  • Assets downloaded from AEM Assets UI
  • Assets downloaded from shared Asset link
It does not capture folder download from AEM Assets UI.

Note: OOTB “Day CQ DAM Event Recorder” is not configured. You could verify this via “Enables this service” parameter of the service configuration. Thus, any pre-selected Event types would not have any effect.

ACLs required to enable Reports:
Out-of-the-box, only administrators are allowed to access reports. To enable reports for other users you would need following ACLs.

1. To access report list page
  • path: /libs/dam/gui/content/reports
  • permission: allow
  • actions: read
2. To get report tile in tools menu
  • path: /libs/dam/gui/content/nav/tools/assets/assetreports
  • permission: allow
  • actions: read
3. To view asset link share reports
  • path: /var/dam
  • permission: allow
  • actions: read
4. To read/view/delete existing reports and create new reports
  • path: /var/dam/reports
  • permission: allow
  • actions: modify, create, delete
5. For creating new reports
  • path: /libs/dam/gui/content/reports/generatereport
  • permission: allow
  • actions: read
Performance considerations
  • Configure the DAM Report Purge service as described on link
  • Enabling the Day CQ DAM Event Recorder and DAM Event Purge services increases write operations to JCR and search indexing, which significantly increases the load on the AEM server (example when doing bulk import). The additional load on the AEM server can impact its performance.
  • With the fine-tuning that the “Day CQ DAM Event Recorder” configuration provides (example for enabling download report), there are few additional configurations needed to minimise performance impact.
  • Configure only the necessary event types: Specially, enabling the Asset viewed, Projects viewed, and Collections viewed options, significantly increases the number of recorded events. Thus, if you are configuring the “Day CQ DAM Event Recorder” for download reports, then assure all other event types are unselected.
  • Schedule DAM Event Purge Service frequency based on the server load. This would purge the download events recorded in user activties.


By aem4beginner

Asset upload restrictions

You can configure Adobe Experience Manager Assets to restrict the type of assets that users can upload. It helps you:
eliminate the possibility of users uploading assets in an undesired format
restrict upload of any malicious files.

To restrict the upload, configure “Day CQ DAM Asset Upload Restriction” as described on link


Once the configuration is done, you can test the files by uploading them to AEM. For restricted files, you would receive error message similar to the image attached below:


What to do if AEM does not allow upload of an unrestricted asset?
This can be case where AEM is unable to determine dc:format property for the asset. For example: OOTB AEM is unable to determine dc:format for .pam files.

You can verify the same by uploading the asset after selecting “Allow all MIME” config in “Day CQ DAM Asset Upload Restriction“. The dc:format might not be available on jcr:content/metadata node.

To fix this, we need to enable “Day CQ DAM Mime Type Service“.


Once the Mime Type Service is enabled, perform following steps to verify the upload restrictions:
Configure “Day CQ DAM Asset Upload Restriction“. Deselect “Allow all MIME”
Upload the unrestricted asset, that you were unable to upload earlier.

You should now be able to upload the asset. In CRXDE, you would find dc:format property in the jcr:content/metadata node of the asset.

Note: MIME type detection using the Apache Tika library is a resource-intensive operation. Reference link


By aem4beginner

November 6, 2020
Estimated Post Reading Time ~

Forcing the use of the DAM for images by closing loopholes - AEM

How to prevent users from uploading images to AEM without passing through the DAM.
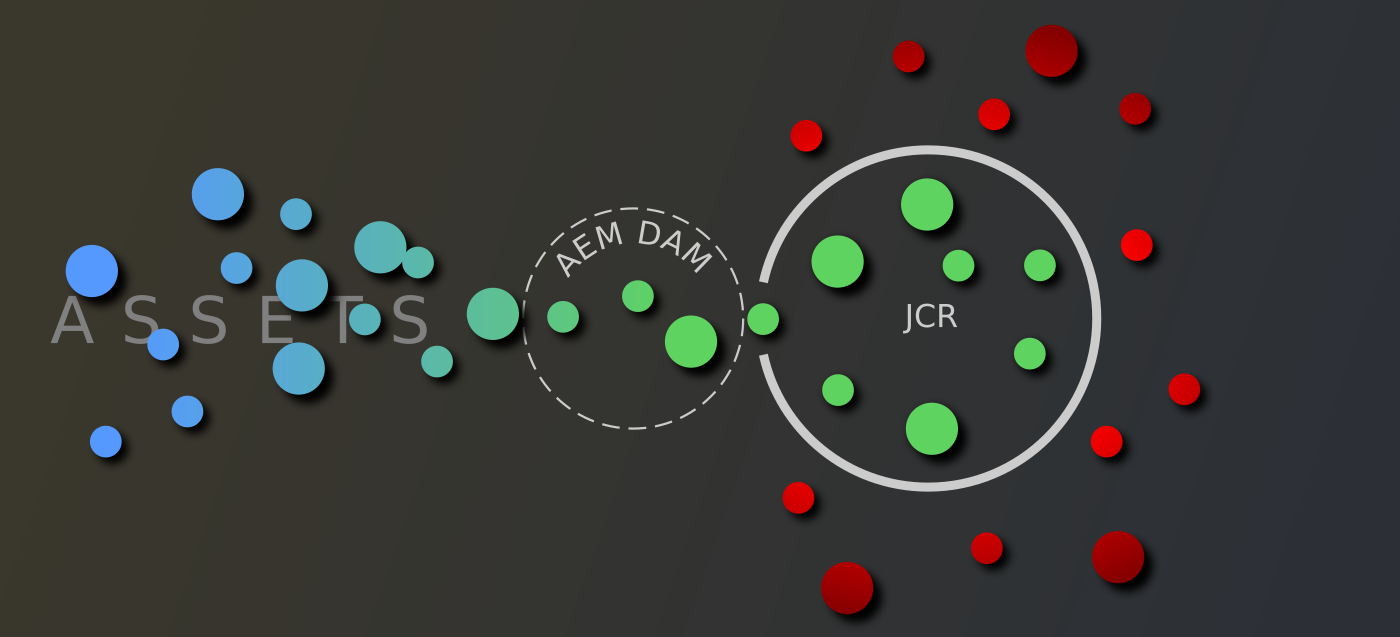

The DAM (Digital Asset Manager) is AEM’s asset management system and should be the single point of entry for all assets into the AEM platform and the one-stop-shop for using those assets in content.

The DAM goes beyond simply storing assets by providing useful features such as asset validation, license management, tagging, and analytics, among many others. Even if you do not use these features, there are many reasons why you’d want to make sure that all your assets are in one place and under the same management system:
  1. Assets are easy to find, especially if you have a common-sense directory structure or use the collections feature.
  2. If you want to run workflows (such as content validation) or do any kind of processing on new assets, this can be done upon DAM asset creation.
  3. If you need to move assets from or to another platform, integrations are made easy.
It is, however, possible for users to circumvent the DAM by using what I consider to be “loopholes” in OOTB components to directly upload files (typically images) to certain locations in the JCR directly from their machine without having to place that file in the DAM.Loophole

If the image of the loop above reminds you of a hangman’s rope, that’s no coincidence! Leaving these loopholes open can lead to a polluted JCR containing “floating assets”, which is can become a massive pain for any kind of batch job for example, and has a devastating impact on JCR size long-term.

AEM Sites Image component
Let’s look at the most flagrant loophole first: the browse option of the Image component.
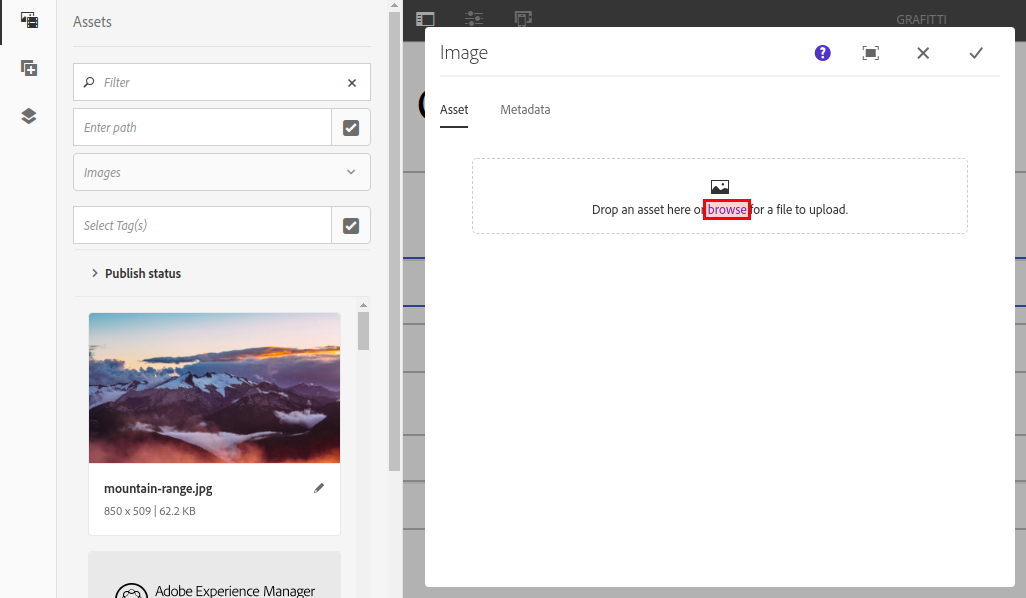
The browse button

This is what happens if you use the upload button to provide an image:
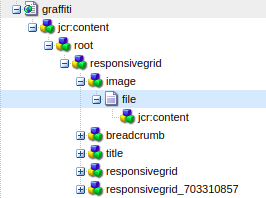
An image stored at the page level

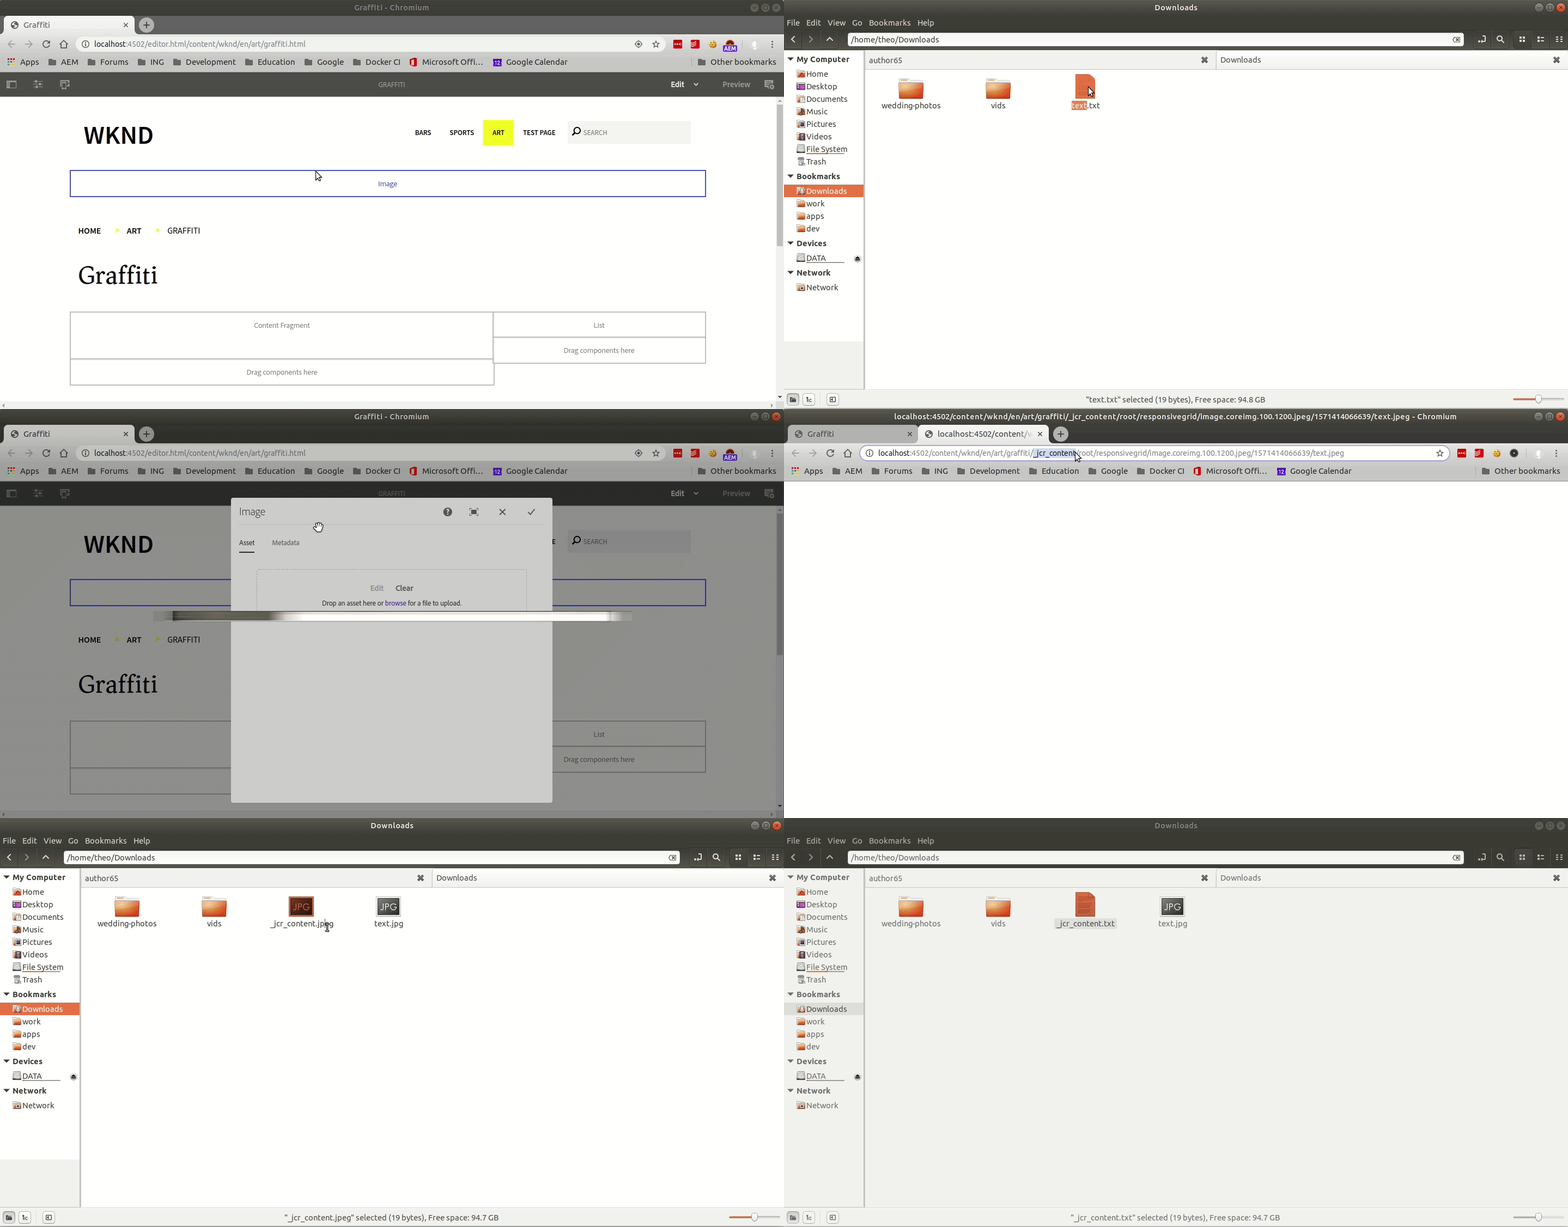
The image gets saved at the page level rather than the DAM, which makes it very hard to find in the future. Imagine now that the same high-res image is used in 10 places and, each time, users are uploading from their system: you are now stocking 10 images instead of saving it once in the DAM and referencing it 10 times.

The size of the page in the CRXDE screenshot above is 7.3MB with a reference to the DAM and 3.1MB with an uploaded image (that’s a 424x increase)!

There is also a potential security risk with this method of providing images. A user who has access to confidential information and a chip on their shoulder could use the browse functionality to upload a text file masked as a JPEG which, after publication, would then be accessible to the outside world. I’ve played out this scenario in the GIF below:
Exposing confidential information using the Image component

Of course, there are many security measures you could put in place to prevent this kind of abuse, but removing the browse option is a good start.

Convinced yet? Let’s take a look at how we can “de-activate” this feature.

Option 1: For a specific component
The “cleanest” way to do this is by using the allowUpload property of the /libs/cq/gui/components/authoring/dialog/fileupload component for your Image component. Setting this property to false will remove the browse button.

If you are using AEM Core Components, you can do this by copying the node at /apps/core/wcm/components/image/v2/image/cq:dialog/content/items/tabs/items/asset/items/columns/items/column/items/file to your Image component and simply adding the following property to it:

allowUpload - Boolean - false

Option 2: Globally
If you prefer to remove the functionality completely you can do so by overlaying the JSP at /libs/cq/gui/components/authoring/dialog/fileupload/render.jsp and simply removing the code which reads the allowUpload property and renders the browse button.

Here is a sample, but check out the GitHub repo for the complete refactor of the JSP

Removing the browse button from the JSP

AEM Forms Image and Image Choice components
The same concerns exist for the AEM Forms components Image and Image Choice:
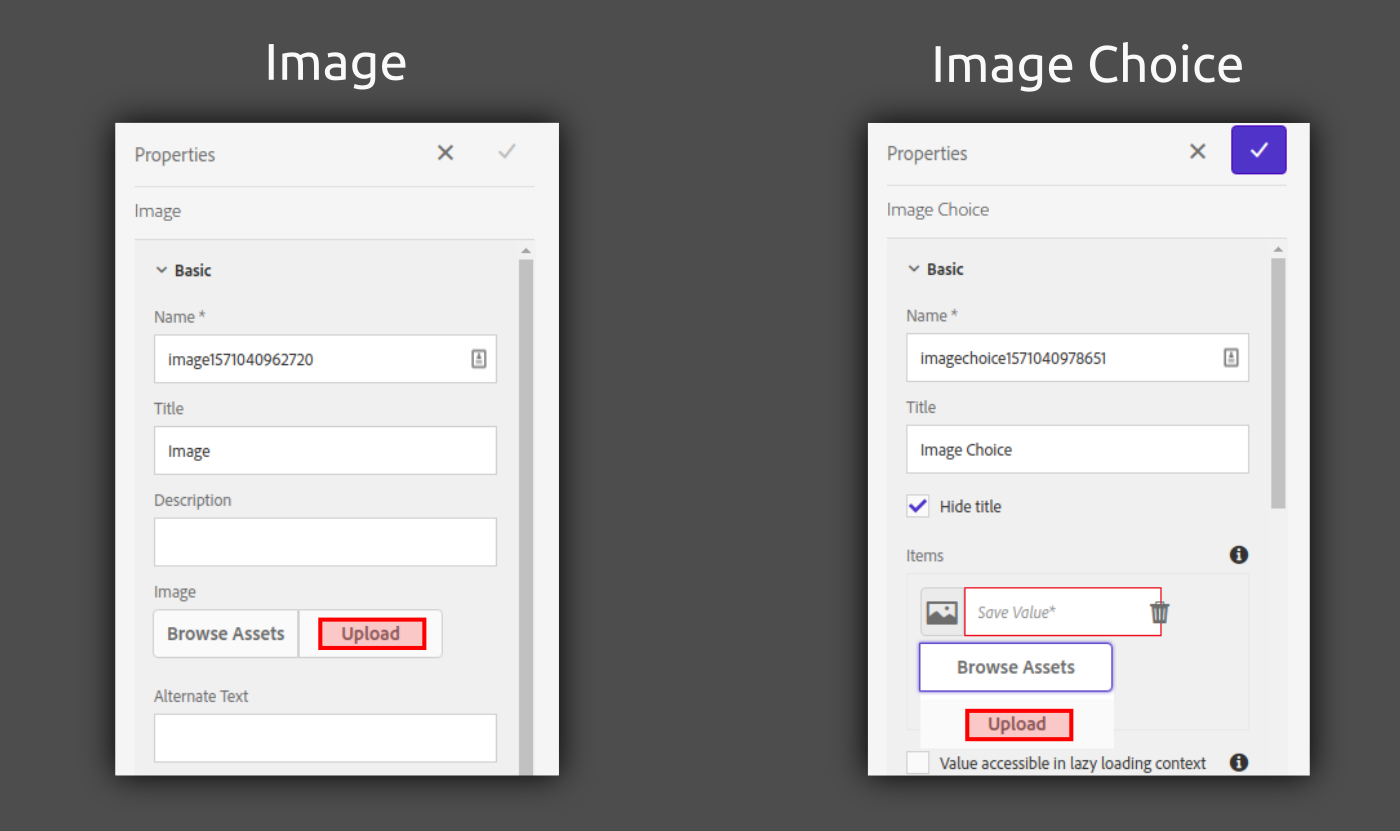

However, generally speaking, AEM Forms is much less customization-friendly that AEM Sites, so we will need to employ a workaround to make these buttons disappear.

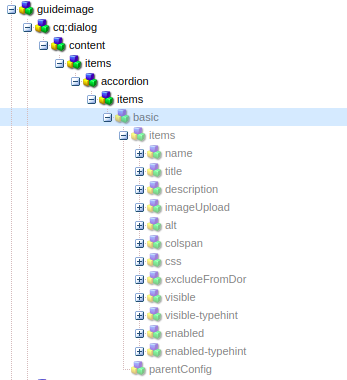
Large portions of both components’ cq:dialog node trees have been marked with the granite:InternalArea mixin to indicate that they are not extendable and cannot be overlaid. This also makes them appear greyed-out in CRXDE:
Nodes marked with granite:InternalArea mixin

Since we cannot modify these nodes directly, we will create a CSS clientlib to prevent the rendering of the buttons.

Create a similar node structure to the following:apps
\ — customization (nt:folder)
\ — clientlibs (nt:folder)
\ — restrict-asset-upload (cq:ClientLibraryFolder)
\ — css.txt (nt:file)
\ — css (nt:folder)
\ — restrictAssetUpload.css (nt:file)

Add the following to css.txt:
#base=css
restrictAssetUpload.css

We can modify the contents of restrictAssetUpload.css to implement our feature. The following CSS will hide the Upload buttons:

/* Hides the Image component file upload button */
.fdImageUploadGroup coral-fileupload.fdImageFileUpload {
    display: none;
}

/* Makes the Image component Browse Assets button border properly rounded */
.fdpathfield .coral-InputGroup .coral-InputGroup-button > button.coral3-Button.coral3-Button--secondary {
    border-radius: 0.25rem;
}

/* Hides the Image Choice component file upload button */
.fdImageUploadWithText .fdImageUploadWithTextList coral-fileupload {
    display: none;
}

/* Removes ugly background overlap in the Image Choice component configuration */
.fdImageUploadWithText .fdImageUploadWithTextList.coral-Popover {
   background-color: transparent;
}

Now we must make sure this CSS is loaded with the rest of the clientlibs associated with the Forms Editor screen.

The existing styles for the two components are in the /libs/fd/af/authoring/clientlibs/granite/components/imageUploadStyles clientlib which is in theimageUpload category. In order to load our CSS at the same time, we will put it in the same category so it is picked up by AEM and merged in with the other styles. Add the following property to the restrict-asset-upload node:

categories — String[] — imageUpload

Now reload your AEM Forms editor and open the configuration side-panel for an Image component and you should see that the Upload button is gone.
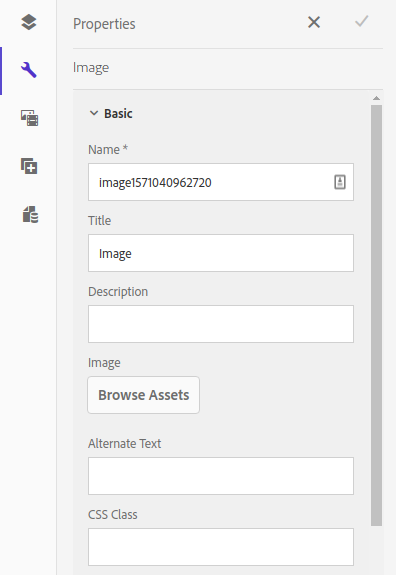
No more Upload button

You will see the same for Image Choice.

Of course, this does not stop a tech-savvy user from inspecting the DOM in their browser, removing the display: none; CSS property, and clicking the Upload button, but it’s a good start. If you want to go the extra mile, the process is the same except you’ll be creating a JS clientlib that removes the Upload button from the DOM.

AEM Sites page thumbnails
Another time that users are allowed to upload files from their machine is when they set a thumbnail image for a page. This is less dramatic as the thumbnails are for internal use and are not typically accessible by website visitors. Furthermore, pages inherit their template’s thumbnail so there is rarely a need for users to manually set a thumbnail.

However, if you want to remove the feature you can do so as follows.

Option 1: For a specific page component
Create a the following node structure under your page component:

your-page-component/tabs/thumbnail/items/column/items/thumbnail

Then under that, create a node of type nt:unstructured named upload and give it the following property:

sling:hideResource - Boolean - true

Option 2: Globally
If you prefer to remove thumbnail uploads from all pages regardless of their page type or template, you can do so by overlaying the file at /apps/cq/gui/components/common/wcm/pagethumbnail/pagethumbnail.jsp and making the following changes to remove the button (see GitHub repo at the bottom of the article for code):
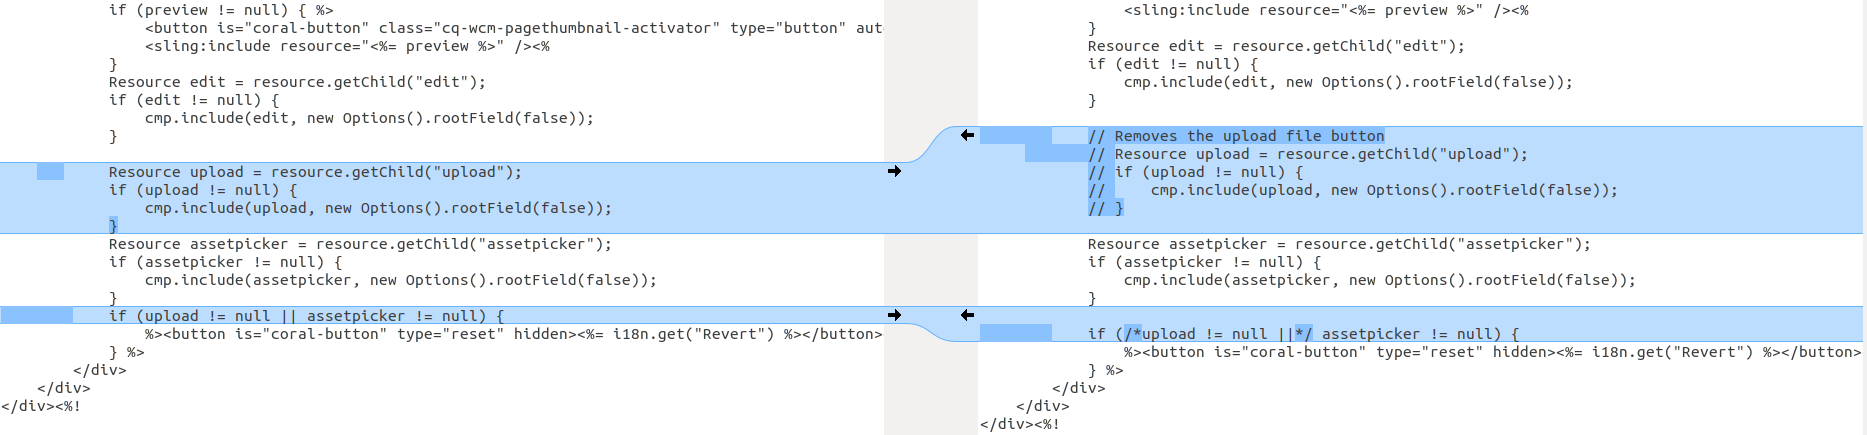

There you go, your JCR is now protected from “floating” assets!

To see the source code for the JSP modifications, head over to the GitHub repo for this tutorial.

If you can think of any other instances where users can upload images (or any asset) without using the DAM, comment below and I’ll add a fix to this article :)


By aem4beginner

October 13, 2020
Estimated Post Reading Time ~

Read/Write data in Json file of DAM in AEM + Making Rest API Call.


This is the frequently searched query on Google by AEM Developers.
So I will provide you the code in which we can use Asset and AssetManager API to read and write the data to any file in out DAM structure.
For this we need System User to be created which has read and write permission of DAM folder using which we will access the resource in our code.
So following is the code with required comments.

For better understanding copy the following code/paste in notepad++ or eclipse and format it:

package com.ab.internal.servlets;

//Java program to read JSON from a file
import java.io.BufferedReader;
import java.io.ByteArrayInputStream;
import java.io.IOException;
import java.io.InputStream;
import java.io.InputStreamReader;
import java.nio.charset.StandardCharsets;
import java.util.HashMap;

import javax.servlet.Servlet;
import javax.servlet.ServletException;

import org.apache.http.HttpResponse;
import org.apache.http.client.methods.HttpGet;
import org.apache.http.impl.client.CloseableHttpClient;
import org.apache.http.impl.client.HttpClients;
import org.apache.sling.api.SlingHttpServletRequest;
import org.apache.sling.api.SlingHttpServletResponse;
import org.apache.sling.api.resource.LoginException;
import org.apache.sling.api.resource.Resource;
import org.apache.sling.api.resource.ResourceResolver;
import org.apache.sling.api.resource.ResourceResolverFactory;
import org.apache.sling.api.servlets.SlingSafeMethodsServlet;
import org.json.JSONException;
import org.json.JSONObject;
import org.osgi.framework.Constants;
import org.osgi.service.component.annotations.Component;
import org.osgi.service.component.annotations.Reference;
import org.slf4j.Logger;
import org.slf4j.LoggerFactory;

import com.day.cq.dam.api.Asset;

@Component(service = Servlet.class, property = {
Constants.SERVICE_DESCRIPTION
+ “= Servlet to save data in AEM from Holiday Calendar API”,
“sling.servlet.paths=” + “/apps/ab/holidayCalendar” })
public class HolidayCalendar extends SlingSafeMethodsServlet {

private static final long serialVersionUID = 1L;

protected static final Logger LOGGER = LoggerFactory
.getLogger(HolidayCalendar.class);

@Reference
private ResourceResolverFactory resolverFactory;

@Override
protected void doGet(SlingHttpServletRequest request,
SlingHttpServletResponse response) throws ServletException,
IOException {

// Reading the JSON File from DAM.
Resource original;
String myJSON = “”;

LOGGER.info(“before factory..”);
ResourceResolver resolver = null;
HashMap<String, Object> param = new HashMap<>();
param.put(ResourceResolverFactory.SUBSERVICE, “readService”); //readService is my System User.
LOGGER.info(“After factory..”);
try {

resolver = resolverFactory.getServiceResourceResolver(param);
Resource resource = resolver
.getResource(“/content/dam/ab/holiday.json”);
Asset asset = resource.adaptTo(Asset.class);
original = asset.getOriginal();
InputStream content = original.adaptTo(InputStream.class);

StringBuilder sb = new StringBuilder();
String line;
BufferedReader br = new BufferedReader(new InputStreamReader(
content, StandardCharsets.UTF_8));

while ((line = br.readLine()) != null) {
sb.append(line);
}
JSONObject jsonObj = new JSONObject(sb.toString()); // In jsonObj I will get the data from the JSON file from DAM.

} catch (LoginException | JSONException e1) {
LOGGER.info(“EXCEPTION”);
}

// Getting the data from API Call by sending header parameters.

JSONObject json = null;
CloseableHttpClient httpClient = HttpClients.createDefault();
HttpGet getRequest = new HttpGet(
“/rest/api/end/point”);
getRequest.addHeader(“accept”, “application/json”);
getRequest.addHeader(“ClientId”, “123456”);
getRequest.addHeader(“Request-Tracking-Id”, “123456”);
HttpResponse httpResponse = httpClient.execute(getRequest);
LOGGER.info(“before if condition”);
if (httpResponse.getStatusLine().getStatusCode() != 200) {
LOGGER.info(“inside if condigiton”);
throw new RuntimeException(“Failed : HTTP error code : ”
+ httpResponse.getStatusLine().getStatusCode());
} else {
StringBuilder sb = new StringBuilder();
LOGGER.info(“before buffer reader”);
BufferedReader br = new BufferedReader(new InputStreamReader(
(httpResponse.getEntity().getContent())));

String output;
while ((output = br.readLine()) != null) {

myJSON = myJSON + output;
sb.append(output);
}

// Saving the data to DAM .json file which we got from API call.
InputStream is = new ByteArrayInputStream(myJSON.getBytes()); //we are sending the JSON data as a String.
com.day.cq.dam.api.AssetManager assetMgr = resolver
.adaptTo(com.day.cq.dam.api.AssetManager.class);
assetMgr.createAsset(“/content/dam/ab/holidayApi.json”, is,
“application/json”, true);
try {
json = new JSONObject(sb.toString());
} catch (JSONException e) {
LOGGER.info(“EXCEPTION”);
}

}

response.getWriter().println(json);

}
}


By aem4beginner

October 2, 2020
Estimated Post Reading Time ~

Metadata Profiles in DAM : AEM 6.3

When we talk about DAM, the first thing that comes to our mind is the collection of images, audios, and videos, etc. But when we look at AEM DAM, we are provided with a number of features that are very useful and intriguing.

So today we will talk about Metadata Profiles for Digital Assets. There are a lot of Assets in a project and metadata is important to search in assets.

A Metadata Profile lets you apply default metadata to assets within a folder. Create a Metadata Profile and apply it to a folder. Any asset that you subsequently upload to the folder inherits the default metadata that you configured in the Metadata Profile.

How to create metadata profiles:
Go to Tools-> Assets-> Metadata Profiles
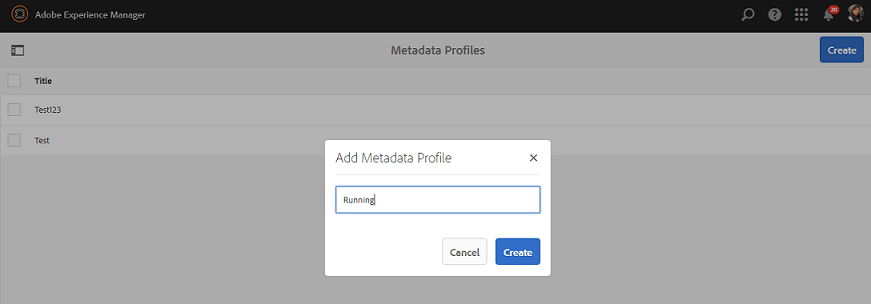
Create a metadata profile.

Fig: Create Metadata Profile in AEM

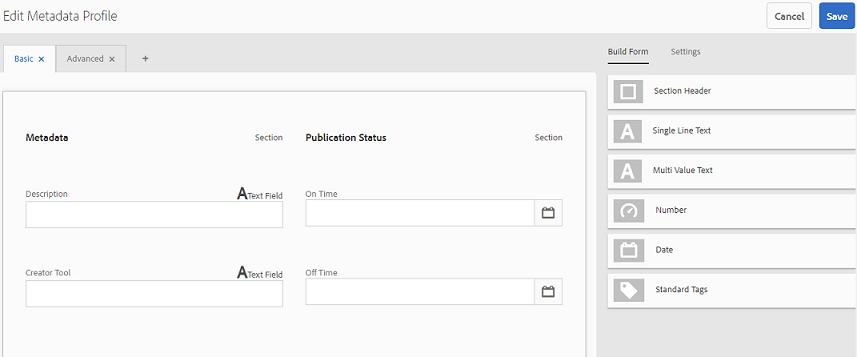
The metadata profile will be opened with different widgets.

Fig: Add the widget in metadata profile

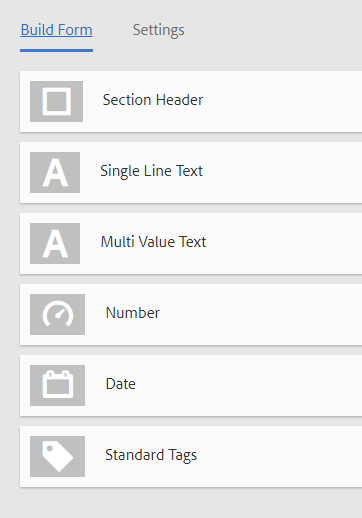
There are multiple widgets that can be added to a profile:

➤ Section Header
➤ Single-Line Text
➤ Multi-Line Text
➤ Number
➤ Date
➤ Standard Tags

Fig: Widgets for adding in the Metadata Profiles

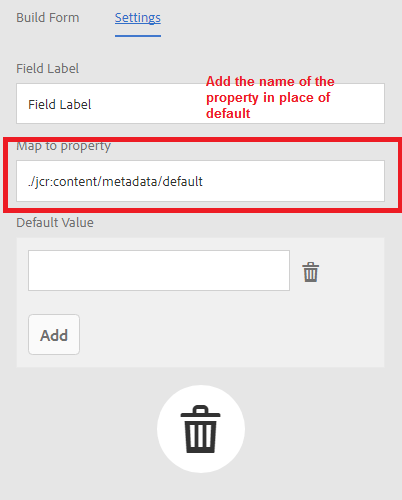
A widget needs these options to be filled.

Fig: map the widget with any property

Where all metadata profiles get stored?
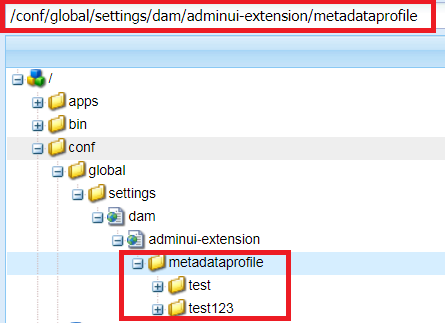
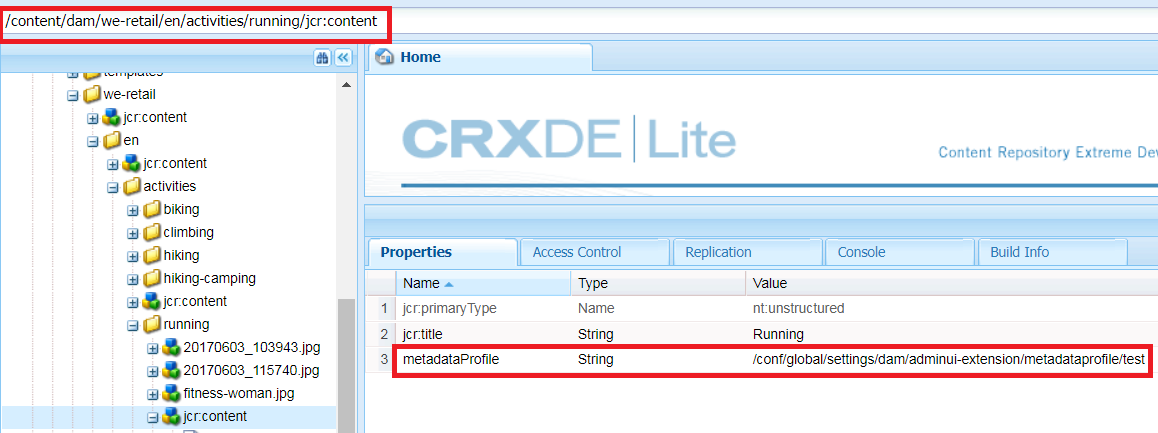
All metadata Profiles can be seen here “/conf/global/settings/dam/adminui-extension/metadataprofile” like this:

Fig: metadata profiles getting stored in conf

How to apply a metadata profile to any DAM Asset folder?
When you assign a metadata profile to a folder, any subfolders automatically inherit the profile from its parent folder. This means that you can assign only one metadata profile to a folder. As such, consider carefully the folder structure of where you upload, store, use, and archive assets.

If you assigned a different metadata profile to a folder, the new profile overrides the previous profile. The previously existing folder assets remain unchanged. The new profile is applied to the assets that are added to the folder later.
Folders that have a profile assigned to it are indicated in the user interface by the name of the profile appearing in the card name.

After adding a metadata profile to a folder, Under the jcr:content of a folder, you can see the metadata profiles which are attached to that particular folder.

Fig: applied metadata profile to dam assets folder

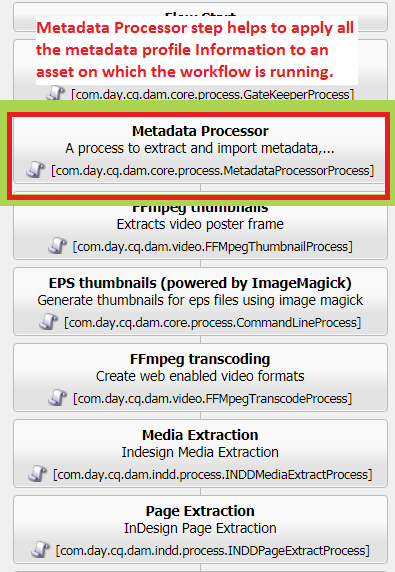
Note: If you add something new to the metadata profile, the previous existing assets can’t get updated with metadata until we run the “Dam Update Asset” workflow on them. In the Dam update asset, the process step named “Metadata Processor” adds the metadata profile of that image.

Fig: Metadata profile processor for applying in the dam assets folder

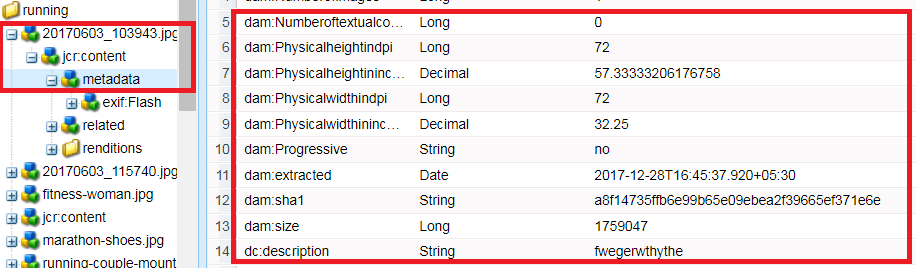
All the metadata profiles need to be added in the metadata node of jcr: content each asset.

Fig: added some property from metadata profile

Note: Adding a default value to a new metadata property (which doesn't exist already at the ./jcr:content/metadata node) does not display the property and its value on the asset's Properties page by default. To view the new property on the assets' Properties page, modify the corresponding schema form.

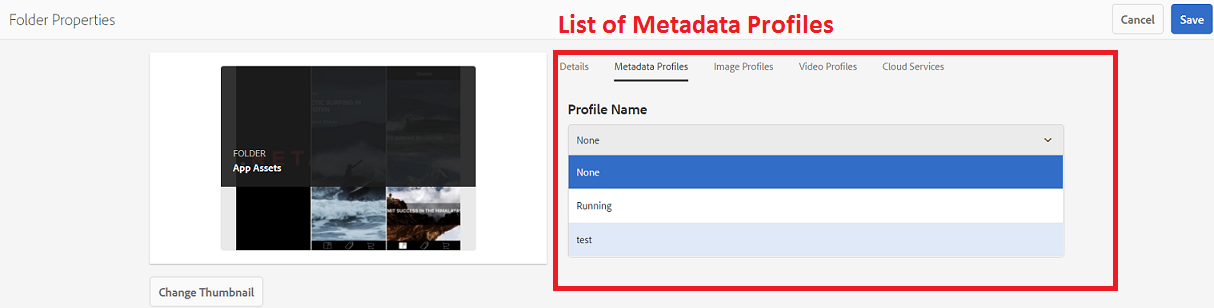
Applying Metadata Profiles to folders from Properties:
1. In the left rail, click/tap Assets then navigate to the folder that you want to apply a metadata profile to.
2. On the folder, tap or click the checkmark to select it and then tap or click Properties.
3. Select the Metadata Profiles tab and select the profile from the drop-down menu and click Save.

Fig: Apply the metadata profile by selecting the profiles in the asset folder

Applying metadata profiles globally?
In addition to applying metadata profile to a folder, we can apply a metadata profile globally on the “/content/dam” folder from this link http://localhost:4502/mnt/overlay/dam/gui/content/assets/foldersharewizard.html/content/dam

Let's have a demonstration video on Metadata profiles in AEM DAM:
In AEM 6.3, If we add “Standard Tags” Widget in the metadata profile form, add some default values and save it, when we again reopen the form the default values get disappeared.

Actually, values get saved in the metadata profile but values are not able to be picked up in the console. It was working fine in AEM 6.1. When we compare it with AEM 6.3, we found out that in AEM 6.1 there is an attribute data-default is setting which shows these values, but in AEM 6.3 this data-default attribute is not setting.

To solve this issue, we need to overlay “/libs/granite/ui/components/coral/foundation/form/autocomplete/render.jsp” with the following changes.

After Line 132, add
"String str = cfg.get("default", "");"

After line 157, add
"attrs.add("data-default", str);"

So you need to make these two changes and things will work fine for you.

Source: http://www.sgaemsolutions.com/2020/02/metadata-profiles-in-dam-aem-63.html


By aem4beginner

May 26, 2020
Estimated Post Reading Time ~

Adding Custom Asset Metadata in AEM CMS and How to Use It

PROBLEM STATEMENT
Working in AEM CMS and need to add custom metadata like tags, dates, or text properties to images and videos? Read this quick how-to from our AEM experts.
Step 1:

Go to projects page ( http://<host>:<port>/projects.html )

Select ‘Tools’ from the right rail and then go to ‘Assets’ and select ‘Metadata Schema’.


Step 2:
Click on add button and provide a name to your schema.

In this case, I have created a schema named ‘DemoSchema’.


Step 3:
Select your schema from the list by checking the checkbox and click on edit.

Here you will get an empty form in tab layout with all the widgets present in the right section, we can drag and drop widgets to our form.

Step 4:
Provide a name for your tab from settings and drag widgets onto the form.
Step 5:
Select a widget and go to setting option on the top right.
  • Provide a name to a field using ‘Field Label’.
  • In the ‘Map to property’ field gives the property path in which you want the value to be stored inside the image file. This property will be automatically created once this field will get authored.
  • Give placeholder (If required), choose distinct options like required, editable, empty in read-only.
  • If a field is wrongly placed either drag it to right position or delete it using the delete icon below properties.
Step 6:
After making your schema. Select your schema and click on ‘Apply to folders icon on the top rail and select the folders on which you want your schema to be applied.


Properties will look like this:

Step 7:
To utilize these properties in sightly used in AEM CMS, make a java class using resource API.

In Java, I have injected the image path and then I’ve extracted resources out of it using resource resolver and extracted properties out of it.

@Model(adaptables = { Resource.class, SlingHttpServletRequest.class }, cache = true) 
public class ImageMetadataModel { 

@Inject 
@Optional 
private String imagePath; 

@SlingObject 
private ResourceResolver resourceResolver; 
public String getProperty () { 

Resource resource = resourceResolver.getResource(imagePath +“/jcr:content”); 
String property = “”; 

if (resource != null) { 
ValueMap valueMap = resource.getValueMap(); 
if (valueMap.containsKey(“propertyname”)) { 
property = valueMap.get(“propertyname”, String.class); 
return property; 
}


By aem4beginner

Smart Crop: Intelligent Image Crop in AEM

What makes websites vibrant and attractive across all touchpoints? When your images, videos and other assets are well customized and come together like the pieces of a solved puzzle, your website experience is elevated. Images optimized for all target devices improve the responsiveness of your website. If your site is on AEM, the different image features are automatically handled by AEM DAM. However, the limited image rendition capabilities of DAM might make your image lose its effectiveness on certain devices.

DAM Asset Update Workflow creates only three renditions for uploaded images, which are not always enough in real-life projects where you need banner images, carousel images, card images, thumbnails, etc. This workflow can be updated to include some custom renditions but a lot of effort is required.

Smart Crop helps you improve your image renditions to create responsive designs. It is an intelligent image handling feature in AEM that crops your images while preserving the area of interest.

Avoid Custom Workflow and the Manual Tasks of Creating DAM Image Renditions
We’ve all faced the hassle of using inefficient tools to crop images exactly the way we want. The custom algorithms let you crop only in fixed combinations like from the top left, etc. In the process, your relevant logos, banners and other elements in the background might get cropped. You are left to manually grind for minutes and sometimes hours trying to get the image right for different small-screen devices and card sizes. Even harder if you are working on a bulk quantity.

Smart Crop is a rockstar in such scenarios. This feature lets you easily create custom renditions for image cards or banners by preserving the focal point in the image. Authors can now edit more images quickly without all the hassle of custom workflow steps or tedious manual image adjustments.

So, What’s this Smart Crop Feature?
Smart Crop leverages Adobe Sensei technology to automatically crop the images based on the focal point of the image. For example, if an image has a mountain view and a person, and you want them in your final cropped image. Through this image crop feature, all your renditions will contain the person (or part of the person) and some parts of the mountain depending on the dimension. This feature helps in creating quality experiences for users on all touchpoints. Adobe Sensei automatically judges the image and tries to find points of interest by preserving the important parts of the image. It also enables authors to adjust the smart cropped renditions in place to fit the target devices.

How to use Smart Crop
To smart crop an image, you’ll need to start your AEM instance in Dynamic media scene7 mode.

To know how to start dynamic media in S7 mode, refer to this
The following demonstration is on AEM 6.4 SP3
This image crop feature automatically works from the Scene7 server by delivering the necessary image for the screen size.

To create smart cropped images, you need to create an image profile for Smart Crop.

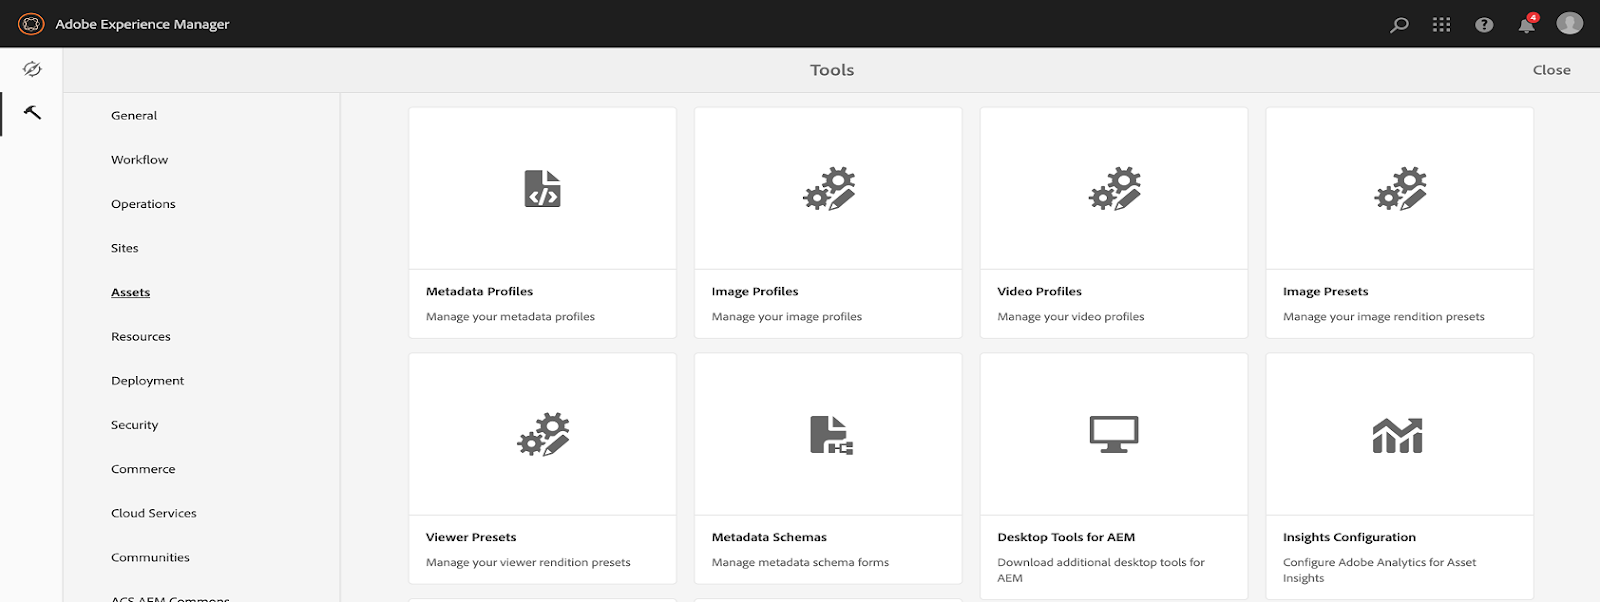
1. Navigate to Tool > Assets > Image profiles

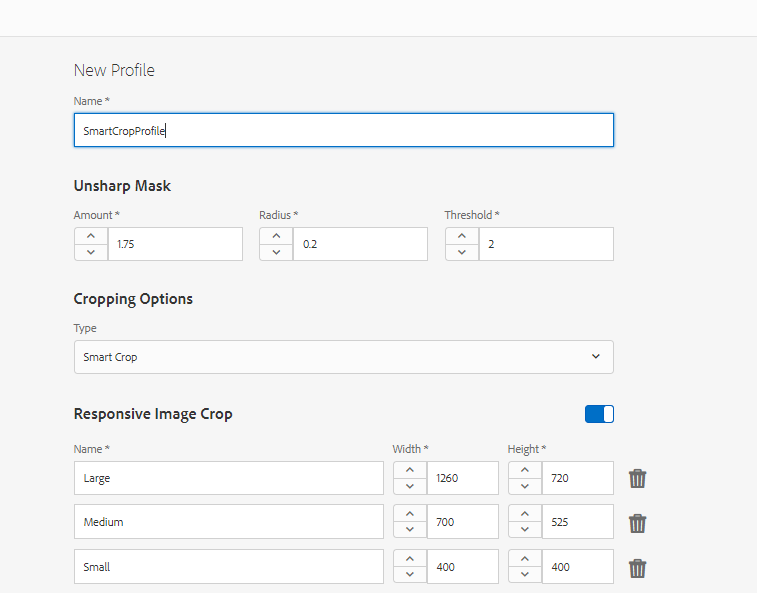
2. Create a new image profile. Select Smart Crop as Type in Cropping Options. By default, it gives the dimensions of large, medium and small sizes.


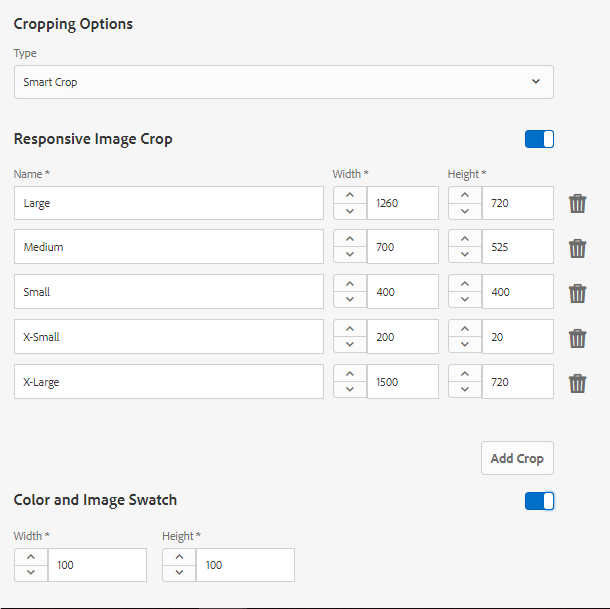
3. You can create a custom responsive image crop by introducing extra-small (for cards) or extra-large image sizes (for banner or carousel images) and provide respective dimensions for them. We can also choose an option for Color and Image Swatch (for products). This automatically detects the prominent color in the image and creates a swatch for the product.


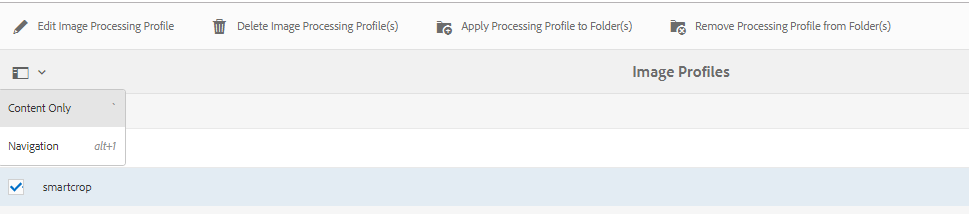
4. After creating the Image Profile, you need to apply this profile to a folder where all the images will be uploaded. Select the Image Profile and click on Apply Processing Profile to folder(s). Select folder(s) and click Apply.


5. The images uploaded in that folder will generate smart crop renditions.


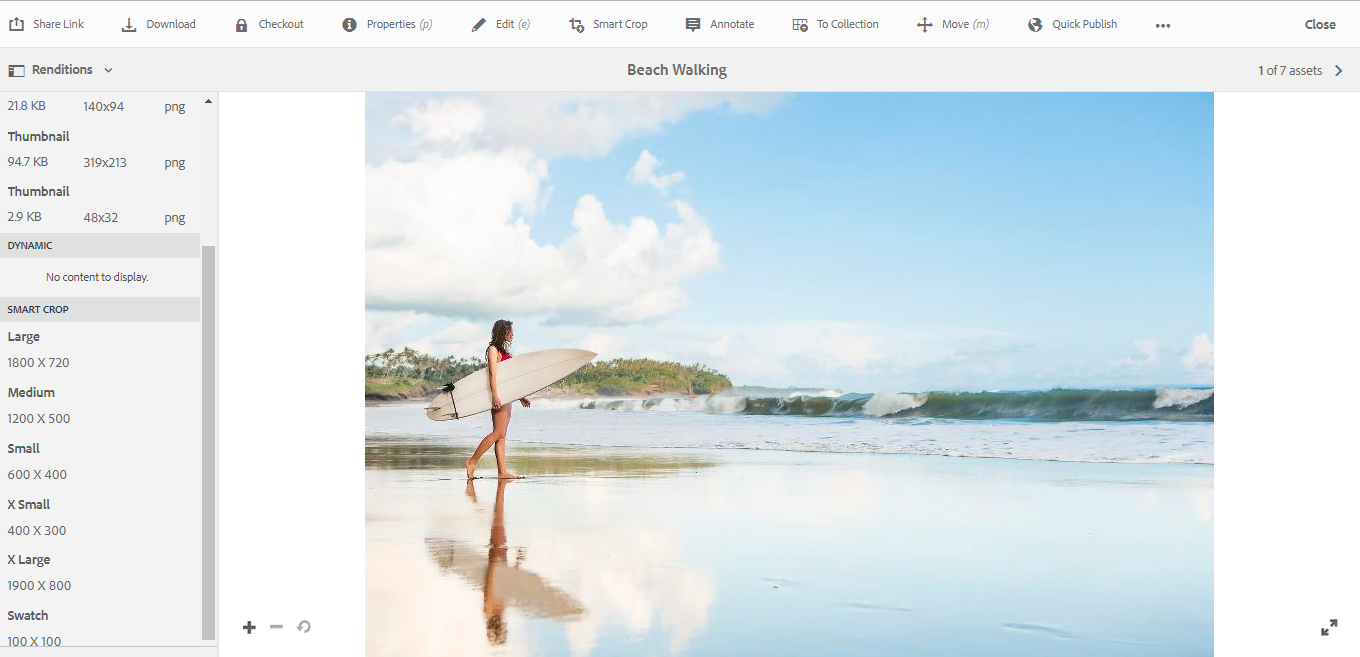
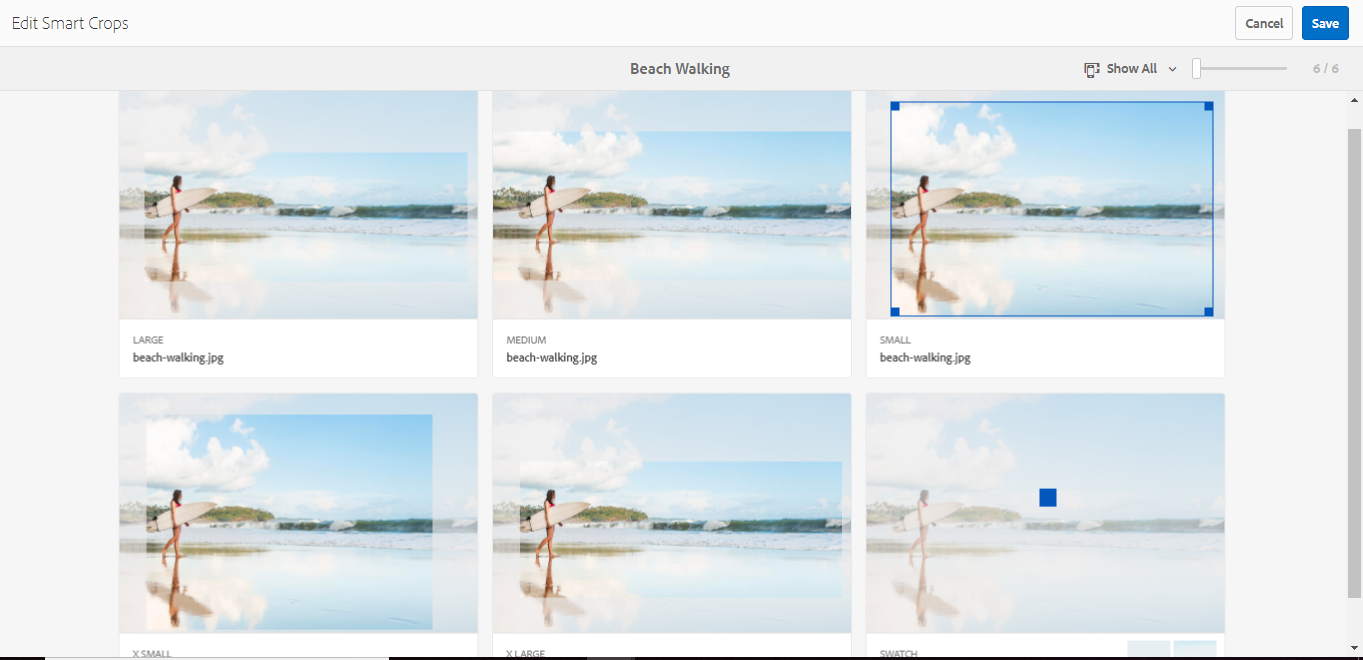
6. Smart Cropped renditions can also be manually adjusted in the editor to further customize the view of the renditions. Click on the Smart Crop option in the menu to open smart crop edits.


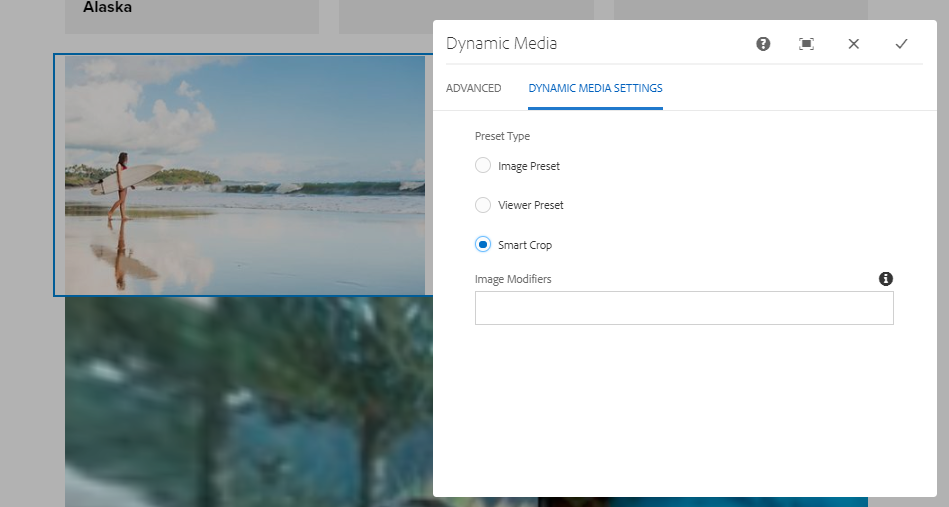
7. You can use these images on the page in the Dynamic Media component from the Dynamic Media group. Drag and drop this component and add the relevant image (with smart cropped renditions) to it. Open the dialog and go to the Dynamic Media Settings tab and choose Smart Crop in Preset Type. You can also add Image Modifiers i.e. extra parameters to be sent to the Scene7 server for some image effects.


How Will Your Organization Benefit from Using this Intelligent Image Crop Feature?
Smart crop can either be applied to a single asset or used for bulk editing of assets in a folder. Authors can customize smart cropped renditions for better coverage of focal points using editing layout.

It can also detect available bandwidth and screen size of the device and can optimize the images for delivery. This can dramatically reduce the size of the file.
Smart cropped images rendered via dynamic media are smooth, with no quality loss, and can drive an enriched user experience with faster loading.
An added advantage of smart cropped images is that they can be used outside AEM as well.

Challenges with Smart Crop
While using the smart crop feature in a few projects, we found it challenging to use this feature in custom components of the project. Use this feature in the dynamic media components for the best results. Design custom components like dynamic media components to use the smart crop feature.

Another pre-requisite for images to be smart cropped is that the original uploaded image should have dimensions greater than as mentioned in the image profile. In other cases, extra white space may be added for fitting the image profile dimensions.

Prospects of Smart Crop
Smart Video Cropping is also being introduced in AEM 6.5 to enable users to create suitable video sizes that fit different devices by keeping the focal point in the frame. Adobe Sensei will automatically track the point-of-interests and crop the images to optimize it for all devices.

So, Adobe Sensei has empowered authors by introducing artificial intelligence and machine learning through Smart Crop to enrich media and content on websites.

Look at other ways to improve your brand digital experience using AEM through integrations like AEM-DTM-Target integration.


By aem4beginner