Showing posts with label CICD. Show all posts

January 5, 2021
Estimated Post Reading Time ~

Continuous Delivery on Adobe AEM

I get asked a lot what I think about various topics on Adobe AEM. Many large companies are now attempting to implement a solution on Adobe AEM, and Continuous Delivery is one of the topics that keeps coming up. Unlike many typical features of AEM, there is not much guidance in the documentation about how to implement Continuous Delivery yet I believe AEM is very much suitable for it. So I wanted to share my thoughts on this topic hoping it might help someone in their implementation of AEM.

What is Continuous Delivery?
I understand Continuous Delivery as an IT process of continuously releasing pieces of content or functionality, from inception at a whiteboard to release to production, without downtime, often fully automated. This is in contrast to the typical enterprise IT process that requires many manual steps, the involvement of many people, and a typical release cycle of one to two weeks.

Continuous Delivery is often associated with an Agile development process, as it allows us to deliver small pieces of production quality functionality, frequently. And I don't just mean iterative delivery such as in fortnightly iterations, but multiple releases per day.

These additional requirements on the IT processes - frequency, quality, no downtime - also spread beyond the processes, on the architecture, IT infrastructure, development processes and tooling, quality processes, and company culture.

Continuous Delivery on Adobe AEM

The architecture of Adobe AEM as the platform leverages itself particularly well to Continuous Delivery because of OSGi and JCR.

OSGi modularity
OSGi allows the development and deployment of individual modules (bundles). OSGi is an SOA within a single Java process, and it allows you to be as granular with your deployment units as you need. You can go Micro Services, deploying individual service implementations at once, or bundle the whole subsystem. But either way, you get a straightforward (almost) no-downtime deployment mechanism via bundles, which also supports easy rollback.

Flexible modularity also means the ability to develop functionality independently so your developers can work on multiple work streams in parallel. And because you can deploy as big or as small units as you need, it works well with Agile development processes where the scope of a deployable task could be a single component or a service.

Deploying to JCR
In Adobe AEM, JCR typically stores the components, templates, and front-end artifacts in the form of objects with metadata, and these are deployed via packages. The neat thing about those is that they are typically static files or scripts, plus metadata, which doesn't require any restart. So they come into effect immediately after being updated, and you can update any piece of JCR at any time - whether it is one component, or the whole website (called Projects in AEM) - and it takes milliseconds to seconds. As the result, you can continuously evolve JCR, on the fly, without any downtime, deploying multiple features in parallel to production. And to mitigate the risks, simple rollback mechanisms such as deploying the previous version of a package, or creating a reverse package, can be used.

Because AEM architecture is so simple - a single application component is a single instance and a single Java process, in non-clustered cases the deployment only touches a single instance. Apart from caching, very little can go out-of-sync or wrong - the artifacts are either in JCR and active, or they are not. Even in clustering scenarios, the deployment to a cluster of production Publish instance (the riskiest scenario) is often done via replication which is aware of clustering and ensures all Publish instances are in sync.

Feature switches
Feature switches are a mechanism that allows instantaneous change of system behavior without redeployment. Typically Feature switches are used to control risky or incomplete features, and for a/b testing of functionality, and because of that they can be used to reduce the risks of deploying features at a rapid pace.

Consider the scenario when during a day, 5 features were implemented and deployed by different developers. 4 of them work fine, and 1 does not work. If you were to deal with the situation in a typical source-controlled environment, you'd have to make a reverse commit for the broken commit, test and redeploy. But with Feature switches, you can simply disable the broken functionality until the time when it's fixed.

Feature switches can be implemented on both OSGi service properties and JCR properties as they can be controlled by HTTP requests.

Caching
Caching is the only thing that requires careful planning and sometimes additional work. As Adobe AEM is designed to be heavily cached (the guideline is 90%), any changes to underlying resources need to be propagated to the caching layers. There is no all-matching solution, however, Adobe AEM has enough mechanisms (such as flush URLs, JCR update triggers, replication URLs), all accessible via HTTP requests, which allow the caching state to be controlled automatically as part of the deployment process.

Deployment Process
AEM has a set of Maven archetypes and plugins which make it easy to build and deploy the code to environments. You can also include all the design artifacts, components, and even default content. This allows us to keep the single source of truth for all instances in all development environments in a source repository, and build new instances in existing or new environments via a maven build.

Backup and Restore
In AEM, the backup operation is simply "xcopy" of the application folder, and restore is just copying it somewhere else, and running there. Because of that, it's very easy to replicate or bootstrap AEM instances on-demand, so you can comfortably manage dozens of instances and environments at the same time.

Also, because these operations are so simple, they can be automated, so it's easy to support scenarios where environments need to be rebuilt or replicated. For example, creating DR Author or Publish instance after deployment, or restoring environments after data center failure.

So why no Continuous Delivery?
Considering how simple AEM architecture is, how straightforward and safe the deployment operations are, and how many tools and mechanisms AEM has in order to support deployments, it would be surprising if organizations did not implement Continuous Delivery on AEM. Of course, Continuous Integration and Deployment are not the only things that need to be implemented to achieve Continuous Delivery, but the remaining things are more to do with the organization's development and quality processes. And at least AEM is providing a great technological foundation in order to achieve smooth Continuous Delivery.


By aem4beginner

Continuous Delivery with Jenkins and AEM

Introduction
We all know CI - Continuous Integration and the next step is: CD - Continuous Delivery. Which is a combination of many steps to automate the build, test, release, and deploy process.

There are some options we can choose from such as Jenkins or the GitLab Integration (https://stackoverflow.com/questions/37429453/gitlab-ci-vs-jenkins).

We use Jenkins Pipelines (https://jenkins.io/doc/book/pipeline/) because I discovered the GitLab integration too late and at that time the Jenkins process was already finished. Otherwise, I would strongly recommend trying the GitLab integration to prevent the "Jenkins Plugin Hell". (Another alternative is https://de.atlassian.com/software/bamboo)

Basics
The goal is to see the CD process as part of the code and not as a separate part of development. Because of this reason, the process is described in script files that are committed to GIT.

Now we have the advantage that we don't need to edit the Jenkins-Job-Configuration every time we need to change the process. If we have a new server we can (theoretically) easily start our CD process without creating new jobs on the new server.

In the case of Jenkins, we need to store a "Jenkinsfile" under the root directory of our project. This Jenkinsfile can be written in the Jenkins-Pipeline language or in groovy or a mix of both.

Requirements
Jenkins needs to be at least at version 2 (because we need the Jenkins Pipeline)    
Following Plugins are needed to get the example Jenkinsfile running          
In the Jenkins "Global Tool Configuration" maven needs to be defined:

Example Jenkinsfile
Following steps are executed   
  1. Update the project/maven/pom version    
  2. Create a GIT-Tag with the new version    
  3. Push the new version to the branch
  4. Upload the artifact to the Nexus Repository
  5. Commit the new version to the child/develop branch
  6. Deploy the new version to the AEM Author and Publish instance
The complete file

#!groovy​

node {

    def version
    def webAppTarget = "xxx"
    def sourceBranch = "develop"
    def releaseBranch = "quality-assurance"
    def nexusBaseRepoUrl = "http://xxx"
    def repositoryUrl = "http://xxx"
    def gitCredentialsId = "xxx"
    def nexusRepositoryId = "xxx"
    def configFileId = "xxx"
    def mvnHome = tool 'M3'

    def updateQAVersion = {
        def split = version.split('\\.')
        //always remove "-SNAPSHOT"
        split[2] = split[2].split('-SNAPSHOT')[0]
        //increment the middle number of version by 1
        split[1] = Integer.parseInt(split[1]) + 1
        //reset the last number to 0
        split[2] = 0
        version = split.join('.')
    }

    //FIXME: use SSH-Agent
   //FIXME: use SSH-Agent

sh "git config --replace-all credential.helper cache"
sh "git config --global --replace-all user.email gituser@xxx.de; git config --global --replace-all user.name gituser"

configFileProvider([configFile(fileId: "${configFileId}", variable: "MAVEN_SETTINGS")]) {

    stage('Clean') {
        deleteDir()
    }

    dir('qa') {
        stage('Checkout QA') {
                echo 'Load from GIT'
                git url: "${repositoryUrl}", credentialsId: "${gitCredentialsId}", branch: "${releaseBranch}"
       }

            stage('Increment QA version') {
                version = sh(returnStdout: true, script: "${mvnHome}/bin/mvn -q -N org.codehaus.mojo:exec-maven-plugin:1.3.1:exec -Dexec.executable='echo' -Dexec.args='\${project.version}'").toString().trim()
                echo 'Old Version:'
                echo version
                updateQAVersion()
                echo 'New Version:'
                echo version
            }

            stage('Set new QA version') {
                echo 'Clean Maven'
                sh "${mvnHome}/bin/mvn -B clean -s '$MAVEN_SETTINGS'"

                echo 'Set new version'
                sh "${mvnHome}/bin/mvn -B versions:set -DnewVersion=${version}"
            }

            stage('QA Build') {
                echo 'Execute maven build'
                sh "${mvnHome}/bin/mvn -B install -s '$MAVEN_SETTINGS'"
            }

            stage('Push new QA version') {
                echo 'Commit and push branch'
                sh "git commit -am \"New release candidate ${version}\""
                sh "git push origin ${releaseBranch}"
            }

            stage('Push new tag') {
                echo 'Tag and push'
                sh "git tag -a ${version} -m 'release tag'"
                sh "git push origin ${version}"
            }

            stage('QA artifact deploy') {
                echo 'Deploy artifact to Nexus repository'
                try {
                    sh "${mvnHome}/bin/mvn deploy:deploy-file -DpomFile=pom.xml -DrepositoryId=${nexusRepositoryId} -Durl=${nexusBaseRepoUrl} -Dfile=${webAppTarget}/target/${webAppTarget}-${version}.zip -Dpackaging=zip -s '$MAVEN_SETTINGS'"
                } catch (ex) {
                    println("Artifact could not be deployed to the nexus!")
                    println(ex.getMessage())
                }
            }

            stage('Deploy AEM Author') {
                echo 'deploy on author'
                withCredentials([usernamePassword(credentialsId: '6a613b0f-631b-453a-9f34-6a69e8676877', usernameVariable: 'USERNAME', passwordVariable: 'PASSWORD')]) {
                    sh "curl -u ${USERNAME}:${PASSWORD} -F file=@\"${webAppTarget}/target/${webAppTarget}-${version}.zip\" -F force=true -F install=true http://doom.eggs.local:64592/crx/packmgr/service.jsp"
                }
            }

            stage('Deploy AEM Publish') {
                echo 'deploy on publish'
                withCredentials([usernamePassword(credentialsId: '3a25eefc-d446-4793-a621-9f15e4774126', usernameVariable: 'USERNAME', passwordVariable: 'PASSWORD')]) {
                    sh "curl -u ${USERNAME}:${PASSWORD} -F file=@\"${webAppTarget}/target/${webAppTarget}-${version}.zip\" -F force=true -F install=true http://doom.eggs.local:64594/crx/packmgr/service.jsp"
                }
            }
        }

        dir('develop') {
            stage('Checkout develop') {
                echo 'Load from GIT'
                git url: "${repositoryUrl}", credentialsId: "${gitCredentialsId}", branch: "${sourceBranch}"
            }

            stage('Set new develop version') {
                echo 'Clean Maven'
                sh "${mvnHome}/bin/mvn -B clean -s '$MAVEN_SETTINGS'"

                echo 'Set new version'
                sh "${mvnHome}/bin/mvn -B versions:set -DnewVersion=${version}-SNAPSHOT"
            }

            stage('Develop Build') {
                echo 'Execute maven build'
                sh "${mvnHome}/bin/mvn -B install -s '$MAVEN_SETTINGS'"
            }

            stage('Push new develop version') {
                echo 'Commit and push branch'
                sh "git commit -am \"New QA release candidate ${version}\""
                sh "git push origin ${sourceBranch}"
            }
        }
    }

}

Step by step explanation
Code Snippet #1

#!groovy

Our pipeline script is a groovy script (declarative) so we annotate this file as groovy for our development environment.

Code Snippet #2
node {

With the node, we declare this script as a scripted pipeline (see declarative pipeline for comparison)

Code Snippet #3
def version
    def webAppTarget = "xxx"
    def sourceBranch = "develop"
    def releaseBranch = "quality-assurance"
    def nexusBaseRepoUrl = "http://xxx"
    def repositoryUrl = "http://xxx"
    def gitCredentialsId = "xxx"
    def nexusRepositoryId = "xxx"
    def configFileId = "xxx"
    def mvnHome = tool 'M3'

    def updateQAVersion = {
        def split = version.split('\\.')
        //always remove "-SNAPSHOT"
        split[2] = split[2].split('-SNAPSHOT')[0]
        //increment the middle number of version by 1
        split[1] = Integer.parseInt(split[1]) + 1
        //reset the last number to 0
        split[2] = 0
        version = split.join('.')
    }

Some variables like the branch names and the credential-ids that are used to log into GIT. And a function updateQAVersion that removes the "-SNAPSHOT" and increments the middle number (2.1.12-SNAPSHOT → 2.2.0)

Code Snippet #4
//FIXME: use SSH-Agent

sh "git config --replace-all credential.helper cache"
sh "git config --global --replace-all user.email gituser@xxx.de; git config --global --replace-all user.name gituser"

configFileProvider([configFile(fileId: "${configFileId}", variable: "MAVEN_SETTINGS")]) {

    stage('Clean') {
        deleteDir()
    }

    dir('qa') {
        stage('Checkout QA') {
                echo 'Load from GIT'
                git url: "${repositoryUrl}", credentialsId: "${gitCredentialsId}", branch: "${releaseBranch}"
       }
Set the git credentials with the help of the credential.helper. Clean the directory for a fresh checkout.

The first stage (Jenkins Pipelines are grouped by stages) which will load the project sources with the help of the Jenkins Credentials Plugin (https://wiki.jenkins.io/display/JENKINS/Credentials+Plugin)

With dir('qa') we set the workspace/location (because we use two separate branches in this script) 

Code Snippet #5
stage('Increment QA version') {
    version = sh(returnStdout: true, script: "${mvnHome}/bin/mvn -q -N org.codehaus.mojo:exec-maven-plugin:1.3.1:exec -Dexec.executable='echo' -Dexec.args='\${project.version}'").toString().trim()
    echo 'Old Version:'
    echo version
    updateQAVersion()
    echo 'New Version:'
    echo version
}

stage('Set new QA version') {
    echo 'Clean Maven'
    sh "${mvnHome}/bin/mvn -B clean -s '$MAVEN_SETTINGS'"

    echo 'Set new version'
    sh "${mvnHome}/bin/mvn -B versions:set -DnewVersion=${version}"
}

stage('QA Build') {
    echo 'Execute maven build'
    sh "${mvnHome}/bin/mvn -B install -s '$MAVEN_SETTINGS'"
}

Now we use the exec-maven-plugin to read the project version from the pom.xml. We set "returnStdout" to return the terminal output and place it into the "version" variable.

Then we use our function "updateQAVersion()" to get the next version and update our pom-files with the "versions:set" goal of maven.

After that, we build the project to get the build package.

Code Snippet #6
stage('Push new QA version') {
    echo 'Commit and push branch'
    sh "git commit -am \"New release candidate ${version}\""
    sh "git push origin ${releaseBranch}"
}

stage('Push new tag') {
    echo 'Tag and push'
    sh "git tag -a ${version} -m 'release tag'"
    sh "git push origin ${version}"
}

The next stage is used to push the project with the changed version to the branch and create a tag. This only works because we set the "credential.helper cache". The get() function of groovy/pipeline does not support push (see Code Snippet #4)

Code Snippet #7
stage('QA artifact deploy') {
    echo 'Deploy artifact to Nexus repository'
    try {
        sh "${mvnHome}/bin/mvn deploy:deploy-file -DpomFile=pom.xml -DrepositoryId=${nexusRepositoryId} -Durl=${nexusBaseRepoUrl} -Dfile=${webAppTarget}/target/${webAppTarget}-${version}.zip -Dpackaging=zip -s '$MAVEN_SETTINGS'"
    } catch (ex) {
        println("Artifact could not be deployed to the nexus!")
        println(ex.getMessage())
    }
}

This stage deploys the created artifact (a .zip-file) to our Nexus Repository with the help of the maven command line command deploy:deploy-file. The configFileProvider is once again a Jenkins-Plugin which provides us with the maven settings.xml in which the credentials for the Nexus are defined.

Code Snippet #8
stage('Deploy AEM Author') {
    echo 'deploy on author'
    withCredentials([usernamePassword(credentialsId: 'xxx', usernameVariable: 'USERNAME', passwordVariable: 'PASSWORD')]) {
        sh "curl -u ${USERNAME}:${PASSWORD} -F file=@\"${webAppTarget}/target/${webAppTarget}-${version}.zip\" -F force=true -F install=true http://xxx/crx/packmgr/service.jsp"
    }
}

stage('Deploy AEM Publish') {
    echo 'deploy on publish'
    withCredentials([usernamePassword(credentialsId: 'xxx', usernameVariable: 'USERNAME', passwordVariable: 'PASSWORD')]) {
        sh "curl -u ${USERNAME}:${PASSWORD} -F file=@\"${webAppTarget}/target/${webAppTarget}-${version}.zip\" -F force=true -F install=true http://xxx/crx/packmgr/service.jsp"
    }
}

Now in the AEM-Deploy stage, we call curl commands and deploys it to the AEM-Servers.

Code Snippet #9
dir('develop') {
    stage('Checkout develop') {
        echo 'Load from GIT'
        git url: "${repositoryUrl}", credentialsId: "${gitCredentialsId}", branch: "${sourceBranch}"
    }

    stage('Set new develop version') {
        echo 'Clean Maven'
        sh "${mvnHome}/bin/mvn -B clean -s '$MAVEN_SETTINGS'"

        echo 'Set new version'
        sh "${mvnHome}/bin/mvn -B versions:set -DnewVersion=${version}-SNAPSHOT"
    }

    stage('Develop Build') {
        echo 'Execute maven build'
        sh "${mvnHome}/bin/mvn -B install -s '$MAVEN_SETTINGS'"
    }

    stage('Push new develop version') {
        echo 'Commit and push branch'
        sh "git commit -am \"New QA release candidate ${version}\""
        sh "git push origin ${sourceBranch}"
    }
}

Because we changed the version from "1.2.12" to "1.3.0" in the qa-branch we want to change the version in the develop-branch too. In the develop-branch, we add the "-SNAPSHOT" to the new version.

Conclusion
We have a functioning release process, from incrementing the maven/project version, creating tags, deploying to the nexus repository until we deploy it to the AEM-Instances. Even other branches can be updated. We have full control and are very flexible.

This saves a lot of work for developers.

But this process is not perfect    
  • The error handling is none existing (can be optimized)    
  • We need a separate Jenkins-Trigger-Job that calls the pipeline or else the pipeline calls itself after it commits to the branch. (We would need to implement something like ci-skip into our pipeline)
  • We need to configure a lot of credentials and maven settings in Jenkins


By aem4beginner

AEM - Continuous Integration with Jenkins

Goal
For Source Code Management using GIT (Bitbucket) check this post

Jenkins is a continuous integration tool (CI) for automating builds. In simple terms, developers in an AEM project code a feature or bugfix, test on their local instances, commit/push to a central SVN or GIT repo; continuous integration tools like Jenkins kick-off, build packages, and deploy to some common AEM test/integration servers. The quality team can then test the feature/bugfix on the AEM integration server

In a nutshell...

1) Developer starts working on a feature/bug-fix, marks the story in JIRA as In Progress
2) Tests the code on local AEM
3) Commits/Pushes change to the SVN/GIT repo. For source code management using GIT check this post
4) A configured Jenkins Hook in GIT can kick off the build, deploy packages to AEM Integration Server. When too many changes are being pushed to the repo, the admin may choose to manually start builds through Jenkins console (Jobs), to refresh integration environments.
5) Developer moves the story to QA
6) Quality team picks up the story and tests code changes on the Integration Server.

Build Demo

Install Jenkins
1) Get Jenkins for Windows here
2) Run install with default settings. For more refined steps check this link
3) When completed, service Jenkins is available and a browser window opens up with URL http://localhost:8080/

Configure Jenkins Global Security
1) After installation, by default, no authentication is required for accessing the Jenkins console. So it allows anyone to creates a job, right away

2) To secure Jenkins, enable Global Security (Manage Jenkins -> Configure Global Security) http://localhost:8080/configureSecurity/


3) A Jenkins internal database of users can be created by selecting Jenkins’ own user database option or connect to organization LDAP. In the following example, Jenkins was connected to LDAP on localhost:389 (a sample OpenLDAP database). So any logged-in user can modify the configuration, create jobs, etc, a more fine-grained access control can be set by selecting Matrix-based security


4) Two-sample users eaem, nalabotu were created in the local OpenLDAP database

JDK, GIT, Maven Configuration

1) Access the configuration screen, Manage Jenkins -> Configure System (http://localhost:8080/configure)

2) Configure the JDK used for compiling sources


3) Configure the GIT plugin to download sources from a remote repository. For this post, use sample repo experience-aem-intranet created in this post

4) Add the path to GIT executable on the file system, used for checking out source code


5) Configure MAVEN install, required for running any typical AEM project build


6) Restart Jenkins service

Creating Build Jobs
1) Create new job (If not already logged-in, login as user, say eaem)

2) Enter name experience-aem-intranet-portal and select the project type Maven

3) Configure the GIT repository URL and credentials. The Branches to build specifies which branch of the repo should be downloaded and compiled, here they develop


4) Specify the relative path of pom.xml; the goal autoInstallPackage builds, installs packages to provided CQ instance, here its localhost

clean install -X -P autoInstallPackage -Dcrx.host=localhost -Dcrx.port=4502 -Dcrx.user=admin -Dcrx.password=admin -Dvault.timeout=30

5) Run the build by clicking Build Now

6) Build creates a workspace with sources downloaded from remote GIT repo

7) Packages are Installed on AEM running on localhost:4502

8) If the GIT repo can communicate with Jenkins, a webhook can be configured in GIT to trigger a build automatically when there is a commit on the build branch say develop


By aem4beginner

January 4, 2021
Estimated Post Reading Time ~

Build automation with Gradle

As all the world knows, inside CI/CD exists an automated building. This concept is so important in DevOps because here you build your package and run automate tests (depends on the result if you are continuous or abort the next phases). I know that already there is a lot of documentation about this topic, but I will write about my concerns and opinions.

Gradle works with a few CI tools, such as Jenkins, Travis, and TeamCity. Its ideal for a lot of languages, even, it can be extended by plugins (developed mainly by the community). Another feature that I like is its simplicity. All commands and use are logical, so, you no need a lot of memory in your head to remember how it works and extend its functionality.

Installation in RedHat/Centos/Fedora distributions
Firstly, you need to install a JDK, for me, OpenJDK is the best option because It is into the repositories.

sudo [yum|dnf] install unzip java-1.8.0-openjdk -y

Create the home directory for Gradle.
sudo mkdir /opt/gradle
sudo chown gradleuser: /opt/gradle

Download the binary from the official site.
wget -O ~/gradle-6.5-bin.zip https://services.gradle.org/distributions/gradle-6.5-bin.zip

Uncompress the archive file.
unzip -d /opt/gradle/ gradle-6.5-bin.zip
sudo vi /etc/profile.d/gradle.sh

Add this variable declaration in the afore-mentioned file.
export GRADLE_HOME=/opt/gradle/gradle-6.5export PATH=$PATH:$GRADLE_HOME/bin

Logout from your current session and login again.

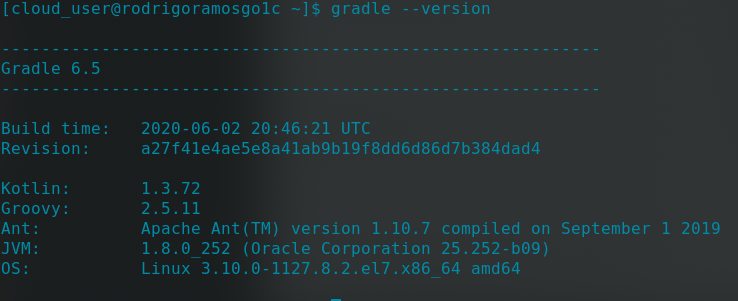
Test your installation.
gradle --version

Output

Gradle Basics
You have to put it into your project directory. So, once there, you must initialize with the following command. Be free to put where you want, surely you will discover a better way.

cd $MYPROJECTDIRECTORY/
gradle init

After that, some files would be generated.


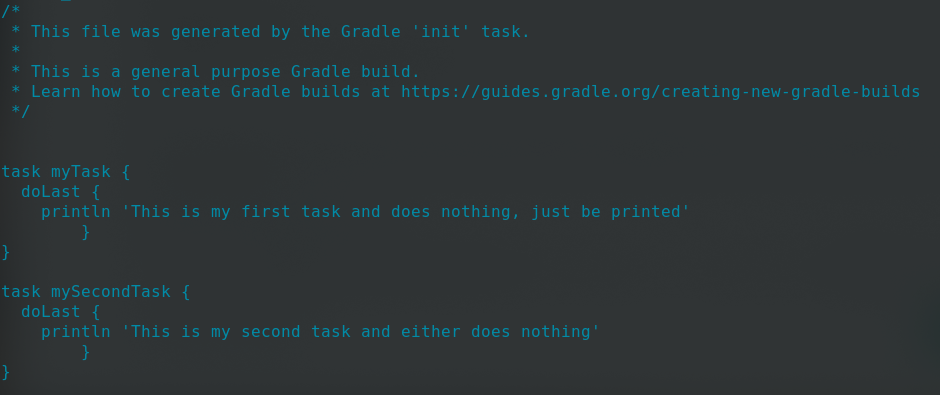
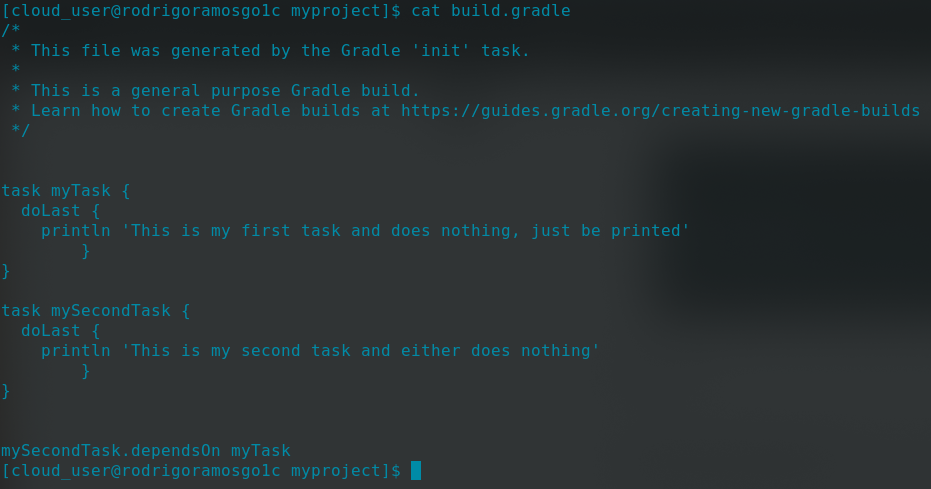
The file named build.gradle must contain all tasks to build our packages. In this example as the project does not exist yet, I will not build a package, I just only show how to use this file. In the next posts, I will use real examples.

I write two tasks and both just print a message.


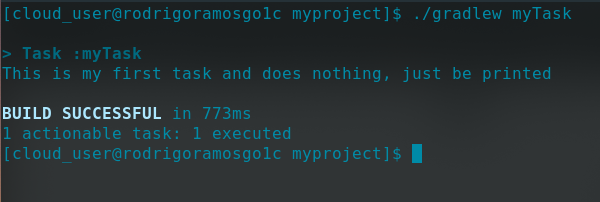
Then, I test them../gradlew myTask


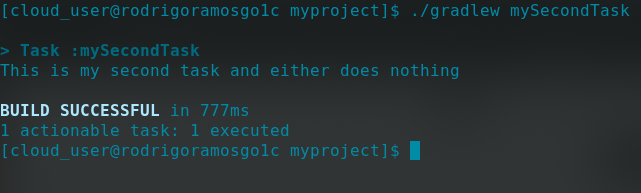
Second test../gradlew mySecondTask


Surely at one moment, we will structure our build having dependencies inside the file between tasks.


The last line of the picture is where I have declared my dependency. “mySecondTask depends on myTask”. We will see.


By aem4beginner

Declarative deployment for AEM application

The objective of this article is to describe how to create an AEM-CLI (AEM Command Line Interface) and use it for Declarative Deployment to an AEM application with a lot of practical snippets of codes.

1) Introduction
What and Why Declarative is better than procedural deployment?
Procedural deployment describes a bundle of steps requires to transform the application from a particular version to another. The main point of this practice is that it tightly depends on the context of each time deployment and would be executed differently based on the release requirements of a specific version of the application as well as the targeting version that the application would need to transform to.

For example, let’s assume our AEM environment has been installed initially with some packages like: The Service Packs, Hotfixes, ACS-Common, Grabbit, Access Control Tool, and some custom packages. In a particular window, our team would have released a new version for one of the custom packages or need to increase the version for one of the above third-party packages and would need to deploy those new changes to the server. By using procedural deployment, we need to create a document to describe clearly the steps of how to deploy just those new packages in the desired order to AEM and send it to the operation team to execute it. Or we could properly go further to create a bash script to automate the process by using some CURL commands pointing to our desired packages. However, in the next release, we would have to modify either this deployment process document or script for a different scenario deployment with different released packages.

Then one of the biggest disadvantages of the procedural approach is that sometimes in the far future it is almost not possible to know which exactly packages, codes, hotfixes have been installed to the server therefore recreating a similar environment is extremely difficult and need to trace back all the historical changes or related deployment documents.

On the other side, “Declarative deployment” focuses on describing a desired state of the system, what a system does look like at the particular version which allows us to create a system at a required state (version) without knowing the history of the deployment or whatever state is the current system.

Let’s go back to the above example, a declarative deployment model would consist of all information of packages that need to be installed to make the system at the production-alike state, and for any new release, all those packages' information remains the same except the ones with the new version. That means, all the packages from the beginning of the project are all reflected in the declarative model.

Read more about declarative-vs-procedural.

2) How to achieve?
A Traditional way for declarative deployment is using fat-package:

Fat-package is a normal package that declares all dependencies sub-packages and uses “content-package-maven-plugin” to create a combined-big-package all-in-one.
<plugin>
<groupId>com.day.jcr.vault</groupId>
<artifactId>content-package-maven-plugin</artifactId>
<extensions>true</extensions>
<configuration>
<filterSource>${basedir}/META-INF/vault/filter.xml</filterSource>
<verbose>true</verbose>
<failOnError>true</failOnError>
<group>My-Group</group>
<version>${bamboo.buildKey}-${bamboo.buildNumber}-${project.parent.version}</version>
<embeddeds>
<embedded>
<groupId>my.custom</groupId>
<artifactId>my-custom.core</artifactId>
<target>/apps/my-custom/install</target>
</embedded>
</embeddeds>
<subPackages>
<subPackage>
<!--This package normally is not a part of the fat-package,
I put it here to just demonstrate my point-->

<groupId>adobe.binary.aem.64.servicepack</groupId>
<artifactId>AEM-6.4.3.0-6.4.3</artifactId>
<filter>true</filter>
</subPackage>
<subPackage>
<groupId>com.adobe.acs</groupId>
<artifactId>acs-aem-commons-content</artifactId>
<filter>true</filter>
</subPackage>
<subPackage>
... other packages.
</subPackage>
</subPackages>
</configuration>
</plugin>
Fat-Package has some disadvantages, the obvious one is that it is very heavy if the application consists many packages, including the custom and third-party ones. Furthermore, it is time consuming when installing fat-package because all the sub-packages need to be reinstalled unnecessarily every time.

A second approach is using a custom CLI (I call it AEM-CLI) which I will discuss in the rest of this article. AEM-CLI is mainly making the declarative deployment easy, and possible to solve all the problems of fat-package approach I mentioned above.

3) The deployment architecture with AEM-CLI
Why CLI?


CLI is a standalone small program and would not cause any impact to the AEM application. In addition, it is very easy to inject the CLI to the AMI (Amazon Machine Image) or to the host machine of AEM instance (The same is true for other kinds of Machine Image).

A typical deployment process with AEM-CLI:


Note that, deployment server in my case is Bamboo or Jenkins or it could be a simple Shell script running in some where. The deployment-server can communicate with CLI by SSH protocol, and CLI downloads all artifacts from Artifact Repositories. The YamlFile here is a declarative model file at a particular version (1.0.5 for instance), I will talk in detailed about this file in next section.

There is an another way for using the CLI is putting it in deployment-server, and remotely deploy to all AEM instances, but this approach may have some performance and security issue so I do not recommend it.

It is also even simpler to just install the CLI on Author Instance, and let CLI trigger the replication of all the packages to all publishers. However, this practise does not support Blue-Green or Canary deployment strategy.

** There is one more advantage of using AEM-CLI, is that it makes deploying to AEM server from scratch possible and easy. The following chart will show the process:


Notes, maybe in another article I will discuss more about Blue-Green deployment, and even real-time scaling AEM just as easy as other stateless applications, by adopting AEM-CLI and other techniques.

4) How to implement an AEM-CLI for declarative deployment:

Some main features of AEM-CLI application:

- First one is the ability to read a list of declared packages from a particular text file and then download them from the internet (Repository Server) to local storage.

- Secondly, the CLI needs to talk with AEM server via REST APIs or JMX in order to upload, install, replicate and do health-check to the server.

- And some extra utilities to make to CLI user friendly and flexible enough.

Now let’s go closer to the implementation details:

Here, I use YAML format for declarative packages model — and name it packages-0.0.1.yaml. Or you could use Json, Xml, or whatever format you feel comfortable. Following one is my sample:
version: 0.0.1
packages:
# AEM 6.4 Service Pack 3
- group: adobe.binary.aem.64.servicepack
name: AEM-6.4.3.0-6.4.3
version: 1.0
type: zip
# acs-aem-commons-content
- group: com.adobe.acs
packageGroup: adobe/consulting
name: acs-aem-commons-content
version: 3.4.0
type: zip
# Netcentric/accesscontroltool
- group: biz.netcentric.cq.tools.accesscontroltool
name: accesscontroltool-package
version: 2.3.2
type: zip
# Adobe Experience Manager Core WCM Components Full Package
group: com.adobe.cq
name: core.wcm.components.all
version: 2.3.0
type: zip
# Custom packages
- group: my.custom
name: my-custom.ui.apps
version: 1.5.1
type: zip
- group: my.custom
name: my-custom.ui.config
version: 1.5.1
type: zip
- group: my.custom
name: my-custom.ui.content
version: 1.3.0
type: zip
- group: my.other.custom
name: my-other-custom.ui.app
version: 1.0.0
classifier: activation-tree
type: zip
# And many more more other packages.
I would use Java as the language in this article as it is the language I am most familiar and JVM is already available in the AEM server so no need to install any extra dependency. But you can use Nodejs, Python, GoLang, Ruby, or even Shell-Bash script to write it.

First of all, to read a YAML file in Java:
// Dependencies//'com.fasterxml.jackson.dataformat:jackson-dataformat-yaml:2.9.8
//'com.fasterxml.jackson.core:jackson-databind:2.9.8'
@Data
public class Yaml {
private String version;
private List<Artifact> artifacts;
}
@Data
public class Artifact {
private String group;
private String name;
private String version;
private String type;
private String classifier;
private boolean force;
}
public Yaml pasteYaml(File yamlFile) {
try {
ObjectMapper mapper = new ObjectMapper(new YAMLFactory());
Yaml packages = mapper.readValue(yamlFile, Yaml.class);
return packages;
} catch (Exception err) {
log.info("Pasting YAML exception: {}", err);
}
return null;
}

Then convert an artifact to a downloadable URL
public static String getArtifactPath(String group, String artifactId, String version, String packageing, String classifier) {
final StringBuffer stringBuffer = new StringBuffer();
stringBuffer.append("/").append(StringUtils.replace(group, ".", "/"));
stringBuffer.append("/").append(artifactId);
stringBuffer.append("/").append(version);
stringBuffer.append("/").append(artifactId);
stringBuffer.append("-").append(version);
if (StringUtils.isNoneEmpty(classifier)) {
stringBuffer.append("-").append(classifier);
}
stringBuffer.append(".").append(packageing);
return stringBuffer.toString();
}
// There are maybe many maven repositories, such as mavenCentral, Jmaven, or your company own mavenRepo, etc.
// So you need to check which repository does each artifact belong to before start download it.
String mavenRepositoryUrl = "https://repo.adobe.com/nexus/content/groups/public";
String URL = mavenRepositoryUrl + getArtifactPath(...);
download(URL);

After downloaded all artifacts locally, the next step is to upload and install them to AEM instance “one by one” with “health-checking step in-between”.

To upload a package file to AEM
// [**1] AemPathConstants.PKG_MANAGER_JSON_PATH = "/crx/packmgr/service/.json"@Data
public class CrxPackageManagerResponse {
private boolean success;
private String msg;
private String path;
}
public CrxPackageManagerResponse uploadPackage(AemInstance instance, File file, boolean force) {
try {
URI uri = URI.create(instance.getServer() + AemPathConstants.PKG_MANAGER_JSON_PATH);
log.info("Sending Upload Request: {}, file: {}", uri, file.getName());
MultiValueMap<String, Object> body = new LinkedMultiValueMap<>();
body.add("package", new FileSystemResource(file));
body.add("cmd", "upload");
body.add("force", String.valueOf(force));
// force should be false, unless special cases.
HttpEntity<MultiValueMap<String, Object>> requestEntity
= new HttpEntity<>(body, RequestUtils.authenticatedHeaders(instance, MediaType.MULTIPART_FORM_DATA));
ResponseEntity<CrxPackageManagerResponse> responseEntity
= restTemplate.postForEntity(uri, requestEntity, CrxPackageManagerResponse.class);
log.info("Upload Response: {}", responseEntity);
return responseEntity.getStatusCode().is2xxSuccessful() ? responseEntity.getBody() : null;
} catch (Exception er) {
log.error("Upload exception: {}", er);
throw new CrxUploadException(er.getMessage());
}
}
// Note:
// CrxPackageManagerResponse.path will looks like: /etc/packages/my-group/my-custom.apps.zip
// this information will be used later to install that package.

Note: with the “force” of false, all the installed packages will not get re-upload and install, unless there is a special case we need to re-install the package every time deployment. Thus this practice solves the problem of installing unnecessary packages in the fat-package approach.

[**1], when using AEM REST APIs to upload and install packages, AEM provides two endpoints. The first one, “/crx/packmgr/service.json” returns XML and able to do both upload and install jobs in one call. However, I would recommend using “/crx/packmgr/service/.json” which returns JSON with the associated etcPackagePath of the package that you can use later to either install or even replicate that package.

And the final step, to install the previously uploaded package:
//fullEtcPackagePath is returned by the upload function
//If fullEtcPackagePath is null, the package is no need to install.
public CrxPackageManagerResponse installPackage(AemInstance instance, String fullEtcPackagePath) {
try {
URI uri = URI.create(
instance.getServer()
+ AemPathConstants.PKG_MANAGER_JSON_PATH
+ fullEtcPackagePath
);
log.info("Sending Install Request: {}", uri);
MultiValueMap<String, Object> body = new LinkedMultiValueMap<>();
body.add("cmd", "install");
HttpEntity<MultiValueMap<String, Object>> requestEntity
= new HttpEntity<>(body, RequestUtils.authenticatedHeaders(instance, MediaType.APPLICATION_FORM_URLENCODED));
ResponseEntity<CrxPackageManagerResponse> responseEntity =
restTemplate.exchange(uri, HttpMethod.POST, requestEntity, CrxPackageManagerResponse.class);
log.info("Install Response: {}", responseEntity);
return responseEntity.getStatusCode().is2xxSuccessful() ? responseEntity.getBody() : null;
} catch (Exception er) {
log.error("Install exception: {}", er);
throw new CrxInstallException(er.getMessage());
}
}
Similarly, we can create a replicationPackage() function just like the installPackage().

* Note that, one of the special attitude of an OSGi application is that it sometimes
needs to restart internally all of it’s bundles after be updated by a particular new bundle or when a particular configuration get updated, then during this internal restarting, the whole system is freak-out and the installation process has to wait. This characteristic makes the installation not as simple as just posting all packages, instead of, we need to check AEM healthy status in between two installations and frequently need to pause the process in order to let the server become stable again to handle the next installation requests.
Fortunately, the AEM system provides a REST Api to expose all the OSGi bundles states
(Installed, Resolved, Active, Fragment, Restarting), so we can utilise this feature to predict whether the system is stable enough:

@Data
public class BundlesJson {
private String status;
/* This contains a summary of all bundles status
which we need to refer*/
private List<Integer> s;
private List<Bundle> data;
}
private static final int BUNDLE_RESOLVED_ORDER = 3;
private static final int BUNDLE_INSTALLED_ORDER = 4;// AemPathConstants.OSGI_BUNDLES_LIST_JSON = "/system/console/bundles.json"
public boolean isHealthy(AemInstance instance) {
try {
URI uri = URI.create(instance.getServer()
+ AemPathConstants.OSGI_BUNDLES_LIST_JSON);
log.info("Sending Request: {}", uri);
HttpEntity<String> requestEntity
= new HttpEntity<>(RequestUtils.authenticatedHeaders(instance, MediaType.APPLICATION_JSON_UTF8));
ResponseEntity<BundlesJson> responseEntity = restTemplate.exchange(uri, HttpMethod.GET, requestEntity, BundlesJson.class);
log.info("Response: {}", responseEntity);
return responseEntity.getStatusCode().is2xxSuccessful()
// Check if no RESOLVED bundle
&& responseEntity.getBody().getS().get(BUNDLE_RESOLVED_ORDER) == 0// Check if no INSTALLED bundle
&& responseEntity.getBody().getS().get(BUNDLE_INSTALLED_ORDER) == 0;
} catch (Exception er) {
log.error("uploadAndInstall exception: {}", er);
}
return false;
}
public void waitForAemStable(AemInstance instance, int timeoutInSecond) {
int totalWaitedTime = 0;
while (!isHealthy(instance)) {
try {
TimeUnit.SECONDS.sleep(DURATION_RETRY_IN_SECOND);
totalWaitedTime += DURATION_RETRY_IN_SECOND;
} catch (InterruptedException e) {
log.info("waitForAemStable->InterruptedException: {}", e);
}
if (totalWaitedTime > timeoutInSecond) {
log.error("Aem is remaining unhealthy after: {} (seconds)", timeoutInSecond);
// It is possible to let aem-cli restart the AEM in this casethrow new AemUnhealthyException("Aem is remaining unhealthy after: " + timeoutInSecond + " (seconds)");
}
}
}

So the whole installation process looks like this:
readYamlFile()packagesFiles = downloadAllArtifacts();forEach(file : packagesFiles) {    String etcPath = uploadPackage(file);    if etcPath not empty: installPackage(etcPath);    waitForAemStable();
}

The last piece of code is how to create a command-line interface in Java, and I would recommend using picocli library. Furthermore, if you want to utilize the dependencies injection and fat-jar packaging, you can use Spring Framework, and Spring-boot as well.
// Spring boot, CommandLineRunner@SpringBootApplication
@Log4j2
public class AemCliApplication implements CommandLineRunner {
// pococli code@Autowiredprivate CommandLine commandLine; public static void main(String[] args) {
SpringApplication.run(AemCliApplication.class, args);
}
@Overridepublic void run(String... args) {
commandLine.parseWithHandlers(new CommandLine.RunAll().andExit(0),
CommandLine.defaultExceptionHandler().andExit(1), args);
}
}
And a command in pococli would look like this:
@Component
@Log4j2
@Getter
@ToString
@CommandLine.Command(footer = "Copyright(c) 2019",
mixinStandardHelpOptions = true,
versionProvider = CliVersionProvider.class,
subcommands = {CommandLine.HelpCommand.class})
public class AemMainCommand implements Runnable {
@Option(names = {"-n", "--name"}, description = "AEM instance name. Example SIT, UAT, PROD")
private String name;
@Option(names = {"-s", "--server"}, description = "AEM Server including protocol and port. Ex: http://localhost:4502")
private String server;
@Option(names = {"-u", "--user"}, description = "User")
private String user;
@Option(names = {"-p", "--pass"}, description = "Password")
private String password;
@Option(names = {"-t", "--type"}, description = "AEM Instance Types: ${COMPLETION-CANDIDATES}")
private InstanceType type;
@Autowired@ToString.Exclude
@Getter(AccessLevel.NONE)
private DefaultCliConfig defaultCliConfig;

@Autowired@ToString.Exclude
@Getter(AccessLevel.NONE)
private AemInstallService installService;
@Overridepublic void run() {
log.info("Aem->: {}-{}", this::getAemInstance);
installService.install(getAemInstance(), ....);
}
public AemInstance getAemInstance() {
AemInstance defaultInstance = defaultCliConfig.getAem();
return new AemInstance(
StringUtils.isNoneEmpty(name) ? name : defaultInstance.getName(),
StringUtils.isNoneEmpty(server) ? server : defaultInstance.getServer(),
type != null ? type : defaultInstance.getType(),
StringUtils.isNoneEmpty(user) ? user : defaultCliConfig.getAem().getUser(),
StringUtils.isNoneEmpty(name) ? password : defaultCliConfig.getAem().getPassword()
);
}
public Integer getCheckHealthTimeout() {
return defaultCliConfig.getCheckHealthTimeout();
}
5) AEM-CLI expected usage:
Assuming we all finished those above implementation steps. The usage of AEM-CLI would look like:
// Using the AEM-CLI is just simple as any other typical CLIs:
$ java -jar aem-cli.jar install /tmp/packages-0.0.1.yaml
// Or we can even wrap it in a SH script and use like:
$ aem-cli install https://mynexus.com/release/packages-0.0.1.yaml
// Others functions:
$ aem-cli --help
$ aem-cli config --server http://localhost:4502 --user admin ...
$ aem-cli report --lastest
From now on, instead of deploying a list of binary artifacts to AEM servers, we just need to release the package-xxx.yaml, and AEM-CLI will take care of the rest of the process.

6) Conclusion:
This article shows how to implement a custom CLI in order to improve the deployment process, especially following the “declarative deployment” approach to making the re-creation/redeployment just as simple as possible. If you find this kind of concept is interesting and helpful please leave your comment, or any suggestion so I can consider starting a new open source project of this one.

Also, I hope AEM 6.5 will officially support the concept of “composite-nodestore”, if then it will be more straightforward to deploy AEM follow a blue-green approach or even more.

Here is the diagram to demonstrate the point:


The inspiration for this article comes from:


By aem4beginner