Showing posts with label Adobe Target. Show all posts

December 29, 2020
Estimated Post Reading Time ~

Target Integration with AEM 6.5 - Personalization

I have integrated AEM 6.5 and Target successfully through IMS and legacy Target cloud service. I created an activity on AEM and pushed it to Target. I am able to see the activity in AEM. When I open the page either in publish or in author with wcmmode disabled, I got the following error

Rendering mbox failed target-global-mbox : {status: "error", error: "unknown client code : <client-code>

For this, I changed the property "clientcode" from tenant id to client code in the target configuration. After this I am getting the following error:

"The default offer path was not found in the internal map for mbox target-global-mbox"

And the targeted content is hidden on the page. Even the default content is not shown.

Solution:
This was happening because, for some reason, another offer (which was configured to some other page) was being resolved on this page. Hence nothing was displayed. I deactivated the old offer and then the default content was displayed. I still have a problem with the offer resolution.


By aem4beginner

AEM 6.1 client context error while configuring Test and target

While configuring Test and target I have to include the client context to my site.

Now I am getting the below error in error.log. There are no issues in the functionality but i can see following lines in the error logs(user admin, local author environment(AEM6.1))

18.01.2016 09:36:47.107 *ERROR* [0:0:0:0:0:0:0:1 [1453070207104] GET /etc/segmentation.segment.js HTTP/1.1] org.apache.sling.servlets.get.impl.DefaultGetServlet No renderer for extension js, cannot render resource JcrNodeResource, type=rep:ACL, superType=null, path=/etc/segmentation/aam/rep:policy

18.01.2016 09:36:47.108 *ERROR* [0:0:0:0:0:0:0:1 [1453070207104] GET /etc/segmentation.segment.js HTTP/1.1] org.apache.sling.servlets.get.impl.DefaultGetServlet No renderer for extension js, cannot render resource JcrNodeResource, type=rep:ACL, superType=null, path=/etc/segmentation/rep:policy

I am not using AAM(adobe audience manager) so why it is trying to include that node?

Solution:
  • Go to the home page of your site
  • Change WCM mode to design mode and configure the Segment Path to the test and target segmentation path in your instance.


By aem4beginner

Error while exporting Experience Fragment from local AEM to Adobe Target

I am getting below error while exporting Experience Fragment from local AEM to Adobe Target


25.05.2020 03:15:58.319 *WARN* [0:0:0:0:0:0:0:1 [1590390943951] GET /editor.html/content/experience-fragments/target_fragments/ak---fragment1/master.html HTTP/1.1] org.apache.sling.caconfig.resource.impl.def.DefaultConfigurationResourceResolvingStrategy Ignoring reference to /conf/we-retail/settings from /conf/we-retail/settings - Probably misconfigured as it ends with '/settings'
25.05.2020 03:16:22.784 *INFO* [0:0:0:0:0:0:0:1 [1590390980294] GET /libs/wcm/core/content/components.1590390968783.json HTTP/1.1] com.day.cq.wcm.core.impl.components.ComponentServlet provided components.
25.05.2020 03:16:38.971 *WARN* [0:0:0:0:0:0:0:1 [1590390998281] POST /libs/cq/experience-fragments/content/commons/targetexporter.html HTTP/1.1] org.apache.sling.engine.impl.request.RequestData SlingRequestProgressTracker not found in request attributes
25.05.2020 03:16:42.637 *INFO* [sling-default-4-health-org.apache.sling.discovery.oak.SynchronizedClocksHealthCheck] org.apache.sling.discovery.oak.SynchronizedClocksHealthCheck execute: no topology connectors connected to local instance.
25.05.2020 03:16:45.019 *ERROR* [0:0:0:0:0:0:0:1 [1590390998281] POST /libs/cq/experience-fragments/content/commons/targetexporter.html HTTP/1.1] com.adobe.cq.xf.impl.adobetarget.exporter.AbstractExperienceFragmentExporter Create offer request failed!
API request failed
com.day.cq.analytics.testandtarget.TestandtargetException: Create offer request failed!
at com.day.cq.analytics.testandtarget.impl.RestApiAdapter.create(RestApiAdapter.java:114) [com.adobe.cq.cq-target-integration:1.3.28]
at com.day.cq.analytics.testandtarget.impl.RestApiAdapter.createOffer(RestApiAdapter.java:97) [com.adobe.cq.cq-target-integration:1.3.28]
at com.day.cq.analytics.testandtarget.impl.TestandtargetServiceImpl.createHTMLOffer(TestandtargetServiceImpl.java:65) [com.adobe.cq.cq-target-integration:1.3.28]
at com.day.cq.analytics.testandtarget.impl.TestandtargetCampaignMediatorImpl.syncOffer(TestandtargetCampaignMediatorImpl.java:537) [com.adobe.cq.cq-target-integration:1.3.28]
Caused by: com.day.cq.analytics.testandtarget.impl.service.WebServiceException: API request failed
at com.day.cq.analytics.testandtarget.impl.service.WebServiceImpl.request(WebServiceImpl.java:610) [com.adobe.cq.cq-target-integration:1.3.28]
at com.day.cq.analytics.testandtarget.impl.service.WebServiceImpl.request(WebServiceImpl.java:564) [com.adobe.cq.cq-target-integration:1.3.28]
at com.day.cq.analytics.testandtarget.impl.service.WebServiceImpl.createOffer(WebServiceImpl.java:265) [com.adobe.cq.cq-target-integration:1.3.28]
at com.day.cq.analytics.testandtarget.impl.RestApiAdapter.create(RestApiAdapter.java:109) [com.adobe.cq.cq-target-integration:1.3.28]
... 147 common frames omitted
Caused by: com.day.cq.analytics.testandtarget.impl.service.WebServiceException: Unexpected response status code [403] for request [https://mc.adobe.io/xxxxxxxxxxxxxxxxpartner/target/offers/content ].
{"httpStatus":403,"requestId":"QGumpPGNen1h519l19N6ik1lNjiUVS2K","requestTime":"2020-05-25T07:16:45.410Z","errors":[{"errorCode":"Forbidden.Resource","message":"Access denied. To perform this operation, all of the following privileges are required \"[editor]\"."}]}

at com.day.cq.analytics.testandtarget.impl.service.WebServiceImpl.request(WebServiceImpl.java:607) [com.adobe.cq.cq-target-integration:1.3.28]
... 150 common frames omitted
25.05.2020 03:17:42.636 *INFO* [sling-default-5-health-org.apache.sling.discovery.oak.SynchronizedClocksHealthCheck] org.apache.sling.discovery.oak.SynchronizedClocksHealthCheck execute: no topology connectors connected to local instance.

I am already done with the related configurations


Solution:
I ran into a similar issue while working on my local instance.
Please give the "Editor" role to the integration and wait for some time.

It worked for me. Also, review the section "Assigning privileges to the Integration" here


By aem4beginner

September 18, 2020
Estimated Post Reading Time ~

Integrating AEM 6.5 with Adobe Target


Over a year ago, I wrote a guide for integrating Adobe Experience Manager (AEM) 6.4 with Adobe Target. Since then, with the release of AEM 6.5, a few things have changed. I see this article as an update of the previous guide we released, so here I’ll only highlight some key differences and issues I ran into when implementing with AEM 6.5. All the same prerequisites in 6.4 still apply in 6.5, so make sure to check out the first guide before getting started, if you haven’t yet.

Adobe IMS Configuration for Target
The primary change in configuring the integration is how AEM authenticates with the Target API. The new recommended approach for this is using Adobe IMS (Identity Management System) instead of username and password credentials. This approach previously in AEM 6.4 only worked for Adobe Launch.

When you set this up, note that you will need a separate API integration in the Adobe Developer Console for Launch and Target. I initially thought we could use the same, but that doesn’t work because each integration is tied to just one product.

One roadblock we discovered is that only the actual "admin" user is able to create IMS configurations. Being in the "administrators" group is not good enough. As you can see here, we get an error saying, "user does not have necessary permissions:"


We ended up working closely with our AMS Customer Success Engineer (CSE) to get this configured properly across all the environments. This road-block seems like a product flaw to me so I wouldn’t be surprised to see this fixed in an upcoming service pack.

Other Issues That We Have Run Into
Error: Uncaught ReferenceError: CQ is Not Defined

If you see this error in your browser’s developer console, make sure your clientlib dependencies are correctly set up and included in the proper order.

In our case, we ended up having to add the cq.shared library in the <head> of the page so that the CQ object is defined before any of the Target libraries which rely on it are loaded.

<sly data-sly-use.clientlib="/libs/granite/sightly/templates/clientlib.html" data-sly-call="${clientlib.js @ categories='cq.shared'}"></sly>

Error: Get mboxes Request Failed!
There can be many reasons for this error message. It helps to create a custom logger for com.day.cq.analytics.testandtarget.impl to get more visibility into why the API call is failing. Most likely reasons are:
  • Invalid credentials (if still using those instead of IMS)
  • Typo in the client code
  • IMS config does not have proper API integration configured in Adobe.io
We found an interesting edge case for one of our clients. Their client code did not match up with the tenant name in Target. One of their brands was the first to use Target, so that’s what the client code was named after. However, after migrating other brands over and changing the name to the umbrella organization’s name, the Target client code was not kept in sync. It required Adobe support and account management to get involved in resolving the issue. I suspect this is not a very likely edge case.

Creating Activity Fails Silently
The use case here is as follows: You’ve set up the entire integration, and you now want to create a Target activity by targeting components from the AEM interface. After you fill out the "Create Activity" dialog and hit "Save," it confirms that the activity was successfully created. However, in the browser’s developer console, you see a 404 for the activity path (e.g. /content/campaigns/brandname/master/paul-local-xt-test-1/jcr:content.experiences.json).

The issue here seems to be a missing sling:resourceType on the /content/campaigns/brandname/master node which prevents the ActivityUpdateServlet from firing properly and therefore the activity is never actually saved.

This looks like another AEM bug to me so it will hopefully be addressed in the not too distant future.

Launch issue in AEM 6.5.0
If you’re running on AEM 6.5.0 without any service packs, be aware that the Launch integration doesn’t work. An exception message is displayed when trying to edit and save the Experience Manager launch configuration: 

"Postfix-containing path /conf/brandname/settings/cloudconfigs/dtm-reactor/jcr:content/production/async@Typeh int contained in the modification list. Check configuration"

This is a known issue that was addressed by service pack 1.

Additional Resources
Here are some additional resources worth checking out for setting up the AEM/Target integration manually:
Summary
The AEM/Target integration hasn’t changed much between versions 6.4 and 6.5, the main change being the introduction of Adobe’s IMS-based authentication. However, there are still a lot of moving pieces to getting it all set up and working correctly. Use this guide as well as my last one related to 6.4 to help you avoid common pitfalls when integrating AEM 6.5 and Adobe Target.

Source: https://www.bounteous.com/insights/2020/08/18/integrating-aem-6-5-adobe-target/


By aem4beginner

May 15, 2020
Estimated Post Reading Time ~

Email Personalization & Targeting with Adobe Campaign

You can't be effective in marketing anymore without knowing your customers. With Adobe Campaign you'll get a 360-degree view of their habits and behaviours.

Email personalisation to create ROI
We are now in the Big Data era and companies all over the world are able to gather an incredible amount of data and insights not only about their 'offline' customers, but also about their online visitors, social followers, etc. For most companies, this information is stored in a CRM and similar other databases but it is not always gathered in a comprehensive way. With the Adobe Marketing Cloud, the possibility to link and synchronise all this data is available and comes into action with Adobe Campaign in particular.

Adobe Campaign provides campaign planning as well as offer- and personalisation-management capabilities for marketing automation and the execution of marketing programs across all channels - online (emails, apps...) and offline (SMS...). As such, it is is the best-in-class tool to deliver personalised 1:1 marketing on an enterprise level.

As highlighted in a recent study by Adobe and Econsultancy (open the pdf on adobe.com), most companies are already personalising digital experiences and messaging with personal data such as name, gender and location (65 to 70 per cent of them), less than half are using user preferences, purchase history and online behavioural information. Yet, the latter are described as the top three type of data with high ROI when used to personalise offers. As such, it is time for companies to jump to the next level of personalisation.

Personalisation & targeting in Adobe Campaign

To kick-off email personalisation efforts in the right way, it is important that digital marketers check the quality and completeness of all data which is available and accessible for them. As said above, most of the time customer and prospect data is scattered inside different tools and it is often hard for companies to have a comprehensive view of this data. Marketers need a solution like Adobe Campaign to get a 360-degree view of their customer's personal information and behaviours across all channels. This is only achievable by leveraging data automatically from online and offline channels through connectors and automated imports.

Personalisation Fields
Adobe Campaign allows marketers and web developers to easily incorporate customers and prospects personal information and interests into an email or a offer easily. Once all your customer and visitor data has been synched or imported, it is easy to select the right fields of information in the dropdown menu.

It is also possible to add pre-defined personalised blocks like offers or promotions as it can be seen above. These pre-defined blocks can include conditional offers or just standardised HTML blocks (text, links, images...). Additionally, users are able to add conditional content directly and therefore adapt the text and content of emails based on the actual profile of the recipients.

Targeting and Segmentation
Regarding targeting, Adobe Campaign enables the creation of simple to complex and advanced workflows that can help marketers define multiple segments and offers as well as automating their entire marketing campaigns from A to Z. Segments can be pre-defined using filters or by using queries in workflows. Once workflows are ready to be launched, a preview of the estimated target by segment branch will be shown. Workflows provide the possibility to target offers based on personal data but also behavioural and purchasing data from external sources in a comprehensive and visual way.


Multi-staged workflows will show the campaign proceeding over time. Based on direct customer interaction within a campaign or even taking into account what happened offline during a campaign life-cycle, following campaign deliveries can be automated. Data import tasks can be managed easily by adding respective workflow elements.

Connecting AEM & Adobe Campaign for personalisation
As part of the Adobe Marketing Cloud, Adobe Campaign (AC) also allows to manage delivery contents, landing pages or forms directly in Adobe Experience Manager (AEM). This separation enables marketers to start creating their campaigns and targeting in AC while content creators can work on the design of the offers in AEM.

Like in Adobe Campaign, it will be possible to add personalised fields from a dropdown menu but also target offers!


Jumping to the next level of email personalisation

Right now, there are plenty of companies seeing and leveraging targeted and personalized digital marketing content to engage more users and customers. Yet, if you are one of the stakeholders in a marketing move of this type, you should be aware that this kind of innovation requires the reevaluation of not only the technical solutions you are using but also the auditing of your current organizational setup and available resources. Digital transformation is one of the current key topics and becomes very obvious in executing digital marketing campaigns. Digital marketing channels can no longer be seen and treated as silos, system integration is as well a crucial factor as keeping an eye on change management. Integrated solutions on an enterprise-level are the only way that will effectively help you to be always one step ahead of your competition while being able to follow your customer's expectations. As such, inform yourself about the latest email marketing automation tools and do not hesitate to ask advice from experts.

Source: https://www.netcentric.biz/insights/2015/09/email-personalisation-adobe-campaign.html


By aem4beginner

May 4, 2020
Estimated Post Reading Time ~

A Bug with Targeting in AEM 5.6 and a Workaround

While working on upgrading a site from Adobe CQ 5.5 to Adobe Experience Manager (AEM) 5.6, we found a new button (Target) that when clicked, seemed to break every component we had. AEM 5.6 introduced the target button to the toolbar of every component. This button is designed to target the content in order to give a user-specific experience that can be tied into Adobe Test&Target. You can then manage your experiences through the Marketing Campaign Manager (MCM) to make your content adaptable and dynamic.

After much investigation, we determined that the bug is encountered when a component is directly included on a page and the target button is clicked. We will go through the problem, cause, and a couple of solutions in the following post.

This is what the target button looks like:


Below is the node structure and properties for bannercarousel (sling:resourceType = brianfanclub/components/bannercarousel.) The component is on our homepage and contains three bannerimages.


In the makeup of the homepage, promos.jsp pulls in the bannercarousel with cq:include.


<%@include file=”/apps/brianfanclub/global.jsp”%><%
%><section id=”promos”>

<cq:include path=”bannercarousel” resourceType=”brianfanclub/components/bannercarousel” />

<div style=”clear: both;”></div>
</section>

Initially, the bannercarousel is configured to have three bannerimages through a pretty simple dialog. Each bannerimage has its own dialogue that controls the image and associated options.


If we hit the target button, the page refreshes and it gives us a blank component with a blank dialogue.


In the node structure, there is a new node called “default” that inserts itself between the bannercarousel and the bannerimages. The bannercarousel node is now sling:resourceType = cq/personalization/components/target.


This is the default node’s properties. It has the content we expect to be in bannercarousel. Let’s hit the target button again to make sure:


We get another default node nested below bannercarousel.


The problem comes from cq:include:
<%@include file=”/apps/brianfanclub/global.jsp”%><%
%><section id=”promos”>

<cq:include path=”bannercarousel” resourceType=”brianfanclub/components/bannercarousel” />

<div style=”clear: both;”></div>
</section>

path=”bannercarousel” no longer has its resourceType=”brianfanclub/components/bannercarousel”—it has become cq/personalization/components/target. The pressing target wraps the component in a mbox that has its own properties but takes the name of the contained component. It renames the targeted component as “default” inside of the mbox. cq:include cannot find a bannercarousel, so it gives you a blank component as if you meant to add the component to your page but have yet to set it up.

We got around this mix-up by creating a custom tag library with an “axis:include” tag. Check out this link for guidance to create your own tag library: http://docs.oracle.com/cd/E11035_01/wls100/taglib/quickstart.html.

This is our custom include tag code:

package com.axis41.taglibs;
import com.day.cq.wcm.tags.IncludeTag;
import org.slf4j.Logger;
import org.slf4j.LoggerFactory;
import javax.jcr.Node;
import javax.jcr.RepositoryException;
import javax.servlet.jsp.JspException;

/**
* An extension of the cq:include tag.
*
* This will check the resourceType of the resource and resolve before including it
*/
public class Include extends IncludeTag {
private static final Logger logger = LoggerFactory.getLogger(Include.class);
private String path;
private String resourceType;

@Override
public int doEndTag() throws JspException {
// let base class handle missing attribute(s)
if ((this.path == null) || (this.resourceType == null)) {
return super.doEndTag();
}

Node parentNode = (Node) pageContext.findAttribute("currentNode");
Node resourceNode = null;

try {
resourceNode = parentNode.getNode(this.path);
} catch (RepositoryException e) {
e.printStackTrace();
}

// if resource node does not exist, let the base class create it
if(resourceNode == null) {
return super.doEndTag();
}

// Get the node's resource type and set that as the resourceType member variable.
// The resource type in the include tag may not match the node’s,
// e.g. when resource is targeted, the resourceType will become
// cq/personalization/components/target
try {
if(resourceNode.hasProperty("sling:resourceType")) {
String type = resourceNode.getProperty("sling:resourceType").getString();
setResourceType(type);
}
} catch (RepositoryException e) {
e.printStackTrace();
}

// now that we have resolved the resource type, let the base class do the rest
return super.doEndTag();
}

@Override
public void setPath(String path) {
this.path = path;
super.setPath(path);
}

@Override
public void setResourceType(String resourceType) {
this.resourceType = resourceType;
super.setResourceType(resourceType);
}
}


<%@include file=”/apps/brianfanclub/global.jsp”%><%
%><section id=”promos”>
    <axis:include path=”bannercarousel” 
    resourceType=”brianfanclub/components/bannercarousel” />
<div style=”clear: both;”></div>
</section>


Our tag handles three cases:
  1. If there is no path or type given, we call the normal cq:include. This will put a blank, fresh component on the page.
  2. Next, we check the page’s nodes for our component based on the path. If we do not find the component by path on the page, we call cq:include, which will give a blank, fresh component.
  3. If we do find our node based on the path, we set the sling:resourceType to whatever we find that the node has and then pass it to cq:include.
When the bannercarousel has a type “target,” the axis includes changes in the sought after component to have type target. cq:include is able to recognize the type target as a targeted component.

Using our tag, target behaves as it should:


The node structure is the same, but axis:include handles the case when the bannercarousel is type target. Hitting the Disable Targeting button will revert the mbox and the component go back to normal.

To manually recover a node buried by mboxes, just go down the node structure until you find the default node with the properties that your component expects. Drag the default node out to where the component should be. Delete the old node with your component’s name; it is just a bunch of nested mboxes now. Rename “default” with the correct component name since it now contains the data that was lost.


Another, the quick fix is to disable the target button on a component. Add a cq:editConfig node to your component if it does not have one already, then add the property cq:disableTargeting=”{Boolean}true”. You would have to go into every component (whether it is custom or from the foundation) to truly disable targeting throughout your site. Changes in libs can be in danger because your modifications will be overwritten with each AEM update. Creating a new tag is a better option.


Keep in mind that this issue is only encountered when the component is included directly on the page. If it is included through a parsys, you get the correct targeting behavior without any modification. This workaround helps you use AEM’s targeting feature as it was intended, providing custom content for your users. Stay informed on AEM workarounds, subscribe to the Adobe Experience Manager Podcast today.


By aem4beginner

Adobe CQ5 Integration with Test&Target (now Adobe Target)

Test&Target is a system that allows you to dynamically modify existing content on your website or change it out for other content. It provides the ability to do A/B testing or create personalized content based on users of the site. But what do you need to do to use it on your Adobe CQ website? Below are some instructions to help you implement this correctly on a site that uses the Adobe CQ 5.5 platform.

First, you’ll need to set up your Adobe Target configuration in AEM Cloud Services. This configuration allows you to hook into the Adobe Target service and begin to use mboxes. Mboxes are nothing more than a container with a class name on it, followed by a piece of JavaScript to initialize it. 

For example:
<div class="mboxDefault">
<!-- default content goes here -->
</div>
<script>
mboxCreate("my_mbox");
</script>

Adobe CQ has made the mbox creation process even easier by adding it all into one component, called mbox. The mbox component is essentially a parsys wrapped in a mbox div. You want to add this component on the site (from the Personalization component group, inside a regular parsys, where you want to swap data in and out. Inside the mbox, you would add the component that you wanted to be able to control. So the structure would look like this: [Parsys[mbox[component]]]. The idea is that the mbox wraps around the component, allowing you to modify the content contained within.

Most often the integration is simple and basic, but there are times when customization is needed because of the site functionality. For example, if you decide to share data from a parent page (such as an ad) onto children's pages, the simple method will not work. The typical solution for this problem is to use an iparsys. However, the way that an iparsys parses through its contained content breaks when it hits a mbox. The iparsys iterates through its components and creates them for children's pages. When it hits a mbox with child components, it severs that relationship and makes the siblings. For example:

iparsys_start
    component1
    mbox_start
        component2
    mbox_end
iparsys_end


On child pages, you want to retain the same structure, but instead, this is what happens:
iparsys_start
    component1
    mbox_start
    mbox_end
    component2
iparsys_end


Here at Axis41, what we ended up seeing was component2 showing as well as the mbox content that was generated from Adobe Target. The way this was set up, Adobe Target should be replacing component2.

To overcome this problem, we decided to set up a blank template with a regular parsys inside it. We created a page using the new template, and added the mbox component and default content to the parsys:
parsys_start
    mbox_start
        component (default content)
    mbox_end
parsys_end


In the reference component, we pointed to the parsys on the new page we created. This made it so the iparsys no longer had to iterate over mboxes, thus keeping the parent-child relationship of mboxes intact.


By aem4beginner

May 1, 2020
Estimated Post Reading Time ~

Using AEM Experience Fragments with Adobe Target

Use the new Experience Fragments feature to reuse a complete set of content for targeted experiences across channels.

Experience Fragments, introduced with Adobe Experience Manager (AEM) 6.3, provide an excellent feature set to author content in a channel-neutral way. An experience fragment is a set of content that, when grouped, forms an experience that should make sense on its own.

Experience Fragments can be utilized across several channels and tools including your website, Facebook, Pinterest, Adobe Campaign, and Adobe Target. Experience Fragment integration with Adobe Target is particularly interesting as it allows you to leverage AEM Content and use it for creating offers in Adobe Target. These offers can then be used to insert or replace content within different activities. In this blog post, we will go over the steps to export AEM Experience Fragments to Adobe Target.

Prerequisites
AEM 6.4 Author
AEM 6.4 Publish
ngrok: allows you to externalize your local instance and makes it available globally with the help of an external URL. ngrok is free to download from ngrok.com.
Target Classic or Target API User Credentials (Contact: customercare@adobe.com)
Experience Fragment flag enabled on the Adobe Experience Cloud

Steps
  • Startup the Author and Publish instance. For this exercise, we are assuming that the Author server is running on port 4502, and the Publish server is running on port 4503.
  • Startup ngrok for the Publish server. (You would need to navigate to the ngrok folder before running the command.) The command to start up ngrok is:
For Mac: ./ngrok http 4503
For Windows: ngrok http 4503

3. Copy the forwarding URL and use it to update the Publish tag in the AEM Link Externalizer Configuration:


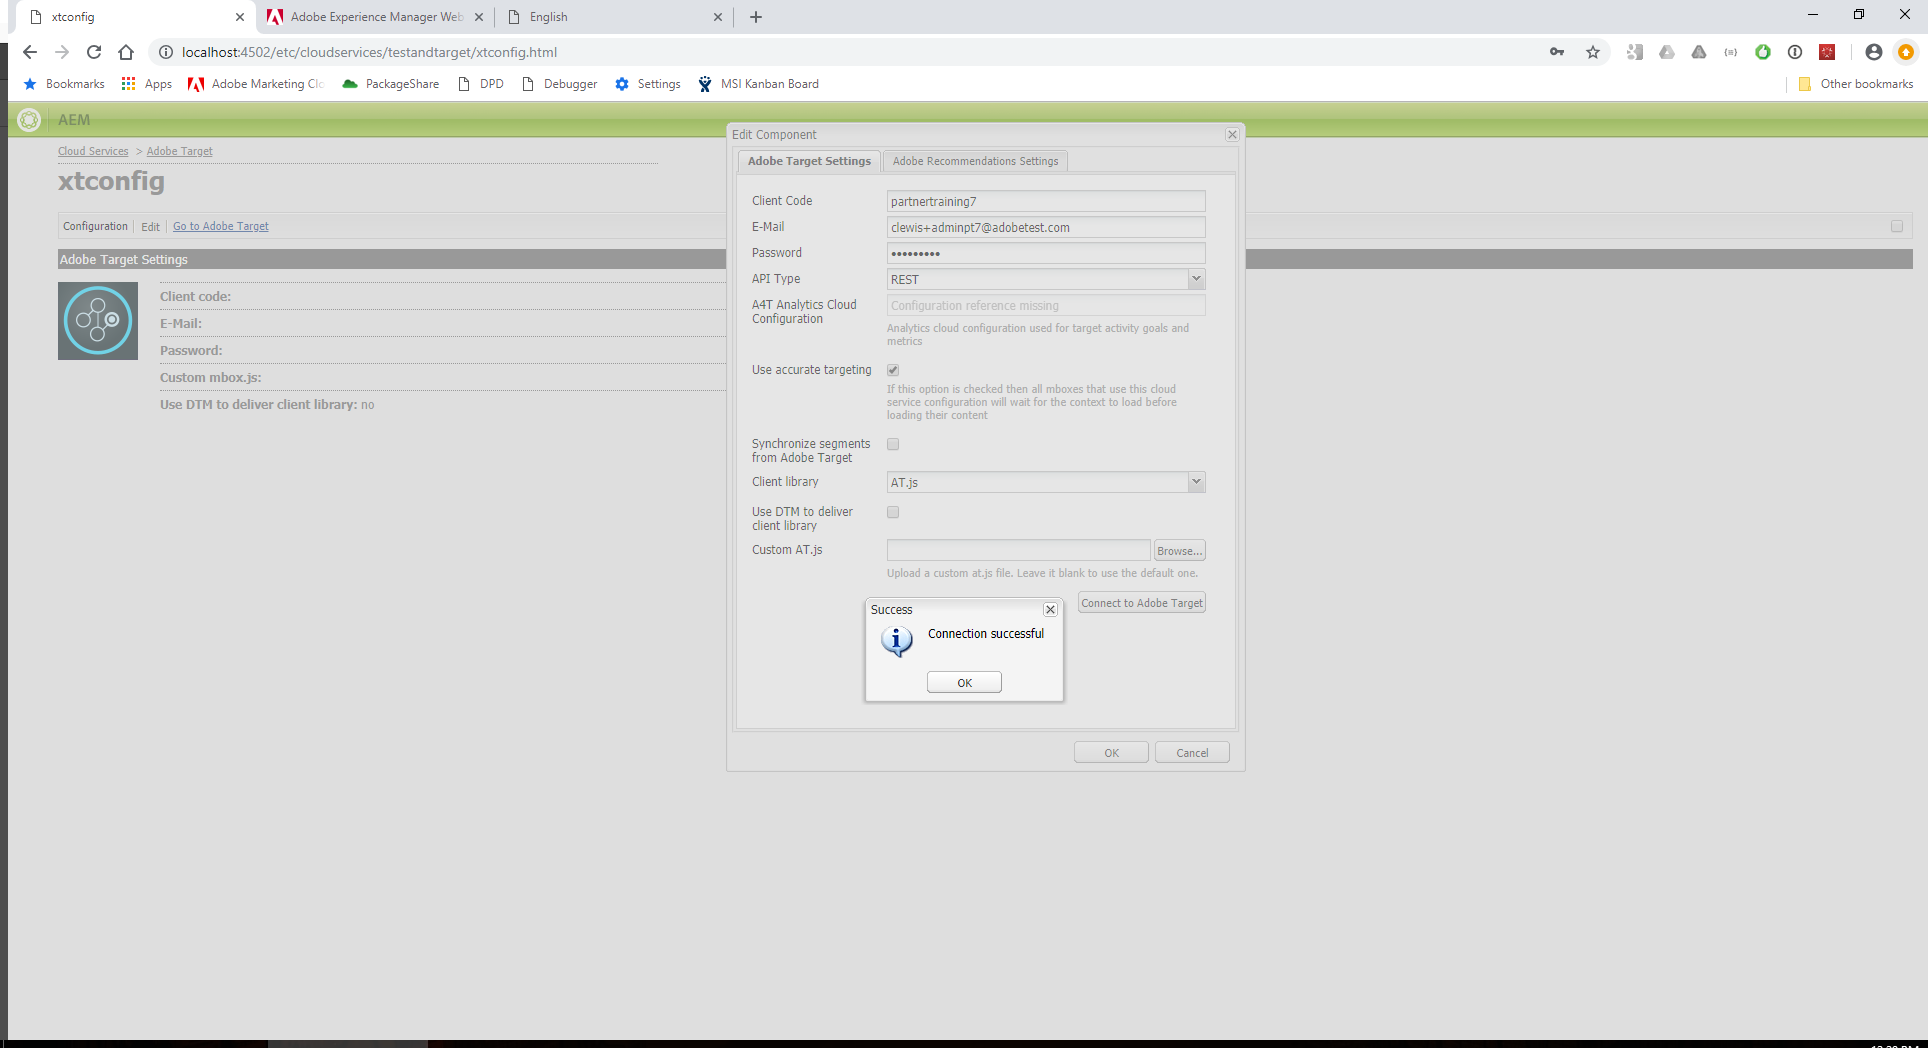
4. Head over to cloud services and create a new Target configuration, then specify the client code, email, and password to connect to Adobe Target.


5. Go to the Experience Fragments Console, create a new Experience Fragment, and add it to the Target configuration.

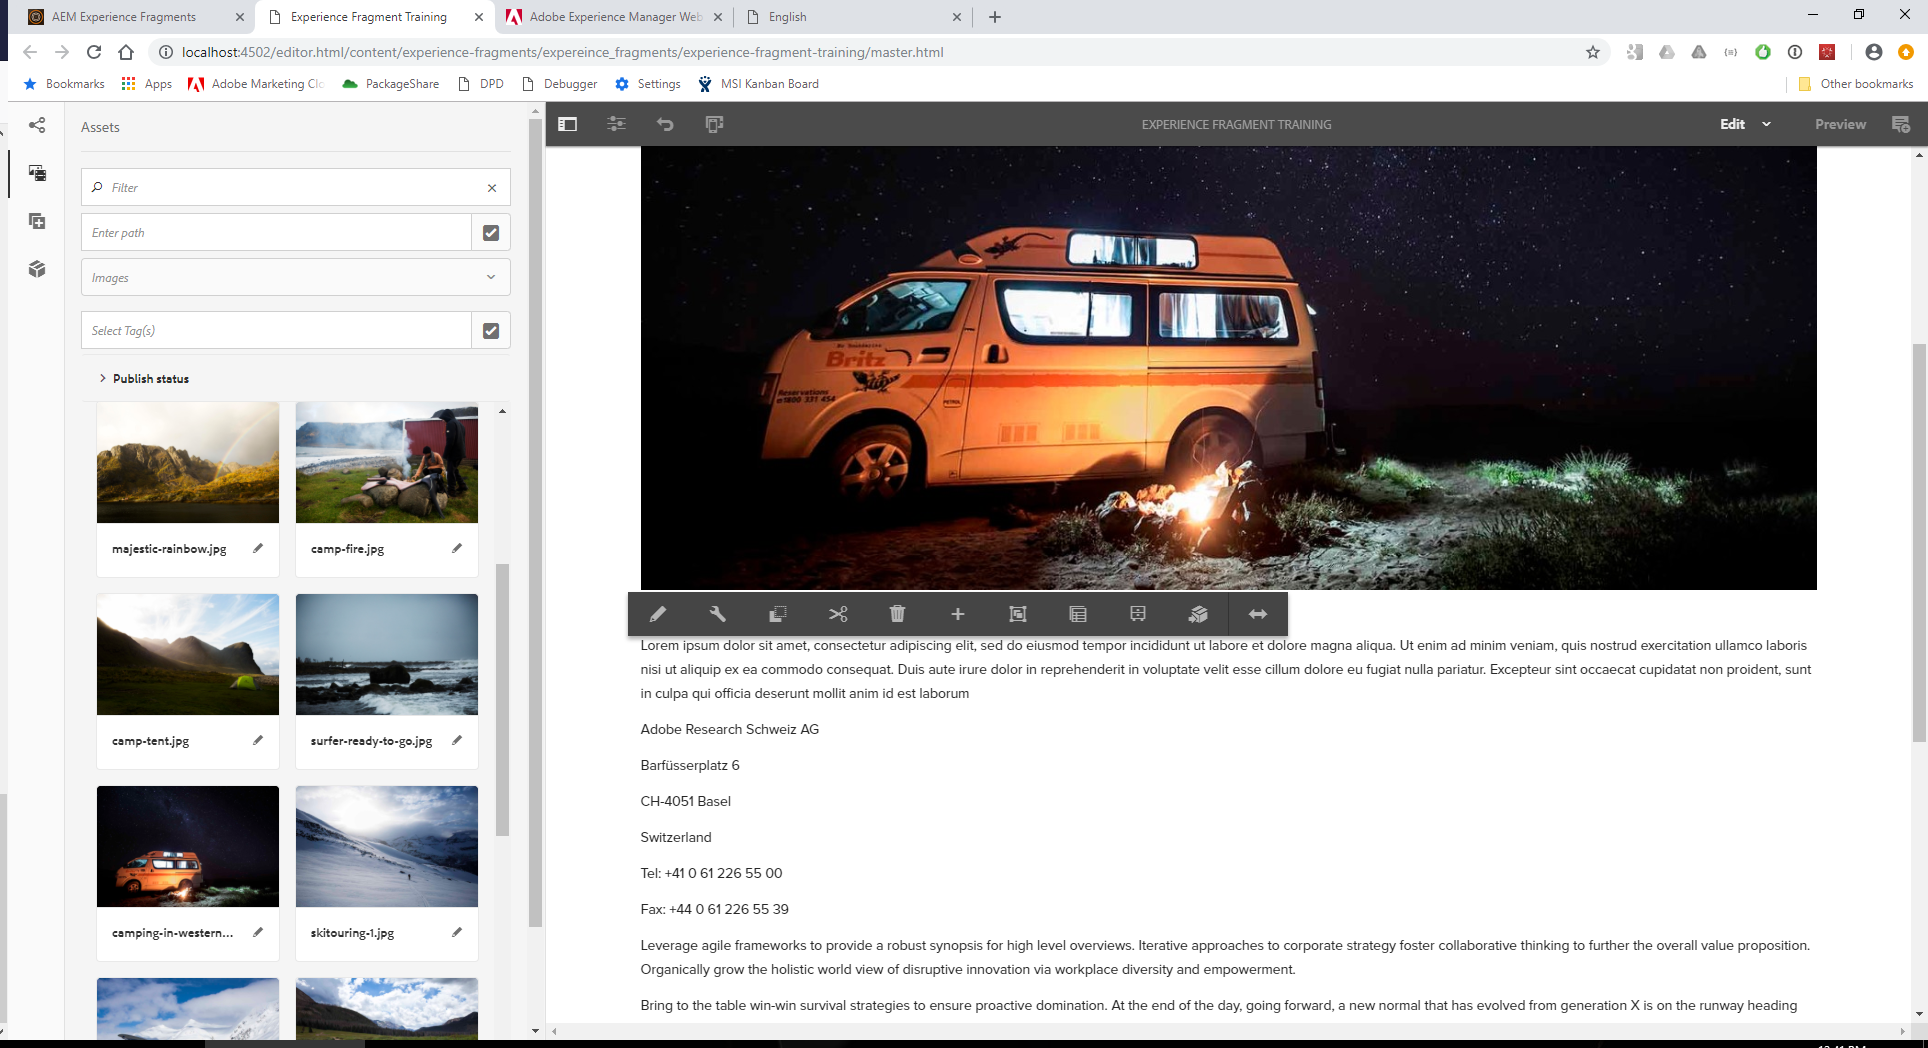
6. Edit the Experience Fragment. Make sure to add text and images.


7. Publish the Experience Fragment to the Publish Server.
8. Export the Experience Fragment to Adobe Target.
9. Log onto Adobe Experience Cloud and navigate to Adobe Target.
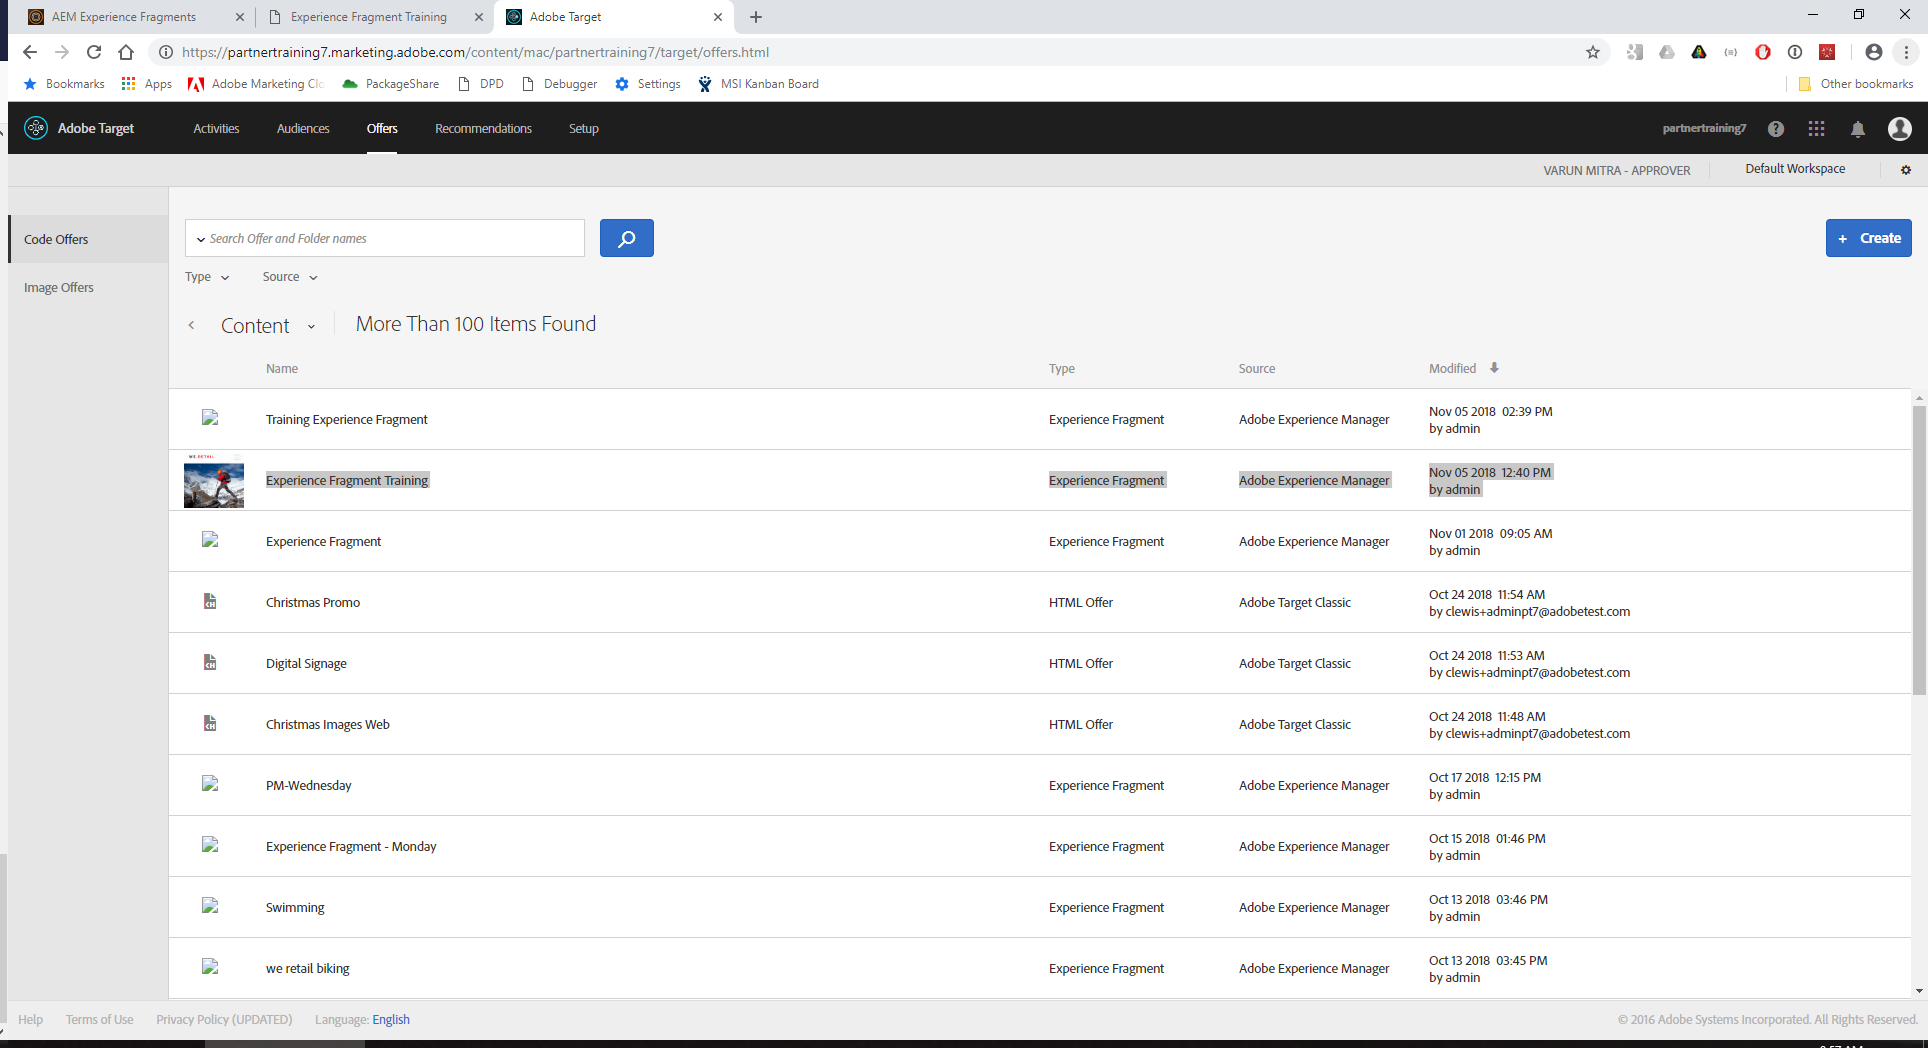
10. Click on the Offers tab and look for the Experience Fragment.
Training Experience Fragment

11. Navigate back to the Activities tab.
12. Create a new Activity. You should be able to insert the Experience Fragment here.


By aem4beginner

April 26, 2020
Estimated Post Reading Time ~

Issue with turning off location tracker feature(Remove the geolocation store) in AEM

I was trying to turn off the location tracker in AEM 6.4, unfortunately, it was not working.

Steps Followed:

Define new clientcontex- /etc/clientcontext/new (copy the existing /etc/clientcontext/default node through CRXDE)


Remove the geolocation store from /etc/clientcontext/new


Change the clientcontext path in Design mode of a page.


Replicate the design(e.g /etc/designs/default) to publisher

Unfortunately after implementing the above steps still the geolocation tracker popup was displaying in the browser.

The popup is displayed due to the clientcontext path is still pointing to the default path - /etc/clientcontext/default(Geo Location store is available) instead of pointing to /etc/clientcontext/new(Geo Location store is not available)

$CQ(function() {
CQ_Analytics.SegmentMgr.loadSegments("\/etc\/segmentation");
CQ_Analytics.ClientContextUtils.init("\/etc\/clientcontext\/default", "\/content\/sample\/test");
});

Based on the analysis the root cause of the problem is currentStyle.getPath() inside the clientcontext component was returning the wrong path value.

currentStyle.getPath() was returning /etc/designs/default/jcr:content/homepage but the expected value is /etc/designs/default/jcr:content/homepage/clientcontext(this node has the property path with the value /etc/clientcontext/new) due to the wrong currentStyle.getPath() is returned server was not able to locate the path property and used the default clientcontext value-/etc/clientcontext/default

The design path was modified by the below code executed before including the client context -

if (!getWcmMode().isEdit() && !getWcmMode().isDesign()) {
IncludeOptions.getOptions(getRequest(), true).forceSameContext(true);
getRequest().setAttribute(ComponentContext.BYPASS_COMPONENT_HANDLING_ON_INCLUDE_ATTRIBUTE, false);
}

<div data-sly-resource="${@path='clientcontext', resourceType='cq/personalization/components/clientcontext'}"></div>

The issue is resolved after changing the order of the above code blocks(this order should be maintained even if these two code blocks are in two different files).

<div data-sly-resource="${@path='clientcontext', resourceType='cq/personalization/components/clientcontext'}"></div>

if (!getWcmMode().isEdit() && !getWcmMode().isDesign()) {
IncludeOptions.getOptions(getRequest(), true).forceSameContext(true);
getRequest().setAttribute(ComponentContext.BYPASS_COMPONENT_HANDLING_ON_INCLUDE_ATTRIBUTE, false);
}

Now the /etc/clientcontext/new is considered and also the geolocation tracker popup is disabled.

$CQ(function() {
CQ_Analytics.SegmentMgr.loadSegments("\/etc\/segmentation");
CQ_Analytics.ClientContextUtils.init("\/etc\/clientcontext\/new", "\/content\/sample\/test");
});


By aem4beginner

Targeting content in AEM

AEM enables to target content for different audience.
This post will explain how to target title component to display content based on user's location and do A/B testing.

Create a web page called Target under we-retail website.


Click here to check how to enable ContextHub.
Navigate to AEM instance and create Brand and activities.


Create audience and these audiences are mapped to activity "Country".


Drag and drop Context-hub component called "Comparing Property - Value".


Open web page in Targeting mode. Click "Start Targeting" and select Brand and Activity "Country" from the toolbar.

Select title component, click on settings.

Select Engine as Context Hub


"Country" activity is mapped two audience. Now drag and drop title component on the page. Select DEFAULT audience and then click on title component then enable target. Enter text "Welcome" in the component. Select another audience and update the text in title component. Click next.


Click next. Select when this target should be enabled.

Click Save. Remove editor.html to see ContextHub toolbar.


On the toolbar, select GeoLocation. Enter country as "United States".


Now title text is updated as per the country location.


Change location to Canada.


Text is updated as per location.


By aem4beginner

April 24, 2020
Estimated Post Reading Time ~

A Comprehensive Guide to Integrating AEM with Adobe Target


On a recent project, I had the chance to integrate Adobe Experience Manager (AEM) with Adobe Target. More specifically, the goal was to do Experience Targeting (XT) from within AEM’s interface. That means authors in AEM can use the UI they’re accustomed to in order to create offers/experiences for their various user segments/audiences. The end-user then sees the experience that Target deems is most relevant based on what it knows about the user and AEM serves the experience.

While this integration has been around since AEM 6.2, there are several gotchas that I discovered during this project. The following article documents the pitfalls and best practices that enrich existing Adobe documentation and hopefully, help you get the most out of your Adobe investment.

The articles covers:
  1. Prerequisites
  2. Enable Targeting in AEM
  3. Integrating AEM and Adobe Target APIs with Cloud Service Config
  4. Deploying at.js Using Launch
  5. Configuring Target Replication Agent
  6. AEM Author Permission Requirements
  7. Dispatcher Considerations
  8. Other Issues That We Have Run Into
Please feel to jump to the section that is most relevant to you. If you’re looking for step-by-step instructions, check out these articles:
Here’s a diagram that’s helpful in understanding the different parts of the integration:
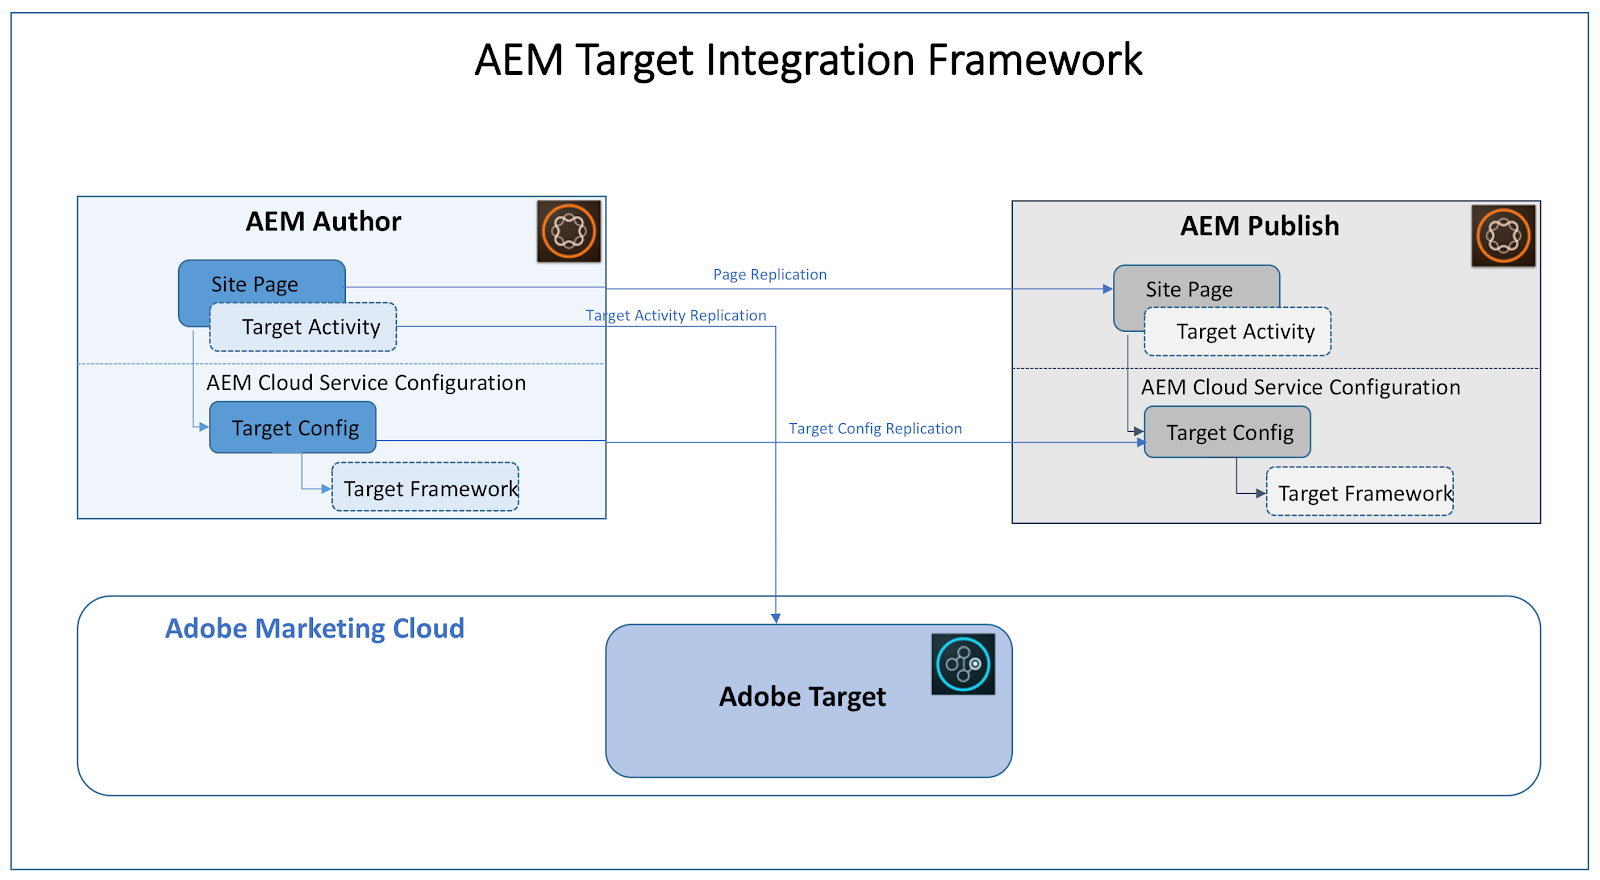
(Source: https://helpx.adobe.com/marketing-cloud/how-to/aem-target.html)

Prerequisites
  • Before even attempting to integrate the two systems, make sure you have access to the following:
  • Adobe Target account with sufficient (at least approver-level) access. Make note of the “client code” and keep your username and password handy.
  • AEM admin account. In some scenarios, you may not have full admin access because you’re in a locked-down environment or using Adobe Managed Services. In that case, test-run the setup on a lower/local environment and make sure you’re documenting all the changes you’re making so they can be applied by the appropriate system admin later on.
  • Access to both the AEM code base as well as the Apache/Dispatcher configs.
Enable Targeting in AEM
Your page component needs to have all the necessary includes supporting cloud services. If you’re using the Page component that ships with the Core components you’re good to go (take a look at headlibs.html and footer.html), just add the include for ContextHub to enable “Targeting” mode in the editor.

===========
<!--/* Include Context Hub */-->
<sly data-sly-resource="${'contexthub' @ resourceType='granite/contexthub/components/contexthub'}"/>
===========


Note, however, the problem that we ran into with enabling this on Publish.
Integrating AEM and Adobe Target APIs with Cloud Service Config

The first step in setting up the AEM Target integration is configuring the Adobe Target cloud service. This is where you establish the actual API connection between the two systems. You will need your client code as well as a username and password.

With 6.4 you can find the config in the Tools menu under Cloud Services > Legacy Cloud Services. It has not been migrated to the new interface yet.

When you set up the config, check the box for “Use DTM to deliver client library” even if you’re using Launch and not DTM. The idea here is that AEM doesn’t have to worry about loading the Target library.

Also, make sure to check “Synchronize segments from Adobe Target.” As the name implies it will sync the segments which allow your authors to use them when building out the experiences.
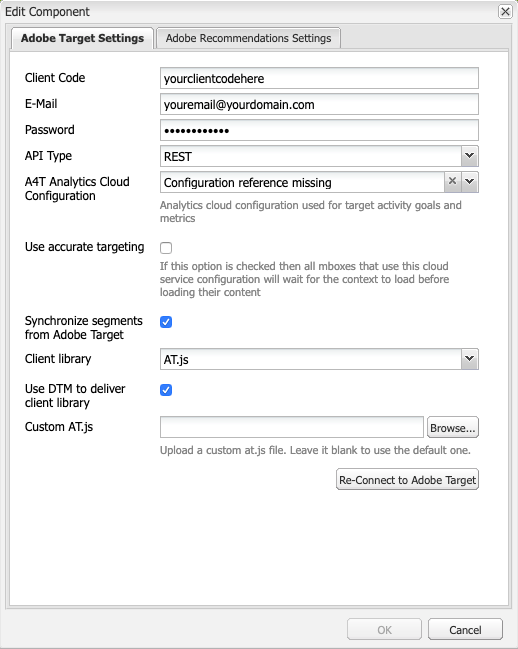
Deploying at.js Using Launch

There are different ways of deploying the Target library on an AEM website and Adobe Experience Platform Launch (previously just “Adobe Launch,” or “Launch by Adobe”) is the new recommended way of doing this. Adobe has some videos and documentation about this set up so I won’t get into the details here.

One thing worth noting here is that the asynchronous approach didn’t work for us so we chose to use the less ideal synchronous approach with the library loaded at the top and satellite script at the bottom.
Configuring Target Replication Agent

Another important part of the puzzle is configuring the Target Replication Agent. This step is documented here. Note that at least in AEM 6.4 you will still see it being referred to under its previous name “Test and Target.”

Most of the default settings of the replication agent are fine as is, just make sure it’s enabled (with the “nosamplecontent” runmode it’s disabled by default). Also, confirm that the “Agent User Id” is left blank so that the out-of-the-box (OOTB) system user is used. If you see “your_replication_user” as the user ID, remove it.
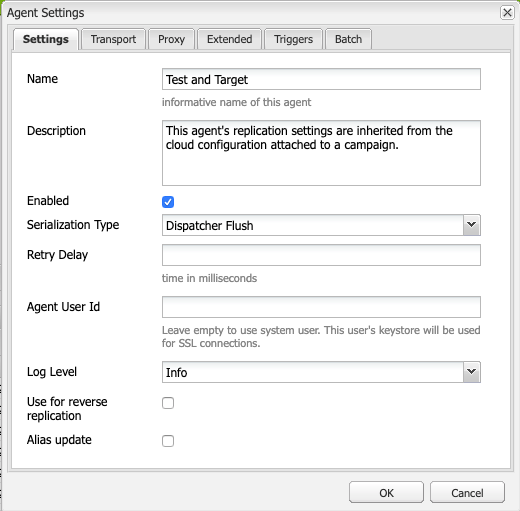

The replication agent is used to publish activities to Target. Without this, you won’t be able to test the personalization on Publish or with “?wcmmode=disabled." This was a big gotcha for me at the beginning because on AEM Author I always test in “wcm disabled” mode and nothing was working there until things get published to Target.

On the Target side of things, there should be two line items for each activity that you’ve created in AEM, one appended with “_author” and one without:
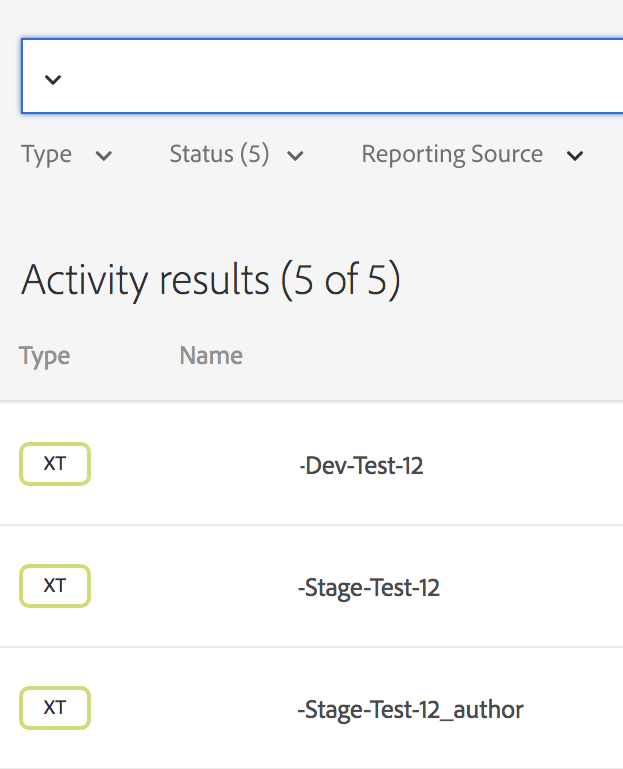

If you’re seeing only the “_author” one, check and make sure that the replication agent is set up properly. View the logs and confirm that you’re not seeing any errors. There should be “info” statements like this “Creating content for path /content/path/to/page.”

AEM Author Permission Requirements
In order to create brands, campaigns, activities, and offers you will need a user group with the following permissions configured.

Read/modify/create/delete/replicate on these paths:
  • /content/campaigns/
  • /etc/cloudservices/testandtarget/
  • /etc/segmentation/adobe-target/
There are the OOTB groups “target-administrators” and “target-activity-authors” but they don’t quite seem to provide all the permissions that are necessary.
Dispatcher Considerations

Most AEM sites use the Apache HTTP server to rewrite incoming requests so that users don’t need to type in the AEM internal paths (e.g. “/content/path/to/website”) into their address bar. It’s also very common to remove the trailing “.html” from the URL.

Both of these have to be considered to ensure that requests to the default as well as personalized offers are routed properly. Also, check your filter rules to confirm that they are not blocked.

Example rewrite condition to exclude the offer URLs from your rewrites:
===========
RewriteCond %{REQUEST_URI} (default|tandt)\.html$
===========


Also, make sure that the ContextHub and any other JS you may have associated with it, is allowed by your rewrites and filters.

Other Issues That We Have Run Into
Activity Creation Modal
The dialog box to create a new activity acted a little strange for us in AEM 6.4.2. When first opened, the dropdown for “Select a Target Configuration” and “Activity type” is grayed out but when closed and opened again, they show up fine and are selectable.
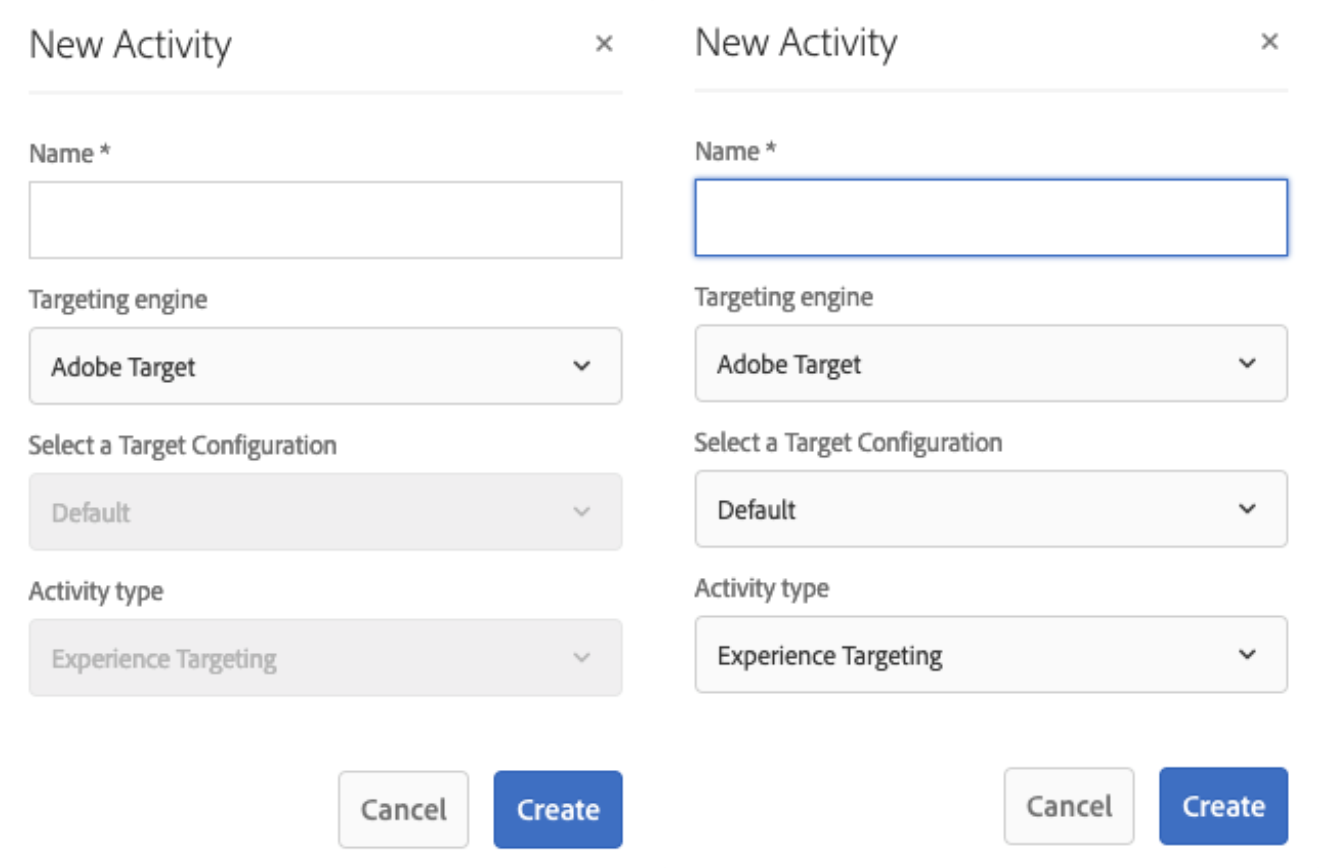

We have not found the solution for this yet but with the “workaround” we’re at least able to create activities as necessary.

Synchronization With Target Fails
This is an error we got when trying to save everything in the editor:
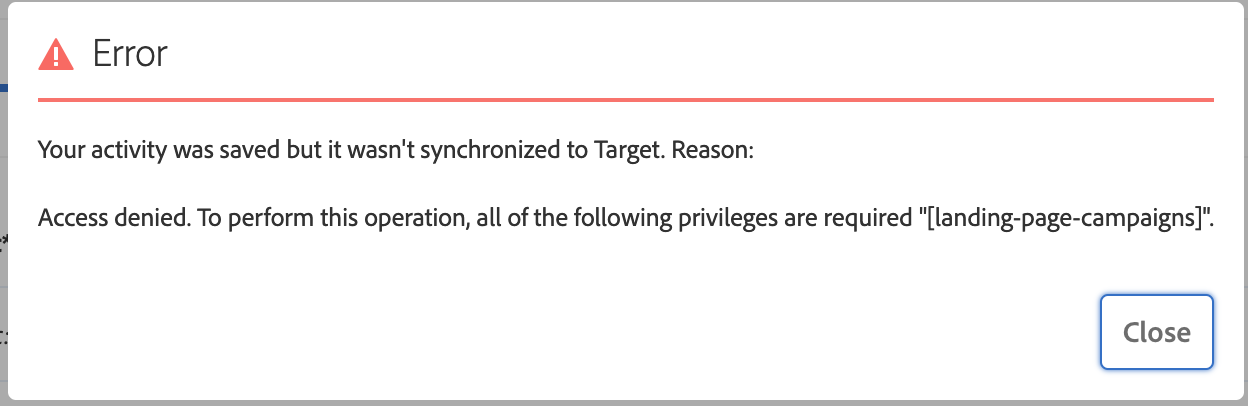

The solution here was a permission fix Adobe had to make for us on their end. If you run into this, file a ticket and they can get it taken care of.

Another issue that I've seen is this: "The values for 'email' and 'password' parameters cannot be blank unless there is an IMS token in the Authorization header or Basic Authentication is used or userId+orgId IMS headers are present."

This showed up even though the IMS configuration was set and the Launch cloud-config was configured properly to use the IMS token. The solution here was to re-enter the password in the Target cloud-config because somehow the field had got wiped out. This error message threw me off because the IMS config isn’t even used for this part of the integration as far as I can see.

Uncaught ReferenceError: CQ_Analytics is not defined
Make sure there’s a snippet in the <head> defining “CQ_Analytics” and “CQ_Analytics.TestTarget”. If it’s not there, it could be that the Target cloud service config is not assigned to the page you’re on. It’s also common to have the config assigned to the root page. In that case, make sure the root page got published so that all the descendant pages can inherit their config from it.

“Uncaught TypeError: Cannot read property 'externalize' of undefined” / “TypeError: Granite.HTTP is undefined”
Check that you’re including the “granite.utils” clientlib. You can either do that with a separate clientlib include or just make it a dependency for your main site client lib that’s already being included everywhere.

Browser Testing
Be aware that you may see different behavior depending on which browser and browser mode you’re testing with. For example, private windows in Firefox block DTM and Launch. It’s fine in Chrome’s incognito windows, though.

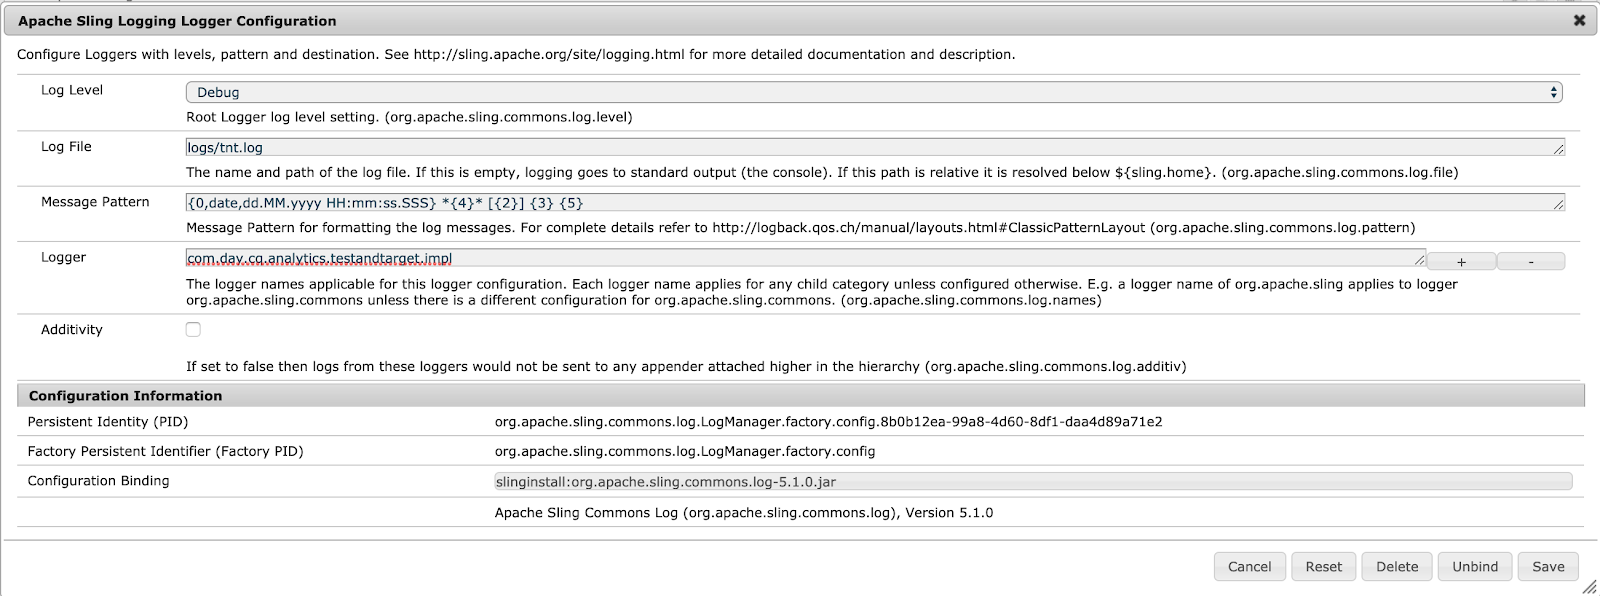
Backend Integration Logs
If part of the integration isn’t quite doing what it’s supposed to, it can help to review the messages that the Target implementation logs. To do that, create a Logger for the package: “com.day.cq.analytics.testandtarget.impl”.

For Example:

Components Need to Support Targeting
Some specific things to look out for:
Don’t rely on a specific <div> structure outside of what’s in your component’s HTL file. That’s all fair game for AEM and the Target component to modify. For example, we had relied on the standard component <div> with the CSS class with the component name which when targeted is not there anymore.

If your component has some JS that runs on page load, like setting up a slider/carousel/etc., it may have to get re-initialized since AEM will load in your offer HTML but if the JS already ran on page load, it by default wouldn’t run again when all the Ajax requests for offers are done. Here’s an example for the “adobe.target.event.REQUEST_SUCCEEDED” event that you can listen to and here’s a list of all the available events that you can act on.

When using VueJS in your components, be aware that it creates a virtual DOM that it interacts with. AEM targeting just appends/deletes HTML snippets it gets from the offers and that conflicts with Vue. To get around this, delay initializing Vue until the offer is completely loaded. [Thanks to Ryan Keenan for this tip!]

ContextHub Slows Down the Site
According to the Adobe documentation, ContextHub needs to be included in order to enable the “Targeting” mode in the AEM authoring interface. However, on AEM Publish we saw some issues with ContextHub slowing down our page requests and even bringing the server to a crawl.

For our use case, since we’re not actually leveraging ContextHub for personalization, we disabled it in Publish and don’t even load all the associated JavaScript files that slow things down.

Custom Link Rewriters/Transformers
If you have a custom link rewriter, make sure to add your respective “/content/campaigns/*” path to the list of allowed paths that it acts on. I noticed that the rewriter wasn’t acting on our offers so links would still include “/content/path/to/site” as well as have the “HTML” file extension.

Targeting Mode Doesn't Show Up
If you don’t see “Targeting” as an option in the editor dropdown, make sure you have the ContextHub snippet from above included. Also, check and make sure the "ContextHub Configurations" in the page properties of your page (or further up in the hierarchy) are set correctly (mine had a wrong path at some point which caused issues.).

"Choose Audience" Dialog is Empty
Check under "Personalization > Audiences" and the appropriate folder that audiences/segments were properly synced from Target. In my case that was into the "/etc/segmentation/adobe-target" folder. You can see where this is stored in the "segmentsPollConfig" under your Target cloud-config node. Also, make sure you use "Adobe Target" as the Targeting engine instead of "ContextHub," otherwise it will try to pull the audience from the wrong folder.

A Note About Using at.js 2.x
Adobe Launch now has the option to select the new version of the Target library and I've had a chance to try this out. The first thing that got me was the lack of "mbox" requests in the network panel so I thought it wasn't working properly. However, this is on purpose because the at.js 2.x uses a new Delivery API, and also the global mbox isn’t used anymore. Instead, you can now filter by "delivery" or "tt.omtrdc.net" to see Target requests. If you're considering using the new version, definitely check out the migration guide here.

Summary
The integration between AEM and Target seems fairly straight forward but there are a few things to be aware of. As with any integration, it becomes tricky when something doesn’t quite work as it’s documented (or it’s not documented at all).

Happy integration!


By aem4beginner