Showing posts with label Best Practices. Show all posts

January 23, 2021
Estimated Post Reading Time ~

What is the best practise/Approach for upgrade to AEM 6.5 from AEM 6.3 SP2

Solution:
The best approach for upgrade is in-place upgrade just like you said.

Please review the all the links of doc - > Upgrading to AEM 6.5
The main upgrade steps are mentioned here Performing an In-Place Upgrade

Note:
In addition to that its good to check the following document:
Post Upgrade Checks and Troubleshooting


By aem4beginner

January 2, 2021
Estimated Post Reading Time ~

Managing Multiple AEM Instances

One of the challenges I’ve had over the last few years is how to easily manage multiple AEM instances concurrently. Over the last few years, I’ve often had to have several different AEM instances running during the course of the day, whether it be different versions, client codebases, or just for standing up a quick test.

To make starting, stopping, and resetting AEM instances on my computer quick and easy, I created a small script and a structure to support easily managing multiple AEM instances on the same computer.
Folder Structure

First, from a structure perspective, create the following folders:

/[user-home] 
     /dev 
         /aem 
             /instance1 
             /instance2 
             ...

This structure is pretty simple, but it does help a lot to be consistent and makes it pretty quick to navigate folders via terminal or finder; cd ~/dev/aem/6.1 is pretty darn easy to type, easy to remember, and makes sense from a taxonomy perspective. This structure also allows me to add other applications in parallel, such as MongoDB, Tomcat, or anything else with which I may need to integrate as sibling folders to the AEM folder.

AEM Manager Script
Next, I created a shell script to manage the individual AEM instances under this structure. The script allows you to start, stop, and clear the repositories of instances. When starting, the script clears the AEM logs before starting, can start the instance in debug mode, start multiple publisher instances, can run without the GUI, and allows you to configure the JVM settings for the AEM instances.

This script also allows you to clear the repository, removing everything under the crx-quickstart folder to quickly restore the repository to the starting state. This can be especially useful if you are trying to save space or need to install two incompatible codebases.

Examples
The commands for the script are relatively straightforward:

Starting an AEM Instanceaem-mgr start -i 6.1.0
Starting an AEM Author and Publishersaem-mgr start -i 6.1.0 -p

It’s probably worth mentioning that what this will do is start the author instance found in the folder ~/dev/aem/6.1.0 and all of the instances in folders that look like ~/dev/aem/6.1.0-publish-[N].

Stopping an AEM Instanceaem-mgr stop -i 6.1.0
Clearing an AEM Instanceaem-mgr clear -i 6.1.0

A quick note, if you want to run multiple instances in parallel, you will need to pass in the -nd flag to disable debugging on the non-primary instances. The script handles this automatically for publish instances by incrementing all of the port numbers.

Defaults
By default, the script will look for AEM instances under the ~/dev/aem folder I described above. Each instance is assumed to be in a sub-folder with a JAR inside with a name matching ^.*aem.*.jar$ or ^.*cq.*.jar$.

Each instance with debug enabled will start by default with the Java debug port set to 30303 and the JMX port to 9999. Additionally, by default the JVM is granted a maximum of 1GB heap and 256MB of Permanent Generation. These values can be configured in the “Default Settings” section of the script.

Installation
To install the script either download it directly from GitHub or clone the git repository and add it into your computer’s PATH variable. It has been tested in Linux and Mac and I would suspect it would work on windows with GNUTools or Cygwin installed.

Source:


By aem4beginner

September 18, 2020
Estimated Post Reading Time ~

AEM Sling Models - Why Bother?


A debate sometimes arises among developers creating components on Adobe Experience Manager (AEM) as to whether or not to create sling models for all components. The discussion often focuses on simple components that merely read authored properties from the JCR and display them on the page since HTL can readily do this without the aid of sling models.

Some common perceptions are that sling models for these components represent unnecessary complexity (arguable in some aspects, but not true in the big picture) and that development is simpler and quicker, especially for front-end developers, by omitting sling models (also not true).

Sling models are recommended for all AEM components, complex or simple, and building them via standard practices saves development time in both initial implementation and ongoing maintenance.

Adobe Best Practices
Coding components with sling models is the recommended AEM best practice from Adobe, as demonstrated by the implementation patterns in WCM Core Components. At face value, this reason can seem arbitrary. However, there are some very good reasons why we should follow AEM best practices in most cases.

For starters, clients specifically request industry best practice development. Naturally, Adobe prefers partners that follow and tout best practices.

A more concrete reason to follow Adobe’s recommended practices is to ensure projects minimize long-term maintainability costs in context of future AEM upgrades. Building components the way Adobe officially supports gives the highest probability of code that “just works” on future versions of AEM, and this consideration is always worth keeping in mind when proposing alternative solutions to “the AEM way.”

Lastly, in partnering with clients there are times we are tasked with enabling internal IT to take on long-term ownership of their AEM platform. As we teach AEM development to our fellow IT brethren, we want to make sure we’re in lockstep with Adobe and their documentation unless we have some very good and objective reasons for diverging.

Content Service (JSON) Support
Sling models coded according to best practices ensure that all content within a website can be accessed as JSON web services (via the .model.json URL extension). Content as a service is a feature that AEM fundamentally supports out of the box, and a feature that Adobe ensures customers are aware of.

Though the usefulness of web pages delivered as JSON can be debated, not building in this support is setting a potential landmine that can blow up in your face if a client asks why this fundamental feature does not work for the platform you built.

This reason alone is a solid argument for building sling model support for all components.

Image/Link/Other Processing
Accessing properties directly in HTL leaving only complex values to sling models may seem convenient in some cases. However, that convenience will almost inevitably lead to shortcuts with hidden deficiencies and maintainability implications.

Take images for example. In HTL you can render an image simply by grabbing the fileReference property from the image node and dropping it into the src attribute of a <img> tag. This will display the image directly from the Digital Asset Manager (DAM), giving an impression that the coding for this image is complete. However, this approach has two very grave deficiencies.

First, the image will be rendered without a cache buster value in the URL. This means that even if the asset is updated in the DAM, any user that has already viewed the image on the website will not see the new version due to browser caching.

Second, the image will be rendered in its original form which could be very large (potentially multiple MB) and without any support for adapting to the device viewport or styling constraints of the website, resulting in poor website performance, search ranking, and user experience. This is a huge blunder, and the problem is exacerbated by the fact that it will be almost imperceptible to testers who see the image render “correctly” in their web browser.

URL links also open a pitfall when rendering properties directly in HTL. Say we‘re coding a Button component with a path property that we expect authors to point to an internal page on the website. In HTL, we can simply render this link into an <a> tag by setting the href value to ${properties.path}.html. However, what happens when an author decides to link the component to another of the client's domains, such as http://blogs.clientsite.com/? The HTL now renders http://blogs.clientsite.com/.html and thus we have a bug.

Now let's say we update the HTL to check if the path starts with / and only conditionally append .html. This will give the appearance of solving the problem, but again we will have applied only a partial solution. Common link processing functionality checks internal paths and renders them as their vanity URL if present. By coding the link directly in HTL via direct properties access, we've unintentionally subverted that behavior, and have created an inconsistency in how links work across components.

Inheritance and Override Support
HTL is a robust syntax, elegantly joining HTML with java code to render dynamic content to a page. However, HTL is still not a full-fledged coding language that easily supports granular overrides via inheritance. Imagine a Quote component that renders a piece of text (the quote) and the name of the person who coined the quote (the author).

Now let's say we want to create a Product Quote component that looks the same but instead renders the latest product review for the product referenced on the current page. In the HTL, all we really want to change is how the quote and author are calculated—95 percent of the HTL we wish to keep the same. Given the limitations of HTL, changing the logic of how we fetch the quote and author forces us to either overwrite the entire file (if we are extending the original Quote component) or create a completely new component (effectively a copy and paste).

Take the same scenario but instead using a sling model. In this case we extend the original QuoteImpl class, changing the implementation of getQuote() and getAuthor() to incorporate the logic required for our new component. Now our Product Quote component that extends Quote doesn't need an HTL file at all—it simply uses the inherited one with no changes, and we can be assured that any changes to the markup, look, and feel of the original Quote component will automatically be applied to the Product Quote component as well, as we've avoided the pitfall of copy and paste.

The Quote example may seem like a simplistic case where it could be argued that creating a separate component without inheritance is low risk, but the value proposition of component inheritance grows proportionally with component complexity. Inheritance is particularly common in page components which can contain a significant number of HTL files and amount of sling model functionality that can become a maintenance nightmare without proper inheritance.

Code Consistency
When considering maintainability of a code base, consistency trumps convention most of the time. Unless we are executing an incremental, intentional effort to change the overall implementation pattern of a code base to a new standard, keeping patterns consistent is one of the ways to ensure that developers both old and new to a project can easily learn and support all parts of the code base.

When developers start making judgment calls of when to use sling models versus when to access properties directly via HTL, teams find themselves having additional conversations/debates on the merits of either approach in a myriad of circumstances, seeing additional items turned back in code reviews (due to pitfalls described above), and ultimately landing on a code base with some components fully supported by sling models, some with no sling model at all, and others implemented partially with both patterns.

For an expert with many years of AEM experience and the foresight to know and navigate all the potential problems, this may seem like not that big a deal. But for anyone new to a project, let alone new to AEM, this can be extremely confusing and error-prone, resulting in significant time lost navigating the code and pitfalls.

Remember the effect of code inconsistency on content service (JSON) support? In a project where some fields are present in sling models and others are not, content APIs will contain some fields and others not. This is arguably worse than not supporting content services at all.

No Extra Effort
A common argument for accessing properties directly in HTL without sling models is speed of development, particularly for front-end developers. In the past, I would be inclined to concede this point, but given the emergence of the AEM Component Generator, this simply isn't true.

Regardless of how efficient a developer is in creating an AEM component, it’s still more efficient to leverage the component generator. The generator not only builds a fully functional sling model requiring zero developer interaction, but also outputs the dialog XML (including support for shared and global properties), base clientlib folders, and an HTL file hooked up to the sling model with sample code accessing every property.

Another argument can arise on projects that require unit testing coverage of a certain percent, where it can be perceived that the requirement of a sling model is adding additional work (in the form of unit tests) for some components. Though this is true in limited context, it's also not accounting for the entire picture.

Ignoring the merits of whether it's acceptable to use a method of coding to purposely avoid unit testing requirements, let's consider the unit testing effort for these sling models. We’re only incrementally increasing sling model unit testing efforts—any complex fields requiring sling model support will already require unit testing. Unit tests for simple sling models are trivial to write once the testing patterns are established. The "visible" time spent here will be offset by "invisible" time saved mitigating other issues discussed in this article.

Final Thoughts
Change for the sake of change in development patterns is something we actively steer our developers and clients away from. Sling models are a case where change is non-debatable. Component development with sling models has numerous advantages that strongly advocate for transition away from legacy and other non-standard AEM coding practices.

Saving development time and budget by using best practice component patterns, more resources can be allocated to custom features that truly make a difference for your business.


By aem4beginner

August 19, 2020
Estimated Post Reading Time ~

AEM Upgrade: A Complete Playbook For Flawless Upgrade

In this digital age, organizations of all shapes and sizes are investing a lot in improving their overall customer experience. Keeping that in mind, Adobe constantly enhances Adobe Experience Cloud suite to empower marketers with the necessary tools to create and deliver amazing experiences. The foundation of many of those experiences relies heavily on Adobe Experience Manager, and like most platforms, Adobe annually updates its solutions with new features or existing features that are enhanced to meet the expectations of the evolving digital world. Hence, it’s imperative for organizations to upgrade AEM and avail the latest powerful features in-store to deliver amazing omnichannel experiences to customers.

Though upgrading AEM to the latest version has some support from the Adobe, but the upgrade process may be a little challenging and often requires some specialized experience and knowledge to deploy everything smoothly. Also, proper planning is mandatory for upgrading any of the previous AEM, which includes – author training, writing test cases for the upgrade procedure, understanding the new changes around architecture, estimating LOE using AEM provided pattern detector, and then finally creating a project plan. Further, the AEM Upgrade needs analysis and execution phases with key deliverables defined for each phase.

Considering the above complexities and problems faced while AEM Upgrade, I have put together this AEM playbook in an attempt to educate you, so you can establish clear goals and phases to upgrade AEM with little or no hiccups. Let’s discuss each and every step in some detail:

Steps Involved In AEM Upgrade:1. Create An Overview For All Processes Associated With Upgrade
2. Scope And Requirements For Upgrade
3. Planning For Author Training
4. Creating A Test Plan
5. Evaluation Of Changes Required For Architecture And Infrastructure
6. Complexity Assessment For The Upgrade
7. Rollback Runbook For Upgrade
8. A Comprehensive Project Plan
9. Execution Of Development And QA
10. Validation Of Runbook For Final Testing
11. Execution Of Runbook To Implement Upgrade
12. Support Post Upgrade

1. Upgrade Overview:
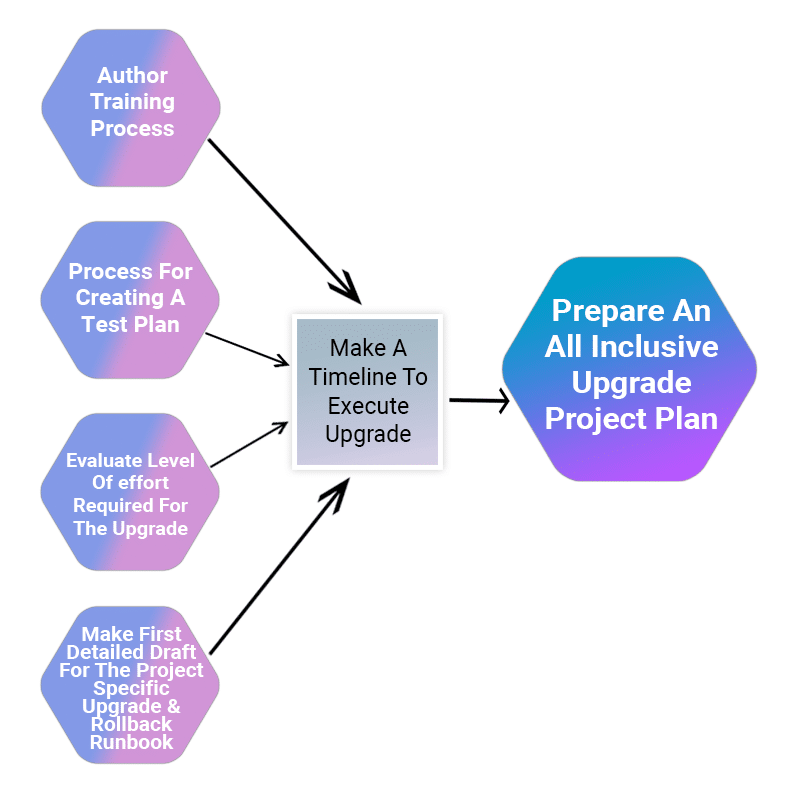
The Upgrade process associated with AEM is a multi-step that often takes a few months to complete. The image below provides an overview of the different processes associated with an upgrade project.


2. Upgrade Scope and Requirements:
Before initiation of the upgrade, it is important to ensure that you are running a supported operating system, Java runtime, httpd, and Dispatcher version. Also, upgrading components need to be accounted for in the project plan before upgrading AEM. The table below describes a list of areas that are impacted in a typical AEM Upgrade project.


3. Plan For Author Training:
There are many potential changes required to be introduced to the UI and user workflows during the AEM upgrade. It’s highly recommended to review the functional changes that have been introduced and create a plan to train your author teams to leverage them effectively. Make sure to note any changes to UIs or product features that are commonly used in your organization and after looking through what has changed in upgraded AEM, develop a training plan for your authors.

4. Create A Test Plan:
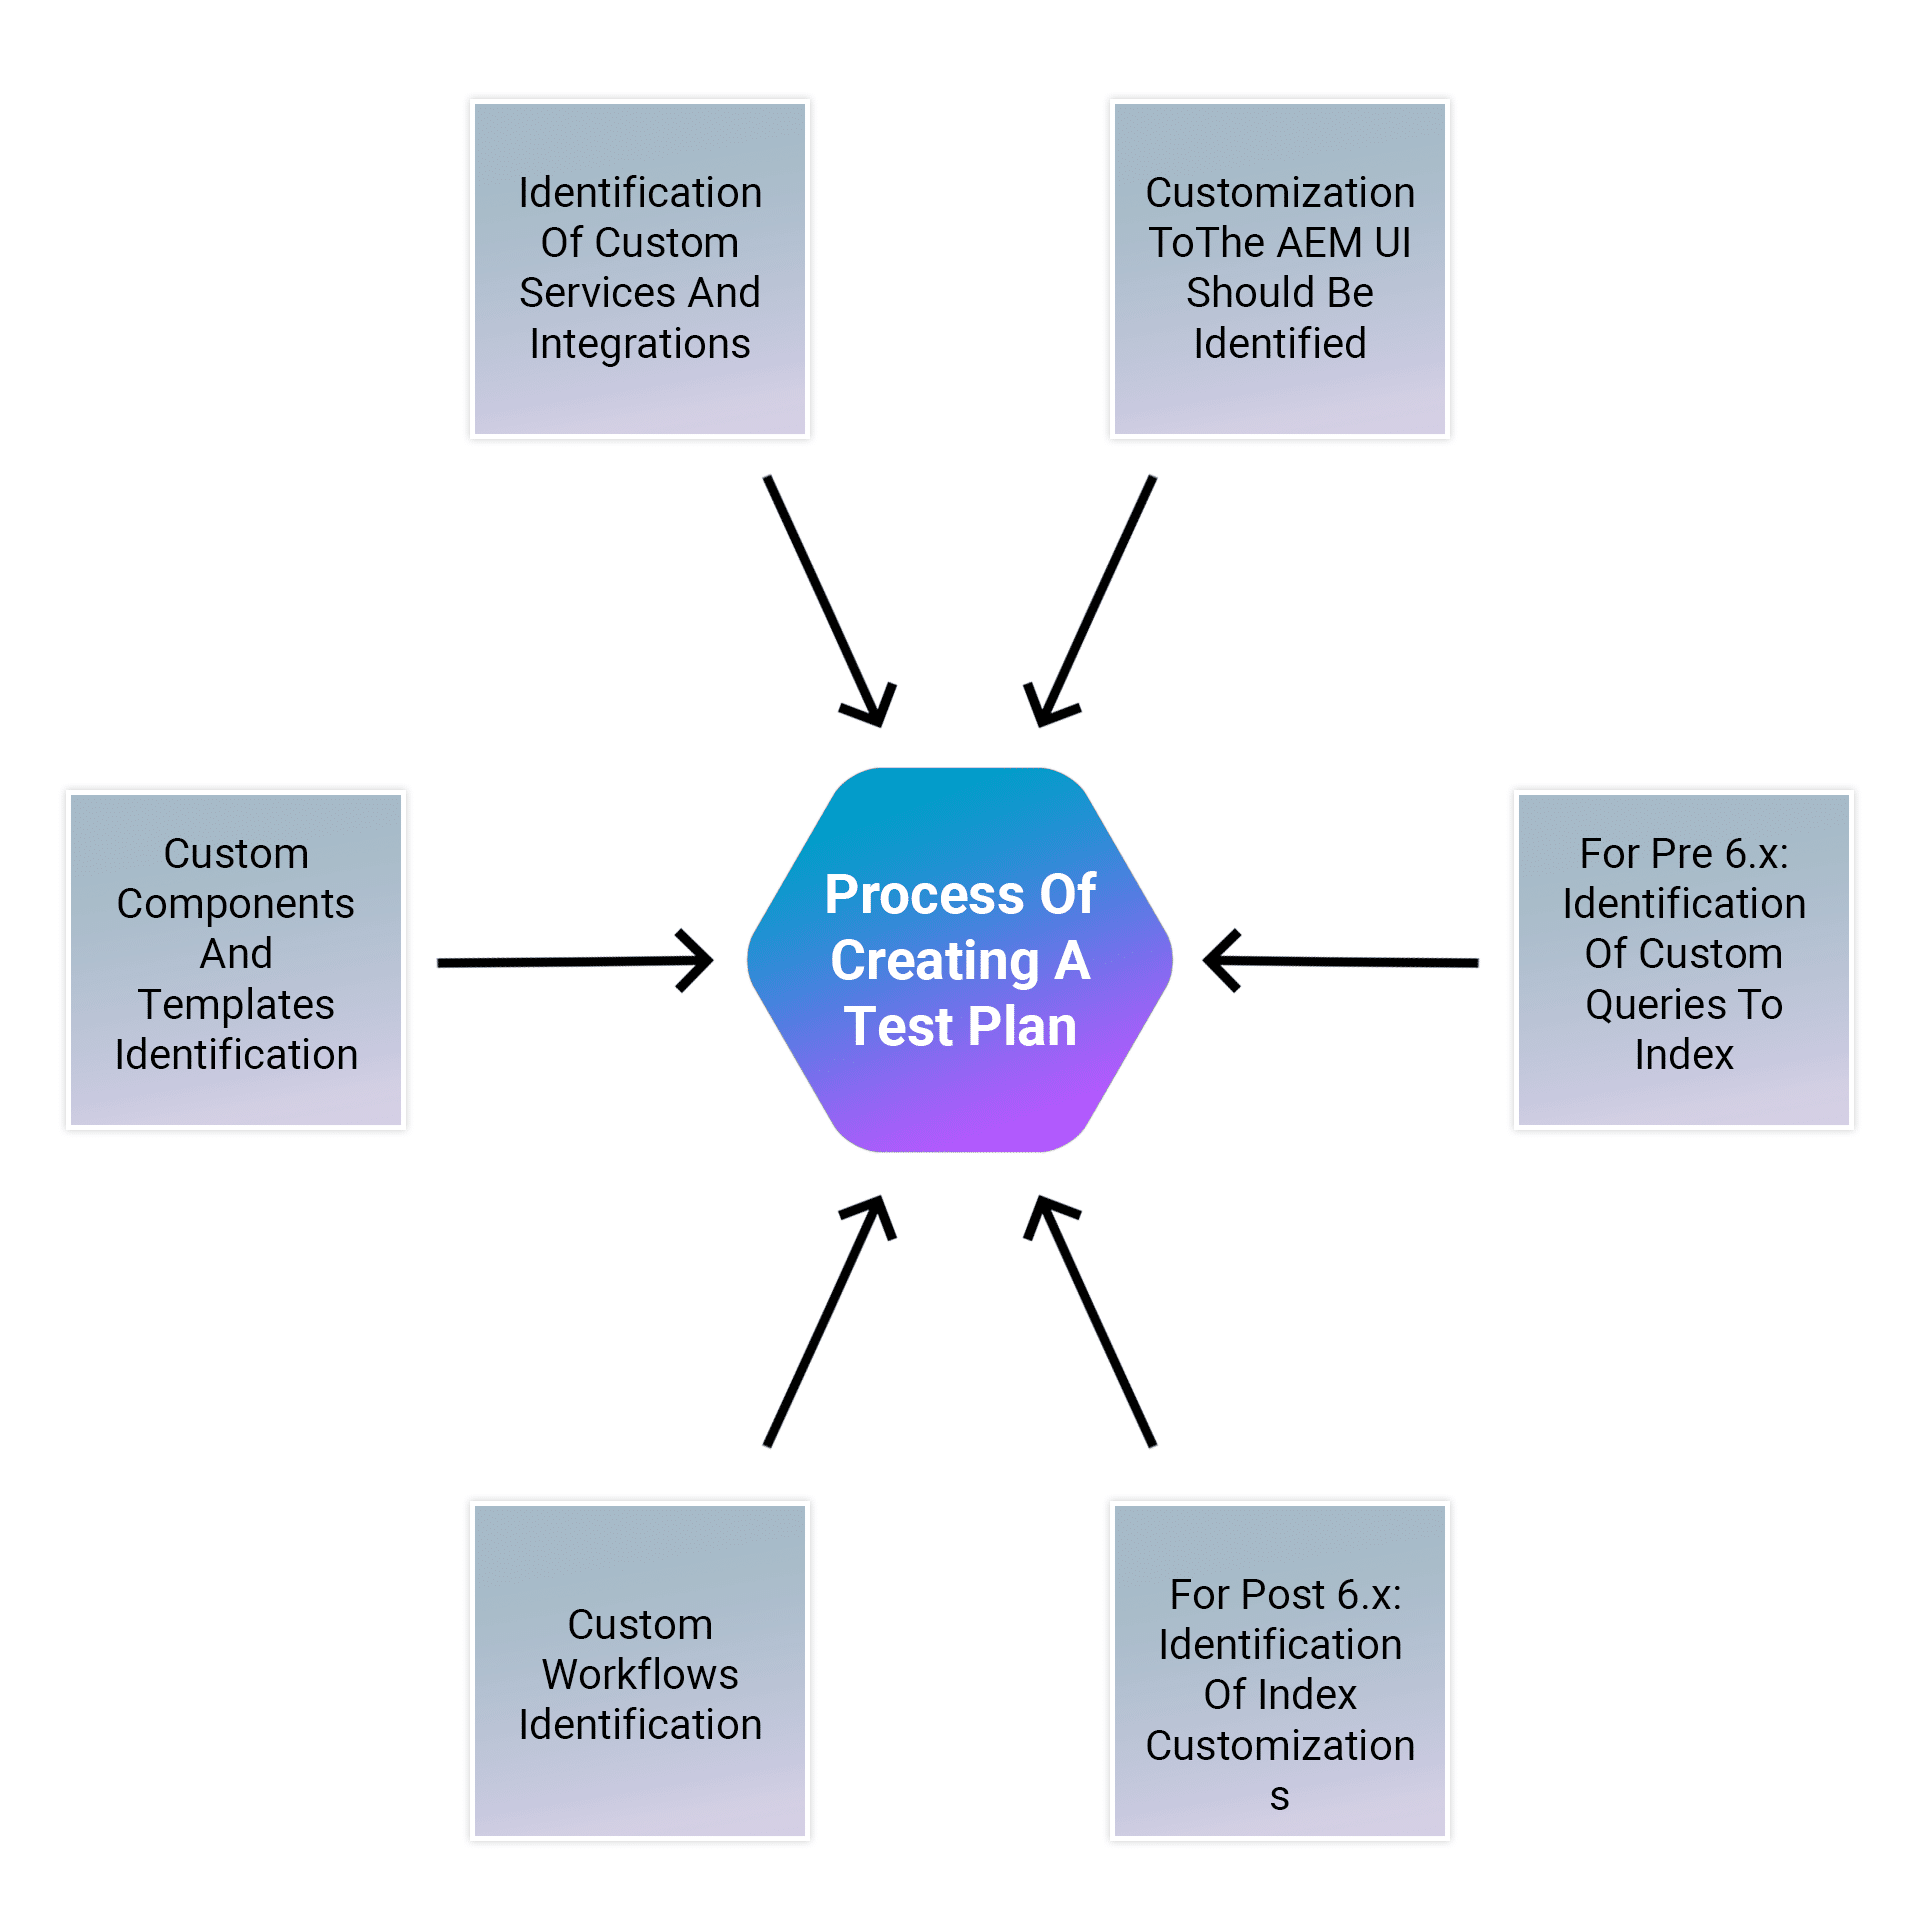
Every organization’s implementation of AEM is unique and customized to meet their specific business needs. So, it’s important to determine all the customization made to the system and included in a test plan. The test plan empowers the QA process, which is performed on the upgraded instance. The exact production environment needs to be duplicated and testing should be performed on it after the upgrade to make sure all applications and the custom code still run as desired.


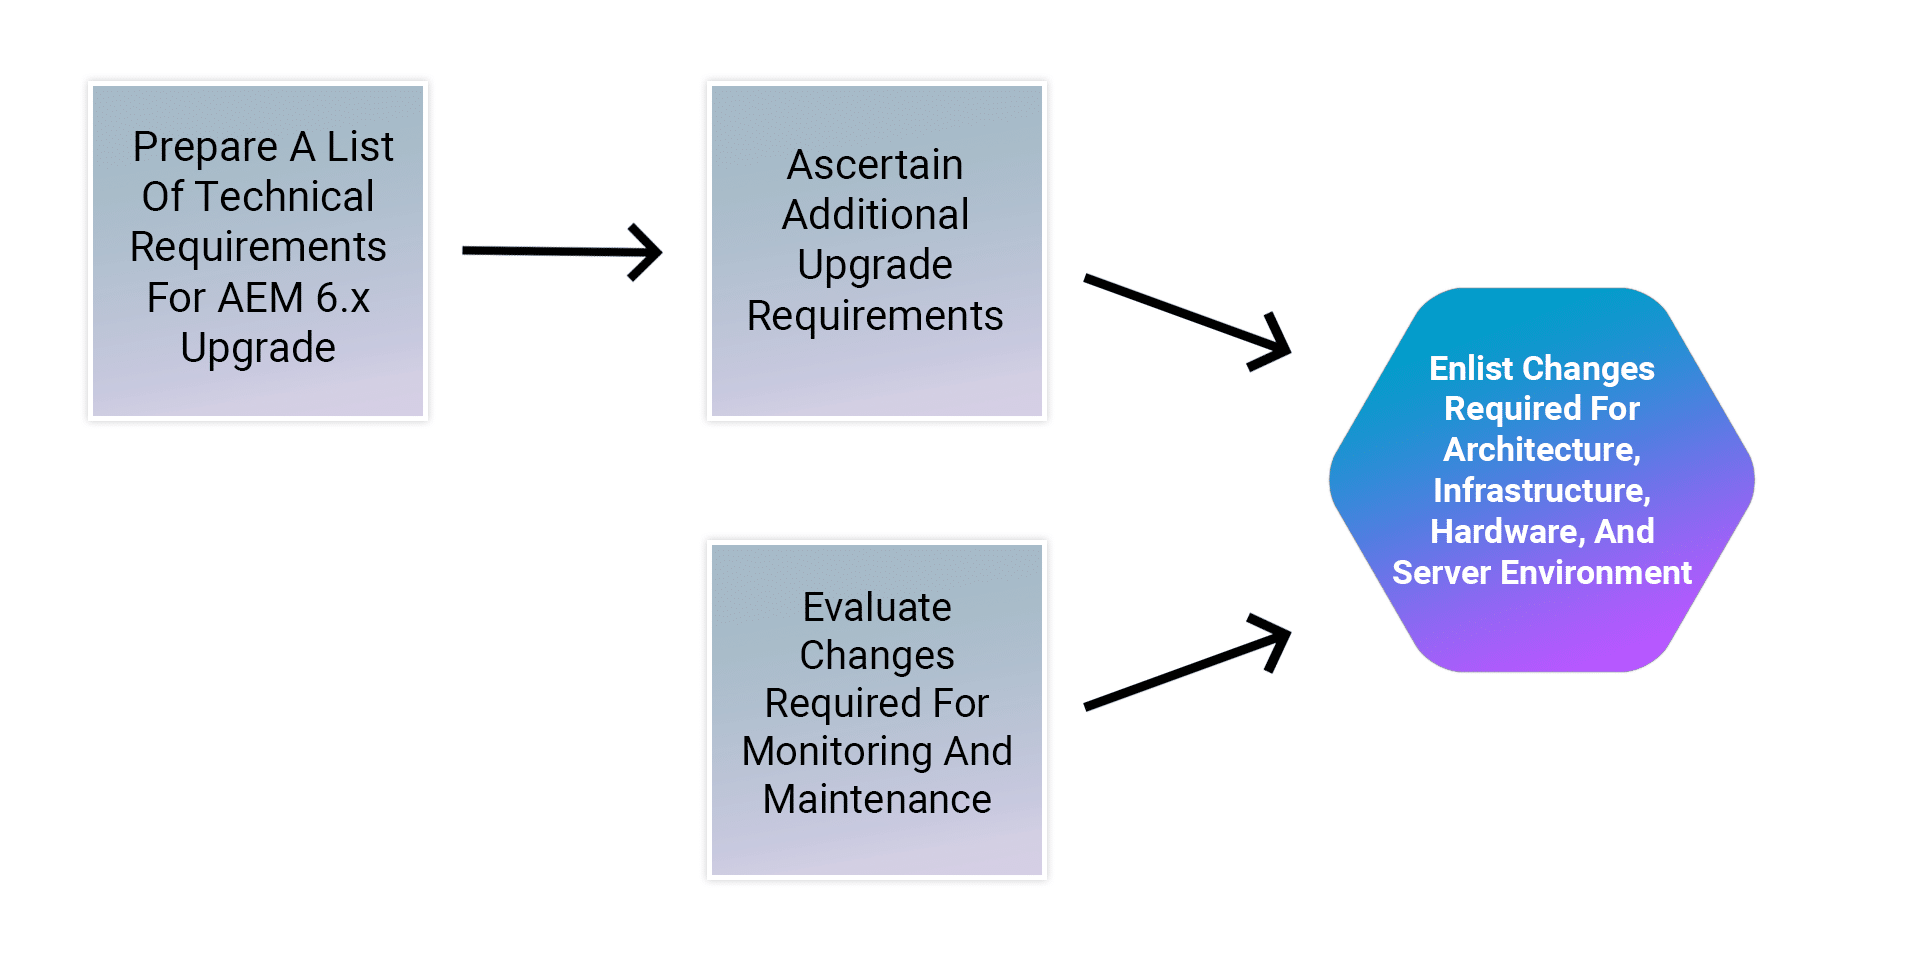
5. Determine Changes Required For Architecture And Infrastructure:
While upgrading, you may need to upgrade other components in your technical stack such as the operating system or JVM. Also, it’s possible that due to changes in the repository, additional hardware may be required (this is for migrating from pre 6.x instances). Further, changes may be required for operational practices including monitoring, maintenance, and backup and disaster recovery processes.

6. Assessing Complexity Associated With The Upgrade:
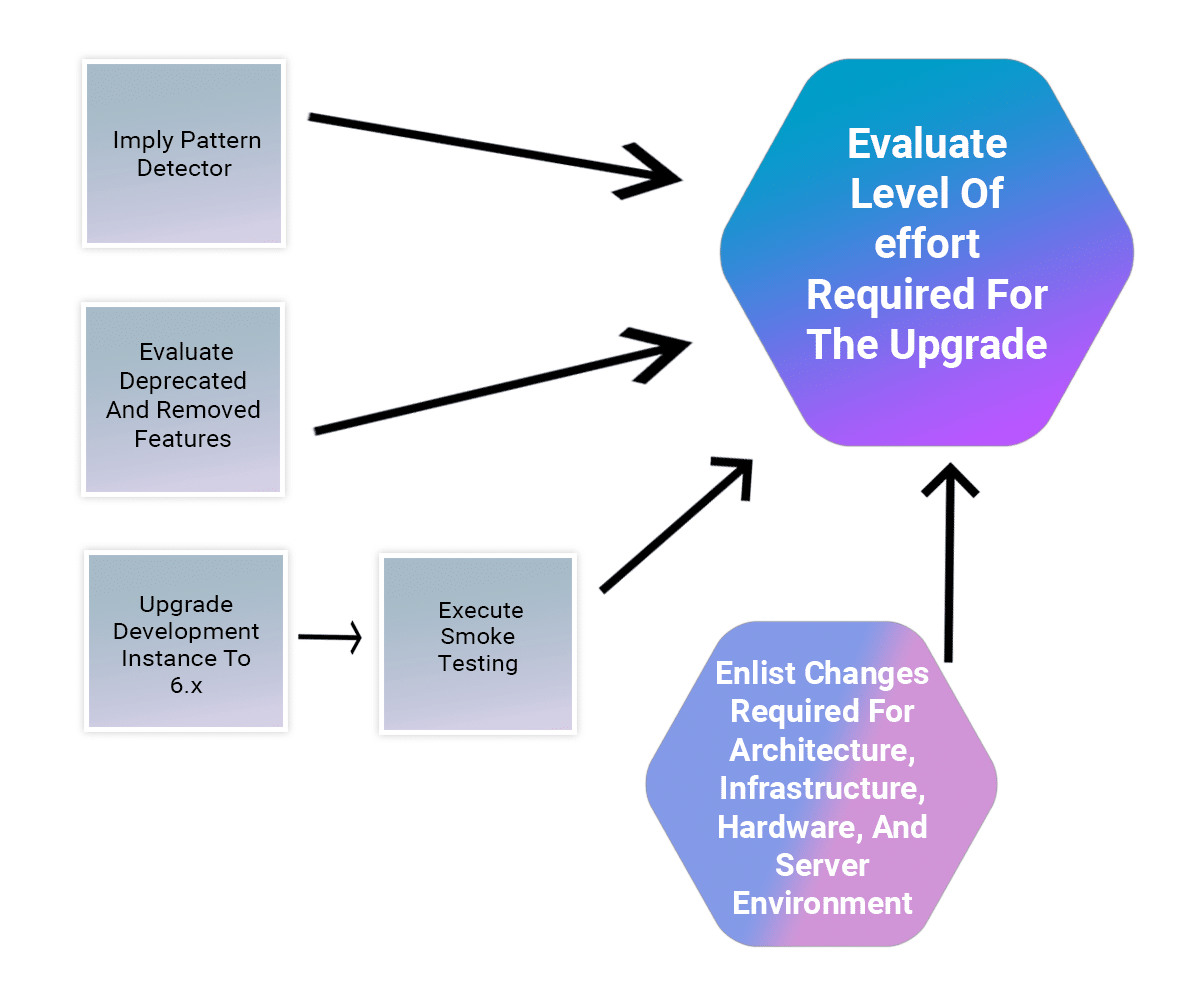
There are two steps involved to assess the complexity of the AEM upgrade. The first is the newly introduced Pattern Detector which is available to be run on AEM 6.1, 6.2 and 6.3 instances. It is the easiest way to assess the overall complexity of an upgrade in the form of reported patterns. The pattern detector report includes patterns for identifying unavailable APIs that are in use by the custom codebase. This test gives a fairly accurate estimate of what to expect during an upgrade for most cases.

The second and more comprehensive step is to perform an upgrade on a test instance that also includes some basic smoke testing. Also, the list of Deprecated and Removed Features should not only be reviewed for the version that you are upgrading to, but also for any versions between the source and target versions.

7. Prepare An Upgrade and Rollback Runbook:
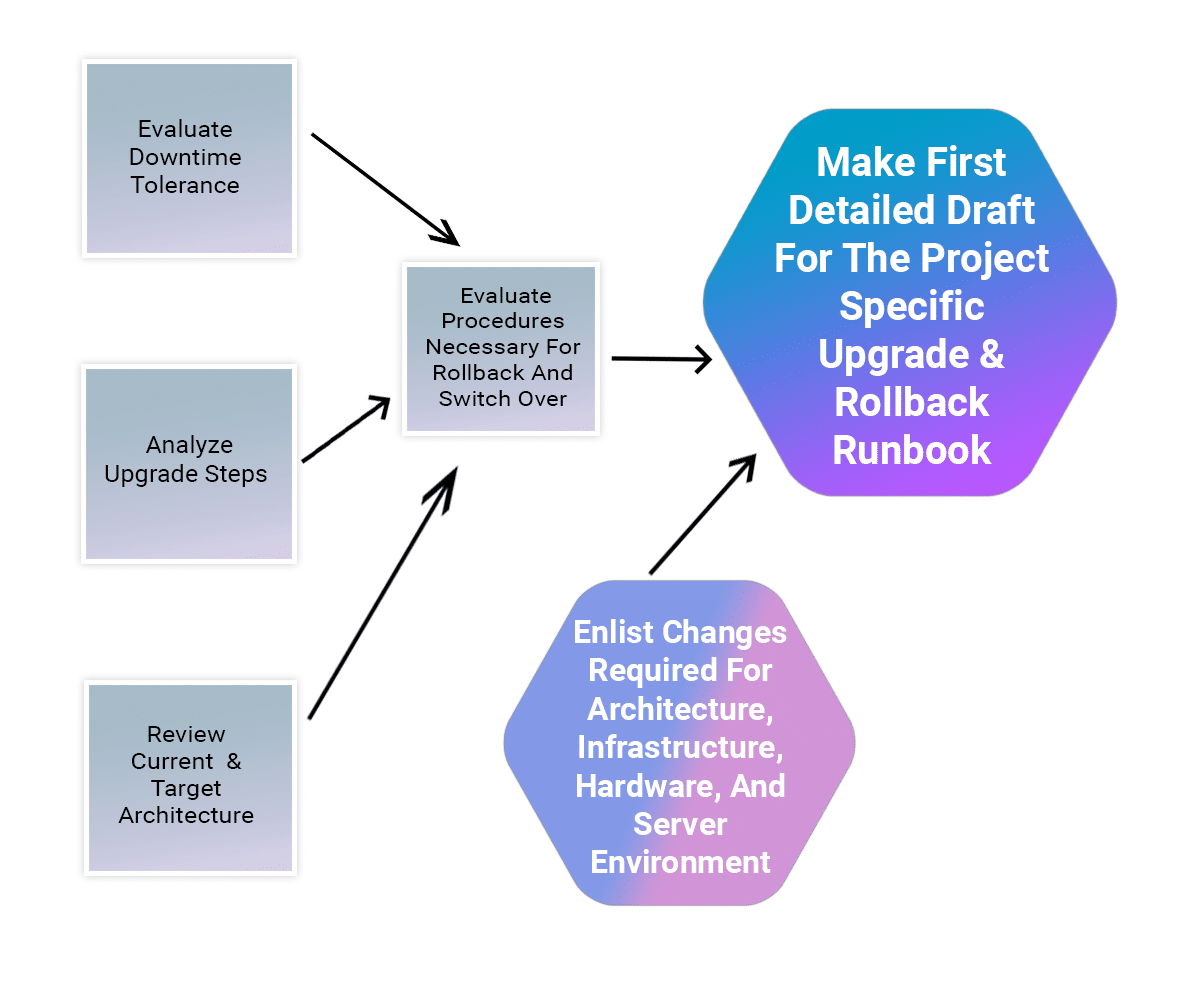
Though, Adobe has documented the basic process associated with upgrading an AEM instance, but, each organization’s network layout, deployment architecture, and customizations require tailored and fine-tuned procedure. Hence, it’s highly recommended to view all the documentation to construct a project-specific runbook that outlines the specific upgrade and rollback procedures. All instructions should be reviewed and taken into consideration with your system architecture, customizations, and downtime tolerance to determine the appropriate switch-over and rollback procedures that will be executed during the upgrade.


8. Develop A Project Plan:
Based on the steps described above, a project plan covering the expected timelines for test, development efforts, training, and actual upgrade execution can be built.

A comprehensive project plan includes:
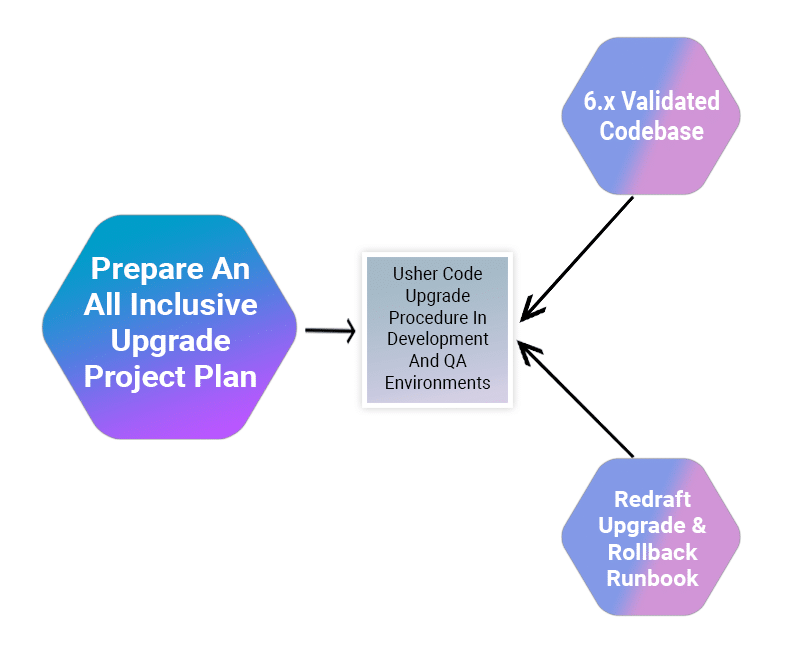
Finalization of development and test plans
Upgrading development and QA environments
Updating the custom code base for AEM 6.5
A QA test and fix cycle
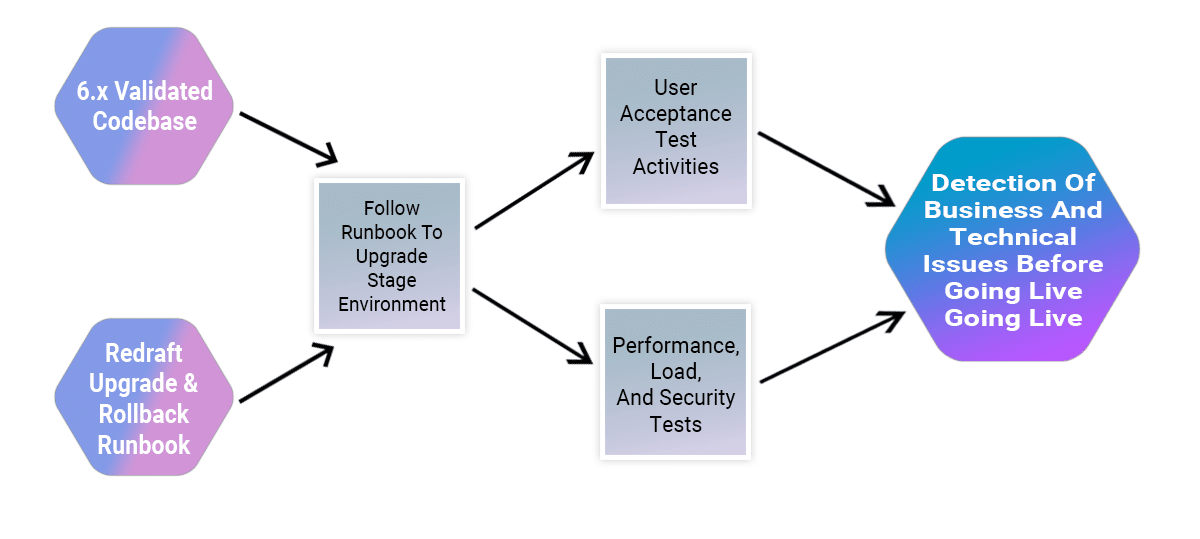
Upgrading the staging environment
Integration, performance, and load testing
Environment certification
Go live


9. Perform Development And QA:
We all know that the development and the testing process go hand in hand. During the customizations, the changes made while upgrade can make an entire section of the product unusable. There is the potential of discovering some new problems even after the redressal of the root issues by developers and testing teams. So, it’s better to keep track of these newly discovered issues in the upgrade runbook to make adjustments to the upgrade process. After testing and fixing, the code base should be fully validated and ready for deployment to the stage environment.


10. Final Testing:
A final round of testing is highly recommended after the codebase has been certified by the QA team. Also, validation of the runbook on the stage environment must be followed by user acceptance, performance, and security testing. Finding and correcting issues before going live can help to prevent costly production outages. Apart from these, it is also important to perform performance, load and security tests on the system to understand significant changes to the underlying platforms on the new version of AEM.


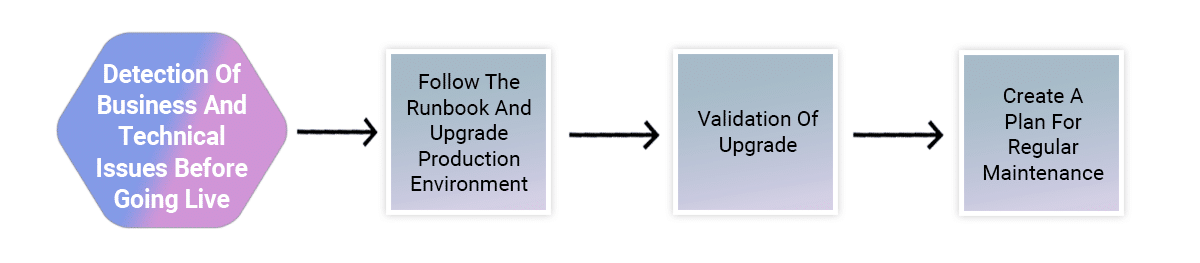
11. Performing the Upgrade:
Once the green signal has been received from all the stakeholders, the execution of runbook procedures should begin. The below image depicts the various steps to be taken into consideration while performing the final upgrade.


12. Post Upgrade Support:
Many clients do ignore the importance of post go-live support. It is very critical to have enough resources planned out for post upgrade support to ensure minimal/zero disruption to your live site(s). If you hired a vendor for this upgrade, make sure to budget for post upgrade warranty/support period. If you do it with internal resources, make sure to allocate enough resources to address any issues identified on production.

As I mentioned earlier, no two upgrades are the same and there will be unique challenges you may have to work thru specific to your scenario. Having an experienced partner like NextRow Digital to help you guide thru and execute may prove critical differentiation factor between a successful or not-so-smooth upgrade.


By aem4beginner

May 19, 2020
Estimated Post Reading Time ~

Web Accessibility Best Practices for Content Authors: Accessible Links

Authoring Accessible Links
There are many accessibility issues around the hyperlink element and its use. As a primary functional element used in webpages, we want to make sure that any experience that a non-impaired user has of our site’s links, there is an equivalent experience for the impaired user. For content authoring, however, we primarily need to worry about the guideline of link purpose (in context). This is the double-A standard and while there is a triple-A WCAG 2.0 standard for link purpose, that won’t be our focus here.

The guideline for link purpose says that,
The purpose of each link can be determined from the link text alone or from the link text together with its programmatically determined link context, except where the purpose of the link would be ambiguous to users in general.
While the guideline seems pretty straightforward, following the guideline consistently will require attention every time we author content for a page.
As you work on the content of your site a good question to ask yourself when creating links is this:

Does the user need to look outside of the element the link is in for nearby context in order to determine the purpose of the link?

Examples:
For content authoring purposes, we can successfully follow this guideline in a few different ways (not a complete list):

1. Use link text that describes the purpose of the link where there is no other context. This is one of the easier-to-solve situations. The purpose is going to be fully described by the text of the link itself because there is no other context to let the user know anything about the purpose of the link. So, what we need to focus on is making sure we’re creating a clear text description.

Example: Let’s look at the situation where you want to link to a specific product category page with a text link. Choose text that describes the purpose of the link. In this case, our purpose is to have users visit a specific product category page.
· If our category is Home & Kitchen, our link text could be “Home & Kitchen category”.
· Above you can see what is read by the VoiceOver screen reader when the user encounters that link.
· Back to our question: Does the user need to look outside of the element the link is in for nearby context in order to determine the purpose of the link?

With the link text above, NO! This link could stand alone with no other context and be understood by all users however they encounter it.

2. Use link text that describes the purpose of the link where there is programmatically determined additional context.
The key to this example is to make sure the context is able to be programmatically associated with the link. That means that the context must either be:

1. Encased in the same content element (paragraph, list, table cell, etc…)
2. A preceding heading the content
3. Associated using aria-label or aria-labeled by properties.

If we know that the context fits one of the conditions above, we can focus on just providing link text that will make the purpose of the link clear given that other context.

Example: Consider a block of links with a heading partially identifying the group of links from Amazon.com.

For the situation above, the block of links is identified as being top categories for the user. Visually, these links might be easy to associate together contextually, however, we don’t know if they are fully accessible.
However, we don’t know if the text “top categories for you” is programmatically associated with the links below it.

If we check the HTML we see the below for the ‘heading’:
Additionally, each link below the ‘heading’ is contained inside of its own <div> tag.
Analysis: the links provided do not have enough programmatic context to stand on their own.

So, what would Amazon need to do to make these links accessible? Any of these four would work and there are probably a few more ways to solve this beyond these.

1. Use an appropriate heading (h2, h3, h4, etc…) tag for the “Top categories for you” text
2. Add an aria-label to each link that describes the purpose of the link
3. Use aria-labelledby on each link using the ID of the description element
4. Make the “top categories for you” text a list element parent with the links below as a nested list.

3. Use image alt text that describes the purpose of the link when an image is the only link content.

When you are using an image as the only content of a link, your image’s alt text is going to define the purpose of the link. The best solution for this situation is to have the image and link text all be contained within the link. However, if using actual text for the link is not an option, the alt text of the image should be used.

When read by screenreaders, the user will hear the identification of the element type in order of nesting. So, for alt text on an image nested in a link, they will hear “link, image, [alt text]”. It is that context that we want to provide a text alternative to the meaning and purpose of the linked image.

For example, if we had an image of kitchen gadgets on our page that we wanted to link to our home & kitchen category, our link’s purpose is still to get the user to the Home & Kitchen category page. So, our alt text on the image should be “Home & Kitchen category”, the same as in the first example.

SEO Considerations:
Overall, what’s good for SEO is good for Accessibility. Best practices for search engine optimization and accessibility best practices are not in conflict when considering link text. The same things you want for accessibility make for good SEO practices. For instance:

BAD: “Click Here!” is bad for SEO just as it’s bad for Accessibility.
GOOD: “Home & Kitchen” would be good for both SEO and Accessibility.

For search engine optimization we also want page names that roughly describe the content of the page rather than just a string of random characters. If we are already naming our pages in a descriptive way for SEO, we can very easily use link text that roughly matches the page name. Doing so creates a good association for SEO as well as for accessibility.

Warning: exact matching every single page name throughout your site will potentially trigger spam filters.

That means that if your page pathname is “…/home-kitchen”, every single link to that page throughout your site should not be “home kitchen”. It would be more natural to have “home and kitchen”, “home & kitchen”, “home & kitchen category”, etc… Just don’t use something completely unrelated like “patio chairs” for a link to “…/home-kitchen”.

Other negative SEO practices such as keyword stuffing, spammy anchor text, and other techniques regarding links should also be avoided for accessibility.

Basic Do’s and Don’ts:
· DO use text that describes the purpose of the link
· DO make sure context can be determined programmatically
· DO keep links consistent throughout your site
· DO write clear and concise link text
· DO clean up empty or broken links
· DON’T use the “links to”, “link”, etc… in the link text (screenreaders announce that the user has encountered a link, so this will be repetitive)
· DON’T use ASCII characters or all Capital letters
· DON’T use URLs as link text
· DON’T use direct download links without notice

For more information and to read the full guidelines from W3 you can go directly to their site.


By aem4beginner

Is a single AEM instance best for your enterprise organization?

Most enterprise-level companies don’t have just one site in their portfolio they have 2, 5, 10, sometimes even hundreds. They could be scattered across multiple platforms or even worse on a server underneath the IT guy's desk. Choosing a platform for your company is key and having one that can handle all the sites in your portfolio is crucial.

AEM like many other platforms has a multi-site manager, making it easy to manage and maintain multiple sites in one instance. For example, they may have a site in Spanish, one in English, an e-commerce site, and a simple static site all on one instance.

Can AEM Handle multiple sites with millions of daily visitors?
Yes, it can! Where AEM stands out from other platforms is that it has the architecture to easily scale up. AEM comes OOTB with a dispatcher making it easier to cache content and distribute visitors to multiple servers so they’re not putting all the load on a single server.

This question came up with a recent Fortune 100 client, was among their portfolio was a site that hosted millions of visitors per day, and at the same time, they bought a company with a site that also had millions of visitors per day.
The client had two questions to answer: what platform is best for our business and do we go with a single AEM instance?
After many conversations both with the client and amongst our team, it was determined AEM was the right platform, and putting the entire portfolio on one instance made the most sense from a business perspective. It presented some challenges but in the end, they decided to migrate to AEM because of its ability to scale and sync seamlessly with other Adobe products they already used such as Target and analytics.
With a lot of hard work from our expert team, we successfully got both sites, as well as other sites from their portfolio, onto one AEM instance.

Should your business move to one instance of AEM?
Each business scenario is unique but from our experience with enterprise clients, I’ve compiled a list of factors you should consider when you're deciding whether to put all your sites on one AEM instance:
  • What is your current infrastructure like? Does it have the ability to scale? Confirming that your current server setup can scale is key. Despite AEM’s inherent scalability, if all your traffic is going to one server it won’t matter. You should ensure your team has the ability to add additional servers if needed and perform load tests before you begin. In many cases scaling up is not a serious issue, but be sure to check with your DevOps team.
  • Do you have a dedicated DevOps team? When we migrated this client’s one site that saw a million daily visitors to a new server, our DevOps team was very involved with the migration; helping to set-up and configure new servers, as well as a variety of other tasks like ensuring the URL structure was properly kept so SEO value wasn’t lost. The bottom line is, having a dedicated DevOps team is crucial to the success of the migration and continued support of AEM.
  • What’s your analytics and personalization strategy? If you are migrating to AEM a key decision is whether to use AEM’s personalization and analytics features. We suggest you stay within the Adobe family, utilizing Adobe Analytics and Target is a major benefit because AEM easily syncs with both of them and brings a whole new level of integrated personalization features that would be difficult to reach with other software.
  • What CMS is your current site built on? Depending on what CMS your existing site is on, sometimes you may just want to start from scratch when migrating to AEM. Often times you can either re-purpose some existing code/integrations or even migrate some of the content. This is an area you’ll want to work closely with your business and development teams to determine the best strategy.
In addition to the list of questions to ask, we’ve identified some pros and cons of moving everything to one instance. Honestly, sometimes it’s not the right decision to put everything in one instance. Depending on your situation you may want to split them across multiple AEM instances. Consider these points when making your decision:

Pros
  • You can share global configurations. One of AEM’s great features is its ability to save versions of a page. If a content author on your team accidentally deletes an entire section of a page it can easily be reverted to a previous version and restore content. In addition to this, you have the ability to configure how many versions of the page you wish to keep. For example, If you wanted to change it from saving 5 versions of a page to 10 you can make the configuration in one location and all your sites will now save 10 versions of a page. There are many other global configurations possible within AEM however we wanted to highlight a practical example.
  • Upgrading is easier. With any platform, you’re going to want the latest and greatest features but there can be a significant amount of work to perform the upgrade. With a single instance of AEM when you upgrade that one instance, all your sites are upgraded and available to use the platform’s newest features.
  • Less long term development time. Your DevOps and development team will likely be ecstatic if all your sites are in one instance. It’ll be far less long term development overhead to maintain one instance as opposed to multiple. 
  • Easy to share components or custom integrations. Your development team just created a component that sends user information to Salesforce. Since your sites are in one instance you can easily share this feature across multiple sites. But what if the configurations are different? No problem, with minimal extra development effort you can build the component to have varying configurations per site and direct information to different email distribution lists or Salesforce instances.
Cons
  • You can share global configurations. While this is also a pro it could potentially be a con. It’s key that your development team strategizes in making changes to shared components. If someone forgets the component they’re modifying is used across multiple sites they might not have QA’ed what they changed across the sites and could have broken a piece of functionality.
  • Multiple sites can go down if they’re in one instance. If something goes wrong on one side, it can and will affect the other sites on the instance. We had to address this for a client when one of their authors, who through user permissions was only allowed to modify one site, unfortunately, uploaded thousands of large files to the instance at once. The result was a total overload and subsequent system crash. It not only crashed the site the author was working on but had a cascading effect on all the sites that were on the same instance as well.
  • Communication between teams needs to be in sync. Often times when you have multiple sites in one instance you’ll have various business units involved who oversee each of the sites. It’s imperative that they communicate effectively, especially at times when they’re planning on doing a large code/content deployment for any number of reasons. If another site is doing maintenance at the same time, this could cause the servers to be bogged down and the site could experience slowness or worse, go down.
Each enterprise has a unique set of business scenarios and no two are going to be exactly the same. What we’ve learned is that AEM can handle multiple sites with millions of visitors provided your server setup is right. It’s important in any scenario that you take the time to strategically plan what you're going to do upfront, ensuring your business and development/DevOps teams are in sync throughout the process. If you have any questions about projects we’ve done in the past or just want to reach out we’d love to hear from you!


By aem4beginner

Best Approaches to Client Libraries in Adobe CQ5, Part 2

Dependencies
One nifty feature of clientlibs is the dependencies property, which allows you to define dependencies between clientlibs. One example of dependencies is that a component may be dependent on jQuery to function. If the dependencies property of “cq.jquery” is added to the template-level clientlib node, this clientlib can be ‘coupled’ with the template-level clientlib.

For example: 
<cq:includeClientLib js=”project.all” />
Will then result in: <code><script type=”text/javascript” src=”/etc/clientlibs/foundation/jquery.js”></script><script type=”text/javascript” src=”/etc/designs/{project}/clientlib.js”></script></code>

With all of these features in mind, you can structure your application in a secure, optimized, and logical fashion.

Optimizing Performance
When it comes to the production environment, page load performance is of the utmost importance. The more files that need to be fetched and the greater their size, the longer it will take for the page to be loaded and dispatched to the user.
CQ5 can deliver enhanced performance by enabling Minify and Gzip in the Day CQ HTML Library Manager of the Felix Configuration console. Minify compresses JS and CSS using the YUI compressor, removing all comments and whitespace. This not only obfuscates the source code but also reduces the file size for faster load time.

You can also save even more bandwidth and increase speed by enabling Gzip compression in the Felix console. Gzip is an algorithm that can compress a file ten-fold. The server sends compressed content to the browser of the Gzip encoding, and the browser accepts its compression scheme and decompresses it before loading it into the cache. These are two simple ways of improving overall performance.

Summary
We have covered the centralized, modular, and hybrid approaches to setting up clientlibs in your CQ5 project as well as a few simple tips for optimizing your dependencies and page load performance. A wonderful thing about the organization of clientlibs in CQ5 is that any combination of these strategies can be utilized within your project. You may prefer to always keep “global” clientlib resources at the template level (the centralized approach), and component-specific clientlibs at the component level (the modular approach). Then, you can couple clientlib dependencies and optimize page performance with ease!
No matter what you choose, utilizing clientlibs is essential to well-organized code and will assist you on your path to success.


By aem4beginner

10 Questions to Consider When Upgrading to AEM 6.1

The new version of the platform includes some significant changes to architecture behind the scenes, meaning that it is not a “flip the switch” upgrade. While the upgrade comes with some significant improvements, such as Sling and OSGi version upgrades and new features like touch UI, careful planning is still required to help ensure success.
10 Questions to Consider Before Upgrading to AEM 6.1

When creating a plan for the upgrade, here are some of the questions they had to consider:
  1. Would they use TarMK or MongoDB?
  2. Would they upgrade to Java8?
  3. Would they do a new, clean install or upgrade in place?
  4. Would they upgrade to AEM 6.0 or AEM 6.1?
  5. How would they handle all the API version updates?
  6. How would teasers work in 6.0?
  7. How would they handle the jQuery upgrade — how far would they go to clean up old jQuery?
  8. Would they use Google guava 15 or guava 17?
  9. Would they use classic UI or upgrade to the new touch UI?
  10. When would they start using Sightly?
For their upgrade, this particular client decided to do a “bare bones” upgrade to AEM 6.1, working with a minimal viable product to implement the upgrade, beginning with a jQuery upgrade and component clean up. They decided to go ahead and upgrade to Java8 and to leave new personalization efforts, Campaign, and the new Touch UI to be implemented once the initial upgrade was complete.
Once they’d made those decisions, there were still a few other items to address before moving forward.
  1. Check the Adobe docs
  2. Check the upgrade scenarios
  3. Check the service pack info
  4. Check performance optimization
  5. Try things — use data to decide your path
  6. Plan the performance testing
  7. Assess risks
Since they had previously upgraded to 5.6.1, they were able to use lessons learned during that process to help ensure this upgrade went a lot more smoothly. For example, during the upgrade to AEM 5.6.1, they’d experienced a significant performance fail — they’d missed doing performance testing on the author's side of the platform. So heading into the AEM 6.1 upgrade they made sure to keep that previous upgrade experience in mind.


By aem4beginner

Best Approaches to Clientlibs in AEM: Part III

The breadth of useful and innovative features within AEM cover many different aspects of creating an amazing digital experience. Digital content and asset management? Check. The latest in customer personalization and targeted content? Check. Ability to integrate with a vast variety of technologies? Check.

What about speed? While all of the dynamic and intricate functionality AEM provides is impressive, it does impact the speed of the site. You may already know that page load time has a direct impact on SEO, revenue, customer satisfaction, and conversion rates. Load time often comes down to page design and optimizing the when and how of loading resources on a page. You’ve organized, minified, and gzipped…What more can you do!? There are a few more design tricks with clientlibs you can take advantage of if you’re looking to create extremely fast websites.

Load only what you need
Start by visualizing the types of pages on your site and components on those pages. Maybe you already have a navigation menu designed. That’s a great place to start to figure out what types of pages you have. Do you have components that are only used within that category of the page?

For our example, we’ll use an eCommerce site and split the pages into different categories. These would be categories like homepage, product marketing/description pages, shopping flow pages, account management pages, and support pages. Some components are very common and used across most pages, like rich text, images, menus, and so on. Identify these and write them down under a Shared category. Then identify other components that you use only in one or two categories. Hero banner and carousels may only be used on the homepage and product marketing pages. 

Now you can split up these page categories into different page components that load different groups of clientlibs. Using dependencies we can make small chunks of javascript and css to load and cache across pages. A marketing page could load <cq:includeClientLib js=”project.marketing.all” /> which embeds “project.marketing” components and has a dependency on the “cq.jquery” and “project.shared” resulting in:

<script type=”text/javascript” src=”/etc/clientlibs/foundation/jquery.js”></script>
<script type=”text/javascript” src=”/etc/designs/{project}/shared/ clientlib.js”></script>
<script type=”text/javascript” src=”/etc/designs/{project}/marketing/ clientlib.js”></script>
This concept works particularly well if you’re aiming for an extremely fast site and minimizing total loaded file size. If mainly targeting mobile users, it may make sense to aim for a low number of requests instead of embedding the “cq.jquery” and “project.shared” in the “project.marketing.all” client library. Keep in mind that this approach will take some additional code updates if you decide later that a component should be used in another location on the site.

Other approaches
If maintenance and static categories won’t work for your site because the components and layout of your pages constantly change, the Hybrid clientlibs approach may still be your best option. The hybrid approach results in one cached javascript file that can be used across your site because it includes all of your component javascript.

However, if your layout constantly changes and you’re worried about how big your clientlibs file has become, deferred clientlibs might be a better option. For this approach, you would remove the load all javascript clientlib (<cq:includeClientLib js=”project.all” />) from the footer and tell your components to consolidate their javascript in the footer only if they are used on the page.

Let’s say you have 50 components with javascript across your site. On your Sitemap page, you only load 5 components – a few in the header and footer, and one for the sitemap itself. Instead of loading the javascript for all 50 components, you could load the javascript for just those five.

Usually, this is implemented through the use of a custom Tag Library to wrap script, and clientlib includes of javascript at the component level. The tag library tells the server to remove the include from where it’s loaded inside the component and combine it with other deferred includes to make just one request in the footer of the page.
For example:
… [Navigation component logic]
<ici:js-defer>
<cq:includeClientLib js=”icidigital.components.navigation”/>
</ici:js-defer>
[Navigation component end]
… [Sitemap component logic]
<ici:js-defer>
<cq:includeClientLib js=”icidigital.components.siteMap”/>
</ici:js-defer>
[Sitemap component end]
becomes…
<div class=”footer” />
<script type=”text/javascript” src=”path/to/programmatically/combined/deferred/clientlib.js”></script>
</div>

The downside of this approach is that it splits up your reusable javascript clientlibs file into one for each page. Meaning that our javascript file will be cacheable only for the page it’s on, opposed to across your site like it would be in the hybrid approach. The great thing is this solution is particularly faster if your javascript takes a long time to load from cache or if there’s a reason you can’t cache the page (e.g. query parameters).

What’s next?
Keep in mind that the web is ever-changing. The HTTP/2 protocol adoption rate is growing and will replace these HTTP best practices with its own. Instead, sites may want to split back out each clientlibs request as they can all be loaded asynchronously at the same time. Even still, reducing the weight of javascript and css loaded on the page will go a long way, making your site faster. Looking for even faster speeds? Remember when sites loaded “instantly?” So do your customers. Contact us to learn more about how we can help you develop your optimization strategy.


By aem4beginner

CSS Best Practices For AEM: Part II

Selector Priority
For all of AEM’s great features, perhaps one of its pain points is the amount of additional markup it adds to your page. This makes both scoping your CSS properly, and understanding selector priority, extremely important so that you’re not conflicting with other elements on your site. Generally, the more specific a selector is, the higher priority it has. Selectors get a point for each instance of a category, where the categories are as follows:
!important > style attribute > id attribute > classes or other attributes > element type

You can think of each category as a different “digit” than the others, where categories on the left trend higher. So for example, a selector with an id attribute will always override selectors with only class attributes.

*{} /* a=0 b=0 c=0 d=0 -> specificity = 0,0,0,0 */
li{} /* a=0 b=0 c=0 d=1 -> specificity = 0,0,0,1 */

li:first-line{} /* a=0 b=0 c=0 d=2 -> specificity = 0,0,0,2 */
ul li{} /* a=0 b=0 c=0 d=2 -> specificity = 0,0,0,2 */

ul ol+li{} /* a=0 b=0 c=0 d=3 -> specificity = 0,0,0,3 */
h1 + *[rel=up]{} /* a=0 b=0 c=1 d=1 -> specificity = 0,0,1,1 */
ul ol li.red{} /* a=0 b=0 c=1 d=3 -> specificity = 0,0,1,3 */
li.red.level{} /* a=0 b=0 c=2 d=1 -> specificity = 0,0,2,1 */
#x34y{} /* a=0 b=1 c=0 d=0 -> specificity = 0,1,0,0 */
style=””/* a=1 b=0 c=0 d=0 -> specificity = 1,0,0,0 */


Web Accessibility
Don’t forget your end-users who need additional accessibility! User-defined styles will generally override your CSS. There’s not much you can do about it directly, but you can still try to account for common accessibility cases, such as larger text, color-blindness, and contrast reversal to name a few. Here are a few more accessibility tips to keep in mind when building your site:
  • Label all form input elements
  • Supply alt tags for images
  • Specify the correct Doc-Type
  • Supply proper meta tags (language, description, and keywords)
  • Use as much text as possible, don’t use images with text on them
  • Using fallback fonts and avoid using tiny fonts
Floating vs Display: Inline-Block
In most cases, floating elements are outdated for browsers newer than IE7. Floating elements put them in a separate flow from other elements on the page, requiring that you maintain the layout by working around these elements, rather than letting the browser do it for you.

Parent elements are particularly notorious for having issues, as they only expand to contain non-floated elements. Layout designers try to work around this by using clear:both and .clearfix to re-add the floated section to the flow, but why go through the effort?

Inline-block was invented to remove these complexities and simplify layout understanding. It’s also far easier to maintain and change, because the elements keep their influence on the rest of the layout.

Properly Naming Your CSS
This seems like a no-brainer, but we’ve all been in situations where we’re in a rush to get something out of the door, and poorly named either a file or a selector. When dealing with an enterprise-level site, you’re bound to come back to that CSS at some point and have no idea why you named it the way you did. Or if you don’t come back to it, someone on your team spends an extra 20 minutes tracking down the file. Properly naming your selectors, CSS files, and adding comments, can save you and your team a ton of time in the future maintaining the site.


By aem4beginner

CSS Best Practices for AEM: Part I

In any large scale project CSS can often be put on the back burner while some of the more “important” features of the project are built out. In reality, CSS can make or break your site (literally!). You may be thinking “it’s just CSS – it can’t be that hard” but when building an enterprise level site, a well thought out CSS design can save you a tremendous amount of time in the future. For the sake of this post, we’ll assume you have a basic understanding of CSS and a basic understanding of AEM component development.

Selectors
Selectors are arguably the most important concept to grasp in modern CSS, even more than styling. Without selectors, there isn’t a “cascading” part of the style sheets. Incorrect selectors can cause even more problems. A general rule of thumb is to use about 2-3 selectors, and no more than 6. Too few selectors, and your CSS will likely affect more elements than intended. Too many, and your CSS becomes limited, confusing, and difficult to maintain.
Thus, the number one rule for selectors is:
Select classes at the lowest level, and make them as specific as possible, while still being reusable.
Otherwise, you’ll often find your CSS more difficult to maintain, and sometimes it’ll even have unintended consequences on other parts of your site. Just because CSS is loaded for a specific component, does not mean that it will not affect other elements on the same page.
This typically means we should try to:
  • Design global site-level defaults
  • Design CSS at a component level
  • Override on a page-by-page basis as necessary
  • Avoid #id selectors in CSS (limited reusability)
A general rule for making the component reusable across pages, is to rely on classes only present in the component itself. Rarely is there a guarantee that your wrapper class will always be the same, especially in future reuse cases. In AEM, this includes the generated wrapper and its classes, as the classes will change based on the “path” specified in the include statement. Exceptions include tightly coupled wrapper classes (I want a different style if the component is in this wrapper), and implementing CSS for a specific component instance, where you’re usually better off with page-specific CSS.
Why is that? Preferring page-specific CSS imports vs. instance-specific:
  • The CSS itself is more specific (Which page is this limited CSS pointing to again?)
  • Less confusing from a context standpoint (Where is this class in the component? Oh, it’s in some wrapper or parent that is not tightly coupled.)
  • Much easier to maintain (If the parent class or layout on the page changes, then you have to refactor CSS.)
Design Order
  1. Global default style
  2. AEM design-level CSS defaults
  3. Component CSS defaults using only markup in the component
  4. Tightly-coupled components CSS defaults
  5. Page-level/page components CSS defaults
  6. CSS for specific component instances (usually with loosely coupled wrapper)
Overriding CSS will typically follow this order as well, where the lower levels override the ones above them.
A well planned and thought out CSS design is just as important as any other part of your site and is a major contributor to the success or failure of a project. When dealing with complex sites, you should really take the time to sit down and think about a strategy for your CSS, while keeping the above-mentioned points in mind.


By aem4beginner

8 Keys to a Successful AEM Implementation

Adobe Experience Manager (AEM) is a powerful and flexible content management system. Successfully implementing AEM can be a challenge, and through the hundreds of AEM sites that Blue Acorn iCi has launched, we have noted several key factors that promote successful implementation.
Here are our keys to successfully implementing AEM:

1. Clearly define your strategy
Commit a few weeks to a strategy phase to assess your current state, define requirements, mitigate risks, and create the AEM reuse and implementation strategy across multiple domains.

2. Start with a pilot site
An AEM implementation is complex and carries risks. Manage risks and learn about AEM development, integration, and authoring by first implementing AEM on a pilot site, and then on a flagship site.

3. Maximize knowledge share
Bring in an outside partner for specific AEM expertise and experience. Demand visibility into the implementation process to make sure the functionality can be maintained after the partner leaves.

4. Create an appropriate team structure
Combine your internal team with an experienced implementation partner. The collaboration leads to a greater likelihood of self-sufficiency for your organization following launch.

5. Change your business processes
Adapt and modernize business processes to suit the strengths of AEM. It can improve organizational efficiency and user experience. AEM implementations get expensive when you ignore the business process.

6. Think creatively to satisfy business needs
Think creatively about how AEM templates and components can be built or modified to suit the needs of multiple web pages, websites, and business units. It will lead to less cost overall.

7. Don’t skimp on quality
Quality Assurance (QA) is critical to success, but it is often a bottleneck. Invest in QA resources to increase delivery team throughput.

8. Enroll authors early in the process
Authors provide insights about how AEM and existing processes can be blended, modified, or created to improve publishing. Enrolling authors also help AEM adoption after site launch.


By aem4beginner

Web Accessibility Best Practices for Content Authors: Alt Text

Accessible Text Alternatives for Images
What is an Alt Text for an Image?

The alt text attribute on an image serves as a text equivalent to the experience of viewing the image; it isn’t just a written description of the image. To meet the W3 standards, EVERY image MUST have an alt attribute applied to the <img> element.
There are three primary variations on how an alt attribute should be handled for an image:
  1. For images that convey meaning or serve a purpose to sighted users, that same meaning or purpose should be provided through a text alternative added to the alt attribute in the image tag.
  2. For images that are purely decorative or that add no meaning or serve no real purpose to the sighted user that is not already conveyed through text elements on the page, the alt text should be left intentionally empty so that the image is ignored by assistive technology, such as screen readers.
  3. Images that are linked, that have no other link description, should have alt text that not only is a text alternative to the image, but also describes the purpose and destination of the link.
Example:
Let’s look at a complex situation to illustrate our points.
Consider a typical recipe site. Their pages usually have a text element at the top holding the recipe’s title and right below that there will be a large ‘hero’ shot of the finished recipe.

The first question we need to ask when considering what alternative text we should use for the image is:

What does the experience of viewing the image communicate to the viewer?
A basic description of the image content doesn’t provide anything that the text recipe title above the image (which likely would have already been communicated to the user by assistive technology) is already telling them. Instead, think about how the experience of viewing the image is meant to entice the user to become drawn to it. Remember the reason you chose the image, it’s not just a picture of the recipe, its job is to get the user to make it!
So, that means that we need a high-quality text alternative if we want the same experience to be conveyed to the non-sighted user.

In this case, perhaps we have a recipe titled, “Herb-Roasted Chicken.” We certainly can’t just repeat the image title; that is incorrect on a number of levels. Instead, consider this text alternative:
“golden brown, herb-roasted chicken served in a cast iron pot”
The above text alternative provides a description of the contents of the image that attempts to provide the same experience of an enticing image that serves to get the user to engage further with the content.

SEO Considerations:
Search engines place significant value on alt text to score your page rank, however, they also draw a line that you do not want to cross where their algorithms will start to classify your site as spam. They value quality alt text. In the example found at this link: https://support.google.com/webmasters/answer/114016?hl=en, Google shows a clear example of the scale of alternative text quality.

In Google’s example, for an image of a puppy, alt=”puppy” is an ok alternative text. The better alternative text they present is: alt=”Dalmatian puppy playing fetch”. If you were a screen reader user, the second example gives you a much richer experience of that image’s content than “puppy” and probably more accurately describes what is going on in the image. Their example to be avoided is a long list of keywords related to dogs and puppies that would probably result in negative page rank.

SEO conclusion: even for SEO purposes, using a text alternative to the meaning and purpose of an image will net the best results for your site’s content.

Basic Do’s and Don’ts:
Text alternatives are critical for accessibility, however, they are also very contextual and what is “good” or “great” alt text is very subjective. That being said, there are some clear do’s and don’ts provided below that can help guide you when authoring accessible alt text.

DO Give every Image an alt attribute
  1. DO add alt text that is a text equivalent to the meaning or purpose conveyed by seeing the image (but keep it as brief as possible)
  2. DO leave the alt attribute empty to designate an image as purely decorative
  3. DO think about providing the same experience to sighted and non-sighted users
  4. DO describe the purpose and destination of a linked image
  5. DON’T just describe the picture
  6. DON’T use the exact text of a nearby text element
  7. DON’T duplicate the content of the alt text attribute into the title text attribute or vise versa
  8. DON’T worry about alt text for branded text such as logos
  9. DON’T stuff alt text with keywords


By aem4beginner

Best Approaches to Client Libraries in Adobe CQ5, Part 1

Client libraries are an essential building block of an application programming interface (API). A client library is a resource that the API depends on. In other words, when constructing an application, the controller is dependent on the information that the client library resource provides to appear and act as expected.
In this two-part series, we will explore the functionality of the Client Library Folder in Adobe CQ5, colloquially known as the clientlib, and how it can be properly utilized to breathe life into the application.
The concept of the clientlib is central to Adobe CQ5 because it can allow all the JavaScript and CSS resources within the application to be organized intelligently, as well as provide the means to handle dependencies between client libraries. It gives you a great deal of freedom to structure and consolidate client resources, offering a modular platform by which the application can easily import the resources it needs.
But with great freedom also comes great responsibility. There are several ways to go about setting up clientlibs, and we will cover some of the pros and cons of a centralized approach versus a compartmentalized approach.
The Centralized Approach

The centralized approach entails bundling all client libraries into monolithic and all-encompassing.JS and .CSS files within /etc/designs/{project}/clientlibs. This type of clientlib is loaded by default for every page within a project and it doesn’t need to be called explicitly. The biggest obstacle to this is large files that load all the JS and CSS regardless of whether or not the page actually needs it, at the expense of page load performance.

The Modular Approach
The modular approach is to create clientlibs at the component level. This keeps the clientlib local to the component. You will create a “categories” property of the String[] type with the value that is descriptive of the type or use of the components within the clientlib. This value will be referenced when including the clientlib in the JSP of a component, as well as defining embedded clientlib inheritance at the template-level.
This categories property is also beneficial because it allows you to group several clientlibs into the same category, so one include can pull as many clientlibs that belong to that category with one CQ include.
For instance, if you place the following CQ includes into the <head>:<cq:includeClientLib css="project.components" /> 
<cq:includeClientLib js="project.components" />

It might result in this HTML-output:
<link href="/apps/components/component1/clientlib.css?x96110" rel="stylesheet" type="text/css" /> 
<link href="/apps/components/component2/clientlib.css?x96110" rel="stylesheet" type="text/css" /> 
<link href="/apps/components/component3/clientlib.css?x96110" rel="stylesheet" type="text/css" /> 
<script type="text/javascript" src="/apps/components/component1/clientlib.js?x96110"></script> 
<script type="text/javascript" src="/apps/components/component2/clientlib.js?x96110"></script> 
<script type="text/javascript" src="/apps/components/component3/clientlib.js?x96110"></script>

While this may sometimes be a good thing, the major criticisms to this modular clientlib approach is 1) the resources are retrieved directly from /apps and application structure is exposed, and 2) a number of server calls have to be made to fetch the resources, in the case of grouped clientlibs by category. However, there is a hybrid approach that can be considered the best of both worlds; essentially redirecting these resources which keeps /apps invisible and still allows CQ5 to merge them to single files.

The Hybrid Approach
To do this, you will need to create a clientlib node under /etc/designs/{project}/clientlibs. The etc/designs/project clientlib node will have an embed property of “project.components,” and a category property of “project.all.” By defining this embed property, this template-level clientlib automatically embeds, or inherits, all of the internal component-level clientlib resources with “project.components,” and define its own category called “project.all.” Now when you change the CQ5 includes in the JSP to:

<cq:includeClientLib css="project.all" /> 
<cq:includeClientLib js="project.all" />
It will result in a consolidated, template-level clientlib, with HTML-output like this:

<link href="/etc/designs/{project}/clientlib.css?x96110" rel="stylesheet" type="text/css" /> 
<script type="text/javascript" src="/etc/designs/{project}/clientlib.js?x96110"></script>

This approach has all of the merits of a preferred approach, because if you open these files then you will see that the three js/css resources are merged into one file. And although the resources are located in the /apps-folder, all references seem to originate from the /etc/designs folder. So in essence, the component’s JS and CSS are local, the component within the JCR, /apps is obscured from the end-user, and the internal resources are being masked into an external clientlibs file that is kept within /etc and referenced in the component. Check back later this week or subscribe to our blog via email for the continued exploration of clientlibs in Adobe CQ5, particularly how to optimize your page load time and a summary of the advantages when using a centralized or compartmentalized approach.


By aem4beginner

May 3, 2020
Estimated Post Reading Time ~

Sass Best Practices for Adobe Experience Manager (AEM) based websites

Most of the front end developers are aware of the difficulties of having a single CSS file which is having hundred and hundred of lines, usually duplicated styles more than the required ones. In such cases, the front-end developers would be struggling to handle priority, specificity which finally ends up into a stage of maintenance hell.

Thanks to CSS preprocessors like LESS /SASS which has revolutionized vanilla CSS. Those who start learning and using them used to have a common opinion that they would never want to go back.

As with any other technology, Sass needs best practices for writing a reusable and extendable codebase which helps a front-end team to deal with CSS in a structured and professional manner. This article is all about that from my personal experience with front-end development and reading from other blogs like Sass Guidelines

Folder and File Organization
Folder structuring is the best place to start with Sass development. This is one of the key factor which help to categorize the style sheets instead of dumping all files in one place. Here is a sample folder structure which we followed to categorize our style sheets and to keep in sync with AEM component based developmentsass
|
|– core-components/
| |– _button.scss
| |– _colors.scss
| |– _globals.scss
| |– _mixins.scss
| |– _parallax.scss
| |– _typography.scss
| |– _variables.scss
| |– core.scss
| … # Etc…
|
|– components/
| |– _accordian.scss
| |– _section-type1.scss
| |– _section-type2.scss
| |– _section-type3.scss
| … # Etc…
|
|– pages/
| |– home.scss
| |– contact-us.scss
| … # Etc…
|
|– themes/
| |– _theme1.scss
| |– _theme2.scss
| |– theme-all.scss
| … # Etc…
|
|– animations/
| |– _ripples.scss
| … # Etc…

Let's go through each folder to understand the purpose of each folder.

/core-components
The core-components folder holds the styles which are common for all the pages. There is only one Sass file at the root level(ie core.scss). All the other files are prefixed with an underscore (_) to tell Sass that they are partials. Those partial will not be compiled to .css files. Here it is the core.scss file’s role to import and merge all of them into core.css.

Here is an excellent definition of partials from the Sass website itself.

“You can create partial Sass files that contain little snippets of CSS that you can include in other Sass files. This is a great way to modularize your CSS and help keep things easier to maintain.”

/components
The core-components folder holds the styles(partials) which are supposed to be imported into *pages.scss files as and when required. The components like ‘section-hero’, section-banner, ‘section-feature’ are selected to match those of the components defined by AEM

/pages
It is the *page.scss files role to import partials available in the components folder and animation folder. Ideally, pages should be just a collection of components. Any of the page-specific styles or those which need to be overridden at the page level can also be there in these files. The advantage here is that only those style(components) required for a particular page will be loaded which in-turn improves performance and reduce bandwidth usage.

/themes
This folder holds all the theme-related style sheets in the form of partials
The theme-all.scss file’s role is to import all these theme partial files.

/animations
This folder holds all the animation-related partial style sheets

Modularization
Due to its ability to import multiple .scss files and compile them into one .css file, it is super easy to bring in modularization and better maintainability in sass based projects. It also allows multiple developers to work on the same pages of a website with-out much issues/conflicts. A typical sample follows

/* Variables */
@import '../core-components/mixins';
@import '../core-components/colors';
@import '../core-components/variables';

/* components */
@import '../components/widget';
@import '../components/section-type1';
@import '../components/section-type2';

Colors
This file can be used to store all the colors which are used across the website. A typical sample follows

/* Style Guide Colors */
$green: #1F4212;
$light-white: #FBFBFB;
$cool-blue: #4D8DAB;
$dark-sky-blue: #66ACEE;
$greyish-brown: #363636;

/* shades */
$black: #000000;
$white: #FFFFFF;
$transparent: transparent;

Variables
This file is used to store a lot of information(ie those may vary) during the course of website development, UI reviews, etc. This really helped us a lot as changing a variable in one place, reflects those changes globally. The best practice is never to use a color value directly in any of the style sheets except in variable.scss.

/* Colors */
$primary-color: $white;
$secondary-color: $greyish-brown;

/* Background */
$primary-bg-color: $primary-color;
$secondary-bg-color: $light-white;

/* Buttons */
$button-color: $primary-color;
$button-background: $blue;

/* Section Hero */
$section-type1-background: $black;
$section-type1-headline-color: $primary-color;

Typography
It is this file that helped to controls the typography across the entire website. The best practice is that anything related to font-size, font-weight, etc has to be defined in this file so that any change later has do done only in this file and would have a global effect. Follows is a sample of this file

/* Text Styles */
.text-style {
    font-size: 2.813rem; //40px
    font-weight: normal;
    line-height: 1.01;
    text-align: center;
    color: $color-ts;
    @media #{$medium-only} {
        font-size: 2rem;
    }
    @media #{$small-and-down} {
        font-size: 1.233rem;
        line-height: 1.02;
    }
}

Mixins
They are a collection of attributes that can be imported. The best practice is that static codes should not be defined as mixins, but dynamic values passed as attributes can be used. Follows is a sample of this file

@mixin opacity($opacity) {
    opacity: $opacity;
    $opacity-ie: $opacity * 100;
    filter: alpha(opacity=$opacity-ie); //IE8
}
@mixin boxsizing($box-model) {
    -webkit-box-sizing: $box-model; // Safari <= 5
    -moz-box-sizing: $box-model; // Firefox <= 19
    box-sizing: $box-model;
}

Nesting
This is an interesting feature, but if not used judiciously can result in .css code which has too much specificity than required and hence less performance. The best practice is that
  • Avoid nesting more than 3 levels.
  • Define a class which is small and reusable.
  • Use nesting if really required, not to match HTML structure.
Media Queries
The best practice is that make use of the Sass feature to nest media queries. The following is a sample snippet.

/* Text Styles */
.text-style {
    font-size: 2.813rem; //40px
    font-weight: normal;
    line-height: 1.01;
    text-align: center;
    color: $color-ts;
    @media #{$medium-only} {
        font-size: 2rem;
    }
    @media #{$small-and-down} {
        font-size: 1.233rem;
        line-height: 1.02;
    }
}

This helps in solving many issues like
  • Re-writing the selectors somewhere else
  • The rules which are over-riding are visible there itself, which is usually not the case when they are defined at the bottom of the file or in a different file
For Adobe Experience Manager(AEM) Compatibility
Define generic style for H tags(H1, H2 through H6 ), P tags, A tags, etc so that all those pages where ever authoring is enabled, will have better flexibility for AEM based website development as the AEM development don't need to track .css class with-in the authorable sections. A sample snippet follows

/* Text content - body text*/
.text-content {
    font-size: 1.25rem; //20px
    line-height: 2;     //40px
    font-weight: $font-weight-regular;
    color: $text-content-color;
    @media #{$small-and-down} {
        font-size: 1.067rem; //16px
        line-height: 1.11; //20px
    }
    p {
        word-break: break-word;
        @media #{$small-and-down} {
            font-size: 1.067rem; //16px
            line-height: 1.63; //26px
        }
    }
    ul {
        padding-left: 1.563rem;
        box-sizing: border-box;
        @media #{$small-and-down} {
            font-size: 1.067rem; //16px
            line-height: 1.63; //26px
        }
    }
    a {
        font-size: 1.25rem; //20px
        font-weight: $font-weight-regular;
        color: $color-link;
        @media #{$small-and-down} {
            font-size: 1.067rem; //16px
            line-height: 1.63; //26px
        }
    }
}
/* H Tags */
h1 {
    font-size: 2.813rem; //45px
    line-height: 1.07; //48px
    font-weight: $font-weight-regular;
    color: $color-h1;
    &.light {
        font-weight: $font-weight-light;
    }
    @media #{$small-and-down} {
        font-size: 1.733rem; //26px
        line-height: 1.08; //28px
    }
}
h2 {
    font-size: 2.25rem; //36px
    line-height: 1.22; //44px
    font-weight: $font-weight-light;
    color: $color-h2;
    @media #{$small-and-down} {
        font-size: 1.6rem; //24px
        line-height: 1.08; //26px
    }
}

Wrap-It-Up
Sass is relatively a new technology and we all may continue learning and adopting new best practices with it. Sass does not do anything which we don’t ask it to do, so blaming that Sass results are too bloated is just that we wrote bloated code. So we all may follow the best practices so that the final CSS output is the best.

The ideal way to learn these best practices is to apply those into our projects and see what really works. Over time, we could decide what is more beneficial than others, in which case we may keep whatever works and skip what doesn’t. Let me know if you have any thoughts, advice, etc. in the comments section.


By aem4beginner