Showing posts with label Web Services. Show all posts

October 13, 2020
Estimated Post Reading Time ~

Read/Write data in Json file of DAM in AEM + Making Rest API Call.


This is the frequently searched query on Google by AEM Developers.
So I will provide you the code in which we can use Asset and AssetManager API to read and write the data to any file in out DAM structure.
For this we need System User to be created which has read and write permission of DAM folder using which we will access the resource in our code.
So following is the code with required comments.

For better understanding copy the following code/paste in notepad++ or eclipse and format it:

package com.ab.internal.servlets;

//Java program to read JSON from a file
import java.io.BufferedReader;
import java.io.ByteArrayInputStream;
import java.io.IOException;
import java.io.InputStream;
import java.io.InputStreamReader;
import java.nio.charset.StandardCharsets;
import java.util.HashMap;

import javax.servlet.Servlet;
import javax.servlet.ServletException;

import org.apache.http.HttpResponse;
import org.apache.http.client.methods.HttpGet;
import org.apache.http.impl.client.CloseableHttpClient;
import org.apache.http.impl.client.HttpClients;
import org.apache.sling.api.SlingHttpServletRequest;
import org.apache.sling.api.SlingHttpServletResponse;
import org.apache.sling.api.resource.LoginException;
import org.apache.sling.api.resource.Resource;
import org.apache.sling.api.resource.ResourceResolver;
import org.apache.sling.api.resource.ResourceResolverFactory;
import org.apache.sling.api.servlets.SlingSafeMethodsServlet;
import org.json.JSONException;
import org.json.JSONObject;
import org.osgi.framework.Constants;
import org.osgi.service.component.annotations.Component;
import org.osgi.service.component.annotations.Reference;
import org.slf4j.Logger;
import org.slf4j.LoggerFactory;

import com.day.cq.dam.api.Asset;

@Component(service = Servlet.class, property = {
Constants.SERVICE_DESCRIPTION
+ “= Servlet to save data in AEM from Holiday Calendar API”,
“sling.servlet.paths=” + “/apps/ab/holidayCalendar” })
public class HolidayCalendar extends SlingSafeMethodsServlet {

private static final long serialVersionUID = 1L;

protected static final Logger LOGGER = LoggerFactory
.getLogger(HolidayCalendar.class);

@Reference
private ResourceResolverFactory resolverFactory;

@Override
protected void doGet(SlingHttpServletRequest request,
SlingHttpServletResponse response) throws ServletException,
IOException {

// Reading the JSON File from DAM.
Resource original;
String myJSON = “”;

LOGGER.info(“before factory..”);
ResourceResolver resolver = null;
HashMap<String, Object> param = new HashMap<>();
param.put(ResourceResolverFactory.SUBSERVICE, “readService”); //readService is my System User.
LOGGER.info(“After factory..”);
try {

resolver = resolverFactory.getServiceResourceResolver(param);
Resource resource = resolver
.getResource(“/content/dam/ab/holiday.json”);
Asset asset = resource.adaptTo(Asset.class);
original = asset.getOriginal();
InputStream content = original.adaptTo(InputStream.class);

StringBuilder sb = new StringBuilder();
String line;
BufferedReader br = new BufferedReader(new InputStreamReader(
content, StandardCharsets.UTF_8));

while ((line = br.readLine()) != null) {
sb.append(line);
}
JSONObject jsonObj = new JSONObject(sb.toString()); // In jsonObj I will get the data from the JSON file from DAM.

} catch (LoginException | JSONException e1) {
LOGGER.info(“EXCEPTION”);
}

// Getting the data from API Call by sending header parameters.

JSONObject json = null;
CloseableHttpClient httpClient = HttpClients.createDefault();
HttpGet getRequest = new HttpGet(
“/rest/api/end/point”);
getRequest.addHeader(“accept”, “application/json”);
getRequest.addHeader(“ClientId”, “123456”);
getRequest.addHeader(“Request-Tracking-Id”, “123456”);
HttpResponse httpResponse = httpClient.execute(getRequest);
LOGGER.info(“before if condition”);
if (httpResponse.getStatusLine().getStatusCode() != 200) {
LOGGER.info(“inside if condigiton”);
throw new RuntimeException(“Failed : HTTP error code : ”
+ httpResponse.getStatusLine().getStatusCode());
} else {
StringBuilder sb = new StringBuilder();
LOGGER.info(“before buffer reader”);
BufferedReader br = new BufferedReader(new InputStreamReader(
(httpResponse.getEntity().getContent())));

String output;
while ((output = br.readLine()) != null) {

myJSON = myJSON + output;
sb.append(output);
}

// Saving the data to DAM .json file which we got from API call.
InputStream is = new ByteArrayInputStream(myJSON.getBytes()); //we are sending the JSON data as a String.
com.day.cq.dam.api.AssetManager assetMgr = resolver
.adaptTo(com.day.cq.dam.api.AssetManager.class);
assetMgr.createAsset(“/content/dam/ab/holidayApi.json”, is,
“application/json”, true);
try {
json = new JSONObject(sb.toString());
} catch (JSONException e) {
LOGGER.info(“EXCEPTION”);
}

}

response.getWriter().println(json);

}
}


By aem4beginner

May 10, 2020
Estimated Post Reading Time ~

Web Services

Q1: What Are Web Services?
Ans: Web services are client and server applications that communicate over the World Wide Web’s (WWW) HyperText Transfer Protocol (HTTP).

As described by the World Wide Web Consortium (W3C), web services provide a standard means of interoperating between software applications running on a variety of platforms and frameworks. Web services are characterized by their great interoperability and extensibility, as well as their machine-processable descriptions, thanks to the use of XML. Web services can be combined in a loosely coupled way to achieve complex operations. Programs providing simple services can interact with each other to deliver sophisticated added-value services.

Web Services is a technology applicable for computationally distributed problems, including access to large databases

Q Web Services Architecture?


Q2: Types of Web Services?
Ans: On a technical level, web services can be implemented in various ways but we can categorize in two way
(a)big web services
(b)RESTful web services(Representational State Transfer).

Big web services use XML messages that follow the Simple Object Access Protocol (SOAP) standard, an XML language defining a message architecture and message formats. Such systems often contain a machine-readable description of the operations offered by the service, written in the Web Services Description Language (WSDL), an XML language for defining interfaces syntactically.

REST is well suited for basic, ad hoc integration scenarios. RESTful web services, often better integrated with HTTP than SOAP-based services are, do not require XML messages or WSDL service–API definitions.

Q3: In which format data is a transfer with web services?
Ans: Data in a well-defined XML format
Transport over various protocols
HTTP, SMTP is the most used, perhaps because they are firewall-friendly
server-side: either an RPC call or a message delivered

Q4: What is SOAP?
Ans: Simple Object Access Protocol
http://www.w3c.org/TR/SOAP/
A lightweight protocol for the exchange of information in a decentralized, distributed environment
Two different styles to use:
to encapsulate RPC calls using the extensibility and flexibility of XML
…or to deliver a whole document without any method calls encapsulated

Q5: What is Apache Axis?
Ans: Java SOAP Toolkits.

Q6: Why to use Web Services?
Ans: WS is easier to deploy because of their firewall-friendliness
WS is quite well marketed (both from IT companies and Open Source projects)
However:
user sessions are less standardized
many parts yet-to-be-done (notification, transactions, security, etc.)
The programming effort and maintainability is similar to other distributed technologies

Q81: Web Services Stack?


Example of RESTFul Webservices: using tomcat 6.0, java 6 and Jersey
Homepage lib.

http://www.vogella.de/articles/REST/article.html
package de.vogella.jersey.first;
import javax.ws.rs.GET; import javax.ws.rs.Path;
import javax.ws.rs.Produces;
import javax.ws.rs.core.MediaType;
// POJO, no interface no extends
// The class registers its methods for the HTTP GET request using the @GET annotation.
// Using the @Produces annotation, it defines that it can deliver several MIME types,
// text, XML and HTML.
// The browser requests per default the HTML MIME type.
//Sets the path to base URL + /hello
@Path("/hello")
public class Hello {
// This method is called if TEXT_PLAIN is request
@GET
@Produces(MediaType.TEXT_PLAIN)
public String sayPlainTextHello() {
return "Hello Jersey";
}
// This method is called if XML is request
@GET
@Produces(MediaType.TEXT_XML)
public String sayXMLHello() {
return "<?xml version=\"1.0\"?>" + "<hello> Hello Jersey" + </hello>"; }
// This method is called if HTML is request
@GET @Produces(MediaType.TEXT_HTML)
public String sayHtmlHello() {
return "<html> " + "<title>" + "Hello Jersey" + "</title>" + "<body><h1>" + "Hello Jersey" + "</body></h1>" + "</html> ";
}
}

-----------------------------------------------------------------------------------------

<?xml version="1.0" encoding="UTF-8"?>
<web-app xmlns:xsi="http://www.w3.org/2001/XMLSchema-instance" xmlns="http://java.sun.com/xml/ns/javaee" xmlns:web="http://java.sun.com/xml/ns/javaee/web-app_2_5.xsd" xsi:schemaLocation="http://java.sun.com/xml/ns/javaee http://java.sun.com/xml/ns/javaee/web-app_2_5.xsd" id="WebApp_ID" version="2.5">
<display-name>de.vogella.jersey.first</display-name>
<servlet>
<servlet-name>Jersey REST Service</servlet-name>
<servlet-class>com.sun.jersey.spi.container.servlet.ServletContainer</servlet-class>
<init-param>
<param-name>com.sun.jersey.config.property.packages</param-name>
<param-value>de.vogella.jersey.first</param-value>
</init-param>
<load-on-startup>1</load-on-startup>
</servlet>
<servlet-mapping>
<servlet-name>Jersey REST Service</servlet-name>
<url-pattern>/rest/*</url-pattern>
</servlet-mapping>
</web-app>

--------------------------------------------------------------------------------------
Then make a client:
package de.vogella.jersey.first.client;
import java.net.URI;
import javax.ws.rs.core.MediaType;
import javax.ws.rs.core.UriBuilder;
import com.sun.jersey.api.client.Client;
import com.sun.jersey.api.client.ClientResponse;
import com.sun.jersey.api.client.WebResource;
import com.sun.jersey.api.client.config.ClientConfig;
import com.sun.jersey.api.client.config.DefaultClientConfig;
public class Test {
public static void main(String[] args) {
ClientConfig config = new DefaultClientConfig();
Client client = Client.create(config);
WebResource service = client.resource(getBaseURI());
// Fluent interfaces
System.out.println(service.path("rest").path("hello").accept(
MediaType.TEXT_PLAIN).get(ClientResponse.class).toString());
// Get plain text
System.out.println(service.path("rest").path("hello").accept(
MediaType.TEXT_PLAIN).get(String.class));
// Get XML
System.out.println(service.path("rest").path("hello").accept(
MediaType.TEXT_XML).get(String.class));
// The HTML
System.out.println(service.path("rest").path("hello").accept(
MediaType.TEXT_HTML).get(String.class));
}

private static URI getBaseURI() {
return UriBuilder.fromUri(
"http://localhost:8080/de.vogella.jersey.first").build();
}

}


By aem4beginner

May 2, 2020
Estimated Post Reading Time ~

Invoke REST Services in AEM, The Right Way

Any web developer should at some point have had to invoke a RESTful web service, in at least 3 different languages, leveraging the APIs built into that language or by using 3rd party APIs. Now you are here trying to figure out how to do it in Adobe Experience Manager. When faced with this new challenge we will all run to Google and search for “aem json web service”. Oh look, the top result will probably be this Adobe tutorial on how to do just that. You could just cut and paste from that article straight into the IDE, say a prayer, compile and run. Or you can read the entire article, store the relevant points into your short term memory, and keep on searching. After about the 3rd or 4th how-to article, a possible solution will take shape in your head and then you are ready to implement.

Such was the case when I first had to invoke a RESTful web service in AEM. The Apache HttpClient is a decent library. It comes to OOTB in AEM. It is a pretty basic tool. It's great for one-offs (i.e. I just want to grep a web page and parse things out) but it can quickly become cumbersome if you are invoking multiple services with different content types, SSL, authentication, cookies, headers or encodings. Your code can quickly become a patchwork of hacks to address all those things.

OpenFeign
I first used OpenFeign when I wrote my first RESTful client in Java years ago. To be honest, I don’t know much about the genesis of this project. I know it started as a Netflix OSS project but now it does not seem associated with Netflix anymore. I don’t know the authors, and there does not seem to be an official project website or wiki, other than the extensive README file. You need support? Go look at the source. Why do I like it? Its pluggable, flexible, and lets me focus on working with the results from a REST service and not having to flip a bazillion switches to get an Apache HTTP request just right.

Start A New AEM Project
To get started, I am creating a new AEM project using the Lazybones template, with pretty much all the defaults. If you have an existing project, look carefully, and adapt.

lazybones create aem-multimodule-project aem-feign

Adding Dependencies
Apache HttpClient comes with AEM OOTB, great! Feign does not. To get it in the box means getting the OSGi bundle into the OSGi container, Apache Felix. This can be done in several ways. You can upload straight to the Felix console, you can embed them in a content package, or you can inline them into your own bundle. Lucky for us feign-core is distributed as an OSGi bundle, so we are ready to rock-n-roll. The easiest way for this tutorial is to embed it into the project’s ui.apps package.

Depending on your AEM version, you may or may not have Jackson or Gson. In 6.4, both are included OOTB so we are going to add the feign-jackson dependency to do our parsing.

In the root pom.xml, add the following to the dependencyManagement section

<dependency>
    <groupId>io.github.openfeign</groupId>
    <artifactId>feign-core</artifactId>
    <version>9.7.0</version>
    <scope>provided</scope>
</dependency>
<dependency>
    <groupId>io.github.openfeign</groupId>
    <artifactId>feign-jackson</artifactId>
    <version>9.7.0</version>
    <scope>provided</scope>
</dependency>

In the ui.apps/pom.xml add the following to the dependencies section
<dependency>
    <groupId>io.github.openfeign</groupId>
    <artifactId>feign-core</artifactId>
</dependency>
<dependency>
    <groupId>io.github.openfeign</groupId>
    <artifactId>feign-jackson</artifactId>
</dependency>

and to the list of embedded decencies of the content-package-maven-plugin configuration

<embedded>
    <groupId>io.github.openfeign</groupId>
    <target>/apps/my-aem-project/install</target>
</embedded>

Feign will now get into the OSGi container, but to actually start using it you’ll need to update the dependencies of your own bundle under core/pom.xml by adding the following to the dependencies section

<dependency>
    <groupId>io.github.openfeign</groupId>
    <artifactId>feign-core</artifactId>
</dependency>
<dependency>
    <groupId>io.github.openfeign</groupId>
    <artifactId>feign-jackson</artifactId>
</dependency>

Setting Up A Mock Service
If you already have a web service you want to invoke, then you can skip this part. Otherwise, we will take a little detour and set up a mock REST service so we can test. We like Docker, so let set something up with a docker-compose.yml file

version: "3.3"
services:
    wiremock:
        image: rodolpheche/wiremock:2.23.2-alpine
        ports:
            - 8080:8080
        volumes:
            - ./wiremock:/home/wiremock

You’ll also need wiremock/__files/list-items.json

[
    { "name": "foo" },
    { "name": "bar" }
]

and wiremock/mappings/list-items.json
{
    "request": {
        "method": "GET",
        "url": "/list-items",
        "basicAuth": {
            "username": "bill",
            "password": "lumbergh"
        }
    },
    "response": {
        "status": 200,
        "bodyFileName": "list-items.json"
    }
}

Fire up the docker container with docker-compose up -d and access the WireMock admin endpoint at http://localhost:8080/__admin where you’ll see the configured request. If you set up a PostMan request with the configured basic authentication, you should be able to get a response from http://localhost:8080/list-items.

Invoking The Service
Via HttpClient
For comparison, here is the HttpClient implementation. When I was writing this up, I ran into issues right away with getting the basic auth set up, and deserializing the response stream.

final CredentialsProvider credentialProvider = new BasicCredentialsProvider();
final UsernamePasswordCredentials credentials = new UsernamePasswordCredentials(this.username, this.password);
credentialProvider.setCredentials(AuthScope.ANY, credentials);

final HttpHost targetHost = HttpHost.create(this.host);

final AuthCache authCache = new BasicAuthCache();
authCache.put(targetHost, new BasicScheme());

final HttpClientContext context = HttpClientContext.create();
context.setCredentialsProvider(credentialProvider);
context.setAuthCache(authCache);

final HttpClient client = HttpClientBuilder.create()
                                           .build();
final HttpResponse httpResponse = client.execute(new HttpGet(this.host + "/list-items"), context);
final int statusCode = httpResponse.getStatusLine()
                                   .getStatusCode();

List<Item> listItems = Collections.emptyList();
if (statusCode == HttpStatus.SC_OK) {
    final InputStream content = httpResponse.getEntity()
                                            .getContent();
    final Item[] items = new ObjectMapper().readValue(content, Item[].class);
    listItems = Arrays.asList(items);
}

Via Feign
You’ll need to define an interface and set the annotations as necessary, a pretty trivial task

interface ItemService {

    @RequestLine("GET /list-items")
    List<Item> listItems();
}

and create an instance of the client based on your contract

final ItemService api = Feign.builder()
                             .decoder(new JacksonDecoder())
                             .requestInterceptor(new BasicAuthRequestInterceptor(this.username, this.password))
                             .target(ItemService.class, this.host);
List<Item> listItems = api.listItems();

Thats a lot less code to read, write, maintain and unit test.

Conclusion
HttpClient is a good API but can sometimes be cumbersome. You wind up doing a lot more plumbing. Feign offers all good API to take care of all that plumbing but it is OSS. It is also limited to text-based APIs. Depending on your needs/constraints it may make sense to switch to an API like Feign. The complete project can be found here.


By aem4beginner

April 29, 2020
Estimated Post Reading Time ~

How to Create and Consume Content using Apache Sling

Apache Sling is one of the core technologies used in Adobe Experience Manager (formerly known as Adobe CQ / Day CQ).

Sling started as an internal project at Day Software and taken up by Apache in September 2007. It’s the reason why some bundles/libraries are named like com.day.

The other important technologies include Apache Jackrabbit, Apache Felix, OSGi. We will discuss the Apache Sling in this article, and how to create a sample content and consume it.

Apache Sling is a web framework that uses a Java Content Repository (like Apache Jackrabbit) to store and manage content. Sling applications use either scripts or Java servlets to process HTTP requests in a RESTful way.

Sling in very simple terms could be described as a REST API for JCR. We can use http requests to manage content inside the repository. Sling provides a mechanism to render that content in different ways. We can use JSP, ESP scripts, Java (servlets, pojos, etc) in the Felix container to process requests and deliver content.

When a request is made for a particular node, Sling looks up for a property called sling:resourceType. This is used to look up the rendering scripts for the requested resource.

Apache Sling is:
  • a REST-based web framework
  • Content-driven, using JCR
  • Powered by OSGi framework
  • an Apache Open Source project
We shall see an example of how to start, create a node, and read the node’s content from Sling.
  1. Download Apache Sling Launchpad self-runnable jar from https://sling.apache.org/downloads.cgi. In my case, I have downloaded the latest jar org.apache.sling.launchpad-8.jar
  2. After the jar is downloaded, just start it as follows:java -jar org.apache.sling.launchpad-8.jar
  3. This starts the Sling embedded Web Server on port 8080 and writes application files into the sling folder found in the current working directory of your choice. You can check http://localhost:8080/system/console/bundles to see if the application is started properly or not. The credentials would be admin/admin. Here you would see different bundles in started state.
  4. Create content by giving the below cUrl command:
curl -u admin:admin -F "sling:resourceType=training/aem" -F "title=Sling for AEM" http://localhost:8080/content/myaemnode

We can expect a response as below:


Now check the content by using the below URLs from a web browser.

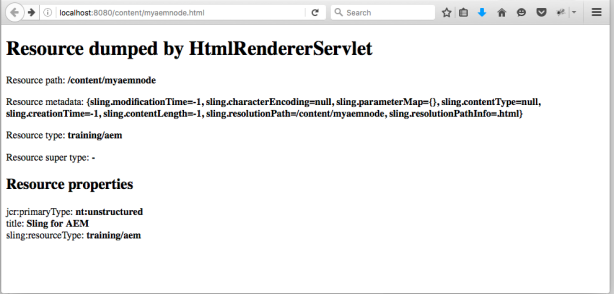
Content node in HTML format: http://localhost:8080/content/myaemnode.html


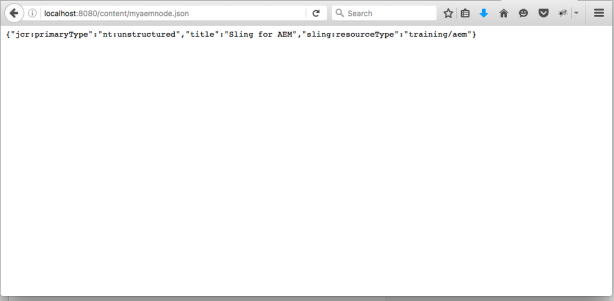
The same node in JSON format: http://localhost:8080/content/myaemnode.json


By aem4beginner

April 28, 2020
Estimated Post Reading Time ~

Test the REST services using Chrome

This post will explain you how to test the REST services using chrome.

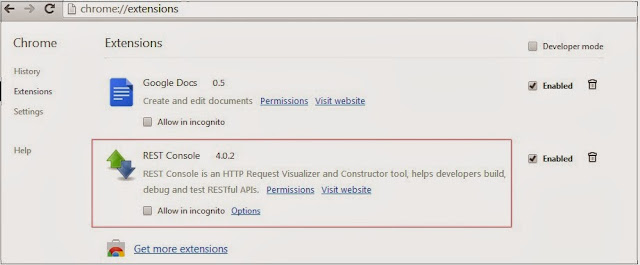
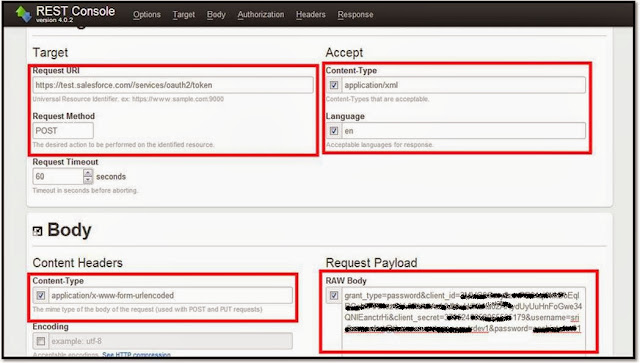
Steps to test the REST services using ChromeInstall the REST Console Extension to Chrome.

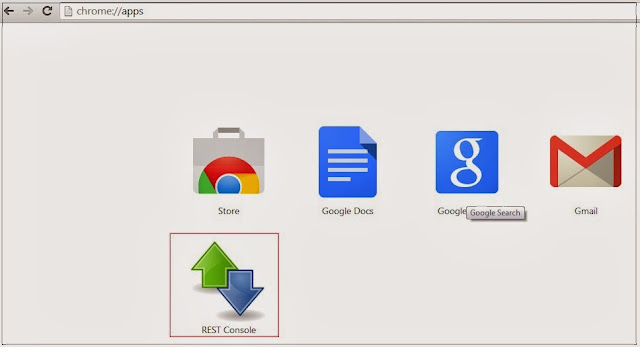
Open REST Console

Here, i am invoking the REST enabled salesforce login service with OAuth.

Provide the Request URI, Content-Type and Language.
Select the Content-Type of Content Headers as application/x-www-form-urlencoded and provide the request payload.We can also add Authorization, Attachment and Headers to the request.


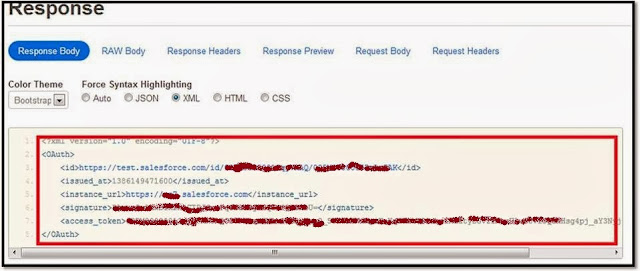
Click on GET/POST/PUT/DELETE button based on the request method, this will displays the response in the response section.


By aem4beginner

How to expose Regex based rest service in AEM

This post will explain the approach to expose the regex-based rest service in Adobe Experience Manager(AEM). By default, OSGI will not support exposing regex-based rest services and it will only support the services based on the specified Path or Resource Type.

Install OSGI JAX-RS connector:Install(/system/console/bundles) jersey-all, publisher, provider-security and other required bundles e.g. provider-gson for JSON support and make sure the bundles are in Active state.

The bundles(jar) can be downloaded from the following URL - http://search.maven.org/#search%7Cga%7C1%7Cg%3A%22com.eclipsesource.jaxrs%22


Develop the Servlet with required path mapping:>=AEM 6.2

import javax.servlet.http.HttpServletRequest;
import javax.servlet.http.HttpServletResponse;
import javax.ws.rs.GET;
import javax.ws.rs.Path;
import javax.ws.rs.PathParam;
import javax.ws.rs.Produces;
import javax.ws.rs.core.Context;
import javax.ws.rs.core.MediaType;

import org.osgi.service.component.annotations.Component;

@Component(service = RegexServlet.class)
@Path("/{catagroy}/{title}/p/{code : \\d{5}}")
public class RegexServlet {

@GET
@Produces({MediaType.TEXT_PLAIN})
public String getProductDetails(@Context HttpServletRequest request, @Context HttpServletResponse response,@PathParam("catagroy") String catagroy,@PathParam("title") String title,@PathParam("code") String code) {

return "code="+code+";catagroy="+catagroy+";title="+title;

}
}

< AEM 6.2
import org.apache.felix.scr.annotations.Component;
import org.apache.felix.scr.annotations.Property;
import org.apache.felix.scr.annotations.Service;
import javax.ws.rs.Path;
import javax.ws.rs.*;
import javax.ws.rs.core.Context;
import javax.ws.rs.core.MediaType;

import java.io.IOException;
import javax.servlet.http.HttpServletRequest;
import javax.servlet.http.HttpServletResponse;

@Service(RegexServlet.class)
@Component(metatype = false)
@Path("/{catagroy}/{title}/p/{code : \\d{5}}")
public class RegexServlet {

@GET
@Produces({MediaType.TEXT_PLAIN})
public String getProductDetails(@Context HttpServletRequest request, @Context HttpServletResponse response,@PathParam("catagroy") String catagroy,@PathParam("title") String title,@PathParam("code") String code) {

return "code="+code+";catagroy="+catagroy+";title="+title;

}
}

Add the following dependency in POM.xml

<dependency>
<groupId>javax.ws.rs</groupId>
<artifactId>javax.ws.rs-api</artifactId>
<version>2.0</version>
</dependency>

Install the package and make sure the core bundle status is active.

Verify whether the RegexServlet service is registered in system console


The servlet will accept the request with matching pattern - the servlet path should be starting with /services

The Path Regex pattern specified in the servlet will match for the following URL - localhost:4502/services/categoryTest/Sampletitle/p/12345 (Code should be 5 digit)


Download the sample code -https://gitlab.com/albinsblog-data/RegexServlet/tree/master (Refer com.regex.servlet.core.RegexServlet.java in core module)
The sample code is tested in AEM 6.3 but it should be working in 6.2


By aem4beginner

April 27, 2020
Estimated Post Reading Time ~

How to Invoke the SOAP services from Adobe CQ5

This post will explain how to invoke the SOAP services from Adobe CQ5

Configure wsimport plugin to POM.xml:
<plugin>
   <groupId>org.codehaus.mojo</groupId>
   <artifactId>jaxws-maven-plugin</artifactId>
   <version>1.12</version>
   <executions>
      <execution>
         <goals>
            <goal>wsimport</goal>
         </goals>
      </execution>
   </executions>
   <configuration>
      <verbose>true</verbose>
      <args>
         <arg>-B-XautoNameResolution</arg>
      </args>
      <wsdlUrls>
         <wsdlUrl>http://localhost:8080/services/AddressService_1.0.wsdl</wsdlUrl>
      </wsdlUrls>
      <sourceDestDir>src/main/java/</sourceDestDir>
      <packageName>com.ws.address.validation</packageName>
   </configuration>
</plugin>

Change the wsdlurl,sourceDestDir, and packageName accordingly.


Execute the generate-source target

This will generate the java code to the specified path.


Invoke the service:
AddressServiceV01_Service service = new AddressServiceV01_Service();
AddressServiceV01 port = service.getAddressServiceV01();
BindingProvider bindingProvider = (BindingProvider) port;
bindingProvider.getRequestContext().put("http://localhost:8080/services/AddressService");
String response = port.method(input);

Change the service and the endpoint accordingly.

Add com.sun.xml.internal.ws.* to sling.properties org.osgi.framework.bootdelegation property.

org.osgi.framework.bootdelegation=com.yourkit.*, ${org.apache.sling.launcher.bootdelegation}, com.sun.xml.internal.ws.*


By aem4beginner

Integrating Adobe Experience Manager with REST services

Integrating CQ5 with REST services
Service integration is one of the important parts of Enterprise systems, the systems have to be integrated with different services to satisfy the business. SOAP/REST approaches can be used to integrate the systems with third party services.

This post will explain the approach to integrate CQ5 with REST-based services.
Create a service component class with the required HTTP methods. The service class is mapped to the url /services/RestInvocationServlet. This URL can be used to invoke the service class.

package com.test.servlet;
import java.io.*;
import javax.servlet.Servlet;
import org.apache.felix.scr.annotations.*; import org.apache.sling.api.*;
import org.apache.sling.api.servlets.SlingAllMethodsServlet; import org.slf4j.*;
import com.test.core.config.ConfigService;
import com.test.service.RestUtilService;
import com.test.service.impl.RestUtileServiceImpl;
/**
* Gets OSGi configuration. */
@Service(value = Servlet.class) @Component(immediate = true, metatype = true) @Properties({
@Property(name = "sling.servlet.paths", value = "/services/RestInvocationServlet"),
@Property(name = "service.description", value = "RestInvocationServlet"),
@Property(name = "label", value = "RestInvocationServlet")
})
public class RestInvocationServlet extends SlingAllMethodsServlet implements Serializable {
private static final Logger LOG = LoggerFactory .getLogger(RestInvocationServlet.class);
/**
* Default serial version id. */
private static final long serialVersionUID = 1L;

/**
* {@inheritDoc} *
* @see
org.apache.sling.api.servlets.SlingAllMethodsServlet#doPost(org.apache.sling.api.SlingH ttpServletRequest,
* org.apache.sling.api.SlingHttpServletResponse)
*/
protected final void doPost(final SlingHttpServletRequest request, final
SlingHttpServletResponse response)
throws IOException {
LOG.info("Entered servlet");
RestUtilService restUtilService = new RestUtileServiceImpl(); String
endPointURL=TRConfigService.getPropertyValue(TRConfigService.REST_INVOCATI ON_URL);
String result =restUtilService.execute(endPointURL, "GET"); LOG.info("URL is "+endPointURL);
System.out.println("value is"+restUtilService.execute(endPointURL,
LOG.info("Value is "+restUtilService.execute(endPointURL, "GET")); //response.setContentType("application/json"); response.setHeader("Cache-Control", "no-cache"); response.getWriter().write(result);
}
/**
* {@inheritDoc} *
* @see
org.apache.sling.api.servlets.SlingSafeMethodsServlet#doGet(org.apache.sling.api.Sling HttpServletRequest,
* org.apache.sling.api.SlingHttpServletResponse)
*/
protected final void doGet(final SlingHttpServletRequest request, final
SlingHttpServletResponse response)
throws IOException {
doPost(request, response); }

}

Create a service interface with the execute method
package com.test.service;
import java.io.IOException;
import org.apache.sling.api.*;
public interface RestUtilService {
String execute(String targetURL, String HttpMethod) throws IOException;
}

Create the implementation for the service interface – this class will use the HttpURLConnection to connect to the REST service and send the XML/JSON response back.

package com.test.service.impl; import java.io.*;
import java.net.*;
import org.slf4j.*;
import com.test.service.RestUtilService;
public class RestUtileServiceImpl implements RestUtilService{
static {
//for localhost testing only javax.net.ssl.HttpsURLConnection.setDefaultHostnameVerifier( new javax.net.ssl.HostnameVerifier() {
public boolean verify(String hostname, javax.net.ssl.SSLSession sslSession) {
if (hostname.equals("c111mdhdswapp")) {
return true;
}
return false;
}
});

}

private static final Logger LOG = LoggerFactory .getLogger(RestUtileServiceImpl.class);
public String execute(String targetURL, String HttpMethod) { URL url;
HttpURLConnection connection = null; try {
url = new URL(targetURL); if (HttpMethod == "GET") {
url = new URL(url.toString());
System.out.println("\n GET URL called " + url);
}
connection = (HttpURLConnection)url.openConnection();
connection.setRequestProperty("accept", "application/json"); //for GET service to return xml payload
InputStream is = connection.getInputStream();
BufferedReader rd = new BufferedReader(new InputStreamReader(is)); System.out.println("\n Received response" + System.currentTimeMillis());
String line;
StringBuffer response = new StringBuffer(); while ((line = rd.readLine()) != null) {
response.append(line);
response.append('\r');
}
rd.close();
LOG.info("Value response "+response.toString()); return response.toString();
} catch (Exception e) {
e.printStackTrace();
return (e.getClass().getName()+":"+e.getMessage().toString());
}
finally {
if (connection != null) {
connection.disconnect();

}
}
}

}

The value of the endpoint will be configured in the configuration service inside a bundle as shown

@Property(label = "Rest End point", value = "https://localhost:9002/webservices/v1/products/", description = "Enter the Service End point URL to consume")

public static final String REST_INVOCATION_URL = "restUrl";


The service can be invoked wherever REST-based integration.

<script type="text/javascript">
$('document').ready(function(){
$.ajax({
type : "POST",
async: false,
url : "/services/RestInvocationServlet", //dataType : "xml",
success : function(result) { alert(result);
},
error : function() {
}
});
}); </script>


By aem4beginner

April 26, 2020
Estimated Post Reading Time ~

Salesforce REST API implementation - JAVA

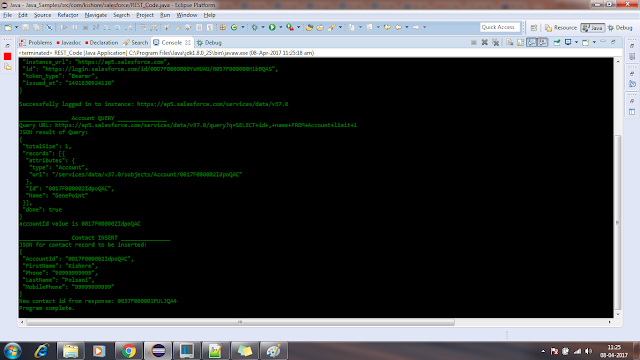
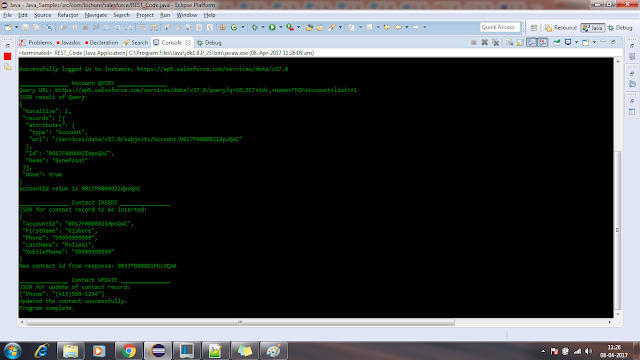
This post demonstrates the following basic use cases for the REST API:
- authentication with OAuth 2.0 (This is for development purposes only. Not a real implementation.)
- querying (using account records)
- inserting (using a contact record related to one of the retrieved account records)
- updating (updates contact record added in previous step)

import java.io.BufferedReader;
import java.io.InputStream;
import java.io.InputStreamReader;
import java.io.IOException;
import java.io.UnsupportedEncodingException;

import org.apache.http.Header;
import org.apache.http.HttpResponse;
import org.apache.http.client.HttpClient;
import org.apache.http.client.methods.HttpGet;
import org.apache.http.client.methods.HttpPost;
import org.apache.http.entity.StringEntity;
import org.apache.http.impl.client.DefaultHttpClient;
import org.apache.http.message.BasicHeader;
import org.apache.http.util.EntityUtils;

import org.json.JSONException;
import org.json.JSONObject;

/**
* This program demonstrates the following basic use cases for the REST API:
* - authentication with OAuth 2.0 (This is for development purposes only. Not a real implementation.)
* - querying (using account records)
* - inserting (using a contact record related to one of the retrieved account records)
* - updating (updates contact record added in previous step)
*
*/
public class REST_Code extends Object {
//---------Credentials----------
//Credentials providing access to a specific Salesforce organization.
private static final String userName = "demo@demo.com"; // COPY USERNAME
private static final String password = "passwordTOKEN"; // COPY PASSWORD AND TOKEN

//---------REST and OAuth-------
//Portions of the URI for REST access that are re-used throughout the code
private static String OAUTH_ENDPOINT = "/services/oauth2/token";
private static String REST_ENDPOINT = "/services/data";

//Holds URI returned from OAuth call, which is then used throughout the code.
String baseUri;

//The oauthHeader set in the oauth2Login method, and then added to
//each HTTP object that is used to invoke the REST API.
Header oauthHeader;

//Basic header information added to each HTTP object that is used
//to invoke the REST API.
Header prettyPrintHeader = new BasicHeader("X-PrettyPrint", "1");

//----------Data specific---------
//Retrieved accountId that is used when contact is added.
private static String accountId;

//Id of inserted contact. Used to update contact.
private static String contactId;

//----------Utility-------------
//Used to get input from console.
private static BufferedReader reader = new BufferedReader(new InputStreamReader(System.in));

//================Code starts here===================
public static void main(String[] args) {
new REST_Code();
}

/**
* This class holds all the values related to the credentials needed to
* make the OAuth2 request for authentication. Normally they would not be set in
* this manner.
*/
class UserCredentials {
String loginInstanceDomain = "cs10.salesforce.com"; // COPY YOUR SERVER INSTANCE
String apiVersion = "37"; // COPY YOU API VERSION
String userName = REST_Code.userName;
String password = REST_Code.password;
String consumerKey = "CONSUMER_KEY"; // COPY YOUR CONSUMER KEY
String consumerSecret = "CONSUMER_SECRET"; // COPY YOUR CONSUMER SECRET
String grantType = "password";
}

/**
* Constructor drives console interaction and calls appropriate methods.
*/
public REST_Code() {

showMenu();
boolean invalidValue = true;
int executionOption = 99;
String choice = getUserInput("Enter option: ");
while (invalidValue) {
try {
executionOption = Integer.parseInt(choice);
if ((executionOption < 1 || executionOption > 4) && executionOption!=99) {
System.out.println("Please enter 1, 2, 3, 4, or 99.\n");
choice = getUserInput("Enter the number of the sample to run: ");
showMenu();
} else {
invalidValue = false;
}
} catch (Exception e) {
System.out.println("Invalid value. Please enter 1, 2, 3, 4, or 99.\n");
choice = getUserInput("Enter the number of the sample to run: ");
showMenu();
}
}
if (executionOption == 99) {
System.out.println("No action taken");
} else {
//Login is done for option 1, as well as all other valid options.
this.oauth2Login();
if (executionOption >= 2) {
this.restGetExample();
}
if (executionOption >= 3) {
if (accountId != null) {
this.restPostExample(accountId);
} else {
System.out.println("Account not found.");
}
}
if (executionOption == 4) {
if (contactId != null) {
this.restPatchExample(contactId);
} else {
System.out.println("Contact not found.");
}
}
}
System.out.println("Program complete.");
}

/**
* This method connects the program to the Salesforce organization using OAuth.
* It stores returned values for further access to organization.
* @param userCredentials Contains all credentials necessary for login
* @return
*/
public HttpResponse oauth2Login() {
System.out.println("_______________ Login _______________");
OAuth2Response oauth2Response = null;
HttpResponse response = null;
UserCredentials userCredentials = new UserCredentials();
String loginHostUri = "https://" + userCredentials.loginInstanceDomain + OAUTH_ENDPOINT;

try {
//Construct the objects for making the request
HttpClient httpClient = new DefaultHttpClient();
HttpPost httpPost = new HttpPost(loginHostUri);
StringBuffer requestBodyText = new StringBuffer("grant_type=password");
requestBodyText.append("&username=");
requestBodyText.append(userCredentials.userName);
requestBodyText.append("&password=");
requestBodyText.append(userCredentials.password);
requestBodyText.append("&client_id=");
requestBodyText.append(userCredentials.consumerKey);
requestBodyText.append("&client_secret=");
requestBodyText.append(userCredentials.consumerSecret);
System.out.println("Response Body: "+requestBodyText.toString());
StringEntity requestBody = new StringEntity(requestBodyText.toString());
requestBody.setContentType("application/x-www-form-urlencoded");
httpPost.setEntity(requestBody);
httpPost.addHeader(prettyPrintHeader);

//Make the request and store the result
response = httpClient.execute(httpPost);

//Parse the result if we were able to connect.
if ( response.getStatusLine().getStatusCode() == 200 ) {
String response_string = EntityUtils.toString(response.getEntity());
try {
JSONObject json = new JSONObject(response_string);
oauth2Response = new OAuth2Response(json);
System.out.println("JSON returned by response: +\n" + json.toString(1));
} catch (JSONException je) {
je.printStackTrace();
}
baseUri = oauth2Response.instance_url + REST_ENDPOINT + "/v" + userCredentials.apiVersion +".0";
oauthHeader = new BasicHeader("Authorization", "OAuth " + oauth2Response.access_token);
System.out.println("\nSuccessfully logged in to instance: " + baseUri);
} else {
System.out.println("An error has occured. Http status: " + response.getStatusLine().getStatusCode());
System.out.println(getBody(response.getEntity().getContent()));
System.exit(-1);
}
} catch (UnsupportedEncodingException uee) {
uee.printStackTrace();
} catch (IOException ioe) {
ioe.printStackTrace();
} catch (NullPointerException npe) {
npe.printStackTrace();
}
return response;
}

/**
* This method demonstrates
* - How to use HTTPGet and a constructed URI to retrieve data from Salesforce.
* - Simple parsing of a JSON object.
*/
public void restGetExample() {
System.out.println("\n_______________ Account QUERY _______________");
try {
//Set up the HTTP objects needed to make the request.
HttpClient httpClient = new DefaultHttpClient();
String uri = baseUri + "/query?q=SELECT+id+,+name+FROM+Account+limit+1";
System.out.println("Query URL: " + uri);
HttpGet httpGet = new HttpGet(uri);
httpGet.addHeader(oauthHeader);
httpGet.addHeader(prettyPrintHeader);

// Make the request.
HttpResponse response = httpClient.execute(httpGet);

// Process the result
int statusCode = response.getStatusLine().getStatusCode();
if (statusCode == 200) {
String response_string = EntityUtils.toString(response.getEntity());
try {
JSONObject json = new JSONObject(response_string);
System.out.println("JSON result of Query:\n" + json.toString(1));
accountId = json.getJSONArray("records").getJSONObject(0).getString("Id");
System.out.println("accountId value is " + accountId);
} catch (JSONException je) {
je.printStackTrace();
}
} else {
System.out.println("Query was unsuccessful. Status code returned is " + statusCode);
}
} catch (IOException ioe) {
ioe.printStackTrace();
} catch (NullPointerException npe) {
npe.printStackTrace();
}
}

/**
* This method demonstrates
* - How to use HTTPPost and a constructed URI to insert data into Salesforce.
* - Simple creation of a JSON object.
*/
public void restPostExample(String accountId) {
System.out.println("\n_______________ Contact INSERT _______________");
String uri = baseUri + "/sobjects/Contact/";
try {
//create the JSON object containing the new contact details.
JSONObject contact = new JSONObject();
contact.put("LastName", "Polsani");
contact.put("FirstName", "Kishore");
contact.put("MobilePhone", "9999999999");
contact.put("Phone", "9999999999");
contact.put("AccountId", accountId);
System.out.println("JSON for contact record to be inserted:\n" + contact.toString(1));

//Construct the objects needed for the request
DefaultHttpClient httpClient = new DefaultHttpClient();
HttpPost httpPost = new HttpPost(uri);
httpPost.addHeader(oauthHeader);
httpPost.addHeader(prettyPrintHeader);
// The message we are going to post
StringEntity body = new StringEntity(contact.toString(1));
body.setContentType("application/json");
httpPost.setEntity(body);

//Make the request
HttpResponse response = httpClient.execute(httpPost);

//Process the results
int statusCode = response.getStatusLine().getStatusCode();
if (statusCode == 201) {
String response_string = EntityUtils.toString(response.getEntity());
JSONObject json = new JSONObject(response_string);
// Store the retrieved contact id to use when we update the contact.
contactId = json.getString("id");
System.out.println("New contact id from response: " + contactId);
} else {
System.out.println("Insertion unsuccessful. Status code returned is " + statusCode);
}
} catch (JSONException e) {
System.out.println("Issue creating JSON or processing results");
e.printStackTrace();
} catch (IOException ioe) {
ioe.printStackTrace();
} catch (NullPointerException npe) {
npe.printStackTrace();
}
}

/**
* This method demonstrates
* - How to use HTTPPatch and a constructed URI to update data in Salesforce.
* NOTE: You have to create the HTTPPatch, as it does not exist in the standard library.
* - Simple creation of a JSON object.
*/
public void restPatchExample(String contactid) {
System.out.println("\n_______________ Contact UPDATE _______________");

//Notice, the id for the record to update is part of the URI, not part of the JSON
String uri = baseUri + "/sobjects/Contact/" + contactid;
try {
//Create the JSON object containing the updated contact phone number
//and the id of the contact we are updating.
JSONObject contact = new JSONObject();
contact.put("Phone", "(415)555-1234");
System.out.println("JSON for update of contact record:\n" + contact.toString(1));

//Set up the objects necessary to make the request.
DefaultHttpClient httpClient = new DefaultHttpClient();
HttpPatch httpPatch = new HttpPatch(uri);
httpPatch.addHeader(oauthHeader);
httpPatch.addHeader(prettyPrintHeader);
StringEntity body = new StringEntity(contact.toString(1));
body.setContentType("application/json");
httpPatch.setEntity(body);

//Make the request
HttpResponse response = httpClient.execute(httpPatch);

//Process the response
int statusCode = response.getStatusLine().getStatusCode();
if (statusCode == 204) {
System.out.println("Updated the contact successfully.");
} else {
System.out.println("Contact update NOT successfully. Status code is " + statusCode);
}
} catch (JSONException e) {
System.out.println("Issue creating JSON or processing results");
e.printStackTrace();
} catch (IOException ioe) {
ioe.printStackTrace();
} catch (NullPointerException npe) {
npe.printStackTrace();
}
}

/**
* Extend the Apache HttpPost method to implement an HttpPost
* method.
*/
private static class HttpPatch extends HttpPost {
public HttpPatch(String uri) {
super(uri);
}

public String getMethod() {
return "PATCH";
}
}

/**
* This class is used to hold values returned by the OAuth request.
*/
static class OAuth2Response {
String id;
String issued_at;
String instance_url;
String signature;
String access_token;

public OAuth2Response() {
}
public OAuth2Response(JSONObject json) {
try {
id =json.getString("id");
issued_at = json.getString("issued_at");
instance_url = json.getString("instance_url");
signature = json.getString("signature");
access_token = json.getString("access_token");


} catch (JSONException e) {
e.printStackTrace();
}
}
}

//==========utility methods=============
/**
* Utility method for changing a stream into a String.
* @param inputStream
* @return
*/
private String getBody(InputStream inputStream) {
String result = "";
try {
BufferedReader in = new BufferedReader(
new InputStreamReader(inputStream)
);
String inputLine;
while ( (inputLine = in.readLine() ) != null ) {
result += inputLine;
result += "\n";
}
in.close();
} catch (IOException ioe) {
ioe.printStackTrace();
}
return result;
}

//--------------utility methods for user input----------
/**
* A utility method to be used for getting user input from the console.
*/
private String getUserInput(String prompt) {
String result = "";
try {
System.out.print(prompt);
result = reader.readLine();
} catch (IOException ioe) {
ioe.printStackTrace();
}
return result;
}

/**
* Outputs menu choices on console.
*/
private void showMenu() {
System.out.println("");
System.out.println(" 1. Login Only");
System.out.println(" 2. Find Account");
System.out.println(" 3. Insert Contact for Account");
System.out.println(" 4. Update Contact");
System.out.println("99. Exit");
System.out.println(" ");
}
} Create an Inbound Integration Using the Force.com REST API
Sample Project

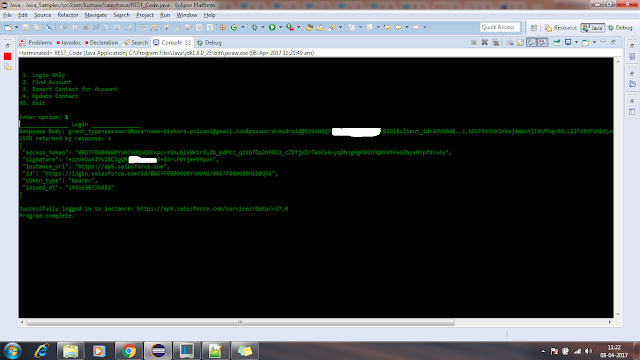
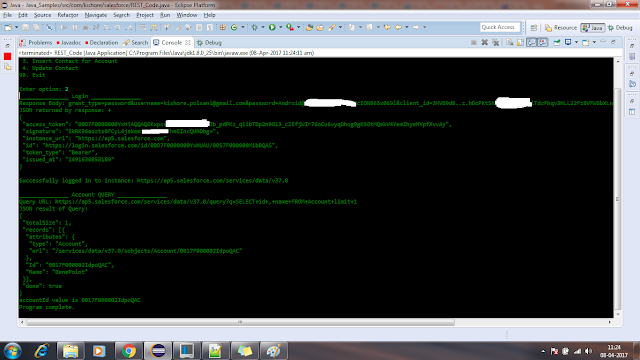
Screenshots:


By aem4beginner

April 23, 2020
Estimated Post Reading Time ~

Few lists of Apache We server Security and Harding Tips

v How to disable the directory display in Apache webserver
Environment: Apache Webserver

Solution:
- In the absence of index file by default apache server will list the default content root directories
- We can turn off the directory listing by using Options directive in the httpd.conf or apache2.conf configuration file for any specific directory

1. Open the Httpd.conf or apache2.conf file
Options –Indexes

2. Restart the server
3. Go to website and access for the content root -/var/www/html or /content
4. You must see the Forbiden error(You don’t have permission to access/ on this server.

v How to hide Apache Version and OS Identity from Errors in Apache HTTP server

- When you install apache with source or package through installer like Yum, it displays the version of Apache and OS version in the errors.
- It also shows the module installed in the apache server

Steps to follow in RHEL, CentOS , Fedora, Debian and Ubuntu

1. Open the httpd.conf/apache2.conf file based on the OS
# vim /etc/httpd/conf/httpd.conf (RHEL/CentOS/Fedora)
# vim /etc/apache2/apache2.conf (Debian/Ubuntu)

2. Add the below configuration to httpd.conf/apache2.conf and Save the file
ServerSignature Off
ServerTokens Prod

3. Restart the Server and That’s It
# service httpd restart (RHEL/CentOS/Fedora)
# service apache2 restart (Debian/Ubuntu)

v How to Keep updating Apache Regularly

Environment: Apache Webserver
Solution:
1. Check the apache version by using #httpd –v
2. Run the below command to update the version
# yum update httpd
#apt-get install apache2
3. That’s it! again check for the version of apache post upgrade #httpd -v

v Disable the Unnecessary modules
1. Insert # beginning at the module to comment the unnecessary module for loading

v Disable Apache’s following of Symbolic Links

- By default Apache webserver follows symlinks,
- We can turn off this feature with FollowSymLinks with Options directive.
- Open the httpd.conf file and add the below line.
# Options -FollowSymLinks

- If there is a need for FollowSymLinks feature, can be enabled by writing in the rule in “.htaccess” file from that website.
# Enable symbolic links
# Options +FollowSymLinks
Note: To enable rewrite rules inside “.htaccess” file “AllowOverride All” should be present in the main configuration globally.

v Turn off Server Side Includes and CGI Execution

Environment: Apache
Solution:
- Steps to turn off server side includes (mod_include)
- And CGI execution
- Modify the httpd.conf or apache2.conf file in the main configuration file.
- This can be applied to root directory or specific directory
- Open the main configuration file and add the below details

Options -Includes -ExecCGI

Or

Options -Includes -ExecCGI

- Restart the server. That’s it!.

v Statement: Below directives will help to prevent the DoS attacks and completely cannot be prevented

Environment: Apache webserver
Solution:
- Set the TimeOut:.

- Its default value is 300 secs, set the value to lower depending on the website functionalities.

- This will wait for a certain amount of time to complete the event. post the request will be failed.

- MaxClients:
- The default value is 256, set this value to lower to prevent DoS atatcks
- It allows you to set the no of maximum connection and to be served simultaneously.
- Once the limit crosses the every new connection will be queued up.

- KeepAliveTimeout :
- The default value is 5 sec

- The default value indicates the amount of time server will wait for the subsequent request before closing the connection


- LimitRequestFields: default value is 100, set this value to lower to prevent DoS atatcks


- LimitRequestFieldSize: it helps to set a size limit on the http request headers.

v Use mod_security and mod_evasive Modules to Secure Apache

- Mod_security:
§ It will act as a Firewall for web application and allow to monitor the traffic on a real time basis
§ It also protects the website or web server from brute force attacks
§ Install the Mod_security directive
- Install mod_security on Ubuntu/Debian
o $ sudo apt-get install libapache2-modsecurity
o $ sudo a2enmod mod-security
o $ sudo /etc/init.d/apache2 force-reload

- Install mod_security on RHEL/CentOS/Fedora/
o # yum install mod_security
o # /etc/init.d/httpd restart
- Mod_evasive
§ It handles the DoS
§ it handles the DDoS atatcks
§ It handles the Brute force attacks
§ This module detects three atatcks
o If Multiple requests come to the same page a few times per second.
o If the child process creates more than 50 concurrent requests.
o If temporarily blacklisted IP is trying to make new requests


By aem4beginner

How to hide Apache Version and OS Identity from Errors in Apache HTTP server

Environment: Apache Webserver
- When you install apache with source or package through installer like Yum, it displays the version of Apache and OS version in the errors.
- It also shows the module installed in the Apache server
- It also shows the Port number

Steps to follow in RHEL, CentOS , Fedora, Debian and Ubuntu
1. Open the httpd.conf/apache2.conf file based on the OS
# vim /etc/httpd/conf/httpd.conf (RHEL/CentOS/Fedora)
# vim /etc/apache2/apache2.conf (Debian/Ubuntu)


2. Add the below configuration to httpd.conf/apache2.conf and Save the file
ServerSignature Off
ServerTokens Prod

3. Restart the Server and That’s It
# service httpd restart (RHEL/CentOS/Fedora)
# service apache2 restart (Debian/Ubuntu)


By aem4beginner

How to Disable Directory Listing in Apache Webserver

Environment: Apache Webserver
Solution:
- In the absence of index file by default apache server will list the default content root directories
- We can turn off the directory listing by using Options directive in the httpd.conf or apache2.conf configuration file for any specific directory

1. Open the Httpd.conf or apache2.conf file

Options –Indexes

2. Restart the server
3. Go to website and access for the content root -/var/www/html or /content
4. You must see the Forbidden error(You don’t have permission to access/ on this server.


By aem4beginner

How to upgrade Apache version regularly

Environment: Apache Webserver

Solution:
1. Check the apache version by using #httpd –v
2. Run the below command to update the version
# yum update httpd
#apt-get install apache2
3. That’s it! again check for the version of apache post-upgrade #httpd -v


By aem4beginner

Disable Apache’s following of Symbolic Links

Environment: Apache webserver
- By default Apache webserver follows symlinks,
- We can turn off this feature with FollowSymLinks with Options directive.
- Open the HTTD.conf file and add the below line.
# Options -FollowSymLinks

- If there is a need for FollowSymLinks feature, can be enabled by writing in the rule in the “.htaccess” file from that website.
# Enable symbolic links
# Options +FollowSymLinks
Note: To enable rewrite rules inside the “.htaccess” file “AllowOverride All” should be present in the main configuration globally.


By aem4beginner

Turn off Server Side Includes and CGI Execution in Apache Webserver

Environment: Apache webserver
Solution:
- Steps to turn off server-side includes (mod_include)
- And CGI execution
- Modify the httpd.conf or apache2.conf file in the main configuration file.
- This can be applied to the root directory or specific directory
- Open the main configuration file and add the below details

Options -Includes -ExecCGI

Or

Options -Includes -ExecCGI
- Restart the server. That’s it!.


By aem4beginner

Protect DDOS attacks in Apache Webserver

Statement: Below directives will help to prevent the DoS attacks and completely cannot be prevented
Environment: Apache webserver

Solution:
- Set the TimeOut:.
- Its default value is 300 secs, set the value to lower depending on the website functionalities.
- This will wait for a certain amount of time to complete the event. post the request will be Failed.

- MaxClients:
- Default value is 256 , set this value to lower to prevent DoS attacks
- It allows you to set the no of maximum connection and to be served simultaneously.

- Once the limit cross the every new connection will be queued up.

- KeepAliveTimeout:
- Default value is 5 sec
- Default value indicates the amount of time server will wait for the subsequent request before closing the connection
- LimitRequestFields : default value is 100 , set this value to lower to prevent DoS attacks
- LimitRequestFieldSize : it helps to set a size limit on the http request headers.


By aem4beginner

How to Use mod_security and mod_evasive Modules to Secure and Prevent DoS, DDoS and Brute Force attacks in Apache Webserver

Statement: Use mod_security and mod_evasive Modules to Secure Apache
Environment: Apache webserver

Mod_security:
  • It will act as a Firewall for web application and allow to monitor the traffic on a real-time basis
  • It also protects the website or web server from brute force attacks
  • Install the Mod_security directive
- Install mod_security on Ubuntu/Debian
o $ sudo apt-get install libapache2-modsecurity
o $ sudo a2enmod mod-security
o $ sudo /etc/init.d/apache2 force-reload

- Install mod_security on RHEL/CentOS/Fedora/
o # yum install mod_security
o # /etc/init.d/httpd restart
Mod_evasive
  • It handles the DoS
  • It handles the DDoS attacks
  • It handles the Brute force attacks
  • This module detects three attacks
o If Multiple requests come to the same page a few times per second.
o If the child process creates more than 50 concurrent requests.
o If temporarily blacklisted IP is trying to make new requests


By aem4beginner

April 22, 2020
Estimated Post Reading Time ~

Apache Web server Installation and configuration of Dispatcher in AEM

Apache webserver installation and Dispatcher configuration

Steps
Solution Description
Step: 1
Make sure you have downloaded Apache 2.4.3
Download From:
#wget http://apache.techartifact.com/mirror//httpd/httpd-2.4.3.tar.bz2
Step: 2
Install the apache webserver: Extract the Zip file to the /data/downloads Directory
#tar jxvf httpd-2.4.3.tar.bz2
Step: 3
Download apr check for the latest version
Download From:
#wget http://apache.techartifact.com/mirror/apr/apr-1.4.6.tar.bz2
Step: 4
Download apr-util Check for the latest version.
Download From:

Step: 5
Extract the bzip files.

#tar jxvf apr-1.4.6.tar.bz2
#tar jxvf apr-util-1.5.1.tar.bz2
Step: 6
Rename to remove the version from the directory name.

 #mv apr-1.4.6 apr
 #mv apr-util-1.5.1 apr-util
Step: 7
Download pcre.  latest version and compile it

#wget  ftp://ftp.csx.cam.ac.uk/pub/software/programming/pcre/pcre-8.31.tar.bz2
#./configure --prefix=/etc/httpd/pcre
#make
#make install
Step: 8
Install apache

#./configure --prefix=/etc/httpd/apache2 --enable-mods-shared=all   --with-included-apr --with-pcre=/etc/httpd/pcre/
#make
#make install
Step: 9
Start Apache and verify installation
# cd /etc/httpd/apache2/bin
#./apachectl configtest
# ./apachectl  start
Or
#cd /etc/init.d/httpd start

Step: 10
Apache Configuration file:
#vi /etc/httpd.conf

ServerRoot "/etc/httpd/apache2"
Listen 80

#Modules added for
LoadModule expires_module modules/mod_expires.so
LoadModule deflate_module modules/mod_deflate.so
LoadModule headers_module modules/mod_headers.so
LoadModule rewrite_module modules/mod_rewrite.so

          User apache
          Group apache


Step: 11
Install Dispatcher
Get Dispatcher package: dispatcher-apache2.4-linux-x86-64-4.1.2.tgz
#tar zxvf dispatcher-apache2.4-linux-x86-64-4.1.2.tgz
#cp -r modules/* /etc/httpd/modules/

Create a symbolic link to name 'mod_dispatcher.so' to the dispatcher module by running the command
> ln -s dispatcher_apache_xxxx_yyyy.so mod_dispatcher.so
Step:12.1
Setting Dispatcher Handler
       
                SetHandler dispatcher-handler
                ModMimeUsePathInfo On
       
        Options FollowSymLinks

        AllowOverride None


Step: 13
Setting up the Publish renders 1,2,3 and 4
#vi /usr/local/apache2/conf/extra/dispatcher.any
                       /renders
                        {
                                /render0
                                {
                                        /hostname "localhost1"
                                        /port "4503"
                                }
                                /render1
                                {
                                        /hostname "localhost2"
                                        /port "4503"
                                }
                                /render2
                                {
                                        /hostname "localhost3"
                                        /port "4503"
                                }
                                /render3
                                {
                                        /hostname "localhost4"
                                        /port "4503"
                                }
                        }


Step: 13.1
Filter out specific URL from accessing over the internet
/filter
      {
      # Deny everything first and then allow specific entries
      /0001 { /type "deny"  /glob "*" }
    #  /0001 { /type "allow"  /glob "*" }
       
      # Open consoles
#     /0011 { /type "allow" /glob "* /admin/*"  }  # allow servlet engine admin
#     /0012 { /type "allow" /glob "* /crx/*"    }  # allow content repository
#     /0013 { /type "allow" /glob "* /system/*" }  # allow OSGi console

      # Deny query
      /0090 { /type "deny"  /glob "* *.query.json*" }
          /0091 { /type "allow" /glob "* /test/*" }
          /0092 { /type "allow" /glob "GET *.1.json*" }          # allow one-level json requests
          /0093 { /type "allow" /glob "* /auth/*" }

      }
Step: 13.2
    # The cache section regulates what responses will be cached and where.
    /cache
      {
      # The docroot must be equal to the document root of the webserver. The
      /docroot "/data/aem/dispatcher/cache"
      # Sets the level upto which files named ".stat" will be created in the
      #/statfileslevel "0"
      # Flag indicating whether to cache responses to requests that contain
      # authorization information.
      #/allowAuthorized "1"
      # Flag indicating whether the dispatcher should serve stale content if
      # no remote server is available.
      /serveStaleOnError "0"
      # The rules section defines what responses should be cached based on
      /rules
        {
        /0000
          {
          # the glob pattern to be compared against the URL
         /glob "*"
          /type "allow"
          }


Step14
Cache invalidation for webserver and access to publishers
/invalidate
        {
                /0002
          {
          /glob "/etc/segmentation.segment.js"
          /type "allow"
          }
        /0003
          {
          /glob "*/analytics.sitecatalyst.js"
          /type "allow"
          }
                   /0004
                    {
                    /glob "*.js"
                    /type "allow"
                    }         
                /0005
                    {
                    /glob "*.css"
                    /type "allow"
                    }
        }
Step: 15
Performance tuning
# this configuration file extends the basic httpd.conf
# it includes a number of options that are used to improve performance
# turn off Etags completely, since they will differ across the cluster
FileETag None
# instead we use Expires and Cache-Control headers
ExpiresActive On
ExpiresByType text/css "access plus 1 year"
ExpiresByType text/javascript "access plus 1 year"
ExpiresByType image/gif "access plus 1 year"
ExpiresByType image/jpg "access plus 1 year"
ExpiresByType image/png "access plus 1 year"
ExpiresByType application/x-shockwave-flash "access plus 1 year"
# force set Vary header so it works with proxies and IE properly
Header set Vary "Accept-Encoding"
        # enable compression for text file types: html, css, js, XML
        AddOutputFilterByType DEFLATE text/plain
        AddOutputFilterByType DEFLATE text/html
        AddOutputFilterByType DEFLATE text/xml
        AddOutputFilterByType DEFLATE text/css
        AddOutputFilterByType DEFLATE text/javascript
        AddOutputFilterByType DEFLATE application/xml
        AddOutputFilterByType DEFLATE application/xhtml+xml
        AddOutputFilterByType DEFLATE application/rss+xml
        AddOutputFilterByType DEFLATE application/javascript
        AddOutputFilterByType DEFLATE application/x-javascript
        DeflateCompressionLevel 9
        DeflateFilterNote Input instream
        DeflateFilterNote Output outstream
        DeflateFilterNote Ratio ratio


Step: 16
Test configuration
# sudo /etc/init.d/httpd status

Step: 17
Stop Apache Server

# sudo /etc/init.d/httpd stop

Step: 18
Start Apache Server

# sudo /etc/init.d/httpd stop

Step:19
Log file location
/etc/httpd/logs/


By aem4beginner