Showing posts with label XLIFF. Show all posts

April 26, 2020
Estimated Post Reading Time ~

XLIFF Connector: now Open Sourced

This has been long pending. We always wanted to open source the XLIFF connector for Adobe Experience Manager 6.1, but have been really busy. The connector was built for Adobe Experience Manager 6.1 and is listed on the Adobe Marketing Exchange here. The connector was always free and anyone could download the connector from Adobe Marketing Exchange. The connector was also featured in Multilingual Magazine. Today, we are open-sourcing the source code. You can look at the source code here: https://github.com/ExperienceLabs/xliff-export-connector

For core XLIFF conversion, the connector relies on the OKAPI framework. It supports both XLIFF 1.2 and XLIFF 2.0 conversion. In case, you have forked OKAPI and have a modified version, you can just replace the OKAPI libs and repackage the connector.

In Adobe Experience Manager 6.2, Adobe has improved XLIFF support. Interestingly enough, they did not go ahead and implement XLIFF conversion. Rather they defined an interface and rely upon customers to implement the interface (basically write an XLIFF conversion). The XLIFF interface is modeled on Translation API. You can repurpose the XLIFF connector to build a connector for AEM 6.2 by implementing the interfaces as exposed in AEM 6.2. I want to do the same but I will park that as a weekend project for later. I will share with you more once I get around implementing it myself.
Happy forking!!


By aem4beginner

XLIFF support in AEM 6.2

AEM 6.2 release was a major milestone from translation perspective. In this release, AEM took a huge step forward and added support for XLIFF generation, making AEM truly vendor agnostic. In this post, we will see try to evaluate what is available in AEM 6.2 and how can you take advantage of the same.

First and foremost, there is a NEW simple interface to support XLIFF. It has two simple APIs – one for generating XLIFF from AEM XML (export workflows) and the second one is for ingesting XLIFF back into AEM by converting that to AEM XML. For folks who like to see the parameters, here are the exact APIs:

public interface TranslationXLIFFService {

/**
* Converts an XML document, corresponding to a translation object, to an equivalent XLIFF string
* @param xmlDocument XML document containing the content to be translated
* @param id Unique id corresponding to the translation object from which the xmlDocument was created
* @param sourceLanguage Source language of the translatable content inside xmlDocument
* @param xliffVersion Version of the output XLIFF
* @return String containing the complete XLIFF
* @throws TranslationXLIFFServiceException
*/

String convertXMLDocumentToXLIFFString(Document xmlDocument, String id, String sourceLanguage, String xliffVersion)

throws TranslationXLIFFServiceException;

/**
* Converts an XLIFF InputStream to an equivalent XML
* @param xliffInputStream Input XLIFF stream
* @param sourceLanguage Source language
* @param destinationLanguage Target language
* @return XML Document
* @throws TranslationXLIFFServiceException
*/

Document convertXLIFFStreamToXMLDocument(InputStream xliffInputStream, String sourceLanguage, String destinationLanguage)

throws TranslationXLIFFServiceException;

}

This interface can either be implemented by an AEM user, or there is an implementation available on PackageShare. For the purposes, of this blog post, we are going to install the package from Package Share.

Download package from here: https://www.adobeaemcloud.com/content/marketplace/marketplaceProxy.html?packagePath=/content/companies/public/adobe/packages/com.adobe.granite.translation.xliff/okapi-xliff-service-pkg

Once you have the package, install it on AEM using Package Manager (http://localhost:4502/crx/packageshare/index.html). This package supports both XLIFF 1.2 and XLIFF 2.0

Now the Translation Connectors can request XLIFF using the Translation Service. However, in case you do not use a connector and want to use Import/Export workflow from Translation Projects / Jobs, you will need to additionally set another option in the Felix Console. Follow these steps to enable XLIFF for Import/Export workflows:
Browse to Felix Console Configuration Manager (http://localhost:4502/system/console/configMgr)

Search for “Translation Platform Configuration” and click open it
Select the right XLIFF format here.

Once this property is set, if you Export a Translation Job, it will export the content in that specific XLIFF version.

Please note, this setting applies across the AEM instance.


By aem4beginner

XLIFF Export Connector

Now you can easily generate your translatable content in XLIFF format from within Adobe Experience Manager(AEM) using Gcell XLIFF Export Connector developed by Gcell, an Adobe Business Partner.

Installing Connector
Go to your AEM environment’s CRXDE Lite from the Projects screen by selecting Tools > CRXDE Lite in the navigation menu on the left side of the page.
In the new window, select the Package Manager icon from the navigation menu at the top of the page.


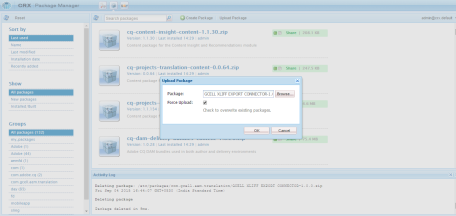
In the CRX Package Manager window select “Upload Package” and locate the package on your local machine. Make sure to check the Force Upload checkbox before selecting “OK”.
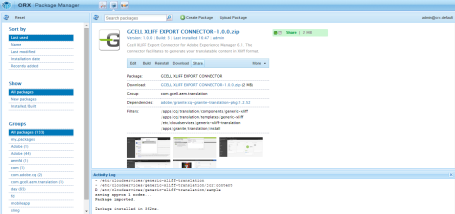
Once the package is uploaded, a menu bar will become available under the uploaded package. Select “Install”. Once the installation is complete, you are ready to configure your GCELL XLIFF cloud service. 


Configure Gcell XLIFF Export Connector

Navigate to Cloud Services from the Projects page by selecting Tools > Operations > Cloud > Cloud Services from the navigation menu on the left side of the page.
When you’ve located the GCELL XLIFF EXPORT CONNECTOR cloud service, select the “+” to create a configuration. Enter the required information and select “XLIFF Connector Configuration” from the available configurations listed. 
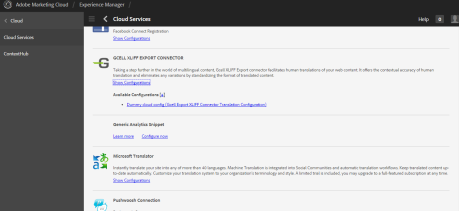


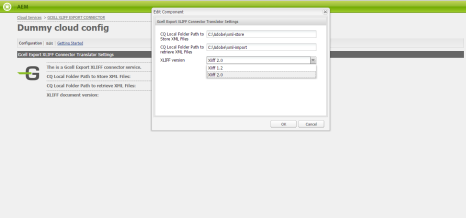
Finally, select “Edit” in the menu bar and fill
Adobe Experience Manager Local Folder Path to Store XML Files ( Path of the folder where XLIFF files will store )
Adobe Experience Manager Local Folder Path to Store XML Files ( Path of the folder from where connector will import translated XLIFF files )
XLIFF Version ( Choose the version from the drop down )


Creating a translation project
Go to Projects page, click “Create” and select “Translation Project” and click “Next”.
In Basic tab Fill
  1. Title
  2. Description
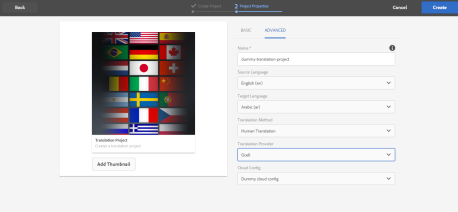
  3. Now click the “ADVANCED” tab and fill
  4. Source Language from drop down
  5. Target Language from drop down
  6. Translation Method as Human Translation
  7. Translation Provider as Gcell
  8. Cloud Config
  9. Click on “Create” and your project has been created. 


By aem4beginner