Showing posts with label RTE. Show all posts

January 11, 2021
Estimated Post Reading Time ~

Touch UI RTE Dialog Color Picker Plugin - Throwing Handlebars.compile error in XF pages

Question:
We are using the Color Picker plugin (Refer ) developed and provided by Sreekanth. The plugin works fine in our pages, but while using the color-picker in the XF pages, it is not loading in the RTE and we are getting Handlebars.compile is not a function issue in the console.

Solution:
The color-picker doesn't work in Experience Fragment (XF) pages since the Handlebar js is not available there and underscore (clientlibs added as a dependency in the picker) doesn't have Handlebar.compile module. I was trying with handlebars as dependency all the time after reading it somewhere, but after some debugging, I could figure out that the dependency which had handlebar in AEM is cq.handlebars.

So anybody facing Handlebars.compile is not a function issue in the future, please add cq.handlebars as an additional dependency to your clientlibs

Source:
https://experienceleaguecommunities.adobe.com/t5/adobe-experience-manager/aem-65-touch-ui-rte-rich-text-editor-dialog-color-picker-plugin/qaq-p/392705/comment-id/84334#


By aem4beginner

January 3, 2021
Estimated Post Reading Time ~

Touch UI - RTE HTML Element Selector, Custom Style Plugin & Color Picker Plugin

Touch UI RTE is always a challenging topic because of a lack of documentation to create or customize plugins, There are great articles at http://experience-aem.blogspot.com/2013/08/in-blog-experiencing-adobe-experience.html which talk about RTE plugins. I got the idea from the ColorPicker plugin and tried to create a new Style Picker plugin that may help the AEM community to achieve more from RTE.

This blog covers :
HTML DOM Navigation and HTML element selector inside RTE Editor
Custom Style(Style Picker) Plugins
Color Picker Plugin

HTML DOM Elements Navigator extension:
  • Shows selected/current HTML element's DOM structure in RTE
  • Allows selecting an exact HTML element in RTE to apply settings using RTE plugins.
Style Picker Plugins apply a class attribute to selected HTML elements unlike the OOTB style plugin to create a span tag. The exact HTML element can be selected from the DOM navigator e.g. ul, ol, hr, p, div, img, etc. These elements can be selected by DOM Element Navigator and class can be applied to them.
The Color Picker Plugin as the same as ColorPicker Plugin from http://experience-aem.blogspot.com but I modified it to work with all AEM version from 6.3+

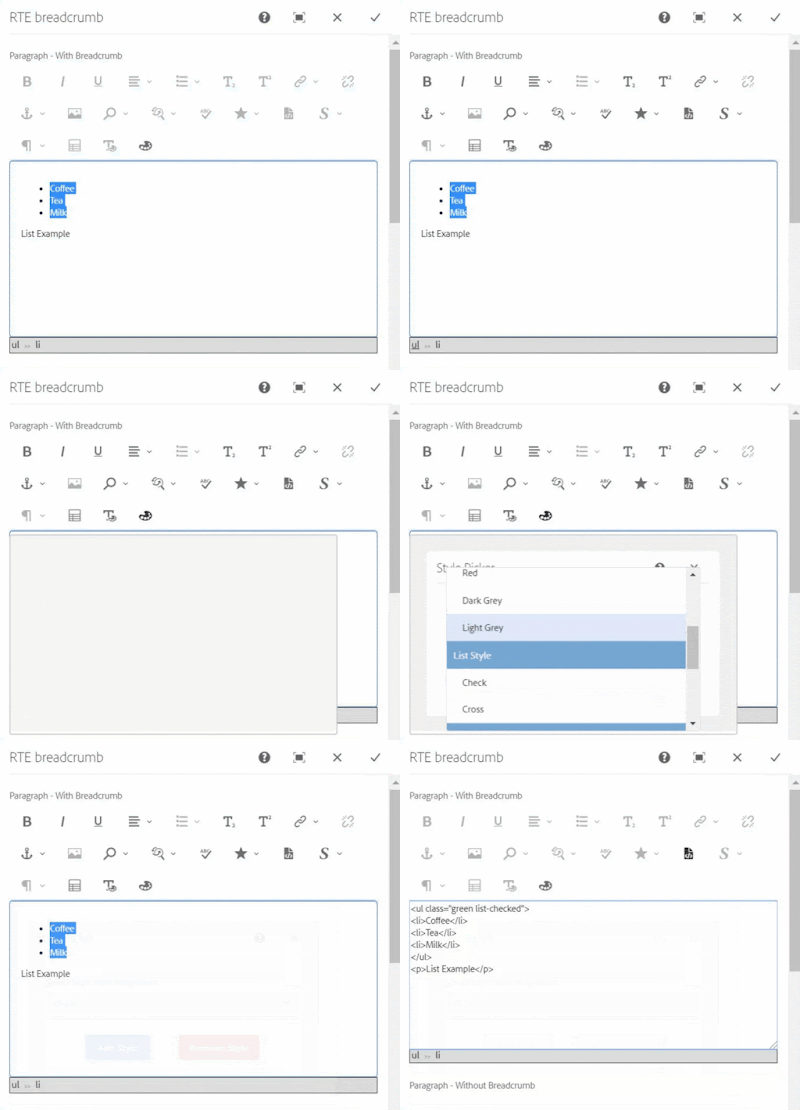
Color Picker, Style Picker Plugins, and HTML DOM navigation


RTE Element Selection from DOM navigation


Applying class to ul element using Style Picker

When the selected item already has existing styles, the style will be pre-selected in the dropdown, If another style is chosen, the new class will be added and the existing class will also remain, this will allow applying multiple styles to a single element.

In case of applying a different style or a single style to an element then an existing style should be chosen and removed using the Remove Style button. 

Pre-selected style


Applying another style to list


Removing style from the list

If only a text is selected for applying the style using this custom style picker plugin, the style will be added to its parent's node. If you want to apply a style to text using a span tag, use the OOTB style plugin.

Style is added to P tag


OOTB style plugin, style added with a span tag

Note: If multiple HTML items are selected then the style will be applied to only one element.

Code
You can install the below packages from GitHub to use these plugins in AEM 6.3+
Packages contain:
Details
1. DOM Elements Navigation and Selector inside RTE Editor

In RTE, the element tree breadcrumb is created at the bottom section of RTE, which shows the DOM navigation and allows a user to select a particular HTML element in RTE by clicking on breadcrumb items.

RTE Navigation will only be shown for the RTE which has showBreadcrumb property with true.
ShowBreadcrumb property in RTE item node


RTE DOM Tree
Although navigation can be enable for all the RTEs by changing below line in /apps/commons/rte/rte-breadcrumb/js/rte-breadcrumb.js file
replace
$('.coral-RichText[data-showbreadcrumb="true"]').each(function() {
$(this).parent().find(".rte-sourceEditor").after(breadcrumbItem);
});

with
$('.coral-RichText').each(function() {
$(this).parent().find(".rte-sourceEditor").after(breadcrumbItem);
});

The DOM navigation extension is independent of the style plugin and can be used with other plugins as well to select, cut, copy, etc.

2. Custom Style Picker Plugins

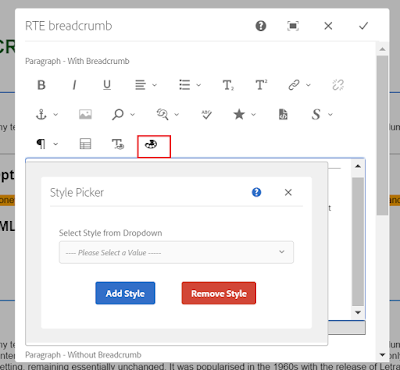
StylePicker Plugin in RTE toolbar

After installing the package you can find the Style Picker Plugins files at:

Plugins JS and CSS at
/apps/commons/rte/plugins/clientlibs/js/style-picker.js
/apps/commons/rte/plugins/clientlibs/css/style-picker.css

Plugins popover dialogs
/apps/commons/rte/plugins/popovers/style-picker

Plugin Popover Dialog - dropdown option datasource and JSON at
/apps/commons/rte/plugins/popovers/style-picker/datasource
/apps/commons/rte/plugins/popovers/style-picker/options.json

Datasource is a JSP file which read json specified in options property and populates dropdown option for Style Picker plugin.
JSON file should have an array of elements in the below format:

If want to show as Heading/Category use the below format(value could be anything)
{"text": "Background Color","value": "BTC","heading": "true"}

If Option

{"text": "White","value": "white"}

Example: /apps/commons/rte/plugins/popovers/style-picker/options.json

[
{"text": "Background Color","value": "BTC","heading": "true"},
{"text": "White","value": "white"},
{"text": "Black","value": "black"},
{"text": "Green","value": "green"},
{"text": "Orange","value": "orange"},
{"text": "Light Grey","value": "lightgrey"},
{"text": "List Style","value": "LS","heading": "true"},
{"text": "Check","value": "list-checked"},
{"text": "Cross","value": "list-crossed"},
{"text": "Link Style","value": "LS","heading": "true"},
{"text": "Primary","value": "btn-primary"},
{"text": "Secondary","value": "btn-secondary"}
]


List Style and List Style are the Category and can't be selected

Plugin configuration in RTE
create 'styleformat' child node of rtePlugins node and create features property in it with * value as shown in below screenshot.

Add 'styleformat#styles' in the toolbar property on the inline node as shown in the below screenshot.


3. Color Picker Plugin
ColorPicker Plugin in RTE toolbar

After installing the package you can find the ColorPicker Plugins files at :

Plugins JS and CSS at
/apps/commons/rte/plugins/clientlibs/js/color-picker.js
/apps/commons/rte/plugins/clientlibs/css/color-picker.css

Plugins popover dialogs
/apps/commons/rte/plugins/popovers/color-picker

Plugin configuration in RTE

create 'colorformat' child node of rtePlugins node and create features property in it with * value as shown in below screenshot.

Add 'colorformat#colorPicker' in the toolbar property on the inline node as shown in the below screenshot.


Sample Components
Sample Test Component package contains a sample component (/apps/mfHTL63/components/content/simple-rte)

This component can be referred for ColorPicker and StylePicker Plugins configurations.

References
http://experience-aem.blogspot.com/2017/06/aem-63-touch-ui-rte-rich-text-editor-color-picker-plugin-inplace-dialog-edit.html


By aem4beginner

January 2, 2021
Estimated Post Reading Time ~

How to Architect a RTE Solution for AEM Touch UI Dialog

Rich Text Editor (RTE) is one of the most common and widely used widgets in a component in Adobe Experience Manager (AEM). Although Adobe provides out of the box (OOTB) RTE functionality, most projects I’ve been on require custom development or configurations. Hence, knowing more about RTE should help you better design a rich text solution for clients.

Here, we’ll focus on touch-enabled UI. Adobe introduced Touch UI in AEM 5.6 and has become the standard UI throughout the product. Classic UI will be deprecated in AEM 6.4 and will be removed in the 2019 release.

You can refer to a complete code sample of RTE in the title text component in my GitHub project.

Get Started with OOTB RTE
In touch UI dialog, you define the sling:resourceType property in _cq_dialog/.content.xml for each field, as touch UI dialog, is rendered on server-side as Granite UI components. It leverages Sling and sling resource type to render the component.

In order to have RTE in touch UI dialog, you can call the OOTB RTE script. The OOTB sling:resourceType for RTE is cq/gui/components/authoring/dialog/richtext. You can refer to the OOTB text component under /libs/wcm/foundation/components/text and /libs/foundation/components/text, where the former uses HTML Template Language (HTL) and the latter uses JSP. There’s also a text component from AEM WCM Core components.

Touch UI Dialog Mode and In-place Editing Mode
There are two modes the author can use RTE in a touch-enabled UI AEM page. One is touch UI dialog mode, which is the wrench when you click on the component; the other is in-place editing mode, the pencil.


Adobe recommends using in-place editing for RTE. Both in-place editing and touch UI dialog have two views. One is the compact inline view, the other is the full-screen view. They can be configured by the corresponding uiSettings node. It controls the plugins and popovers in the RTE toolbar for each view. A default uiSettings will be used if you don’t have a uiSettings node for your field.

Table plugins and the source-edit feature are not available for in-place editing in the touch-enabled UI. Moreover, the Image plugin is only supported partially (drag-and-drop functionality is not available). Also, the drag-and-drop does not apply to the full-screen mode.

Multiple In-place Editors
In-place editors are defined in cq editconfig node. Multiple in-place editors, no matter if they are all text or different types, require editorType to be hybrid. Cq:childEditors node holds in place editor nodes. And config node holds configurations for in-place editors. Detailed instructions can be found here.
Use Same RTE Plugins and UI Settings in Touch UI Dialog and In-place Editing

Same RTE plugins and UI settings provide the author with a consistent authoring experience in both modes. To achieve that, for touch UI dialog mode, you can use the Sling Resource Merger to call the path to the RTE plugins and UI settings. Sling Resource Merger is introduced since AEM 6.1. It overwrites the default component dialog for touch-enabled UI, using the resource type hierarchy (by means of sling:resourceSuperType property).

For in-place editing, it’s a little bit difficult. Sling Resource Merger doesn’t work in edit config. You can set configpath property in cq:inplaceEditing node, especially when you have only one type of in place editors. The OOTB RTE script works charmingly and will not display the control buttons (like the fullscreen, cancel and save) in touch UI dialog inline view. So you can have one shared set of rtePlugins and uiSettings nodes for both touch UI dialog and in-place editing. However, the configpath doesn’t work quite well if you have different types of in-place editors and need to pass multiple custom configurations, since you can only point to one path in the property. Plus, the configpath property is for backward compatibility only. It’s not recommended by Adobe.

Optionally, you can write a script to encapsulate all your RTE plugins and UI settings and then load them into the RTE config programmatically. Here are some pointers for you.

/libs/cq/gui/components/authoring/editors/clientlibs/core/inlineediting/js/HybridEditor.js /libs/cq/gui/components/authoring/editors/clientlibs/core/inlineediting/rte/coralui3/js/InlineTextEditor.js

/libs/clientlibs/granite/richtext/js/rte/ConfigUtils.js

/libs/cq/gui/components/authoring/editors/clientlibs/core/inlineediting/rte/coralui3/js/RTE.js

The drawback of this approach is that Adobe doesn’t make the RTE js apis public, so you will have to dig into all the OOTB RTE scripts. And you may fix any discrepancies when you do an upgrade.

The recommended way is to use config node in cq:inplaceEditing node. But then you will need to configure rtePlugins and uiSettings in each component.

An example of RTE node for touch UI dialog mode:

<text
jcr:primaryType="nt:unstructured"
sling:resourceType="cq/gui/components/authoring/dialog/richtext"
fieldLabel="Text"
name="./text">
<rtePlugins
jcr:primaryType="nt:unstructured"
sling:resourceSuperType="/apps/blog/dialogs/standardRTE/rtePlugins"/>
<uiSettings
jcr:primaryType="nt:unstructured"
sling:resourceSuperType="/apps/blog/dialogs/standardRTE/uiSettings"/>
</text>


An example of RTE config for in-place editing mode:

<cq:inplaceEditing
jcr:primaryType="cq:InplaceEditingConfig"
active="{Boolean}true"
editorType="hybrid">
<cq:childEditors jcr:primaryType="nt:unstructured">
<title
jcr:primaryType="cq:ChildEditorConfig"
title="Title"
type="text"/>
<text
jcr:primaryType="cq:ChildEditorConfig"
title="Text"
type="text"/>
</cq:childEditors>
<config jcr:primaryType="nt:unstructured">
<rtePlugins jcr:primaryType="nt:unstructured">

</rtePlugins>
<uiSettings jcr:primaryType="nt:unstructured">

</uiSettings>
</config>
</cq:inplaceEditing>


An example of shared RTE plugins and UI settings file:

<?xml version="1.0" encoding="UTF-8"?>
<jcr:root xmlns:cq="http://www.day.com/jcr/cq/1.0" xmlns:jcr="http://www.jcp.org/jcr/1.0" xmlns:nt="http://www.jcp.org/jcr/nt/1.0"
jcr:primaryType="nt:unstructured">
<rtePlugins jcr:primaryType="nt:unstructured">
<edit
jcr:primaryType="nt:unstructured"
features="*"/>
...
</rtePlugins>
<uiSettings jcr:primaryType="nt:unstructured">
<cui jcr:primaryType="nt:unstructured">
<inline
jcr:primaryType="nt:unstructured"
...
</inline>
<dialogFullScreen
jcr:primaryType="nt:unstructured"
...
</dialogFullScreen>
<tableEditOptions
jcr:primaryType="nt:unstructured"
...
</tableEditOptions>
</cui>
</uiSettings>
</jcr:root>


RTE Link href Issue and Resolution
With the out of the box richtext resource type defined for touch UI dialog, cq/gui/components/authoring/dialog/richtext, and when the author adds a link from the Touch UI dialog (the wrench), the href of anchor tag will be stripped off upon submitting the dialog.


This issue happens only for RTE in touch UI dialog, not in-place editing. This is a known defect for AEM, also documented on the Adobe website. The root cause is that with the OOTB richtext resource type, an RTE instance is getting created each time the RTE is clicked or just simply scrolling the dialog. There’s a simple fix provided by Adobe for this. When you develop the touch UI dialog for the RTE, you can add a property of useFixedInlineToolbar="{Boolean}true". With this setting, you will see the toolbar is fixed above the text editing area, and if you open the developer console in your browser, you will see only one instance for RTE is created. This setting will also fix the href issue in the touch UI dialog, and other plugins should work as expected, too.

Moreover, if you want to apply this setting on an application level, you can use the sling resource merger and overlay the OOTB richtext script to your app location. I.e., create this structure in your code, apps/cq/gui/components/authoring/dialog/richtext/render.jsp. Now you can add your custom logic in the JSP to render RTE. And what you want to do is that when there’s no useFixedInlineToolbar setting in the dialog configuration, default it to be true.

/*
* Get useFixedInlineToolbar value from component configuration, if not found, default it to
* true to fix rte anchor link issue
*/
String useFixedInlineToolbar = cfg.get("useFixedInlineToolbar", String.class);
if (useFixedInlineToolbar == null) {
useFixedInlineToolbar = "true";
}


And then in the markup, you can pass the useFixedInlineToolbar variable in.

<div class="coral-RichText-editable coral-Form-field coral-Textfield coral-Textfield--multiline coral-RichText" data-config-path="<%=resource.getPath()%>.infinity.json" data-use-fixed-inline-toolbar="<%=useFixedInlineToolbar%>"></div>

In this case, if you do have a use case that requires to set the useFixedInlineToolbar to false, you can set it in the component dialog configuration and your custom script will be able to read that configuration value.

Custom RTE Plugin and Validation
Both RTE custom plugins and validation can be achieved by clientlibs and JavaScript. Even though OOTB RTE plugins are enough most of the time, I have been in couple projects that required to a custom RTE plugin. One example would be the font color picker. If you do need to develop a custom RTE plugin, you can start with creating a clientlib in your code with category rte.coralui3 (AEM 6.3) and dependencies underscore. This will load your JavaScript when AEM is calling RTE in a touch UI component. 

Then you will write JS code to build the plugin into toolbar and custom logic and implementation for the plugin. At the end, register your custom plugin with Coral UI RTE api, CUI.rte.commands.CommandRegistry.register(). After your plugin is registered, you can add that into the RTE plugins and author will be able to see it. You can reference to some OOTB plugins scripts under here: /etc/clientlibs/granite/coralui2/optional/rte/js/components/rte/plugins(AEM 6.2)

/libs/clientlibs/granite/richtext/js/rte/plugins (AEM 6.3).

Validation for RTE touch UI dialog should follow the new best practice and use Granite UI foundation validation.


By aem4beginner

RTE Validation for AEM 6.2, The Right Way

I’ve looked far and wide for an RTE validation solution that is straightforward and easy to share between teams. The examples I found online seemed like patches or half-solutions that would break in the next AEM version, or when used in complex dialogs. So I set out to write one myself following my newly acquired Javascript skills. And here’s the result: An RTE validation registry that makes it simple for teams to register RTE validations just like they would a text field validation following the Granite foundation validator for AEM 6.2.


The code in this post is relevant to and tested on AEM 6.2.

Download the clientlib code as a zip package from here: rte-validator

Here is the code:
I won’t get into explaining the code as it is fully documented (jsDoc) and should be easy to follow by any Javascript developer.

The most important thing to keep in mind is that this code uses foundation validator. Please take the time to read that documentaton.

/* jshint undef: true, unused: true, esversion:5, node: true */
/* globals Coral, window, $ */
/**@author Ahmed Musallam */
(function ($window) {
var foundationRegistry = 'foundation-registry';
var foundationValidator = 'foundation.validation.validator';
var foundationSelector = 'foundation.validation.selector';
var validationTooltipDataAttr = 'rte-validation.error.tooltip';
var validationErrorDataAttr = 'rte-validation.error';
// coral ui util class to hide elements https://docs.adobe.com/docs/en/aem/6-2/develop/ref/coral-ui/styles/#screen-readerOnly
var screenReaderClass = 'u-coral-screenReaderOnly';
/**
* a helper that set's the field to coral ui invalid
* for AEM 6.2, this sets the is-invalid attribute
* @param {Element | jQuery} el the element, can be an Element or jQuery
* @param {Boolean} invalid true, set to invalid. false, set to valid
*/
function _setInvalid(el, invalid){
if(!el) return;
var $el = el.length ? el : $(el);
// find non hidden form fields
$el = $el.find('.coral-Form-field:not(:hidden)');
var fieldAPI = $el.adaptTo('foundation-field');
// set the field to invalid
if (fieldAPI && fieldAPI.setInvalid) fieldAPI.setInvalid(invalid);
// if we cant, show warning
else console.warn('cannot use foundation field api for this element', $el);
}
/**
* a helper to show/hide the field info icon and tooltip
* @param {Boolean} show true to show the fieldinfo, false to hide
*/
function _toggleFieldInfo(field, show){
if(show) field.nextAll('.coral-Form-fieldinfo').removeClass(screenReaderClass);
else field.nextAll('.coral-Form-fieldinfo').addClass(screenReaderClass);
}
/**
* adds/removes the error ui
* mostly the same as:
* http://localhost:4502/libs/granite/ui/components/coral/foundation/clientlibs/foundation/js/coral/validations.js
* @param {Element} element the element on which the validation is hapening
* @param {String} message the error message to show
* @return void
*/
function _showRteError(element, message){
var el = $(element);
var field = el.closest('.richtext-container');
// set the field to invalid (adds the red border)
_setInvalid(field, true);
// hide the fieldinfo element
_toggleFieldInfo(field, false);
var tooltip;
var error = field.data(validationErrorDataAttr);
// if we already set the error in the data attribue, retrieve and show
if (error) {
tooltip = $(error).data(validationTooltipDataAttr);
tooltip.content.innerHTML = message;
if (!error.parentNode) {
field.after(error, tooltip);
}
}
// if this is the first time we validate, create and add errors
else {
// create error icon
error = new Coral.Icon();
error.icon = 'alert';
error.classList.add('coral-Form-fielderror');
// create tooltip
tooltip = new Coral.Tooltip();
tooltip.variant = 'error';
tooltip.placement = field.closest('form').hasClass('coral-Form--vertical') ? 'left' : 'bottom';
tooltip.target = error;
tooltip.content.innerHTML = message;
// set the error and tooltip as data attributes for later use
$(error).data(validationTooltipDataAttr, tooltip);
field.data(validationErrorDataAttr, error);
// add error and tooltip to the ui
field.after(error, tooltip);
}
}
/**
* Clears error ui (for when the field is valid)
* @param {*} element the element on which the validation is hapening
* @return void
*/
function _clearRteError(element){
var el = $(element);
var field = el.closest('.richtext-container');
// set the field to valid (removes the red border)
_setInvalid(field, false);
var error = field.data(validationErrorDataAttr);
if (error) {
var tooltip = $(error).data(validationTooltipDataAttr);
// hide and remove both tooltip and error icon
tooltip.hide();
tooltip.remove();
error.remove();
}
// show the fieldinfo element
_toggleFieldInfo(field, false);
}
/**
* A helper method to register a selector
* Add the data attribue selector to foundation submittable
* This just means that elements with the data attribute now can be validated
* This is needed because in the case of RTE, the field is hidden and hidden
* fields are excluded from validation by default.
* @param selector the selector to register
*/
function _registerSelector(selector){
$window.adaptTo(foundationRegistry).register(foundationSelector, {
submittable: selector,
candidate: selector,
exclusion: ''
});
}
/**
* Check if variable is a function
* credit: https://stackoverflow.com/questions/5999998/how-can-i-check-if-a-javascript-variable-is-function-type
* @param {*} functionToCheck
*/
function _isFunction(functionToCheck) {
var getType = {};
return functionToCheck && getType.toString.call(functionToCheck) === '[object Function]';
}
/** Clear Fnction
@name Clear
@function
@param {Element} element the element on which validation is hapening;
@param {FoundationValidationValidatorContext} ctx
*/
/** Show Function
@name Show
@function
@param {Element} element the element on which validation is hapening;
@param {string} message the message returned from validate
@param {FoundationValidationValidatorContext} ctx
*/
/**
* RteValidator type def
* @typedef {Object} RteValidator
* @property {string|Functon} selector: Only the element satisfying the selector will be validated using this validator.
* @property {Function} validate: The actual validation function. It must return a string of error message if the element fails.
* @property {Clear} beforeClear: optional hook function to be executed before the clear function
* @property {Clear} afterClear: optional hook function to be executed after the clear function
* @property {Show} beforeShow: optional hook function to be executed before the clear function
* @property {Show} afterShow: optional hook function to be executed after the clear function
*/
/**
* a function to register an RTE validator
* @param {*} attribute the attrubute to use for validation
* @param {RteValidator} validator the validator object documented here: https://docs.adobe.com/docs/en/aem/6-2/develop/ref/granite-ui/api/jcr_root/libs/granite/ui/components/coral/foundation/clientlibs/foundation/js/validation/index.html#validator
*/
function registerRteValidator(validator){
if(!validator){
console.error("cannot register an empty validator");
}
// first register the selector so we can use it for validation.
_registerSelector(validator.selector);
var rteValidator =
{
selector: validator.selector,
validate: validator.validate,
show: function(element, message, ctx){
if(_isFunction(validator.beforeShow)) validator.beforeShow(element, message, ctx);
_showRteError(element, message, ctx);
if(_isFunction(validator.afterShow)) validator.afterShow(element, message, ctx);
},
clear: function(element, ctx){
if(_isFunction(validator.beforeClear)) validator.beforeClear(element, ctx);
_clearRteError(element, ctx);
if(_isFunction(validator.afterClear)) validator.afterClear(element, ctx);
}
};
/**
* register the validator
*/
$window.adaptTo(foundationRegistry).register(foundationValidator, rteValidator);
}
// expose the
window.customValidator = window.customValidator || {};
window.customValidator.registerRteValidator = registerRteValidator;
})($(window));


Now, to the fun part, let’s say you want to add a validation that makes RTE field required

(function () {
// register an RTE validator to make RTE required
window.customValidator.registerRteValidator({
selector: '[data-rte-required]',
validate: function (element) {
// if there is a value, return
if ($(element).val()) return;
// no value, return error message
else return 'This field is required.';
}
});
})();


All code above needs to be in a clientlib with the following categories:

categories=”[granite.ui.foundation,cq.authoring.dialog]”

Since the selector we chose is data-rte-required we need to somehow add that attribute on the RTE in our dialog. Luckily, RTE granite UI widget adds the data attribute for any unknown attribute added to the field. So all we have to do is add rte-required to the RTE field as follows:


and voila! You can create all sorts of complex validations like that without having to worry about showing or hiding error UI and messages.

When trying to submit an empty field, you’ll get the following dialog validation:


Additionally, I have added optional function hooks that can be provided and executed before and after the show/clear methods of the granite validator:

beforeClear: optional hook function to be executed before the clear function
afterClear: optional hook function to be executed after the clear function
beforeShow: optional hook function to be executed before the show function
afterShow: optional hook function to be executed after the show function

Let’s look at an example of how to use those hooks. The following code snippet is the same required validation above but with added hook methods:

(function () {
window.customValidator.registerRteValidator({
selector: '[data-rte-required]',
validate: function (element) {
var rteValue = $(element).val();
if(rteValue.indexOf('simple') < 0){
return "the word 'simple' must be in the field"
}
},
beforeShow: function(element, message){ console.log("this message is printed BEFORE showing error UI")},
afterShow: function(element, message){ console.log("this message is printed AFTER showing error UI")},
beforeClear: function(element){ console.log("this message is printed BEFORE hiding error UI")},
afterClear: function(element){ console.log("this message is printed AFTER hiding error UI")}
});
})();


By aem4beginner

SunEditor: An Alternative to the AEM RTE

Ever since I first worked with the AEM Rich Text Editor, it was clear to me that it was buggy, not easily extensible, and sometimes unusable. But the main issue for me was extensibility. There is no official API documentation or any documentation on how to build RTE Extensions. This is the reason I started searching for an alternative. Two years ago, I integrated CKEditor as an AEM Dialog Widget. This editor works, but was mainly a Proof of concept and not to be used in production.

SunEditor
Recently, I stumbled upon SunEditor, which the author describes as “Pure javascript based WYSIWYG HTML editor, with no dependencies”. You can play with an example here. It seems to work really well and has a simple API that allows you to build plugins to your heart’s desire. The documentation and plugin examples are pretty good as well.

Integrating SunEditor with AEM
Since I liked it very much, I decided to build an integration for it with AEM. It turned out to be extremely simple! SunEditor starts with a <textarea> and initializes the editor around it. Additionally, the editor saves the HTML value into the <textarea>making Sun ideal as an AEM dialog widget!

I’ve created a simple project on Github, that you can deploy and test for yourself: https://github.com/ahmed-musallam/AEM-SunEditor

Once you have it deployed to your AEM instance and have a component dialog that uses it, you should see something like this:


The editor allows you to edit almost everything the AEM RTE allows you to. It even allows you to author in full screen!

The editor does not support adding/authoring AEM images, but integrating that with AEM should not be difficult since SunEditor does support images. But that might be for a later post. For now, test this out and let me know how you like it!


By aem4beginner

Fixing Last Dropdown Visibility in Fullscreen Dialog

I recently saw an issue with AEM dialogs where, if you have a Dropdown in the dialog and open that dialog in full screen, you have to scroll down to see the Dropdown items. This issue happens on AEM 6.5.0

The issue:


This is especially annoying on the page properties:


Do you see how I have to scroll to see the rest of the dropdown items? Although it is not a big deal, you can easily fix it with some CSS.
The CSS Fix

Create a clientlib with categories="[cq.authoring.dialog]"

Add the following CSS:
/* fix for page properties */
.cq-siteadmin-admin-properties , .cq-siteadmin-admin-properties .cq-dialog-content-page {
height: 100%;
}
/* fix for full screen component dialogs */
.coral3-Dialog--fullscreen .cq-dialog {
height: 100vh;
overflow-y: scroll;
}
.coral3-Dialog--fullscreen .cq-dialog .coral3-Dialog-content,
.coral3-Dialog--fullscreen .cq-dialog .cq-dialog-content {
height:100%;
}

and here is the result:


and in page properties:


That is it for this one. I hope you’ve enjoyed the complimentary GIFs!


By aem4beginner

Non-AEM relative links in RTE and Path Browser in Touch UI

In AEM 6.0, 6.1 & 6.2 the Touch UI RTE link plugin and path browser adds a content keyword automatically. This begins as soon as the author starts typing/. It can be difficult for authors to enter non-AEM relative links in the content, and some environments require both AEMand non-AEM links in the same domain.

A CSS class js-coral-pathbrowser-input does exist which validates on RTE and path browsers. If this class is removed when the dialog is loaded, authors can enter relative URLs in the path browser and RTE link dialog.

Path Browser has this validation coming from class js-coral-pathbrowser-input in client lib/etc/clientlibs/granite/coralui2/optional/rte/js/components/cui-rte.templates.js. RTE has the same class coming from /libs/cq/ui/widgets/source/widgets/form/rte/plugins/LinkDialog.js

These are out of the box (OOTB) files that cannot be modified. I have created a custom extension that removes this class when the dialog is loaded. However, this extension only removes the validation. There are other configurations that need to be done on the RTE side in order for non-AEM internal links to be added.

AEM automatically appends .html for any links that don’t start with HTTP in RTE. In order to prevent non-AEM links from appending .html RTE needs to have htmlRules which have few configuration properties as defined in https://docs.adobe.com/docs/en/aem/6-1/administer/operations/page-authoring/rich-text-editor.html

You can then add this node to the current RTE in Text Component. But remember that this node needs to have links subnode with property ensureInternalLinkExt set to false to avoid changing .html to non-AEM or external links.

For path browser links, I extended the OOTB image component to stop appending .html to external links or any non-AEM path starting with /.

This class can be removed by the following statement when the dialog loads:
Path Browser
$(".js-coral-pathbrowser-input").removeClass("js-coral-pathbrowser-input");

For RTE, when the link dialog loads, we need to find this attribute from the element and remove from the DOM
RTE Link Dialog
this.$rteDialog = this.$container.find("[data-rte-dialog=link]");
this.$rteDialog.find(".js-coral-pathbrowser-input").removeClass("js-coral-pathbrowser-input");

Code samples are provided in my GitHub repository, and I created a sample page that can be accessed after the package is installed in your local AEM repository at http://localhost:4502/editor.html/content/invalidatejspathrte/en.html

Below are sample screenshots of the page with the OOTB issue(left) and its fix(right):


The code can be downloaded from the GitHub repository: https://github.com/shajiahmed/AEMjsinvalidatepathrte.

Let us know how this solution worked for you!


By aem4beginner

RTE mandatory/blank space content validation using foundation-validation

One of the differences between CoralUI 2 and Coral UI 3, changes in the way we do validation is illustrated in this post with an example.

Till AEM 6.2, we would have used $.validator.register (jQuery Plugin) for validating dialog fields. The same is deprecated in AEM 6.3 and it is recommended to use foundation-validation.

Example : Validation/constraint validating if RTE content is null/empty along with validating blank space. (clicking on enter to produce blank space rather than actual content in editor area)

Before getting into an example, we will have an understanding on foundation-registry, foundation-submittable, foundation-validation, foundation.validation.selector, foundation.validation.validator.

foundation-registry:
  • It is a general purpose registry to register anything required by components. (anything refers to registering a validator/ registering a custom selector - in this case.)
  • It is similar to OSGI declarative service. (where we register a Java component(@Component) as OSGI service by means of @Service annotation)
  • Recommended way to do registration is by means of adaptTo interface. For this, first we need to adapt our window object to foundation-registry using which we can then register selector/validator.
    • var registry = $(window).adaptTo("foundation-registry")
foundation-validation/foundation-submittable:
  • Form field/dialog field validation in Granite UI is performed using foundation-validation.
  • By default, we have certain elements which are recognised as submittable elements for which validation can be directly registered against "foundation.validation.validator"
    • Eg: HTML form elements like input, button, select, textarea etc are considered to be submittable elements. List of applicable/submittable elements are available here along with few coral elements and selectors.
  • With respect to Touch UI dialog, consider a textfield or pathfield has to be validated -> we need to add a property named "validation" with value related to validation.(let say, value as "textlength").
  • This would result in attribute "data-validation=textlength" being generated in field markup which would serve as selector for validating the respective field.
  • For elements other than submittable elements, first we need to register a custom selector against "foundation.validation.selector" and then register a validator for the registered custom selector which would ultimately be applied to the respective field holding the custom selector.
Registering a custom selector with foundation.validation.selector:
registry.register("foundation.validation.selector", {
    submittable: "[data-validation=rte-mandatory]",
    candidate: "[data-validation=rte-mandatory]:not([disabled]):not([readonly])",
    exclusion: "[data-validation=rte-mandatory] *"
});


submittable: custom selector string that is associated to a field
candidate : selector string that is stricter than "submittable" -> exact match of this selector is going to get validated.
exclusion : selector string mentioned here will not be validated.

For class and ID attributes, selector string will be ".customclass" and "#customId" respectively.

Registering a validator using foundation.validation.validator:
  • foundation-validation is not actually performing the validation. Instead we need to register a validator against foundation.validation.validator with respective selector and validate function highlighting the validation logic.
registry.register("foundation.validation.validator",{
selector: "[data-validation=rte-mandatory]",
validate: function(el){
//validation logic goes here.
// must return a error message if element fails
},
show: function(el, message, ctx){
// function to show the error
ctx.next();
},
clear: function(el, ctx){
// function to clear the error
ctx.next();
}
});


ctx: ctx argument in show/clear function is FoundationValidationValidatorContext interface which has next method.
ctx.next(): Indicates that validation process should continue to next validator, stops otherwise.

Example:
Constraint for RTE field: Editor area should not be empty and it should not contain leading space.(ie. when we author rich text editor, there is a chance to hit enter (inducing space), to avoid mandatory validation which is handled in this example)


Code package : RTE-foundation-validation-1.0.zip
Inside script.js :
  • Window object adapted to foundation-registry.
  • register custom selector with foundation.validation.selector using registry object created in step1
  • register validator with foundation.validation.validator using registry object created in step 1
Usage:
Include this package in your project and add a property named validation with value "rte-mandatory" for the richtext node of type "cq/gui/components/authoring/dialog/richtext"

Screenshots for reference:


Note : Custom selector we use need not always be a data attribute, it can be class or id attribute as well provided the same is available in the respective markup(as highlighted above) for the validator to apply the validation logic to the respective field.


By aem4beginner

December 31, 2020
Estimated Post Reading Time ~

RTE plugin menu is not visible until you click inside the RTE textarea in AEM 6.3 touch UI dialog

I have added RTE plugins for the text area within a dialog in AEM 6.3 touch UI. I see that the RTE toolbar is displayed only when you click inside the text area.

Is there a configuration that will always display the toolbar?

Following are the screenshots for your reference:

1) When the dialog is loaded


2) When I click inside the text area


Could someone please let me know if there is a configuration to have the toolbar show up every time?

Solution:
This is Expected. Since, a dialog can contain multiple RTE, at a time, only one of RTE's toolbar should be visible. Hence, it is decided to show on the toolbar on click inside it.


By aem4beginner

Touch UI RTE (Rich Text Editor) Color Picker Plugin for InPlace and Dialog Editing

Goal: Touch UI Color Picker Plugin for RTE (Rich Text Editor) InPlace and Dialog Edit - /libs/cq/gui/components/authoring/dialog/richtext

For a similar extension on 64 checks this post, 62 checks this post, 61 checks this post; to add General group components on We.Retail pages check this post

For demo purposes, dialog of foundation text component was modified to add the color picker configuration - /libs/foundation/components/text/cq:dialog/content/items/text/items/column/items/text/rtePlugins
Demo | Package Install | Github

Plugin Configuration - InPlace Editing


Plugin Configuration - Dialog


Picker with FreeStyle Palette - InPlace Editing Maximized


Picker with FreeStyle Palette - Inline Dialog


Picker with FreeStyle Palette - Full-Screen Dialog


Color Applied


Solution
1) Login to CRXDE Lite, add nt:folder /apps/eaem-touchui-dialog-rte-color-picker

2) To show the color picker in a dialog create /apps/eaem-touchui-dialog-rte-color-picker/color-picker-popover of type sling:Folder and /apps/eaem-touchui-dialog-rte-color-picker/color-picker-popover/cq:dialog of type nt:unstructured


3) Create clientlib (cq:ClientLibraryFolder) /apps/eaem-touchui-dialog-rte-color-picker/clientlib set property categories to cq.authoring.dialog.all and dependencies to [underscore]

4) Create file (nt:file) /apps/eaem-touchui-dialog-rte-color-picker/clientlib/js.txt, add the following content
    color-picker.js

5) Create file (nt:file) /apps/eaem-touchui-dialog-rte-color-picker/clientlib/color-picker.js, add the following code

(function($, CUI){
    var GROUP = "experience-aem",
        COLOR_PICKER_FEATURE = "colorPicker",
        TCP_DIALOG = "eaemTouchUIColorPickerDialog",
        PICKER_NAME_IN_POPOVER = "color",
        REQUESTER = "requester",
        PICKER_URL = "/apps/eaem-touchui-dialog-rte-color-picker/color-picker-popover/cq:dialog.html";
 
    addPluginToDefaultUISettings();
 
    addDialogTemplate();
 
    var EAEMColorPickerDialog = new Class({
        extend: CUI.rte.ui.cui.AbstractDialog,
 
        toString: "EAEMColorPickerDialog",
 
        initialize: function(config) {
            this.exec = config.execute;
        },
 
        getDataType: function() {
            return TCP_DIALOG;
        }
    });
 
    var TouchUIColorPickerPlugin = new Class({
        toString: "TouchUIColorPickerPlugin",
 
        extend: CUI.rte.plugins.Plugin,
 
        pickerUI: null,
 
        getFeatures: function() {
            return [ COLOR_PICKER_FEATURE ];
        },
 
        initializeUI: function(tbGenerator) {
            var plg = CUI.rte.plugins;
 
            if (!this.isFeatureEnabled(COLOR_PICKER_FEATURE)) {
                return;
            }
 
            this.pickerUI = tbGenerator.createElement(COLOR_PICKER_FEATURE, this, false, { title: "Color Picker" });
            tbGenerator.addElement(GROUP, plg.Plugin.SORT_FORMAT, this.pickerUI, 10);
 
            var groupFeature = GROUP + "#" + COLOR_PICKER_FEATURE;
            tbGenerator.registerIcon(groupFeature, "textColor");
        },
 
        execute: function (id, value, envOptions) {
            if(!isValidSelection()){
                return;
            }
 
            var context = envOptions.editContext,
                selection = CUI.rte.Selection.createProcessingSelection(context),
                ek = this.editorKernel,
                startNode = selection.startNode;
 
            if ( (selection.startOffset === startNode.length) && (startNode != selection.endNode)) {
                startNode = startNode.nextSibling;
            }
 
            var tag = CUI.rte.Common.getTagInPath(context, startNode, "span"), plugin = this, dialog,
                color = $(tag).css("color"),
                dm = ek.getDialogManager(),
                $container = CUI.rte.UIUtils.getUIContainer($(context.root)),
                propConfig = {
                    'parameters': {
                        'command': this.pluginId + '#' + COLOR_PICKER_FEATURE
                    }
                };
 
            if(this.eaemColorPickerDialog){
                dialog = this.eaemColorPickerDialog;
            }else{
                dialog = new EAEMColorPickerDialog();
 
                dialog.attach(propConfig, $container, this.editorKernel);
 
                dialog.$dialog.css("-webkit-transform", "scale(0.8)").css("-webkit-transform-origin", "0 0")
                    .css("-moz-transform", "scale(0.8)").css("-moz-transform-origin", "0px 0px");
 
                dialog.$dialog.find("iframe").attr("src", getPickerIFrameUrl(color));
 
                this.eaemColorPickerDialog = dialog;
            }
 
            dm.show(dialog);
 
            registerReceiveDataListener(receiveMessage);
 
            function isValidSelection(){
                var winSel = window.getSelection();
                return winSel && winSel.rangeCount == 1 && winSel.getRangeAt(0).toString().length > 0;
            }
 
            function getPickerIFrameUrl(color){
                var url = PICKER_URL + "?" + REQUESTER + "=" + GROUP;
 
                if(!_.isEmpty(color)){
                    url = url + "&" + PICKER_NAME_IN_POPOVER + "=" + color;
                }
 
                return url;
            }
 
            function removeReceiveDataListener(handler) {
                if (window.removeEventListener) {
                    window.removeEventListener("message", handler);
                } else if (window.detachEvent) {
                    window.detachEvent("onmessage", handler);
                }
            }
 
            function registerReceiveDataListener(handler) {
                if (window.addEventListener) {
                    window.addEventListener("message", handler, false);
                } else if (window.attachEvent) {
                    window.attachEvent("onmessage", handler);
                }
            }
 
            function receiveMessage(event) {
                if (_.isEmpty(event.data)) {
                    return;
                }
 
                var message = JSON.parse(event.data),
                    action;
 
                if (!message || message.sender !== GROUP) {
                    return;
                }
 
                action = message.action;
 
                if (action === "submit") {
                    if (!_.isEmpty(message.data)) {
                        ek.relayCmd(id, message.data);
                    }
                }else if(action === "remove"){
                    ek.relayCmd(id);
                }else if(action === "cancel"){
                    plugin.eaemColorPickerDialog = null;
                }
 
                dialog.hide();
 
                removeReceiveDataListener(receiveMessage);
            }
        },
 
        //to mark the icon selected/deselected
        updateState: function(selDef) {
            var hasUC = this.editorKernel.queryState(COLOR_PICKER_FEATURE, selDef);
 
            if (this.pickerUI != null) {
                this.pickerUI.setSelected(hasUC);
            }
        }
    });
 
    CUI.rte.plugins.PluginRegistry.register(GROUP,TouchUIColorPickerPlugin);
 
    var TouchUIColorPickerCmd = new Class({
        toString: "TouchUIColorPickerCmd",
 
        extend: CUI.rte.commands.Command,
 
        isCommand: function(cmdStr) {
            return (cmdStr.toLowerCase() == COLOR_PICKER_FEATURE);
        },
 
        getProcessingOptions: function() {
            var cmd = CUI.rte.commands.Command;
            return cmd.PO_SELECTION | cmd.PO_BOOKMARK | cmd.PO_NODELIST;
        },
 
        _getTagObject: function(color) {
            return {
                "tag": "span",
                "attributes": {
                    "style" : "color: " + color
                }
            };
        },
 
        execute: function (execDef) {
            var color = execDef.value ? execDef.value[PICKER_NAME_IN_POPOVER] : undefined,
                selection = execDef.selection,
                nodeList = execDef.nodeList;
 
            if (!selection || !nodeList) {
                return;
            }
 
            var common = CUI.rte.Common,
                context = execDef.editContext,
                tagObj = this._getTagObject(color);
 
            //if no color value passed, assume delete and remove color
            if(_.isEmpty(color)){
                nodeList.removeNodesByTag(execDef.editContext, tagObj.tag, undefined, true);
                return;
            }
 
            var tags = common.getTagInPath(context, selection.startNode, tagObj.tag);
 
            //remove existing color before adding new color
            if (tags != null) {
                nodeList.removeNodesByTag(execDef.editContext, tagObj.tag, undefined, true);
            }
 
            nodeList.surround(execDef.editContext, tagObj.tag, tagObj.attributes);
        }
    });
 
    CUI.rte.commands.CommandRegistry.register(COLOR_PICKER_FEATURE, TouchUIColorPickerCmd);
 
    function addPluginToDefaultUISettings(){
        var toolbar = CUI.rte.ui.cui.DEFAULT_UI_SETTINGS.inline.toolbar;
        toolbar.splice(3, 0, GROUP + "#" + COLOR_PICKER_FEATURE);
 
        toolbar = CUI.rte.ui.cui.DEFAULT_UI_SETTINGS.fullscreen.toolbar;
        toolbar.splice(3, 0, GROUP + "#" + COLOR_PICKER_FEATURE);
    }
 
    function addDialogTemplate(){
        var url = PICKER_URL + "?" + REQUESTER + "=" + GROUP;
 
        var html = "<iframe width='410px' height='450px' frameBorder='0' src='" + url + "'></iframe>";
 
        if(_.isUndefined(CUI.rte.Templates)){
            CUI.rte.Templates = {};
        }
 
        if(_.isUndefined(CUI.rte.templates)){
            CUI.rte.templates = {};
        }
 
        CUI.rte.templates['dlg-' + TCP_DIALOG] = CUI.rte.Templates['dlg-' + TCP_DIALOG] = Handlebars.compile(html);
 
        //Coral.templates.RichTextEditor['dlg_' + TCP_DIALOG] = Handlebars.compile(html);
    }
}(jQuery, window.CUI,jQuery(document)));
 
(function($, $document){
    var SENDER = "experience-aem",
        REQUESTER = "requester",
        COLOR = "color",
        ADD_COLOR_BUT = "#EAEM_CP_ADD_COLOR",
        REMOVE_COLOR_BUT = "#EAEM_CP_REMOVE_COLOR";
 
    if(queryParameters()[REQUESTER] !== SENDER ){
        return;
    }
 
    $(function(){
        _.defer(stylePopoverIframe);
    });
 
   function queryParameters() {
        var result = {}, param,
            params = document.location.search.split(/\?|\&/);
 
        params.forEach( function(it) {
            if (_.isEmpty(it)) {
                return;
            }
 
            param = it.split("=");
            result[param[0]] = param[1];
        });
 
        return result;
    }
 
    function stylePopoverIframe(){
        var queryParams = queryParameters(),
            $dialog = $(".coral-Dialog");
 
        if(_.isEmpty($dialog)){
            return;
        }
 
        $dialog.css("overflow", "hidden");
 
        $dialog[0].open = true;
 
        var $addColor = $dialog.find(ADD_COLOR_BUT),
            $removeColor = $dialog.find(REMOVE_COLOR_BUT),
            $colorPicker = $document.find(".coral-ColorPicker"),
            pickerInstance = $colorPicker.data("colorpicker");
 
        if(!_.isEmpty(queryParameters()[COLOR])){
            pickerInstance._setColor(decodeURIComponent(queryParams[COLOR]));
        }
 
        adjustHeader($dialog);
 
        $dialog.find(".coral-Dialog-wrapper").css("margin","0").find(".coral-Dialog-content").css("padding","0");
 
        $colorPicker.closest(".coral-Form-fieldwrapper").css("margin-bottom", "285px");
 
        $(ADD_COLOR_BUT).css("margin-left", "150px");
 
        $addColor.click(sendDataMessage);
 
        $removeColor.click(sendRemoveMessage);
    }
 
    function adjustHeader($dialog){
        var $header = $dialog.css("background-color", "#fff").find(".coral-Dialog-header");
 
        $header.find(".cq-dialog-submit").remove();
 
        $header.find(".cq-dialog-cancel").click(function(event){
            event.preventDefault();
 
            $dialog.remove();
 
            sendCancelMessage();
        });
    }
 
    function sendCancelMessage(){
        var message = {
            sender: SENDER,
            action: "cancel"
        };
 
        parent.postMessage(JSON.stringify(message), "*");
    }
 
    function sendRemoveMessage(){
        var message = {
            sender: SENDER,
            action: "remove"
        };
 
        parent.postMessage(JSON.stringify(message), "*");
    }
 
    function sendDataMessage(){
        var message = {
            sender: SENDER,
            action: "submit",
            data: {}
        }, $dialog, color;
 
        $dialog = $(".cq-dialog");
 
        color = $dialog.find("[name='./" + COLOR + "']").val();
 
        if(color && color.indexOf("rgb") >= 0){
            color = CUI.util.color.RGBAToHex(color);
        }
 
        message.data[COLOR] = color;
 
        parent.postMessage(JSON.stringify(message), "*");
    }
})(jQuery, jQuery(document));


By aem4beginner

Uncaught TypeError - Handlebars.compile is not a function - AEM 6.5

We are using a custom color picker from Experiencing Adobe Experience Manager - Day CQ: AEM 65 - Touch UI RTE (Rich Text Editor) Dialog Colo... - the color picker works fine, but color-picker.js throws this Uncaught TypeError, and that causes an issue with other plugins which load after it. 

My understanding is that Handlebars is included OOTB in AEM, based on the docs - SCF Handlebars Helpers (although, the 6.5 version of this documentation appears incorrect - helpers.js has moved to /libs/clientlibs/social/commons/scf/helpers.js in 6.5) which makes me think that the issue is due to helpers.js moving. Is there a step that is missing somewhere that I need to make sure Handlebars is included and accessible by this JS file?

Solution:
The error is because the plugin is loading twice with the page and in a popover dialog, and in the popover dialog the Handlebar js is not being loaded that causing the issue, in case if you are using custom plugins then add below condition in plugin js to load plugins only once.

if (document.location.pathname.indexOf("/editor.html/") > -1)
addDialogTemplate();


I've updated the color picker and created a new custom style plugin and both are working fine in 6.3, 6.4 and 6.5


Reference:
AEM - Touch UI - RTE HTML Element Selector, Custom Style Plugin & Color Picker Plugin


By aem4beginner

Touch UI Rich Text Editor (RTE) Browse and Insert Image

Goal: Touch UI Rich Text Editor (RTE) Plugin to open a Dialog, Select Image and add it in RTE

Dialog for the plugin can be configured with any standard Touch UI Widgets. In this post, we configure a textfield - /libs/granite/ui/components/foundation/form/textfield for entering alt text and path browser - /libs/granite/ui/components/foundation/form/pathbrowser for selecting image
Demo | Package Install

Component Dialog RTE Config
Add the image insert plugin - touchuiinsertimage, available in group experience-aem in component dialog eg. /libs/foundation/components/text/dialog/items/tab1/items/text/rtePlugins (for demonstration only; never modify foundation components)


Plugin Dialog with Path Browser Config


Plugin Dialog


Plugin Dialog with Picker


Plugin Dialog with Image Selected


Image Shown in RTE


Image Source in RTE


Solution
1) Login to CRXDE Lite, create folder (nt:folder) /apps/touchui-rte-browse-insert-image

2)  Add the dialog configuration for RTE Plugin, shown in popover window when the user clicks on image plugin icon; create a node of type sling:Folder - /apps/touchui-rte-browse-insert-image/popover with the following configuration

<?xml version="1.0" encoding="UTF-8"?>
<jcr:root xmlns:sling="http://sling.apache.org/jcr/sling/1.0" xmlns:jcr="http://www.jcp.org/jcr/1.0"
    jcr:primaryType="sling:Folder"
    jcr:title="Pick an Image"
    sling:resourceType="cq/gui/components/authoring/dialog"/>

3) Add dialog content /apps/touchui-rte-browse-insert-image/popover/content; #5 attribute eaem-rte-iframe-content marks this dialog RTE specific

<?xml version="1.0" encoding="UTF-8"?>
<jcr:root xmlns:sling="http://sling.apache.org/jcr/sling/1.0" xmlns:jcr="http://www.jcp.org/jcr/1.0" xmlns:nt="http://www.jcp.org/jcr/nt/1.0"
    jcr:primaryType="nt:unstructured"
    sling:resourceType="granite/ui/components/foundation/container"
    eaem-rte-iframe-content="">
    <layout
        jcr:primaryType="nt:unstructured"
        sling:resourceType="granite/ui/components/foundation/layouts/fixedcolumns"
        margin="{Boolean}false"/>
    <items jcr:primaryType="nt:unstructured">
        <column
            jcr:primaryType="nt:unstructured"
            sling:resourceType="granite/ui/components/foundation/container">
            <items jcr:primaryType="nt:unstructured">
                <alt
                    jcr:primaryType="nt:unstructured"
                    sling:resourceType="granite/ui/components/foundation/form/textfield"
                    fieldLabel="Alt Text"
                    name="./alt"/>
                <image
                    jcr:primaryType="nt:unstructured"
                    sling:resourceType="granite/ui/components/foundation/form/pathbrowser"
                    fieldLabel="Image"
                    name="./image"
                    rootPath="/content/dam"/>
            </items>
        </column>
    </items>
</jcr:root>

4) Dialog in CRXDE Lite

5) Create clientlib (type cq:ClientLibraryFolder) /apps/touchui-rte-browse-insert-image/clientlib, set property categories of String type to rte.coralui2

6) Create file ( type nt:file ) /apps/touchui-rte-browse-insert-image/clientlib/js.txt, add the following
    image-insert.js
    popover.js

7) Create file ( type nt:file ) /apps/touchui-rte-browse-insert-image/clientlib/image-insert.js, add the following code. This file contains logic for image plugin; receiving a selected image from popover iframe showing the dialog and adding it in RTE

(function ($, $document, Handlebars) {
    var ExperienceAEM = {
        GROUP: "experience-aem",
        TIM_FEATURE: "touchuiinsertimage",
        TIM_DIALOG: "touchuiinsertimagedialog",
        CONTENT_URL: "/apps/touchui-rte-browse-insert-image/popover.html",
        EAEM_RTE_IFRAME_CONTENT: "eaem-rte-iframe-content"
    };
 
    ExperienceAEM.TIM_UI_SETTING = ExperienceAEM.GROUP + "#" + ExperienceAEM.TIM_FEATURE;
 
    //extend toolbar builder to register insert image
    ExperienceAEM.CuiToolbarBuilder = new Class({
        toString: "EAEMCuiToolbarBuilder",
 
        extend: CUI.rte.ui.cui.CuiToolbarBuilder,
 
        _getUISettings: function (options) {
            var uiSettings = this.superClass._getUISettings(options);
 
            //inline toolbar
            var toolbar = uiSettings["inline"]["toolbar"],
                feature = ExperienceAEM.TIM_UI_SETTING;
 
            //uncomment this to make image insert available for inline toolbar
            /*if (toolbar.indexOf(feature) == -1) {
                var index = toolbar.indexOf("fullscreen#start");
                toolbar.splice(index, 0, feature);
                toolbar.splice(index + 1, 0, "-");
            }*/
 
            //add image insert to fullscreen toolbar
            toolbar = uiSettings["fullscreen"]["toolbar"];
 
            if (toolbar.indexOf(feature) == -1) {
                toolbar.splice(3, 0, feature);
            }
 
            if (!this._getClassesForCommand(feature)) {
                this.registerAdditionalClasses(feature, "coral-Icon coral-Icon--image");
            }
 
            return uiSettings;
        }
    });
 
    //popover dialog thats hosts iframe
    ExperienceAEM.InsertImageDialog = new Class({
        extend: CUI.rte.ui.cui.AbstractBaseDialog,
 
        toString: "EAEMInsertImageDialog",
 
        getDataType: function () {
            return ExperienceAEM.TIM_DIALOG;
        }
    });
 
    //extend the CUI dialog manager to register popover dialog
    ExperienceAEM.DialogManager = new Class({
        toString: "EAEMDialogManager",
 
        extend: CUI.rte.ui.cui.CuiDialogManager,
 
        create: function (dialogId, config) {
            if (dialogId !== ExperienceAEM.TIM_DIALOG) {
                return this.superClass.create.call(this, dialogId, config);
            }
 
            var context = this.editorKernel.getEditContext();
            var $container = CUI.rte.UIUtils.getUIContainer($(context.root));
 
            var dialog = new ExperienceAEM.InsertImageDialog();
            dialog.attach(config, $container, this.editorKernel, true);
 
            return dialog;
        }
    });
 
    //extend the toolkit implementation for returning custom toolbar builder and dialog manager
    ExperienceAEM.ToolkitImpl = new Class({
        toString: "EAEMToolkitImpl",
 
        extend: CUI.rte.ui.cui.ToolkitImpl,
 
        createToolbarBuilder: function () {
            return new ExperienceAEM.CuiToolbarBuilder();
        },
 
        createDialogManager: function (editorKernel) {
            return new ExperienceAEM.DialogManager(editorKernel);
        }
    });
 
    CUI.rte.ui.ToolkitRegistry.register("cui", ExperienceAEM.ToolkitImpl);
 
    ExperienceAEM.TouchUIInsertImagePlugin = new Class({
        toString: "TouchUIInsertImagePlugin",
 
        extend: CUI.rte.plugins.Plugin,
 
        pickerUI: null,
 
        getFeatures: function () {
            return [ ExperienceAEM.TIM_FEATURE ];
        },
 
        initializeUI: function (tbGenerator) {
            var plg = CUI.rte.plugins;
 
            if (this.isFeatureEnabled(ExperienceAEM.TIM_FEATURE)) {
                this.pickerUI = tbGenerator.createElement(ExperienceAEM.TIM_FEATURE, this, true, "Insert Image");
                tbGenerator.addElement(ExperienceAEM.GROUP, plg.Plugin.SORT_FORMAT, this.pickerUI, 120);
            }
        },
 
        execute: function (id) {
            var ek = this.editorKernel,
                dm = ek.getDialogManager();
 
            var dialogConfig = {
                parameters: {
                    "command": ExperienceAEM.TIM_UI_SETTING
                }
            };
 
            var dialog = this.dialog = dm.create(ExperienceAEM.TIM_DIALOG, dialogConfig);
 
            dm.prepareShow(this.dialog);
 
            dm.show(this.dialog);
 
            var $popover = this.dialog.$dialog.find(".coral-Popover-content");
 
            loadPopoverUI($popover);
 
            function loadPopoverUI($popover) {
                $popover.parent().css("width", ".1px").height(".1px").css("border", "none");
                $popover.css("width", ".1px").height(".1px");
 
                $popover.find("iframe").attr("src", ExperienceAEM.CONTENT_URL);
 
                //receive the dialog values from child window
                registerReceiveDataListener(receiveMessage);
            }
 
            function receiveMessage(event) {
                if (_.isEmpty(event.data)) {
                    return;
                }
 
                var message = JSON.parse(event.data);
 
                if(!message || message.sender != ExperienceAEM.EAEM_RTE_IFRAME_CONTENT){
                    return;
                }
 
                var action = message.action;
 
                if(action == "submit"){
                    var data = message.data;
 
                    if(!_.isEmpty(data) && !_.isEmpty(data.imagePath)){
                        ek.relayCmd(id, message.data);
                    }
                }
 
                dialog.hide();
 
                removeReceiveDataListener(receiveMessage);
            }
 
            function removeReceiveDataListener(handler){
                if (window.removeEventListener) {
                    window.removeEventListener("message",  handler);
                } else if (window.detachEvent) {
                    window.detachEvent("onmessage", handler);
                }
            }
 
            function registerReceiveDataListener(handler) {
                if (window.addEventListener) {
                    window.addEventListener("message", handler, false);
                } else if (window.attachEvent) {
                    window.attachEvent("onmessage", handler);
                }
            }
        },
 
        //to mark the icon selected/deselected
        updateState: function (selDef) {
            var hasUC = this.editorKernel.queryState(ExperienceAEM.TIM_FEATURE, selDef);
 
            if (this.pickerUI != null) {
                this.pickerUI.setSelected(hasUC);
            }
        }
    });
 
    CUI.rte.plugins.PluginRegistry.register(ExperienceAEM.GROUP, ExperienceAEM.TouchUIInsertImagePlugin);
 
    ExperienceAEM.InsertImageCmd = new Class({
        toString: "InsertImageCmd",
 
        extend: CUI.rte.commands.Command,
 
        isCommand: function (cmdStr) {
            return (cmdStr.toLowerCase() == ExperienceAEM.TIM_FEATURE);
        },
 
        getProcessingOptions: function () {
            var cmd = CUI.rte.commands.Command;
            return cmd.PO_BOOKMARK | cmd.PO_SELECTION;
        },
 
        execute: function (execDef) {
            var data = execDef.value, path = data.imagePath, alt = data.altText || "",
                width = 100, height = 100,
                imageUrl = CUI.rte.Utils.processUrl(path, CUI.rte.Utils.URL_IMAGE),
                imgHtml = "";
 
            imgHtml += "<img src=\"" + imageUrl + "\" alt=\"" + alt + "\"";
            imgHtml += " " + CUI.rte.Common.SRC_ATTRIB + "=\"" + path + "\"";
            imgHtml += " width=\"" + width + "\"";
            imgHtml += " height=\"" + height + "\"";
            imgHtml += ">";
 
            execDef.editContext.doc.execCommand("insertHTML", false, imgHtml);
        }
    });
 
    CUI.rte.commands.CommandRegistry.register(ExperienceAEM.GROUP, ExperienceAEM.InsertImageCmd);
 
    //returns the picker dialog html
    //Handlebars doesn't do anything useful here, but the framework expects a template
    function cpTemplate() {
        CUI.rte.Templates["dlg-" + ExperienceAEM.TIM_DIALOG] =
            Handlebars.compile('<div data-rte-dialog="' + ExperienceAEM.TIM_DIALOG
                + '" class="coral--dark coral-Popover coral-RichText-dialog">'
                + '<iframe width="1100px" height="700px"></iframe>'
                + '</div>');
    }
 
    cpTemplate();
})(jQuery, jQuery(document), Handlebars);

8) Create file ( type nt:file ) /apps/touchui-rte-browse-insert-image/clientlib/popover.js, add the following code. This file contains logic for sending the dialog values like image selected to parent window RTE

(function($, $document){
    //dialogs marked with eaem-rte-iframe-content data attribute execute the below logic
    //to send dialog values to parent window RTE
    var EAEM_RTE_IFRAME_CONTENT = "eaem-rte-iframe-content",
        HELP_BUTTON_SEL = ".cq-dialog-help",
        CANCEL_BUTTON_SEL = ".cq-dialog-cancel",
        SUBMIT_BUTTON_SEL = ".cq-dialog-submit",
        ALT_TEXT_NAME = "./alt",
        IMAGE_NAME = "./image";
 
    $document.on("foundation-contentloaded", stylePopoverIframe);
 
    function stylePopoverIframe(){
        var $iframeContent = $("[" + 'data-' + EAEM_RTE_IFRAME_CONTENT + "]");
 
        if(_.isEmpty($iframeContent)){
            return
        }
 
        var $form = $iframeContent.closest("form"),
            $cancel = $form.find(CANCEL_BUTTON_SEL),
            $submit = $form.find(SUBMIT_BUTTON_SEL);
 
        $form.css("border", "solid 2px");
        $form.find(HELP_BUTTON_SEL).hide();
 
        $document.off("click", CANCEL_BUTTON_SEL);
        $document.off("click", SUBMIT_BUTTON_SEL);
        $document.off("submit");
 
        $cancel.click(sendCloseMessage);
        $submit.click(sendDataMessage);
    }
 
    function sendCloseMessage(){
        var message = {
            sender: EAEM_RTE_IFRAME_CONTENT,
            action: "close"
        };
 
        parent.postMessage(JSON.stringify(message), "*");
    }
 
    function sendDataMessage(){
        var message = {
            sender: EAEM_RTE_IFRAME_CONTENT,
            action: "submit",
            data:{
                altText: $("[name='" + ALT_TEXT_NAME + "']").val(),
                imagePath: $("[name='" + IMAGE_NAME + "']").val()
            }
        };
 
        parent.postMessage(JSON.stringify(message), "*");
    }
})(jQuery, jQuery(document));

Source:
http://experience-aem.blogspot.com/2015/09/aem-61-touch-ui-rich-text-editor-rte-browse-insert-image.html


By aem4beginner