Showing posts with label Shortcuts. Show all posts

August 4, 2021
Estimated Post Reading Time ~

Eclipse Shortcuts

Eclipse Shortcuts

I am using Eclipse on Mac and Windows systems. Here I am providing the most widely used Eclipse shortcut commands.

Note that these shortcuts are for Eclipse Juno, so some of them might not work for other Eclipse versions.

Shortcut Key MacShortcut Key WindowsDescription
Command + 3Ctrl + 3It puts the focus into Quick Access search box.
Command + SCtrl + SSave current editor
Command + 1Ctrl + 1Quickfix for errors and warnings, depends on the cursor position
Control + SpaceCtrl + SpaceContent assist and code completion
Command + Shift + FCtrl + Shift + FFormat source code
Control + QCtrl + QMoves cursor to the last edited position
Command + DCtrl + DDeletes current line in the editor
Command + Shift + OCtrl + Shift + OOrganize imports in the current java file
Command + 2 + LCtrl +2 + LAssign statement to new local variable
Command + 2 + FCtrl + 2 + FAssign statement to a field
Command + OCtrl + OShows quick outline of the java class
Command + fn + F11Ctrl + F11Runs the current opened java class if main method exists or else run the last launched application
Command + Shift + RCtrl + Shift + ROpen / Search for resources
Command + Shift + TCtrl + Shift + TOpen / Search for types, very useful in finding classes
Command + ECtrl + ETo select an editor from the currently open editors
Command + fn + F8Ctrl + F8Shortcut for switching perspectives
Command + [ or Command + ]Alt + ← or Alt + →Go to previous/ next editor position in history
Fn + F3F3Move cursor to the declaration of the variable
Command + Shift + PCtrl + Shift + PMove cursor to the matching bracket
Command + .Ctrl + .Go to the next problem
Command + Shift + .Ctrl + ,Go to the previous problem
Fn + F4F4Show type hierarchy of the variable
Command + KCtrl + KFind next for search text in the opened editor
Command + Shift + GCtrl + Shift + GSearch for references in the workspace
Command + TCtrl + TShows type hierarchy of the current java class
Command + MCtrl + MMaximize Java editor
Fn + Shift + F2Shift + F2Shows the javadoc of the method, class
Command + Option + RAlt + Shift + RRename of package, class etc
Command + Option + TAlt + Shift + TOpens the quick refactoring menu

Reference: https://www.journaldev.com/518/eclipse-shortcuts


By aem4beginner

January 20, 2021
Estimated Post Reading Time ~

How to Start, Stop, and Restart Services in Linux

Introduction
Linux provides fine-grained control over system services through systemd, using the systemctl command. Services can be turned on, turned off, restarted, reloaded, or even enabled or disabled at boot. If you are running Debian 7, CentOS 7, or Ubuntu 15.04 (or later), your system likely uses systemd.

This guide will show you how to use basic commands to start, stop, and restart services in Linux.

Prerequisites
Access to a user account with sudo or root privileges
Access to a terminal/command line
The systemctl tool, included in Linux

Basic Syntax of systemctl Command

The basic syntax for using the systemctl command is:systemctl [command] [service_name]

Typically, you’ll need to run this as a superuser with each command starting with sudo.

How To Check If a Service is Running on Linux
To verify whether a service is active or not, run this command:sudo systemctl status apache2

Replace apache2 with the desired service. In our case, we checked the status of Apache. The output shows that the service is active (running), as in the image below:

How to Restart a Service
To stop and restart the service in Linux, use the command:sudo systemctl restart SERVICE_NAME

After this point, your service should be up and running again. You can verify the state with the status command.

To restart Apache server use:sudo systemctl restart apache2

How to Reload a Service
To force the service to reload its configuration files, type in the following command in the terminal:sudo systemctl reload SERVICE_NAME

After reloading, the service is going to be up and running. Check its state with the status command to confirm.

In our example, we reloaded Apache using:sudo systemctl reload apache2

How to Start a Service
To start a service in Linux manually, type in the following in the terminal:sudo systemctl start SERVICE_NAME

For instance, the command to start the Apache service is:sudo systemctl start apache2

How to Stop a Service
To stop an active service in Linux, use the following command:sudo systemctl stop SERVICE_NAME

If the service you want to stop is Apache, the command is:sudo systemctl stop apache2

Check whether the service stopped running with the status command. The output should show the service is inactive (dead).

How to Enable the Service at Boot
To configure a service to start when the system boots, use the command:sudo systemctl enable SERVICE_NAME

To enable Apache upon booting the system, run the command:sudo systemctl enable apache2

How to Disable Service at Boot
You can prevent the service from starting at boot with the command:sudo systemctl disable SERVICE_NAME

For example:sudo systemctl disable apache2

Variations in Service Names
If you work within the same Linux environment, you will learn the names of the services you commonly use.

For example, if you are building a website, you will most likely use systemctl restart apache2 frequently, as you refresh configuration changes to your server.

However, when you move between different Linux variants, it is helpful to know that the same service may have different names in different distributions.

For example, in Ubuntu and other Debian based distributions, the Apache service is named apache2. In CentOS 7 and other RedHat distros, the Apache service is called httpd or httpd.service.

Conclusion
In most modern Linux operating systems, managing a service is quite simple using the commands presented here.

Make sure to know the name of the service for the operating system you are using, and the commands in this article should always work.


By aem4beginner

Linux Commands List

Linux Commands List
The commands found in the downloadable cheat sheet are listed below.

Hardware Information
Show bootup messages: dmesg
See CPU information: cat /proc/cpuinfo
Display free and used memory with: free -h
List hardware configuration information: lshw
See information about block devices: lsblk
Show PCI devices in a tree-like diagram: lspci -tv
Display USB devices in a tree-like diagram: lsusb -tv
Show hardware information from the BIOS: dmidecode
Display disk data information: hdparm -i /dev/disk
Conduct a read-speed test on device/disk: hdparm -tT /dev/[device]
Test for unreadable blocks on device/disk: badblocks -s /dev/[device]

Searching
Search for a specific pattern in a file with: grep [pattern] [file_name]
Recursively search for a pattern in a directory: grep -r [pattern] [directory_name]
Find all files and directories related to a particular name: locate [name]

List names that begin with a specified character [a] in a specified location [/folder/location] by using the find command: find [/folder/location] -name [a]

See files larger than a specified size [+100M] in a folder: find [/folder/location] -size [+100M]

File Commands
List files in the directory: ls
List all files (shows hidden files): ls -a
Show directory you are currently working in: pwd
Create a new directory: mkdir [directory]
Remove a file: rm [file_name]
Remove a directory recursively: rm -r [directory_name]
Recursively remove a directory without requiring confirmation: rm -rf [directory_name]
Copy the contents of one file to another file: cp [file_name1] [file_name2]
Recursively copy the contents of one file to a second file: cp -r [directory_name1] [directory_name2]
Rename [file_name1] to [file_name2] with the command: mv [file_name1] [file_name2]
Create a symbolic link to a file: ln -s /path/to/[file_name] [link_name]
Create a new file: touch [file_name]
Show the contents of a file: more [file_name]
or use the cat command: cat [file_name]
Append file contents to another file: cat [file_name1] >> [file_name2]
Display the first 10 lines of a file with: head [file_name]
Show the last 10 lines of a file: tail [file_name]
Encrypt a file: gpg -c [file_name]
Decrypt a file: gpg [file_name.gpg]
Show the number of words, lines, and bytes in a file: wc

Note: Want to read more about file creation? Check out an article about how to create a file in Linux using the command line.

Directory Navigation
Move up one level in the directory tree structure: cd ..
Change directory to $HOME: cd
Change location to a specified directory: cd /chosen/directory

File Compression
Archive an existing file: tar cf [compressed_file.tar] [file_name]
Extract an archived file: tar xf [compressed_file.tar]
Create a gzip compressed tar file by running: tar czf [compressed_file.tar.gz]
Compress a file with the .gz extension: gzip [file_name]

File Transfer
Copy a file to a server directory securely: scp [file_name.txt] [server/tmp]
Synchronize the contents of a directory with a backup directory using the rsync command: rsync -a [/your/directory] [/backup/]

Users
See details about the active users: id
Show last system logins: last
Display who is currently logged into the system with the command: who
Show which users are logged in and their activity: w
Add a new group by typing: groupadd [group_name]
Add a new user: adduser [user_name]
Add a user to a group: usermod -aG [group_name] [user_name]
Temporarily elevate user privileges to superuser or root using the sudo command: sudo [command_to_be_executed_as_superuser]
Delete a user: userdel [user_name]
Modify user information with: usermod

Note: If you want to learn more about users and groups, take a look at our article on how to add a user to a group in Linux.

Package Installation
List all installed packages with yum: yum list installed
Find a package by a related keyword: yum search [keyword]
Show package information and summary: yum info [package_name]
Install a package using the YUM package manager: yum install [package_name.rpm]
Install a package using the DNF package manager: dnf install [package_name.rpm]
Install a package using the APT package manager: apt-get install [package_name]
Install an .rpm package from a local file: rpm -i [package_name.rpm]
Remove an .rpm package: rpm -e [package_name.rpm]
Install software from source code: tar zxvf [source_code.tar.gz] cd [source_code] ./configure make make install

Process Related
See a snapshot of active processes: ps
Show processes in a tree-like diagram: pstree
Display a memory usage map of processes: pmap
See all running processes: top
Terminate a Linux process under a given ID: kill [process_id]
Terminate a process under a specific name: pkill [proc_name]
Terminate all processes labelled “proc”: killall [proc_name]
List and resume stopped jobs in the background: bg
Bring the most recently suspended job to the foreground: fg
Bring a particular job to the foreground: fg [job]
List files opened by running processes: lsof

Note:
If you want to learn more about shell jobs, how to terminate jobs or keep them running after you log off, check out our article on how to use disown command.

System Information
Show system information: uname -r
See kernel release information: uname -a
Display how long the system has been running, including load average: uptime
See system hostname: hostname
Show the IP address of the system: hostname -i
List system reboot history: last reboot
See current time and date: date
Query and change the system clock with: timedatectl
Show current calendar (month and day): cal
List logged in users: w
See which user you are using: whoami
Show information about a particular user: finger [username]

Disk Usage
You can use the df and du commands to check disk space in Linux.
See free and used space on mounted systems: df -h
Show free inodes on mounted filesystems: df -i
Display disk partitions, sizes, and types with the command: fdisk -l
See disk usage for all files and directory: du -ah
Show disk usage of the directory you are currently in: du -sh
Display target mount point for all filesystem: findmnt
Mount a device: mount [device_path] [mount_point]

SSH Login
Connect to host as user: ssh user@host
Securely connect to host via SSH default port 22: ssh host
Connect to host using a particular port: ssh -p [port] user@host
Connect to host via telnet default port 23: telnet host

Note: For a detailed explanation of SSH Linux Commands, refer to our 19 Common SSH Commands in Linux tutorial.

File Permission
Chown command in Linux changes file and directory ownership.
Assign read, write, and execute permission to everyone: chmod 777 [file_name]
Give read, write, and execute permission to owner, and read and execute permission to group and others: chmod 755 [file_name]
Assign full permission to owner, and read and write permission to group and others: chmod 766 [file_name]
Change the ownership of a file: chown [user] [file_name]
Change the owner and group ownership of a file: chown [user]:[group] [file_name]

Note: To learn more about how to check and change permissions, refer to our Linux File Permission Tutorial.

Network
List IP addresses and network interfaces: ip addr show
Assign an IP address to interface eth0: ip address add [IP_address]
Display IP addresses of all network interfaces with: ifconfig
See active (listening) ports: netstat -pnltu
Show tcp and udp ports and their programs: netstat -nutlp
Display more information about a domain: whois [domain]
Show DNS information about a domain using the dig command: dig [domain]
Do a reverse lookup on domain: dig -x host
Do reverse lookup of an IP address: dig -x [ip_address]
Perform an IP lookup for a domain: host [domain]
Show the local IP address: hostname -I
Download a file from a domain using the wget command: wget [file_name]

Linux Keyboard Shortcuts
Kill process running in the terminal: Ctrl + C
Stop current process: Ctrl + Z

The process can be resumed in the foreground with fg or in the background with bg.
Cut one word before the cursor and add it to clipboard: Ctrl + W
Cut part of the line before the cursor and add it to clipboard: Ctrl + U
Cut part of the line after the cursor and add it to clipboard: Ctrl + K
Paste from clipboard: Ctrl + Y
Recall last command that matches the provided characters: Ctrl + R
Run the previously recalled command: Ctrl + O
Exit command history without running a command: Ctrl + G
Run the last command again: !!
Log out of current session: exit


By aem4beginner

Linux Commands Cheat Sheet -2


By aem4beginner

Linux Commands Cheat Sheet -1

1 – SYSTEM INFORMATION

# Display Linux system information
uname -a

# Display kernel release information
uname -r

# Show which version of redhat installed
cat /etc/redhat-release

# Show how long the system has been running + load
uptime

# Show system host name
hostname

# Display the IP addresses of the host
hostname -I

# Show system reboot history
last reboot

# Show the current date and time
date

# Show this month's calendar
cal

# Display who is online
w

# Who you are logged in as
whoami

2 – HARDWARE INFORMATION
# Display messages in kernel ring buffer
dmesg

# Display CPU information
cat /proc/cpuinfo

# Display memory information
cat /proc/meminfo

# Display free and used memory ( -h for human readable, -m for MB, -g for GB.)
free -h

# Display PCI devices
lspci -tv

# Display USB devices
lsusb -tv

# Display DMI/SMBIOS (hardware info) from the BIOS
dmidecode

# Show info about disk sda
hdparm -i /dev/sda

# Perform a read speed test on disk sda
hdparm -tT /dev/sda

# Test for unreadable blocks on disk sda
badblocks -s /dev/sda

3 – PERFORMANCE MONITORING AND STATISTICS
# Display and manage the top processes
top

# Interactive process viewer (top alternative)
htop

# Display processor related statistics
mpstat 1

# Display virtual memory statistics
vmstat 1

# Display I/O statistics
iostat 1

# Display the last 100 syslog messages (Use /var/log/syslog for Debian based systems.)
tail 100 /var/log/messages

# Capture and display all packets on interface eth0
tcpdump -i eth0

# Monitor all traffic on port 80 ( HTTP )
tcpdump -i eth0 'port 80'

# List all open files on the system
lsof

# List files opened by user
lsof -u user

# Display free and used memory ( -h for human readable, -m for MB, -g for GB.)
free -h

# Execute "df -h", showing periodic updates
watch df -h

4 – USER INFORMATION AND MANAGEMENT
# Display the user and group ids of your current user.
id

# Display the last users who have logged onto the system.
last

# Show who is logged into the system.
who

# Show who is logged in and what they are doing.
w

# Create a group named "test".
groupadd test

# Create an account named john, with a comment of "John Smith" and create the user's home directory.
useradd -c "John Smith" -m john

# Delete the john account.
userdel john

# Add the john account to the sales group
usermod -aG sales john

5 – FILE AND DIRECTORY COMMANDS
# List all files in a long listing (detailed) format
ls -al

# Display the present working directory
pwd

# Create a directory
mkdir directory

# Remove (delete) file
rm file

# Remove the directory and its contents recursively
rm -r directory

# Force removal of file without prompting for confirmation
rm -f file

# Forcefully remove directory recursively
rm -rf directory

# Copy file1 to file2
cp file1 file2

# Copy source_directory recursively to destination. If destination exists, copy source_directory into destination, otherwise create destination with the contents of source_directory.
cp -r source_directory destination

# Rename or move file1 to file2. If file2 is an existing directory, move file1 into directory file2
mv file1 file2

# Create symbolic link to linkname
ln -s /path/to/file linkname

# Create an empty file or update the access and modification times of file.
touch file

# View the contents of file
cat file

# Browse through a text file
less file

# Display the first 10 lines of file
head file

# Display the last 10 lines of file
tail file

# Display the last 10 lines of file and "follow" the file as it grows.
tail -f file

6 – PROCESS MANAGEMENT
# Display your currently running processes
ps

# Display all the currently running processes on the system.
ps -ef

# Display process information for processname
ps -ef | grep processname

# Display and manage the top processes
top

# Interactive process viewer (top alternative)
htop

# Kill process with process ID of pid
kill pid

# Kill all processes named processname
killall processname

# Start program in the background
program &

# Display stopped or background jobs
bg

# Brings the most recent background job to foreground
fg

# Brings job n to the foreground
fg n

7 – FILE PERMISSIONS
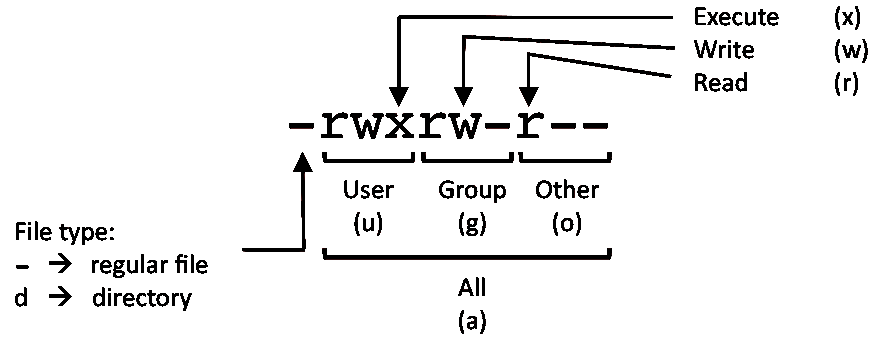


        PERMISSION      EXAMPLE

         U   G   W
        rwx rwx rwx     chmod 777 filename
        rwx rwx r-x     chmod 775 filename
        rwx r-x r-x     chmod 755 filename
        rw- rw- r--     chmod 664 filename
        rw- r-- r--     chmod 644 filename

# NOTE: Use 777 sparingly!

        LEGEND
        U = User
        G = Group
        W = World

        r = Read
        w = write
        x = execute
        - = no access

8 – NETWORKING
# Display all network interfaces and ip address
ifconfig -a

# Display eth0 address and details
ifconfig eth0

# Query or control network driver and hardware settings
ethtool eth0

# Send ICMP echo request to host
ping host

# Display whois information for domain
whois domain

# Display DNS information for domain
dig domain

# Reverse lookup of IP_ADDRESS
dig -x IP_ADDRESS

# Display DNS ip address for domain
host domain

# Display the network address of the host name.
hostname -i

# Display all local ip addresses
hostname -I

# Download http://domain.com/file
wget http://domain.com/file

# Display listening tcp and udp ports and corresponding programs
netstat -nutlp

9 – ARCHIVES (TAR FILES)

# Create tar named archive.tar containing directory.
tar cf archive.tar directory

# Extract the contents from archive.tar.
tar xf archive.tar

# Create a gzip compressed tar file name archive.tar.gz.
tar czf archive.tar.gz directory

# Extract a gzip compressed tar file.
tar xzf archive.tar.gz

# Create a tar file with bzip2 compression
tar cjf archive.tar.bz2 directory

# Extract a bzip2 compressed tar file.
tar xjf archive.tar.bz2

10 – INSTALLING PACKAGES
# Search for a package by keyword.
yum search keyword

# Install package.
yum install package

# Display description and summary information about package.
yum info package

# Install package from local file named package.rpm
rpm -i package.rpm

# Remove/uninstall package.
yum remove package

# Install software from source code.
tar zxvf sourcecode.tar.gz
cd sourcecode
./configure
make
make install

11 – SEARCH
# Search for pattern in file
grep pattern file

# Search recursively for pattern in directory
grep -r pattern directory

# Find files and directories by name
locate name

# Find files in /home/john that start with "prefix".
find /home/john -name 'prefix*'

# Find files larger than 100MB in /home
find /home -size +100M

12 – SSH LOGINS
# Connect to host as your local username.
ssh host

# Connect to host as user
ssh user@host

# Connect to host using port
ssh -p port user@host

13 – FILE TRANSFERS
# Secure copy file.txt to the /tmp folder on server
scp file.txt server:/tmp

# Copy *.html files from server to the local /tmp folder.
scp server:/var/www/*.html /tmp

# Copy all files and directories recursively from server to the current system's /tmp folder.
scp -r server:/var/www /tmp

# Synchronize /home to /backups/home
rsync -a /home /backups/

# Synchronize files/directories between the local and remote system with compression enabled
rsync -avz /home server:/backups/

14 – DISK USAGE
# Show free and used space on mounted filesystems
df -h

# Show free and used inodes on mounted filesystems
df -i

# Display disks partitions sizes and types
fdisk -l

# Display disk usage for all files and directories in human readable format
du -ah

# Display total disk usage off the current directory
du -sh

15 – DIRECTORY NAVIGATION
# To go up one level of the directory tree.  (Change into the parent directory.)
cd ..

# Go to the $HOME directory
cd

# Change to the /etc directory
cd /etc


By aem4beginner

January 5, 2021
Estimated Post Reading Time ~

Hotkeys for Microsoft Teams on Windows

Hotkeys for Microsoft Teams on Windows


https://www.howtogeek.com/669496/every-microsoft-teams-keyboard-shortcut-and-how-to-use-them/


All hotkeys below are for the Teams desktop app on Windows 10 and other versions of Windows. There are some slight differences on the web, so we’ve noted where the Teams web app’s keyboard shortcuts are different.

General

  • Show Hotkeys: Ctrl+.
  • Show Commands: Ctrl+/
  • Search: Ctrl+E
  • Goto: Ctrl+G (On the web: Ctrl+Shift+G )
  • Start New Chat: Ctrl+N (On the web: Left Alt+N)
  • Open Settings: Ctrl+,
  • Open Help: F1 (On the web: Ctrl+F1)
  • Zoom In: Ctrl+=
  • Zoom Out: Ctrl+-

Navigation

  • Open Activity: Ctrl+1 (On the web: Ctrl+Shift+1)
  • Open Chat: Ctrl+2 (On the web: Ctrl+Shift+2)
  • Open Teams: Ctrl+3 (On the web: Ctrl+Shift+3)
  • Open Calendar: Ctrl+4 (On the web: Ctrl+Shift+4)
  • Open Calls: Ctrl+5 (On the web: Ctrl+Shift+5)
  • Open Files: Ctrl+6 (On the web: Ctrl+Shift+6)
  • Go to Previous Item: Left Alt+Up
  • Go to Next Item: Left Alt+Down
  • Go to Previous Section: Ctrl+Shift+F6
  • Go to Next Section: Ctrl+Shift+F6
  • Move Selected Team Up: Ctrl+Shift+Up
  • Move Selected Team Down: Ctrl+Shift+Down

Messaging

  • Go to Compose: C
  • Expand Compose: Ctrl+Shift+X
  • Send (In Expanded Compose Box): Ctrl+Enter
  • Attach: Ctrl+O
  • Insert Return: Shift+Enter
  • Reply to Thread: R
  • Mark Important: Ctrl+Shift+I

Meetings and Calls

  • Accept Video Call: Ctrl+Shift+A
  • Accept Audio Call: Ctrl+Shift+S
  • Decline Call: Ctrl+Shift+D
  • Start Audio Call: Ctrl+Shift+C
  • Start Video Call: Ctrl+Shift+U
  • Toggle Mute: Ctrl+Shift+M
  • Toggle Video: Ctrl+Shift+O
  • Toggle Fullscreen: Ctrl+Shift + F
  • Go to Sharing Toolbar: Ctrl+Shift+Space

Hotkeys for Microsoft Teams on Mac

The hotkeys below are for Teams on macOS. The Teams web app is a little different, so we’ve noted where the website’s hotkeys are different.

General

  • Show Hotkeys: Cmd+.
  • Show Commands: Cmd+/
  • Search: Cmd+E
  • Goto: Cmd+G (On the web: Cmd+Shift+G)
  • Start New Chat: Cmd+N (On the web: Option+N)
  • Open Settings: Cmd+, (On the web: Cmd+Shift+,)
  • Open Help: F1 (On the web: Cmd+F1)
  • Zoom In: Cmd+=
  • Zoom Out: Cmd+-
  • Return to Default Zoom: Cmd+0

Navigation

  • Open Activity: Cmd+1 (On the web: Cmd+Shift+1)
  • Open Chat: Cmd+2 (On the web: Cmd+Shift+2)
  • Open Teams: Cmd+3 (On the web: Cmd+Shift+3)
  • Open Calendar: Cmd+4 (On the web: Cmd+Shift+4)
  • Open Calls: Cmd+5 (On the web: Cmd+Shift+5)
  • Open Files: Cmd+6 (On the web: Cmd+Shift+6)
  • Go to Previous Item: Left Opt+Up
  • Go to Next Item: Left Opt+Down
  • Go to Previous Section: Cmd+Shift+F6
  • Go to Next Section: Cmd+Shift+F6
  • Move Selected Team Up: Cmd+Shift+Up
  • Move Selected Team Down: Cmd+Shift+Down

Messaging

  • Go to Compose: C
  • Expand Compose: Cmd+Shift+X
  • Send (In Expanded Compose Box): Cmd+Enter
  • Attach: Cmd+O
  • Insert Return: Shift+Enter
  • Reply to Thread: R

Meetings and Calls

  • Accept Video Call: Cmd+Shift+A
  • Accept Audio Call: Cmd+Shift+S
  • Decline Call: Cmd+Shift+D
  • Start Audio Call: Cmd+Shift+C
  • Start Video Call: Cmd+Shift+U
  • Toggle Mute: Cmd+Shift+M
  • Toggle Video: Cmd+Shift+O
  • Toggle Fullscreen: Cmd+Shift+F
  • Go to Sharing Toolbar: Cmd+Shift+Space


By aem4beginner

AEM Application Maintenance Tips And Tricks

In today’s world, Adobe Experience Manager (AEM) is a comprehensive content management solution for building websites, mobile apps, and forms. And it makes it easy to manage your marketing content and assets. Adobe Experience Manager can be a real challenge to architect, deploy, and integrate.

A prime factor here is, you need to understand how your AEM application is performing under certain conditions. This is best done by monitoring the application over a long period of time.

When it comes to managing and maintaining an AEM application, it’s not just system maintenance that we should be concerned about, we should also think of it from the application code perspective.

AEM application maintenance is two faceted. One is ongoing, regular maintenance which falls under AEM DevOps/AEM Administrator tasks. The second is following the best practices in application development.

Here we are going to list out the various aspects of application maintenance from both system and development point of view:

DevOps/Admin Tasks
Online Revision Cleanup:

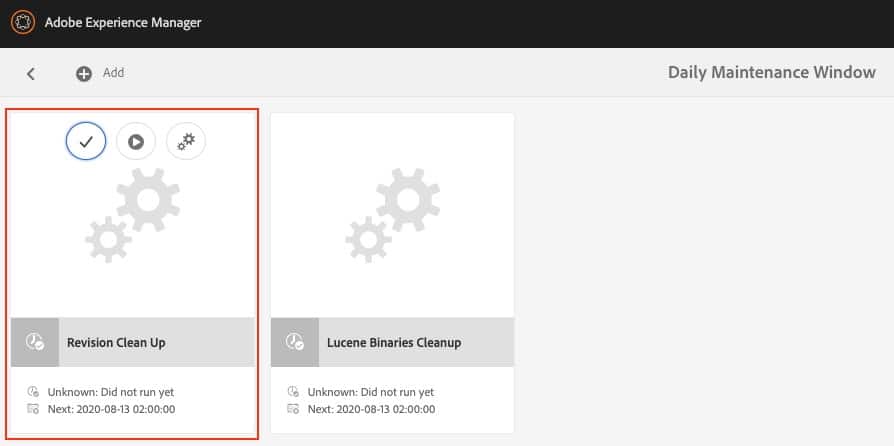
Every update to the repository such as creating, modifying, or publishing a page/asset, running workflows, etc., creates a new content version which gradually increases repository size. In order to improve the AEM application performance and avoid repository growth, the old versions need to be cleaned up to free disk resources. This operation is called Online Revision Cleanup which has been there since AEM 6.3.

Unlike Offline Revision Cleanup (aka Offline Compaction), Online Revision Cleanup doesn’t require AEM instance to be shut down. Online Revision Cleanup is enabled by default to run every day. However, the execution time can be adjusted so that it runs in off-peak hours when there’s minimal activity on the system.

You can find Online Revision Cleanup under Tools > Operations > Maintenance > Daily Maintenance Window.


Note: There’s always a chance that running Online Revision Cleanup for the first time may not reclaim any space. The reason is, Online Revision Cleanup reclaims old revisions by generations. A fresh generation is generated every time Online Revision Cleanup runs. Only the content which is at least two generations old will be reclaimed. That simply means, on the first run, there’s nothing to reclaim.

Offline Revision Cleanup:
Offline Revision Cleanup (aka Offline Compaction) also helps in reclaiming disk resources by cleaning up old revisions. However, in this case, the AEM instance needs to be shut down to free up space. It needs to be run manually using a set of commands and oak-run JAR.

So, what is the benefit of Offline Revision Cleanup? With Offline Cleanup, you can reclaim more space because the online mode keeps one generation while the offline mode keeps two generations.

Note: Offline Revision Cleanup should be used only on an exceptional basis.

Workflow Purge:
Whenever we upload an asset or modify its metadata, it triggers a workflow. And this is not the only instance that triggers a workflow in AEM, there are many more cases. Along with OOTB workflows, we create various custom workflows during the development cycle for different purposes. Once these workflows are complete, they get archived and never get deleted from the system. Hence, workflow purging is one of the mandatory tasks in AEM maintenance to increase the performance of the workflow engine.

Note: Workflow purging can be done for complete as well as running workflows.

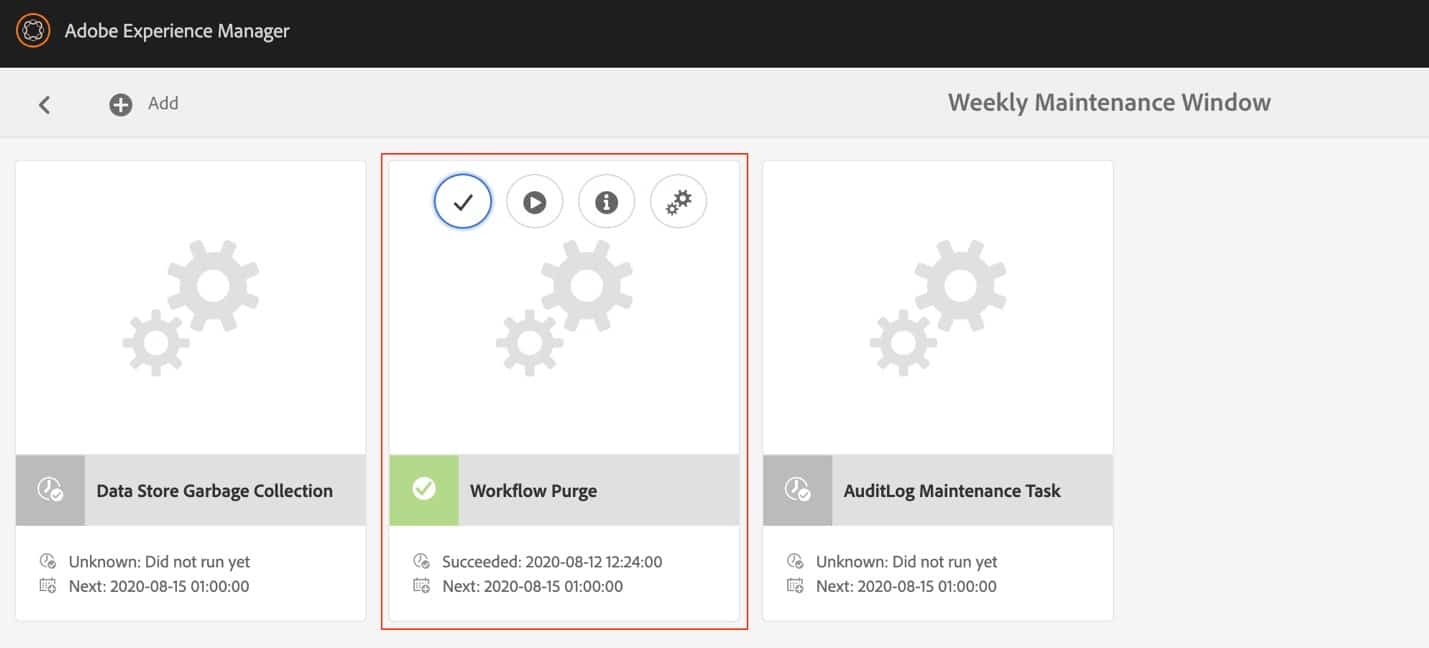
You can find Workflow Purge under Tools > Operations > Maintenance > Weekly Maintenance Window.


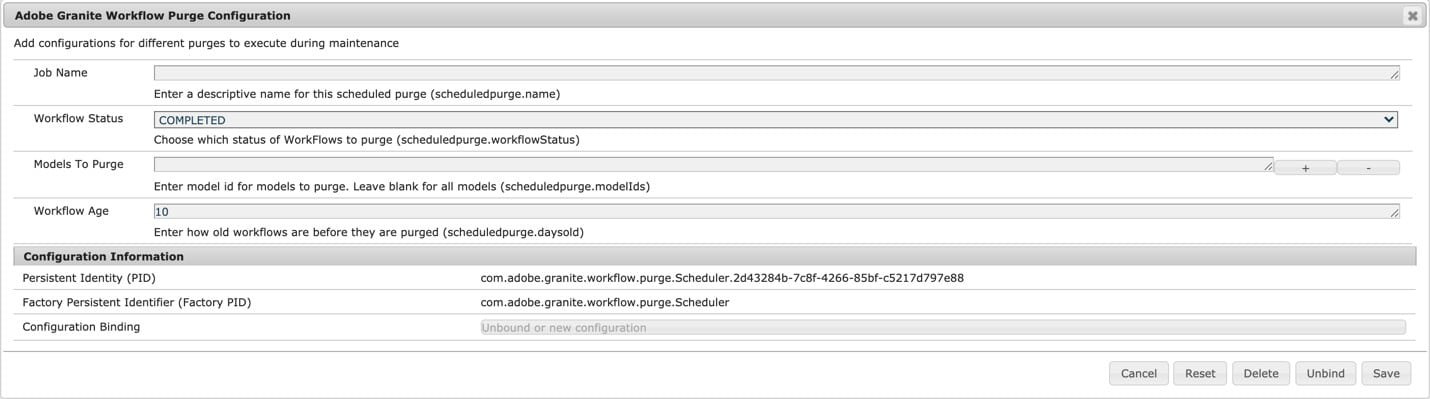
Clicking on the Settings icon will take you to the Workflow Purge configuration window in the OSGi console. Workflow Purge is a factory configuration that allows you to configure multiple purge configurations for different models and workflow status.


Version Purge:
AEM creates a version of a page or an asset when you can activate the content after modifying it. You can also do this manually using the Timeline tab in the sidebar.

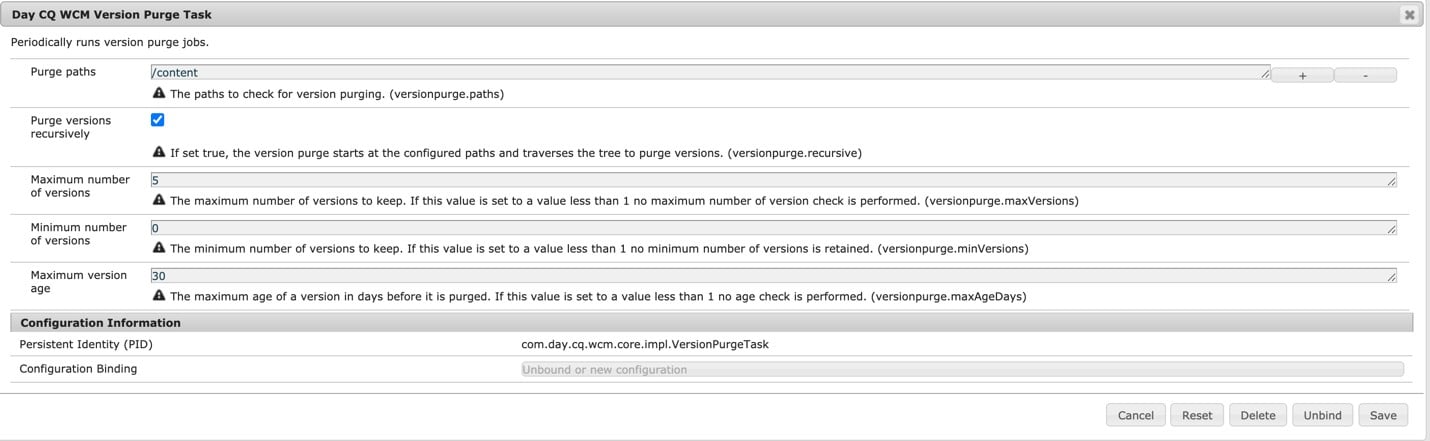
These versions never get purged and can be restored at any point in time. The repository size grows slowly over time because of these versions and therefore they need to be cleaned up to free up the disk resources.

These versions can be purged through the Version Purge maintenance task. This task can be scheduled to remove the old versions automatically.


Audit Log Purge:
AEM events that qualify for audit logging generate more archived data. This data can quickly grow over time due to replications, asset uploads, asset deletion, page creation/modification, and other system activities.

This event data can be purged through the OOTB Audit Log Purge maintenance task.

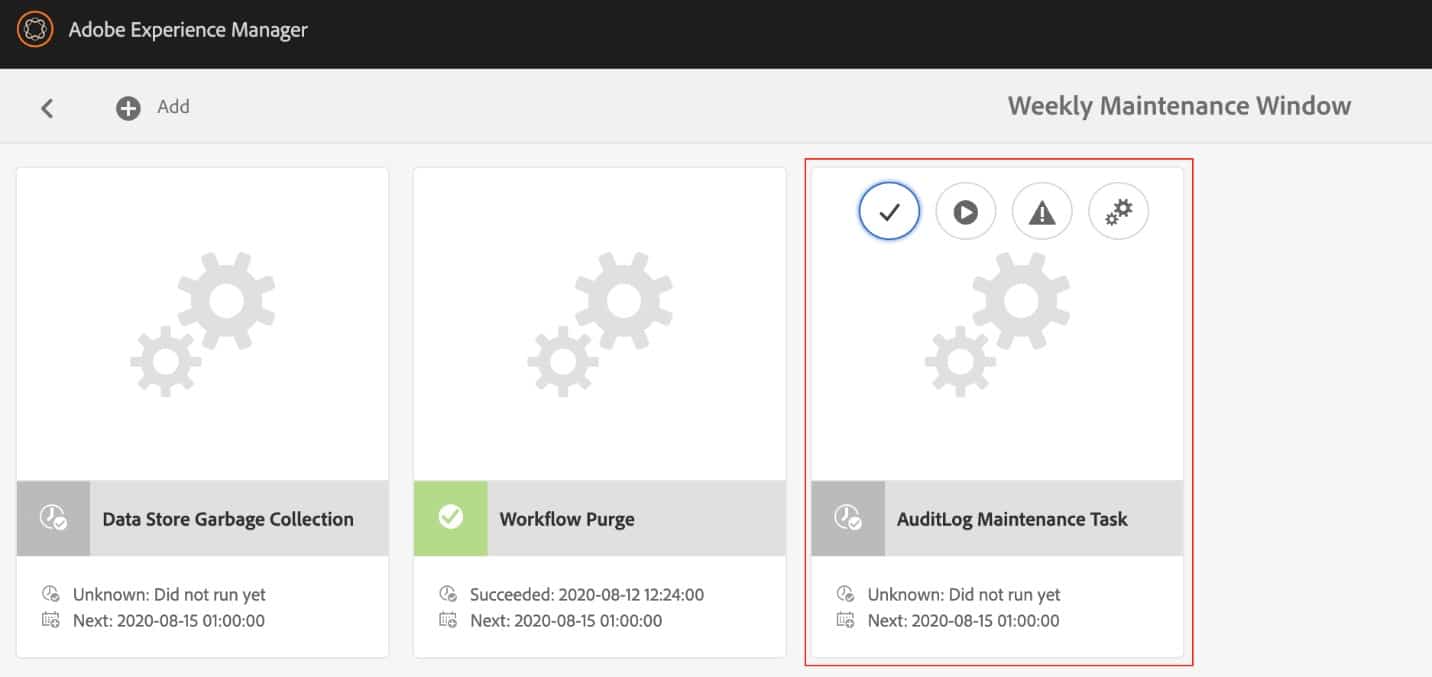
You can find Online Revision Cleanup under Tools > Operations > Maintenance > Weekly Maintenance Window.


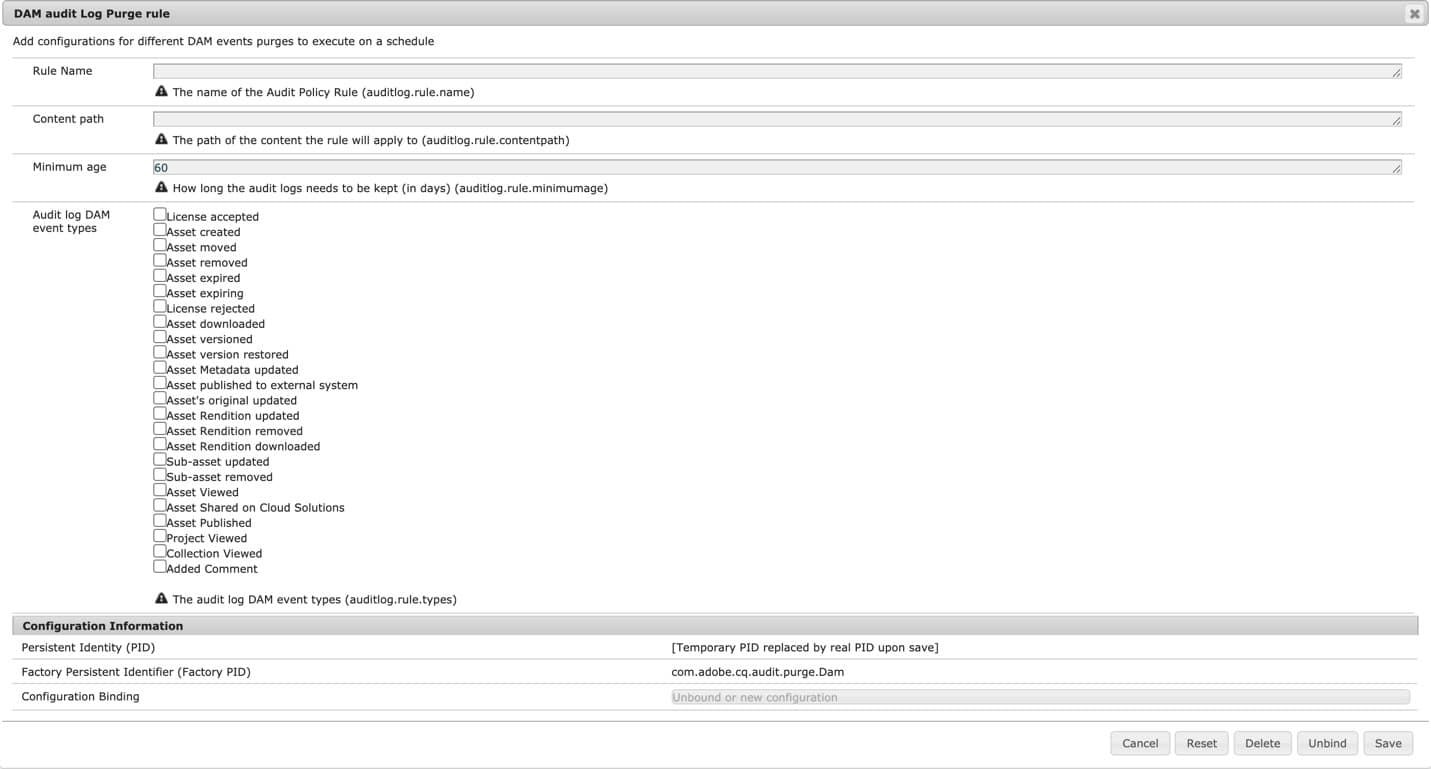
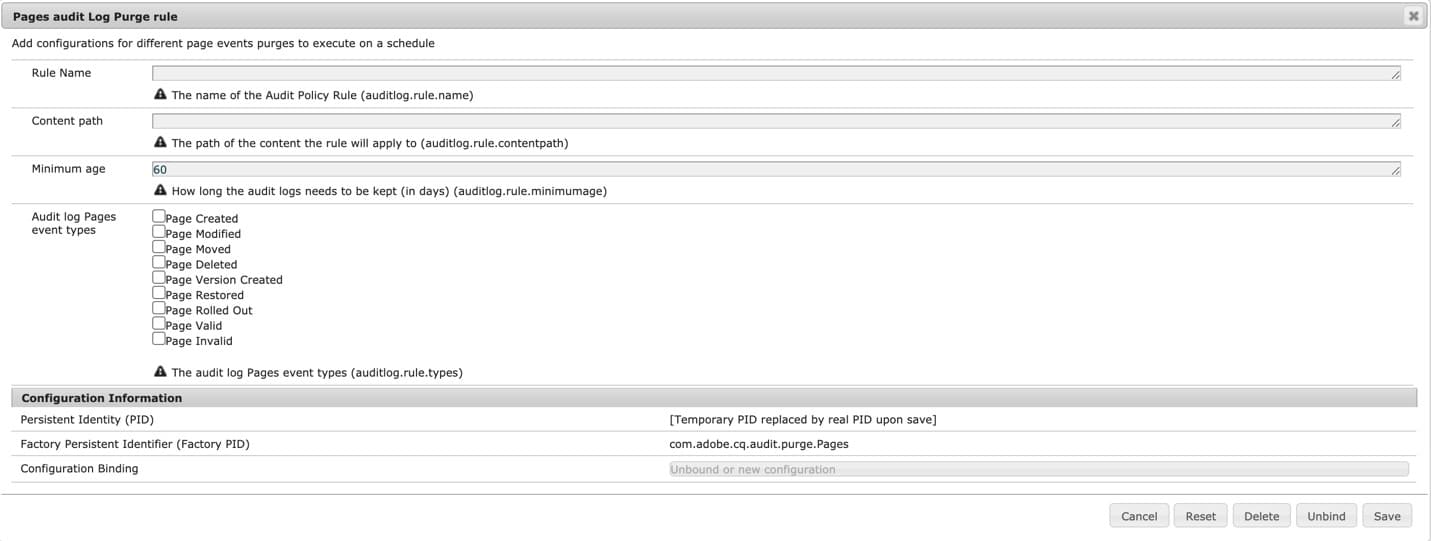
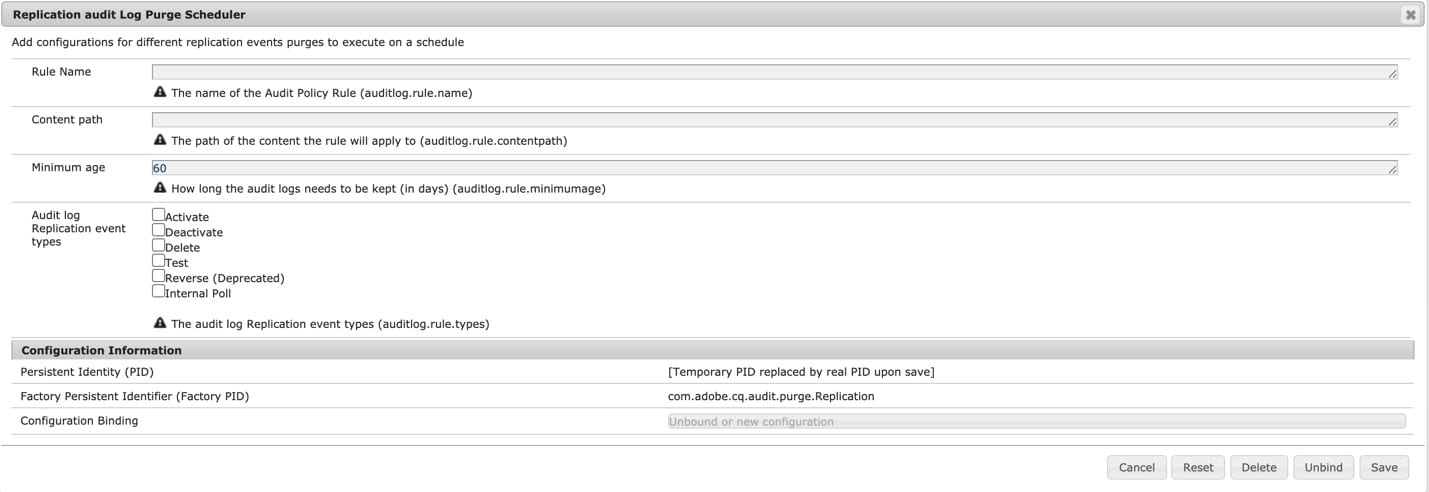
Clicking on the Settings icon will take you to the Audit Log Purge configuration window in the OSGi console. There are three types of log purge options:
DAM Audit log Purge Rule:


Pages Audit log Purge Rule:


Replication Audit log Purge Rule:

Generating Heap dump:
There are cases when your AEM application may go down all of a sudden after performing slow over a period of time and then runs out of memory. Such problems occur due to various reasons; one possible reason is, JAVA process was started with default heap memory settings. That means the JVM parameter -Xmx was not specified.

If that is not the case, then your AEM application might be retaining so many objects and not releasing them for Garbage Collection. This will cause a memory leak. This issue can be identified through Heap Dumps.

You just need to make sure that your system is configured to generate heap dumps. Heap dump can help you analyze application issues such as:
  • Out of Memory Error
  • Frequent garbage collections
You can either configure AEM to automatically generate heap dump when “Out of Memory” error occurs, or you can take it manually through OSGi console.

In order to automate it, you would need to add below JMX parameters to your startup script:
  • -XX:+HeapDumpOnOutOfMemoryError
  • -XX:HeapDumpPath=/path/for/generating/heapdump
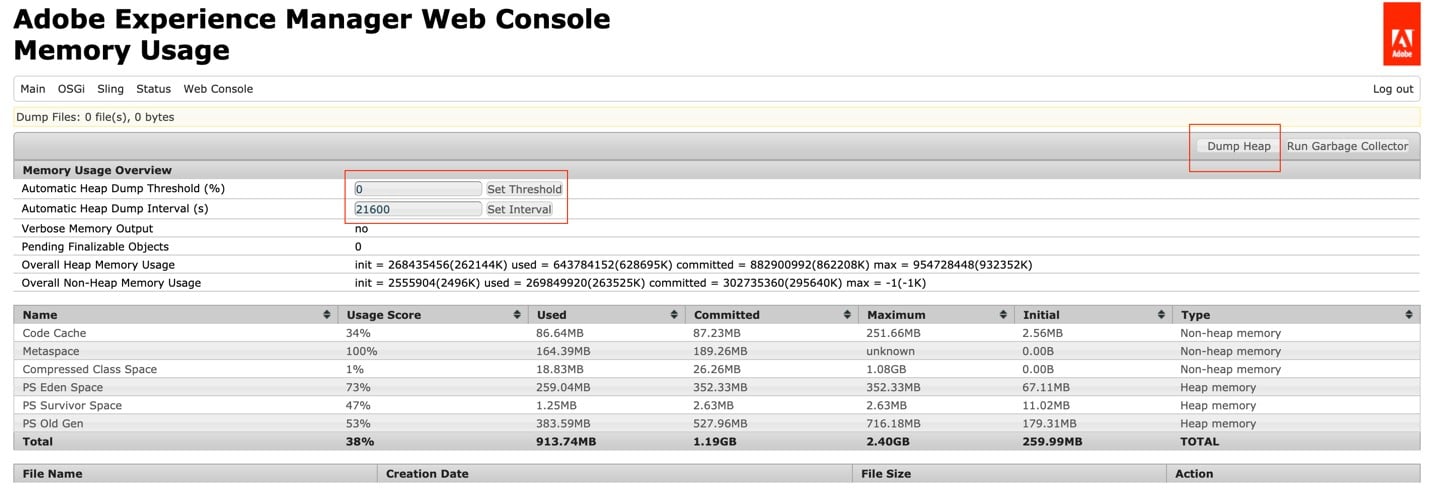
On the other side, to generate heap dump manually, go to “/system/console/memoryusage”. Here you can either generate and download heap dump instantly by clicking “Dump Heap” or you can generate it at a regular interval.


Generating thread dump:
Thread Dump is a list of JAVA threads that are active in a JVM at a certain period of time. When you want to analyze your application, it is recommended to take 10 thread dumps at regular intervals for e.g. 1 thread dump every 10 seconds.

You can generate a thread dump by using below command:

jstack -l <java_pid> >> threaddump.log

Once you have the thread dumps, you can use any third-party tool to analyze it. There are several third-party tools available.

Few other items to help you improve the AEM application performance:
  • Enabling Minification and GZip
    • In order to improve the page load time, you should minify JS and CSS files and Gzip them before delivering them. Minification actually minifies JS and CSS files using the YUI compressor.
  • Check the dispatcher configuration
    • Check the “/cache” section to see what all things are being cached and what all things get invalidated when you publish a page or an asset.
    • Check stat file configuration on the dispatcher.
    • You need to make sure that your dispatcher is configured in such a way that it catches most of the documents and it passes very few requests to the Publish instance.
Development Tasks
Review all OOTB DAM workflows:

Workflows enable us to automate most of the activities in AEM. It’s an important processing part in AEM and needs to be configured according to the best practices, if not, there can be a major impact on the system performance. Hence, it is highly recommended to plan your workflow implementations carefully.

Minimize the number of launchers in AEM. There are listeners that are responsible for all of the registered workflow launchers: It will listen to all the changes on all of the paths specified in the globbing properties of the other launchers. When an event is dispatched, the workflow engine evaluates every launcher to determine if it should run.

Creating too many launchers will cause the evaluation process to run slowly. For this reason, it is recommended to create launchers only when needed and make the globbing path as specific as possible.

Note: Please disable any out-of-the-box launchers that are not in use.

Do not start Workflows from other Workflows. Workflows can carry a significant amount of overhead, both in terms of objects created in memory and nodes tracked in the repository. For this reason, it is better to have a workflow do its processing within itself rather than start additional workflows.

Transient workflows:
When a workflow is transient, the runtime data related to the intermediate work steps is not persisted in the JCR whenever it is in processing. To optimize high ingestion loads, we can define a workflow as transient.

Wherever possible, set the DAM Update Asset workflow to transient. The setting significantly reduces the overheads required to process workflows because, in this case, workflows need not pass through the normal tracking and archival processes.

The advantages of transient workflows can include:
  • A reduction in the workflow processing time; up to 10%.
  • Significantly reduce repository growth.
  • Reduces the number of TAR files to compact.

How to make the DAM Update Asset workflow Transient in AEM:
  1. Open http://localhost:4502/miscadmin on the AEM instance you want to configure.
  2. From the navigation tree, expand Tools > Workflow > Models > dam.
  3. Double-click DAM Update Asset.
  4. From the floating tool panel, switch to the Page tab, and then click Page Properties. Select Transient Workflow Click OK.
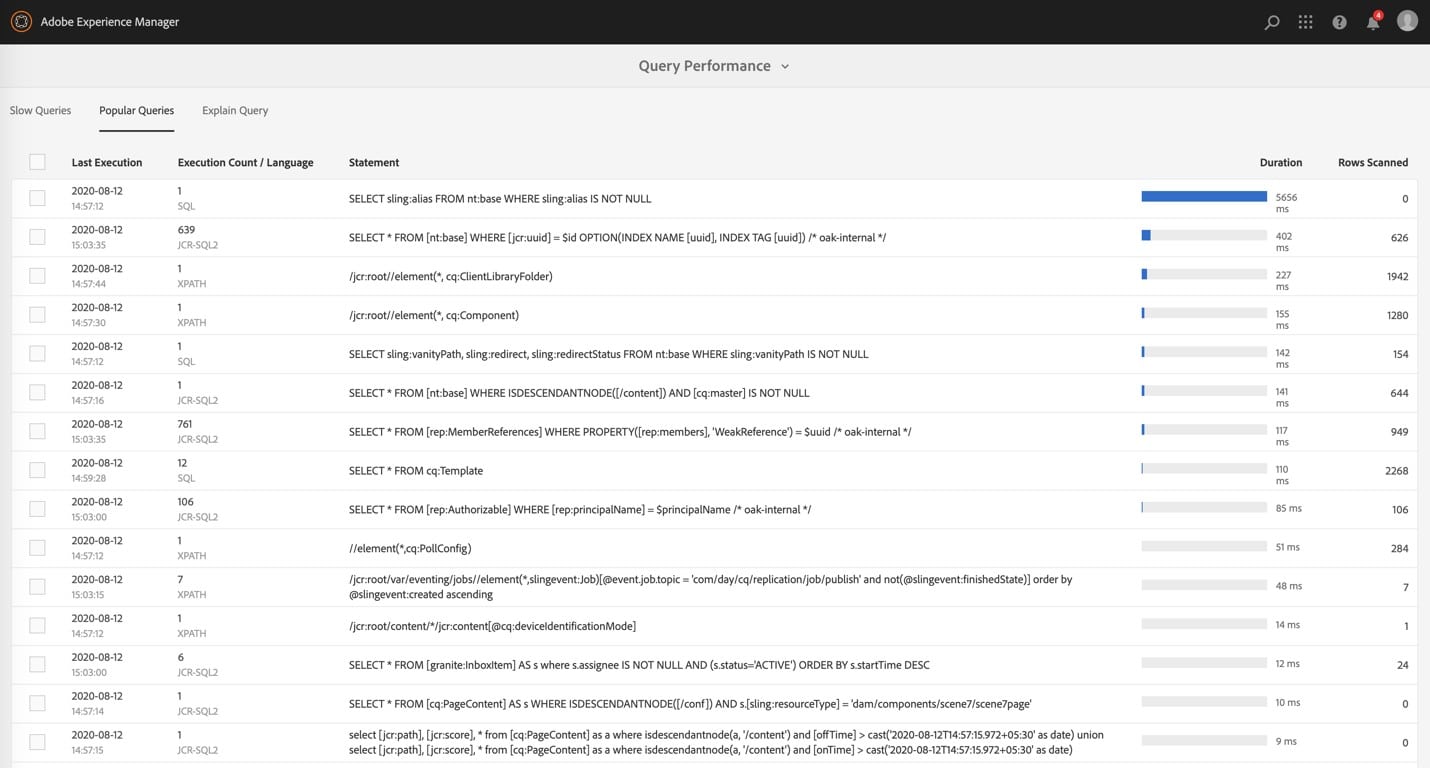
Query Performance Analysis:
Queries lacking a nodetype restriction force AEM to assume the nt:base nodetype, which every node in AEM is a subtype of, effectively resulting in no nodetype restriction.

Setting type=cq:Page or type=dam:Asset restricts this query to the only cq:Page nodes or dam:Asset nodes, and resolves the query to AEM’s cqPageLucene, damLucene, limiting the results to a subset of nodes in AEM.

For cases where query execution is fast but the number of results is large, p.guessTotal is a critical optimization for Query Builder queries. p.guessTotal=100 tells Query Builder to collect only the first 100 results and set a boolean flag indicating if at least one more results exist.


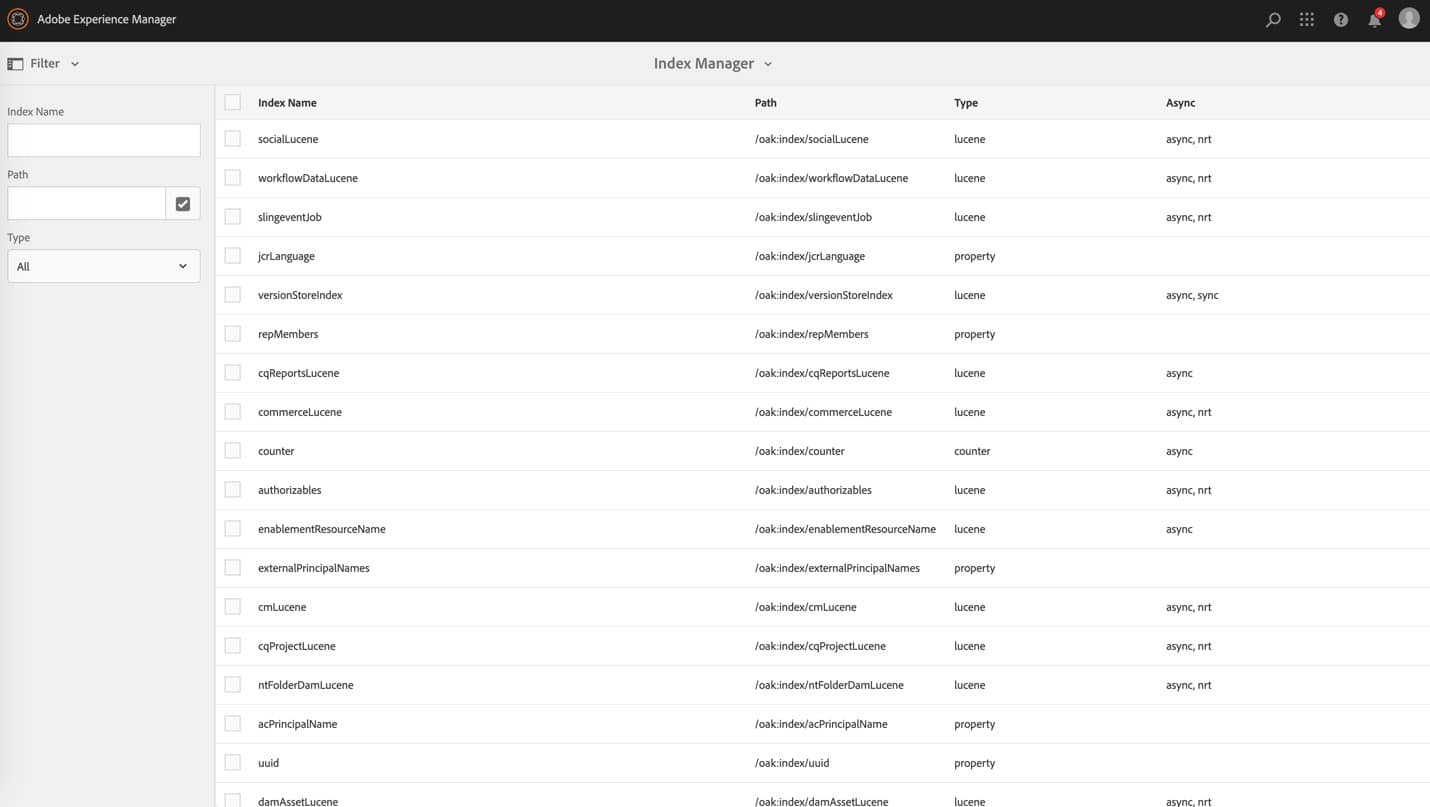
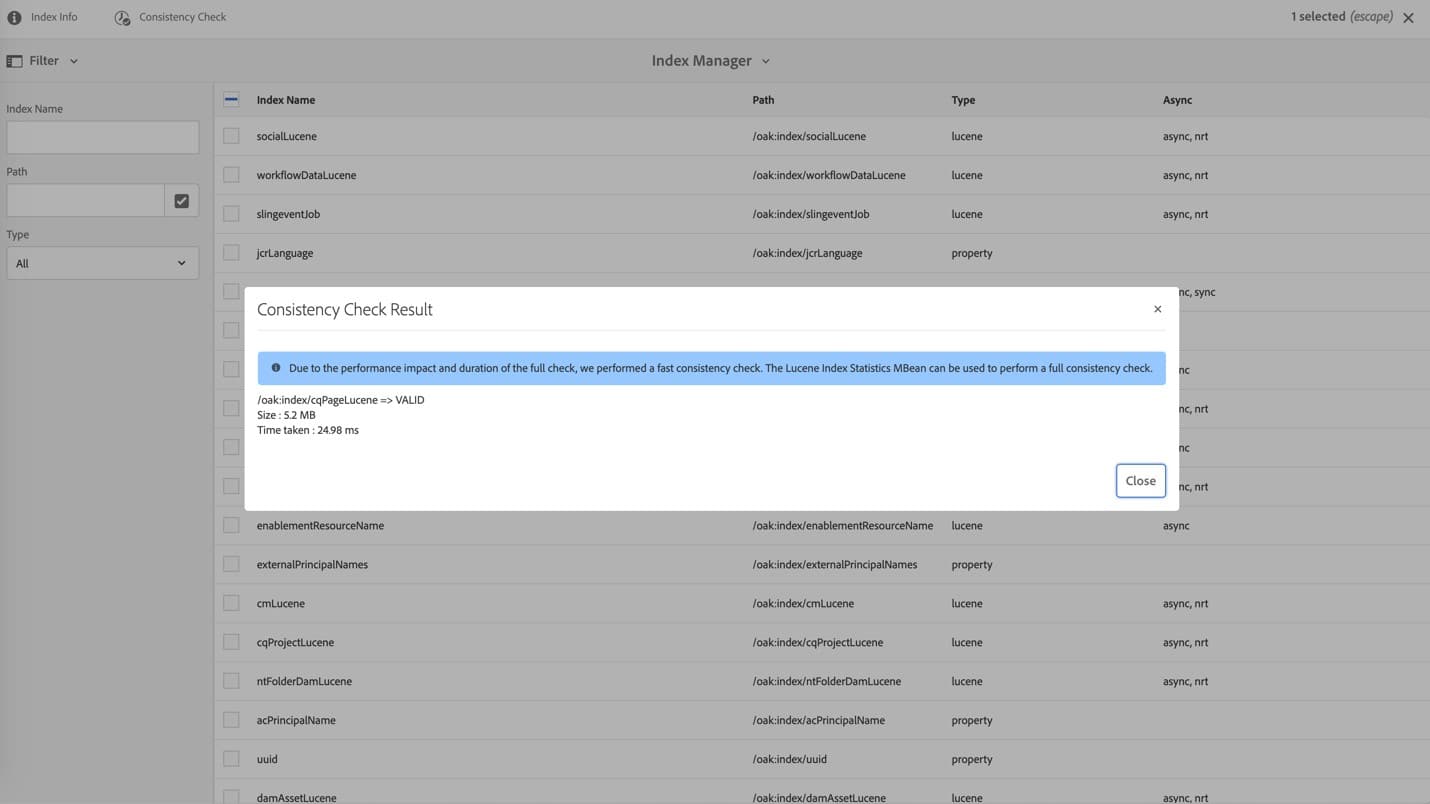
Oak Index Management:
Due to AEM’s flexible content architecture, it is difficult to predict and ensure that the traversals of content structures will not evolve over time to be unacceptably large. Therefore, ensure an index satisfy queries, except if the combination of path restriction and node type restriction guarantees that less than 20 nodes are ever traversed. One index is the Property Index, for which the index definition is stored in the repository itself. Implementations for Apache Lucene and Solr are also available by default, which both support full-text indexing. The Traversal Index is used if no other indexer is available. This means that the content is not indexed, and content nodes are traversed to find matches to the query. If multiple indexers are available for a query, each available indexer estimates the cost of executing the query. Oak then chooses the indexer with the lowest estimated cost.

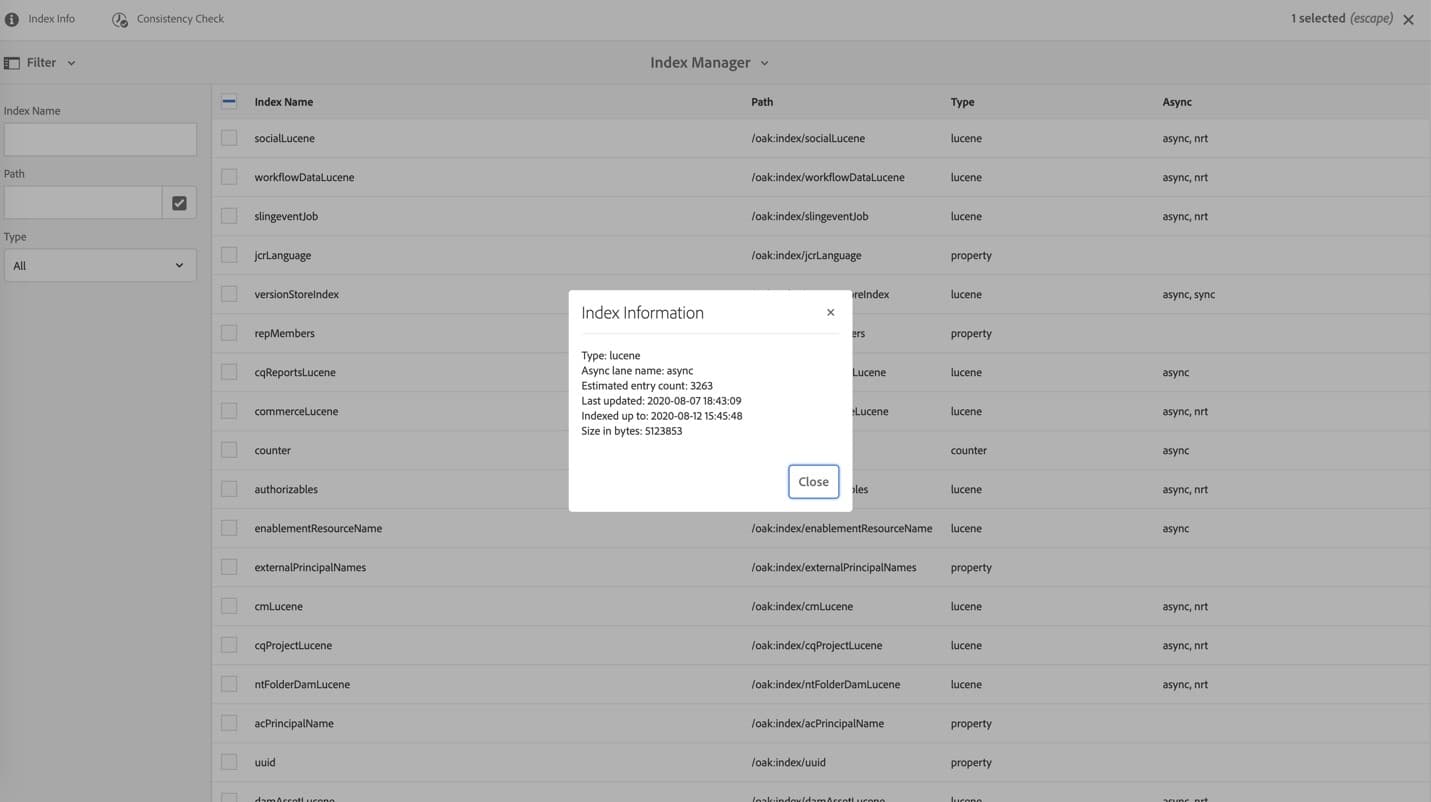
AEM’s internal re-indexing process collects repository data and stores it in Oak indexes to support performant querying of content. In exceptional circumstances, the process can sometimes become slow or even stuck. It is important to distinguish between re-indexing which takes an inappropriately long amount of time and re-indexing which takes a long amount of time because of its indexing vast quantities of content. For example, the time it takes to index content scales with the amount of content, so large production repositories will take longer to re-index than small development repositories.


By aem4beginner