
In this post let’s now understand how to document the REST APIs.
Swagger:
Swagger is a specification for documenting REST APIs. It specifies the format (URL, method, and representation) to describe REST web services. The Swagger UI framework allows both implementers and users to interact with the API. It gives a clear insight into how the API responds to parameters and options. Swagger responses are in JSON and XML, with additional formats in progress.
Before getting started with Swagger documentation, the following pieces of code should be added to the REST application.
1. Add the following code to web.xml file:
<init-param>
<param-name>jersey.config.server.provider.classnames</param-name>
<param-value>
com.wordnik.swagger.jersey.listing.ApiListingResourceJSON,
com.wordnik.swagger.jersey.listing.JerseyApiDeclarationProvider,
com.wordnik.swagger.jersey.listing.JerseyResourceListingProvider,
</param-value>
</init-param>
<init-param>
<param-name>jersey.config.server.provider.packages</param-name>
<param-value>com.wordnik.swagger.jaxrs.json,com.cmsbridge.api</param-value>
</init-param>
2. The following dependencies and plugin need to be added to the pom.xml file:
Dependencies:
<dependency>
<groupId>io.swagger</groupId>
<artifactId>swagger-hibernate-validations</artifactId>
<version>1.5.6</version>
<exclusions>
<exclusion>
<groupId>com.google.guava</groupId>
<artifactId>guava</artifactId>
</exclusion>
</exclusions>
</dependency>
<dependency>
<groupId>io.swagger</groupId>
<artifactId>swagger-core</artifactId>
<scope>compile</scope>
<version>1.5.3</version>
<exclusions>
<exclusion>
<groupId>javax.ws.rs</groupId>
<artifactId>jsr311-api</artifactId>
</exclusion>
<exclusion>
<groupId>com.google.guava</groupId>
<artifactId>guava</artifactId>
</exclusion>
</exclusions>
</dependency>
Plugin:
<plugin>
<groupId>com.github.kongchen</groupId>
<artifactId>swagger-maven-plugin</artifactId>
<version>3.1.1</version>
<configuration>
<apiSources>
<apiSource>
<springmvc>false</springmvc>
<locations>com.myapplication.api</locations>
<schemes>http</schemes>
<host>host.domain.com</host>
<basePath>/MyApplication/rest</basePath>
<info>
<title>MyApplication Swagger</title>
<version>v1</version>
<description>
Describes rest calls
</description>
</info>
<templatePath>${basedir}/src/main/resources/strapdown.html.hbs</templatePath>
<outputPath>${project.basedir}/src/main/webapp/swagger.html</outputPath>
<!-- <outputPath>${basedir}/generated/document.html</outputPath> -->
<swaggerDirectory>${project.build.directory}/swagger-ui</swaggerDirectory>
<swaggerApiReader>com.wordnik.swagger.jaxrs.reader.DefaultJaxrsApiReader</swaggerApiReader>
</apiSource>
</apiSources>
</configuration>
<executions>
<execution>
<phase>compile</phase>
<goals>
<goal>generate</goal>
</goals>
</execution>
</executions>
</plugin>
The following are a few annotations which will be used during swagger documentation:
@Api: Marks a class as a Swagger resource.
@ApiOperation: Describes an operation or typically an HTTP method against a specific path.
@ApiParam: Adds additional meta-data for operation parameters.
Here is a sample example in which a class is marked a swagger resource:
@Path("/user")
@Api("/user")
public class UserInformation {
UserLoginInfo loginInfo;
@Path("/info")
@POST
@Consumes(MediaType.APPLICATION_FORM_URLENCODED)
@Produces(MediaType.TEXT_PLAIN)
@ApiOperation(httpMethod = "POST", value = "info", produces = "text/plain")
public String login(@FormParam("username") String username, @FormParam("password") String password) {
loginInfo = new UserLoginInfo();
String userCredentials = loginInfo.getUserdetails(username, password);
if (userCredentials != null)
return userCredentials;
else
return "{\"error\":\"invalid user\"}";
}
}
Sample swagger documentation looks like:
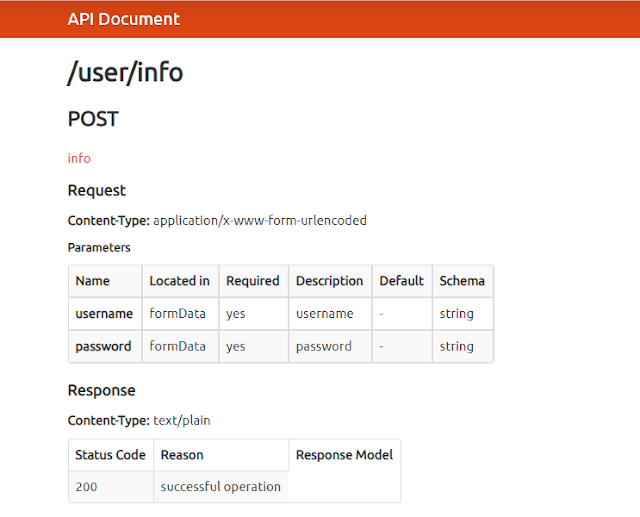
This way you can document your RESTful web services.
Source: https://labs.tadigital.com/index.php/2018/09/25/building-restful-web-services-part-3-documentation-with-swagger/

No comments:
Post a Comment
If you have any doubts or questions, please let us know.