Before continuing with multiple inplace editing, I want to talk about what are all the available plugins for images and how to render an image with available plugins.
Because in my previous blog, we only talk about how to enable the plugins but after resizing, we need to render cropped, resized images also. When you crop, resize, and image Map in the image, these values get stored in the content hierarchy and now need to use those values to render the image using all features.
Below are the editing plugins available for an image:
1. Start Crop:

: Selecting this option opens a drop-down for pre-defined crop proportions.
Choose the option FreeHand to define your own crop.
Choose the option Remove Crop to display the original asset.

Fig-1:Default crop options
Note: All the options shown in the above image are default options for crop and if you want to add more based on your own aspect ratio you can do from here.

You can add your custom aspect radios for the cropping image like shown below.

Note: In AEM, crop aspect ratios are defined as height/width. This differs from the conventional definition of width/height and is done for legacy compatibility reasons.
2. Rotate Right:

: This will rotate the image 90° to the right clockwise.
3. Image Map:

3. Image Map:
: An image map is a graphic image where a user can click on different parts of the image and be directed to different destinations. Image maps are made by defining each of the hot areas in terms of their x and y coordinates (relative to the top left-hand corner). With each set of coordinates, you specify a link that users will be directed to when they click within the area. Take a demo of the image Map from the link here.
Note: The Launch Map feature requires release 2.1.0 of the Core Components or higher along with service pack 2 for AEM 6.4 or service pack 3 for AEM 6.3 or higher to support new image editor features within AEM.
There are three kinds of shapes available for the image Map.
Add Rectangular Map
Add Circular Map
Add Polygon Map

Fig-2: Shapes available for Image Map
Note: The Launch Map feature requires release 2.1.0 of the Core Components or higher along with service pack 2 for AEM 6.4 or service pack 3 for AEM 6.3 or higher to support new image editor features within AEM.
There are three kinds of shapes available for the image Map.
Add Rectangular Map
Add Circular Map
Add Polygon Map
Fig-2: Shapes available for Image Map
Once a map shape is selected, it is superimposed on the image allowing for resizing. Drag and drop the blue resize handles to adjust the shape. After sizing the launch map, click on it to open a floating toolbar to define the path of the link.

Path: If the path is AEM related path, use a relative path and if not in AEM then use an absolute path.
Alt Text: Alternative description of path destination.
Target: Define the target for the path.
4. Reset Zoom:

Alt Text: Alternative description of path destination.
Target: Define the target for the path.
4. Reset Zoom:
If an image is already zoomed this option is used to reset the zoom level.
5. Open Zoom Slider: This option is used to control the zoom level of the image using slider.

Fig-3: Open Zoom Slider Plugin for InplaceEditing of Image
6. Flip:
Note: it will display the Flip Vertically and Flip Horizontally buttons in the edit dialog of the image component, however, the feature is not currently supported by AEM and any changes made using these options will not be persisted so no point in using this plugin in Image Component.
Note: Image edit operations (crop, resize, rotate) are not supported for GIF images. Any such changes made in edit mode to GIFs will not be persisted.
Make an image component with image Editing options and render the image.
Let’s make a new component and add “sling:resourceSuperType” as
“core/wcm/components/image” and then call this logic from the sightly code.
<div data-sly-use.image="com.adobe.cq.wcm.core.components.models.Image">
<div class="cq-dd-image ">
<img src="${image.src}"/>
</div>
But if you use “core/wcm/components/image” as "sling:resourceSuperType" then you can not render image with image Map options.
So if you want to use image Maps in your component, use“core/wcm/components/image/v2/image” as "sling:resourceSuperType" and add inplaceEditing feature in the dialog to render the image after the editing feature use the below code to render the image with cropping and resizing features
<div data-sly-use.image="com.adobe.cq.wcm.core.components.models.Image">
<div class="cq-dd-image ">
<sly data-sly-test.usemap="${'{0}{1}' @ format=['#', resource.path]}"></sly>
<img src="${image.src}" data-sly-attribute.usemap="${image.areas ? usemap : ''}"/>
<map data-sly-test="${image.areas}"
data-sly-list.area="${image.areas}"
name="${resource.path}">
<area shape="${area.shape}" coords="${area.coordinates}" href="${area.href}" target="${area.target}" alt="${area.alt}">
</map>
</div>
If you add sling:resourceType as “core/wcm/components/image/v2/image” in your component,no need to do anything because there is already a sling Model Exporter for this resourceType and when we call “com.adobe.cq.wcm.core.components.models.Image” this model creates the image path as expected.
The problem with inheriting this component is you need to overwrite the image component dialog.
Note: To render images with editing options, The Adaptive Image Servlet is being used. We need to render the image path as shown below and when the image is called using the below-mentioned path, it calls the Adaptive Image Servlet which is being registered using the selector.
To render the image after cropping resizing and many more things, the URL of image in author and publish mode will be as shown below:
Author:
/content/<project_path>/<page_path>/<component_path>/<component_name>.coreimg.<quality>.<width>.<extension>/<timestamp>.<extension>
Publish:
/content/<project_path>/<page_path>/<component_path>/<component_name>.coreimg.<quality>.<width>.<extension>
There is an OSGI Configuration (AEM Core WCM Components Adaptive Image Servlet Mapping Configuration) for adaptive Image Servlet.
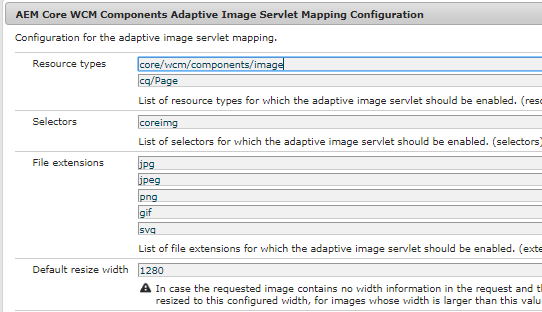
Fig-4:AEM Core WCM Components Adaptive Image Servlet Mapping
Resource Types: The resourcetype or resourceSuperType of the component should be mentioned here.
Selectors: You can create a different selector also as per your requirement and the adaptive Image servlet will be called using that selector.
Note: If only one image in the dialog and the name properties are the same as the OOTB Image component, then you can use the OOTB sling Model but if more than one image is in a single dialog or you don't have the same name properties for image widget then you can’t use OOTB models and you need to write custom logic (Implement your own ImageImpl.class). I have already linked the classes to corresponding GitHub so If you need to write your own custom logic then you can refer to those classes.
You don't need to write Adaptive Servlet again for your custom requirements. just need to change the interface and implementation of Image as per your requirements

No comments:
Post a Comment
If you have any doubts or questions, please let us know.