
- Pre-requisites
- What is AEM Quickstart JAR
- Installation by Double Clicking the JAR file
- Installation through Command Prompt [to set a password for admin account]
- Installation with the newly inroduced -nointeractive flag
- Install AEM in the Production ready mode
- Install AEM as a windows Service
Pre-requisites:
- Adobe Experience Manager Quickstart Jar file – cq-quickstart-6.4.0.jar
- Valid Adobe Experience Manager License key
- JDK Version 1.8
- Minimum 5GB of free space per instance
- Minimum 4GB of RAM
A standalone executable jar file that includes everything needed to get up and running your AEM instance. It comprises of,
- Integrated jetty webserver
- Sling Web Application framework
- In-built Content Repository [JCR – Apache Jackrabbit Oak]
Purpose of Installation method: To start up the instance in a GUI environment, just double-click the cq-quickstart-6.4.0.jar file. This is the default installation method of AEM and preferred for installing AEM in the local environment and for people who are new to AEM.
Step 1: Create an install directory on your local machine. For example, C:\Program Files\aem
Step 3: Jar file naming convention, cq-<instance-type>-p<port-number>.jar
As per the convention rename the JAR file as, cq-author-p4502.jar
Step 4: Double click the Jar file to start the AEM Installation
Note:- If you do not provide a license.properties file, AEM will redirect your browser to a Welcome screen on startup, where you can enter a license key.
Through command prompt:
Purpose of Installation method: From AEM 6.3 onwards, if you try to install AEM through command prompt, it will prompt you to configure Admin Password instead of the default one which will eliminate the need to do it manually after installation.
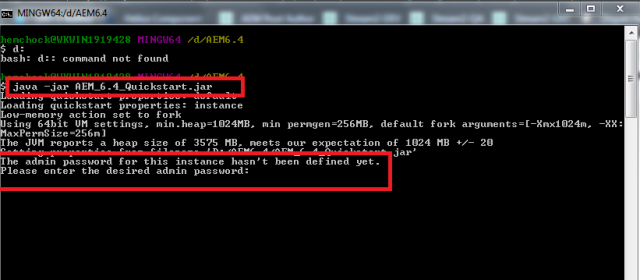
Open command prompt, select the jar file directory and enter the below command
For a 32-bit Java VM,
java -Xmx1024M -jar cq-quickstart-6.4.0.jar |
For a 64-bit Java VM,
java -XX:MaxPermSize=256m -Xmx1024M -jar cq-quickstart-6.4.0.jar |
Note:- This password set will not applicable for Felix Console, it needs to be updated manually.
Purpose of Installation method: Instead of entering the password in the command line while installation, you can also choose to specify the password from a properties file. This non interactive mode can be used for automated installations using the command line in an installation script.
This is done by using the -nointeractive flag combined with the -Dadmin.password.file system property.
admin.password=xxxxxxx[Your Password]
Command Format:
java -Dadmin.password.file =/path/to/passwordfile.properties -jar aem6.3.jar -nointeractiveRun the command as shown below,

Note:- If you simply use the -nointeractive parameter without the -Dadmin.password.file system property, AEM will use the default admin password without asking you to change it.
In Production Ready Mode:
Purpose of Installation method: With AEM 6.1, Adobe introduces the “nosamplecontent“ runmode aimed at automating the steps required to prepare an AEM instance for deployment in a production environment with some pre-configured security settings. Also, remove all the sample content from the instance.
In order to run AEM in production ready mode all you need to do is add the nosamplecontent via the -r runmode switch to your existing startup arguments:
java -jar aem-quickstart.jar -r nosamplecontentFor more details,
https://helpx.adobe.com/experience-manager/6-4/sites/administering/using/production-ready.html
Install AEM as a Windows Service:
Purpose of Installation method: If you want to start AEM in the Windows startup, this option would be useful. The AEM service will start running after windows Start/Re-start, thus removing the need to manually start it after windows startup every time.
To know how to install AEM as a windows service, please refer
https://helpx.adobe.com/experience-manager/6-4/sites/deploying/using/custom-standalone-install.html#InstallingandStartingAdobeExperienceManagerasaWindowsService

No comments:
Post a Comment
If you have any doubts or questions, please let us know.