What is Multi Site Manager (MSM) in AEM.
When MSM Should be Used.
How to manage different language versions using MSM.
How to create a blueprint in MSM.
How to create a Live Copy using existing page or barnch in MSM.
How to create Live Copy using blueprint in MSM.
What is Multi Site Manager (MSM)
Multi Site Manager (MSM) allows aem developers to create copy of existing site and automatically update the copy when changes are done to the source site.
Advantages of using MSM :
Easily manage multiple websites that share common content.
MSM allows aem developers to define relations between the sites so that content changes in one site are automatically replicated in all other sites.
Reduces the time to manage your websites and increases the re-use of common content.
Maintain common look and feel across all websites.
When we should use MSM
- Sites are in multiple countries.
- Sites are in multiple languages.
- Need to reuse/replicate same content in multiple websites.
- Maintain consistent branding and content across websites.
Manage different language versions using MSM
The biggest advantage of using MSM over internationalization is ease to add new languages to websites. To leverage MSM functionality a website must follow below structure:-
The biggest advantage of using MSM over internationalization is ease to add new languages to websites. To leverage MSM functionality a website must follow below structure:-
- The web site should have a single page as the root.
- Each child page is the root page of each language version.
- The name of the child page is the language code.
Steps to add a language to website using MSM


- Open SiteAdmin console, select the root page of website.

- Click New > New Page.

- In create page dialog , enter Title and the Name. Remember Name should be in <language-code> or <language-code>_<country-code> format. You can see the list of default languages-code that comes with AEM at /libs/wcm/core/resources/languages node.

- Select your template and click Create.

- From Website(SiteAdmin) Console, select the root page of website.
- Go to Tools menu –> Select Language copy.

- After clicking language copy option, it will open a table which consist of all languages in which this website is currently supported. An X mark against any page means that it is available in this particular language.
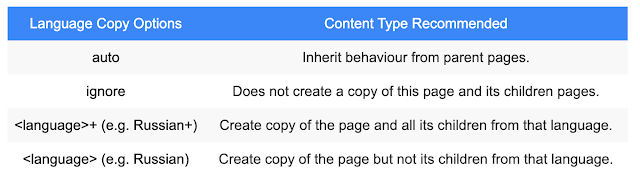
- To copy a page in new language, simply select the cell and choose one option from drop down menu. Below we are copying company page to Russian language.


- Select Language copy Type and click OK.
- Confirmation dialog will Pop up. Click Yes to copy.
Create a Blueprint in MSM
Blueprint allow us to control multiple live copies and apply consistent rollout configurations to all blueprint’s live copies. Using blueprint rollout feature we can push modifications to all it’s live copies simultaneously.
Follow the below steps for creating a blueprint in AEM.

Create Page dialog will Open. Enter below details :
Title – Enter page title.
Name – Enter name in lower-case without space as this will be out Page node in crxde.
Template – Select Blue Print Template

Click Create.
Right click on newly created blueprint page –> Click Open.
Click edit button.

Blueprint allow us to control multiple live copies and apply consistent rollout configurations to all blueprint’s live copies. Using blueprint rollout feature we can push modifications to all it’s live copies simultaneously.
Follow the below steps for creating a blueprint in AEM.
- Go to Tools console.
- Under Tools –> Select MSM Control Centre (Root Folder).
- Click New –> New Page in top Right Corner.

Create Page dialog will Open. Enter below details :
Title – Enter page title.
Name – Enter name in lower-case without space as this will be out Page node in crxde.
Template – Select Blue Print Template

Click Create.
Right click on newly created blueprint page –> Click Open.

Click edit button.

Blueprint page dialog will open. and enter below details:
Name – will be pre populated from our Page title.
Description – Enter Page description.
Source Path– Select the source from where we want to copy page.

Click OK. Your blueprint page is ready.
You can also see a link (show in control centre) in bottom for Blueprint Control Centre.

Note: Managing huge number of sites is always tedious even if they are live copy. Blueprint Control Centre saves us from this tasks by centrally managing all the live copies under one blueprint Page in an organized way.
Create a Live Copy from existing branch in MSM
Live Copy is basically creating a new site based on the content and structure of an existing site or blueprint. MSM allows us to create Live copies and automatically update when changes are made in base/source site.
For create a live copy using Existing branch or page, AEM has provided New Live Copy option which we are going to use in below example.
Follow below steps for creating a Live copy from existing branch or blueprint in AEM :
- Open Website (Site Admin) Console.
- Select the page or folder under which you want to create this live copy.
- Select New –> New Live Copy option from top.

Create Live copy dialog will open, enter below details :
Title – Enter Page title eg. My geometrixx Live copy
Name – Enter page node name eg. geo_live_copy [ Note :- Avoid space between words]
Live copy from – Enter source path whose live copy you want to create
Title – Enter Page title eg. My geometrixx Live copy
Name – Enter page node name eg. geo_live_copy [ Note :- Avoid space between words]
Live copy from – Enter source path whose live copy you want to create
Note : Change in source path get automatically reflected in Live copy.
Exclude sub pages– select this option if you don’t want sub pages get copied.

On the sync config tab, we can specify rollout configurations. This i will cover in next tutorial.

Click Create. Your Live copy is ready.
Exclude sub pages– select this option if you don’t want sub pages get copied.

On the sync config tab, we can specify rollout configurations. This i will cover in next tutorial.

Click Create. Your Live copy is ready.
Create a Live Copy from blueprint in MSM
For create a live copy using blueprint , AEM has provided New Site option which we are going to use in below example.
Open Website (Site Admin) Console.
Select the page or folder under which you want to create this live copy.
Click New –> New Site.

Create site dialog will open, enter below details:
Title – Enter Site title eg. My Live copy website
Name – Enter site node name eg. livecopywebsite [ Note :- Avoid space between words]
Select Template – Select the Template which you want to use as blueprint.

Click Next –> select initial languages. [Note:- This is a major difference in create live copy using blueprint].

Click Next –> select Chapters. [Note:- This option is only available in creating live copy using blueprint].

Click Next –> specify below details
Site Owner: select an existing user from drop-down as Site owner.
Live Copy: Uncheck this check-box to create a static copy of the blueprint.
Rollout Configs: specify Roll out configurations, how you want you modify your live copies when content in source or blueprint website changes.
Note This we will cover in next tutorial.

Click Next –> Click Create Site.

You have successfully create a new live copy from blueprint.
For more details Visit Adobe official documentation.

Click Next –> Click Create Site.

You have successfully create a new live copy from blueprint.
For more details Visit Adobe official documentation.

No comments:
Post a Comment
If you have any doubts or questions, please let us know.