Eloqua Landing Page:
Define a Landing page in Eloqua with requred form fields and action, redirect the user to the Landing page from AEM whenever required to capture the data.User data will be directly submitted to the Eloqua without any interaction from AEM.
In this approach while defining the Landing page in Eloqua the look and feel of the landing page should be matched with AEM pages look and feel for better user experience.
Refer the following URL to more details on defining a landing page -
https://docs.oracle.com/cloud/latest/marketingcs_gs/OMCAA/Help/LandingPages/Tasks/CreatingNewLandingPagesDesignEditor.htm
Submit the data through Eloqua form - Directly to Eloqua Form Action URL:
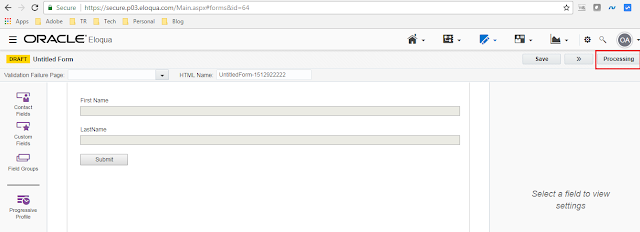
Define the form in Eloqua with required fields, place the form in a AEM component- change the look and feel accordingly.
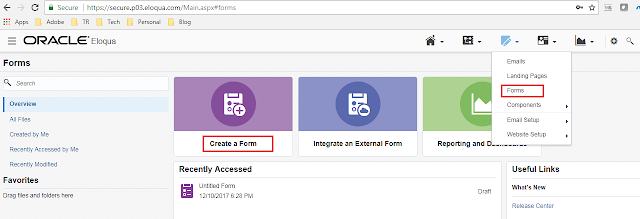
Define required fields in the form
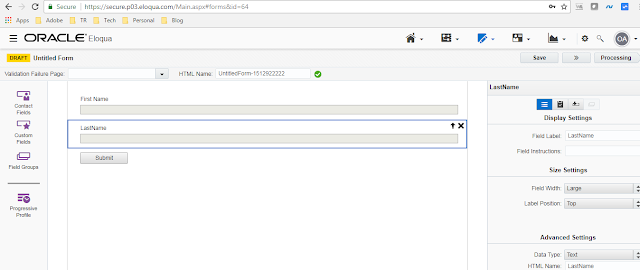
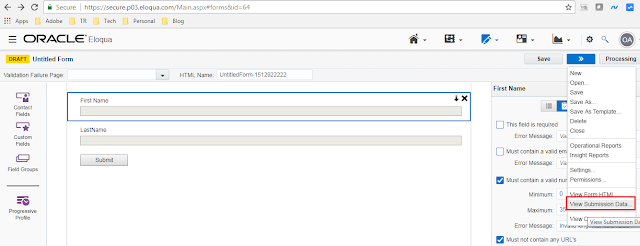
After defining the form - Click on View Form HTML
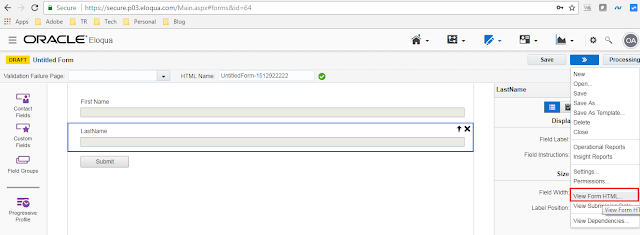
Copy the form section as shown below
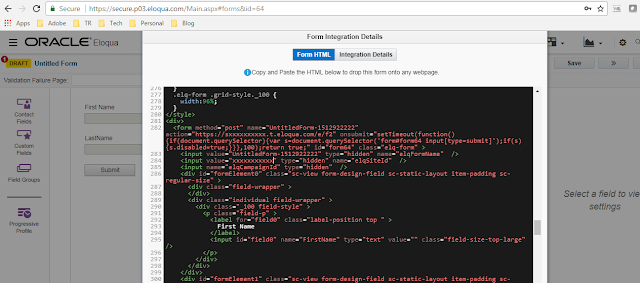
Sample Eloqua form -
<form method="post" name="UntitledForm-1512922222" action="https://sxxxxxxxx.t.eloqua.com/e/f2" id="form64">
<input value="UntitledForm-1512922222" type="hidden" name="elqFormName" />
<input value="xxxxxxxxx" type="hidden" name="elqSiteId" />
<input name="elqCampaignId" type="hidden" />
<div id="formElement0" class="sc-view form-design-field sc-static-layout item-padding sc-regular-size" >
<div class="field-wrapper" >
</div>
<div class="individual field-wrapper" >
<div class="_100 field-style" >
<p class="field-p" >
<label for="field0" class="label-position top " >
First Name
</label>
<input id="field0" name="FirstName" type="text" value="" class="field-size-top-large" />
</p>
</div>
</div>
</div>
<div id="formElement1" class="sc-view form-design-field sc-static-layout item-padding sc-regular-size" >
<div class="field-wrapper" >
</div>
<div class="individual field-wrapper" >
<div class="_100 field-style" >
<p class="field-p" >
<label for="field1" class="label-position top " >
LastName
</label>
<input id="field1" name="LastName" type="text" value="" class="field-size-top-large" />
</p>
</div>
</div>
</div>
<div id="formElement2" class="sc-view form-design-field sc-static-layout item-padding sc-regular-size" >
<div class="field-wrapper" >
</div>
<div class="individual field-wrapper" >
<div class="_100 field-style" >
<p class="field-p" >
<input type="submit" value="Submit" class="submit-button" style="font-size: 100%; height: 24px; width: 100px" />
</p>
</div>
</div>
</div>
</form>
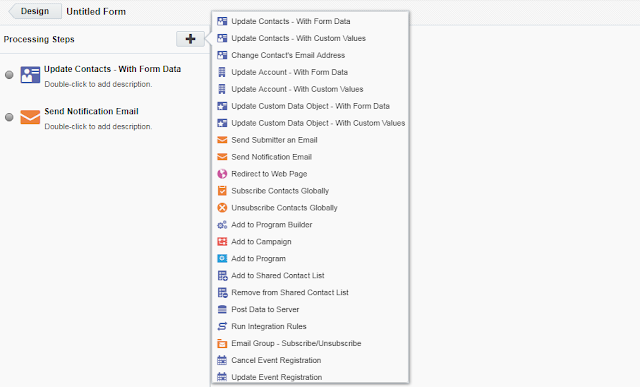
Configure the form action and elqSiteId to actual values.Whenever the user submits the form data, the data is posted to the action URL(Eloqua URL) specified in the form. Define the required processing steps for Eloqua form to process the submitted data.
Submit the data through Eloqua form - AEM servlet to Eloqua form action URL:
The form can be directly posted to Eloqua form action URL but internal AEM servlet will provide more control
Change the form action to AEM Servlet URL
Change <form method="post" name="UntitledForm-1512922222" action="https://sxxxxxxxx.t.eloqua.com/e/f2" id="form64"> to
<form method="post" name="UntitledForm-1512922222" action="/services/EloquaFormSubmission" id="form64">
Configure elqSiteId in the form - <input value="xxxxxxx" type="hidden" name="elqSiteId" />
Create a Servlet to sumbit the data to Eloqua - Confiure the required details in servlet like URL and proxy details etc.
@Component(metatype = false)
@SlingServlet(name = "EloquaFormServlet", description = "Eloqua Form Servlet", methods = {"GET","POST"}, generateComponent = false, paths = "/services/EloquaFormSubmission")
@Service(Servlet.class)
public class EloquaFormServlet extends SlingAllMethodsServlet {
private static String CONTENT_TYPE = "application/x-www-form-urlencoded";
@Override
protected void doGet(SlingHttpServletRequest request, SlingHttpServletResponse response) throws ServletException,IOException {
doPost(request,response);
}
@Override
protected void doPost(SlingHttpServletRequest request, SlingHttpServletResponse response) throws ServletException,IOException {
Logger log = LoggerFactory.getLogger(EloquaFormServlet.class);
String eurl ="https://sxxxxxxxx.t.eloqua.com/e/f2";//Change the Eloqua site ID
String proxyHost=//Set the proxy host
int intProxyPort = //Set the proxy posr
HttpHost proxy = new HttpHost(proxyHost,intProxyPort,"http");
HttpClient client = new DefaultHttpClient();
client.getParams().setParameter(ConnRoutePNames.DEFAULT_PROXY,proxy);//Ignore this if the http proxy is not required to connect to Eloqua
List<String> keys = new ArrayList<>(request.getParameterMap().keySet());
List<NameValuePair> urlParameters = new ArrayList<NameValuePair>();
String value="";
for(String key:keys){
value = (String)request.getParameter(key);
urlParameters.add(new BasicNameValuePair(key, value));
}
HttpPost post = new HttpPost(eurl);
post.setHeader("User-Agent","Mozilla/5.0");
post.setHeader("Accept","text/html,application/xhtml+xml,application/xml;q=0.9,*/*;q=0.8");
post.setHeader("Accept-Language", "en-US,en;q=0.5");
post.setHeader("Connection", "keep-alive");
post.setHeader("Content-Type", "application/x-www-form-urlencoded");
post.setEntity(new UrlEncodedFormEntity(urlParameters,"UTF-8"));
BufferedReader bufferedReader = new BufferedReader(new InputStreamReader(post.getEntity().getContent()));
String inLine;
StringBuilder parameterDetails= new StringBuilder();
while ((inLine = bufferedReader.readLine()) != null) {
parameterDetails.append(inLine);
}
log.info("post entity {}",parameterDetails.toString());
try{
HttpResponse resp = client.execute(post);
log.info("connection response : {}", resp.getStatusLine().getStatusCode());
if(resp.getStatusLine().getStatusCode() == HttpURLConnection.HTTP_OK){
BufferedReader in = new BufferedReader(new InputStreamReader(resp.getEntity().getContent()));
String inputLine;
StringBuilder report= new StringBuilder();
while ((inputLine = in.readLine()) != null) {
report.append(inputLine);
}
log.info("Eloqua Response line: {}",report.toString());
in.close();
response.setContentType(CONTENT_TYPE);
if("".equals(report.toString()))
response.getWriter().print("success");
else
response.getWriter().print(report.toString());
}
}
catch (Exception e){
log.error(e.toString());
}
}
}
Submit the data to Eloqua Form - Eloqua REST API:
Eloqua REST API can be used to send the data to Eloqua form.
Define the form in Eloqua as mentioned in the above step.
Identify the form id of the Eloqua form

The below java code can be used to submit the data to Eloqua form through REST API.
public class SaveFormData {
public static void main(String[] args) {
try {
String authString = "CompanyName\\user name" + ":" + "Password";//Change to actual values
String authToken = "Basic " + javax.xml.bind.DatatypeConverter.printBase64Binary(authString.getBytes());
String response ="";
String line;
//the id of the Fields can be retrieved through Get Request to https://secure.p03.eloqua.com/api/rest/2.0/assets/form/64 (64 is the form id)
//Configure the JSON input for all the fields with id and the value, here input for two fields - FirstName and LastName
String body = "{\"fieldValues\":[{\"id\":497,\"value\":\"asdfasdf\",\"type\":\"FieldValue\"},{\"id\":498,\"value\":\"asdfasdf\",\"type\":\"FieldValue\"}],\"type\":\"FormData\"}";
URL url = new URL("https://secure.p03.eloqua.com/api/rest/2.0/data/form/64");
//URL url = new URL("https://secure.p03.eloqua.com/api/rest/2.0/assets/form/64");
HttpURLConnection conn = (HttpURLConnection) url.openConnection();
conn.setInstanceFollowRedirects(false);
//conn.setRequestMethod("GET");
conn.setRequestMethod("POST");
conn.setRequestProperty("Content-Type", "application/json");
conn.setRequestProperty("Accept", "application/json");
conn.setRequestProperty("Authorization", authToken);
conn.setDoOutput(true);
final OutputStream os = conn.getOutputStream();//Comment out for GET request
os.write(body.getBytes());//Comment out for GET request
os.flush();//Comment out for GET request
os.close();//Comment out for GET request
InputStream is = conn.getInputStream();
BufferedReader rd = new BufferedReader(new InputStreamReader( is));
while ((line = rd.readLine()) != null)
{
response += line;
}
rd.close();
conn.disconnect();
System.out.println(response);
} catch (MalformedURLException e) {
// TODO Auto-generated catch block
e.printStackTrace();
} catch (ProtocolException e) {
// TODO Auto-generated catch block
e.printStackTrace();
} catch (IOException e) {
// TODO Auto-generated catch block
e.printStackTrace();
}
}
}
Retrieve the form Field details:
The field details of a form can be retrieved through the following REST API - GET https://secure.p03.eloqua.com/api/rest/2.0/assets/form/64 - (form id is 64)

Serach for elements in the reponse and locate the id's for every fields.
Now the user submitted data will be send to Eloqua. The submitted data can be verified as follow


After defining the form - Click on View Form HTML

Copy the form section as shown below

Sample Eloqua form -
<form method="post" name="UntitledForm-1512922222" action="https://sxxxxxxxx.t.eloqua.com/e/f2" id="form64">
<input value="UntitledForm-1512922222" type="hidden" name="elqFormName" />
<input value="xxxxxxxxx" type="hidden" name="elqSiteId" />
<input name="elqCampaignId" type="hidden" />
<div id="formElement0" class="sc-view form-design-field sc-static-layout item-padding sc-regular-size" >
<div class="field-wrapper" >
</div>
<div class="individual field-wrapper" >
<div class="_100 field-style" >
<p class="field-p" >
<label for="field0" class="label-position top " >
First Name
</label>
<input id="field0" name="FirstName" type="text" value="" class="field-size-top-large" />
</p>
</div>
</div>
</div>
<div id="formElement1" class="sc-view form-design-field sc-static-layout item-padding sc-regular-size" >
<div class="field-wrapper" >
</div>
<div class="individual field-wrapper" >
<div class="_100 field-style" >
<p class="field-p" >
<label for="field1" class="label-position top " >
LastName
</label>
<input id="field1" name="LastName" type="text" value="" class="field-size-top-large" />
</p>
</div>
</div>
</div>
<div id="formElement2" class="sc-view form-design-field sc-static-layout item-padding sc-regular-size" >
<div class="field-wrapper" >
</div>
<div class="individual field-wrapper" >
<div class="_100 field-style" >
<p class="field-p" >
<input type="submit" value="Submit" class="submit-button" style="font-size: 100%; height: 24px; width: 100px" />
</p>
</div>
</div>
</div>
</form>
Configure the form action and elqSiteId to actual values.Whenever the user submits the form data, the data is posted to the action URL(Eloqua URL) specified in the form. Define the required processing steps for Eloqua form to process the submitted data.


Submit the data through Eloqua form - AEM servlet to Eloqua form action URL:
The form can be directly posted to Eloqua form action URL but internal AEM servlet will provide more control
Change the form action to AEM Servlet URL
Change <form method="post" name="UntitledForm-1512922222" action="https://sxxxxxxxx.t.eloqua.com/e/f2" id="form64"> to
<form method="post" name="UntitledForm-1512922222" action="/services/EloquaFormSubmission" id="form64">
Configure elqSiteId in the form - <input value="xxxxxxx" type="hidden" name="elqSiteId" />
Create a Servlet to sumbit the data to Eloqua - Confiure the required details in servlet like URL and proxy details etc.
@Component(metatype = false)
@SlingServlet(name = "EloquaFormServlet", description = "Eloqua Form Servlet", methods = {"GET","POST"}, generateComponent = false, paths = "/services/EloquaFormSubmission")
@Service(Servlet.class)
public class EloquaFormServlet extends SlingAllMethodsServlet {
private static String CONTENT_TYPE = "application/x-www-form-urlencoded";
@Override
protected void doGet(SlingHttpServletRequest request, SlingHttpServletResponse response) throws ServletException,IOException {
doPost(request,response);
}
@Override
protected void doPost(SlingHttpServletRequest request, SlingHttpServletResponse response) throws ServletException,IOException {
Logger log = LoggerFactory.getLogger(EloquaFormServlet.class);
String eurl ="https://sxxxxxxxx.t.eloqua.com/e/f2";//Change the Eloqua site ID
String proxyHost=//Set the proxy host
int intProxyPort = //Set the proxy posr
HttpHost proxy = new HttpHost(proxyHost,intProxyPort,"http");
HttpClient client = new DefaultHttpClient();
client.getParams().setParameter(ConnRoutePNames.DEFAULT_PROXY,proxy);//Ignore this if the http proxy is not required to connect to Eloqua
List<String> keys = new ArrayList<>(request.getParameterMap().keySet());
List<NameValuePair> urlParameters = new ArrayList<NameValuePair>();
String value="";
for(String key:keys){
value = (String)request.getParameter(key);
urlParameters.add(new BasicNameValuePair(key, value));
}
HttpPost post = new HttpPost(eurl);
post.setHeader("User-Agent","Mozilla/5.0");
post.setHeader("Accept","text/html,application/xhtml+xml,application/xml;q=0.9,*/*;q=0.8");
post.setHeader("Accept-Language", "en-US,en;q=0.5");
post.setHeader("Connection", "keep-alive");
post.setHeader("Content-Type", "application/x-www-form-urlencoded");
post.setEntity(new UrlEncodedFormEntity(urlParameters,"UTF-8"));
BufferedReader bufferedReader = new BufferedReader(new InputStreamReader(post.getEntity().getContent()));
String inLine;
StringBuilder parameterDetails= new StringBuilder();
while ((inLine = bufferedReader.readLine()) != null) {
parameterDetails.append(inLine);
}
log.info("post entity {}",parameterDetails.toString());
try{
HttpResponse resp = client.execute(post);
log.info("connection response : {}", resp.getStatusLine().getStatusCode());
if(resp.getStatusLine().getStatusCode() == HttpURLConnection.HTTP_OK){
BufferedReader in = new BufferedReader(new InputStreamReader(resp.getEntity().getContent()));
String inputLine;
StringBuilder report= new StringBuilder();
while ((inputLine = in.readLine()) != null) {
report.append(inputLine);
}
log.info("Eloqua Response line: {}",report.toString());
in.close();
response.setContentType(CONTENT_TYPE);
if("".equals(report.toString()))
response.getWriter().print("success");
else
response.getWriter().print(report.toString());
}
}
catch (Exception e){
log.error(e.toString());
}
}
}
Submit the data to Eloqua Form - Eloqua REST API:
Eloqua REST API can be used to send the data to Eloqua form.
Define the form in Eloqua as mentioned in the above step.
Identify the form id of the Eloqua form

The below java code can be used to submit the data to Eloqua form through REST API.
public class SaveFormData {
public static void main(String[] args) {
try {
String authString = "CompanyName\\user name" + ":" + "Password";//Change to actual values
String authToken = "Basic " + javax.xml.bind.DatatypeConverter.printBase64Binary(authString.getBytes());
String response ="";
String line;
//the id of the Fields can be retrieved through Get Request to https://secure.p03.eloqua.com/api/rest/2.0/assets/form/64 (64 is the form id)
//Configure the JSON input for all the fields with id and the value, here input for two fields - FirstName and LastName
String body = "{\"fieldValues\":[{\"id\":497,\"value\":\"asdfasdf\",\"type\":\"FieldValue\"},{\"id\":498,\"value\":\"asdfasdf\",\"type\":\"FieldValue\"}],\"type\":\"FormData\"}";
URL url = new URL("https://secure.p03.eloqua.com/api/rest/2.0/data/form/64");
//URL url = new URL("https://secure.p03.eloqua.com/api/rest/2.0/assets/form/64");
HttpURLConnection conn = (HttpURLConnection) url.openConnection();
conn.setInstanceFollowRedirects(false);
//conn.setRequestMethod("GET");
conn.setRequestMethod("POST");
conn.setRequestProperty("Content-Type", "application/json");
conn.setRequestProperty("Accept", "application/json");
conn.setRequestProperty("Authorization", authToken);
conn.setDoOutput(true);
final OutputStream os = conn.getOutputStream();//Comment out for GET request
os.write(body.getBytes());//Comment out for GET request
os.flush();//Comment out for GET request
os.close();//Comment out for GET request
InputStream is = conn.getInputStream();
BufferedReader rd = new BufferedReader(new InputStreamReader( is));
while ((line = rd.readLine()) != null)
{
response += line;
}
rd.close();
conn.disconnect();
System.out.println(response);
} catch (MalformedURLException e) {
// TODO Auto-generated catch block
e.printStackTrace();
} catch (ProtocolException e) {
// TODO Auto-generated catch block
e.printStackTrace();
} catch (IOException e) {
// TODO Auto-generated catch block
e.printStackTrace();
}
}
}
Retrieve the form Field details:
The field details of a form can be retrieved through the following REST API - GET https://secure.p03.eloqua.com/api/rest/2.0/assets/form/64 - (form id is 64)

Serach for elements in the reponse and locate the id's for every fields.
Now the user submitted data will be send to Eloqua. The submitted data can be verified as follow


No comments:
Post a Comment
If you have any doubts or questions, please let us know.