Log into your author instance, and open the Tools console. Open the Replication tree in the navigation pane and expand the Agents on the authoring branch.
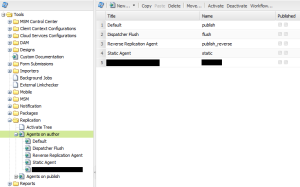
Select the Dispatcher Flush replication agent from the right, click copy, then paste. Repeat this for each Dispatcher you want to create a flush agent for.

Double click the newly created agent you want to edit. It should open in a new tab/window with the details of the replication agent.
Click the edit button, and rename the agent on the Settings tab if desired.
On the Transport tab, update the URI to the server and port of the dispatcher Apache (or whatever web-server software you use) installation, ensuring to leave the remainder of the URI as /dispatcher/invalidate.cache
Open the Triggers tab and ensure that the On Modification checkbox is selected.

Click OK to save the configuration, then click the Test Connection link to ensure the agent is configured correctly. If the test succeeds, edit the agent again and check the Enabled checkbox on the Settings tab, and then OK to save the agent. It should now be saved, running, and invalidating the cache on the Dispatcher for any content that is modified from now on. This caching, of course, is governed by the dispatcher.any file, which I’ll cover in a later post.

No comments:
Post a Comment
If you have any doubts or questions, please let us know.