
In order to configure your custom search engine, you have to go to the developer console of the Google account of your choice: https://console.developers.google.com/project
Just remember Google will allow a quota of 100 requests to your custom search engine per day. It’s perfect for test purposes and when ready, all you’ll have to do is turn on billing on the Google Custom Search API.
Follow the steps below:
Enable Custom Search API
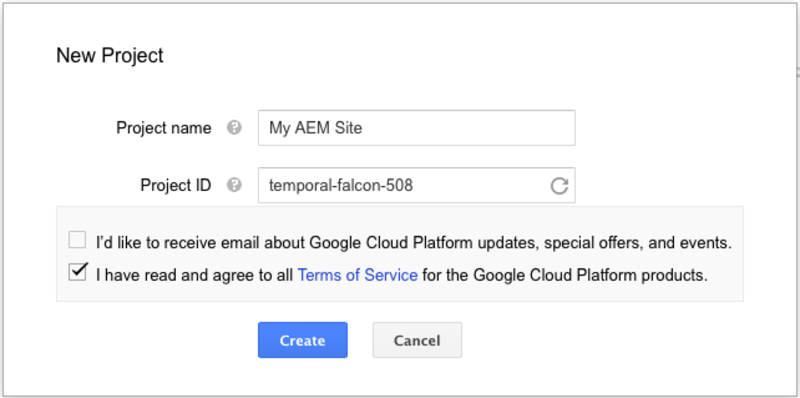
Create a new project.
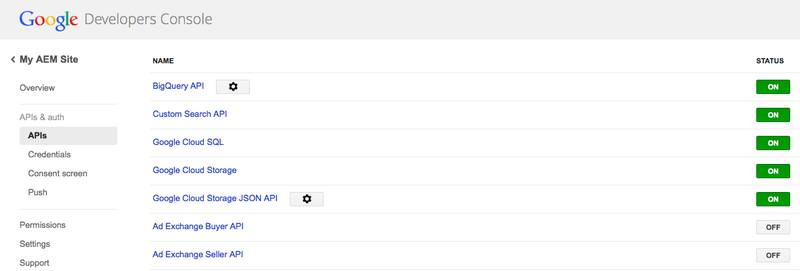
Once created, click on “APIs & auth” on the left navigation.
Scroll down to find “Custom Search API” and turn it on. You should now see an “ON” green status at the top of the list.
Get Your Public API Key
Copy your public API key which you can find in the “Credentials” section of the left sidebar of the developer console.
If you don’t have one, you can create a new one and even limit its access to certain IP addresses if needed.
Configure your Custom Search Engine and Get Your Context Number
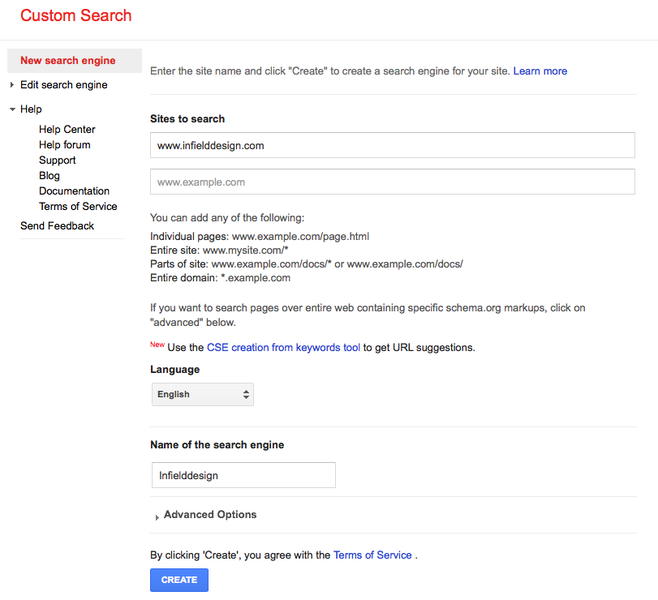
Access the Custom Search Engine dashboard: https://www.google.com/cse/all
Click the “Add” button to configure your search engine.
Enter one or several sites to search, specify the language if needed and name your configuration.
Once created, click the “Get Code” button and copy the context number. It is the password like string inside the cx variable of the code given by Google (i.e var cx = ‘YOUR_CONTEXT_NUMBER‘; don’t copy the quotes).
Create a new project:
Enable custom search:
Create custom search engine:
Get the context code:

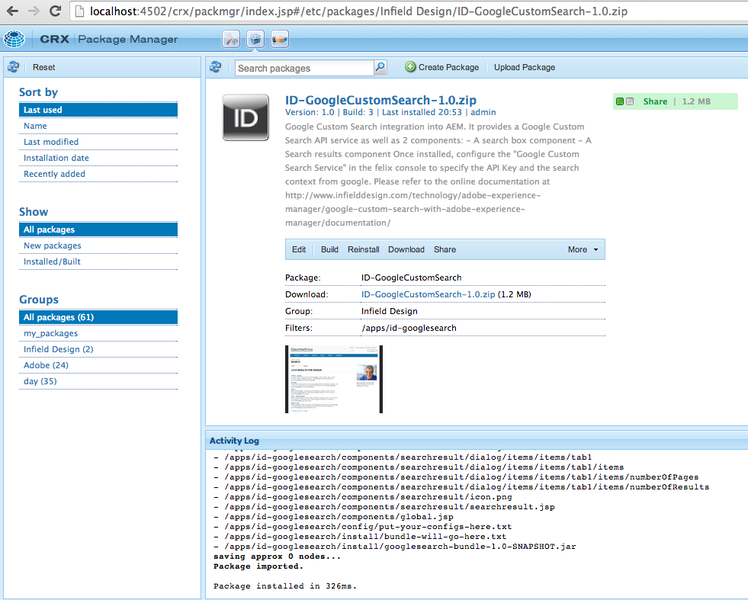
Install the AEM – Google Custom Search package
Get the package On GitHub: https://github.com/infielddesign/aem-id-googlesearch Or direct download from our website If you download the project via GitHub, you can build it via maven with mvn -PautoInstallPackage clean install as explained in the readme file of the repository. If you are downloading the package via the InfieldDesign website, follow the steps listed below. Install the package Go to your CQ5 instance package manager http://localhost:4502/crx/packmgr/index.jsp Upload the package and install it. If you are not familiar with this procedure, please refer to the official documentation here: You are done. :)Get the package On GitHub: https://github.com/infielddesign/aem-id-googlesearch Or direct download from our website If you download the project via GitHub, you can build it via maven with mvn -PautoInstallPackage clean install as explained in the readme file of the repository. If you are downloading the package via the InfieldDesign website, follow the steps listed below. Install the package Go to your CQ5 instance package manager http://localhost:4502/crx/packmgr/index.jsp Upload the package and install it. If you are not familiar with this procedure, please refer to the official documentation here: You are done. ?
Install Google Custom Search package:
Configure the Google Custom Search service
Once the package is installed, you are ready to configure the service to enter the two numbers you’ve copied in the first steps of the documentation.
Apply the API key and The Context Number
Add the search result component to a page
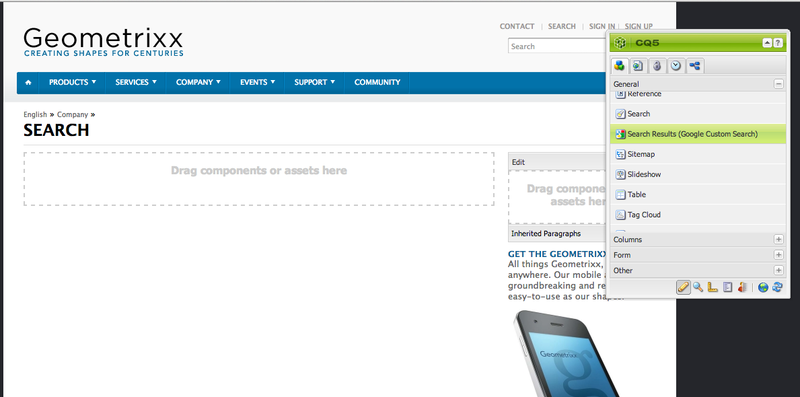
The AEM – Google Custom Search package comes with a Search Box component and a Search Result component.
The Search Result component is part of the “General” component group so if your page doesn’t allow you to insert components from the “General” group, you’ll have to switch to design mode from the sidekick and check the “Search results (Google Custom Search)” entry in the list.
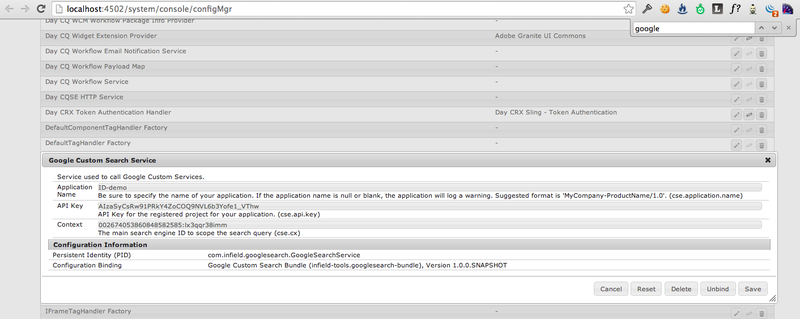
- Go to the “Web Console”, in the OSGI configuration manager section: http://localhost:4502/system/console/configMgr
- Search for “Google Custom Search Service” in the list and click on the title to edit the configuration.
- Enter an application name. This will identify your website for Google custom search statistics.
- Enter the API key.
- Enter the Context number.
- Click save.
Add the search result component to a page
The AEM – Google Custom Search package comes with a Search Box component and a Search Result component.
The Search Result component is part of the “General” component group so if your page doesn’t allow you to insert components from the “General” group, you’ll have to switch to design mode from the sidekick and check the “Search results (Google Custom Search)” entry in the list.
Add the component to a page
Component configuration:
Search result:

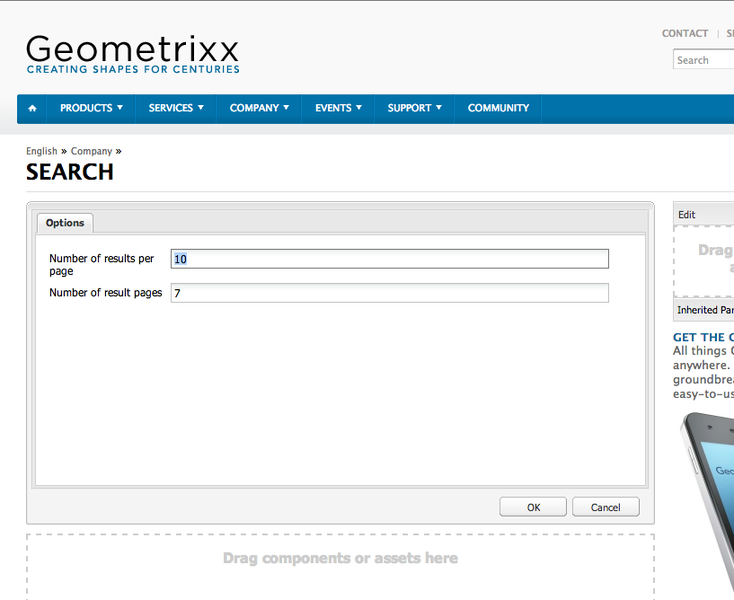
- Create a page or go to an existing search page you’d like to place the search result on.
- Drag and drop the “Search results (Google Custom Search)” component on the page.
- Edit the component to configure the number of pages to show (default 7) and the number of results per page (default 10).
- Click OK and you should be able to perform a search right away.
Component configuration:
Search result:
Add the Search Box component to your template
This step requires you to edit your template and to add the search box component in the header of your website. In this documentation, we are simply replacing the Geometrixx search box by our component to demonstrate the concept.
Edit the main template
Configure the search result page:
Congratulations! You are finished. You can perform a search from any page of the site via the search box. it will direct you to the search results page with the performed search.
Enjoy!
This step requires you to edit your template and to add the search box component in the header of your website. In this documentation, we are simply replacing the Geometrixx search box by our component to demonstrate the concept.
Edit the main template
- Go to CRXDE lite: http://<YOUR_CQ5_INSTANCE>:4502/crx/de/index.jsp
- Edit the file located at /apps/geometrixx/components/page/header.jsp
- Replace the entire form html element by this: <cq:include path=”searchbox” resourceType=”/apps/id-googlesearch/components/searchbox”/> to refer to our component.
- Click “Save all”.
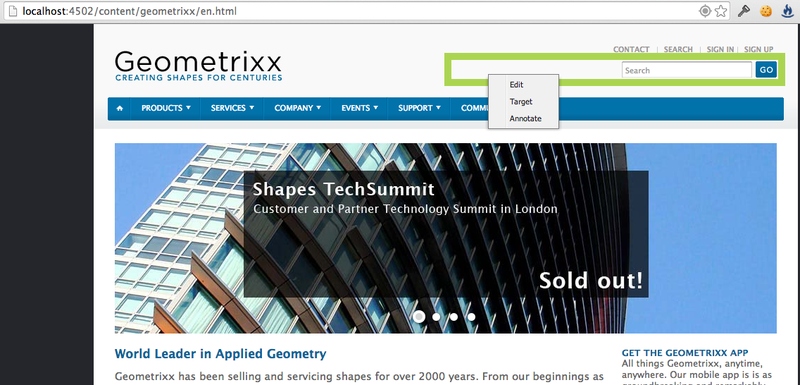
- Open the Geometrixx homepage.
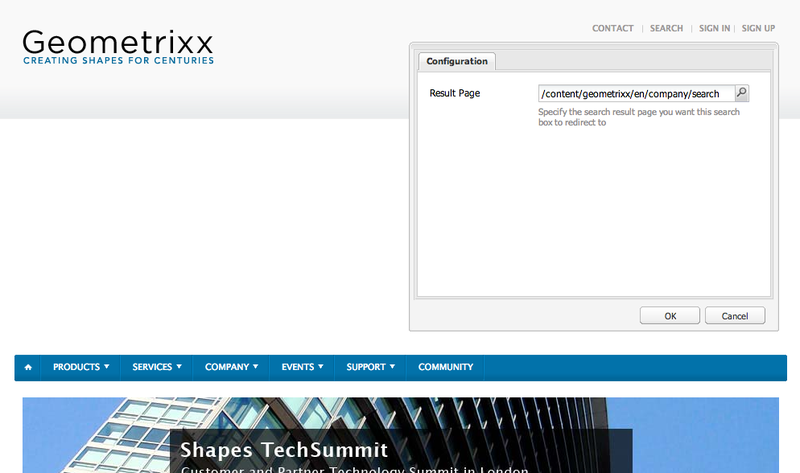
- Right click on the search box and click “edit”.
- Configure the Search result page that you’ve set up in the previous step. This configuration will be applied globally to all the subpages of the homepage unless you override it for a specific section of your site.
Configure the search result page:
Congratulations! You are finished. You can perform a search from any page of the site via the search box. it will direct you to the search results page with the performed search.
Enjoy!

No comments:
Post a Comment
If you have any doubts or questions, please let us know.