Refer the following links for more details-
http://www.translations.com/products/globallink-AEM-adaptor,
http://www.translations.com/globallink/partners/adobe.html
Translations.com provides packages (in Zip format) which can be installed through the AEM package manager. They provide two packages-
a. GlobalLink-Adaptor-4.7.6.zip (Check the latest packages from TDC site)
b. GlobalLink-Workflows-2.1.zip (Check the latest packages from TDC site)
Please note that this is not an open-source product and you need to contact TDC to get these packages. Once packages installed, required page templates will be available. Look at the screenshot below-

You need to create pages for each template under /content/global-link (Their latest Adaptor package doesn't need this activity. Their configuration is available from /projects.html page of the AEM instance)-

Configuring Translation.com
First, add the new Translation vendor to Translation configurations-
On the rail, click or tap Tools > Operations > Cloud > Cloud Services.
In the Adobe Marketing Cloud/Translation Integration area, click or tap Show Configurations.
Click the + link next to Available Configurations.
Type a title for your configuration. The title identifies the configuration in the Cloud Services console as well as in page property drop-down lists. The default name is based on the title. Optionally, type a name to use for the repository node that stores the configuration.
Click Create.
On the configuration page, click Edit.
On the Translation Integration Configuration tab, select the translation provider, and select the category to use for translating the content.
(Optional) On the User Generated Content tab, select the repository node where the original user-generated content and the translations are stored.
Click OK.
Now, Go to the Adaptor configuration page in AEM- http://localhost:4502/content/global-link/globallink-adaptor-configuration.html and enter required details for TDC web service URL, account user name, password, etc. The screen also asks you to define a language key mapping and properties to include for translation.
Scheduling Translations
I am taking here an example of Asset's description metadata field. To submit asset's “description” metadata for translation, follow below steps-
1. Go to the page- http://localhost:4502/content/global-link/globallink-adaptor-dam-assets.html
2. Fill in the required details. Click on the “Find Metadata” button; it will show up the result assets available for translation. Only those assets will be listed which have a description property set.
3. Expand the asset(s), and check the metadata fields that need to be sent for translation. Next, move to the “Target Languages” drop-down and select the desired languages. Click on the “Start Workflow” button to initiate the translation workflow. Look at the screenshot below-

4. After this, go to the TDC submission list page to check status- http://localhost:4502/content/global-link/globallink-adaptor-submissions-list.html.
Verifying Translation
Translation workflow will update node properties sent for translation with translated text automatically once a response is received.
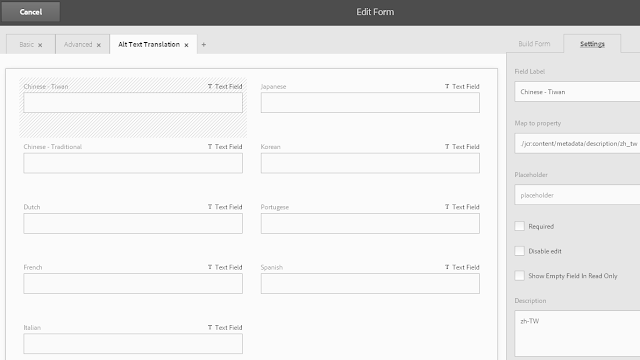
In order to display the translation in the front end, you can customize AEM UI to show translated data. In this example, I will add a new tab named "Alt Text Translation" to show all Alttext translations to the author.
Go to http://localhost:4502/libs/dam/gui/content/metadataschemaeditor/schemalist.html/dam/content/schemaeditors/forms
Select "Default" (You can pick an image, forms, etc. depending on your requirement) and Click on the pencil icon to edit it.
1. Use the "+" icon next to tags in left-hand screen to add a new tab- "Alt Text Translation"
2. Use the "Build Form" in the right-hand screen to add language fields.
Look at the below snapshot on how should it look-

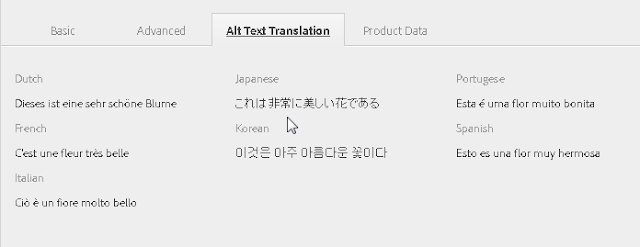
Once you have saved the metadata template, you can go to Asset Properties from the Assets section. The properties section will look like this-

Note: This article is based on the integration of an older version of Translations.com Global-Link Adaptor. While working with the new adapter version, all the above steps may not be required.
No comments:
Post a Comment
If you have any doubts or questions, please let us know.