Let’s begin with defining some basic requirements for sample AEM + Angular 2 components that we’ll develop in this article.
Problem statement for our component
- Develop a simple AEM + Angular 2 component to find location details based on IP address
- Use Angular 2 Http service to get location detail (by calling remote REST web service) based on IP address provided via HTML form input
- Display data/response from REST web service using Angular 2 binding on UI
- Provide the capability to authors so that they can change labels (e.g. label of “Search” button and label for “Location Detail” card/result) using component’s dialog
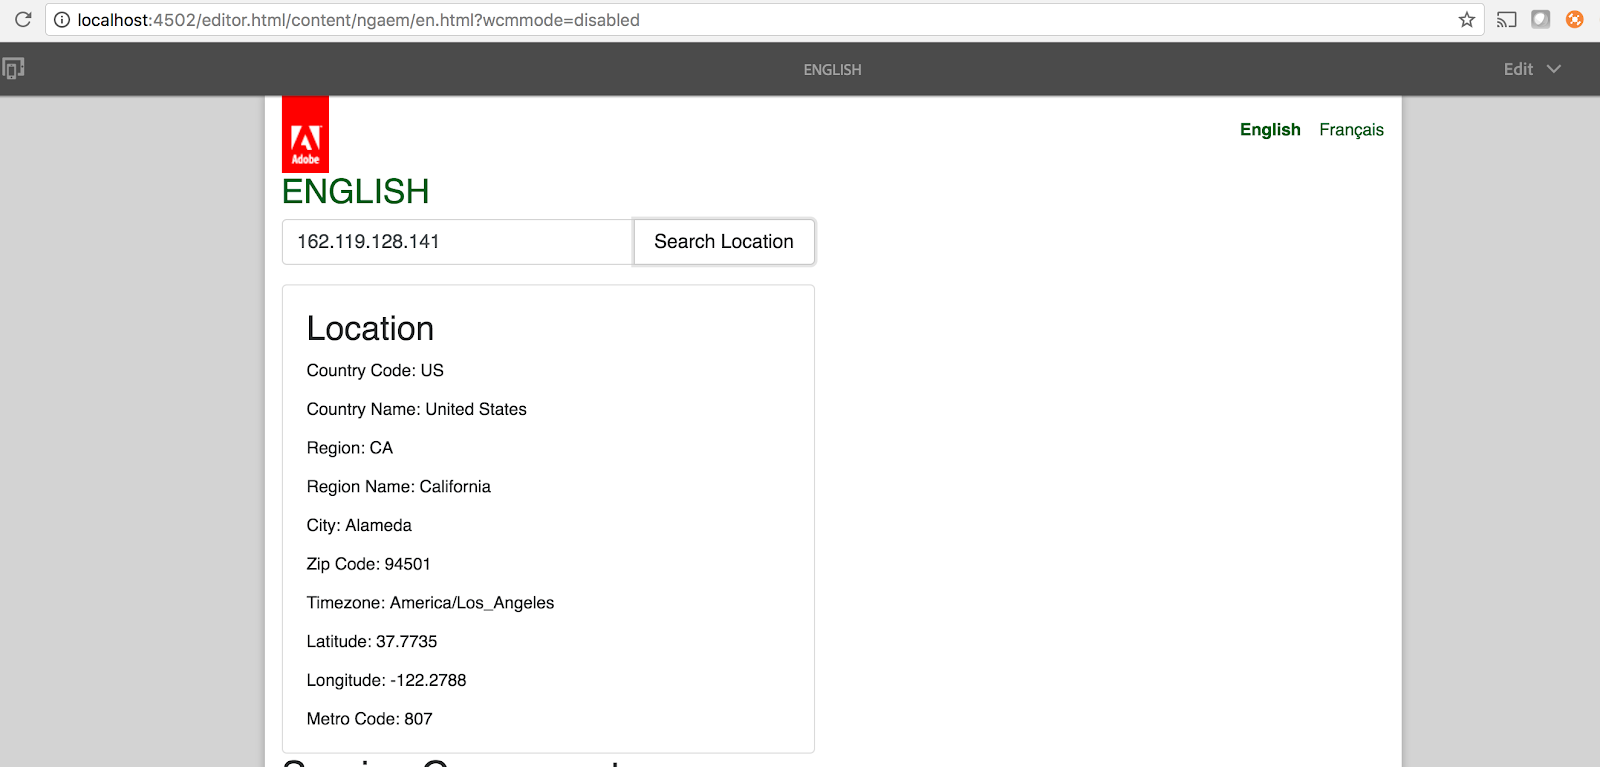
Image 1: “ip-location” AEM + Angular 2 in action on a AEM page
The idea behind developing this component is I want to cover AEM Authoring capabilities as well I want to show you how you can use Angular 2 features (like Http service, data binding, etc.)
Before we proceed, I assume that you already know how to develop a pure and simple AEM component and you also know about the Angular 2 framework. Both of these skills are a must understand the rest of this tutorial.
So, let’s get started!!!
We’ll be developing this component in 2 phases:
1. First, we’ll develop Basic AEM component (no Angular 2 code involved here)
- Create an AEM component in your application the way you have been creating AEM components (let’s say the component name is ip-location). ip-location component will have a sightly template file called “ip-location.html” and we are going to modify this file in the next step.
- Create a component dialog with 2 text fields “./goBtnLabel” and “./localtionLabel”, these are the fields that author will use to input text for “Search Location” button and “Location” label (as shown in above snapshot)
- Create a file in a component folder called “ip-location.component.ts”, this is the TypeScript file that will have Angular 2 component’s TypeScript code. Here is a screenshot of code (I’ll share github URL towards the end of this post):
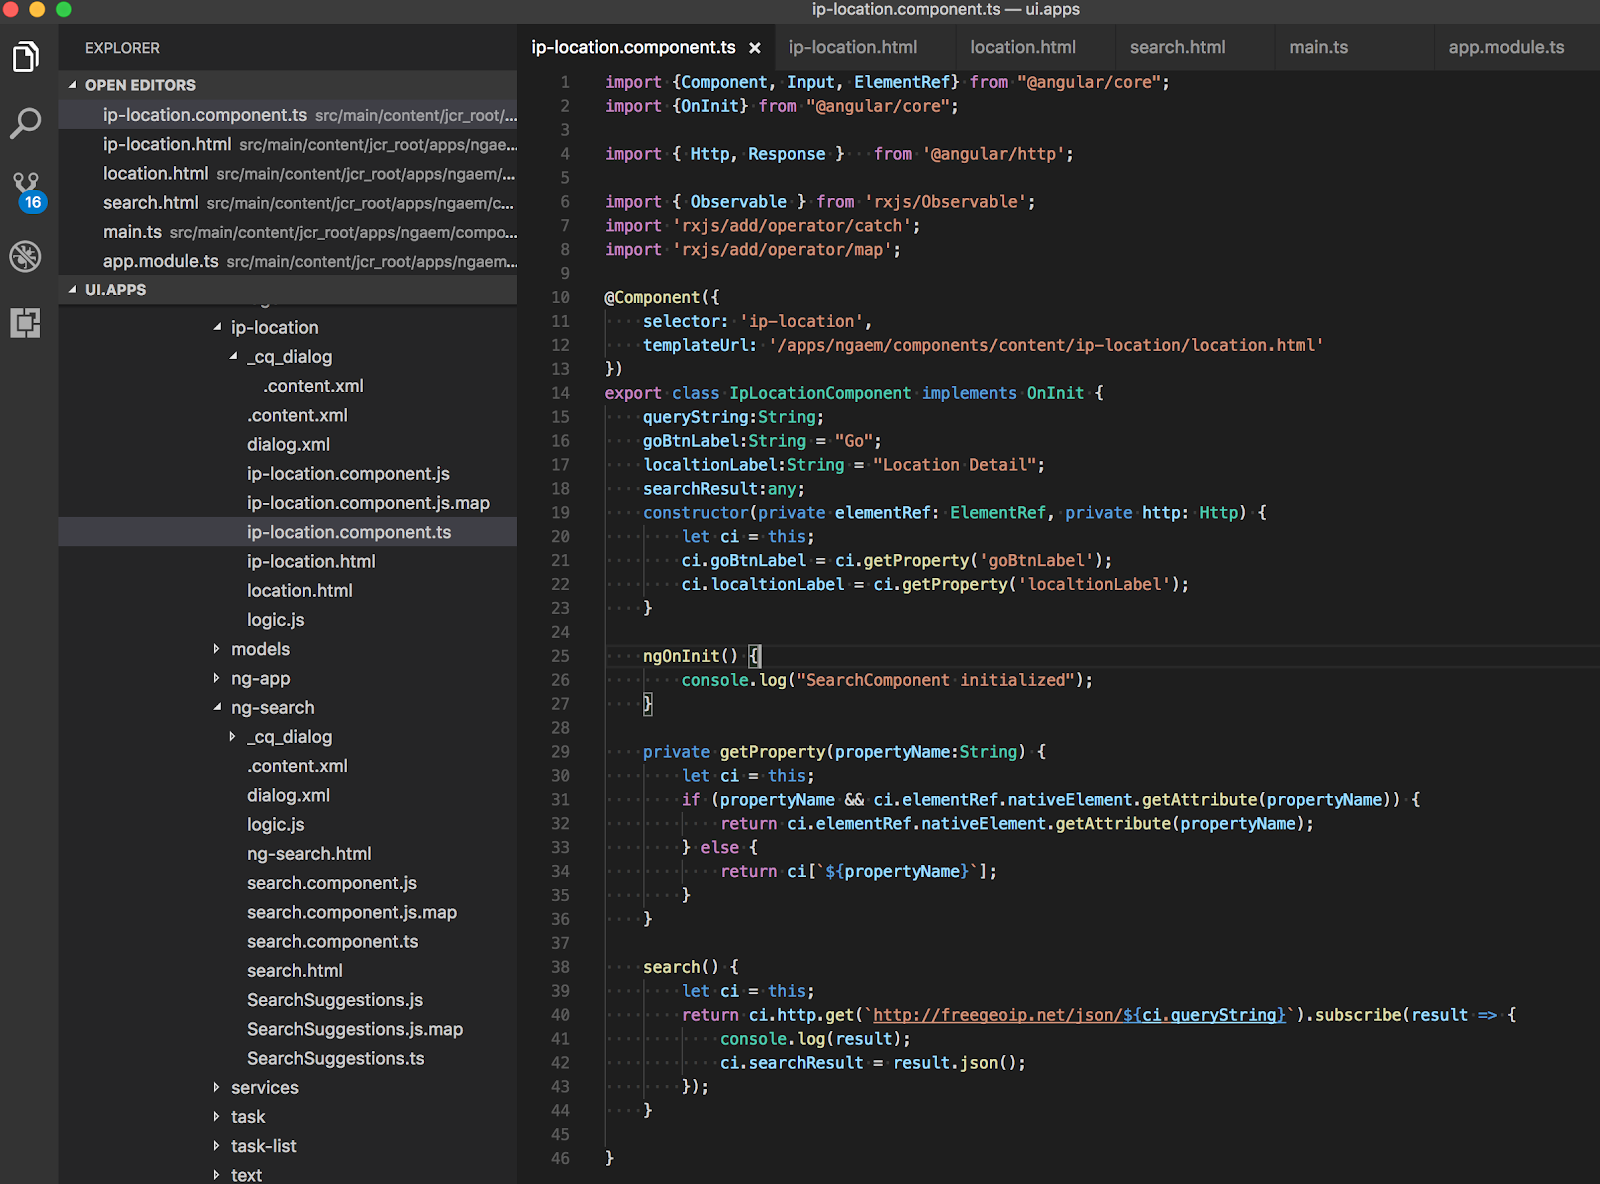
Image 2: “location.html” Angular 2 template/view
At 10 we have added Angular 2 annotation/decorator for component and at line 12 we are loading a template/view for this component.
NOTE the templateUrl path, we are not loading the “ip-location.html” file (which is actually component’s original sightly file), rather we are loading a different file called “location.html”.
This is because the Angular 2 template will not render properly in EDIT mode and that’s why we’ll include this “location.html” explicitly from “ip-location.html” (as shown below, line# 4). Have look at the test at lines number 2 and 11.

Image 3: “ip-location.html” Sightly view that will load Angular view in PREVIEW mode
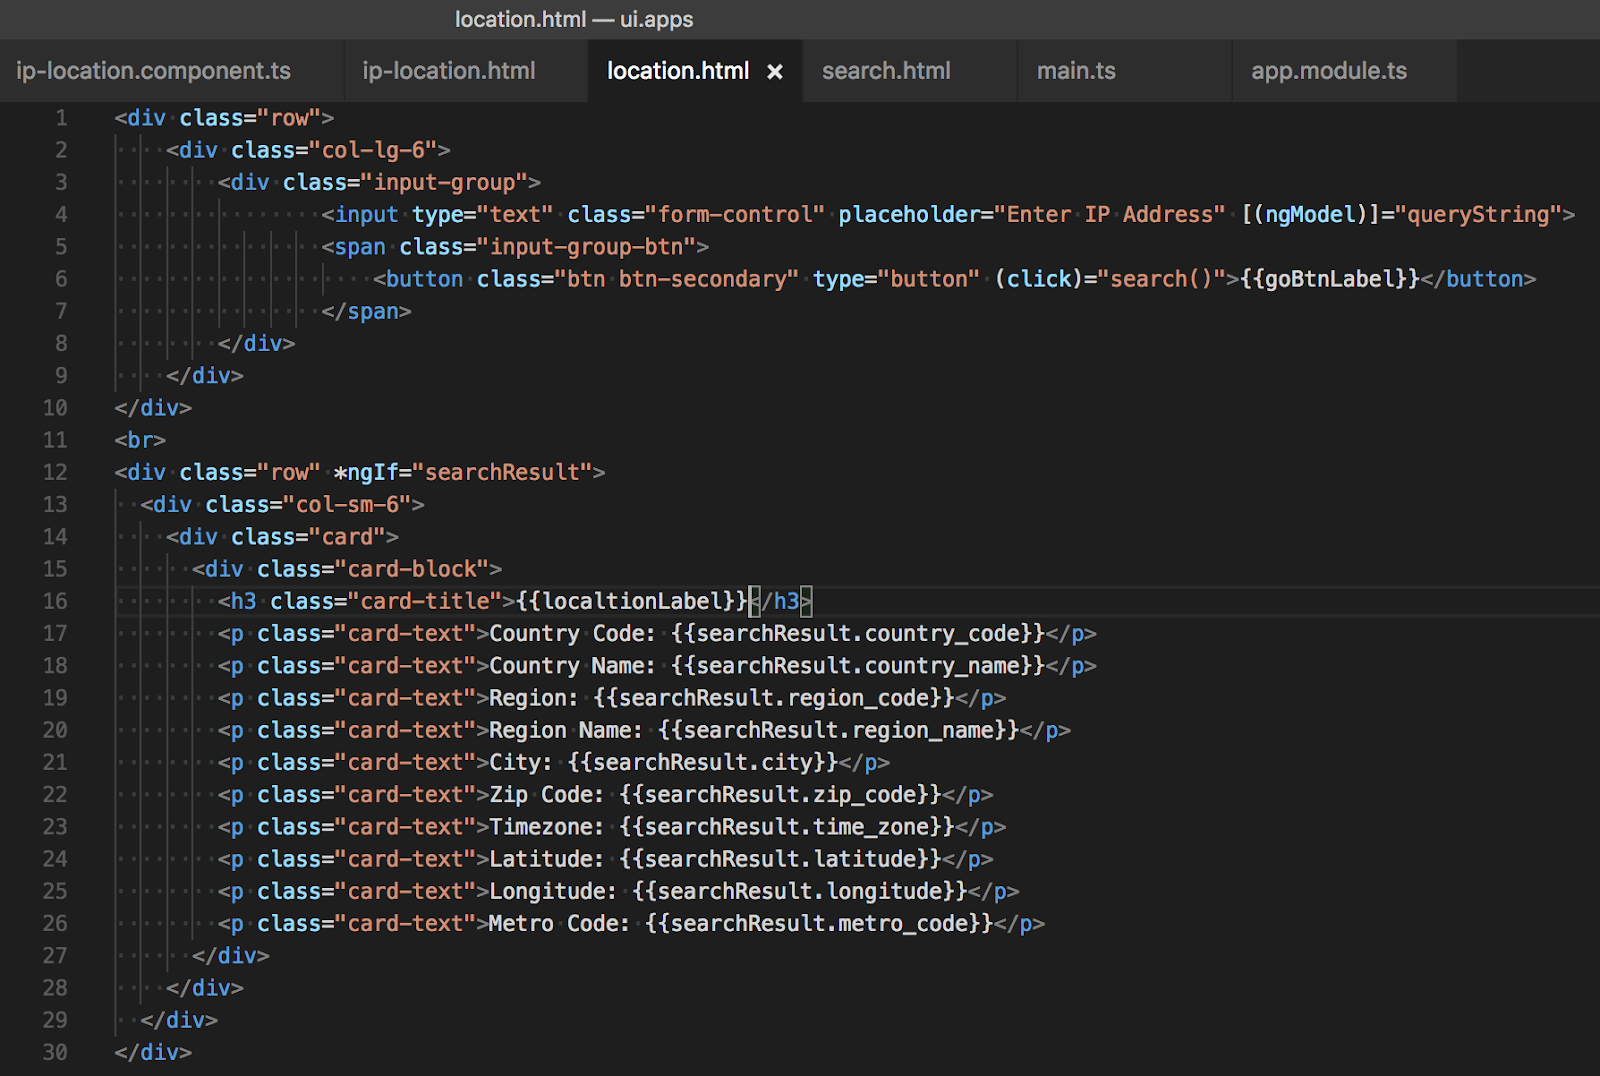
Image 4: “location.html” Angular 2 template referred and rendered by Angular 2 component
At line # 8 (Image 3), we have 2 HTML attributes “goBtnLabel” and “localtionLabel” populated using JCR property values (i.e. values entered by authors via component dialog). Since we don’t have a direct way to access JCR properties from Angular 2 component that’s why we are setting it as HTML attributes so that we can read it in our component’s TypeScript code
At line # 29 (Image 2), we have define a TypeScript function “getProperty()” that is responsible for reading 2 HTML attributes “goBtnLabel” and “localtionLabel” that we have defined at line # 8 (Image 3) and assigned it to Angular 2 component variables defined at line # 16 and 17 (Image 2) respectively. This is a hack to pass authored properties from JCR/properties to Angular 2 component but, so far it has worked perfectly fine for me
Once “goBtnLabel” and “localtionLabel” variable in TypeScript code is populated/binded we can use these variables in Angular 2 templates as shown below line# 6 and 16 (Image 4)
In our Angular 2 component’s TypeScript code (line# 38, Image 2) we have defined a search() function that uses Angular 2’s “Http” service to call a REST API hosted by https://freegeoip.net. To call this REST API we read IP address entered by the user in the input field defined in location.html (line 4, Image 4). This input field is binded with an Angular 2 model variable defined in TypeScript file (line # 15, Image 2)
So in this post, we have seen:
Source: http://suryakand-shinde.blogspot.com/2017/06/part-3-aem-with-angular-2-aem-component.html
Image 3: “ip-location.html” Sightly view that will load Angular view in PREVIEW mode
Image 4: “location.html” Angular 2 template referred and rendered by Angular 2 component
At line # 8 (Image 3), we have 2 HTML attributes “goBtnLabel” and “localtionLabel” populated using JCR property values (i.e. values entered by authors via component dialog). Since we don’t have a direct way to access JCR properties from Angular 2 component that’s why we are setting it as HTML attributes so that we can read it in our component’s TypeScript code
At line # 29 (Image 2), we have define a TypeScript function “getProperty()” that is responsible for reading 2 HTML attributes “goBtnLabel” and “localtionLabel” that we have defined at line # 8 (Image 3) and assigned it to Angular 2 component variables defined at line # 16 and 17 (Image 2) respectively. This is a hack to pass authored properties from JCR/properties to Angular 2 component but, so far it has worked perfectly fine for me
Once “goBtnLabel” and “localtionLabel” variable in TypeScript code is populated/binded we can use these variables in Angular 2 templates as shown below line# 6 and 16 (Image 4)
In our Angular 2 component’s TypeScript code (line# 38, Image 2) we have defined a search() function that uses Angular 2’s “Http” service to call a REST API hosted by https://freegeoip.net. To call this REST API we read IP address entered by the user in the input field defined in location.html (line 4, Image 4). This input field is binded with an Angular 2 model variable defined in TypeScript file (line # 15, Image 2)
So in this post, we have seen:
- How to integrate Angular 2 code with AEM component
- How to load Sightly template (in EDIT mode) v/s render actual Angular 2 component (in PREVIEW mode)
- How to pass authored values from Sightly to Angular 2 template and bind it with Angular 2 model
- How to use Angular 2 services from AEM component
Source: http://suryakand-shinde.blogspot.com/2017/06/part-3-aem-with-angular-2-aem-component.html

No comments:
Post a Comment
If you have any doubts or questions, please let us know.