There are three main categories for testing software and web applications:
- Unit Testing: Tests aimed at singular sections of back-end code.
- Integration Testing: A method that naturally builds on unit testing. For example, say that you test two units separately and they pass as individual components. Integration testing will check to see how well the two function together. Proper communication between the two parts is the primary focus.
- Functional Testing: A method of testing dedicated completely to the user experience. No back-end code is tested—only whether the front-end reacts appropriately to user input. Input is fed to elements, and the output and the reaction of relevant elements are verified.
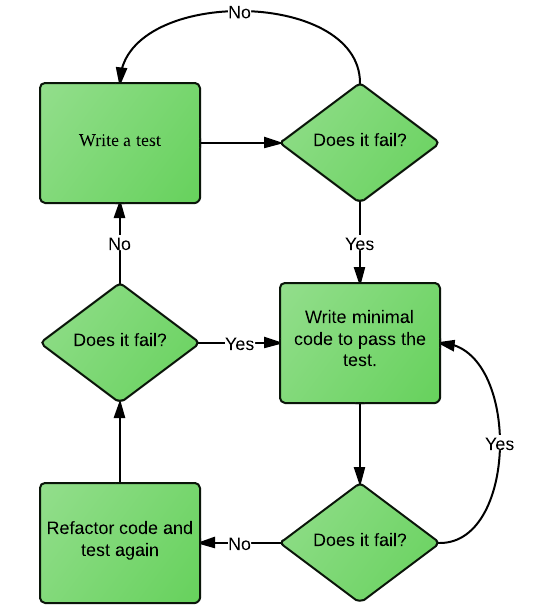
In using TDD as a method of implementation for functional parts of a website, one can steadily add a layer of complexity to specific user experience with each test. For example, we could define a test, which ensures a specific form responds with the correct output for various input values. After writing a minimal amount of code to pass the test and subsequent refactoring, we can write another test that will ensure the form’s submission triggers an additional response, and so forth. This process could be repeated until every visual response to interacting with the form is implemented. Below is a flow chart interpretation of TDD.
It just so happens that a new functional testing system has surfaced with the latest release of Adobe Experience Manager (AEM 6.0). This framework provides a streamlined experience for ensuring the usability of interactive elements on your site. This post will cover navigating the user interface of the framework and understanding how the provided example tests were made. The user interface of the new framework is known as the Test Sidekick—let’s start there.
Navigating to the Test Sidekick
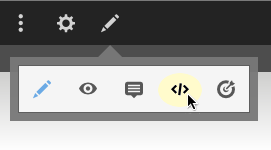
In the upper left corner of your author interface, click on the pencil icon. This will display the mode sub-menu. Select the icon that looks like an empty HTML close tag to enter developer mode.
This will take you to the components tab. Switch to the tests tab by clicking the middle icon on the tab panel.
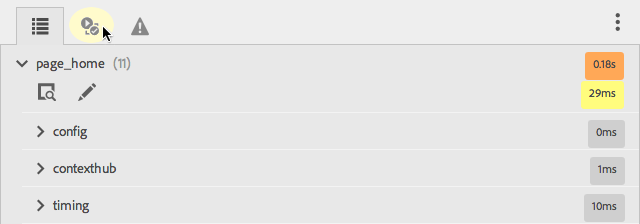
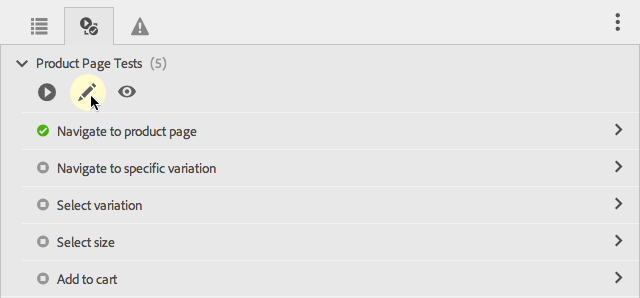
At this point, you will see any tests loaded for the projects in your instance. If you’re running a default instance with AEM’s Geometrixx projects installed, you will see the sample test suites included for Geometrixx Outdoors.
Running a Test
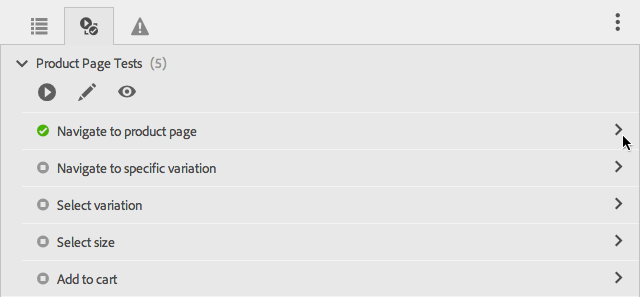
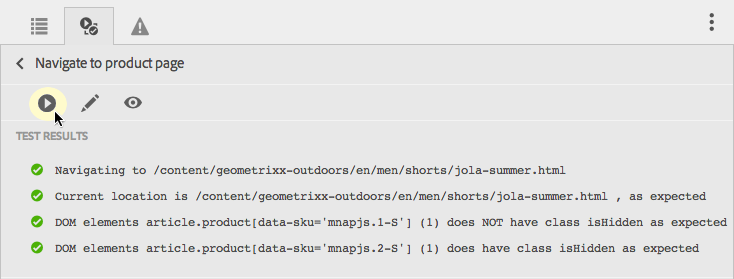
Let’s try out a sample test suite. Click on the “Navigate to product page” test, and then click on the play button. You will see each step of the test executed, and a corresponding message for each step telling you whether it passed or failed. On the right side of your screen, you will see AEM dynamically performing these steps on your site. This ensures that in the case of a simple navigation test, you will end up on the page that the test is programmed to navigate to—unless it’s an external link or a page that doesn’t exist. Run the rest of the tests in the example suites to see more.
Developing Tests
The example test suites for Geometrixx Outdoors are a good start, but how do we make tests? What kind of tests can we make? First, let’s take a look at how Geometrixx Outdoors tests are stored in CRXDE Lite.
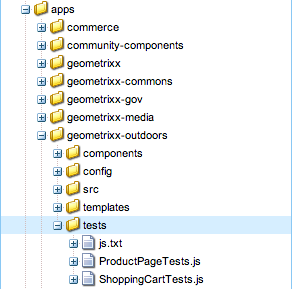
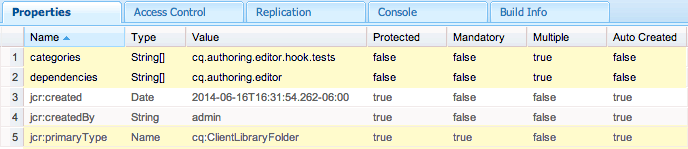
The structure of the tests folder reveals itself to be a Client Library. When making your own, be sure to remember to set the folder’s node type to cq:ClientLibraryFolder and add String array properties named categories and dependencies, which should point to cq.authoring.editor.hook.tests and cq.authoring.editor, respectively.
Test Suites are defined in separate JavaScript files, and identified in js.txt. For example, the js.txt within this test’s Client Library simply contains:
- ProductPageTests.js
- ShoppingCartTests.js
Instantiating a Test Suite
Observe the first line of code in ProductPageTests.js.
new hobs.TestSuite("Product Page Tests", {path:"/apps/geometrixx-outdoors/tests/ProductPageTests.js", register: true})
This creates the test suite. The first parameter assigns a name. The second defines the path in your JCR, which leads to the file containing this code. The third registers the suite to the test sidekick. Once instantiated, we can start chaining test cases onto the TestSuite object by calling the addTestCase method and subsequently defining what the test case entails within, as displayed below:
.addTestCase(new hobs.TestCase("Navigate to product page")
.navigateTo("/content/geometrixx-outdoors/en/men/shorts/jola-summer.html")
.asserts.location("/content/geometrixx-outdoors/en/men/shorts/jola-summer.html", true)
.asserts.hasCssClass("article.product[data-sku='mnapjs.1-S']", "isHidden", false)
.asserts.hasCssClass("article.product[data-sku='mnapjs.2-S']", "isHidden")
)
This defines the “Navigate to product page” test case, within the “Product Page Tests” suite. As navigateTo is being performed, your browser will attempt to arrive at the specified page. Once you’re there and the step has been completed, the test case continues. It asserts that we didn’t get redirected after we’ve navigated to our target page and that the product that is supposed to be visible shows up, while the one that’s supposed to be invisible on page load, is in fact hidden.
Assertion Methods
Most methods accessible through the asserts object have a common format. Below you’ll find the assertion methods that take a jQuery selector string as a parameter. By selector string, I mean just the string normally passed to jQuery, such as “#divID” and not an entire jQuery(“#divID”) object.
Most methods accessible through the asserts object have a common format. Below you’ll find the assertion methods that take a jQuery selector string as a parameter. By selector string, I mean just the string normally passed to jQuery, such as “#divID” and not an entire jQuery(“#divID”) object.
- isEnabled: function(selector, isEnabled, options)
- visible: function(selector, isVisible, options)
- exists: function(selector, doesExist, options)
- hasCSSClass: function(selector, cssClass, hasClass, options)
- cssAttribute: function(selector, cssAttr, cssValue, isTrue, options)
- isTrue: function(assertFct, options)
- isFalse: function(assertFct, options)
- location: function(url, isTrue, options)
Core Methods
These methods may be called before or after you assert something. For instance, the example below would navigate to a page and assert that all img tags with a title attribute possess a tooltip css class.
.navigateTo("/content/example.html").asserts.hasCSSClass("img[title]", ".tooltip", true)
These methods may be called before or after you assert something. For instance, the example below would navigate to a page and assert that all img tags with a title attribute possess a tooltip css class.
.navigateTo("/content/example.html").asserts.hasCSSClass("img[title]", ".tooltip", true)
- wait: function(time) -- Where time is in milliseconds.
- reloadPage: function(options)
- navigateTo: function(url, options)
- click: function(selector, options)
- mouseover: function(selector, options)
- mouseout: function(selector, options)
- fillInput: function(selector, text, options)
- typeInput: function(selector, text, options)
- execTestCase: function(testCase, resetURL, extraParams, options)
- Use this to execute an entire test case within another testcase as a single step.
- execSyncFct: function(sfct, options)
Client Context Methods
A handful of methods provide access to basic ClientContext scenarios. We can chain the functions below with core and assert functions to test functionality and appearance for specific users.
A handful of methods provide access to basic ClientContext scenarios. We can chain the functions below with core and assert functions to test functionality and appearance for specific users.
- toggleDisplayByKeyboard: function(options) -- Simulates toggling ClientContext via pressing “Ctrl+Alt+C”.
- reset: function(options) -- Resets ClientContext to anonymous.
- display: function(doDisplay, options) -- Force display or hide ClientContext.
- changeUserProfile: function(user, options) -- Changes the active profile within ClientContext.
Additional Methods
I encourage you to check out the utility methods available to you within this framework by navigating to /libs/cq/gui/components/authoring/clientlibs/editor/js/testing/hobbes.js within CRXDE Lite. You can manipulate cookies, simulate mouse movement, log results, highlight elements, and more. This new, exciting feature of AEM has laid a foundation to provide a smooth functional testing interface for quality assurance and developers.
I encourage you to check out the utility methods available to you within this framework by navigating to /libs/cq/gui/components/authoring/clientlibs/editor/js/testing/hobbes.js within CRXDE Lite. You can manipulate cookies, simulate mouse movement, log results, highlight elements, and more. This new, exciting feature of AEM has laid a foundation to provide a smooth functional testing interface for quality assurance and developers.
Source: http://aempodcast.com/2014/testing/aem-6-0-functional-testing-framework-overview/#.Xq5quhNKiqA

No comments:
Post a Comment
If you have any doubts or questions, please let us know.