Agenda in a Look
Introduction to Workflow.
Most used Workflow Terminology using interactive questionnaire.
Creating a Workflow Model.
Node Structure of Workflow Model in crxde lite.
Starting Workflow.
Node Structure of Workflow Model instance in crxde lite.
Participation Step in brief
Completing Participant Step from Sidekick as well as from inbox.
Workflow in General Terms
“Workflow is a well defined series of steps to produce a desired out, usually include many participants in between these steps and processes in an organization. “
Workflow?
Workflows enable you to automate AEM activities. It consist of a series of automated steps also called process steps that are executed in a specific order. When you want to use workflow in CQ5 then first, you have to create workflow models.
Workflow model?
workflow models can be think as an architecture of a workflow that shows you how your workflow steps are arranged and how they connect with each other. Workflow model is made up of workflow step nodes and workflow transitions nodes. Workflow Model must have a start node and end node.
Workflow Step Nodes?
workflow nodes are created for each steps you create in a workflow model for ex. if you created three process steps in your model then it will create three different nodes for all of these steps. These nodes are called workflow nodes.
Workflow Transitions?
Workflow transitions are also nodes created in repository, they indicate how these process steps are related or you may think as these transition node define the path how these workflow process step will be executed. It can also be think as a link between two consecutive process steps.
Automated Step?
These are the actual place where all the processing is done, there logic can be written in ECMA script or in process steps using Java. AEM itself provide some Out Of the Box processes. These step may be interactive or non interactive i.e. these step can get input from author or they can only do processing without any intervention of author. Due to all of these factor these steps are called automated steps.
Workflow Payload?
Workflow payload can be think of a resource on which a workflow instance is activated. i.e. payload could be any resource (node or page) or a collection of resources.
Above theoretical discussion is only for making your concept clear, but now I will show you where all of these node exist and how to play with them. I am also thinking that it’s enough theory for getting started with workflow so Let’s play with workflows-
Go to AEM welcome Screen -> Select workflow tab
you will see workflow dashboard as shown below –
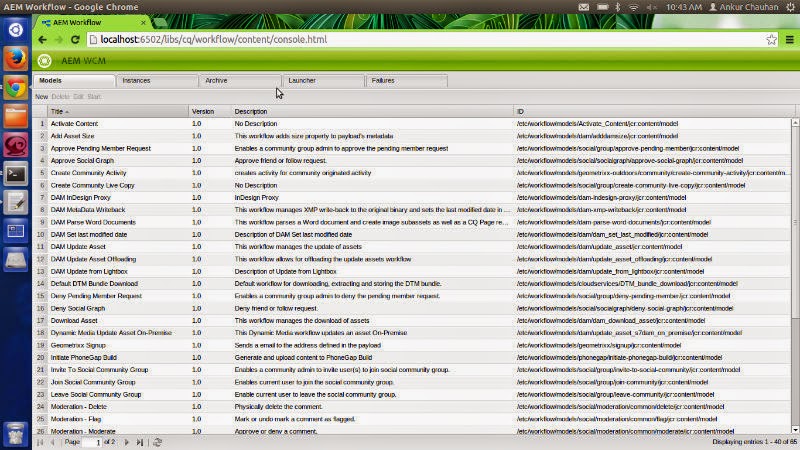
here you will see four tabs
1). Model
List of all workflow models available in AEM.
2). Instances
List of all active instances of workflow model i.e. when you start a workflow then it’s instance will be displayed in instances tab with many properties, all properties will be covered in this series of tutorial.
3). Archive
When a workflow instance has been finished successfully or terminated then it’s information is visible in this tab.
4). Launcher
This is a tab to define a condition for starting a workflow automatically i.e. when a condition is satisfied a workflow will be started automatically. I will discuss it in details just leave it for this introductory post.
5). Failure
This tab show all the workflow instances failed i.e. any error occur while executing a process step of workflow instance. This tab give you the facility to fix the error and resume the workflow. I will cover it in details later, just leave it for now.
Our first step is to create a workflow named as blog so at your Model tab click on New button and fill details as
Name = blog
Title = blog
you will see your model at the end of list in model tab, just double click on it you will see a screen as –
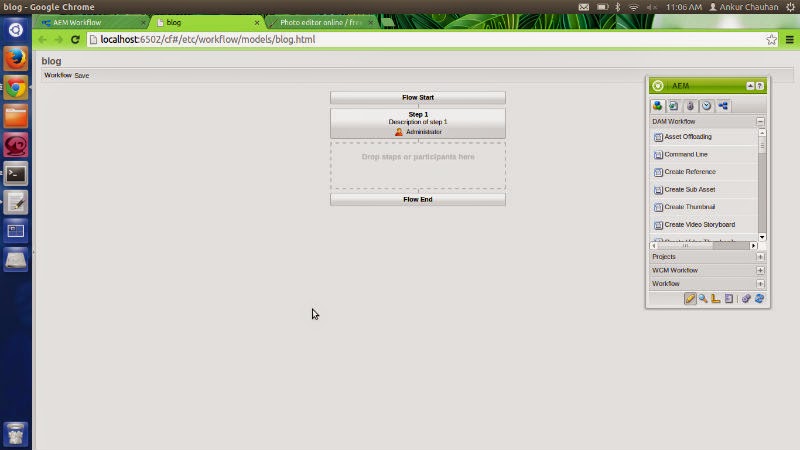
This the basic architecture of a workflow model consist of three nodes as show above
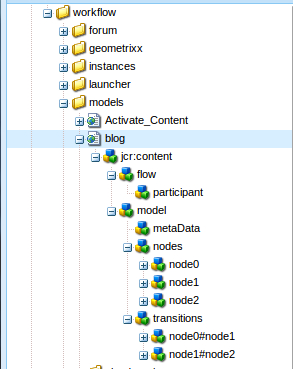
Just go to CRXDE Lite
Go to /etc/workflow/models/blogModels directory.
This is the place where all models has been saved. Just expend your model i.e. blog you will see all nodes as-
This flow Node having only one sub node named as participant. All the nodes under this directory represents the intermediate steps nodes between Start and End step.
As I told you a model is made up of process step nodes and transition node, here they are
i.e. node0, node1, node2 these are the nodes corresponding to all the steps in your workflow model Start, Participant, End steps node respectively.
Each of these node have a subnode metaData which will hold the information, which is available only when the workflow execution will reach to that particular step. i.e.
“Workflow is a well defined series of steps to produce a desired out, usually include many participants in between these steps and processes in an organization. “
Workflow?
Workflows enable you to automate AEM activities. It consist of a series of automated steps also called process steps that are executed in a specific order. When you want to use workflow in CQ5 then first, you have to create workflow models.
Workflow model?
workflow models can be think as an architecture of a workflow that shows you how your workflow steps are arranged and how they connect with each other. Workflow model is made up of workflow step nodes and workflow transitions nodes. Workflow Model must have a start node and end node.
Workflow Step Nodes?
workflow nodes are created for each steps you create in a workflow model for ex. if you created three process steps in your model then it will create three different nodes for all of these steps. These nodes are called workflow nodes.
Workflow Transitions?
Workflow transitions are also nodes created in repository, they indicate how these process steps are related or you may think as these transition node define the path how these workflow process step will be executed. It can also be think as a link between two consecutive process steps.
Automated Step?
These are the actual place where all the processing is done, there logic can be written in ECMA script or in process steps using Java. AEM itself provide some Out Of the Box processes. These step may be interactive or non interactive i.e. these step can get input from author or they can only do processing without any intervention of author. Due to all of these factor these steps are called automated steps.
Workflow Payload?
Workflow payload can be think of a resource on which a workflow instance is activated. i.e. payload could be any resource (node or page) or a collection of resources.
Above theoretical discussion is only for making your concept clear, but now I will show you where all of these node exist and how to play with them. I am also thinking that it’s enough theory for getting started with workflow so Let’s play with workflows-
Go to AEM welcome Screen -> Select workflow tab
you will see workflow dashboard as shown below –
here you will see four tabs
1). Model
List of all workflow models available in AEM.
2). Instances
List of all active instances of workflow model i.e. when you start a workflow then it’s instance will be displayed in instances tab with many properties, all properties will be covered in this series of tutorial.
3). Archive
When a workflow instance has been finished successfully or terminated then it’s information is visible in this tab.
4). Launcher
This is a tab to define a condition for starting a workflow automatically i.e. when a condition is satisfied a workflow will be started automatically. I will discuss it in details just leave it for this introductory post.
5). Failure
This tab show all the workflow instances failed i.e. any error occur while executing a process step of workflow instance. This tab give you the facility to fix the error and resume the workflow. I will cover it in details later, just leave it for now.
Our first step is to create a workflow named as blog so at your Model tab click on New button and fill details as
Name = blog
Title = blog
you will see your model at the end of list in model tab, just double click on it you will see a screen as –
This the basic architecture of a workflow model consist of three nodes as show above
Just go to CRXDE Lite
Go to /etc/workflow/models/blogModels directory.
This is the place where all models has been saved. Just expend your model i.e. blog you will see all nodes as-
This flow Node having only one sub node named as participant. All the nodes under this directory represents the intermediate steps nodes between Start and End step.
As I told you a model is made up of process step nodes and transition node, here they are
i.e. node0, node1, node2 these are the nodes corresponding to all the steps in your workflow model Start, Participant, End steps node respectively.
Each of these node have a subnode metaData which will hold the information, which is available only when the workflow execution will reach to that particular step. i.e.
Participant metaData information is available only at participant step not before this step and also not after this step.
This information has been removed when workflow execution passes from this step.
Nodes under transitions node show how workflow steps are connected i.e. it shows that workflow will run through following path – node0->node1->node2
Note: this is only model representation when you execute a workflow then it’s instance will be created under /etc/workflow/instance directory & all the real work has been down using that model instance node.
your workflow model uses participant step, similarly there are lot of Out of the Box process step I will explain almost all steps in my coming tutorial of this series till then just leave them.
As participant step is present in it’s default model structure so I briefly explain it in this tutorial.
Participant Step
Through this step you can introduce a manual intervention of a user or group i.e. it will restrict further execution of workflow steps till user or group doesn’t permit to proceed. I will explain this step in details in my coming post till then just set the properties as I am showing.
Go to your workflow model tab and double click on blog model.
On this screen double click on participant step you will see a screen just like-
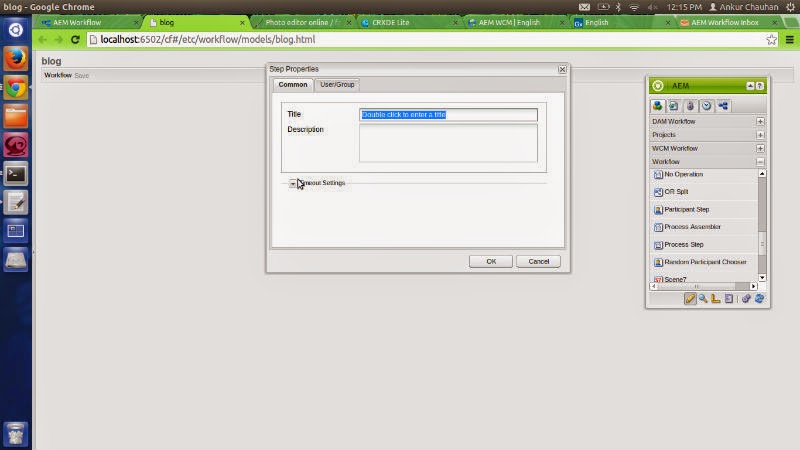
On this screen double click on participant step you will see a screen just like-
Just set title as “blog participant step” , add some description “working with participant step.” in second tab i.e. user/group tab you will see a search bar just click on it and select a admin user as show below-
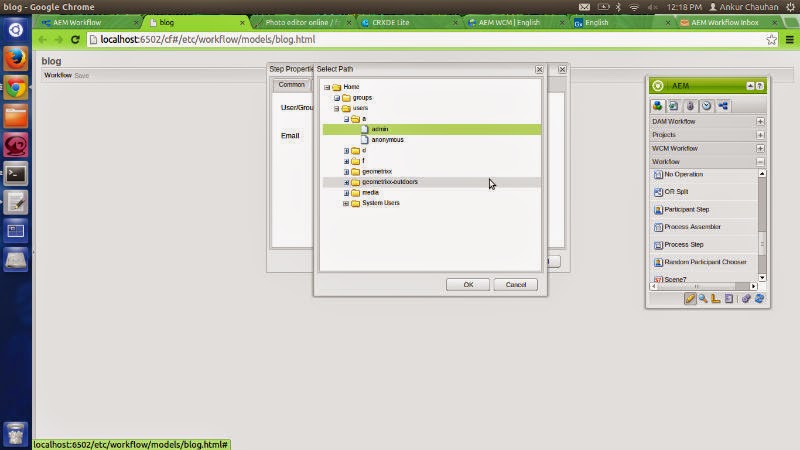
Click OK button. Again Click on OK button of your main dialog. Then Save your workflow model, Save button is present at top left corner of the screen.
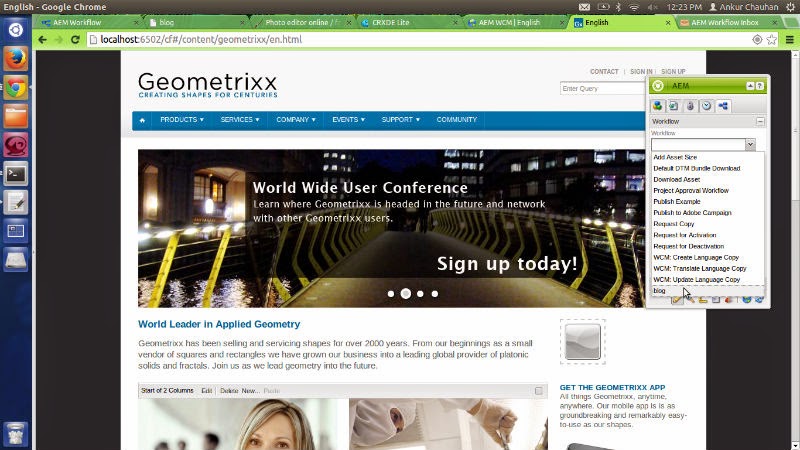
open any content page in my case I have opened /content/geometrixx/en.html
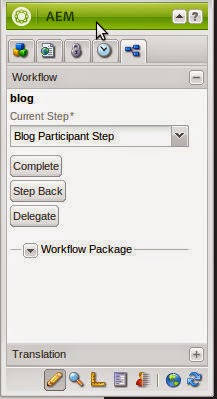
you will get a Sitekick on this page go to workflow tag your screen looks like –
open any content page in my case I have opened /content/geometrixx/en.html
you will get a Sitekick on this page go to workflow tag your screen looks like –
select blog workflow and click on start workflow button. As you logged in as admin so it will show you three menu in your Sidekick as show below.
before doing further processing just have a look what will this workflow instance do in crxde. So go to your crxde lite and explore /etc/workflow/instance directory.
here you will see a new node structure created as shown below –
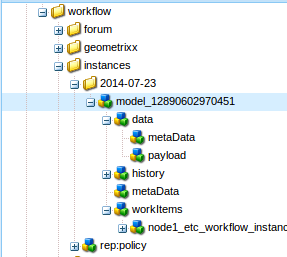
this node represent the instance of your workflow model. it provide different information related to your workflow steps. Payload node defines the payload of this workflow instance.
History node maintains all the data related to all the steps completed.
WorkItems represent the current workflow step node data.
There are two metaData node one inside data and second is metadata under your model node.
difference between these two is –
model/data/metaData represent the information available at all the steps present in this workflow. while model/metaData represent the information available to particular workflow step. model/metaData node copies data from model/data/metaData node.
Now start further processing –
before doing further processing just have a look what will this workflow instance do in crxde. So go to your crxde lite and explore /etc/workflow/instance directory.
here you will see a new node structure created as shown below –
this node represent the instance of your workflow model. it provide different information related to your workflow steps. Payload node defines the payload of this workflow instance.
History node maintains all the data related to all the steps completed.
WorkItems represent the current workflow step node data.
There are two metaData node one inside data and second is metadata under your model node.
difference between these two is –
model/data/metaData represent the information available at all the steps present in this workflow. while model/metaData represent the information available to particular workflow step. model/metaData node copies data from model/data/metaData node.
Now start further processing –
click on complete button you will get a dialog showing your next step as End and comment text area. Just add some comment in this text area and click on submit button. your workflow has been completed.
if you select a user other then admin then these option are not visible here. That is information will be send to that particular user inbox.
as You can complete this workflow from here as well as you can complete this workflow from admin inbox.
for this just again start your workflow & don’t complete from here.
Now go to CQ welcome screen and select inbox tab.
you will see a work item in this inbox with different options & your screen looks like this-
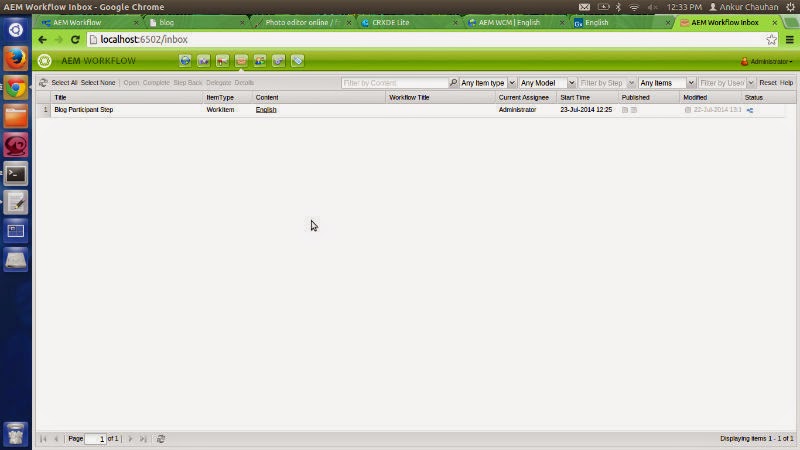
Just complete this step using complete button. This is done for starting with workflow basics.
Your comments/suggestions are welcome for improving my knowledge as well as my writing skills.
if you select a user other then admin then these option are not visible here. That is information will be send to that particular user inbox.
as You can complete this workflow from here as well as you can complete this workflow from admin inbox.
for this just again start your workflow & don’t complete from here.
Now go to CQ welcome screen and select inbox tab.
you will see a work item in this inbox with different options & your screen looks like this-
Just complete this step using complete button. This is done for starting with workflow basics.
Your comments/suggestions are welcome for improving my knowledge as well as my writing skills.

No comments:
Post a Comment
If you have any doubts or questions, please let us know.