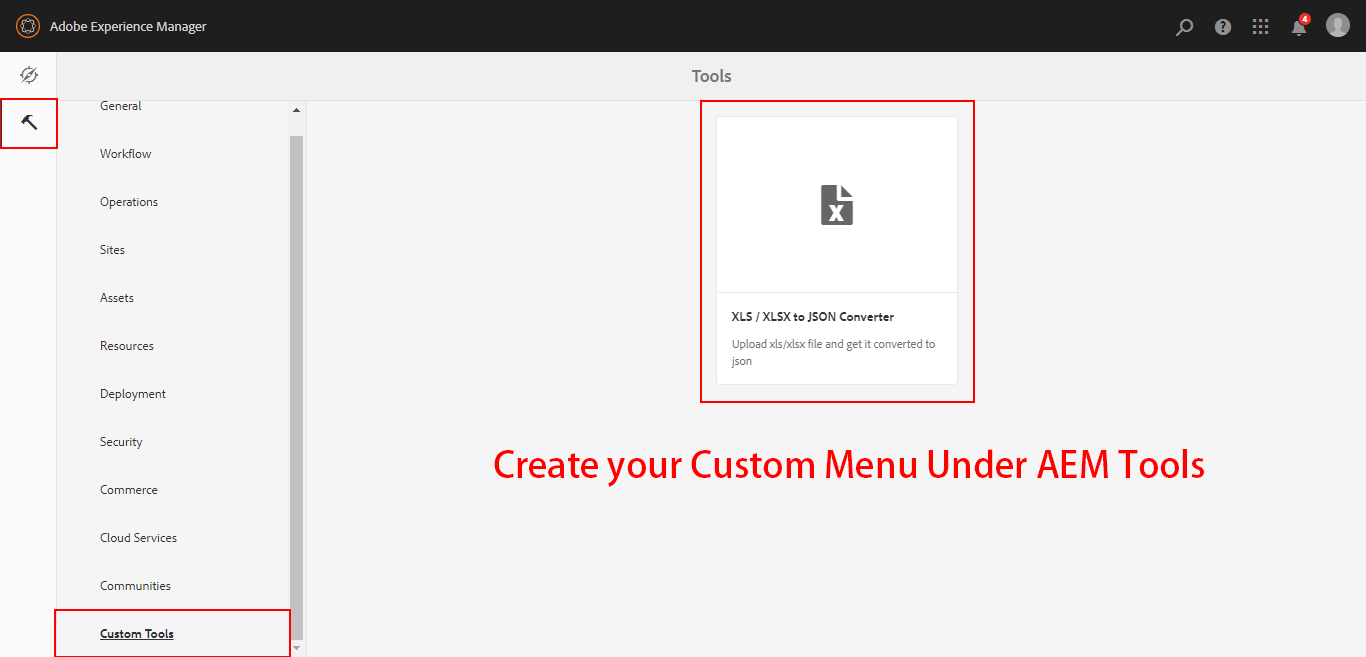
Have you ever wanted to build your custom menus under AEM Tools like ACS AEM Commons or Tools, then this story is for you!
Here, I have developed a XLS/XLSX to JSON Converter tool which converts Excel file to a JSON and stores in JCR.
Code will be available here
In this tutorial, we will learn about two major concepts which get used while customizing AEM
- Sling Resource Merger
- Granite UI
Sling Resource Merger
The Sling Resource Merger provides services to access and merge resources. It provides diff (differencing) mechanisms for both:
ensure that customization changes are not made in /libs.
This is because the content of /libs is overwritten the next time you upgrade your instance (and may well be overwritten when you apply either a hotfix or feature pack).
for our tutorial, we will use Overlays to overlay the AEM Tools node under /libs and create a similar node structure under /apps
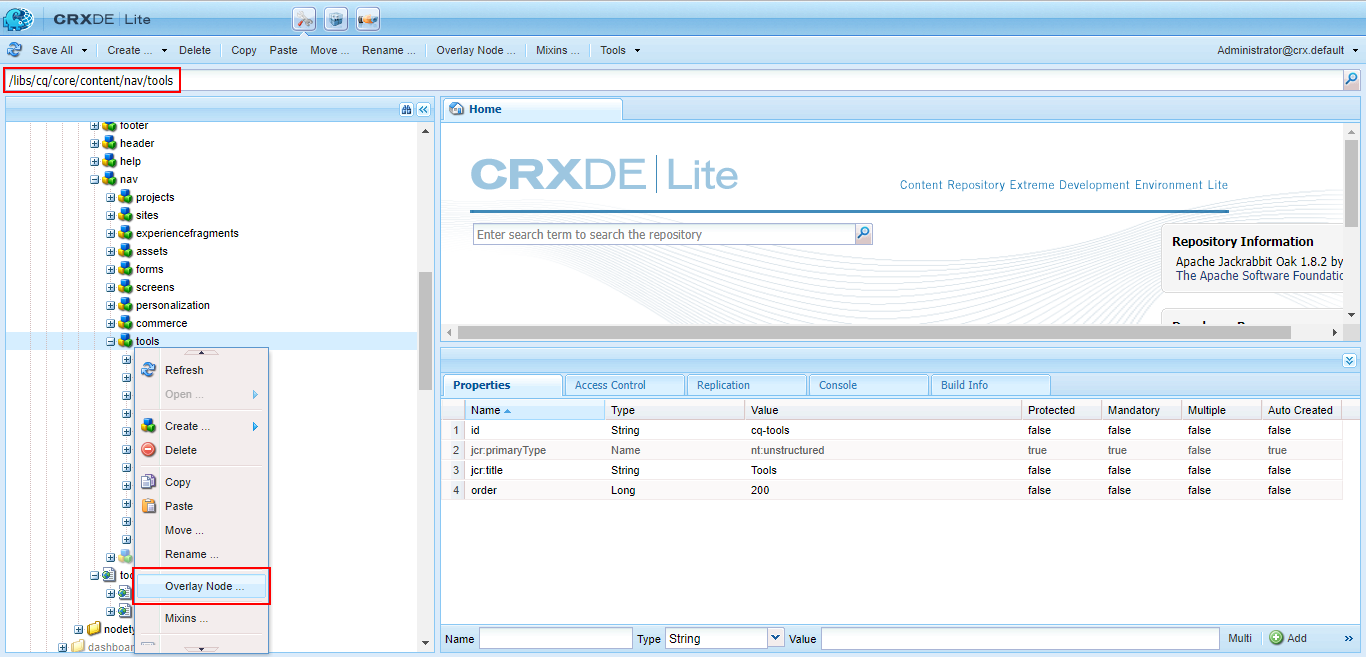
It’s easy and can be done with one right-click on the following path and then select Overlay Node …

The Sling Resource Merger provides services to access and merge resources. It provides diff (differencing) mechanisms for both:
- Overlays: For overlays, the resource delivered is an aggregate of the resources and properties retrieved, depending on search paths that can be defined. In a standard installation the primary defaults are /apps, /libs — so the content of /apps has a higher priority than that of /libs (i.e. it overlays it). Means if you have the same node under /apps as that of under /libs, then AEM will read the results from /apps
- Overrides: It overrides of component dialogs for the touch-enabled UI (cq:dialog), using the resource type hierarchy (by means of the property sling:resourceSuperType).
ensure that customization changes are not made in /libs.
This is because the content of /libs is overwritten the next time you upgrade your instance (and may well be overwritten when you apply either a hotfix or feature pack).
for our tutorial, we will use Overlays to overlay the AEM Tools node under /libs and create a similar node structure under /apps
It’s easy and can be done with one right-click on the following path and then select Overlay Node …

Path: /libs/cq/core/content/nav/tools

Then, select Match Node Types(Optional)
So, it will create a similar node structure as shown below:

New Path: /apps/cq/core/content/nav/tools
Now, we can add custom nodes here to add our Menu under Tools. So, to add a new item to the Menu List, we can add a node of type nt:unstructured or a folder. I have added a folder of type sling:OrderedFolder. The next part is to add id and jcr:title,
id: Here, id should be unique( The recommended value is hierarchically separated by “-“. e.g. “cq-commerce-report”)
jcr:title: Renders the Title of the Menu Item.
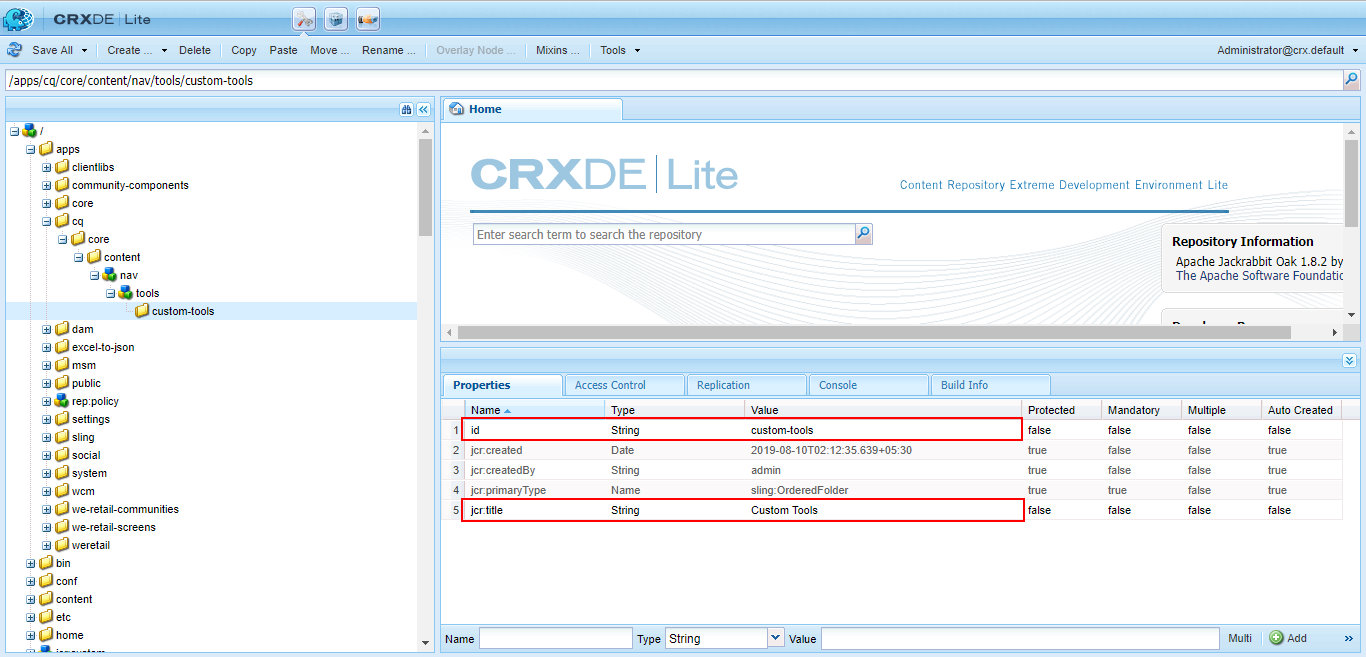
The new node of custom-tools under tools
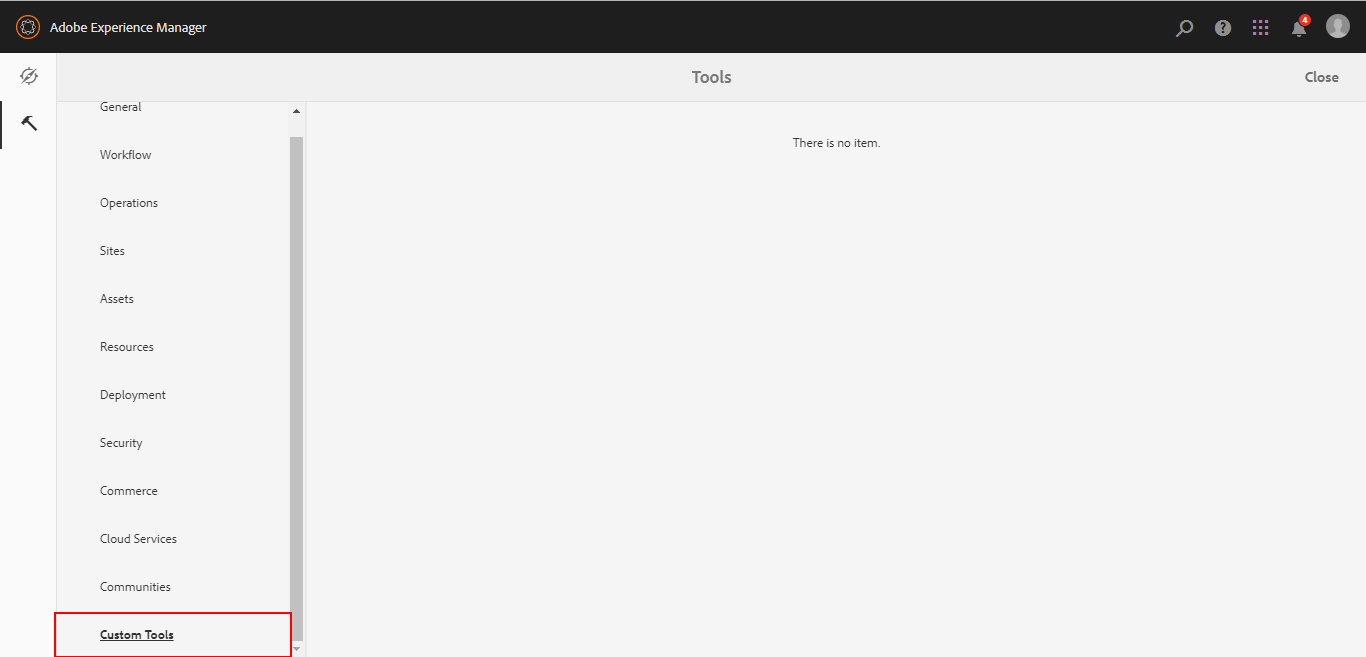
custom-tools node gets render as Custom Tools menu item with the title coming from jcr:title property on the node
Now, to create an actual tool option, we will add one more nt:unstructured node with the following properties:
href: Location of the Tool’s landing page (generally cq:Page under /apps or /content)
target: href target attribute
icon: You can give a name of an available icon in the Coral UI
id: Here, id should be unique( The recommended value is hierarchically separated by “-“. e.g. “cq-commerce-report”)
jcr:description: Description for your tool
jcr:title: Title for your tool
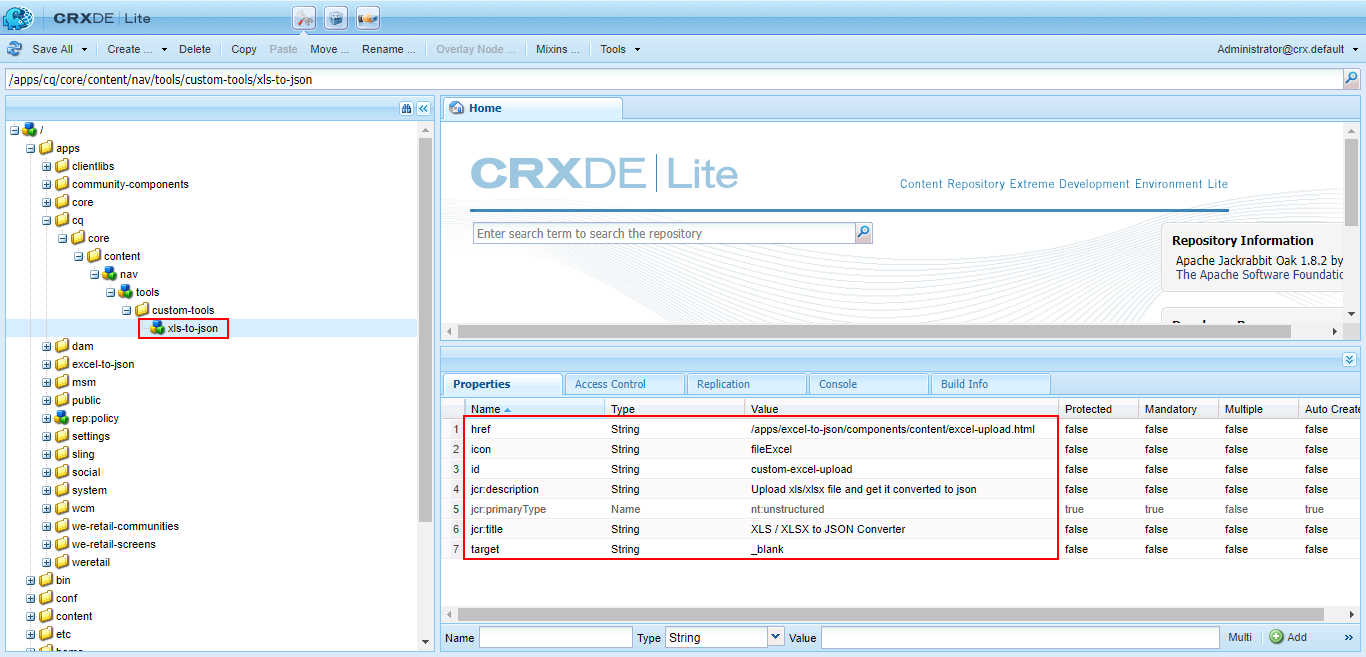
Actual tool node: xls-to-json
Rendered Menu Option
Granite UI
Granite Documentation will be available here
It’s a time to develop the Landing Page for our tool and this can be done in many ways, but still, I have used Granite UI for the following reasons:
I have added the Granite Server Side components like FileUpload and PathField to upload the Excel file and to select the path to store converted JSON.
Excel file gets uploaded to a Servlet and then it converts the table to JSON format, where each row gets converted to a JSON object with column name as property and cell value as the property value.
Granite Documentation will be available here
It’s a time to develop the Landing Page for our tool and this can be done in many ways, but still, I have used Granite UI for the following reasons:
- It’s easy; just like creating your Touch UI Dialog with LEGO® Architecture.
- Easy to maintain.
- Lessor no code required.
I have added the Granite Server Side components like FileUpload and PathField to upload the Excel file and to select the path to store converted JSON.
Excel file gets uploaded to a Servlet and then it converts the table to JSON format, where each row gets converted to a JSON object with column name as property and cell value as the property value.
Granite UI Shell Page
Granite Shell Page is the generic page to render Shell. So, it will get rendered as shown below:

Granite Shell Page is the generic page to render Shell. So, it will get rendered as shown below:

Blank Shell Page

cq:Page Node Structure for the Shell Page
To know all the Shell page properties, you can refer to this page. I will focus on some main properties required to render the page:
head: A folder to specify the content of <head> of the page. Its child resources are iterated and included as is. You need to use the IncludeClientlibs component to add your js and css libraries. Don’t forget to add “granite.ui.coral.foundation” category.
 IncludeClientlibs under head
title: The component to render the title.

title node
the title gets rendered to as shown below

Rendered Title from title node
content: The actual content of the page. Here, you can add sling:resourceType for rendering script or use Granite UI Components as shown below:

Granite UI Server Side components
Final Page:
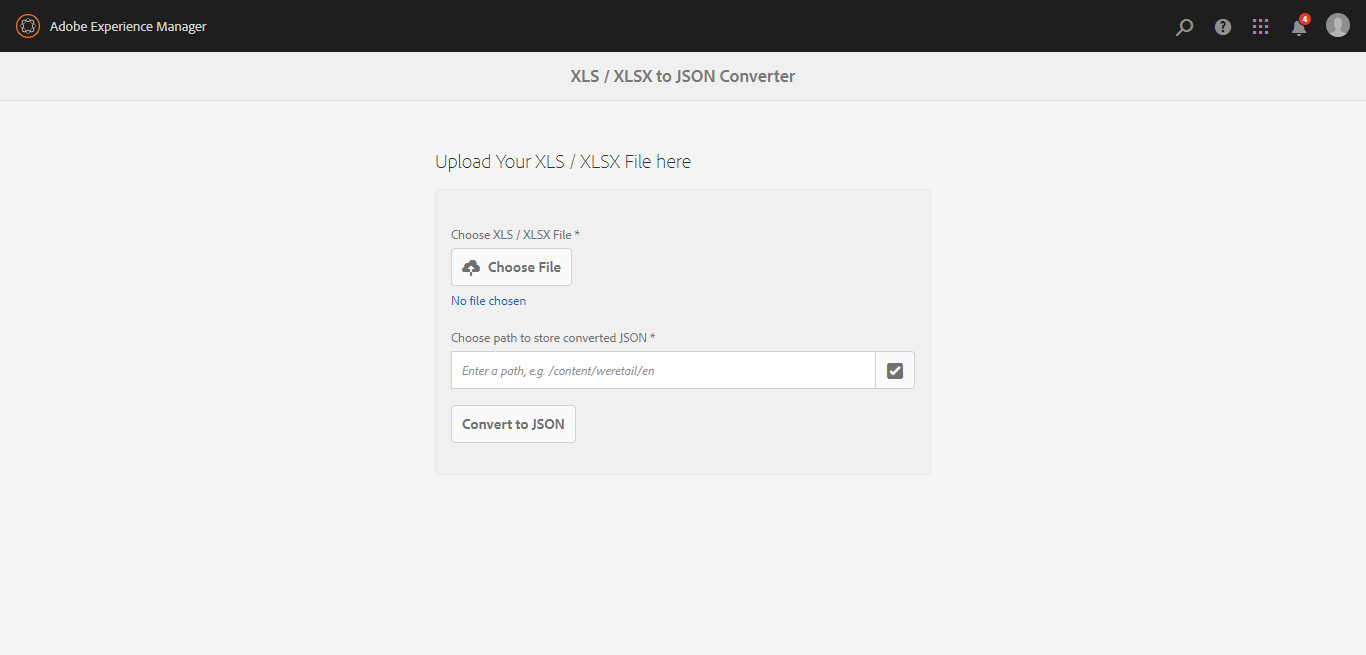
Final Landing Page
No comments:
Post a Comment
If you have any doubts or questions, please let us know.