Basic DAM Functions
AEM provides powerful drag and drops functionality so you can upload images directly from a local machine or bulk upload multiple digital assets via Web DAV or Adobe Drive.
AEM provides powerful drag and drops functionality so you can upload images directly from a local machine or bulk upload multiple digital assets via Web DAV or Adobe Drive.
How to organize assets
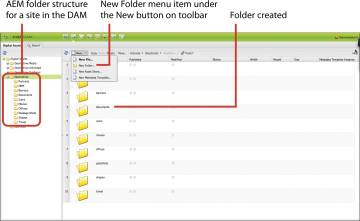
The first step in organizing your assets is to create a logical folder structure:
On the AEM Welcome screen, click the Digital Assets link.

Digital Asset Management link
In the AEM DAM folder structure, select the site where you want to upload or manage the assets.
In the toolbar, click New, and choose New Folder to create a new folder with a relevant name, such as video, document, image, and so on.
Uploading new content to DAM
Double-check the location of the folder within the structure to confirm it was created correctly.
The first step in organizing your assets is to create a logical folder structure:
On the AEM Welcome screen, click the Digital Assets link.
Digital Asset Management link
In the AEM DAM folder structure, select the site where you want to upload or manage the assets.
In the toolbar, click New, and choose New Folder to create a new folder with a relevant name, such as video, document, image, and so on.
Uploading new content to DAM
Double-check the location of the folder within the structure to confirm it was created correctly.
How to upload and activate assets
On the welcome screen, click Digital Assets.
Navigate to the folder you’d like to add an asset to and click the New button in the DAM toolbar. Choose New File.

Creating a new asset
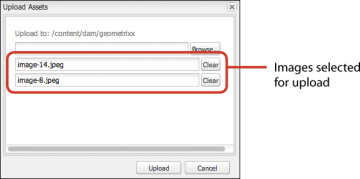
The system prompts you to upload a new asset. Browse to the desired asset, or multiple assets, on a local or network machine and select the files. Click Upload to upload all the assets to the designated folder. Alternatively, you can also simply drag one or more assets at once directly from your directory into the desired DAM folder.
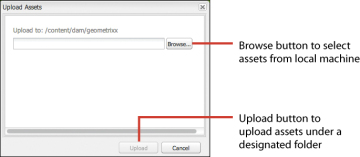
Confirm the Upload To destination is correct.
If you need to browse to another folder for more assets, you can do so from this dialog.
Once you have uploaded an asset, you can send a request to activate the asset by initiating an activation workflow (see Chapter 8).
For a publisher or an administrator, the Activate button will be enabled on the DAM toolbar. Click the Activate button and then choose Activate from the drop-down menu to activate and publish the asset immediately.
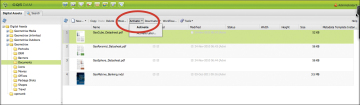
If you have permission to activate an asset, the Activate button will be enabled on the DAM toolbar.
AEM puts an appropriate pending status for that asset based on the other assets marked for activation in the queue.
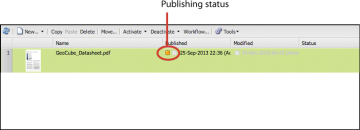
The asset status will change to orange when it is in the queue for publishing. The status color will change to green once it has been successfully published.
On the welcome screen, click Digital Assets.
Navigate to the folder you’d like to add an asset to and click the New button in the DAM toolbar. Choose New File.
Creating a new asset
The system prompts you to upload a new asset. Browse to the desired asset, or multiple assets, on a local or network machine and select the files. Click Upload to upload all the assets to the designated folder. Alternatively, you can also simply drag one or more assets at once directly from your directory into the desired DAM folder.
Confirm the Upload To destination is correct.
If you need to browse to another folder for more assets, you can do so from this dialog.
Once you have uploaded an asset, you can send a request to activate the asset by initiating an activation workflow (see Chapter 8).
For a publisher or an administrator, the Activate button will be enabled on the DAM toolbar. Click the Activate button and then choose Activate from the drop-down menu to activate and publish the asset immediately.
If you have permission to activate an asset, the Activate button will be enabled on the DAM toolbar.
AEM puts an appropriate pending status for that asset based on the other assets marked for activation in the queue.
The asset status will change to orange when it is in the queue for publishing. The status color will change to green once it has been successfully published.
How to delete an asset
Navigate to the Digital Assets interface from the AEM Welcome screen. Select the asset you want to delete and click the Delete button in the DAM toolbar. You can also right-click the asset and choose Delete from the context menu.

Two ways to delete an asset
The system prompts you to confirm the deletion.
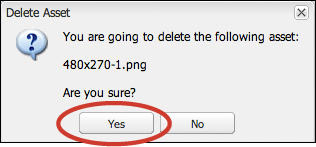
Confirm deletion prompt; if the asset has references to other pages, the system will alert you.
Click Yes to initiate the asset deletion process. If the asset has no references to any pages on any site, the asset will simply be deleted from the DAM. If the asset has references to other pages, the system will throw a warning prompt notifying the user.

In the system prompt, click No to see all the references for the asset that needs to be deleted.

Alternatively, if you click the Tools button in the DAM toolbar and then choose References from the drop-down menu, you’ll see all the references for a particular asset (before you initiate the deletion process).
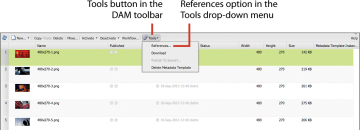
How to see all asset references
Navigate to the Digital Assets interface from the AEM Welcome screen. Select the asset you want to delete and click the Delete button in the DAM toolbar. You can also right-click the asset and choose Delete from the context menu.
Two ways to delete an asset
The system prompts you to confirm the deletion.
Confirm deletion prompt; if the asset has references to other pages, the system will alert you.
Click Yes to initiate the asset deletion process. If the asset has no references to any pages on any site, the asset will simply be deleted from the DAM. If the asset has references to other pages, the system will throw a warning prompt notifying the user.
In the system prompt, click No to see all the references for the asset that needs to be deleted.
Alternatively, if you click the Tools button in the DAM toolbar and then choose References from the drop-down menu, you’ll see all the references for a particular asset (before you initiate the deletion process).
How to see all asset references
How to edit asset properties and metadata
Right-click the asset you want to edit and click Open from the context menu.

Right-click the asset to open a menu of actions.
A detailed asset view opens with different editable properties, including title, description, tags, language, and other fields.
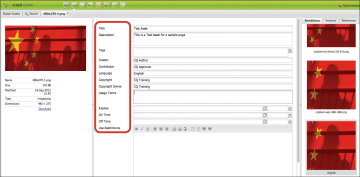
An asset’s editable properties in the detailed asset view
In order to change the asset tags, click the Tags drop-down. To assign a tag, double-click a particular property from the tags pane.
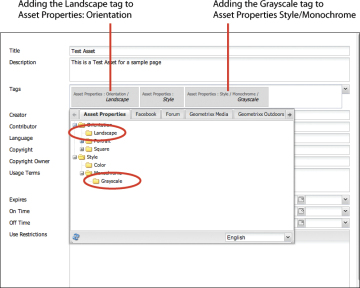
Changing an asset’s tags
Click Save to save all the changes.
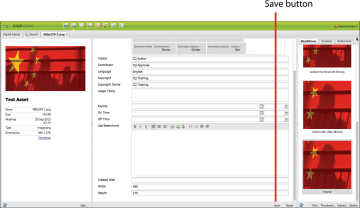
Making asset changes
Right-click the asset you want to edit and click Open from the context menu.
Right-click the asset to open a menu of actions.
A detailed asset view opens with different editable properties, including title, description, tags, language, and other fields.
An asset’s editable properties in the detailed asset view
In order to change the asset tags, click the Tags drop-down. To assign a tag, double-click a particular property from the tags pane.
Changing an asset’s tags
Click Save to save all the changes.
Making asset changes
How to restore an asset
From time to time, you’ll need to restore an asset to a previous version. For example, if it was modified incorrectly or if its tags were changed in error, you could use the restore function to set it back to its former state.
Right-click the asset you’d like to edit and choose Open from the context menu.

Right-click an asset to open the menu.
In the detailed asset view, click the Versions tab to show all the available versions for that asset.
Select a version and click the Restore button to set the asset to another version.
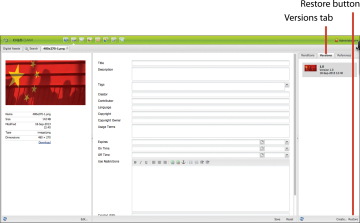
Restore an asset.
You can add a version label and comments for the new version of the image.
Click OK to finish.
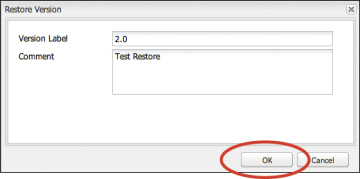
Label the new version and add comments.
Alternatively, you can also restore an asset directly by clicking the Tools button in the DAM toolbar and choosing Restore from the drop-down menu.
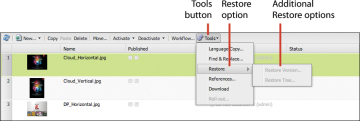
Restore feature on the toolbar
From time to time, you’ll need to restore an asset to a previous version. For example, if it was modified incorrectly or if its tags were changed in error, you could use the restore function to set it back to its former state.
Right-click the asset you’d like to edit and choose Open from the context menu.
Right-click an asset to open the menu.
In the detailed asset view, click the Versions tab to show all the available versions for that asset.
Select a version and click the Restore button to set the asset to another version.
Restore an asset.
You can add a version label and comments for the new version of the image.
Click OK to finish.
Label the new version and add comments.
Alternatively, you can also restore an asset directly by clicking the Tools button in the DAM toolbar and choosing Restore from the drop-down menu.
Restore feature on the toolbar
How to use DAM to transcode videos into different formats
Before enabling DAM to transcode videos, ensure that the AEM framework is enabled with FFmpeg encoder add-on.
If you haven’t already, install the FFmpeg encoder add-on from http://ffmpeg.org.
Unzip the Installation folder and set the system environment variable path to <your-ffmpeg-location>\bin.
Restart AEM.
Once the FFmpeg add-on has been set up, ensure that AEM has a set of Video profiles, which defines a set of video configuration properties for a particular video format, such as MP4, FLV, and so on. Configurations applied to these video profiles will enable the transcoding workflows to generate alternate video formats for a video asset.
AEM comes pre-bundled with some video profiles, which can be reconfigured per the transcoding needs.
In the AEM toolbar, click the Tools button and choose DAM > Video Profiles.
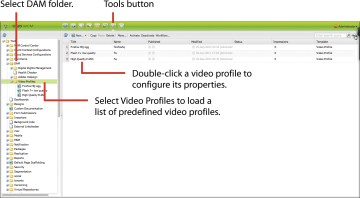
Transcoding video
To test out your video transcoding feature, upload a test video in any format other than H.264, and click Run Test. If FFmpeg is installed correctly, the system successfully transcodes the uploaded video in the H.264 format.
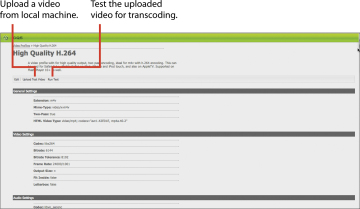
Transcoding video
To edit more properties of the video profile, click the Edit button on the Video Profiles component toolbar. In the Video Profile Settings dialog box, you can change various settings and naming conventions for the selected video profile. Click OK to save all changes.
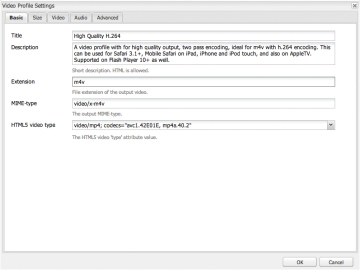
Changing video profile settings
Once the Video profile is configured, navigate to a page in the AEM site hierarchy and add a video component.
Adding a video component to a web page
Edit the video component to see the component’s properties. On the Profiles tab, select the video profile the video should convert to while playing on this page.

Edit Component > Profiles
Before enabling DAM to transcode videos, ensure that the AEM framework is enabled with FFmpeg encoder add-on.
If you haven’t already, install the FFmpeg encoder add-on from http://ffmpeg.org.
Unzip the Installation folder and set the system environment variable path to <your-ffmpeg-location>\bin.
Restart AEM.
Once the FFmpeg add-on has been set up, ensure that AEM has a set of Video profiles, which defines a set of video configuration properties for a particular video format, such as MP4, FLV, and so on. Configurations applied to these video profiles will enable the transcoding workflows to generate alternate video formats for a video asset.
AEM comes pre-bundled with some video profiles, which can be reconfigured per the transcoding needs.
In the AEM toolbar, click the Tools button and choose DAM > Video Profiles.
Transcoding video
To test out your video transcoding feature, upload a test video in any format other than H.264, and click Run Test. If FFmpeg is installed correctly, the system successfully transcodes the uploaded video in the H.264 format.
Transcoding video
To edit more properties of the video profile, click the Edit button on the Video Profiles component toolbar. In the Video Profile Settings dialog box, you can change various settings and naming conventions for the selected video profile. Click OK to save all changes.
Changing video profile settings
Once the Video profile is configured, navigate to a page in the AEM site hierarchy and add a video component.
Adding a video component to a web page
Edit the video component to see the component’s properties. On the Profiles tab, select the video profile the video should convert to while playing on this page.
Edit Component > Profiles
How to upload assets using Web DAV
In order to set the Web DAV, set the network drive to the following:
http://localhost:4502/crx/repository/crx.default
Setting the network drive to this path will enable the simple drag and drop feature to upload assets to the CRX repository.

Setting the network drive
The server prompts you to enter the credentials to connect to the AEM repository.
Select Registered User (Mac), or simply enter user ID and password (Windows). Click Connect to set up the repository as a drive on your local machine.
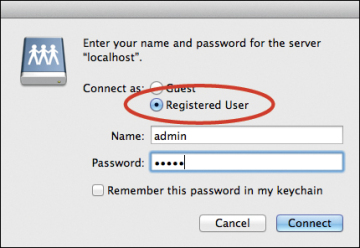
Select Registered User (Mac), or simply enter user ID and password (Windows).
Once the repository is set up as the drive, it will be viewable from My Computer (Windows) or Finder (Mac).
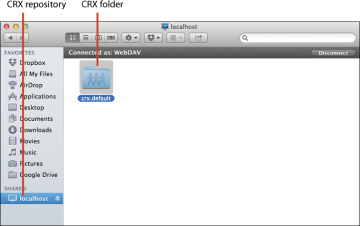
The repository is viewable in My Computer (Windows) or Finder (Mac).
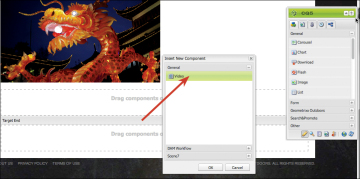
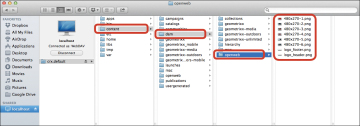
Once inside the directory, navigate to crx.default > Content > DAM. In this directory, you can create new folders and drag and drop assets to directly import assets into DAM.
Drag and drop assets to directly import assets into the DAM.
In order to set the Web DAV, set the network drive to the following:
http://localhost:4502/crx/repository/crx.default
Setting the network drive to this path will enable the simple drag and drop feature to upload assets to the CRX repository.
Setting the network drive
The server prompts you to enter the credentials to connect to the AEM repository.
Select Registered User (Mac), or simply enter user ID and password (Windows). Click Connect to set up the repository as a drive on your local machine.
Select Registered User (Mac), or simply enter user ID and password (Windows).
Once the repository is set up as the drive, it will be viewable from My Computer (Windows) or Finder (Mac).
The repository is viewable in My Computer (Windows) or Finder (Mac).
Once inside the directory, navigate to crx.default > Content > DAM. In this directory, you can create new folders and drag and drop assets to directly import assets into DAM.
Drag and drop assets to directly import assets into the DAM.

No comments:
Post a Comment
If you have any doubts or questions, please let us know.