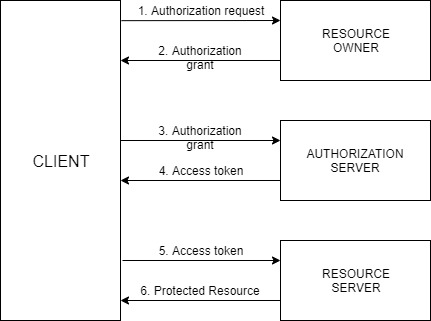
When we speak about Spring (Cloud) Security, we are talking about Service authorization powered by OAuth 2.0. This is how it exactly works:

The actors in this OAuth 2.0 scenario that we are going to discuss are:
- Resource Owner – Entity that grants access to a resource, usually you!
- Resource Server – Server hosting the protected resource
- Client – App making protected resource requests on behalf of a resource owner
- Authorization server – server issuing access tokens to clients
Now that everything is clear about how the general OAuth 2.0 flow is working, let’s get our hands dirty and start writing our resource and authorization server!
Building OAuth2.0 Authorization server
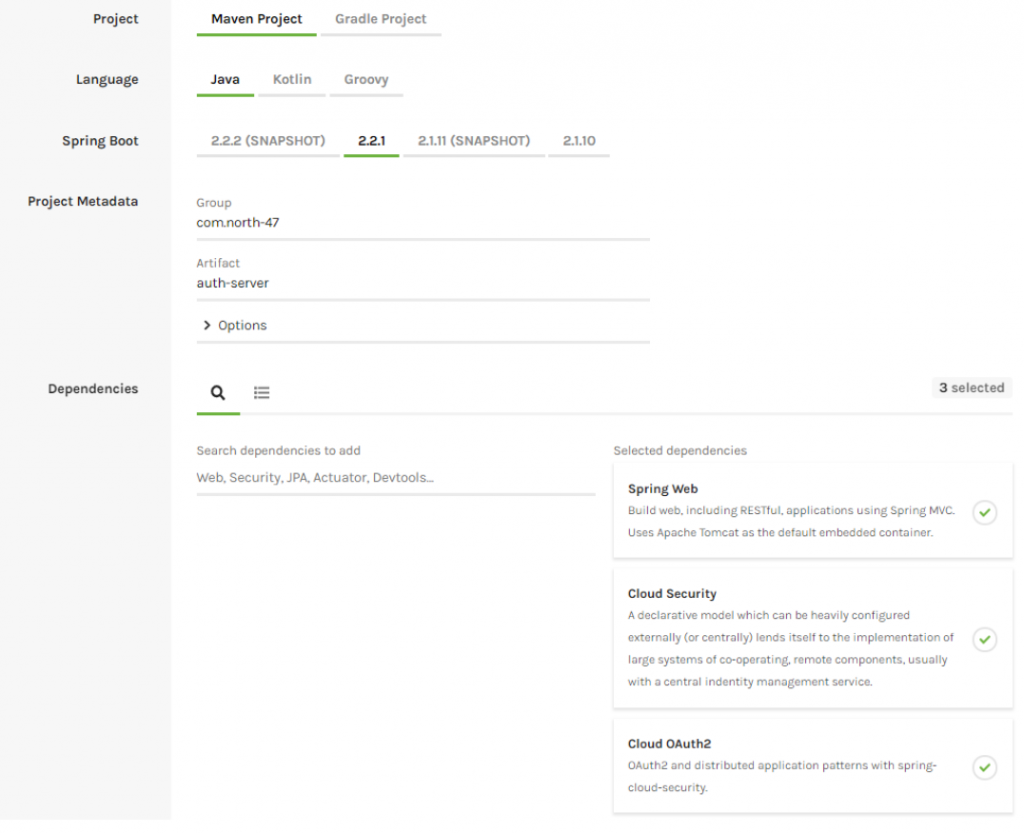
Let’s start by creating our authorization server using the Spring Initializr. Create a project with the following configuration:
- Project: Maven Project
- Artefact: auth-server
- Dependencies: Spring Web, Cloud Security, Cloud OAuth2

Download the project, copy it into your workspace and open it via your IDE. Go to your main class and add the @EnableAuthorizationServer annotation.
@SpringBootApplication
@EnableAuthorizationServer
public class AuthServerApplication {
public static void main(String[] args) {
SpringApplication.run(AuthServerApplication.class, args);
}
}
Go to the application.properties file and make the following modification:
server.servlet.context-path=/api/auth
security.oauth2.client.client-id=north47
security.oauth2.client.client-secret=north47secret
security.oauth2.client.authorized-grant-types=authorization,password,refresh_token,password,client_credentials
security.oauth2.client.scope=read,write
The client id is a public identifier for applications. The way that we used it is not a good practice for the production environment. It is usually a 32-character hex string so it won’t be so easy guessable.
Let’s add some users into our application. We are going to use in-memory users and we will achieve that by creating a new class ServiceConfig. Create a package called “config” with the following path: com.north47.authserver.config and in there create the above-mentioned class:
With this we are defining one user with username: ‘filip’ and password: ‘1234’ with a role ADMIN. We are defining that BCryptPasswordEncoder bean so we can encode our password.
In order to authenticate the users that will arrive from another service we are going to add another class called UserResource into the newly created package resource (com.north47.autserver.resource):
When the users from other services will try to send a token for validation the user will also be validated with this method.
And that’s it! Now we have our authorization server! The authorization server is providing some default endpoints which we are going to see when we will be testing the resource server.
Building Resource Server
Now let’s build our resource server where we are going to keep our secure data. We will do that with the help of the Spring Initializr. Create a project with the following configuration:
@SpringBootApplication
@EnableAuthorizationServer
public class AuthServerApplication {
public static void main(String[] args) {
SpringApplication.run(AuthServerApplication.class, args);
}
}
Go to the application.properties file and make the following modification:
- Change the server port to 8083
- Set the context path to be “/api/auth”
- Set the client id to “north47”
- Set the client secret to “north47secret”
- Enable all authorized grant types
- Set the client scope to read and write
server.servlet.context-path=/api/auth
security.oauth2.client.client-id=north47
security.oauth2.client.client-secret=north47secret
security.oauth2.client.authorized-grant-types=authorization,password,refresh_token,password,client_credentials
security.oauth2.client.scope=read,write
The client id is a public identifier for applications. The way that we used it is not a good practice for the production environment. It is usually a 32-character hex string so it won’t be so easy guessable.
Let’s add some users into our application. We are going to use in-memory users and we will achieve that by creating a new class ServiceConfig. Create a package called “config” with the following path: com.north47.authserver.config and in there create the above-mentioned class:
@Configuration
public class ServiceConfig extends GlobalAuthenticationConfigurerAdapter {
@Override
public void init(AuthenticationManagerBuilder auth) throws Exception {
auth.inMemoryAuthentication()
.withUser("filip")
.password(passwordEncoder().encode("1234"))
.roles("ADMIN");
}
@Bean
public BCryptPasswordEncoder passwordEncoder() {
return new BCryptPasswordEncoder();
}
}
With this we are defining one user with username: ‘filip’ and password: ‘1234’ with a role ADMIN. We are defining that BCryptPasswordEncoder bean so we can encode our password.
In order to authenticate the users that will arrive from another service we are going to add another class called UserResource into the newly created package resource (com.north47.autserver.resource):
@RestController
public class UserResource {
@RequestMapping("/user")
public Principal user(Principal user) {
return user;
}
}
When the users from other services will try to send a token for validation the user will also be validated with this method.
And that’s it! Now we have our authorization server! The authorization server is providing some default endpoints which we are going to see when we will be testing the resource server.
Building Resource Server
Now let’s build our resource server where we are going to keep our secure data. We will do that with the help of the Spring Initializr. Create a project with the following configuration:
- Project: Maven Project
- Artefact: resource-server
- Dependencies: Spring Web, Cloud Security, Cloud OAuth2

Download the project and copy it in your workspace. First, we are going to create our entity called Train. Create a new package called domain into com.north47.resourceserver and create the class there.
public class Train {
private int trainId;
private boolean express;
private int numOfSeats;
public Train(int trainId, boolean express, int numOfSeats) {
this.trainId = trainId;
this.express = express;
this.numOfSeats = numOfSeats;
}
public int getTrainId() {
return trainId;
}
public void setTrainId(int trainId) {
this.trainId = trainId;
}
public boolean isExpress() {
return express;
}
public void setExpress(boolean express) {
this.express = express;
}
public int getNumOfSeats() {
return numOfSeats;
}
public void setNumOfSeats(int numOfSeats) {
this.numOfSeats = numOfSeats;
}
}
Let’s create one resource that will expose an endpoint from where we can get the protected data. Create a new package called resource and there create a class TrainResource. We will have one method only that will expose an endpoint behind we can get the protected data.
@RestController
@RequestMapping("/train")
public class TrainResource {
@GetMapping
public List<Train> getTrainData() {
return Arrays.asList(new Train(1, true, 100),
new Train(2, false, 80),
new Train(3, true, 90));
}
}
Let’s start the application and send a GET request to http://localhost:8082/api/services/train. You will be asked to enter a username and password. The username is user and the password you can see from the console where the application was started. By entering this credentials will give the protected data.
Let’s change the application now to be a resource server by going to the main class ResourceServerApplication and adding the annotation @EnableResourceServer.
@SpringBootApplication
@EnableResourceServer
public class ResourceServerApplication {
public static void main(String[] args) {
SpringApplication.run(ResourceServerApplication.class, args);
}
}
Go to the application properties file and do the following changes:
server.port=8082
server.servlet.context-path=/api/services
security.oauth2.resource.user-info-uri=http://localhost:8083/api/auth/user
What we have done here is:
Changed our server port to 8082
Set context path: /api/services
Gave user info URI where the user will be validated when he will try to pass a token
Now if you try to get the protected data by sending a GET request to http://localhost:8082/api/services/train the server will return to you a message that you are unauthorized and that full authentication is required. That means that without a token you won’t be able to access the resource.
So that means that we need a fresh new token in order to get the data. We will ask the authorization server to give us a token for the user that we previously created. Our client in this scenario will be the postman. The authorization server that we previously created is exposing some endpoints out of the box. To ask the authorization server for a fresh new token send a POST request to the following URL: localhost:8083/api/auth/oauth/token.
As it was said previously that postman in this scenario is the client that is accessing the resource, it will need to send the client credentials to the authorization server. Those are the client id and the client secret. Go to the authorization tab and add as a username the client id (north47) and the password will be the client secret (north47secret). On the picture below is presented how to set the request:

What is left is to say the username and password of the user. Open the body tab and select x-www-form-urlencoded and add the following values:
- key: ‘grant_type’, value: ‘password’
- key: ‘ client_id’, value: ‘north47’
- key: ‘ username’, value: ‘filip’
- key: ‘password’, value ‘1234’

Press send and you will get a response with the access_token:
{
"access_token": "ae27c519-b3da-4da8-bacd-2ffc98450b18", "token_type": "bearer", "refresh_token": "d97c9d2d-31e7-456d-baa2-c2526fc71a5a", "expires_in": 43199, "scope": "read write"
}
Now that we have the access token we can call our protected resource by inserting the token into the header of the request. Open postman again and send a GET request to localhost:8082/api/services/train. Open the header tab and here is the place where we will insert the access token. For a key add “Authorization” and for value add “Bearer ae27c519-b3da-4da8-bacd-2ffc98450b18”.

And there it is! You have authorized itself and got a new token which allowed you to get the protected data.
You can find the projects in our repository:
Resource server
Authorization server
Source: https://www.north-47.com/knowledge-base/securing-your-microservices-with-oauth-2-0-building-authorization-and-resource-server/
No comments:
Post a Comment
If you have any doubts or questions, please let us know.