You want to send an email to the admin for approval or rejection and after approval, page should be activate and send an email to the author of activation and workflow should be complete but if rejected than send an email to the initiator of rejection and workflow should not be completed until the page approved using workflow.
In this post, I will show you all the required step and and configurations which we have to do.
For send an email to the admin on the click of activate, Firstly you have to deny the permission of replication of that author. Now when you click on the activate button you will find a pop up like this:

It means your request for activation workflow has been launched.
Note: It is applied till AEM 6.0 version above this version (AEM 6.1 & AEM 6.2) Activate button will be disabled So In that case we can not activate from siteadmin for this, we have to go on that particular page for activate the page.
Now if you will see in the admin inbox,you will find that request for activation workflow is in running condition.
Now we have to change this model according to our requirements.
Go to the workflow by logging in to the admin interface:
http://localhost:4502/libs/cq/workflow/content/console.html
And search for Request for Activation model in model tab.

Double click on this model and delete all steps and drop your Dialog participant step and double click on this step you will find a pop up like this:

In this popup, there are three tabs Common, User/Group and Dialog.
In first tab, there are two widgets title and description. Here you can give title and description of your step.
In second tab, there are two widgets User/Group and Email.
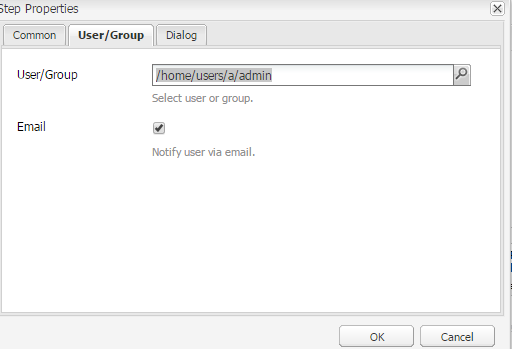
Select admin in user and tick on the Email if you want to send the mail to the admin inbox.
Note:
If you want to send the mail to the gmail of admin than you have to give the gmail id to the admin from the useradmin console.

In third tab you have to select the path of your dialog which you have created for the dialog participant step.
In my case I select the path: /etc/workflow/dialogs/approval/dialog
Now click on OK. your dialog participant step has been created.
Now if we activate the page, an email will send to the admin inbox and gmailId. Admin will select this step and click on the complete tab than a dialog will open with the dropdown. Admin will select approve or reject from the drop down than this value will be save into the workitem.

Till now, workflow not complete this was only for our dialog participant step confirmation that it is working fine or not.
So go back our workflow model and drop the process step below the dialog participant step. This step is used for fetch the value of dilaog input from the workitem and set this property on the workflow metedata.To do this we have to write an ECMA script with some code as given below:
var name;
var history = workflowSession.getHistory(workItem.getWorkflow());
for (var index = history.size() – 1; index >= 0; index–) {
var previous = history.get(index);
var tempRejectApprove = previous.getWorkItem().getMetaDataMap().get(‘name’);
if ((tempRejectApprove != ”)&&(tempRejectApprove != null)) {
name = tempRejectApprove;
break;
}
}
workItem.getWorkflowData().getMetaData().put(‘name’, name);
In my case I created a script named as relpaceDialogValue.ecma. Location of this file will be
/etc/workflow/scripts/replaceDialogvalue.ecma
Now when we select from the process step drop down, this script will show and select it.
Because of this script, your dialog value will be saved on workflow metadata.
Now below this process step, we have to drop the OR Split process and select the 2 branches. In the first branch script, we have to write the script which is given below:
function check() {
var match = ‘approve’;
if (workflowData.getMetaData().get(‘name’) == match) {
return true;
} else {
return false;
}
}
In the Second Branch we have to write this code:
function check() {
var match = ‘rejected’;
if (workflowData.getMetaData().get(‘name’) == match) {
return true;
} else {
return false;
}
}
If the branch 1 will return true then workflow move on left side. If Branch 1 return false or branch2 return true then workflow will move on right side.
Note:
Before the OR Step I have to use Process step because we can not access the value of the dialog from workItem in to the OR Split process there is an error that “workitem is not defined” because OR Split process does not have workitem object so I have to use process Step.
Step for left split:
Now one more process step drop in to the left split.

Double click on this step and go to the process tab and select activate page from the drop down.

This process step will activate the page after selection by the admin as approve from the inbox as select the dropdown.
Below this step drop one more process step for sending the mail to the initiator.

Double click on this step and select the custom process step (custom step for approval) for sending the mail to the initiator.

Code for this step is given below:
package com.havells.services;
import java.util.List;
import javax.jcr.RepositoryException;
import org.slf4j.Logger;
import org.slf4j.LoggerFactory;
import org.apache.felix.scr.annotations.Component;
import org.apache.felix.scr.annotations.Service;
import org.apache.felix.scr.annotations.Properties;
import org.apache.felix.scr.annotations.Property;
import org.apache.felix.scr.annotations.Reference;
import org.apache.jackrabbit.api.security.user.Authorizable;
import org.apache.jackrabbit.api.security.user.UserManager;
import org.apache.sling.api.resource.ResourceResolver;
import org.apache.sling.commons.osgi.PropertiesUtil;
import org.osgi.framework.Constants;
import com.adobe.granite.workflow.WorkflowException;
import com.adobe.granite.workflow.WorkflowSession;
import com.adobe.granite.workflow.exec.HistoryItem;
import com.adobe.granite.workflow.exec.WorkItem;
import com.adobe.granite.workflow.exec.Workflow;
import com.adobe.granite.workflow.exec.WorkflowProcess;
import com.adobe.granite.workflow.metadata.MetaDataMap;
import com.day.cq.mailer.MessageGateway;
import com.day.cq.mailer.MessageGatewayService;
import org.apache.commons.mail.Email;
import org.apache.commons.mail.SimpleEmail;
//This is a component so it can provide or consume services
@Component
@Service
@Properties({
@Property(name = Constants.SERVICE_DESCRIPTION, value = “Test Email workflow process implementation.”),
@Property(name = Constants.SERVICE_VENDOR, value = “Adobe”),
@Property(name = “process.label”, value = “Custom Step for approval”) })
public class CustomStepForApproval implements WorkflowProcess {
protected final Logger log = LoggerFactory.getLogger(this.getClass());
@Reference
private MessageGatewayService messageGatewayService;
public void execute(WorkItem workitem, WorkflowSession wfsession,
MetaDataMap metaDataMap) throws WorkflowException {
ResourceResolver resolver = wfsession.adaptTo(ResourceResolver.class);
UserManager userManager = resolver.adaptTo(UserManager.class);
Workflow workflow = workitem.getWorkflow();
String payload = (String) workitem.getWorkflowData().getPayload();
String initiator = workitem.getWorkflow().getInitiator();
Authorizable authorizable = null;
String userEmail = null;
try {
authorizable = userManager.getAuthorizable(initiator);
} catch (RepositoryException e1) {
// TODO Auto-generated catch block
e1.printStackTrace();
}
try {
userEmail = PropertiesUtil.toString(authorizable.getProperty(“profile/email”), “”);
} catch (RepositoryException e1) {
// TODO Auto-generated catch block
e1.printStackTrace();
}
String temp = null;
List<HistoryItem> list = wfsession.getHistory(workflow);
for(int index = list.size()-1; index >=1; index–){
HistoryItem previous = list.get(index);
temp = (String) previous.getWorkItem().getMetaDataMap().get(“name”);
}
try {
MessageGateway<Email> messageGateway;
Email email = new SimpleEmail();
String emailToRecipients = userEmail;
//String emailCcRecipients = “abc@gmail.com”;
email.addTo(emailToRecipients);
//email.addCc(emailCcRecipients);
email.setSubject(“AEM Custom Step”);
email.setFrom(“gkgauravkumar445@gmail.com”);
if(temp .equals(“approve”)){
email.setMsg(“This message is to inform you that the CQ content has been approved and activated which Payload path is = “+ payload);
}else{
email.setMsg(“This message is to inform you that the CQ content has been Rejected Please modify it which Payload path is = “+ payload);
}
// Inject a MessageGateway Service and send the message
messageGateway = messageGatewayService.getGateway(Email.class);
// Check the logs to see that messageGateway is not null
messageGateway.send((Email) email);
}
catch (Exception e) {
e.printStackTrace();
}
}
}
Step for Right Split:
In the right split, I will drop a process step for sending the mail of rejection to the initiator.

Double click on this step and select the custom process step (custom step for approval) for sending the mail to the initiator.

Now below this step drop Dynamic Participant Step.
About Dynamic Participant Step, I discussed in my last blog click here.

Double click on this step and select the custom dynamic participant step (workflow participant chooser) for assign to the initiator.

Don’t forget to mark the email. Because of this, the mail will be send to the initiator inbox.
Now click OK. Now because of this step the mail will be send to the initiator inbox and from the inbox the initiator will click on complete tab.
Now Below this step we will drop GoTo Step. And select the Dialog Participant Step from the drop down for which the next will be execute as a Dialog Participant Step.
This process will be continue until the admin will not approve the page.
So the final model will be look like this:

If you want to send the mail to the gmail of admin than you have to give the gmail id to the admin from the useradmin console.
In third tab you have to select the path of your dialog which you have created for the dialog participant step.
In my case I select the path: /etc/workflow/dialogs/approval/dialog
Now click on OK. your dialog participant step has been created.
Now if we activate the page, an email will send to the admin inbox and gmailId. Admin will select this step and click on the complete tab than a dialog will open with the dropdown. Admin will select approve or reject from the drop down than this value will be save into the workitem.
Till now, workflow not complete this was only for our dialog participant step confirmation that it is working fine or not.
So go back our workflow model and drop the process step below the dialog participant step. This step is used for fetch the value of dilaog input from the workitem and set this property on the workflow metedata.To do this we have to write an ECMA script with some code as given below:
var name;
var history = workflowSession.getHistory(workItem.getWorkflow());
for (var index = history.size() – 1; index >= 0; index–) {
var previous = history.get(index);
var tempRejectApprove = previous.getWorkItem().getMetaDataMap().get(‘name’);
if ((tempRejectApprove != ”)&&(tempRejectApprove != null)) {
name = tempRejectApprove;
break;
}
}
workItem.getWorkflowData().getMetaData().put(‘name’, name);
In my case I created a script named as relpaceDialogValue.ecma. Location of this file will be
/etc/workflow/scripts/replaceDialogvalue.ecma
Now when we select from the process step drop down, this script will show and select it.
Because of this script, your dialog value will be saved on workflow metadata.
Now below this process step, we have to drop the OR Split process and select the 2 branches. In the first branch script, we have to write the script which is given below:
function check() {
var match = ‘approve’;
if (workflowData.getMetaData().get(‘name’) == match) {
return true;
} else {
return false;
}
}
In the Second Branch we have to write this code:
function check() {
var match = ‘rejected’;
if (workflowData.getMetaData().get(‘name’) == match) {
return true;
} else {
return false;
}
}
If the branch 1 will return true then workflow move on left side. If Branch 1 return false or branch2 return true then workflow will move on right side.
Note:
Before the OR Step I have to use Process step because we can not access the value of the dialog from workItem in to the OR Split process there is an error that “workitem is not defined” because OR Split process does not have workitem object so I have to use process Step.
Step for left split:
Now one more process step drop in to the left split.
Double click on this step and go to the process tab and select activate page from the drop down.
This process step will activate the page after selection by the admin as approve from the inbox as select the dropdown.
Below this step drop one more process step for sending the mail to the initiator.
Double click on this step and select the custom process step (custom step for approval) for sending the mail to the initiator.
Code for this step is given below:
package com.havells.services;
import java.util.List;
import javax.jcr.RepositoryException;
import org.slf4j.Logger;
import org.slf4j.LoggerFactory;
import org.apache.felix.scr.annotations.Component;
import org.apache.felix.scr.annotations.Service;
import org.apache.felix.scr.annotations.Properties;
import org.apache.felix.scr.annotations.Property;
import org.apache.felix.scr.annotations.Reference;
import org.apache.jackrabbit.api.security.user.Authorizable;
import org.apache.jackrabbit.api.security.user.UserManager;
import org.apache.sling.api.resource.ResourceResolver;
import org.apache.sling.commons.osgi.PropertiesUtil;
import org.osgi.framework.Constants;
import com.adobe.granite.workflow.WorkflowException;
import com.adobe.granite.workflow.WorkflowSession;
import com.adobe.granite.workflow.exec.HistoryItem;
import com.adobe.granite.workflow.exec.WorkItem;
import com.adobe.granite.workflow.exec.Workflow;
import com.adobe.granite.workflow.exec.WorkflowProcess;
import com.adobe.granite.workflow.metadata.MetaDataMap;
import com.day.cq.mailer.MessageGateway;
import com.day.cq.mailer.MessageGatewayService;
import org.apache.commons.mail.Email;
import org.apache.commons.mail.SimpleEmail;
//This is a component so it can provide or consume services
@Component
@Service
@Properties({
@Property(name = Constants.SERVICE_DESCRIPTION, value = “Test Email workflow process implementation.”),
@Property(name = Constants.SERVICE_VENDOR, value = “Adobe”),
@Property(name = “process.label”, value = “Custom Step for approval”) })
public class CustomStepForApproval implements WorkflowProcess {
protected final Logger log = LoggerFactory.getLogger(this.getClass());
@Reference
private MessageGatewayService messageGatewayService;
public void execute(WorkItem workitem, WorkflowSession wfsession,
MetaDataMap metaDataMap) throws WorkflowException {
ResourceResolver resolver = wfsession.adaptTo(ResourceResolver.class);
UserManager userManager = resolver.adaptTo(UserManager.class);
Workflow workflow = workitem.getWorkflow();
String payload = (String) workitem.getWorkflowData().getPayload();
String initiator = workitem.getWorkflow().getInitiator();
Authorizable authorizable = null;
String userEmail = null;
try {
authorizable = userManager.getAuthorizable(initiator);
} catch (RepositoryException e1) {
// TODO Auto-generated catch block
e1.printStackTrace();
}
try {
userEmail = PropertiesUtil.toString(authorizable.getProperty(“profile/email”), “”);
} catch (RepositoryException e1) {
// TODO Auto-generated catch block
e1.printStackTrace();
}
String temp = null;
List<HistoryItem> list = wfsession.getHistory(workflow);
for(int index = list.size()-1; index >=1; index–){
HistoryItem previous = list.get(index);
temp = (String) previous.getWorkItem().getMetaDataMap().get(“name”);
}
try {
MessageGateway<Email> messageGateway;
Email email = new SimpleEmail();
String emailToRecipients = userEmail;
//String emailCcRecipients = “abc@gmail.com”;
email.addTo(emailToRecipients);
//email.addCc(emailCcRecipients);
email.setSubject(“AEM Custom Step”);
email.setFrom(“gkgauravkumar445@gmail.com”);
if(temp .equals(“approve”)){
email.setMsg(“This message is to inform you that the CQ content has been approved and activated which Payload path is = “+ payload);
}else{
email.setMsg(“This message is to inform you that the CQ content has been Rejected Please modify it which Payload path is = “+ payload);
}
// Inject a MessageGateway Service and send the message
messageGateway = messageGatewayService.getGateway(Email.class);
// Check the logs to see that messageGateway is not null
messageGateway.send((Email) email);
}
catch (Exception e) {
e.printStackTrace();
}
}
}
Step for Right Split:
In the right split, I will drop a process step for sending the mail of rejection to the initiator.
Double click on this step and select the custom process step (custom step for approval) for sending the mail to the initiator.
Now below this step drop Dynamic Participant Step.
About Dynamic Participant Step, I discussed in my last blog click here.
Double click on this step and select the custom dynamic participant step (workflow participant chooser) for assign to the initiator.
Don’t forget to mark the email. Because of this, the mail will be send to the initiator inbox.
Now click OK. Now because of this step the mail will be send to the initiator inbox and from the inbox the initiator will click on complete tab.
Now Below this step we will drop GoTo Step. And select the Dialog Participant Step from the drop down for which the next will be execute as a Dialog Participant Step.
This process will be continue until the admin will not approve the page.
So the final model will be look like this:

No comments:
Post a Comment
If you have any doubts or questions, please let us know.