In this post we are going to dive in a little deeper and learn how to create your own custom widgets to be used inside your custom project template.
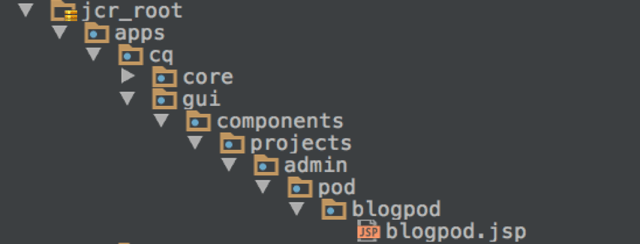
To get started let’s go ahead and create the folder structure necessary for creating your own custom widget. The structure I like to use is, “apps/cq/gui/components/projects/admin/pod/{nameOfWidget}/{nameOfWidget}.jsp”. It’s worth noting that this path is completely up to you. I however like to use this path as it mirrors the one used by Adobe and is nice to have as a helpful reminder as to where you can find their widgets at when browsing CRXDE Lite. It’s also worth noting that Adobe calls these “Pods”, I call them widgets because I feel like it’s more representative of what they are. You call them whatever you want because you are a freethinking, smart and resourceful AEM developer!
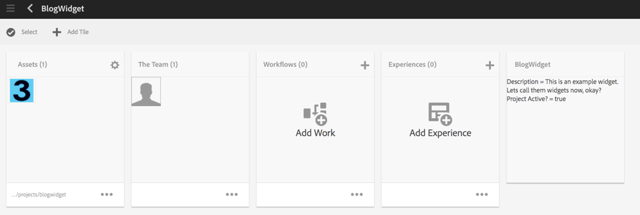
Now it’s time to get down to my favorite part of these posts, the code. You’ll notice the file that is housed in the folder is our good friend JSP. While sightly runs the show when it comes to component development, JSP is still the standard that Adobe is using to build their own widgets/“pods” and since Adobe likes to build them with JSP that’s how we will build them as well. The widget I’m going to be walking you through today is a very simple one that will display the project title and description and make use of the Project class provided by Adobe. It doesn’t have any pretty front end or fancy logic, but it’ll still show you the basics of how to interact with your project. Let’s see the code now.
<%@ page import="com.adobe.cq.projects.api.Project,
com.adobe.cq.projects.api.ProjectLink,
org.apache.sling.api.resource.Resource,
org.apache.sling.api.resource.ValueMap" %>
<%@page session="false"%>
<%@include file="/libs/granite/ui/global.jsp"%>
<ui:includeClientLib categories="cq.projects.admin" />
<%
//1
ProjectLink projectLink = resource.adaptTo(ProjectLink.class);
Project project = projectLink.getProject();
//2
Resource projectResource = project.adaptTo(Resource.class);
Resource projectContentResource = projectResource.getChild("jcr:content");
//3
ValueMap valueMap = projectContentResource.adaptTo(ValueMap.class);
//4
String active = valueMap.get("active", "false");
//5
String title = project.getTitle();
String description = project.getDescription();
%>
<article class="card-pod cq-projects-Pod foundation-collection-item">
<i class="select"></i>
<div class="card">
<nav class="endor-ActionBar">
<div class="endor-ActionBar-left">
<div class="endor-ActionBar-item">
<div class="endor-ActionBar-item coral-Button coral-Button--secondary coral-Button--quiet cq-projects-Pod-title"> <%=title%> </div>
</div>
</div>
</nav>
<div class="cq-projects-Pod-content">
<div>
Description = <%=description%>
</br>
Project Active? = <%=active%>
</div>
</div>
</article>
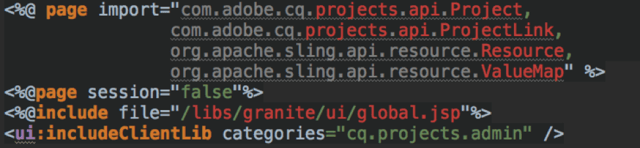
Alright there is a lot to talk about here so we’ll start from the top and work our way down. Top of the JSP file we see page imports. These are classes we are going to use in the Java section of the page. Also you’ll see we are pointing to the default global.jsp included with AEM. Finally, you’ll spot that we’ve included a clientlib provided by Adobe. I’ve found this clientlib to contain a lot of the CSS classes necessary to get our widget to look like the rest that Adobe has created.
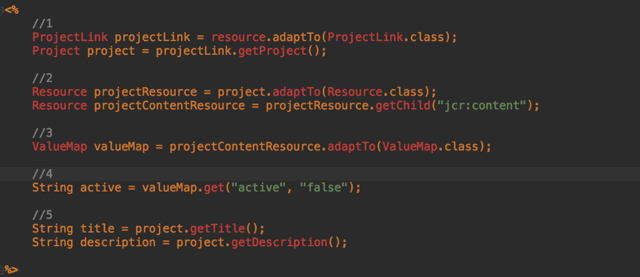 Ah ha! Now we are to the good part of the JSP, our Java scriptlet. Now I’m going to assume since you are reading an AEM Blog that you have had some amount of experience with the infamous scriptlet, however, if you haven’t, here's a helpful tutorial. It’s worth considering that there are a number of ways to avoid having to write your Java code in scriptlet form and this author would recommend them for some more complex widgets, however, in our case, it’s not necessary for such a simple widget. Back to the code now shall we?You can see below comment 1 we take our current resource provided by the JSP and adapt it to the Adobe provided ProjectLink class. If you glance down to comment 5 you can see some of the API calls in use. You can find the API on ProjectLink class here . It provides a number of API calls to access common and useful information about the project. I always recommend using the API if possible, it makes the code more readable and is much prettier than a ValueMap. Also I’d be a bad teacher if I didn’t provide you with a link to the other Project related classes that Adobe so graciously provides us. These can be very useful depending on your use case so take a moment to check them out.
Now I know what you’re thinking, “Okay but what if the data I need isn’t available via any of these API calls?”. No problem at all, we can still interact with resources just like you would for any Java backend component. Take a look at the code below comment 2. What we are doing here is taking the Project and adapting it to the resource class. This will directly equate to the resource at /content/projects/{dateProjectCreated}/{projectTitle}. Next we use the getChild() method via resource to locate the content node directly below it. Any dialog options you’ve customized or added in will likely be on this node unless you’ve configured them otherwise.
Take a look at lines 3 and 4 now. On line 3 we take our newly found content resource and adapt it to a ValueMap class. For those who haven’t used them before, ValueMaps are a class made for easily extracting properties from an adapted resource. You can see just how easy it is to extract the property by glancing down to comment 4 where we are able to extract the status of the project currently.
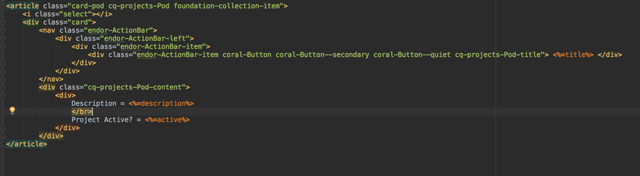
Now finally it’s time to display all of your hard work. The HTML I’ve used is slightly modified HTML from the out of the box widgets that Adobe provides. I do this so that our widget can blend in with the rest of the Adobe provided widgets. This is also where the clientlib include we used at the top comes into play as many of these CSS classes are defined there. All that’s left now is to include it in your custom project. Browse over to your custom project you created from our first post and include it in the context.xml file at “/apps/myproject/templates/customProjects/customProject/“ inside the “gadget” section of the XML.
Source: https://blog.3sharecorp.com/aem-projects-tab-part-2

No comments:
Post a Comment
If you have any doubts or questions, please let us know.