Configuring single sign-on (SSO) for AEM Author instance with Okta using SAML is well documented and easy to achieve the task. However, when it comes to set up the same process on the AEM Publish instance, there are a couple more steps one needs to remember - especially when it comes to setting up a scalable and (almost) stateless authentication process for publish farm. Generally speaking, the AEM instance uses the SAML standard to exchange authentication and authorization data with the Okta service. It enables a web-based cross-domain single sign-on (SSO) and a single logout (SLO). The SAML standard defines AEM as Service Provider (SP) and Okta as Identity Provider (IdP).
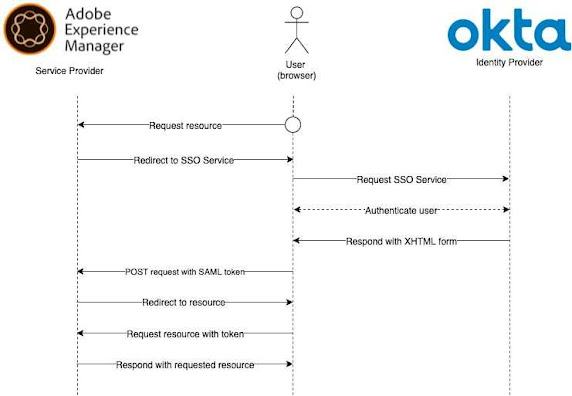
Prerequisites
Before we start the configuration process, there are two things we need to have ready:
To set up the AEM instance we used Gradle AEM Multi-Project Example. The AEM environment consists of 1 Author and 2 Publish instances with Dispatcher in front of them. We will make use of the example demo.example.com domain and content that are available when using the AEM Multi-Project Example.
Additionally, if you have more than one Publish instance, you will need to be capable of handling sticky sessions (e.g. by configuring a Load Balancing (LB) with a sticky cookie).
Before we start the configuration process, there are two things we need to have ready:
- Okta user with administrator rights,
- AEM 6.5 instances.
To set up the AEM instance we used Gradle AEM Multi-Project Example. The AEM environment consists of 1 Author and 2 Publish instances with Dispatcher in front of them. We will make use of the example demo.example.com domain and content that are available when using the AEM Multi-Project Example.
Additionally, if you have more than one Publish instance, you will need to be capable of handling sticky sessions (e.g. by configuring a Load Balancing (LB) with a sticky cookie).
Configuration
This example config shows how to configure SSO for http://demo.example.com domain which is mapped to the /content/example/demo, so e.g.:
Generate and configure the AEM key pair (public certificate and private). The private key is used to sign SAML messages in Okta, while a public key (certificate) is used to encrypt the message so only an instance with that certificate can decrypt it, and verify the signatures.
AEM configuration requires the private key in the PKCS8 format.
1. Generate RSA private and public keys + certificate. To do this, run the following command and fill the form.
This example config shows how to configure SSO for http://demo.example.com domain which is mapped to the /content/example/demo, so e.g.:
- entering http://demo.example.com/en-us.html resolves to /content/example/demo/en-us.html.
Generate and configure the AEM key pair (public certificate and private). The private key is used to sign SAML messages in Okta, while a public key (certificate) is used to encrypt the message so only an instance with that certificate can decrypt it, and verify the signatures.
AEM configuration requires the private key in the PKCS8 format.
1. Generate RSA private and public keys + certificate. To do this, run the following command and fill the form.
$ openssl req -x509 -sha256 -days 365 -newkey rsa:4096 -keyout aem.key -out aem.crt
pass: <password>
Country Name (2 letter code) [XX]:
State or Province Name (full name) []:
Locality Name (eg, city) [Default City]:
Organization Name (eg, company) [Default Company Ltd]:
Organizational Unit Name (eg, section) []:
Common Name (eg, your name or your server's hostname) []:
Email Address []:
2. Convert PEM to DER format
openssl rsa -in aem.key -outform der -out aem.der
3. Verify DER key
openssl rsa -in aem.der -inform der -text -noout
4. DER key to PKCS8 - must be nocrypt, otherwise, AEM throws an error when adding the DER key: https://stackoverflow.com/questions/8451131/read-private-key-in-der-format-java
openssl pkcs8 -topk8 -inform der -nocrypt -in aem.der -outform der -out aem-pkcs8.der
You should now have:
├── aem-pkcs8.der
You should now have:
├── aem-pkcs8.der
├── aem.crt
├── aem.der
└── aem.key
2. Okta application
First, we need to create a new Okta application dedicated to AEM. The Okta application defines SSO/SLO integration details as well as users and permissions. A separate application is created for each environment (separate for author and publish).
2. Okta application
First, we need to create a new Okta application dedicated to AEM. The Okta application defines SSO/SLO integration details as well as users and permissions. A separate application is created for each environment (separate for author and publish).
2.1 Setup
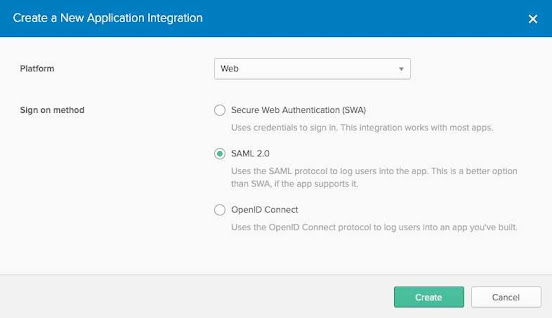
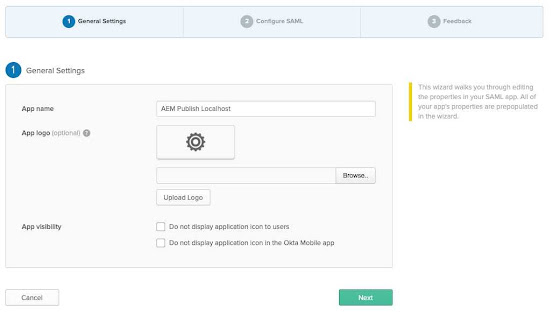
Go to the admin panel: https://your-id.okta.com/admin/dashboard. Select Applications -> Applications, click Add Application, and then Create New App.
Choose Web and SAML 2.0.
Go to the admin panel: https://your-id.okta.com/admin/dashboard. Select Applications -> Applications, click Add Application, and then Create New App.
Choose Web and SAML 2.0.
2.2.2 SAML settings
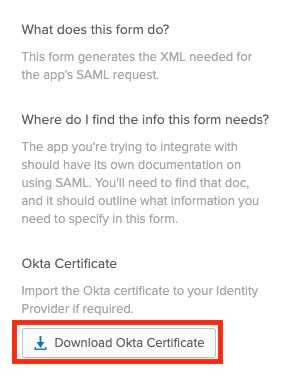
Start with downloading Okta Certificate (its on the right-side panel):
Start with downloading Okta Certificate (its on the right-side panel):
2. General properties configuration
An authentication request from Okta to AEM first goes to https://PUBLISH_DOMAIN/<path configured in SAMLAuthenticationHandler OSGi config>/saml_login.
Audience URI (SP Entity ID) will be later used in the SAML Authentication Handler configuration.
Audience URI (SP Entity ID) will be later used in the SAML Authentication Handler configuration.
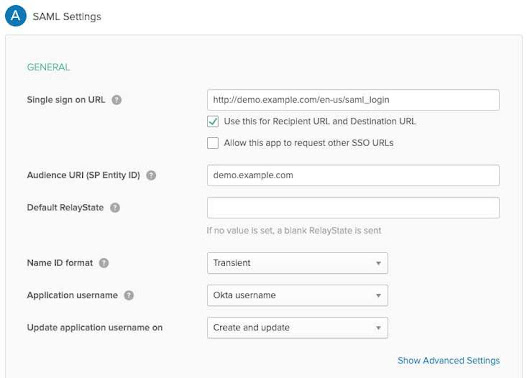
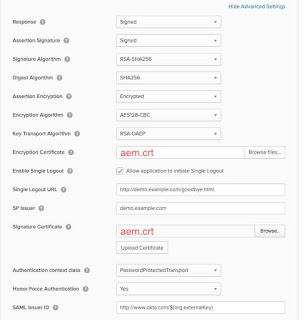
3. Advanced settings configuration:
Click Show Advanced settings and fill the form according to the screenshot below.
Click Show Advanced settings and fill the form according to the screenshot below.
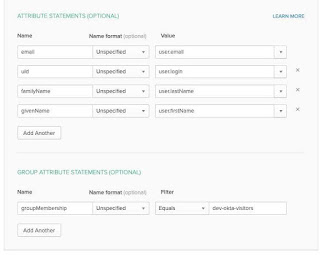
4. Attributes configuration:
In this section, the user profile data sent in the AEM authentication request is configured. This section maps Okta user profile data to the response properties (e.g. email profile value will be sent in the user.email field). We will make use of the AEM SAML Authentication Handler and autocreate CRX Users after successful authentication based on those attributes. Configure which fields should be part of this request.
In this section, the user profile data sent in the AEM authentication request is configured. This section maps Okta user profile data to the response properties (e.g. email profile value will be sent in the user.email field). We will make use of the AEM SAML Authentication Handler and autocreate CRX Users after successful authentication based on those attributes. Configure which fields should be part of this request.
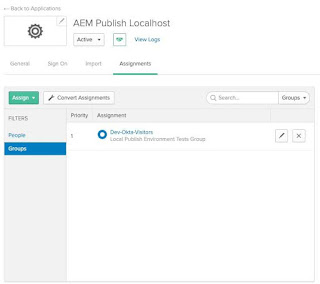
2.2.3 Assign group to the application
This step assumes that proper Group hierarchy exists in Okta (as mentioned in the Prerequisites).
In order to make a successful authentication request to AEM, the Okta application should have corresponding groups from Okta assigned (in our case it is the Okta Dev Visitors group). These groups are part of the authentication request (filtered by the groupMembership attribute configured in the previous step). The corresponding groups must exist in the AEM instance (we will configure it in the AEM Group configuration step).
Open created app (Applications -> Applications and choose from the list). From the Assignments tab choose Assign -> Assign to Groups. Find the proper group for the application and assign it:
2.2.4 Setup instructions
- Open created app (Applications -> Application and choose from the list). From the General tab, copy the Embed link for later.
- In the Sign On tab click View Setup Instructions and copy information for later.
- okta.cert file downloaded
- Embed link (aka IdP URL): https://your-id.okta.com/home/your-id_aempublishlocalhost_1/0oa1ltmftpUq7m9X2357/aln1ltra3mGLIIE5R357
- Single Logout URL: https://your-id.okta.com/app/your-id_aempublishlocalhost_1/exk1ltmfto8GDIrUJ357/slo/saml
- name of the group for authenticated users: dev-okta-visitors
3. AEM configuration
These instructions are for Publish instance configuration. Each point should be executed separately on each AEM publish instance unless stated otherwise. Some steps will be executed on the Author instance.
These instructions are for Publish instance configuration. Each point should be executed separately on each AEM publish instance unless stated otherwise. Some steps will be executed on the Author instance.
3.1 HMAC key synchronization
In order to make the authentication mechanism stateless, it is important to configure the Encapsulated Token. Before you start any configuration - shut down all AEM publish instances in order to synchronize the hmac key. When all instances are offline, follow the Replicating the HMAC key instructions from:
Since the instances are down, you don't have to restart any bundles. When all instances have the same hmac key, run them.
3.2 Trust store
Log in to the AEM Publish instance (using https://AEM_PUBLISH_INSTANCE/libs/granite/core/content/login.html). Configure the Okta certificate in the AEM trust store. Open https://AEM_PUBLISH_INSTANCE/libs/granite/security/content/truststore.html (or Tools -> Security -> Trust Store).
Create a Trust Store and Add Certificate from CER file. Upload okta.cert and submit. Write down Alias - it will be required later in SAML Authenticator Handler config.

3.3 Authentication service
Configure authentication-service user Key Store with private key and certificate generated in step (1).
Open https://AEM_PUBLISH_INSTANCE/security/users.html (or Tools -> Security -> Users) and find authentication-service. Edit it and create a new Keystore. Choose the new keystore alias and write it down for the later SAML Authenticator Handler config (in this example it's local-publish-alias).


Optionally you may configure a separate Logger for SAML:

Read more on this here: https://forums.adobe.com/thread/2334298
Configure authentication-service user Key Store with private key and certificate generated in step (1).
Open https://AEM_PUBLISH_INSTANCE/security/users.html (or Tools -> Security -> Users) and find authentication-service. Edit it and create a new Keystore. Choose the new keystore alias and write it down for the later SAML Authenticator Handler config (in this example it's local-publish-alias).

3.4 SAML Authentication Handler
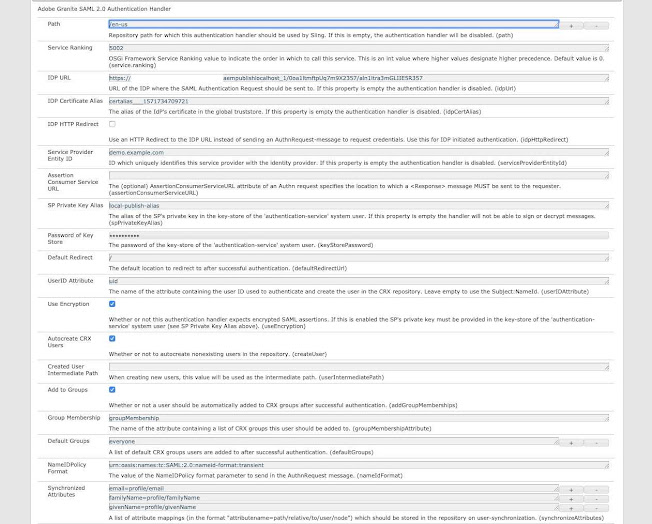
Configure the AEM SAML Authentication Handler to enable SAML authentication and authorization. Open OSGi Config Manager: https://AEM_PUBLISH_INSTANCE/system/console/configMgr and find Adobe Granite SAML 2.0 Authentication Handler config and create a new configuration with the following settings:
Configure the AEM SAML Authentication Handler to enable SAML authentication and authorization. Open OSGi Config Manager: https://AEM_PUBLISH_INSTANCE/system/console/configMgr and find Adobe Granite SAML 2.0 Authentication Handler config and create a new configuration with the following settings:

- Path is configured for the root page before AEM mapping is done. Remember that Okta SAML general settings Single sign-on URL should correspond to the path configured here.
- IDP URL is the Embed link copied from the Okta Setup instructions.
- IDB Certificate Alias is the alias of the configured Trust Store.
- Service Provider Entity ID is the one configured in Okta SAML Settings in Audience URI (SP Entity ID).
- SP Private Key Alias is authentication-service Keystore alias
- The password of Key Store - authentication-service Keystore password
- Group Membership - Okta Group Attribute
- Default Group - default AEM group
- Synchronized Attributes - mapping of attributes from Okta SAML request to AEM user profile.

Optionally you may configure a separate Logger for SAML:
3.5 Apache Sling Referrer Filter
Configure the Apache Sling Referrer Filter. Open OSGi Config Manager: https://AEM_PUBLISH_INSTANCE/system/console/configMgr, find Apache Sling Referrer Filter, and edit it. Specify the Okta domain and host regexp:
Configure the Apache Sling Referrer Filter. Open OSGi Config Manager: https://AEM_PUBLISH_INSTANCE/system/console/configMgr, find Apache Sling Referrer Filter, and edit it. Specify the Okta domain and host regexp:

3.6 Sling Authenticator
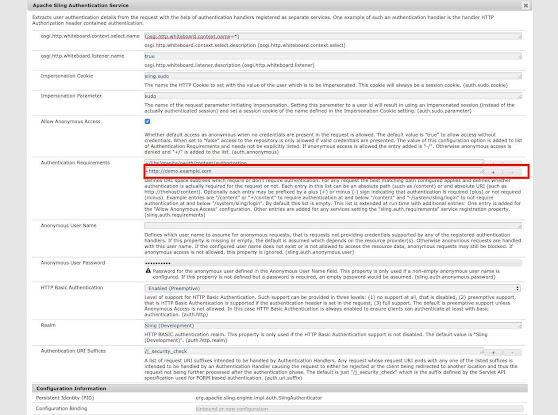
In order to enforce login at a specific path or URI, we need to add a new authentication requirement in the Sling Authentication Service. In our case it is http://demo.example.com because we use two-way mappings (in the /etc/map.publish/http/demo.example.com):
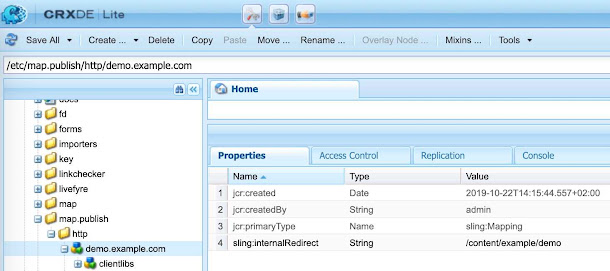
That means in this particular case we can't specify the path.
When path rewriting is handled by the Apache mod_rewrite, it would be possible to configure authentication requirements as a path. In that case, this step can be replaced by creating a service that will provide a "sling.auth.requirements" property with the path value.
We need to configure it in the Sling Authentication Service by adding new authentication requirements.
In order to enforce login at a specific path or URI, we need to add a new authentication requirement in the Sling Authentication Service. In our case it is http://demo.example.com because we use two-way mappings (in the /etc/map.publish/http/demo.example.com):

That means in this particular case we can't specify the path.
When path rewriting is handled by the Apache mod_rewrite, it would be possible to configure authentication requirements as a path. In that case, this step can be replaced by creating a service that will provide a "sling.auth.requirements" property with the path value.
We need to configure it in the Sling Authentication Service by adding new authentication requirements.

Read more on this here: https://forums.adobe.com/thread/2334298
3.7 User group for authenticated users
In order to authorize authenticated users, a group with proper rights for that user has to exist on the Publish instance. Now we will create a group that has access to the /content/example/demo. It is important that the group has exactly the same path in JCR on all AEM Publish instances. It is recommended to create the group on the Author instance and replicate it to all Publish instances. If the group will be created separately on each Publish instance, the User's synchronization with Sling Distribution will not work properly.
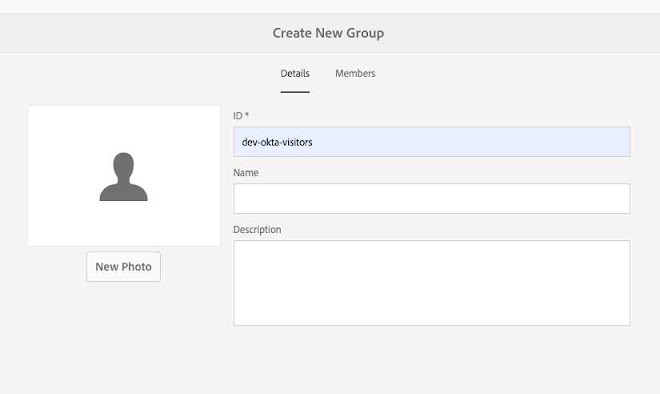
Add a new group that name corresponds to the name from the Okta SAML request. Open https://AEM_AUTHOR/security/groups.html (or Tools -> Security -> Groups) and add a new group.
Now add proper rights and activate the group so it will be replicated to all Publish instances under the same JCR path /home/groups/....
You should now be able to authenticate to AEM Publish using your Okta user (assuming it is assigned to the Okta Application and Okta Group that is connected with this AEM instance).
In order to authorize authenticated users, a group with proper rights for that user has to exist on the Publish instance. Now we will create a group that has access to the /content/example/demo. It is important that the group has exactly the same path in JCR on all AEM Publish instances. It is recommended to create the group on the Author instance and replicate it to all Publish instances. If the group will be created separately on each Publish instance, the User's synchronization with Sling Distribution will not work properly.
Add a new group that name corresponds to the name from the Okta SAML request. Open https://AEM_AUTHOR/security/groups.html (or Tools -> Security -> Groups) and add a new group.

Now add proper rights and activate the group so it will be replicated to all Publish instances under the same JCR path /home/groups/....
You should now be able to authenticate to AEM Publish using your Okta user (assuming it is assigned to the Okta Application and Okta Group that is connected with this AEM instance).
3.8 Token Authentication Handler
The default authentication token is persisted in the repository under the user's profile. That means the authentication mechanism is stateful. Encapsulated Token is the way to configure stateless authentication. It ensures that the cookie can be validated without having to access the repository.
Open OSGi Config Manager: https://AEM_PUBLISH_INSTANCE/system/console/configMgr, find Adobe Granite Token Authentication Handler and edit it:
tick the Enable encapsulated token support box and press Save
3.9 Sling Distribution users synchronization
As mentioned in Encapsulated token documentation:
Please note that the Encapsulated Token is about authentication. It ensures that the cookie can be validated without having to access the repository. However, it is still required that the user exists on all the instances and that the information stored under that user can be accessed by every instance.
For example, if a new user is created on publish instance number one, due to the way the Encapsulated Token works, it will be authenticated successfully on publish number two. If the user does not exist on the second publish instance, the request will still not be successful.
3.9.1 Sync Agents Factory configuration on AEM Author
On Author instance open the OSGi Config Manager: https://AEM_AUTHOR_INSTANCE/system/console/configMgr, find the Apache Sling Distribution Agent - Sync Agents Factory, and edit socialpubsync config (verify that Name is socialpubsync):
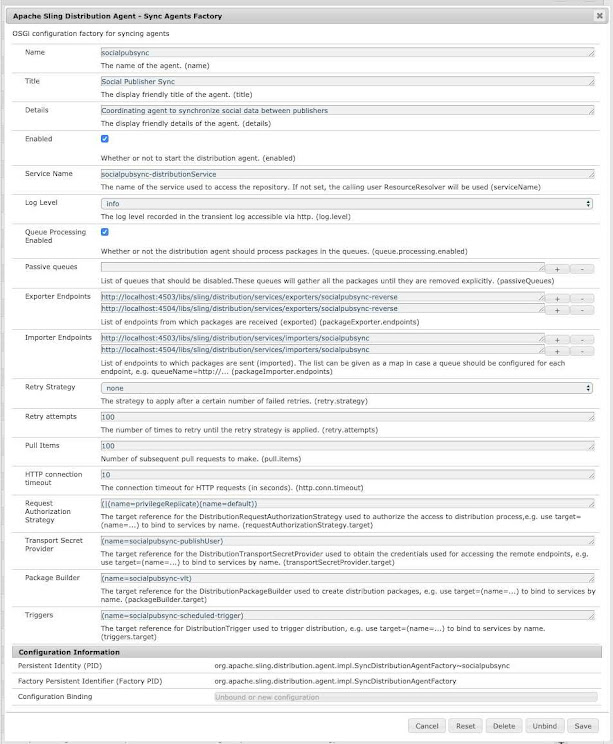
Save all the changes.
On Author instance open the OSGi Config Manager: https://AEM_AUTHOR_INSTANCE/system/console/configMgr, find the Apache Sling Distribution Agent - Sync Agents Factory, and edit socialpubsync config (verify that Name is socialpubsync):
- tick the Enabled checkbox,
- For each Publish instance in the farm, configure Exporter Endpoinds and Importer Endpoints

3.9.2 Create authorized user
Sign in with administrator privileges to Publish instance and open the user admin: https://AEM_PUBLISH_INSTANCE/useradmin. Create a new user, e.g. usersync-admin, remember the password and add this user to the Administrators group. Remember to have exactly the same user with exactly the same password configured on each Publish instance.
Sign in with administrator privileges to Publish instance and open the user admin: https://AEM_PUBLISH_INSTANCE/useradmin. Create a new user, e.g. usersync-admin, remember the password and add this user to the Administrators group. Remember to have exactly the same user with exactly the same password configured on each Publish instance.
3.9.3 Configure authorized user permissions
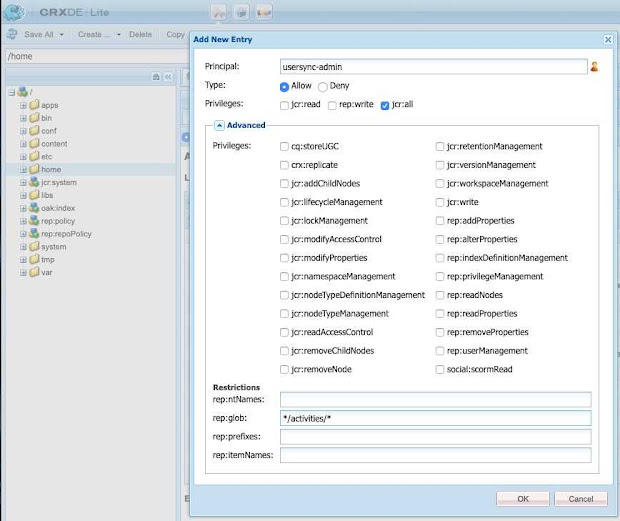
For the created usersync-admin user, add the Allow jcr:all ACL with the restriction rep:glob=*/activities/*. In order to do that, access the CRXDE Lite https://AEM_PUBLISH_INSTANCE/crx/de with administrator privileges and select the /home node. In the right pane, select the Access Control tab and add ACL entry with + icon. Fill the form and Save All changes.
For the created usersync-admin user, add the Allow jcr:all ACL with the restriction rep:glob=*/activities/*. In order to do that, access the CRXDE Lite https://AEM_PUBLISH_INSTANCE/crx/de with administrator privileges and select the /home node. In the right pane, select the Access Control tab and add ACL entry with + icon. Fill the form and Save All changes.

3.9.4 Apache Sling Distribution Transport Credentials configuration on AEM Author
On Author instance open the OSGi Config Manager:
On Author instance open the OSGi Config Manager:
https://AEM_AUTHOR_INSTANCE/system/console/configMgr, locate the Apache Sling Distribution Transport Credentials - User Credentials based DistributionTransportSecretProvider and create select existing (or create a new one) configuration for socialpubsync-publishUser.
3.9.5 Apache Sling Distribution Agent configuration
On Publish instance open the OSGi Config Manager: https://AEM_PUBLISH_INSTANCE/system/console/configMgr, find the Apache Sling Distribution Agent - Queue Agents Factory and edit the existing socialpubsync-reverse config:
On Publish instance open the OSGi Config Manager: https://AEM_PUBLISH_INSTANCE/system/console/configMgr, find the Apache Sling Distribution Agent - Queue Agents Factory and edit the existing socialpubsync-reverse config:
- tick the Enabled checkbox and press Save.
3.9.6 Diff Observer Factory config
On Publish instance open the OSGi Config Manager: https://AEM_PUBLISH_INSTANCE/system/console/configMgr, find the Adobe Social Sync - Diff Observer Factory and edit the existing socialpubsync-reverse config:
On Publish instance open the OSGi Config Manager: https://AEM_PUBLISH_INSTANCE/system/console/configMgr, find the Adobe Social Sync - Diff Observer Factory and edit the existing socialpubsync-reverse config:
- tick the Enabled checkbox and press Save.
Additional steps
Detailed instructions, optional steps (like Apache Sling Distribution Trigger configuration), and troubleshooting on users and groups synchronization with Sling Distribution can be found in the Adobe docs:
https://helpx.adobe.com/experience-manager/6-5/sites/administering/using/sync.html
Detailed instructions, optional steps (like Apache Sling Distribution Trigger configuration), and troubleshooting on users and groups synchronization with Sling Distribution can be found in the Adobe docs:
https://helpx.adobe.com/experience-manager/6-5/sites/administering/using/sync.html
3.10 Sticky cookie
In order to keep the freshly-authenticated user tied to the AEM Publish instance for a short period (just to let Sling Distribution synchronize users and groups), a Sticky Cookie should be added to the response of SAML authentication (the one to /en-us/saml_login). To do that, a rewrite rule on the Apache server can be used:
In order to keep the freshly-authenticated user tied to the AEM Publish instance for a short period (just to let Sling Distribution synchronize users and groups), a Sticky Cookie should be added to the response of SAML authentication (the one to /en-us/saml_login). To do that, a rewrite rule on the Apache server can be used:
RewriteRule "^.*/saml_login$" "-" [E=SAML_LOGIN_REQUEST:1]
Header add Set-Cookie "Instance=1; Domain=demo.example.com; Path=/; Max-Age=60" env=SAML_LOGIN_REQUEST
Now, use that cookie as a base for Sticky Cookie generation in your Load Balancer. That will keep the user tied to the AEM instance where the user profile was generated long enough to distribute her or his profile amongst all Publish instances.
Now, use that cookie as a base for Sticky Cookie generation in your Load Balancer. That will keep the user tied to the AEM instance where the user profile was generated long enough to distribute her or his profile amongst all Publish instances.
Summary
Through this tutorial, we configured the AEM Publish farm with SSO. The solution is scalable (can support any number of AEM Publish instances in the farm) thanks to Encapsulated Token stateless characteristics and short-lived sticky cookie (just to let user data sync on all Publish instances).
Through this tutorial, we configured the AEM Publish farm with SSO. The solution is scalable (can support any number of AEM Publish instances in the farm) thanks to Encapsulated Token stateless characteristics and short-lived sticky cookie (just to let user data sync on all Publish instances).
References
- https://helpx.adobe.com/experience-manager/6-5/sites/administering/using/saml-2-0-authenticationhandler.html
- https://forums.adobe.com/thread/2334298
- https://sling.apache.org/documentation/the-sling-engine/authentication/authentication-framework.html
- https://aemtreasury.wordpress.com/2015/07/02/access-sling-servletservice-without-requiring-authentication/
- https://helpx.adobe.com/experience-manager/6-5/sites/administering/using/sync.html
- https://helpx.adobe.com/experience-manager/6-5/sites/administering/using/encapsulated-token.html
- https://labs.tadigital.com/index.php/2017/10/08/saml-single-sign-on-sso-for-aem-authorpublish-part-1/
Source:
https://tech.cognifide.com/blog/2019/how-to-setup-aem-publish-saml-authentication-using-okta/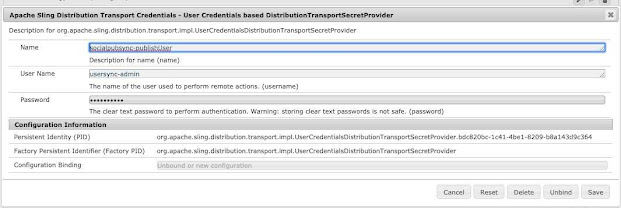
No comments:
Post a Comment
If you have any doubts or questions, please let us know.