LDAP (the Lightweight Directory Access Protocol) is used for accessing centralized directory services. This helps reduce the effort required to manage user accounts as they can be accessed by multiple applications. User accounts can be synchronized between the LDAP server and AEM with LDAP account details being saved in the repository. This allows the accounts to be assigned to specific AEM groups for allocating the required permissions and privileges.
This is a proof of concept (POC) to show that AEM when integrated with LDAP as the Single Sign-On (SSO) solution will use the same authentication mechanism when connecting via WebDAV.
You can also follow this process for integrating AEM with LDAP.
Technical Steps
These steps are specifically performed on a local machine (Mac) using a local AEM Author Instance and a lightweight LDAP Docker image.
Requirements:
- Local AEM Author running on port 4502
- Docker running:
- osixia/openldap:1.3.0 (Lightweight LDAP)
- osixia/phpldapadmin:0.9.0 (LDAP Admin GUI)
Docker
Run both docker images:
Run both docker images:
- For the LDAP container, type in the following:
docker run -p 389:389 -p 636:636 --name aem-openldap -d osixia/openldap:1.3.0
- For the LDAP Admin GUI, type in the following:
docker run -p 6443:443 --env PHPLDAPADMIN_LDAP_HOSTS=localhost -d osixia/phpldapadmin:0.9.0
- To quickly check if your Docker images are running, type in the following:
docker ps
You should see the following on your terminal screen:

LDAP
Now, we are ready to create some test users in our local LDAP container. We will use these users to login into AEM but more specifically when we connect to the DAM via WebDAV, it will ask for our LDAP credentials.

Create a simple user (Generic: Simple Security Object)

AEM - LDAP Integration
The following are the AEM steps in integrating our new LDAP container and using it as our Single Sign On (SSO) source of truth for authenticating AEM Users.
LDAP Identity Provider (IDP)
The LDAP Identity Provider is used to define how users are retrieved from the LDAP server. It can be found in the management console under the Apache Jackrabbit Oak LDAP Identity Provider name (/system/console/configMgr).

AEM Sync Handler
The synchronization handler will define how the Identity Provider users and groups will be synchronized with the repository. It is located under the Apache Jackrabbit Oak Default Sync Handler name in the management console.

AEM External Login Module
The Apache Jackrabbit Oak External Login Module implements the Java Authentication and Authorization Service (JAAS) specifications. The external login module is located under the Apache Jackrabbit Oak External Login Module under the management console. The module defines which Identity Provider and Sync Handler to use, effectively binding the two modules.

AEM User Group
Create a new user group and provide it to read/write access to the DAM content node. For this POC, we are using a test group called “webdav_users”. This is the group that we configured in the AEM Sync Handler as the AEM default auto membership group when the user logs in via LDAP.
AEM LDAP Integration Test
To quickly test if the AEM LDAP Integration is working, you can try the JMX MBean created to make sure that AEM is syncing with LDAP.
Go to the AEM JMX Console:


WebDav Connection
Once validated and confirmed, try connecting via WebDAV. For this POC, we are using a Mac.


You should see the following on your terminal screen:
LDAP
Now, we are ready to create some test users in our local LDAP container. We will use these users to login into AEM but more specifically when we connect to the DAM via WebDAV, it will ask for our LDAP credentials.
- Connect to the LDAP ADMIN GUI: https://localhost:6443/
- Use the following credentials when connecting to the LDAP container as admin:
- Login DN: cn=admin,dc=example,dc=org
- Password: admin
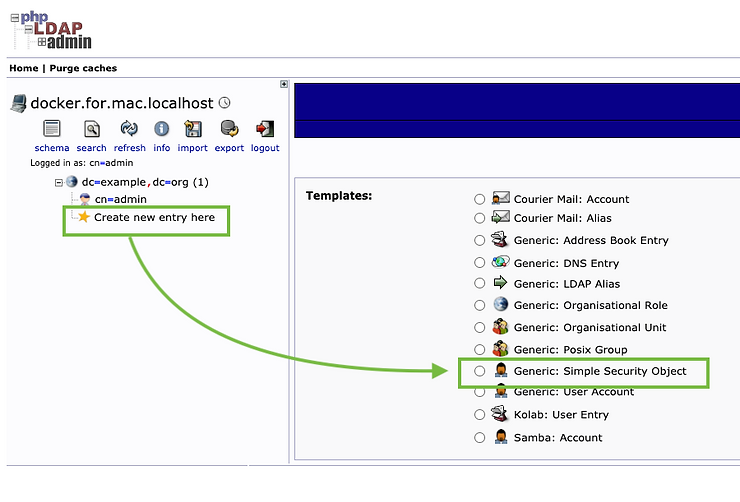
Create a simple user (Generic: Simple Security Object)
- Click on "Create new entry here"
- And then click on "Generic: Simple Security Object"
- Type in your account information and click on "Create Object"
- Click on "Commit" to save your new simple LDAP user:

AEM - LDAP Integration
The following are the AEM steps in integrating our new LDAP container and using it as our Single Sign On (SSO) source of truth for authenticating AEM Users.
LDAP Identity Provider (IDP)
The LDAP Identity Provider is used to define how users are retrieved from the LDAP server. It can be found in the management console under the Apache Jackrabbit Oak LDAP Identity Provider name (/system/console/configMgr).
- Create a new LDAP Identify Provider using our local Docker LDAP container. Use most of them out of the box configuration except for the following values:
- Bind DN: cn=admin,dc=example,dc=org
- Bind Password: admin
- User base DN: dc=example,dc=org
- User object classes: account
- User id attribute: uid
AEM Sync Handler
The synchronization handler will define how the Identity Provider users and groups will be synchronized with the repository. It is located under the Apache Jackrabbit Oak Default Sync Handler name in the management console.
- Create the external login module with the following OSGi configurations:
- Sync Handler Name: webdav
- User auto membership: webdav_users
AEM External Login Module
The Apache Jackrabbit Oak External Login Module implements the Java Authentication and Authorization Service (JAAS) specifications. The external login module is located under the Apache Jackrabbit Oak External Login Module under the management console. The module defines which Identity Provider and Sync Handler to use, effectively binding the two modules.
- Create the external login module with the following OSGi configurations making sure to use the IDP and Sync Handler names that we just created:
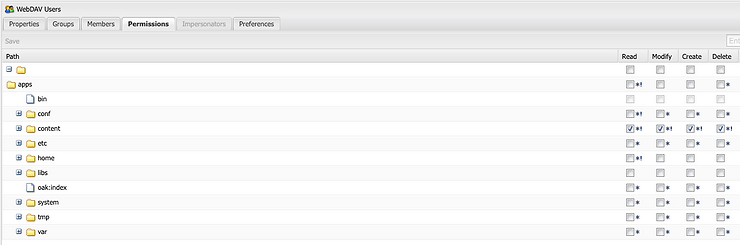
AEM User Group
Create a new user group and provide it to read/write access to the DAM content node. For this POC, we are using a test group called “webdav_users”. This is the group that we configured in the AEM Sync Handler as the AEM default auto membership group when the user logs in via LDAP.
AEM LDAP Integration Test
To quickly test if the AEM LDAP Integration is working, you can try the JMX MBean created to make sure that AEM is syncing with LDAP.
Go to the AEM JMX Console:
- Look for the External Identity Synchronization Management UserManagement MBean we created.
- Click on "syncAllUsers" to invoke the sync process.
- All accounts created in the LDAP container should be listed as being synched.
WebDav Connection
Once validated and confirmed, try connecting via WebDAV. For this POC, we are using a Mac.
- From the Finder window, click on GO, and “Connect to Server” or "cmd + k" should open the connect window. Try connecting to the DAM content node. For our POC, we are using a local AEM instance:
- Type in one of your sample user LDAP credentials and click on "connect":
- You should now have access to the DAM via your finder window. Also, try connecting with an incorrect password to see what type of errors you get.

No comments:
Post a Comment
If you have any doubts or questions, please let us know.