Before going to coding part, we need few prerequisites to set up database with JBOSS. Here we don’t directly put database configurations in spring boot
application.properties.
So we create JNDI configuration in JBoss and add that configuration in spring boot properties file to connect to database.
How to add mysql driver in JBOSS and create a JNDI URL:
Out of the box, JBoss only comes with an H2 JDBC driver. Most likely, you have a different database such as Oracle, MS SQL or MySQL. As long as you have access to JBoss, installing the appropriate JDBC driver is fairly straightforward.
The advantage of installing it into JBoss itself is:
You can enforce a specific JDBC driver version for all of your deployed applications. If any changes required in database configurations, no need to change in the codebase.
If different environments are connected to different databases, still you can manage the same JNDI URL for all the environments. So environment specific configurations are not needed.
Multiple applications can also share the same JNDI URL.
So below are the steps to install MySQL drivers in JBoss.
Navigate to the directory $JBOSS_HOME/modules/system/layers/base
Create com/mysql/main directory.
Navigate to main directory and save MySQL JDBC driver's jar there.

Fig 1: Main Directory
Create a module.xml file with the content below inside the main directory.
<?xml version="1.0" encoding="UTF-8"?>
<module xmlns="urn:jboss:module:1.1" name="com.mysql"> <resources> <resource-root path="mysql-connector-java-[VERSION]-bin.jar"/>
</resources> <dependencies> <module name="javax.api"/>
<module name="javax.transaction.api"/>
<module name="javax.servlet.api" optional="true"/>
</dependencies>
</module>
Access directory $JBOSS_HOME/standalone/configuration and open the file standalone.xml.Till mysql-connector-java-5.1.47-bin.jar,add the driver like this:
<driver name="mysql" module="com.mysql"> <driver-class>com.mysql.jdbc.Driver</driver-class> <xa-datasource-class>com.mysql.jdbc.jdbc2.optional.MysqlXADataSource </xa-datasource-class>
</driver>
From MySQL-connector-java-6.0.2-bin.jar, the hierarchy of driver classes has been changed and for those versions, you need to add the below-mentioned configurations in standalone.xml to add a driver.
<driver name="mysql" module="com.mysql"> <driver-class>com.mysql.cj.jdbc.Driver</driver-class> <xa-datasource-class>com.mysql.cj.jdbc.MysqlXADataSource</xa-
datasource-class>
</driver>
After all the above steps, a new driver will get added to the JBoss Server and need to restart the JBoss Server to see the newly added driver.
Create JDBC DataSource in JBoss Server.
Go to JBoss Server Datasources .
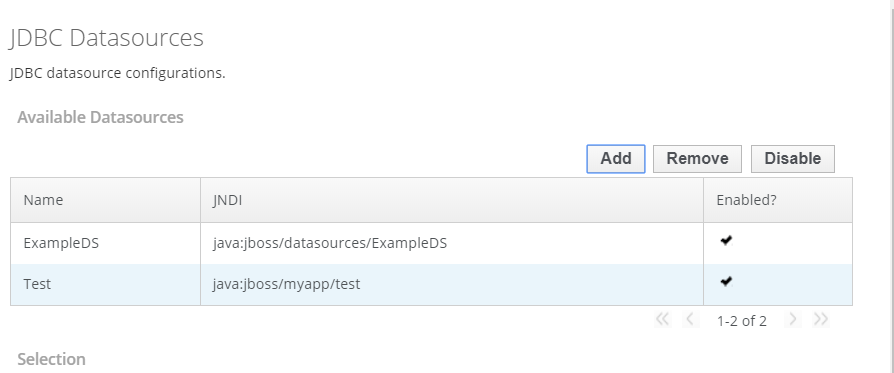
Fig 2: Add a new JDBC DataSource Attributes
Click on Add to create a new Datasource.
It has 3 steps configurations shown below.
Step1/3 :DataSource Attributes
Name: any Name.
JNDI Name: The jndi name must start with “java:jboss/” and after that you can put anything like java:jboss/test
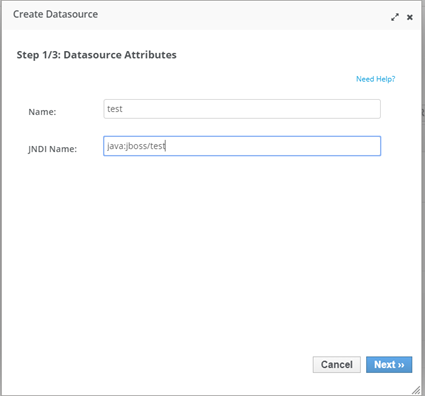
Fig 3: DataSource Attributes
Step 2/3: JDBC Driver
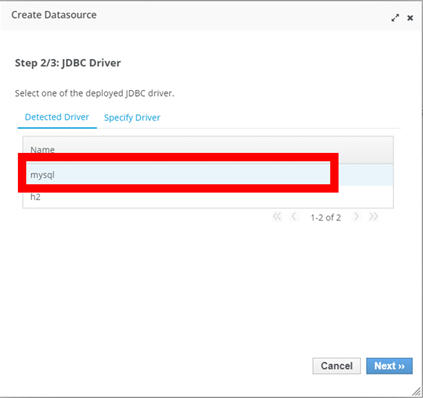
Fig 4: JDBC Driver
Step 3/3 Connection Settings
Connection URL: jdbc:mysql://localhost:3306/sys[here sys is the database name.]
Username: the username of the database.
Password: the password of the database
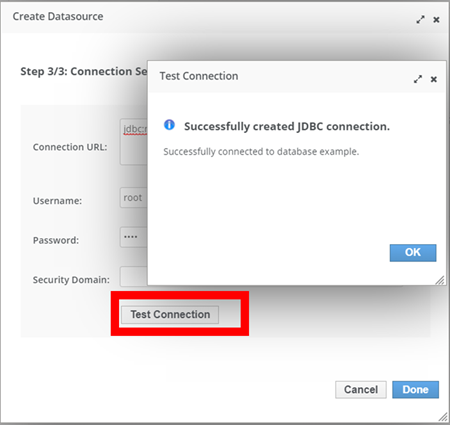
Fig 5: Connection Settings
You can test the connection by clicking on “Test the connection” button after filling all the above configurations and verify that the database is connected correctly or not.

No comments:
Post a Comment
If you have any doubts or questions, please let us know.