Introduction
Setup Products
Use Adobe I/O
Watch the solution work Resources
Debugging
FAQ
Introduction
Before setting up and using AEM with Adobe I/O, you will need to do the following:
Obtain authorization
Register an AEM event consumer app
Obtain authorization
To complete this solution, you will need authorization to use the following services:
An AEM instance, version 6.2.x, 6.3.x, 6.4.x or 6.5.x with administrative permissions. (Note: AEM screens in this topic are captured from version 6.3.)
Adobe I/O Console access, with administrative permissions for your enterprise organization.
Register an AEM event consumer app
You will need to register an AEM event consumer app, such as a webhook, to see responses to AEM changes.
These instructions include steps for setting up a webhook that is able to accept
and reply to a challenge HTTP request parameter sent by Adobe I/O Events.
For more information on understanding and working with webhooks,
see the Introduction to Adobe I/O Events Webhooks.
Setup Products
To set up AEM for Adobe I/O Events:
Install the AEM event proxy package
Configure OAuth and IMS authentication
Install the AEM event proxy package
To install the AEM event proxy package:
Download the latest version of the package
version 6.3.16 for AEM 6.2.xx and 6.3.xx
version 6.4.268 for AEM 6.4.xx
version 6.5.6 for AEM 6.5.xx
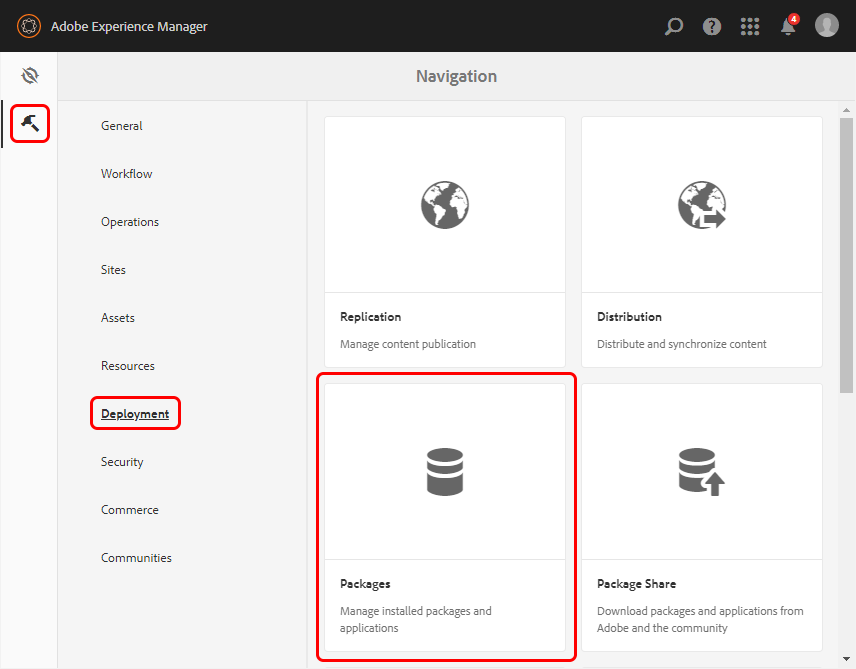
Open AEM Package Manager by selecting the Tools icon and then selecting Deployment and Packages.
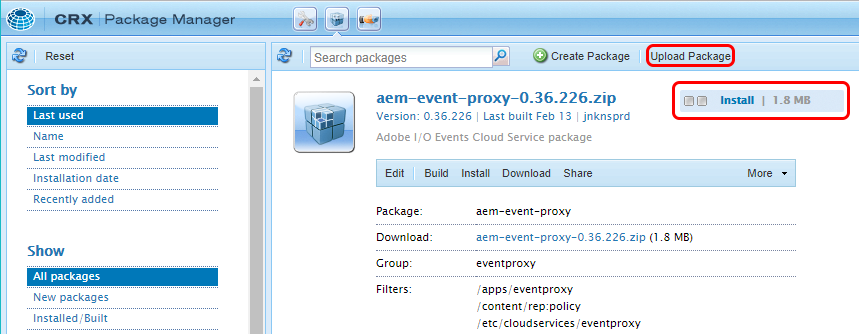
In Package Manager, select Upload Package. Select Browse and navigate to the package zip file. Select OK.
Note: If you have an older version of the package, delete it to avoid potential conflicts. You can delete it from the following location: crx/de/index.jsp#/apps/eventproxy/install.
Select Install.
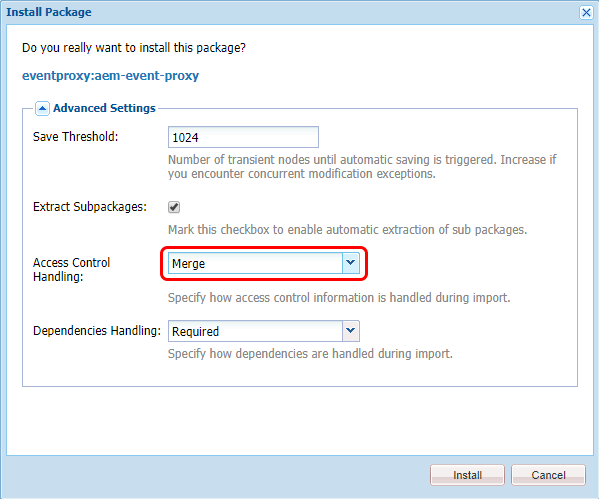
On the Install Package dialog box, select Merge from the Access Control Handling drop-down list and select Install.
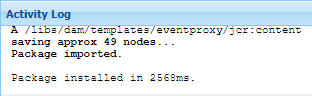
Watch the Activity Log. If installed, the log reports that the package is imported.
For more information on installing packages in AEM, see How to Work with Packages.
ADDITIONAL PACKAGE INSTALLATION NOTES:
If you are upgrading the package, delete the previous .jar file from the following location: /apps/eventproxy/install
Verify that the Access Control Handling is properly applied by checking permissions for the eventproxy-service user at /useradmin.
If applied correctly, the eventproxy-service user is added to the following:
/home/users/system/eventproxy/eventproxy-service with jcr:read and rep:write authorizations
/content with jcr:read authorization
/etc/cloudservices/eventproxy with jcr:read and rep:write authorizations (for AEM versions prior to 6.4.0)
/var/eventproxy with jcr:read and rep:write authorizations (for AEM 6.4.0 and beyond)
For more information, see AEM User, Group and Access Rights Administration.
Configure OAuth and IMS authentication
To configure OAuth and IMS authentication:
Create a certificate and keystore
Add the certificate into the AEM eventproxy-service user's keystore
Configure the AEM Link Externalizer
CREATE A CERTIFICATE AND KEYSTORE
To create a certificate and keystore:
Create an RSA private/public certificate in OpenSSL with the following command:
openssl req -x509 -sha256 -nodes -days 365 -newkey rsa:2048 -keyout private.key -out certificate_pub.crt
Add the private key and signed certificate to a PKCS#12 file with the following command:
openssl pkcs12 -keypbe PBE-SHA1-3DES -certpbe PBE-SHA1-3DES -export -in certificate_pub.crt -inkey private.key -out author.pfx -name "author"
When prompted, create an export password and store it for later use.
Create a keystore from the generated keys with the following command:
cat private.key certificate_pub.crt > private-key-crt
Note: On Windows systems, you may need to concatenate the files manually or provide an alternate command. For more information, see the OpenSSL manpages.
Set the alias as eventproxy and a non-empty keystore password (such as admin), with the following command:
openssl pkcs12 -export -in private-key-crt -out keystore.p12 -name eventproxy -noiter -nomaciter
Note: On Windows systems, this command expression may vary. For more information, see the OpenSSL manpages.
ADD THE CERTIFICATE INTO THE AEM EVENTPROXY-SERVICE USER’S KEYSTORE
To add the certificate into the AEM eventproxy-service user’s keystore:
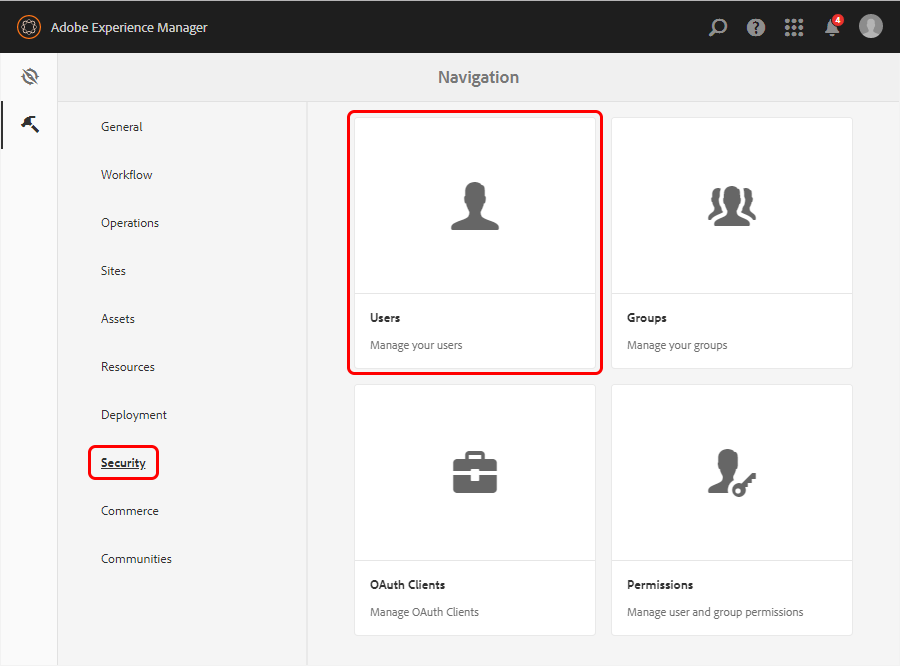
In AEM, open the User Management group by selecting the Tools icon and then selecting Security and Users.
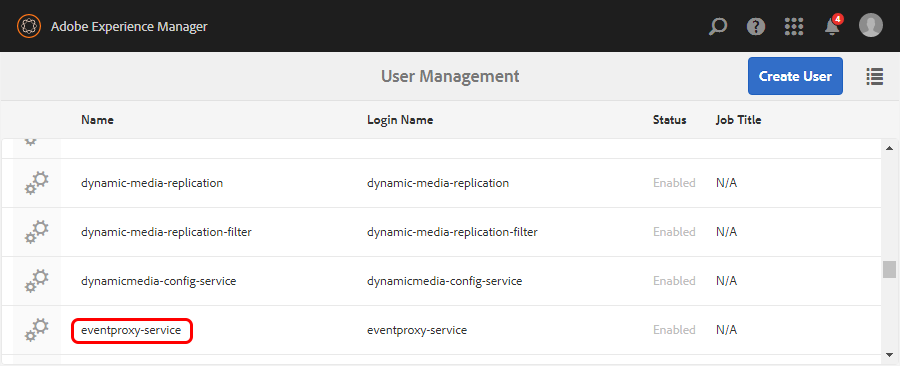
Scroll down and Select eventproxy-service to open it.
Select Create KeyStore
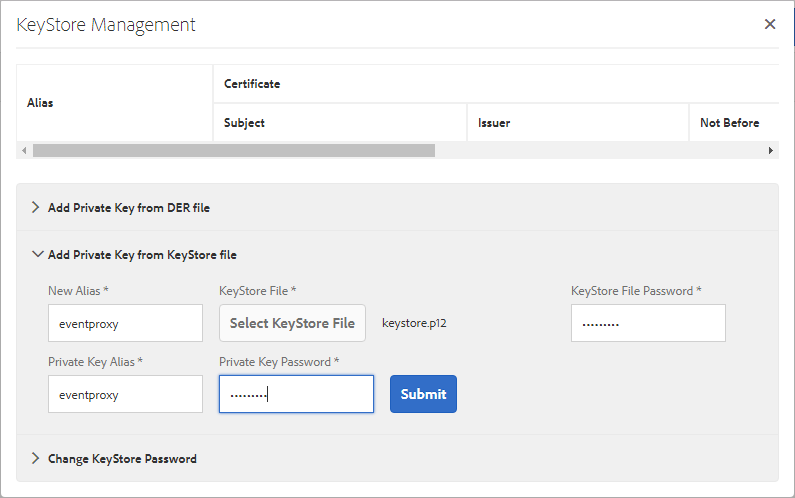
Select Manage KeyStore and then expand the section for Add Private Key from Key Store file.
Add the keystore.p12 file by setting the key pair alias to eventproxy or the alias specified previously.
Provide the keystore password (the same one provided when generating the key store).
Provide the private key password and then provide the private key alias eventproxy.
Select Submit.
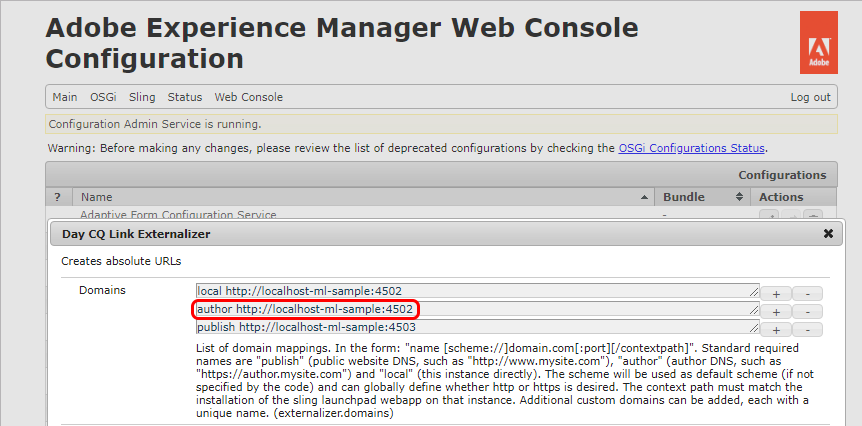
CONFIGURE THE AEM LINK EXTERNALIZER
To configure AEM Link Externalizer:
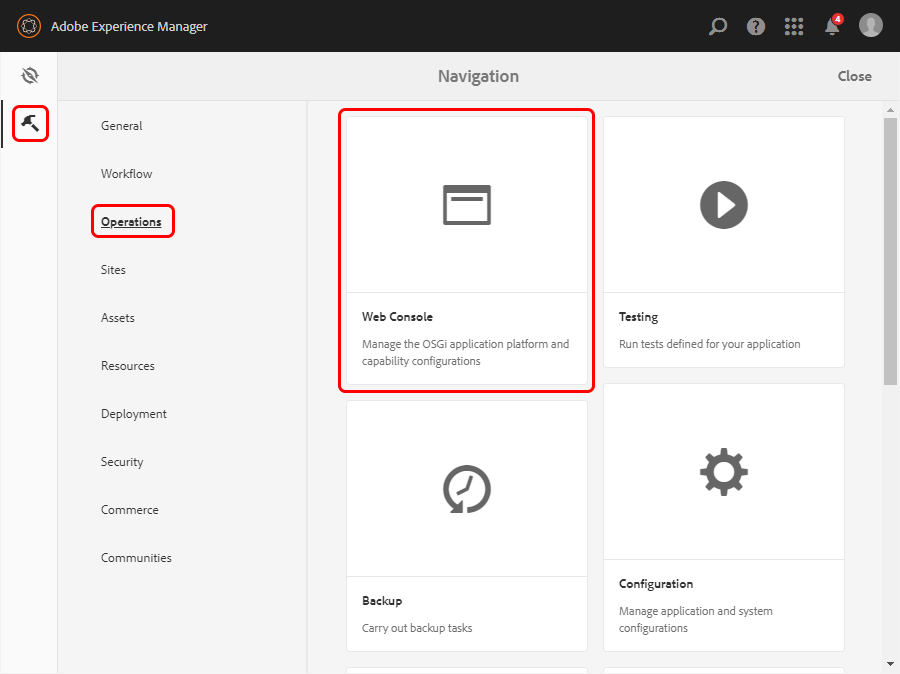
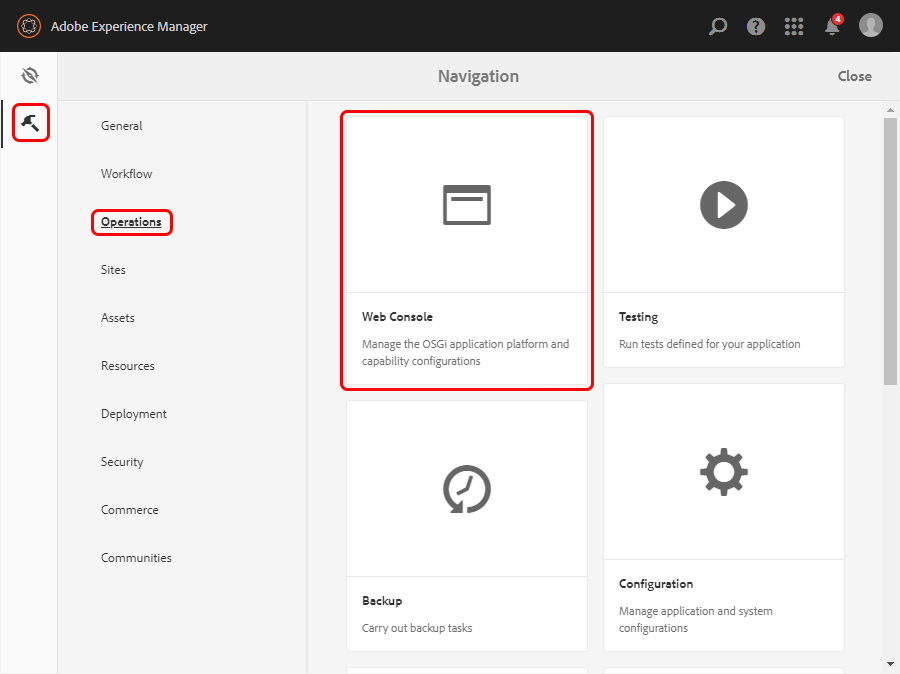
Open the Web Console, or select the Tools icon, then select Operations and Web Console.
The AEM Link Externalizer name can be author or any other alias specified in the Adobe Experience Manager Web Console.
Scroll down the list to find Day CQ Link Externalizer, update the domain name, and select Save when done.
Note: The base URL that you specify appears on the AEM Web Console. Do not use only the word “localhost” as the default name because others may use it. This will then cause confusion and make it difficult to determine which instance is yours. for example, for the below image, you will see "AEM-localhost-ml-sample" in your console as event provider.
Use Adobe I/O
Use Adobe I/O to do the following:
Create an Adobe I/O Console integration
Configure Adobe I/O Events as a cloud service in AEM
Perform an AEM health and configuration check
Register the AEM event consumer app
Create an Adobe I/O Console integration
To create an Adobe I/O Console integration:
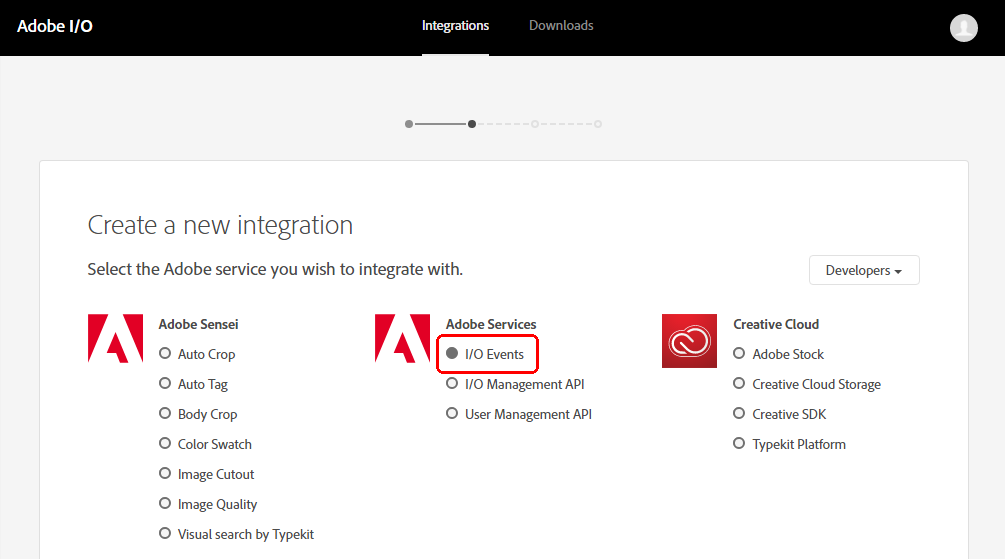
After signing in to the Adobe I/O Console, select New Integration.
Select Access an API and then select Continue.

On the Create a new integration page, select Adobe I/O Events and then select Continue.
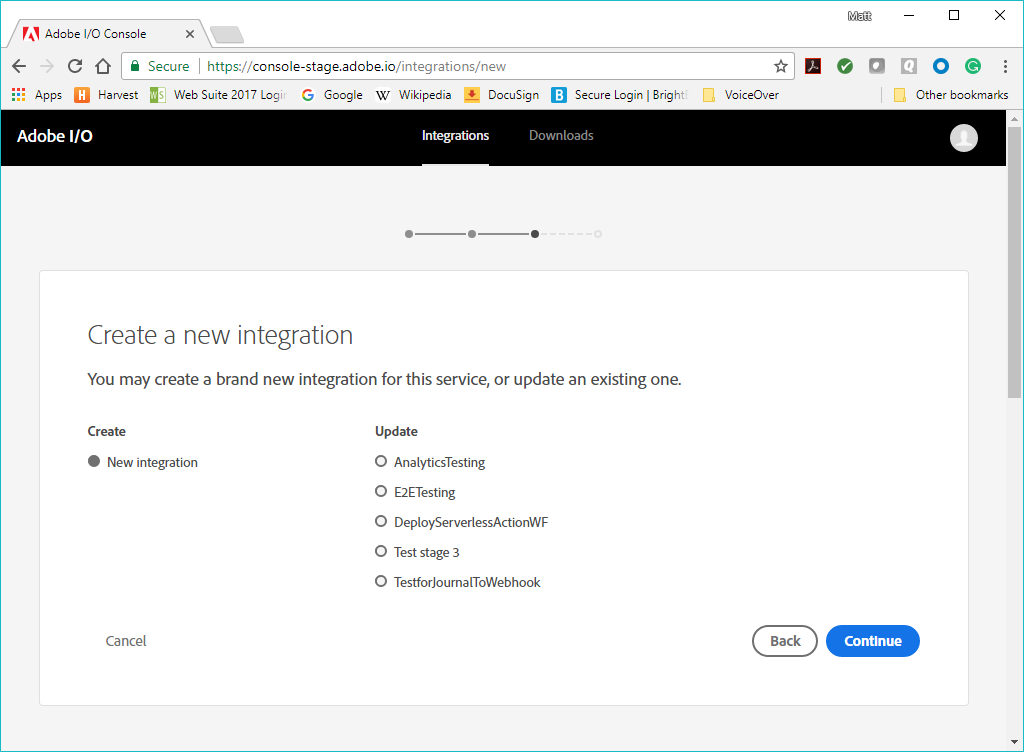
Select New integration.
In the Create a new integration dialog box, specify a name for the integration and add a description. To add Public keys certificates, select Select a File and navigate to your certificate_pub.crt to upload it.
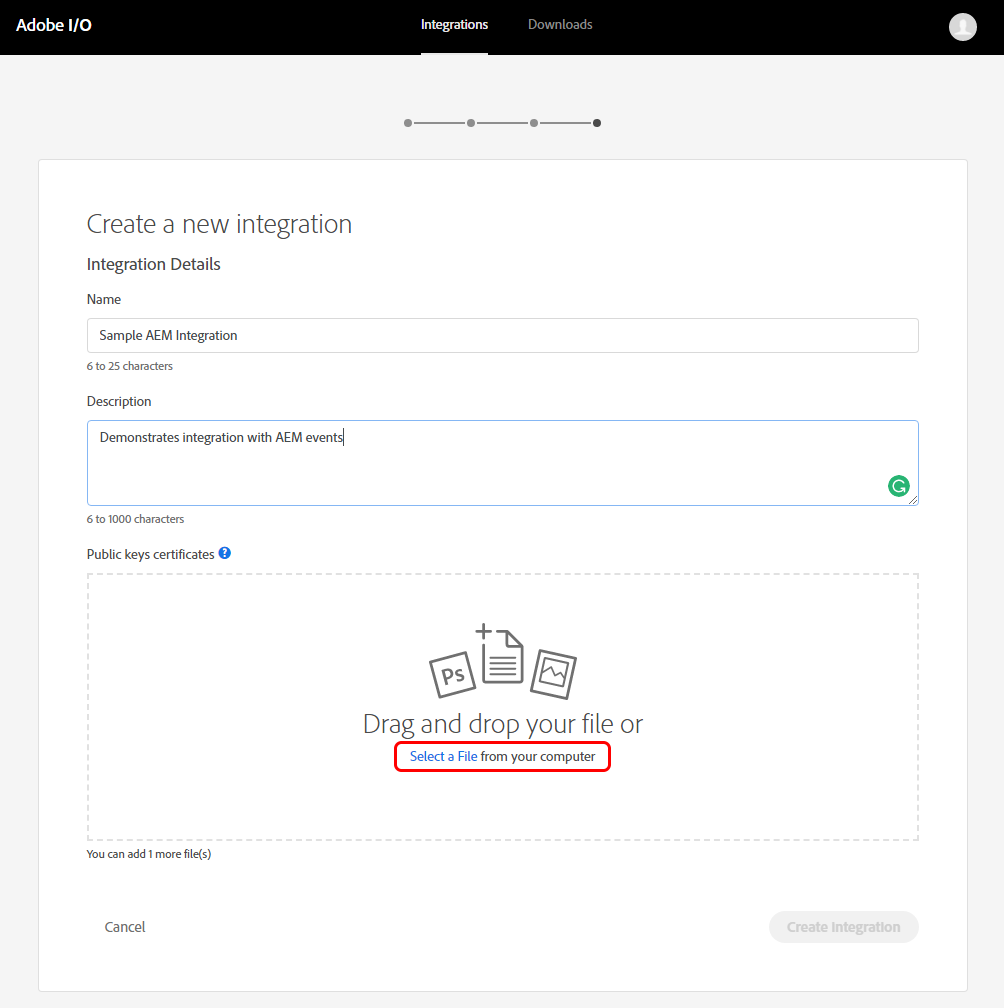
Select Create Integration.
AEM Adobe I/O Events configuration
AEM 6.4 AND AEM 6.5 CONFIGURATION
To configure Adobe I/O Events as a cloud service in AEM:
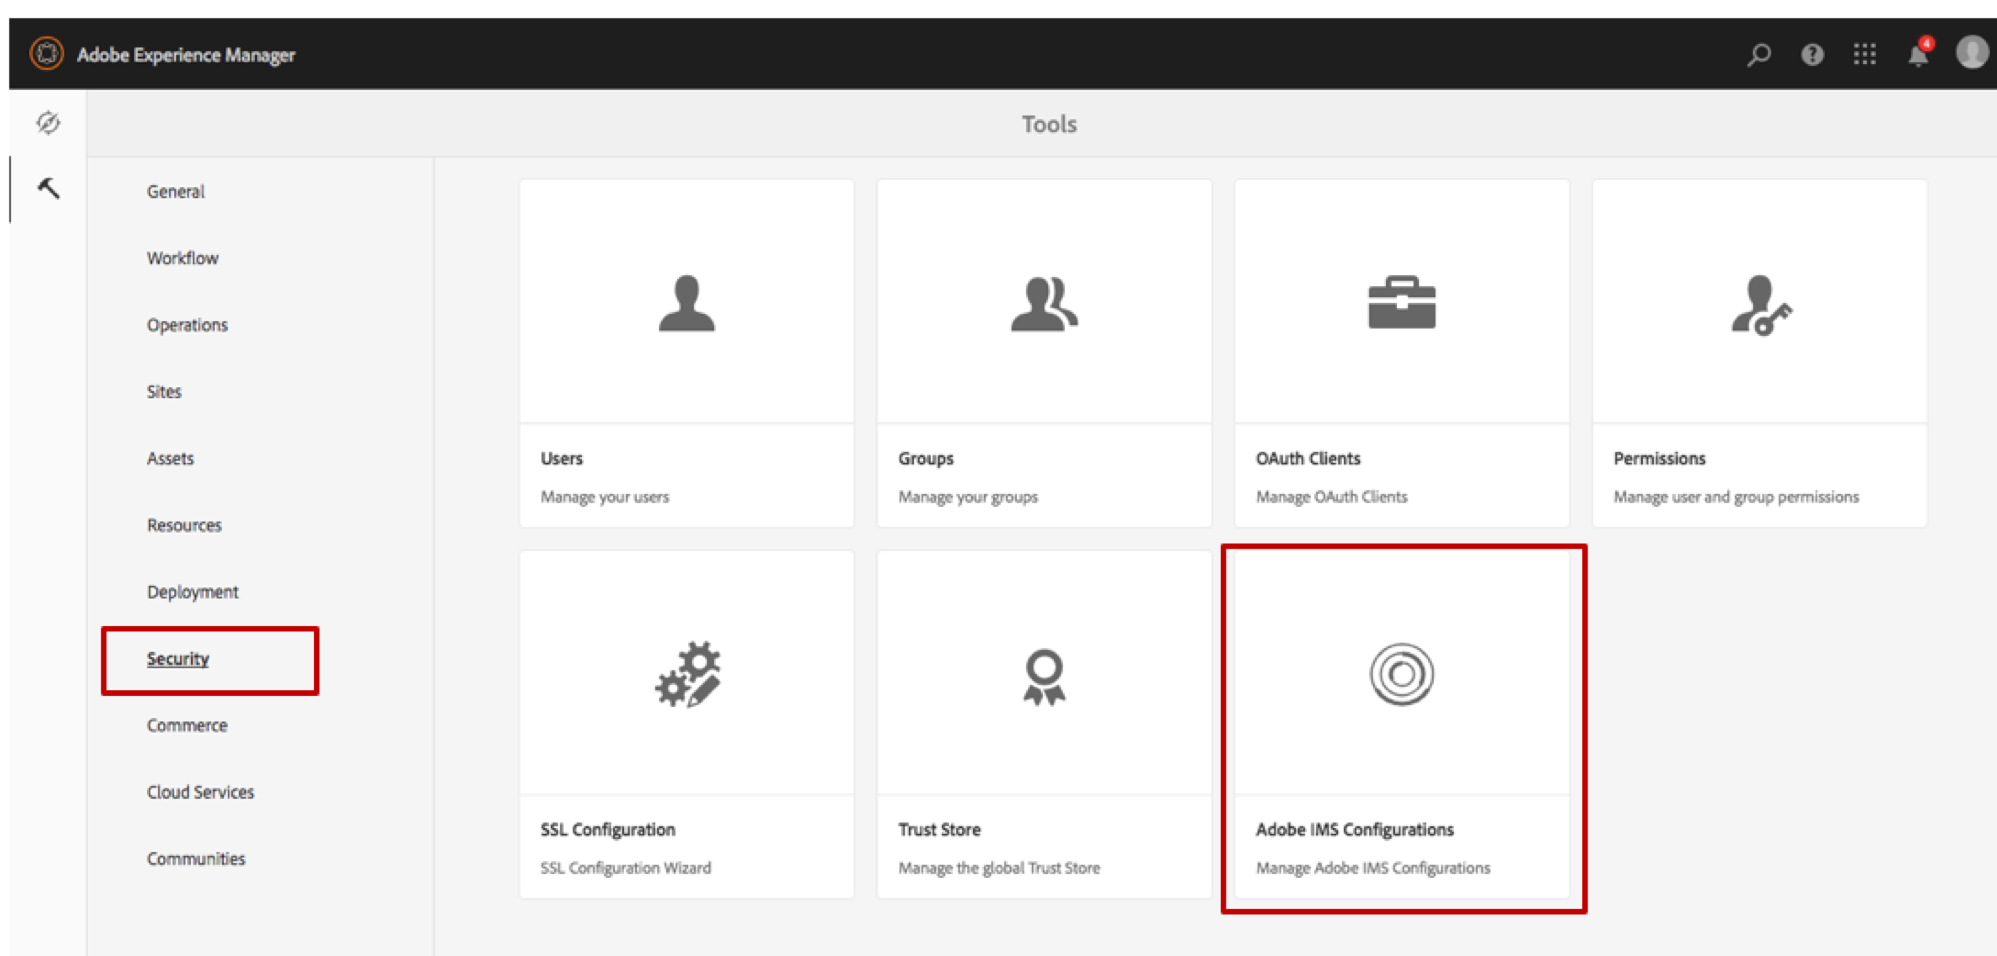
Open the Cloud Services console, or select the Security icon, and then select Adobe IMS Configurations.
Click Create;
Select AdobeIOEvents in the Cloud Solution drop down; once selected, you should see the certificate you just added to the AEM eventproxy-service user's keystore;
Click Next

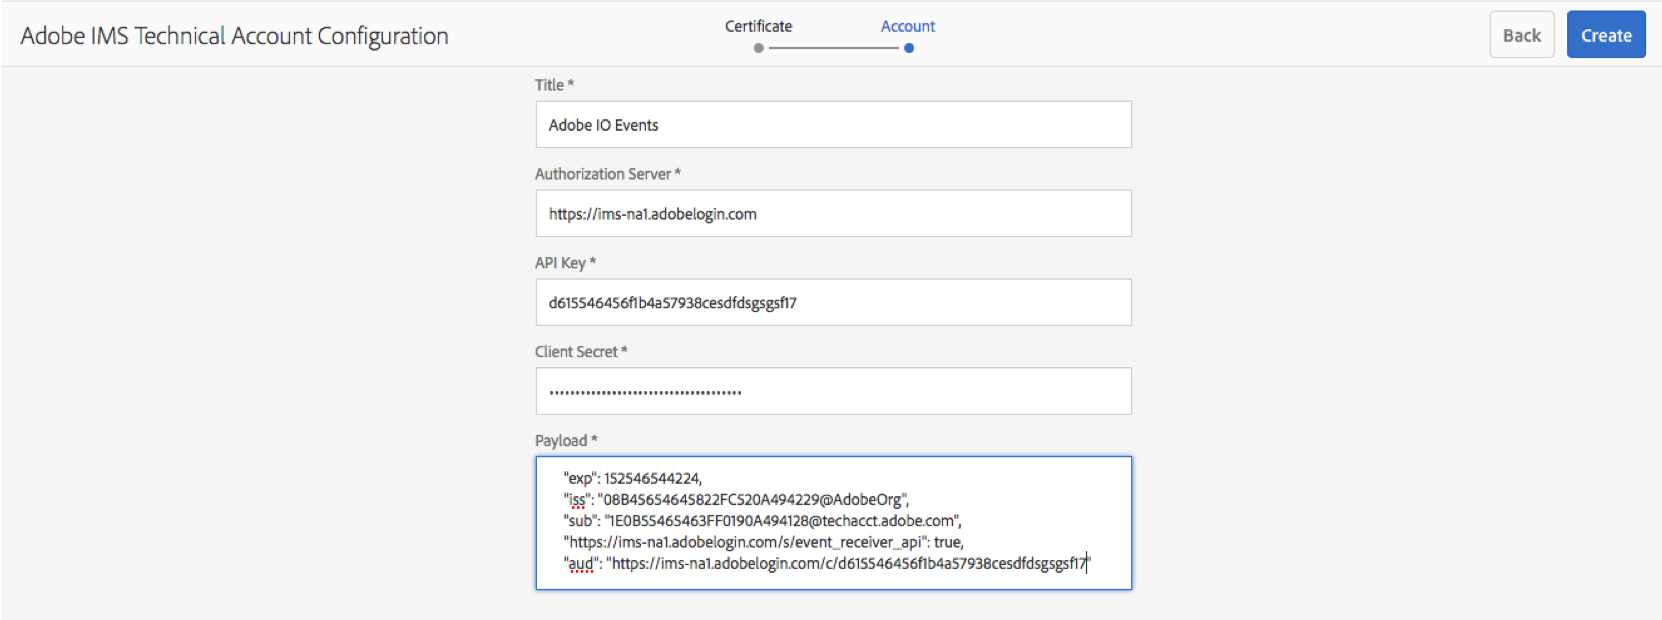
Fill in the various entries expected to configure the IMS account associated with the integration
you just created in the Adobe I/O Console
For Title: specify Adobe IO Events (or any other title that makes sense to you).
For Authorization Server: it should be https://ims-na1.adobelogin.com (unless the URL shown in the JWT tab of your integration page in the Adobe I/O Console is different),
For API key: Provide the API key shown in the Overview tab of your integration page in the Adobe I/O Console.
For Technical Account ID: Provide the Technical Account ID shown in the Overview tab of your integration page in the Adobe I/O Console.
For Client Secret: Provide the Client Secret shown in the Overview tab of your integration page in the Adobe I/O Console.
For Payload: Provide the JWT payload shown in the JWT tab of your integration page in the Adobe I/O Console.
Click Create
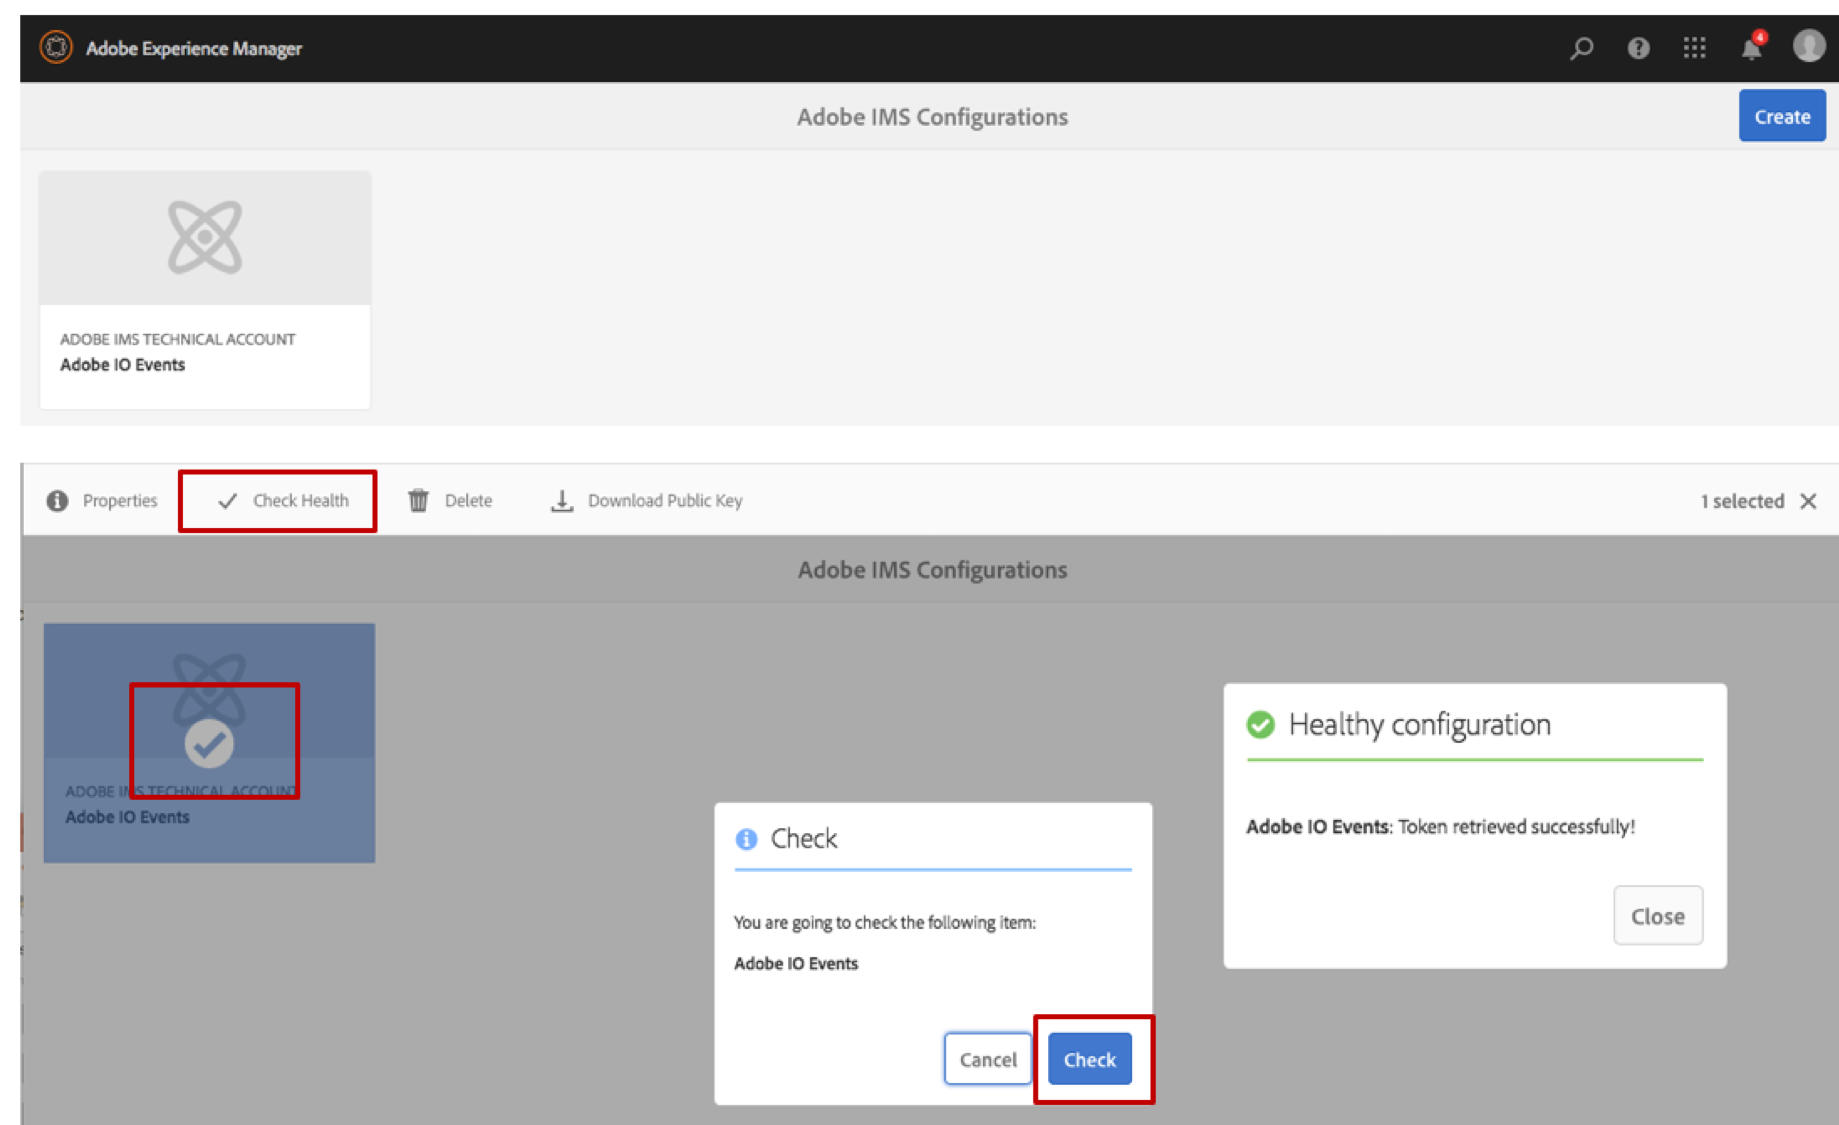
Now you should see this new Adobe IO Events IMS Configuration, and you can select it to check its health.
AEM 6.2 AND AEM 6.3 CONFIGURATION
To configure Adobe I/O Events as a cloud service in AEM:
Open the Cloud Services console, or select the Tools icon, then select Deployment and Cloud Services.
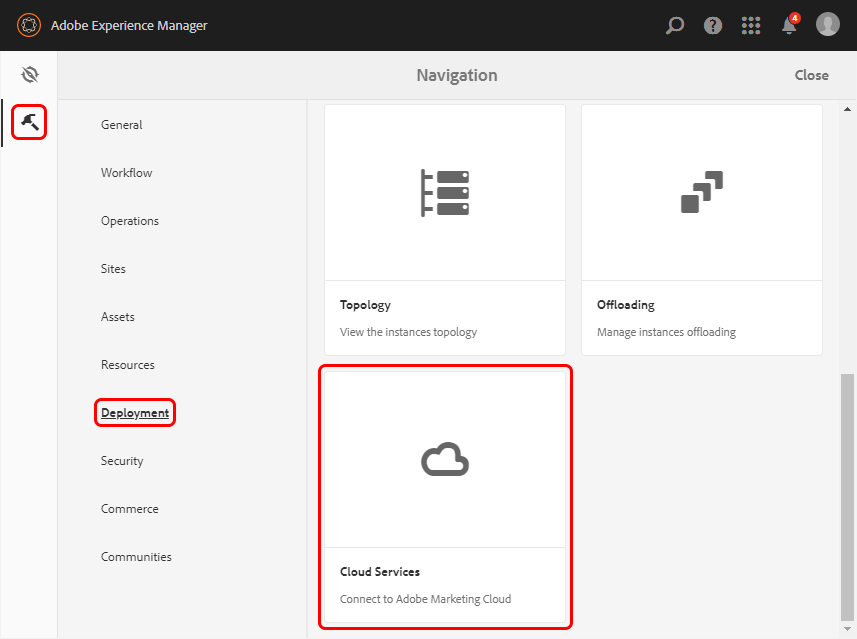
Under Adobe Marketing Cloud on the Cloud Services page, select Configure now for Adobe I/O Events.
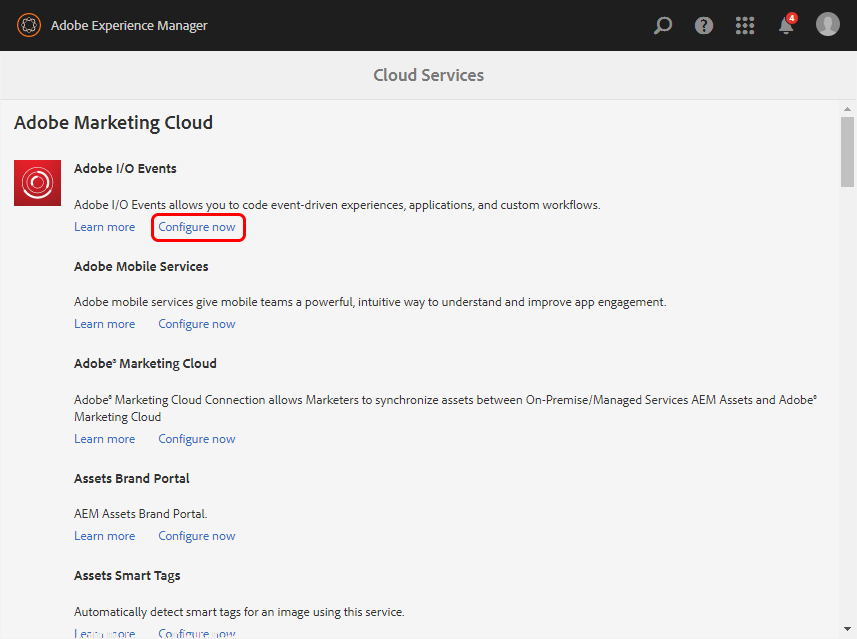
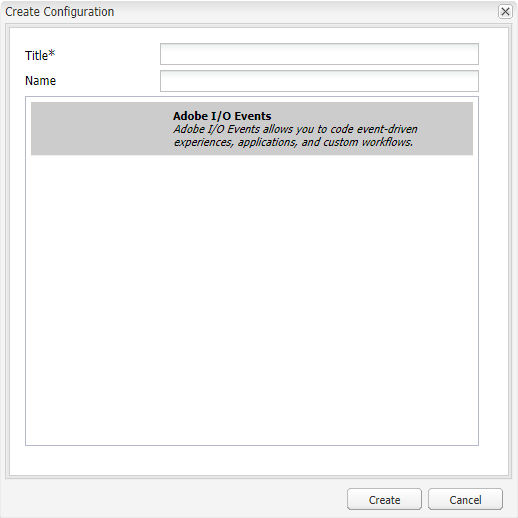
In the Create Configuration dialog box, enter a title and a name for your integration, and then select Create.
Select Edit. Configure the service by specifying each field in the Edit Component dialog box. You can copy your credentials from the Adobe I/O Console and paste them into each required field.
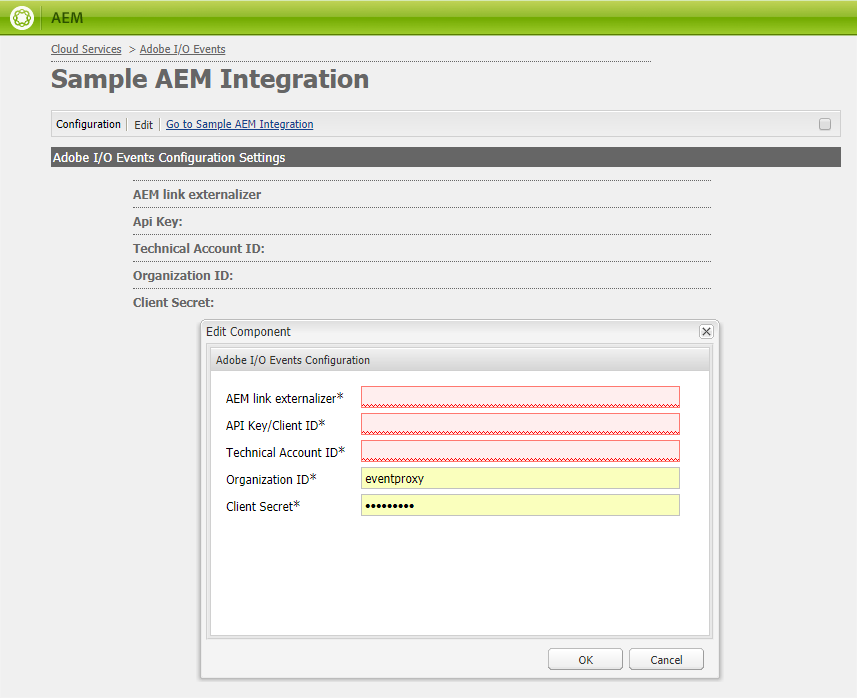
For AEM Link externalizer: specify author (or any other alias previously configured in the AEM Link Externalizer).
For API key: Provide the key shown on the Integration Details page of the Adobe I/O Console.
For Technical Account ID: Provide the ID shown on the Adobe I/O Console.
For Organization ID: Provide the ID shown on the Adobe I/O Console.
For Client Secret: AEM will automatically retrieve the value from the Adobe I/O Console.
Register the AEM event consumer app
To register an AEM event consumer app, you can set up a webhook. Your webhook should be able to accept and reply to a challenge HTTP request parameter sent by Adobe I/O CSM.
SETTING UP A WEBHOOK: EXAMPLE
To create a webhook at webtask.io, add the following code to make sure the Challenge is echoed back. This is needed for the verification by Adobe I/O CSM when you register the webhook URL later using the CSM API:
var express = require('express'); var Webtask = require('webtask-tools'); var bodyParser = require('body-parser'); var app = express(); app.use(bodyParser.json()); app.get('/webhook', function (req, res) { var result = "No challenge"; if (req.query["challenge"]){ result = req.query["challenge"] console.log("got challenge: " + req.query["challenge"]); } else { console.log("no challenge") } res.status(200).send(result) }); app.post('/webhook', function (req, res) { console.log(req.body) res.writeHead(200, { 'Content-Type': 'application/text' }); res.end("pong"); }); module.exports = Webtask.fromExpress(app);
Watch the solution work
You can watch the solution work by testing your integration. To do this:
Register your webhook with the Adobe I/O Console
Perform a webhook health check
Optional: Adobe I/O Events OSGI to XDM event mapping configurations
Register your webhook with the Adobe I/O Console
Once you have your webhook ready, use the Adobe I/O Console to register it:
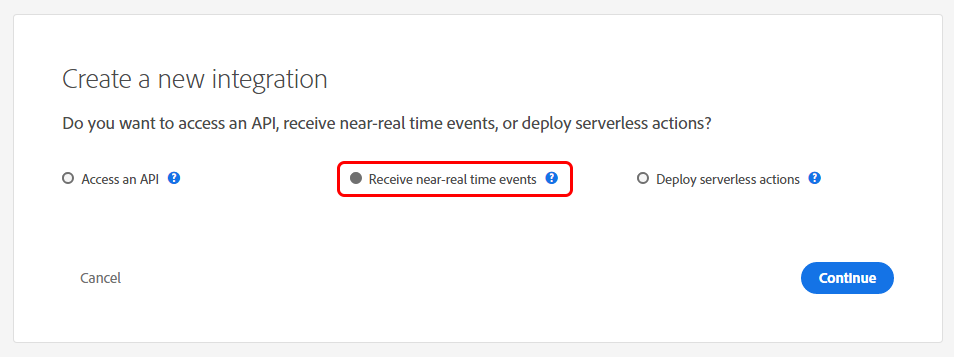
On the Adobe I/O Console, select New Integration.
Select Receive near-real time events and then select Continue.
Select the AEM Link Externalizer base URL that you previously specified and then select Continue.

Note: If you do not see your instance, follow the below part: Perform AEM health check
Select Create new integration and fill in the Integration Details form similar to your previous integration.
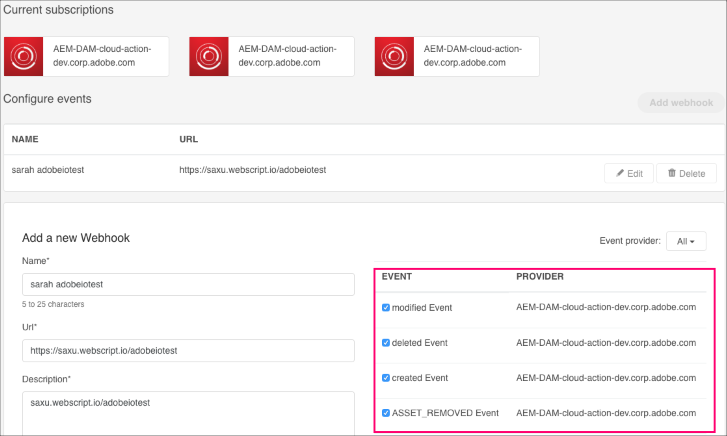
Select Add webhook and complete the Add a new webhook form.
Select the events to which you want to subscribe and select Save.
Perform a webhook health check
Now you can start testing that your AEM-originated events are emitted by Adobe I/O.
To do this, first make sure your webhook is subscribed to the type of event you are testing against.
For asset-related events, create, update or delete an asset in AEM DAM;
for page-related events, publish or unpublish a page;
finally, to test our custom OSGI event type sample, you may use our custom OSGI event health check.

Note: In case of aem-event-proxy-package 6.5.6 for AEM 6.5.xx, the health checks are disabled by default and can be enabled by the following steps -
Select Tools in AEM and then select Operations and Web Console.
In the OSGI menu, select Configuration and search for: Adobe I/O Events Activate Health Check Feature Flag.
For Adobe I/O Events Activate Health Check Feature Flag, select Edit, check the Enabled checkbox and then click on Save button.
Once you are done with debugging and testing your configuration, we would advise you to disable the health checks again by following the same steps as above but unchecking the Enabled checkbox for Adobe I/O Events Activate Health Check Feature Flag.
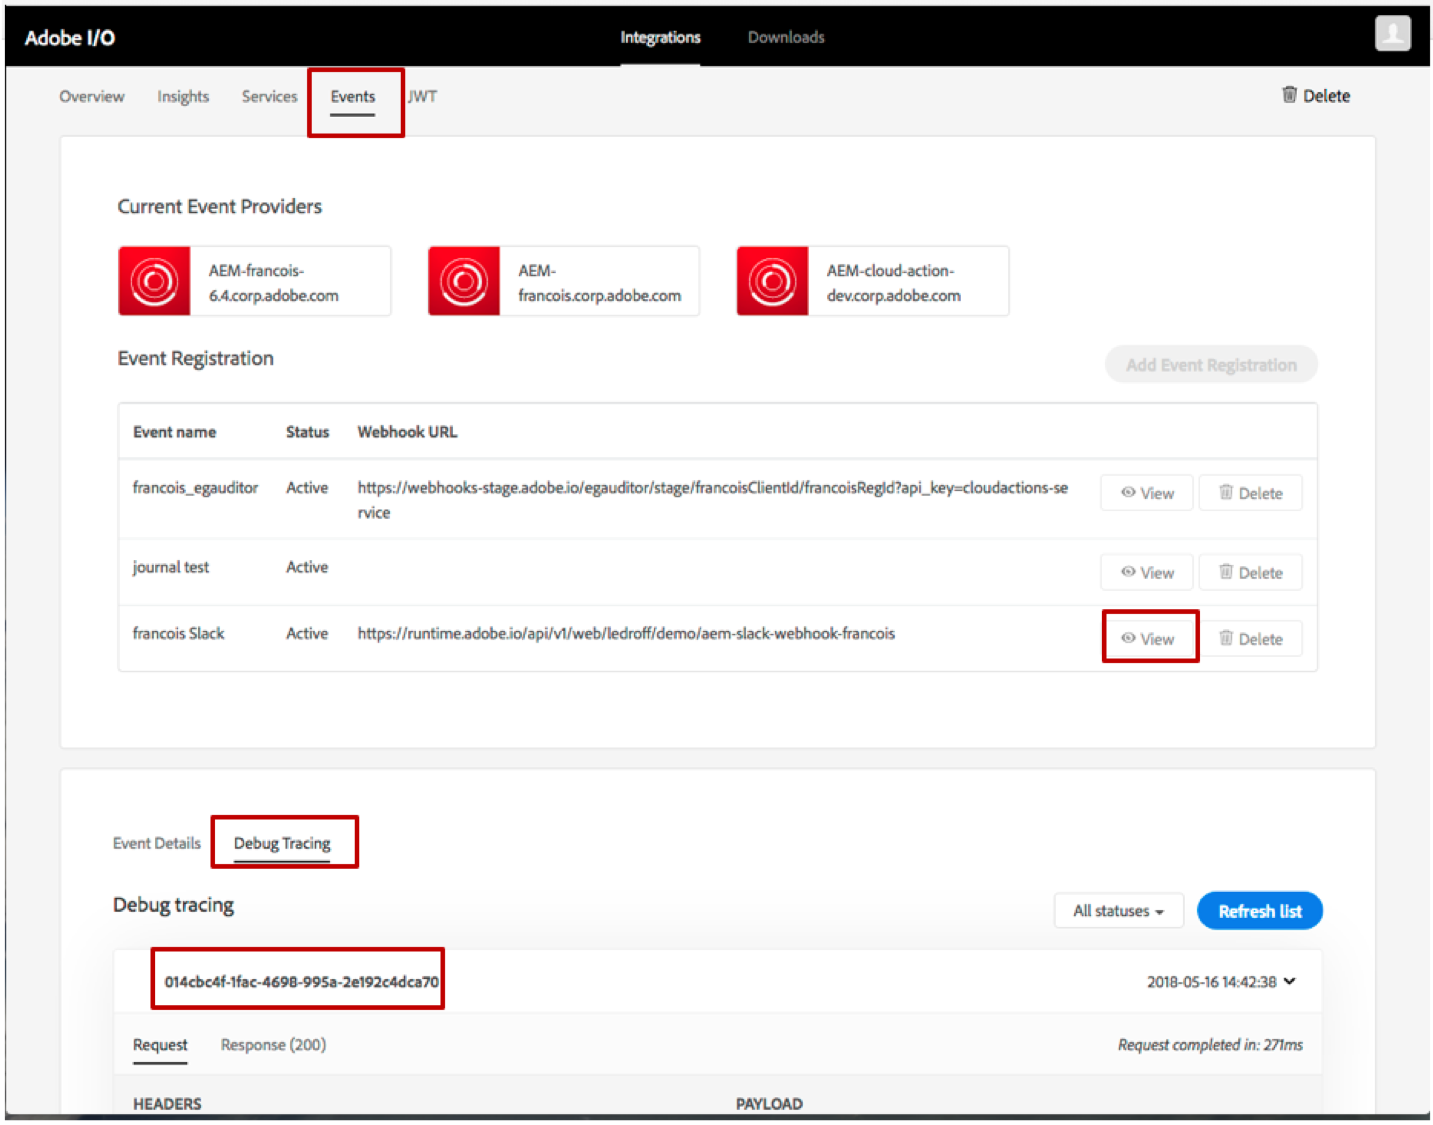
If for some reason, your webhook is failing, note that the Adobe I/O console holds a Debug Tracing feature:
It allows you to watch all the events payloads emitted by Adobe I/O towards your webhook and the associated webhook response.
In the console, select your integration, the Events Tabulation, your webhook, then Debug tracing,
see the screenshot below:
(Optional)
PERFORM AEM HEALTH CHECK
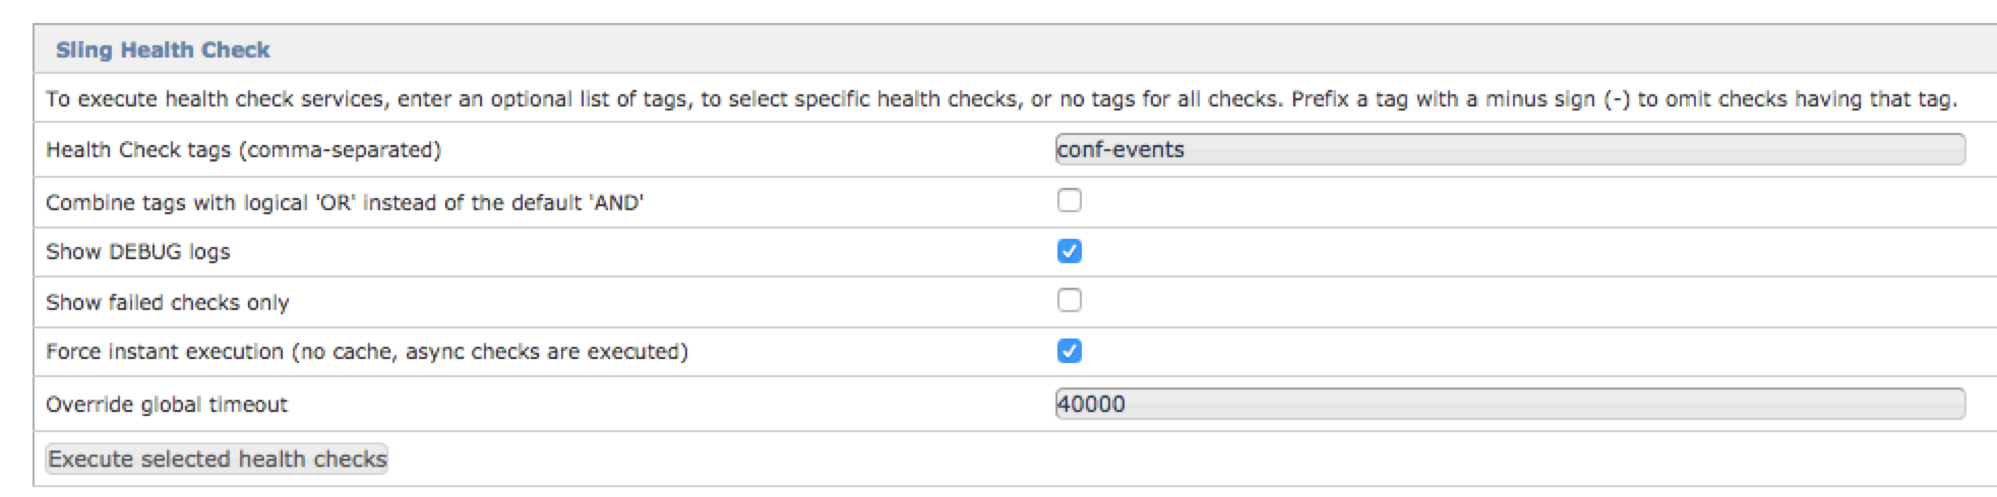
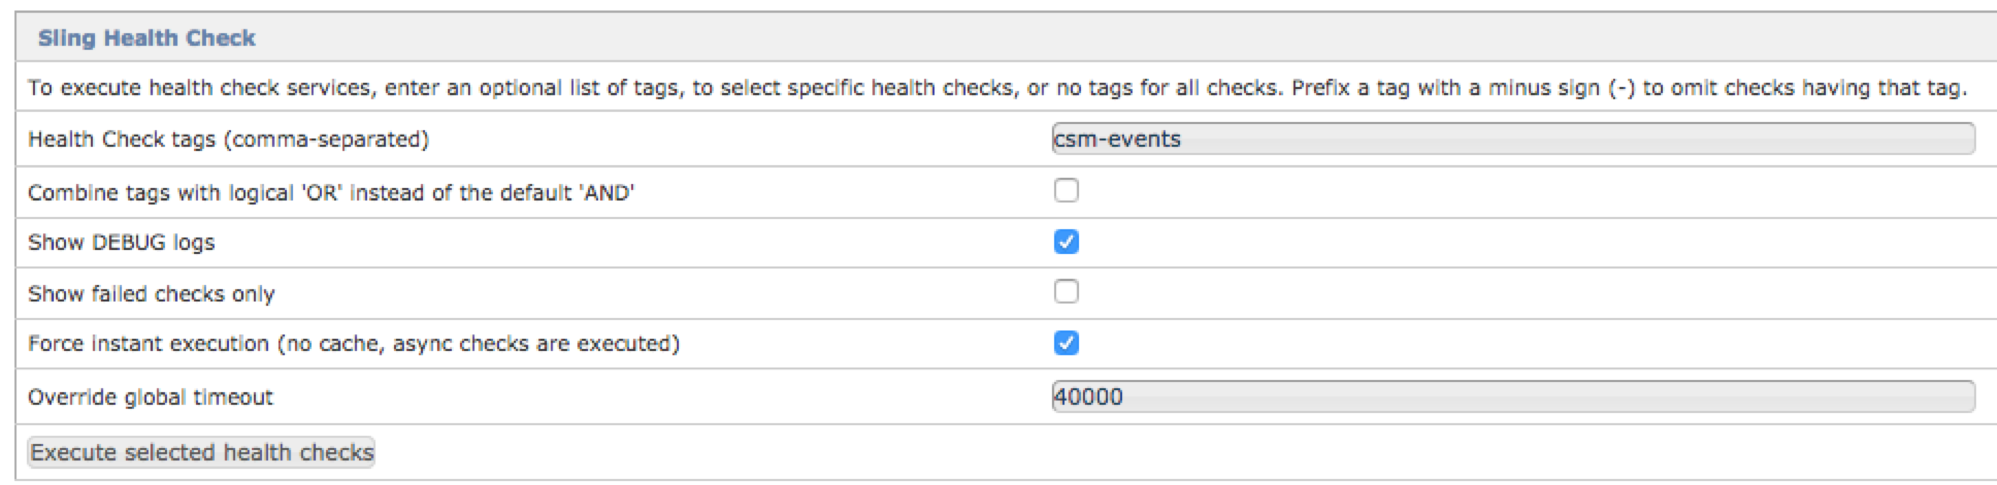
You can use the AEM Web Console Sling Health Check to verify that your configurations are correct.
To verify your configurations:
Check that all your configurations load properly by executing the health check tagged with conf-events.
If this health check is failing, check the following:
Make sure you have the correct event proxy package and update it to the latest version (currently 0.32.226) if needed.
Verify that when you installed your package, you chose the right install settings.
Make sure your AEM instance is compatible with Events (must be version 6.2 or higher).
Check the permissions for your event proxy package.
Match your I/O Events configuration to the integration that you've created in the Adobe I/O Console.
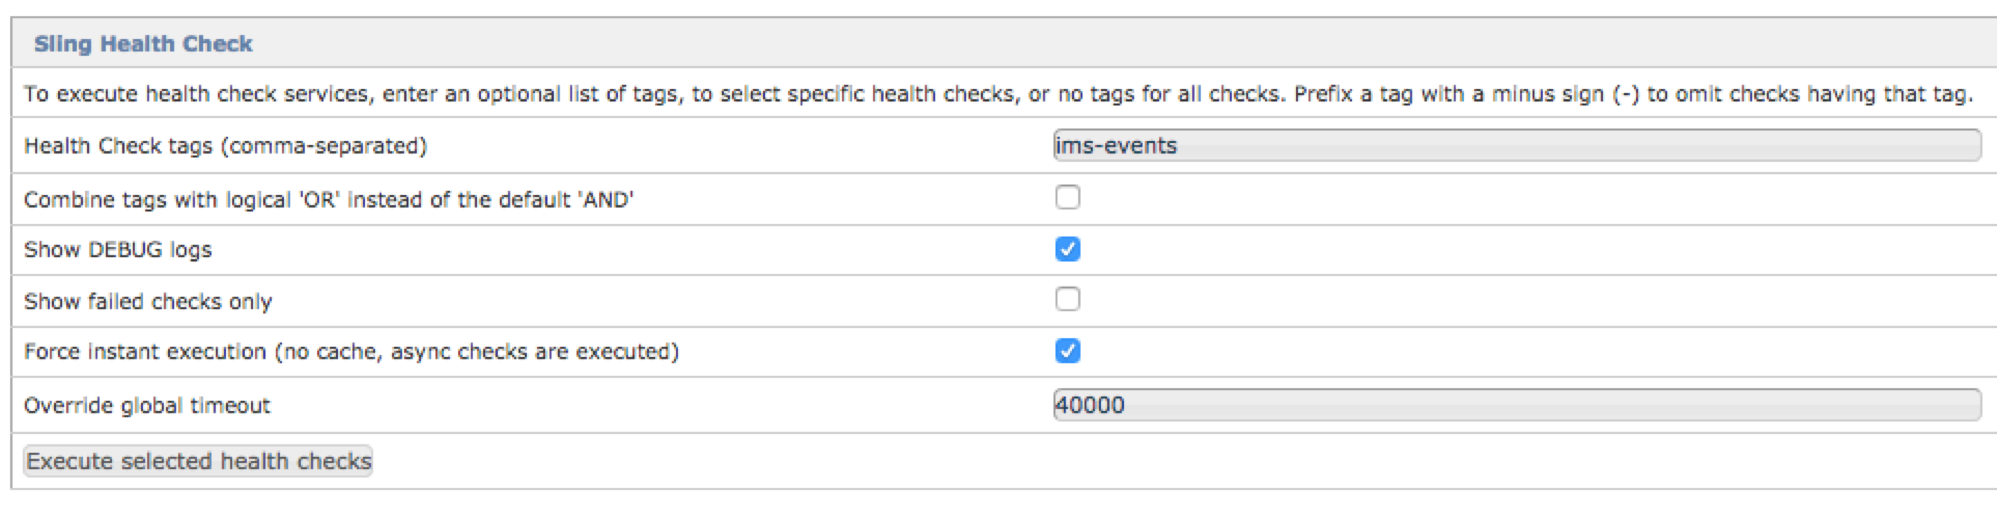
Check that the AEM instance is able to exchange JWT tokens with Adobe I/O Identity Management System (IMS).
To do this, execute the health check tagged with ims-events.
This verifies that your IMS-related configurations are correct and working,
including the eventproxy-service user keystore configuration, the Adobe I/O console–originated API key, the Technical Account ID,
the Organization ID, and the client secret.
If this health check is failing, check the following:
Match your I/O Events configuration to the integration that you've created in Adobe I/O Console.
Make sure that the keystore you've uploaded matches the public certificate in your integration.
Check that the event metadata and the provider associated with the AEM instance are registered in Adobe I/O Channel & Subscription Management (CSM) by executing the health check tagged with csm-events.
This verifies that the AEM instance is successfully registered as an event provider with Adobe I/O CSM.
(Optional) Check that the AEM instance is connected with Engress by executing the health check tagged with evre-events
ADOBE I/O EVENTS OSGI TO XDM EVENT MAPPING CONFIGURATIONS
For all Adobe I/O event types defined by the Adobe I/O Event Model, there is an Adobe I/O Events OSGI to XDM event mapping configuration.
For each of these you can edit:
The OSGI Topic you want to observe: osgiTopic
The OSGI Filter you want to apply in your OSGI event observation. If left empty no osgi filtering is done: osgiFilter
The JCR osgiJcrPathFilter to filter the OSGI events further. If left empty, no resource path filtering is done: osgiJcrPathFilter
The OSGI Event Handler Type (use the default com.day.cq.dam.eventproxy.service.impl.listener.AdobeIoEventHandler to map any custom OSGI event): osgiEventHandlerClassName
The Adobe I/O XDM Event Type to map to the OSGI event: again, use the default (com.adobe.xdm.event.OsgiEmittedEvent) to map your custom OSGI events: adobeIoXdmEventClassName
The Adobe I/O Event Code (unique to your event provider; in other words, unique to your AEM instance/cluster): adobeIoEventCode
The Adobe I/O Event Label as it will appear on the Adobe I/O Console: adobeIoEventLabel
The various OSGI event handlers will intercept the events according to these values and then map these OSGI events to the Adobe I/O Event Model before forwarding them to Adobe I/O.
The solution leverages the OSGI configuration factory pattern; hence you can not only edit these configurations, but you can also remove and add such configurations.
To configure using the panel:
Select Tools in AEM and then select Operations and Web Console.
In the OSGI menu, select Configuration.
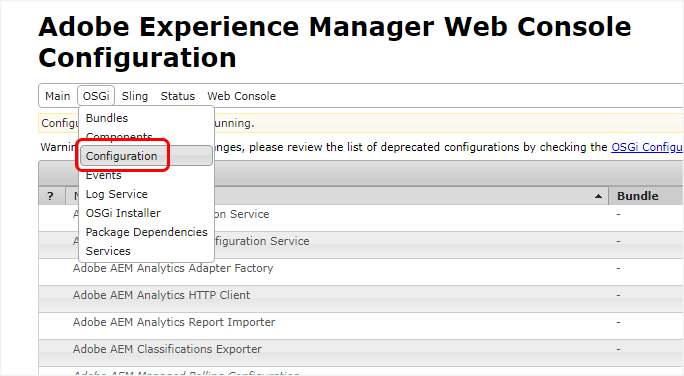
and search for: Adobe I/O Events CSM Registration.
For Adobe I/O Events OSGI to XDM Event Mapping Configuration, select +, Edit, or Delete.
ADOBE I/O EVENTS QUEUING AND RETRIES
When an OSGI event of interest is triggered (i.e an OSGI events that matches one of your OSGI to XDM event mapping configurations), it makes it to a job queue handled by Sling Job Handler.
This job is persisted in the resource tree (for failover etc.), then the job is distributed to an instance responsible for processing the job; and on that instance the job is put into a processing queue, where eventually a Sling Job Consumer will execute it.
Adobe I/O Events Sling Job Consumer's job is to send this event to Adobe I/O.
JobResult.OK should be returned. If the job has not been processed completely,
JobResult.FAILED should be returned if Adobe I/O fails either to receive or to process it (due to network failure or Adobe I/O failure).
In that case the job will be rescheduled/retried
if the max number of retries is met, the process will not be rescheduled and treated like the method would have returned JobResult.CANCEL.
Note that
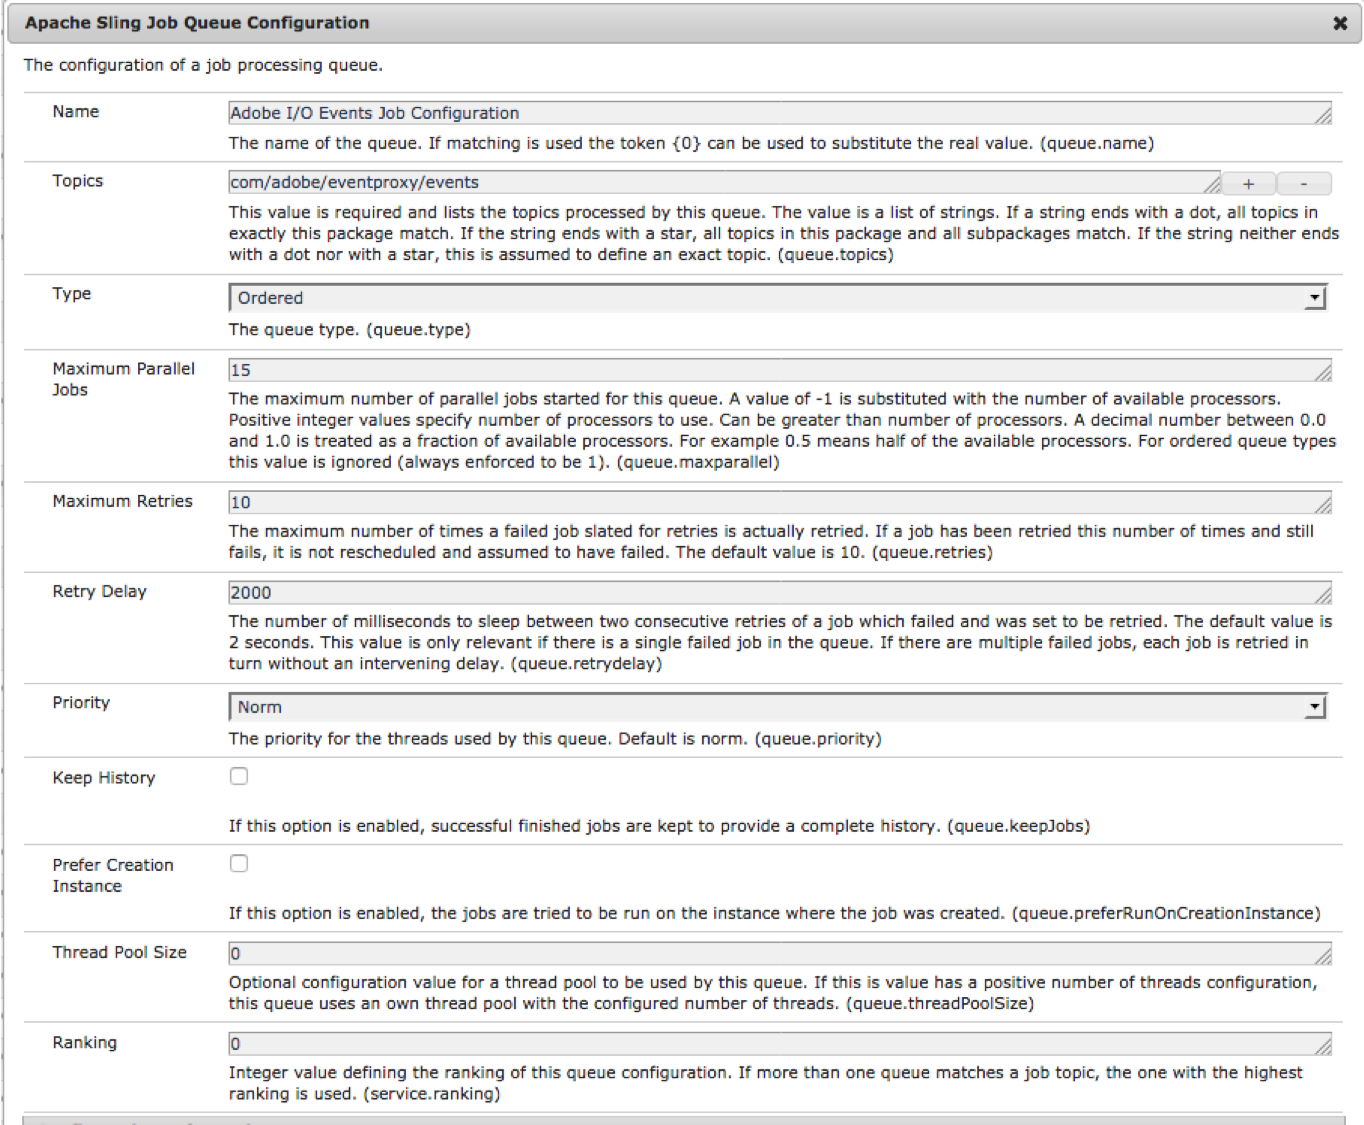
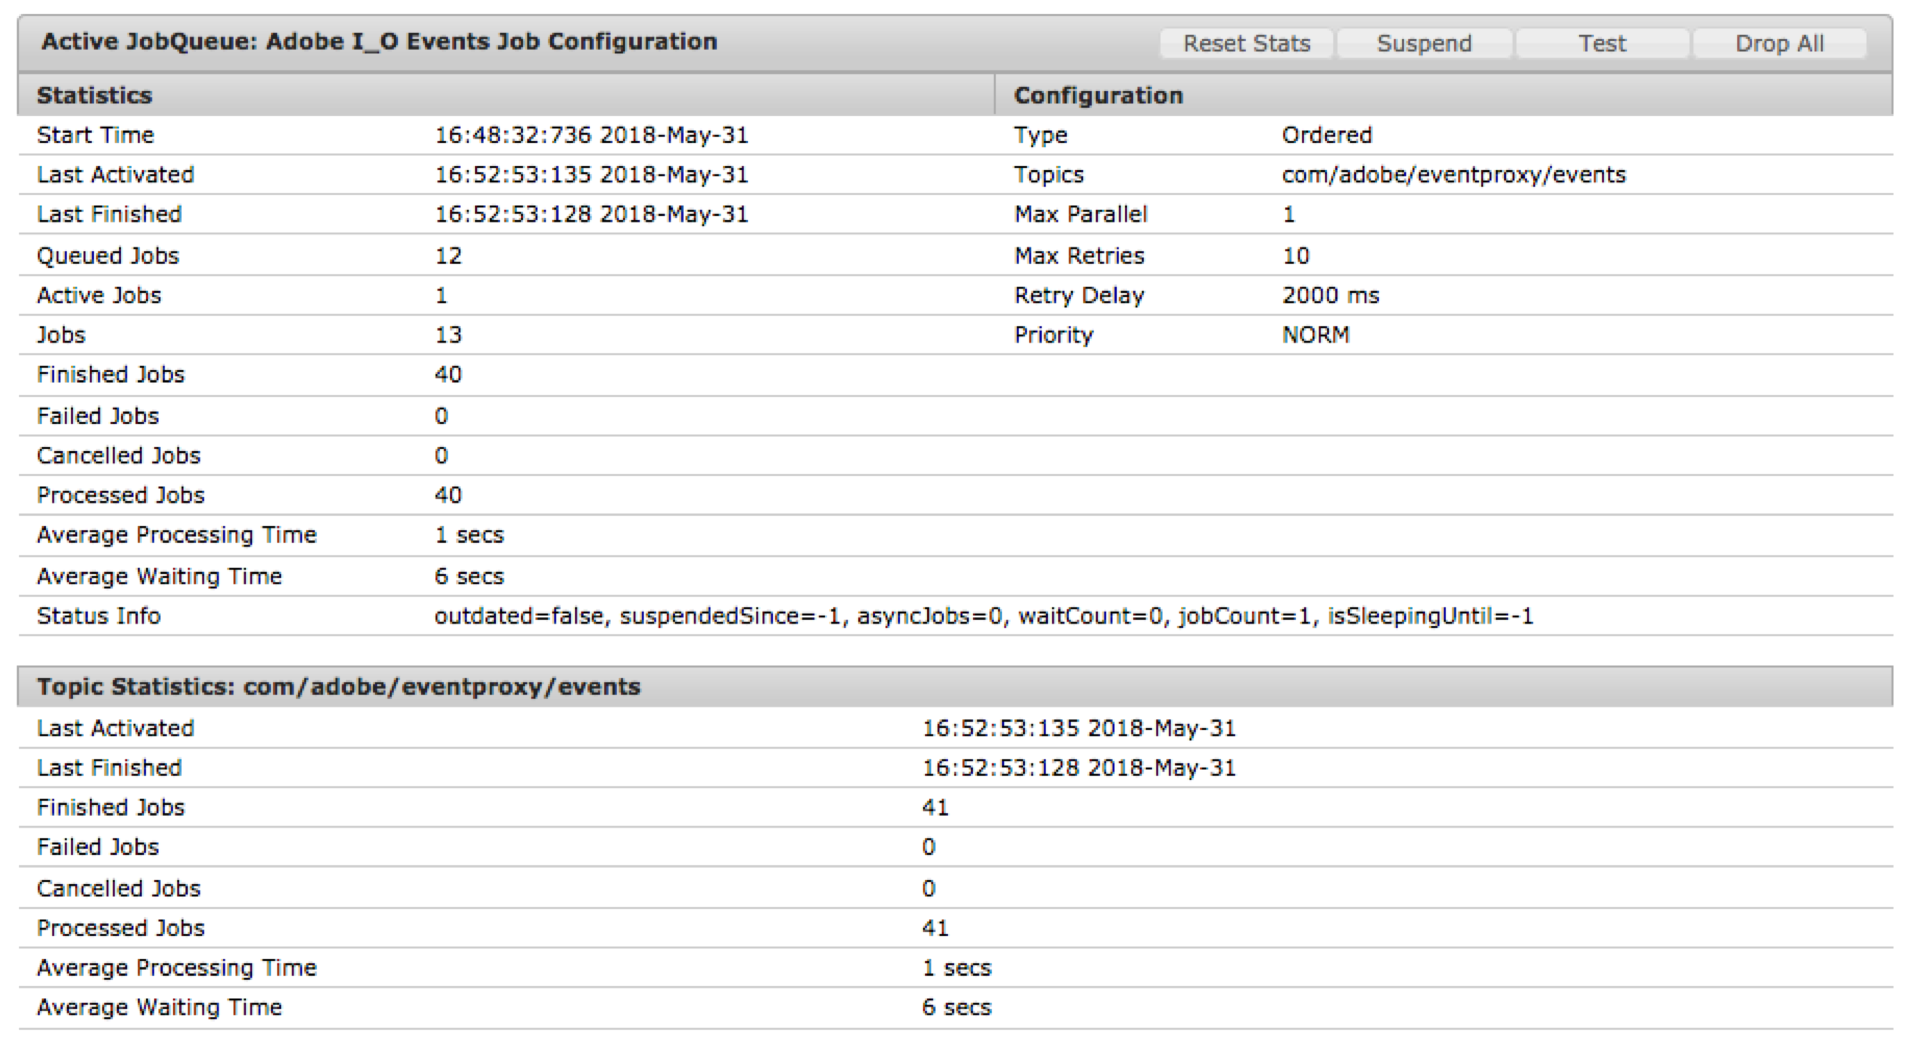
Adobe I/O Events Sling Job Consumer topic is com/adobe/eventproxy/events
Adobe I/O Events Sling Job Queue configuration is the default Apache Sling Job Default Queue with
a Normal job priority
10 maximum retries
2 seconds retry delay
15 maximum parallel jobs
You can tune this configuration according to your needs: using the OSGI > configuration menu of AEM's system console
and create there a new Apache Sling Job Queue Configuration
Note that you can use the Sling > Jobs menu of AEM system console,
to look up the statistics and health of your queues
Please refer to the Sling documentation:
https://sling.apache.org/apidocs/sling7/org/apache/sling/event/jobs/consumer/JobConsumer.html
https://sling.apache.org/documentation/bundles/apache-sling-eventing-and-job-handling.html
Authors
Sarah Xu @sarahxxu.
John Wight @johnwight.
Feedback?
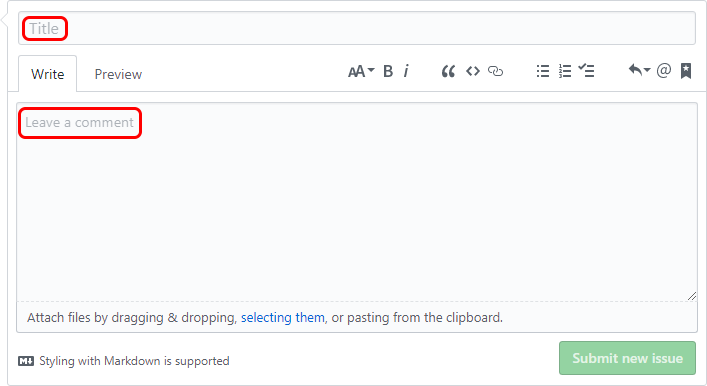
Please help make this solution as useful as possible. If you find a problem in the documentation or have a suggestion, select the Issues tab on this GitHub repository and then select New issue. Provide a title and description for your comment and then select Submit new issue.

No comments:
Post a Comment
If you have any doubts or questions, please let us know.