Jenkins has been around since 2011. Being an open-source project, it has seen many iterations and features. As a result, there is a plethora of tutorials and examples. Here are a few things to keep in mind when you reference outside sources as you implement your own pipelines.
Declarative vs Scripted Pipelines
It is not just one type of pipeline, as there are two! Declarative is the newest of the two. As you Google around for solutions, keep this in mind as you may have to translate the Scripted examples to Declarative (or vice versa). For a basic idea of the DSL syntactical differences, read this section of Pipeline documentation.
The Declarative pipelines were designed to work with Blue Ocean. Blue Ocean is a completely new UI experience that allows users to take advantage of pipelines. I tested out some of its features and I found it somewhat limited. Editing pipeline scripts directly instead of using the Pipeline Editor may be preferable. I’ll make sure to point out how to install the Blue Ocean and show you how to get a nice view of the progress of your pipeline.

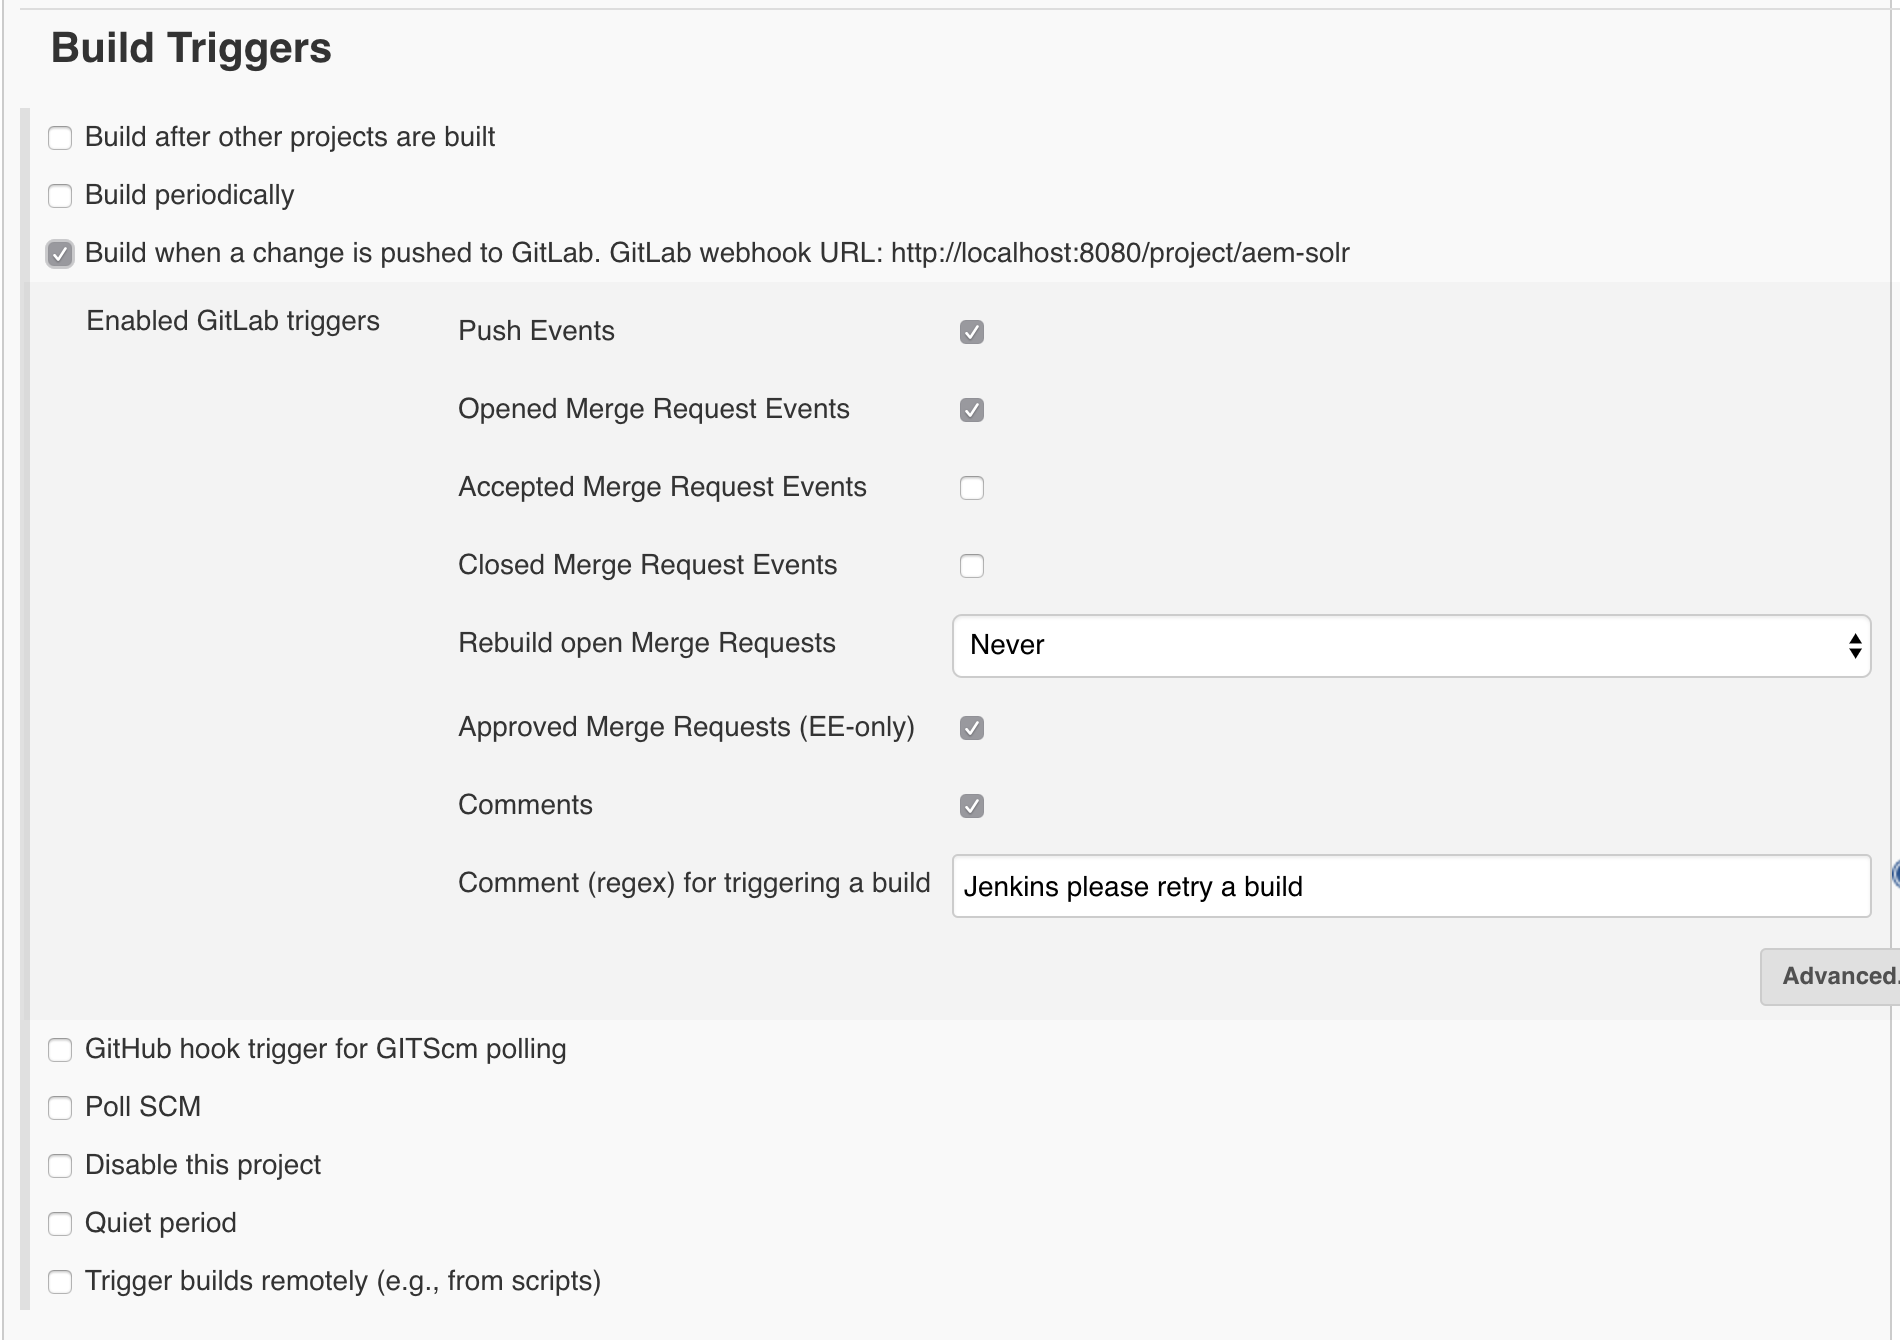
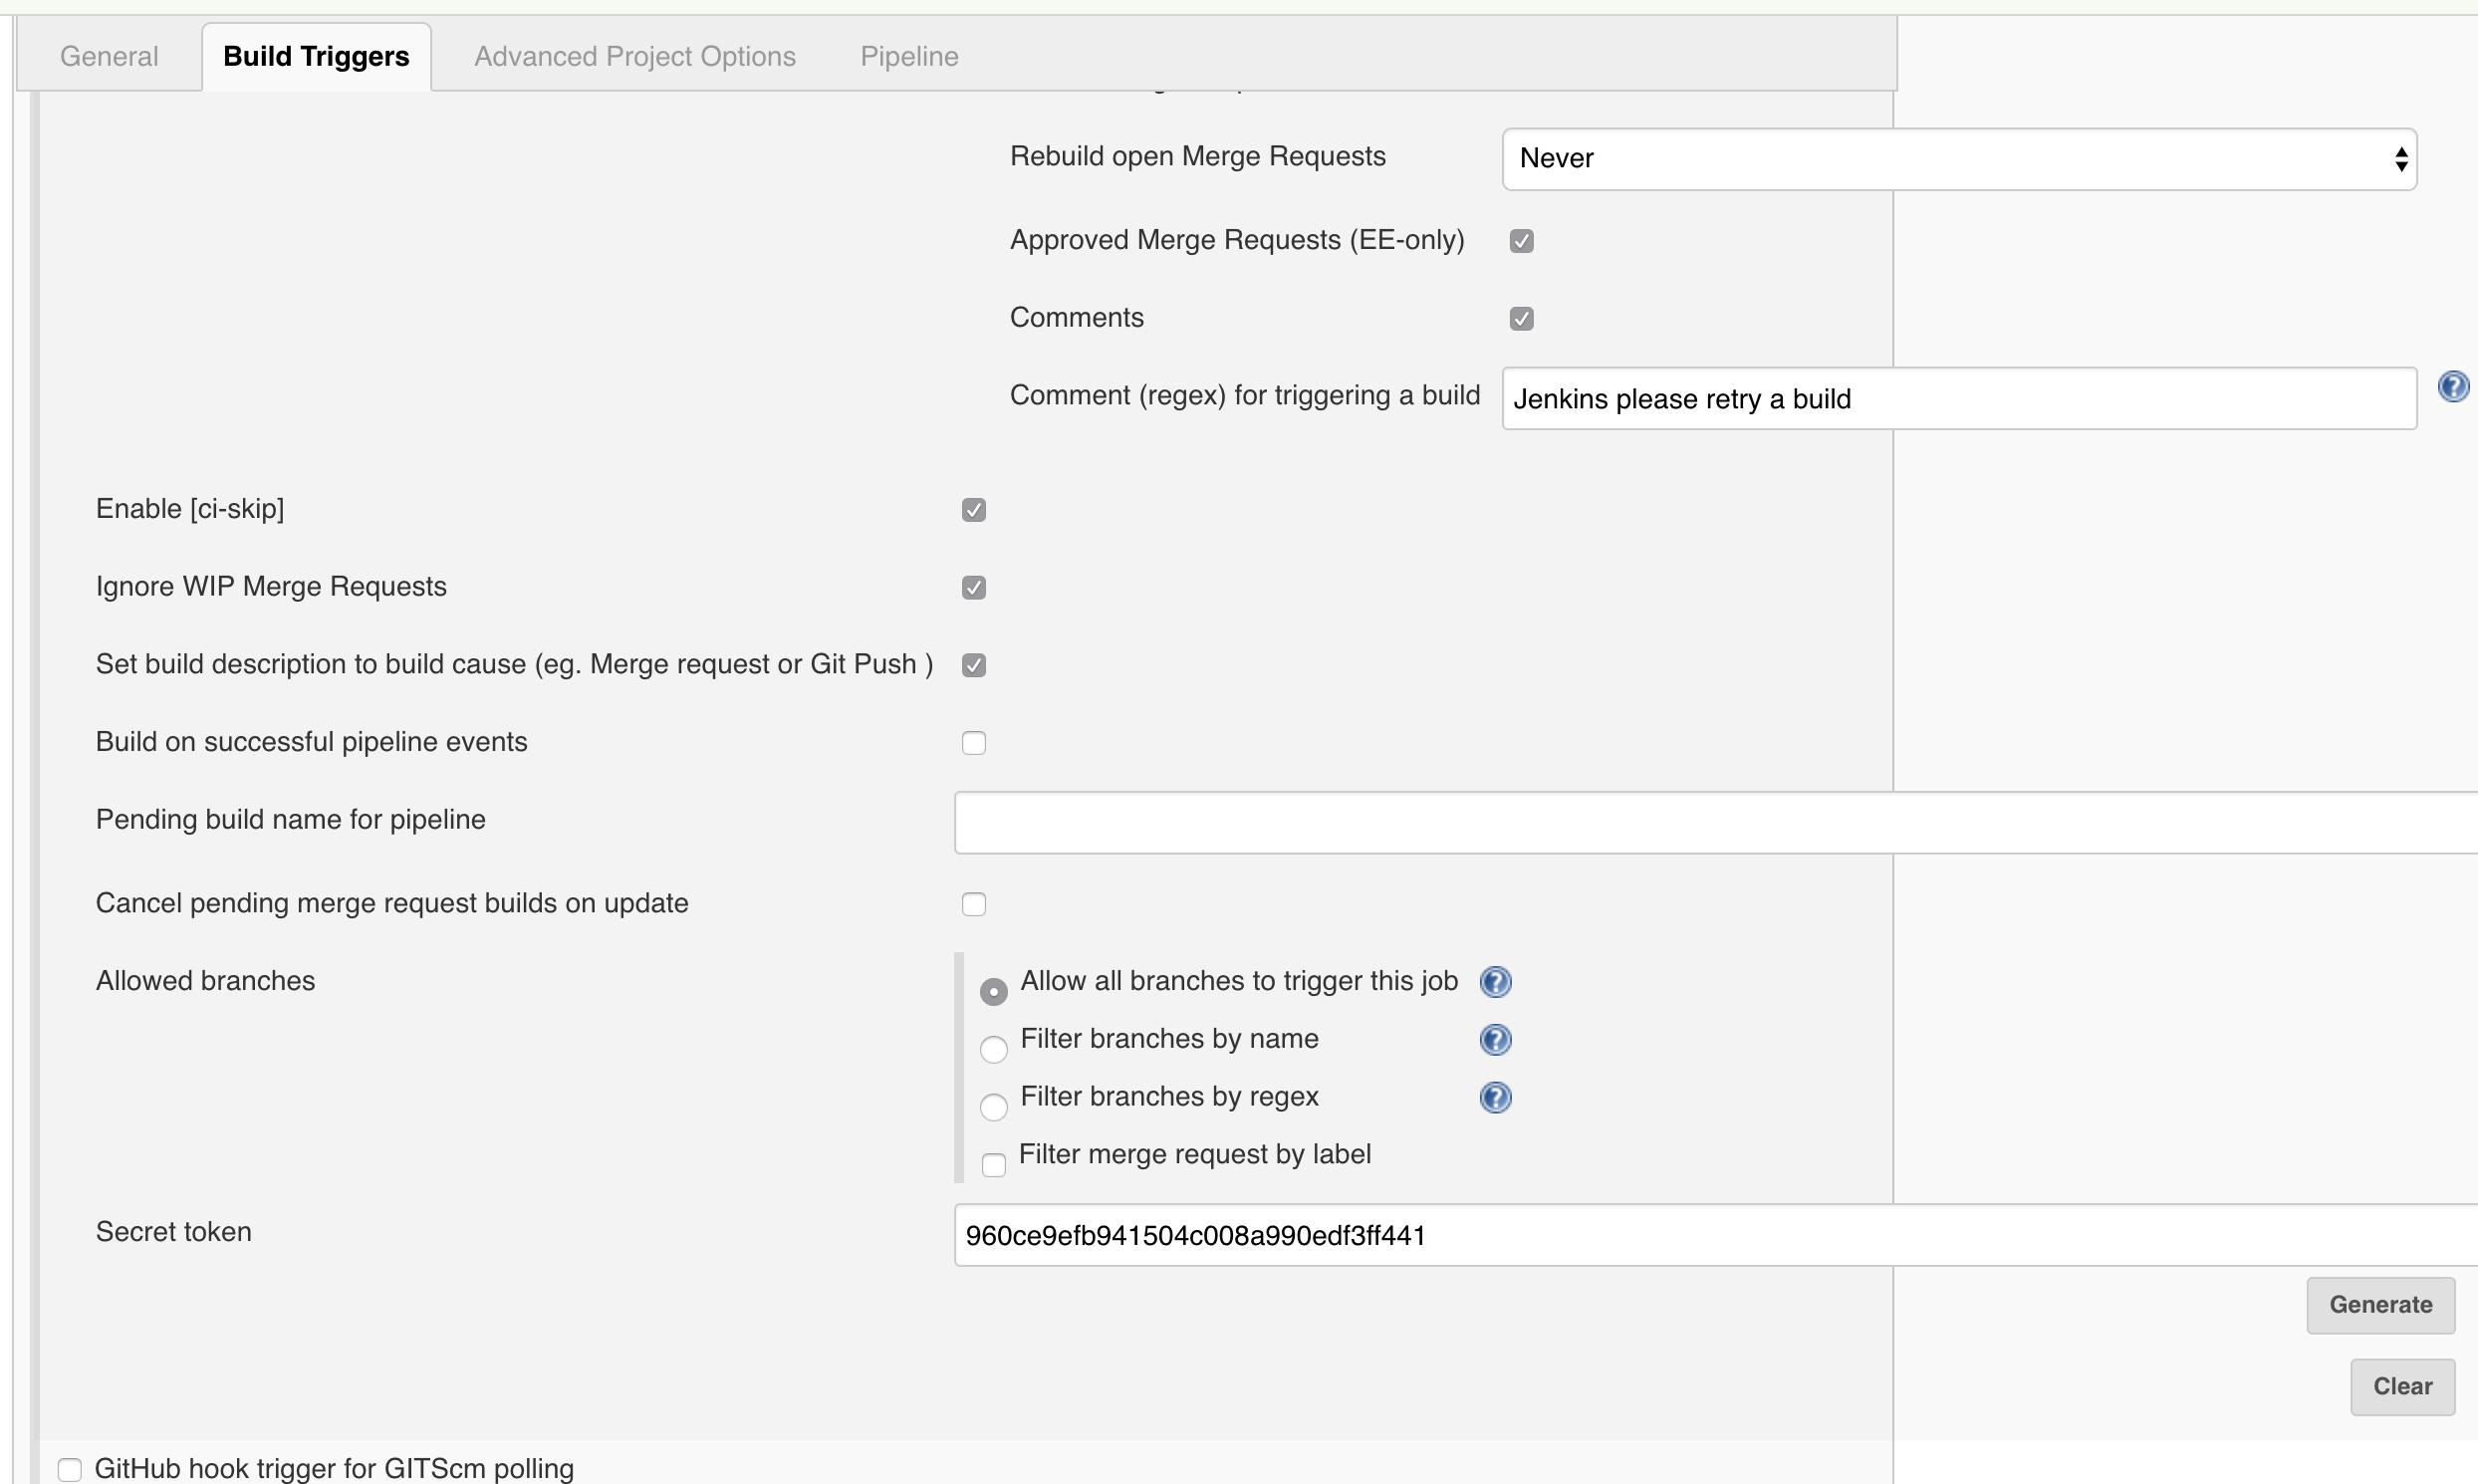
Scroll down to Build Triggers and select “Build when a change is pushed to GitLab”. Make note of the url, but be aware that this is not really going to work in our Docker environment. I’ll give you the URL later. Next click on the Advanced. Generate a token (or use whatever you want). This token is NOT the same as the previous token that is used by Jenkins to authenticate with GitLab. This token is used by GitLab to authenticate with Jenkins.
Scroll down to the Pipeline section. Here we are going to select “Pipeline script from SCM”, even though we don’t have one yet. Put in the URL to the GitLab repository, and select the Git credentials you should of already have created. Change the branch to */develop because that is the branch we’ll be building in our codebase. Additional Behaviours, make sure to add “Custom user name/e-mail address”. You’ll need this in the final stage of the pipeline when you are pushing the release branch and bumping versions. Now you can save the job.


The Jenkinsfile
We now have a project on GitLab that is able to trigger a job on Jenkins via the WebHooks integration. When the job kicks off, it will pull the configured branch and look for a Jenkins file. To create this file, you can create it in your local filesystem using your favorite editor, then push. Or you can use the GitLab editor feature to create and commit right from the web interface. For this tutorial, we are going with the latter.
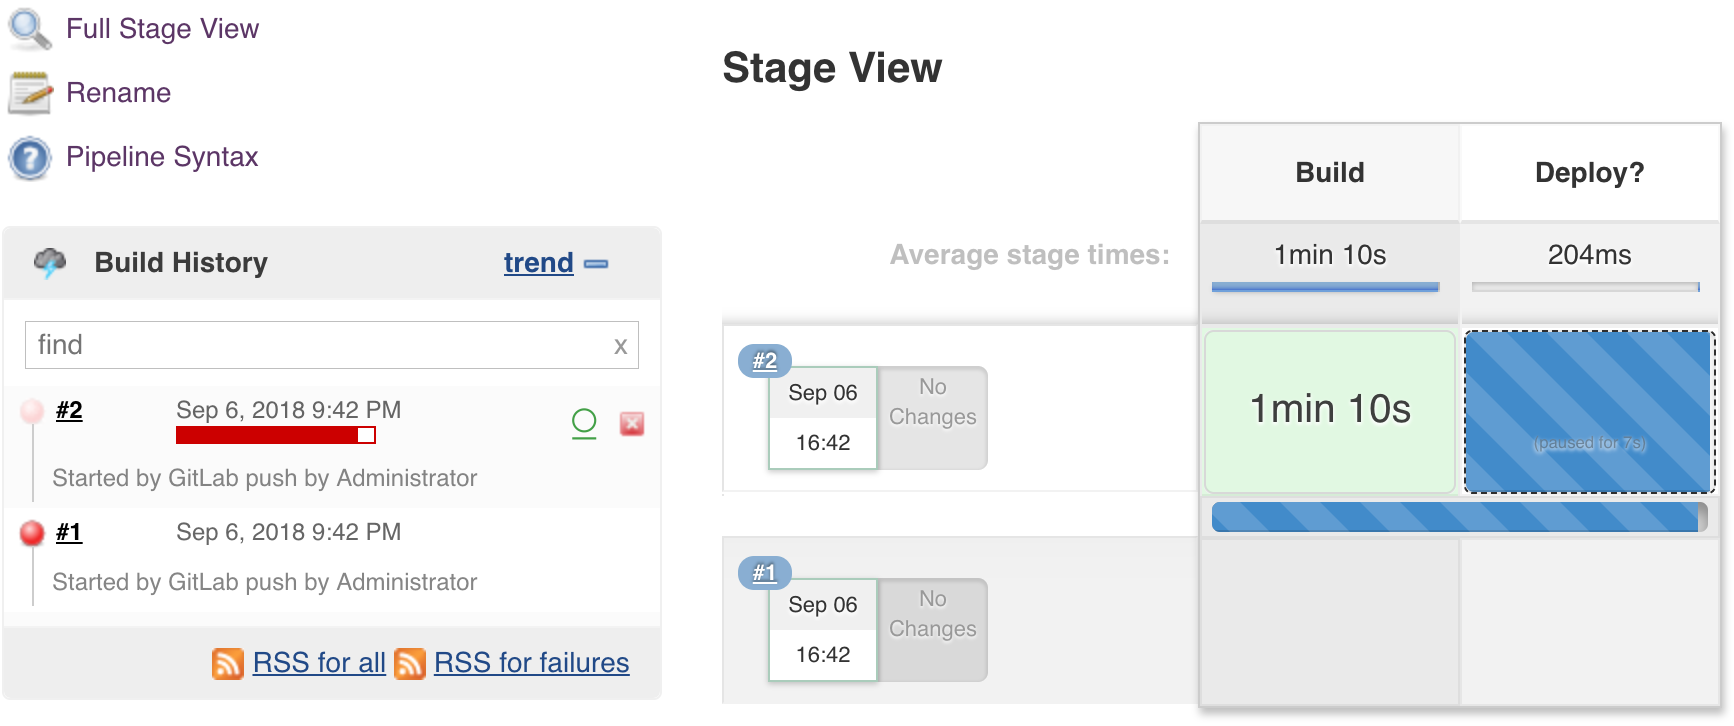
When this file was created, Jenkins should have kicked off a new job as well. It moved through the Build stage and waits for user input on the Deploy? stage. Before we move through the rest of the stages let’s cover what the other sections of the Jenkins file are doing.
Once the user makes the input, the last step in the stage is to set a milestone.
Stage 4: Release?
Once again you access the input pop-up by hovering over the Release? stage. Here we are collecting the release number you want to ship.


In the end, you’ll have a tagged release branch, and you are free to continue development on the development branch. The versioned release artifacts have been deployed to Artifactory and are ready for distribution.
It is not just one type of pipeline, as there are two! Declarative is the newest of the two. As you Google around for solutions, keep this in mind as you may have to translate the Scripted examples to Declarative (or vice versa). For a basic idea of the DSL syntactical differences, read this section of Pipeline documentation.
The Declarative pipelines were designed to work with Blue Ocean. Blue Ocean is a completely new UI experience that allows users to take advantage of pipelines. I tested out some of its features and I found it somewhat limited. Editing pipeline scripts directly instead of using the Pipeline Editor may be preferable. I’ll make sure to point out how to install the Blue Ocean and show you how to get a nice view of the progress of your pipeline.
Classic vs Pipeline Jobs
If you have been using Jenkins for a while now, you are most certainly familiar with the classic Freestyle jobs which are configured through the UI and can be extended by plugins that add their relevant UI sections to capture configuration. Enter… pipelines. Just like Chef or Puppet let you turn your infrastructure into code, pipelines allow you to turn your jobs into code. This is something hard to do with a classic job that stores the settings you input via the UI into an XML file that resides in the Jenkins home filesystem.
If you have been using Jenkins for a while now, you are most certainly familiar with the classic Freestyle jobs which are configured through the UI and can be extended by plugins that add their relevant UI sections to capture configuration. Enter… pipelines. Just like Chef or Puppet let you turn your infrastructure into code, pipelines allow you to turn your jobs into code. This is something hard to do with a classic job that stores the settings you input via the UI into an XML file that resides in the Jenkins home filesystem.
Let's Get Started!
I’m assuming you ran through Part 1 of this tutorial so you should have a Jenkins/Artifactory/GitLab environment up and running, and at least one classic Jenkins job building the aem-solr project. If you are using a different codebase or SCM provider, you’ll need to make adjustments, but the ideas are the same.
I’m assuming you ran through Part 1 of this tutorial so you should have a Jenkins/Artifactory/GitLab environment up and running, and at least one classic Jenkins job building the aem-solr project. If you are using a different codebase or SCM provider, you’ll need to make adjustments, but the ideas are the same.
Install Additional Plugins
Go to Jenkins > Manage Jenkins > Manage Plugins, and select the Available tab. Search for the following plugins and install them.
Go to Jenkins > Manage Jenkins > Manage Plugins, and select the Available tab. Search for the following plugins and install them.
Configure Trigger on Push
We need to set up what is probably the most important part of CI, triggering a build when a change is pushed to the SCM.
We need to set up what is probably the most important part of CI, triggering a build when a change is pushed to the SCM.
GitLab API Token
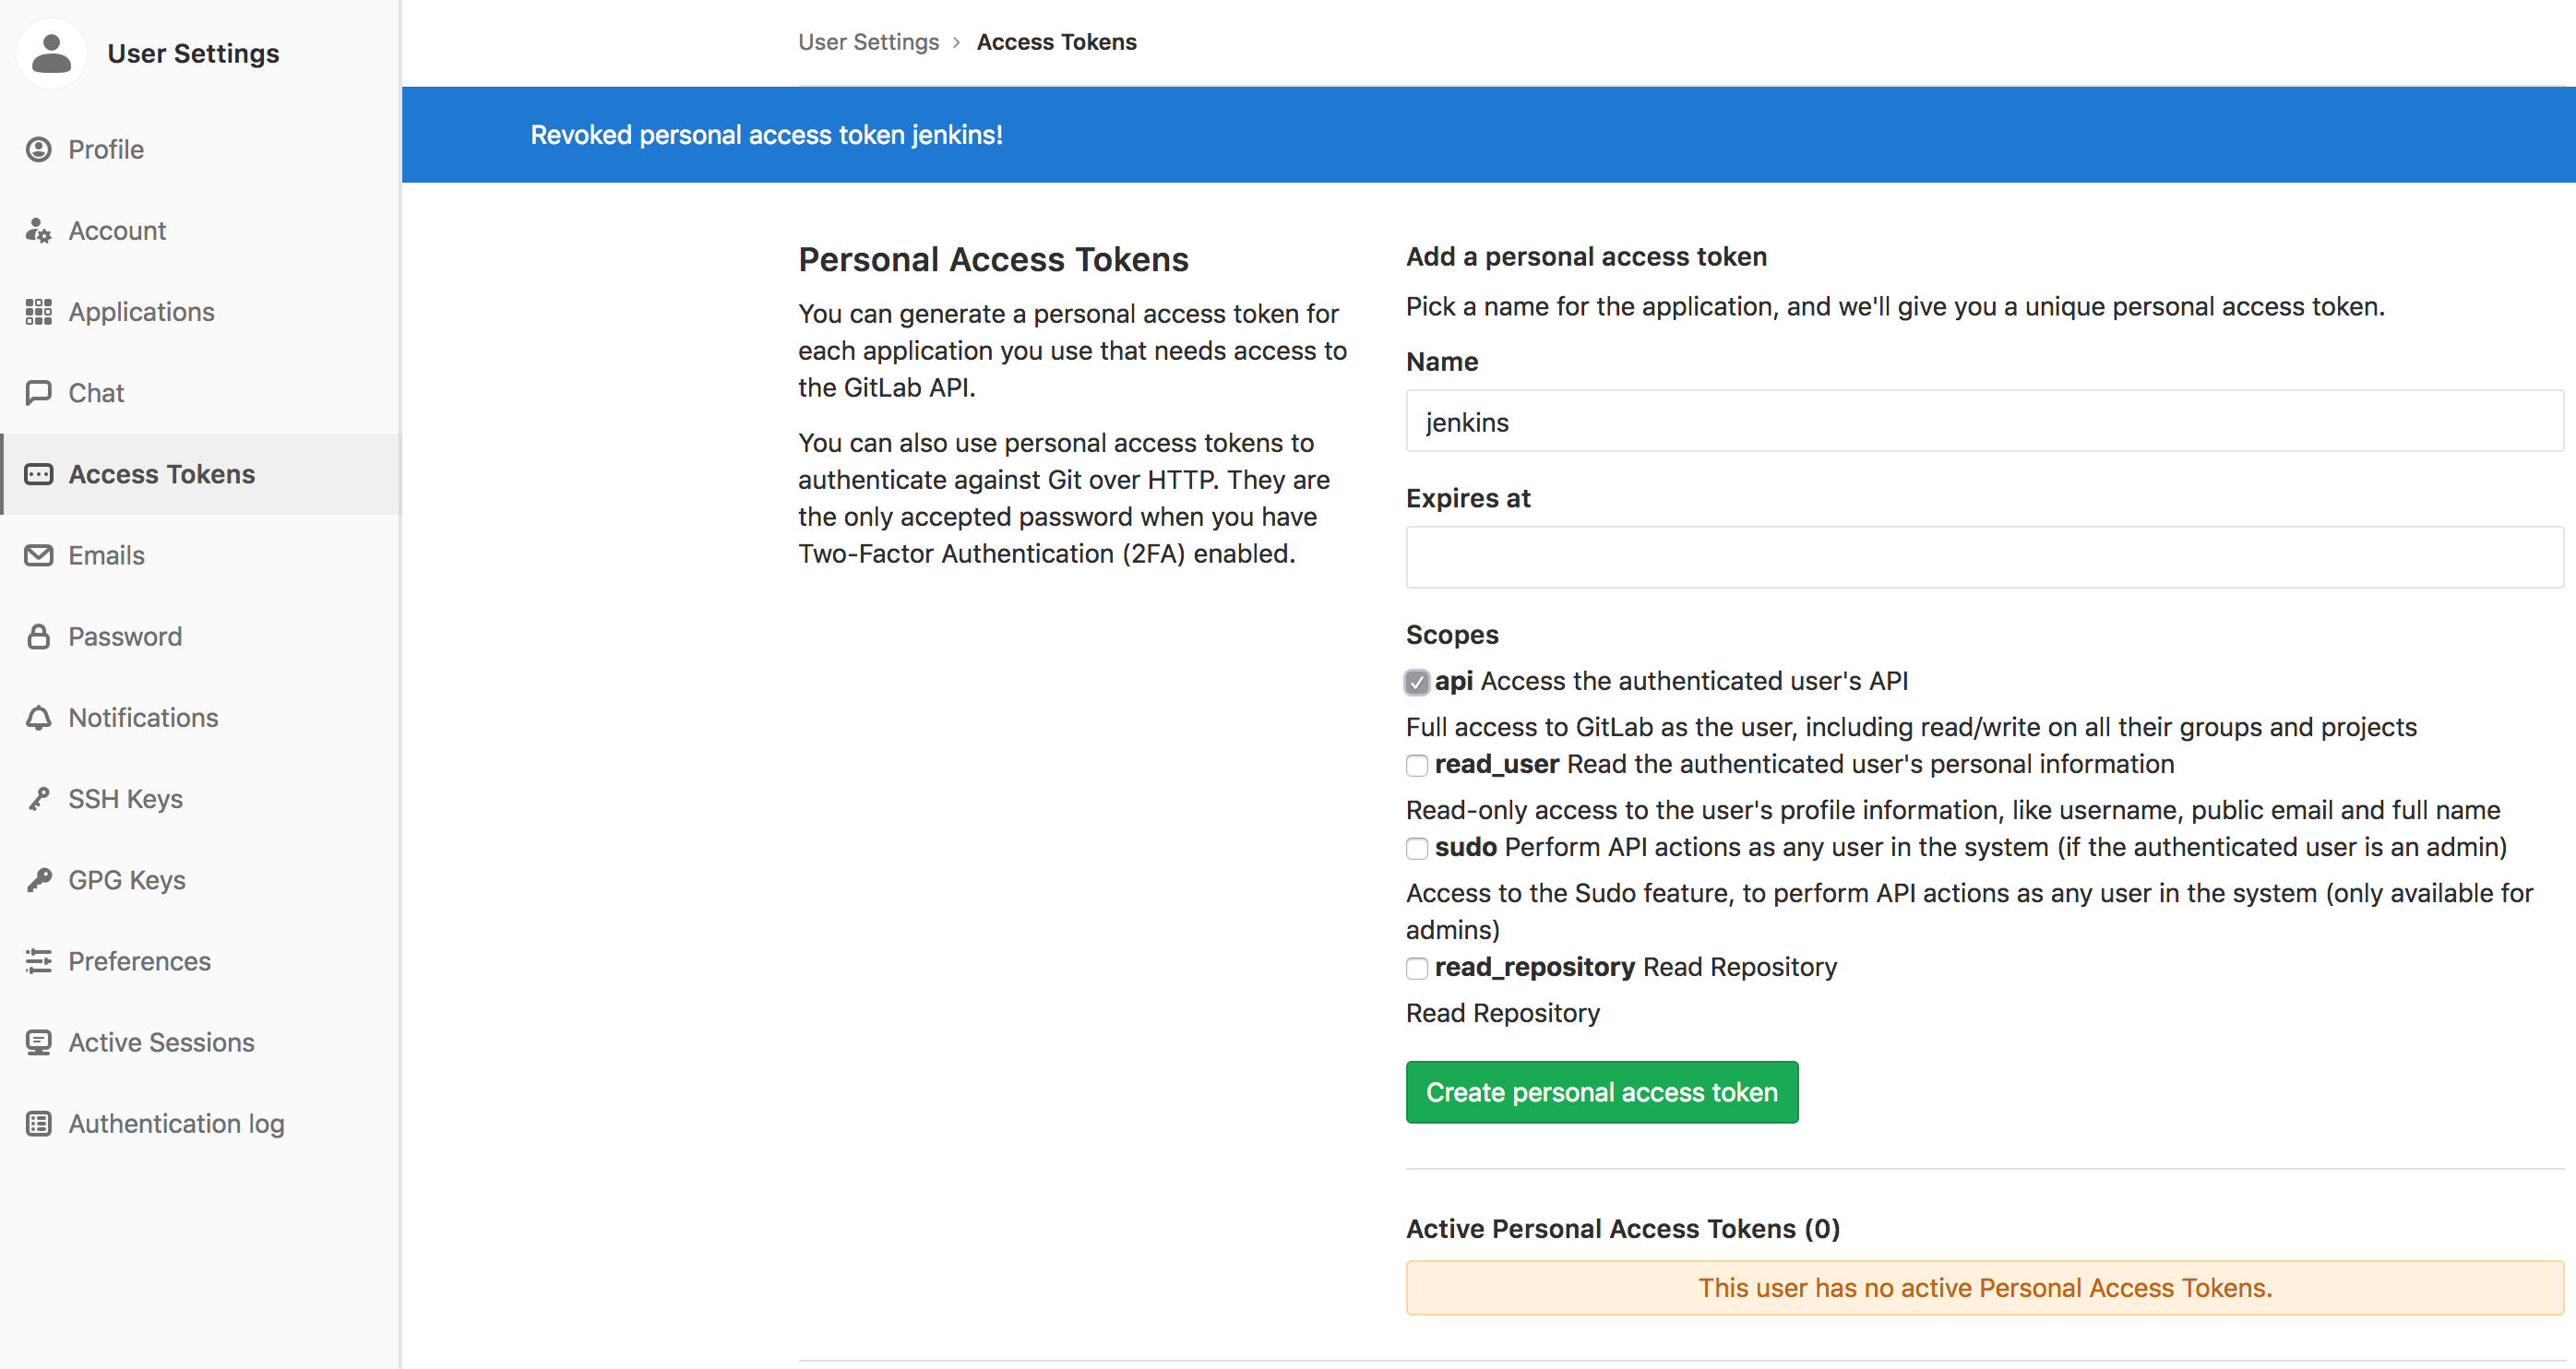
We need to generate an API token on the GitLab site. We are using the admin user, so navigate to that user’s Settings > Access Tokens. Give the token a name (i.e. Jenkins) and select the API option. Once you click the Create button you will have a one-time chance to copy the token. Save it for later as you won’t be able to view it again.

Jenkins GitLab Plugin Configuration
Go to Jenkins > Manage Jenkins > Configure System and scroll down to the GitLab section that is now available after installing the GitLab plugin. Provide a connection name & URL. Use the Add button to add a GitLab API token credential. Then click “Test Connection”.


Create a new Pipeline Job
Next, we are going to create a pipeline job. This will need to be configured so that it is triggered when there is a push to SCM. In Jenkins create a new job. After it is created you’ll notice the GitLab connection is already present and selected because you created one in the previous steps.
We need to generate an API token on the GitLab site. We are using the admin user, so navigate to that user’s Settings > Access Tokens. Give the token a name (i.e. Jenkins) and select the API option. Once you click the Create button you will have a one-time chance to copy the token. Save it for later as you won’t be able to view it again.
Jenkins GitLab Plugin Configuration
Go to Jenkins > Manage Jenkins > Configure System and scroll down to the GitLab section that is now available after installing the GitLab plugin. Provide a connection name & URL. Use the Add button to add a GitLab API token credential. Then click “Test Connection”.
Create a new Pipeline Job
Next, we are going to create a pipeline job. This will need to be configured so that it is triggered when there is a push to SCM. In Jenkins create a new job. After it is created you’ll notice the GitLab connection is already present and selected because you created one in the previous steps.
Scroll down to Build Triggers and select “Build when a change is pushed to GitLab”. Make note of the url, but be aware that this is not really going to work in our Docker environment. I’ll give you the URL later. Next click on the Advanced. Generate a token (or use whatever you want). This token is NOT the same as the previous token that is used by Jenkins to authenticate with GitLab. This token is used by GitLab to authenticate with Jenkins.
Scroll down to the Pipeline section. Here we are going to select “Pipeline script from SCM”, even though we don’t have one yet. Put in the URL to the GitLab repository, and select the Git credentials you should of already have created. Change the branch to */develop because that is the branch we’ll be building in our codebase. Additional Behaviours, make sure to add “Custom user name/e-mail address”. You’ll need this in the final stage of the pipeline when you are pushing the release branch and bumping versions. Now you can save the job.
Turn on GitLab WebHooks Integration
Now that Jenkins is aware of GitLab via the plugin, and a job has been configured to trigger on push, we need to make GitLab actually hit that trigger via a WebHook. In GitLab, navigate to the project and click on Settings > Integrations. Here we are going to enter:

Now that Jenkins is aware of GitLab via the plugin, and a job has been configured to trigger on push, we need to make GitLab actually hit that trigger via a WebHook. In GitLab, navigate to the project and click on Settings > Integrations. Here we are going to enter:
- WebHook URL http://aem-ci_jenkins_1:8080/project/aem-solr,
- The generated token that was generated in the job configuration page
- Push events checkbox
- Click Test > Push events
The Jenkinsfile
We now have a project on GitLab that is able to trigger a job on Jenkins via the WebHooks integration. When the job kicks off, it will pull the configured branch and look for a Jenkins file. To create this file, you can create it in your local filesystem using your favorite editor, then push. Or you can use the GitLab editor feature to create and commit right from the web interface. For this tutorial, we are going with the latter.
Create A Jenkinsfile
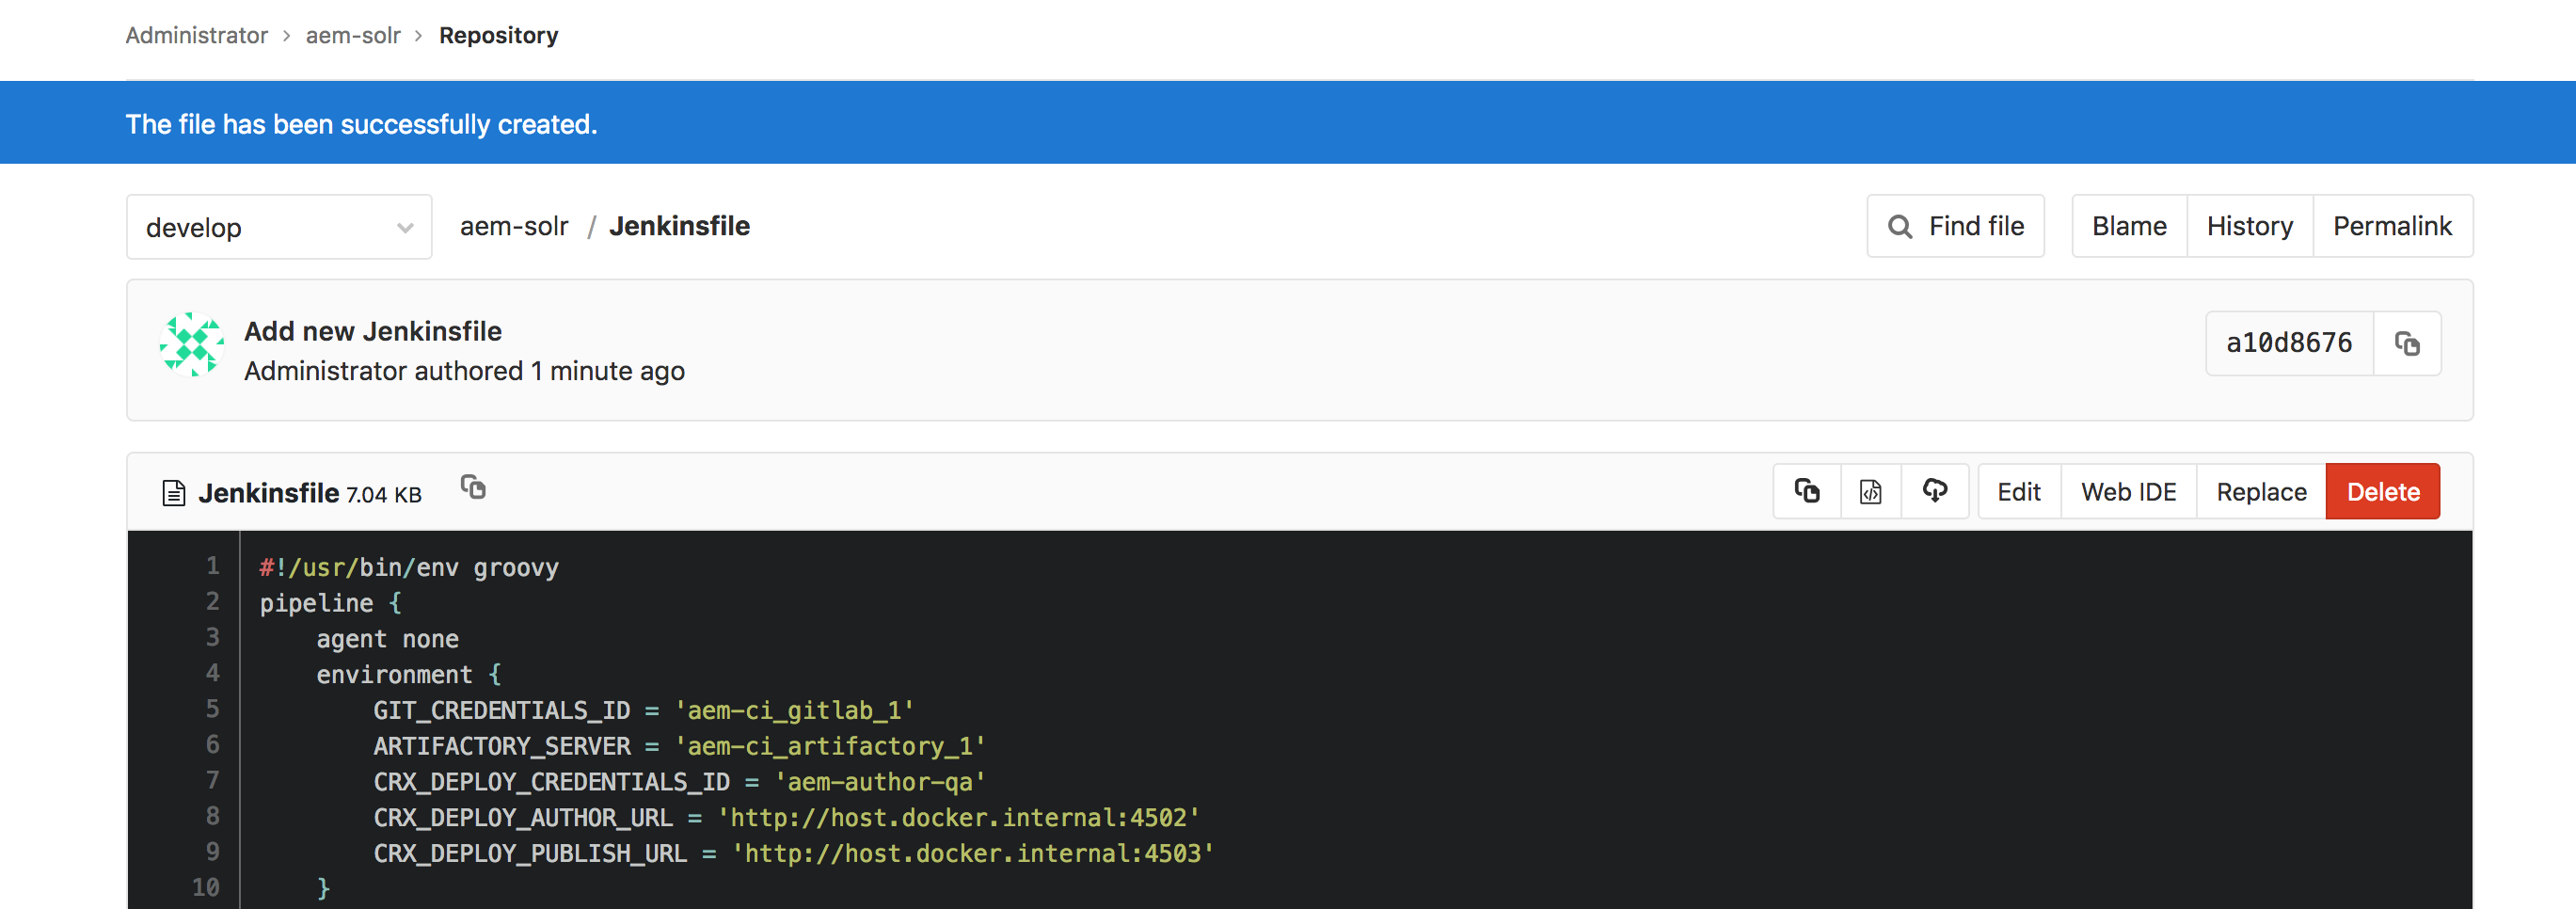
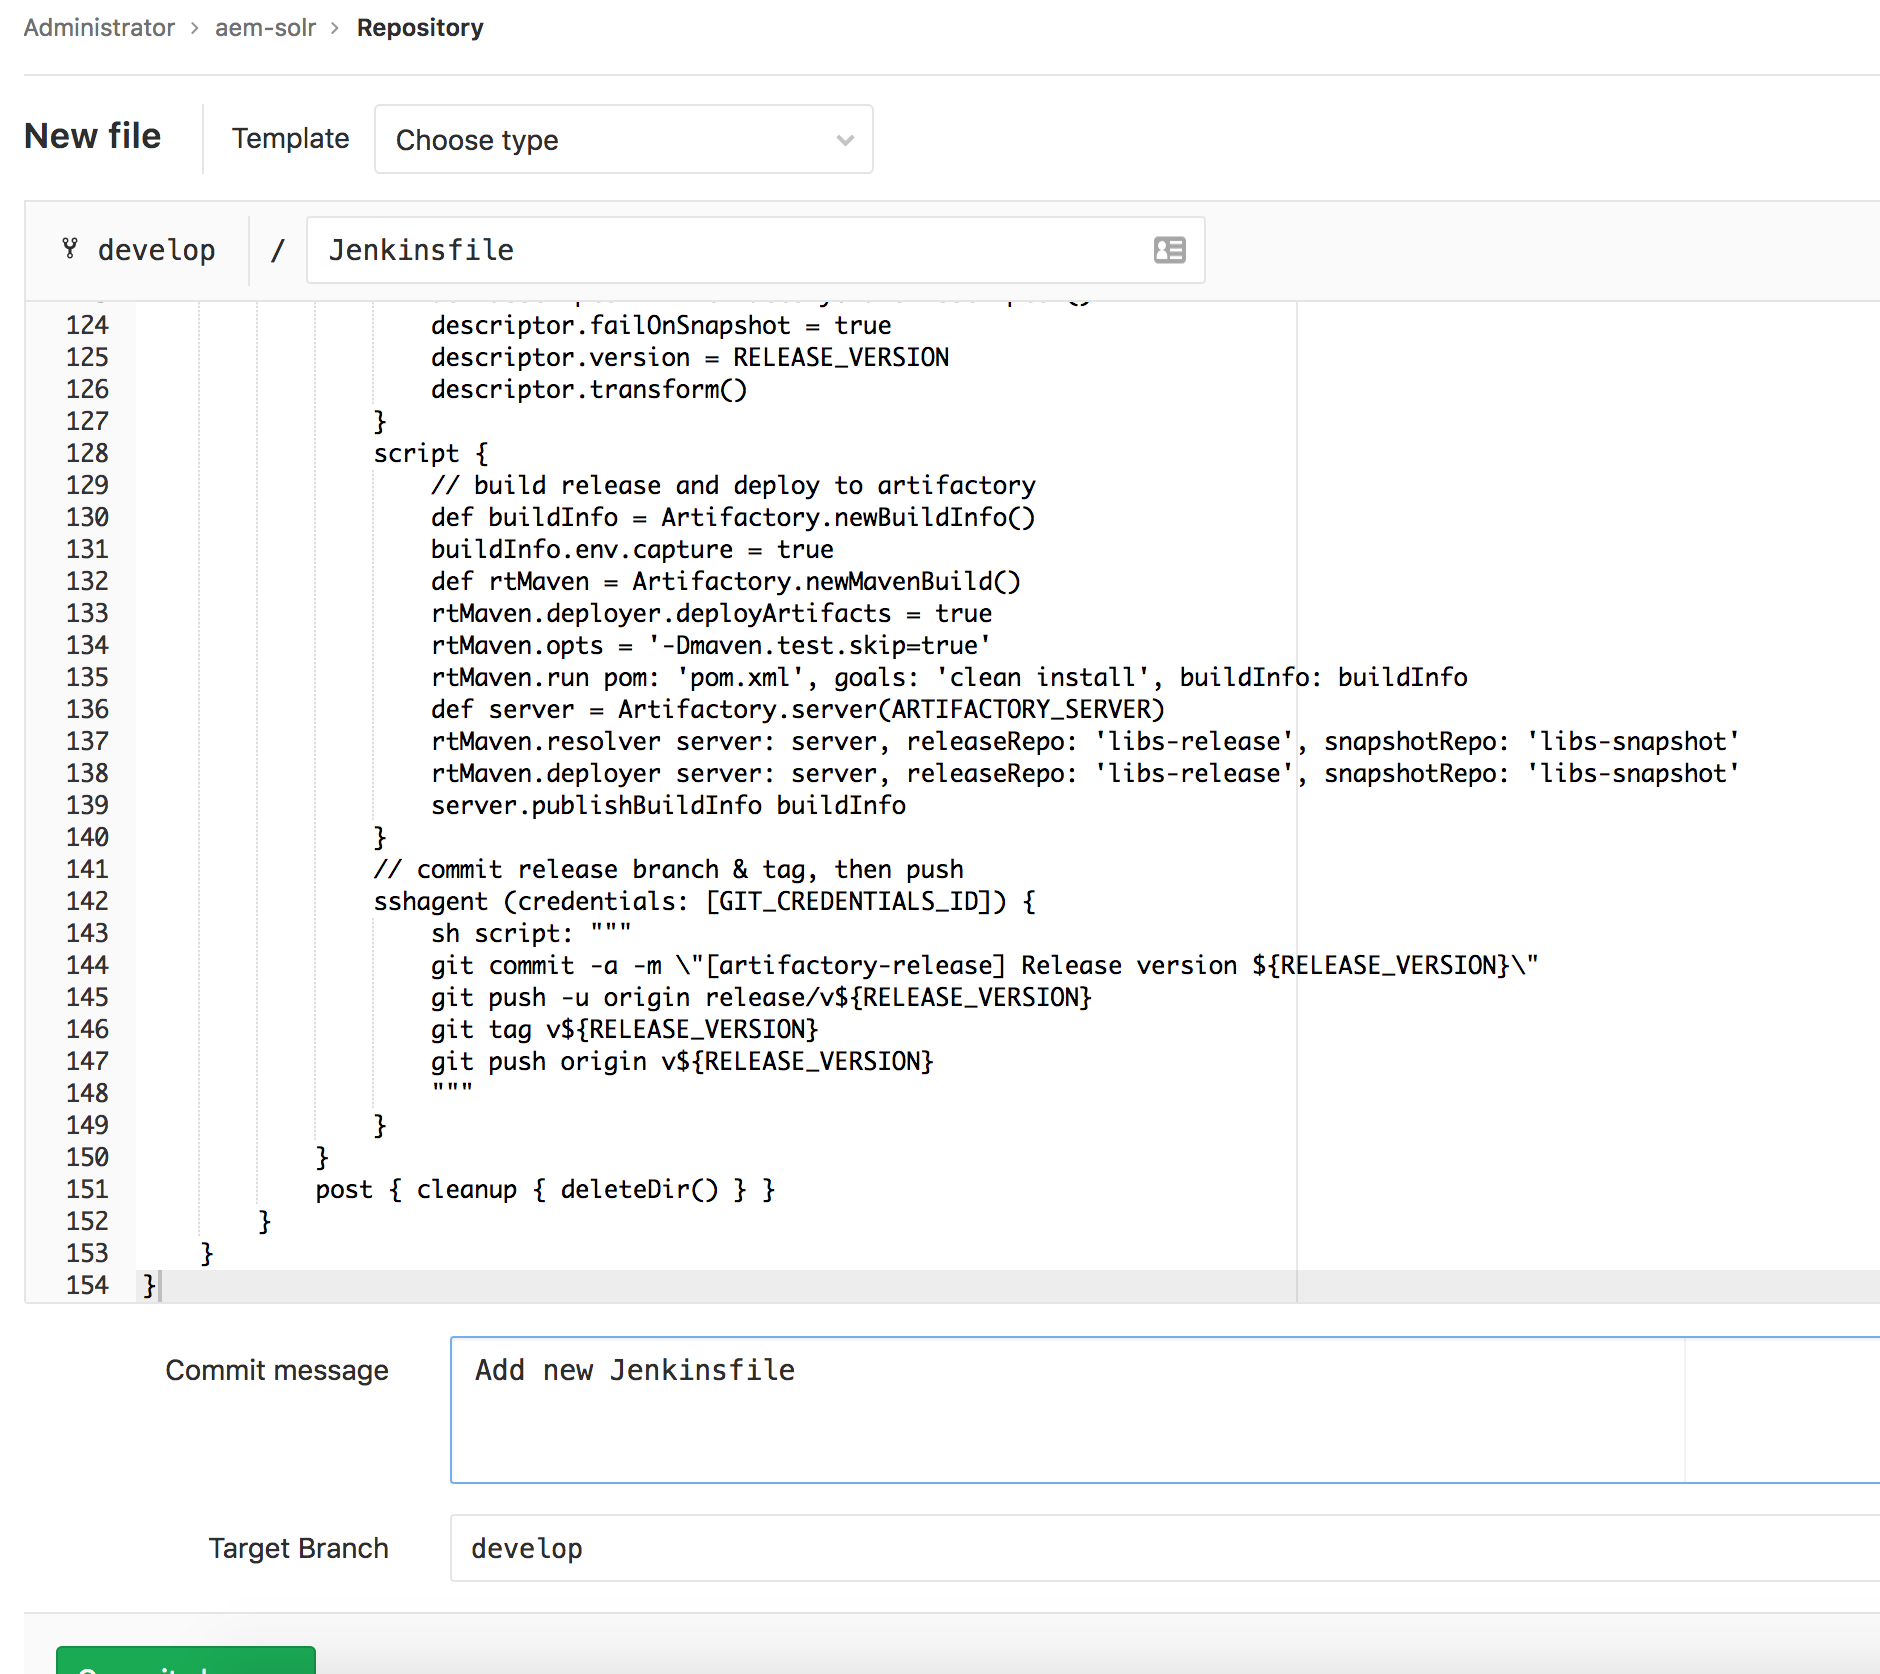
In the GitLab project, click on the [+] > New File, name the file Jenkinsfile, update the commit message and commit the changes.

=
You have now created a Jenkins file which you can subsequently edit by clicking the “Edit” button and committing those changes.
In the GitLab project, click on the [+] > New File, name the file Jenkinsfile, update the commit message and commit the changes.
=
#!/usr/bin/env groovy
pipeline {
agent none
environment {
GIT_CREDENTIALS_ID = 'aem-ci_gitlab_1'
ARTIFACTORY_SERVER = 'aem-ci_artifactory_1'
CRX_DEPLOY_CREDENTIALS_ID = 'aem-author-qa'
CRX_DEPLOY_AUTHOR_URL = 'http://host.docker.internal:4502'
CRX_DEPLOY_PUBLISH_URL = 'http://host.docker.internal:4503'
}
tools {
maven 'Maven 3'
jdk 'Oracle JDK 1.8'
}
stages {
stage('Build') {
agent any
steps {
script {
SCM_VARS = checkout(scm)
def rtMaven = Artifactory.newMavenBuild()
def server = Artifactory.server(ARTIFACTORY_SERVER)
rtMaven.resolver server: server, releaseRepo: 'libs-release', snapshotRepo: 'libs-snapshot'
rtMaven.deployer server: server, releaseRepo: 'libs-release-local', snapshotRepo: 'libs-snapshot-local'
def buildInfo = rtMaven.run pom: 'pom.xml', goals: 'clean install'
server.publishBuildInfo buildInfo
}
milestone(1)
}
post {
success { junit '**/target/surefire-reports/TEST-*.xml' }
cleanup { deleteDir() }
}
}
stage('Deploy?') {
steps {
script {
def userInput = input message: 'Deploy Content Packages',
ok: 'Deploy',
parameters: [
choice(name: 'Content Packages',
choices: 'ui.apps\nall',
description: 'Deploy the main application content package, or all?')
]
CRX_DEPLOY_PKG_ID_FILTERS = 'aem-solr.ui.apps-*.zip'
if (userInput == 'all') {
CRX_DEPLOY_PKG_ID_FILTERS = 'aem-solr.dependencies-*.zip\naem-solr.ui.apps-*.zip\naem-solr.ui.content-*.zip'
}
}
milestone(2)
}
}
stage('Deploy') {
agent any
steps {
script {
def downloadSpec = """{
"files": [
{
"aql": { "items.find": {
"name":{"\$match":"*.zip"},
"repo": "libs-snapshot-local",
"artifact.module.build.name": { "\$eq": "${JOB_NAME}" },
"artifact.module.build.number": { "\$eq": "${BUILD_NUMBER}" }
} },
"flat": true
}
]
}"""
def server = Artifactory.server(ARTIFACTORY_SERVER)
server.download(downloadSpec)
}
lock(resource: 'aem-deploy', inversePrecedence: true) {
crxDeploy baseUrls: CRX_DEPLOY_AUTHOR_URL,
credentialsId: CRX_DEPLOY_CREDENTIALS_ID,
behavior: 'Overwrite',
packageIdFilters: CRX_DEPLOY_PKG_ID_FILTERS,
recursive: true,
disableForJobTesting: true
crxDeploy baseUrls: CRX_DEPLOY_PUBLISH_URL,
credentialsId: CRX_DEPLOY_CREDENTIALS_ID,
behavior: 'Overwrite',
packageIdFilters: CRX_DEPLOY_PKG_ID_FILTERS,
recursive: true,
disableForJobTesting: true
milestone(3)
}
}
post { cleanup { deleteDir() } }
}
stage('Release?') {
steps {
script {
RELEASE_VERSION = input message: 'Release Version',
ok: 'Ok',
parameters: [
string(name: 'Release Version',
description: 'Release version? (i.e. 1.2.3)')
]
}
milestone(4)
}
}
stage('Release') {
agent any
steps {
checkout([ $class: 'GitSCM',
branches: [[ name: SCM_VARS.GIT_COMMIT ]],
userRemoteConfigs: [[ credentialsId: GIT_CREDENTIALS_ID, url: SCM_VARS.GIT_URL]]
])
// create release branch
sh script: """
git checkout -b release/v${RELEASE_VERSION} ${SCM_VARS.GIT_COMMIT}
"""
script {
// set release verison
def descriptor = Artifactory.mavenDescriptor()
descriptor.failOnSnapshot = true
descriptor.version = RELEASE_VERSION
descriptor.transform()
}
script {
// build release and deploy to artifactory
def buildInfo = Artifactory.newBuildInfo()
buildInfo.env.capture = true
def rtMaven = Artifactory.newMavenBuild()
rtMaven.opts = '-Dmaven.test.skip=true'
def server = Artifactory.server(ARTIFACTORY_SERVER)
rtMaven.resolver server: server, releaseRepo: 'libs-release', snapshotRepo: 'libs-snapshot'
rtMaven.deployer server: server, releaseRepo: 'libs-release-local', snapshotRepo: 'libs-snapshot-local'
rtMaven.run pom: 'pom.xml', goals: 'clean install', buildInfo: buildInfo
server.publishBuildInfo buildInfo
}
// commit release branch & tag, then push
sshagent (credentials: [GIT_CREDENTIALS_ID]) {
sh script: """
git commit -a -m \"[artifactory-release] [ci-skip] Release version ${RELEASE_VERSION}\"
git push -u origin release/v${RELEASE_VERSION}
git tag v${RELEASE_VERSION}
git push origin v${RELEASE_VERSION}
"""
}
}
post { cleanup { deleteDir() } }
}
}
}
You have now created a Jenkins file which you can subsequently edit by clicking the “Edit” button and committing those changes.
When this file was created, Jenkins should have kicked off a new job as well. It moved through the Build stage and waits for user input on the Deploy? stage. Before we move through the rest of the stages let’s cover what the other sections of the Jenkins file are doing.
Jenkinsfile: Environment
Here we are defining the following environment variables:
Here we are defining the following environment variables:
- GIT_CREDENTIALS_ID: the id of the credentials you should have pre-configured in Jenkins's global credentials.
- ARTIFACTORY_SERVER: the connection name or the Artifactory connection you should have pre-configured in Jenkins's global configuration.
- CRX_DEPLOY_CREDENTIALS_ID: the username/password to the AEM instances you should have pre-configured in Jenkins's global credentials.
- CRX_DEPLOY_AUTHOR_URL/ CRX_DEPLOY_PUBLISHER_URL: The URLs to the author/publish instances. I am running Jenkins in Docker, but I have not Dockerized AEM (yet). These URLs will allow Jenkins to run in a container to access AEM running on the host OS.
Jenkinsfile: Tools
- Maven: the name of the Maven tool that should have been pre-configured in the Jenkins global tool configuration.
- JDK: the name of the JDK tool that should have been pre-configured in the Jenkins global tool configuration.
Jenkinsfile: Stages
And finally, the most important section, the one that will be doing the actual work, stages.
And finally, the most important section, the one that will be doing the actual work, stages.
Stage 1: Build
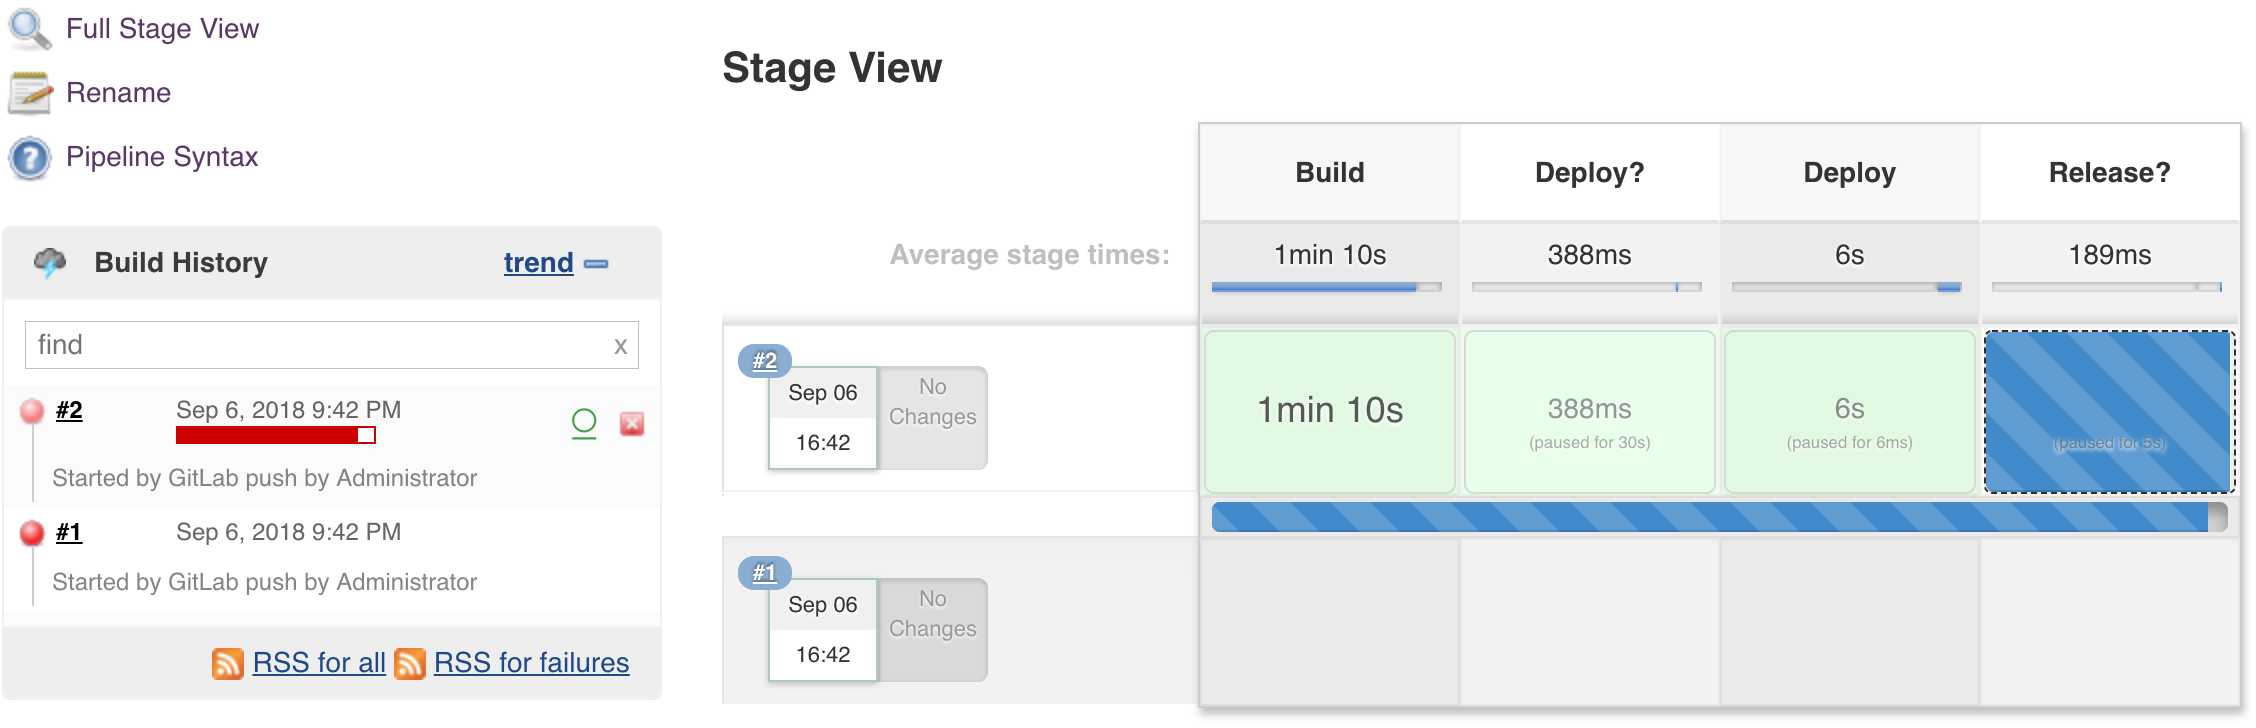
When you created and committed the Jenkins file, a build should have been triggered. The Build stage completed, the pipeline now sits on the Deploy? the stage where a user will input deployment variables.
When you created and committed the Jenkins file, a build should have been triggered. The Build stage completed, the pipeline now sits on the Deploy? the stage where a user will input deployment variables.
What this stage has done is to configure a maven build to use Artifactory to resolve its dependencies. After the maven builds runs, it will publish the build artifacts to Artifactory. You can view the build artifacts by using the build browser in Artifactory. By leveraging Artifactory, we avoid the need to archive the artifacts in Jenkins or preserving the workspace, thus upon subsequent stages, we are free to run on any agent because it will be retrieving the artifacts from Artifactory.
This stage also begins the milestones. What the milestone step does is setting a marker so that if any newer build surpasses this point, any other builds that have not yet reached it will automatically abort. You can go ahead and try it. Queue 3 or 4 builds in Jenkins by clicking “Build Now”. Allow the Build stage to complete on all. Then input the Deploy? options on the 2nd or 3rd one. Any previous builds will be aborted.
This stage also begins the milestones. What the milestone step does is setting a marker so that if any newer build surpasses this point, any other builds that have not yet reached it will automatically abort. You can go ahead and try it. Queue 3 or 4 builds in Jenkins by clicking “Build Now”. Allow the Build stage to complete on all. Then input the Deploy? options on the 2nd or 3rd one. Any previous builds will be aborted.
Stage 2: Deploy?
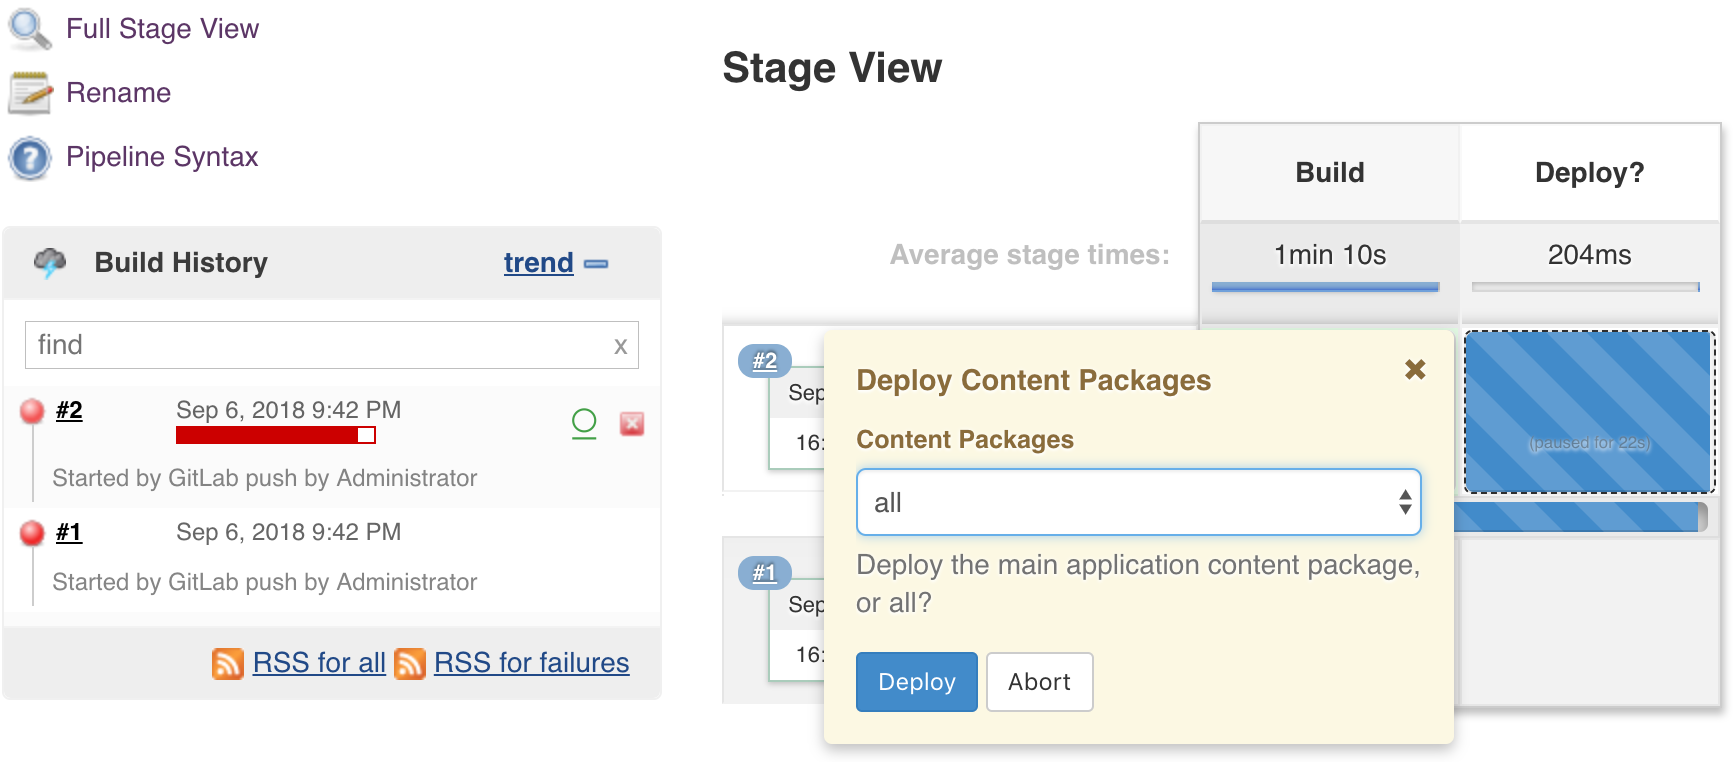
If you hover over the Deploy? stage box you’ll see a pop-up. In our example, we give the option of deploying the ui.apps content-package only or all the content packages. The purpose of this stage is user input only, hence its agent has not been set (the default has been set to none). We do not actually need a dedicated agent to run this.
If you hover over the Deploy? stage box you’ll see a pop-up. In our example, we give the option of deploying the ui.apps content-package only or all the content packages. The purpose of this stage is user input only, hence its agent has not been set (the default has been set to none). We do not actually need a dedicated agent to run this.
Once the user makes the input, the last step in the stage is to set a milestone.
Stage 3: Deploy
In this stage, first, we retrieve the build artifacts from Artifactory. Then the CRX Content Package Deployer is used to deploy. Notice that the disableForJobTesting is set to true, hence no need to actually have AEM up and running. We are also deploying within a lock block because there is a potential for two pipeline jobs to enter this stage at the same time. Should the older build finish first, fine. Should the newest build finish first, the milestone will take care of aborting the older build.
In this stage, first, we retrieve the build artifacts from Artifactory. Then the CRX Content Package Deployer is used to deploy. Notice that the disableForJobTesting is set to true, hence no need to actually have AEM up and running. We are also deploying within a lock block because there is a potential for two pipeline jobs to enter this stage at the same time. Should the older build finish first, fine. Should the newest build finish first, the milestone will take care of aborting the older build.
Stage 4: Release?
Once again you access the input pop-up by hovering over the Release? stage. Here we are collecting the release number you want to ship.
Stage 5: Release
In the final stage, we are going to follow a simple branching strategy. We are going to create a new branch release/v${version}. Then on this branch, we will bump the version by using the Artifactory plugin API, re-build with the new version and publish it to Artifactory.
In the final stage, we are going to follow a simple branching strategy. We are going to create a new branch release/v${version}. Then on this branch, we will bump the version by using the Artifactory plugin API, re-build with the new version and publish it to Artifactory.
In the end, you’ll have a tagged release branch, and you are free to continue development on the development branch. The versioned release artifacts have been deployed to Artifactory and are ready for distribution.
Blue Ocean
As mentioned in the start, the new Jenkins UI called Blue Ocean can be installed via the Blue Ocean Plugin. In Jenkins navigate to the plugin manager, click the Available tab, search for Blue Ocean and install. It brings with it a number of other dependency plugins so get ready to wait.


Once installed you will find a link on the left-hand navigation in Jenkins called “Open Blue Ocean”. Feel free to poke around and try to create pipelines. I found the UI to be somewhat limited, and oftentimes you have to switch back to the classic UI to get things done.
As mentioned in the start, the new Jenkins UI called Blue Ocean can be installed via the Blue Ocean Plugin. In Jenkins navigate to the plugin manager, click the Available tab, search for Blue Ocean and install. It brings with it a number of other dependency plugins so get ready to wait.
Once installed you will find a link on the left-hand navigation in Jenkins called “Open Blue Ocean”. Feel free to poke around and try to create pipelines. I found the UI to be somewhat limited, and oftentimes you have to switch back to the classic UI to get things done.
Conclusion
In this tutorial, we covered how to create a Declarative pipeline to build/deploy/release an AEM project, and collect user input in between. The pipeline worked on a single branch, and the release branching was simple. This should give you the foundation to build more complex pipelines that fit your team’s workflow, and a sandbox environment to rinse and repeat.
In this tutorial, we covered how to create a Declarative pipeline to build/deploy/release an AEM project, and collect user input in between. The pipeline worked on a single branch, and the release branching was simple. This should give you the foundation to build more complex pipelines that fit your team’s workflow, and a sandbox environment to rinse and repeat.

No comments:
Post a Comment
If you have any doubts or questions, please let us know.