Adobe suggests to define a cluster of author AEM instances when one of the following criteria is met:
- 1000+ unique users per day
- 100+ concurrent users
- high volumes of page edits
- large rollouts or activations
Once the cluster of author AEM instances is defined, it is important to avoid the use of MongoDB as a single point of failure. Therefore the database has to be configured as a ReplicaSet in order to grand robustness.
ADVANTAGES – DISADVANTAGES
Hence the advantages of using an author cluster are:
- Ability to scale AEM instances
- High availability, redundancy and automated failover of the data layer
- Performances are not as good as with TarMK
This part of the configuration is not in the scope of this post, it is possible to read more about it in the Adobe documentation
The following post provides a primer for setting up an AEM author cluster with MongoDB.
STEP-BY-STEP INSTALL
PRE-REQUISITE:
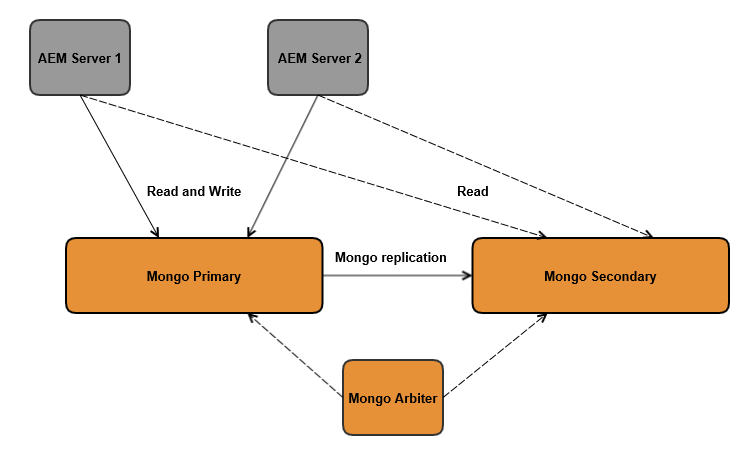
In the following, three instances of MongoDB with replicaSet (a primary, a secondary, and an arbiter) will be set up. This tutorial explains how to deploy it on the same machine. This is usually an environment for testing and developing. In a real cluster, it is sufficient to change the name of the machines and ports accordingly, given that they can reach each other.
Create a config file for each MongoDB instance to be created, following this template:
# mongo.conf
# data directory
dbpath=Path to allocate files of the instance
# log file
logpath=Path to allocate the log file of the instance
logappend=true
# port number
port=[port_number] / Default: 27017
# replica set name
replSet=[replicaSet Name]
Note: If you want more information about configuration, check the documentation.
Be aware that on the same machine you must set different ports.
Once you have prepared the files, you can install each instance via the command line. This example works for windows and creates a service for each instance. Alternatively, it could be set up directly via the command line, as stated in the documentation.
[MONGODB_PATH]\bin\mongod --config mongod1.cfg --serviceName MongoDB1 --serviceDisplayName MongoDB1 --install
[MONGODB_PATH]\bin\mongod --config mongod2.cfg --serviceName MongoDB2 --serviceDisplayName MongoDB2 --install
[MONGODB_PATH]\bin\mongod --config mongod3.cfg --serviceName MongoDB3 --serviceDisplayName MongoDB3 --install
Start all three instances of MongoDB:
net start mongodb1
net start mongodb2
net start mongodb3
Now it is possible to configure the replica set from the MongoDB shell, connect with this command:
[MONGODB_PATH]\bin\mongo --port 27017
The instance on which the replica set is initiated will be the primary. Instantiate a configuration variable with the id of the replica set and its starting member:
config = { _id: "rs1",
members:[ { _id : 0, host : "localhost:27017"} ]
}
With this variable, initialize the replica set and verify its result status.
rs.initiate(config)
{
"info" : "Config now saved locally. Should come online in about a minute.",
"ok" : 1
}
Add the two other instances to the replica set, one will be a secondary replica and the other will be an arbiter:
rs.add("localhost:37017")
rs.addArb("localhost:47017")
It is possible now to verify the final status: you should have three instances with these roles: primary, secondary, and arbiter.
rs.status()
STEP 2 – Set up the AEM 6.2 servers.
Take two new AEM 6.2 instances and run them with the following commands:
java -jar [aem instance jar name] -r crx3,crx3mongo -Doak.mongo.uri=mongodb://[primaryhost]:[port],[secondaryhost]:[port]/?replicaSet=[replicaSet name]
During startup, check the logs both from mongo and from AEM in order to be sure the startup process ends well. On Mongo, you should see the connections from the AEM instances. On AEM you will see eventual errors.
PRE-REQUISITE:
- Java JRE version 1.8 (including its updates)
- AEM version 6.2
- MongoDB version 3.2. This is the last version at the moment working with AEM 6.2
In the following, three instances of MongoDB with replicaSet (a primary, a secondary, and an arbiter) will be set up. This tutorial explains how to deploy it on the same machine. This is usually an environment for testing and developing. In a real cluster, it is sufficient to change the name of the machines and ports accordingly, given that they can reach each other.
Create a config file for each MongoDB instance to be created, following this template:
# mongo.conf
# data directory
dbpath=Path to allocate files of the instance
# log file
logpath=Path to allocate the log file of the instance
logappend=true
# port number
port=[port_number] / Default: 27017
# replica set name
replSet=[replicaSet Name]
Note: If you want more information about configuration, check the documentation.
Be aware that on the same machine you must set different ports.
Once you have prepared the files, you can install each instance via the command line. This example works for windows and creates a service for each instance. Alternatively, it could be set up directly via the command line, as stated in the documentation.
[MONGODB_PATH]\bin\mongod --config mongod1.cfg --serviceName MongoDB1 --serviceDisplayName MongoDB1 --install
[MONGODB_PATH]\bin\mongod --config mongod2.cfg --serviceName MongoDB2 --serviceDisplayName MongoDB2 --install
[MONGODB_PATH]\bin\mongod --config mongod3.cfg --serviceName MongoDB3 --serviceDisplayName MongoDB3 --install
Start all three instances of MongoDB:
net start mongodb1
net start mongodb2
net start mongodb3
Now it is possible to configure the replica set from the MongoDB shell, connect with this command:
[MONGODB_PATH]\bin\mongo --port 27017
The instance on which the replica set is initiated will be the primary. Instantiate a configuration variable with the id of the replica set and its starting member:
config = { _id: "rs1",
members:[ { _id : 0, host : "localhost:27017"} ]
}
With this variable, initialize the replica set and verify its result status.
rs.initiate(config)
{
"info" : "Config now saved locally. Should come online in about a minute.",
"ok" : 1
}
Add the two other instances to the replica set, one will be a secondary replica and the other will be an arbiter:
rs.add("localhost:37017")
rs.addArb("localhost:47017")
It is possible now to verify the final status: you should have three instances with these roles: primary, secondary, and arbiter.
rs.status()
STEP 2 – Set up the AEM 6.2 servers.
Take two new AEM 6.2 instances and run them with the following commands:
java -jar [aem instance jar name] -r crx3,crx3mongo -Doak.mongo.uri=mongodb://[primaryhost]:[port],[secondaryhost]:[port]/?replicaSet=[replicaSet name]
During startup, check the logs both from mongo and from AEM in order to be sure the startup process ends well. On Mongo, you should see the connections from the AEM instances. On AEM you will see eventual errors.
STEP 3 – Testing
Log in to the AEM servers and open CRXde or the Geometrixx outdoors website to check the correctness of the startup.
On any of the two AEM servers, open a page of the Geometrixx outdoors website. Try adding/modifying/deleting some content on the page. If you check on the other server these changes are reflected instantaneously.
Shut down the primary MongoDB server and check that both AEM instances are still working without any problem.
AUTHORS
Javier Reyes Alonso, Marco Pasini
Javier Reyes Alonso, Marco Pasini
BIBLIOGRAPHY
https://docs.adobe.com/docs/en/aem/6-2/deploy/platform/aem-with-mongodb.html
http://www.techaspect.com/blog/web-content-management/adobe-experience-manager/oak-cluster-with-mongomk
https://docs.mongodb.com/manual/tutorial/deploy-replica-set/
https://docs.adobe.com/docs/en/aem/6-2/deploy/platform/aem-with-mongodb.html
http://www.techaspect.com/blog/web-content-management/adobe-experience-manager/oak-cluster-with-mongomk
https://docs.mongodb.com/manual/tutorial/deploy-replica-set/

No comments:
Post a Comment
If you have any doubts or questions, please let us know.