In the programming world, usually, when we’re using languages and technologies such as PHP, Ruby, NodeJS, the URL points out to a script, but in the Sling world, this is different.
Content as the protagonist
As commented previously, in the Sling world, different from the main technologies that we see out there, the content is the main entry point of the application.
As commented previously, in the Sling world, different from the main technologies that we see out there, the content is the main entry point of the application.
When the framework is resolving the URL, it will try to match the content that is contained within the CRX Repository and, just when the content is found, it will fetch its properties to discover which script will be rendered.
The resolver will try to match the content in the URL by trying to find in the content repository by the full path of the URL without exception. If the content isn’t found, it will then trigger the error handler script.
So, for example, the url http://localhost:4502/content/testing.html, it tries to find in the repository for /content/testing.
Finding the right script
When the content is finally found, the next step in the evaluation order of the resolver is to locate the right script to render the content of the resource in for the final user.
In order to do so, the resolver will fetch the node from the repository and inspect its properties trying to find one of those properties, in order:
With the property found, it will parse its value, for example, blog/test and will try to find for this script in two places, also in the same fallback order as the previous list:
When the content is finally found, the next step in the evaluation order of the resolver is to locate the right script to render the content of the resource in for the final user.
In order to do so, the resolver will fetch the node from the repository and inspect its properties trying to find one of those properties, in order:
- sling:resourceType
- sling:resourceSuperType
- jcr:primaryType
With the property found, it will parse its value, for example, blog/test and will try to find for this script in two places, also in the same fallback order as the previous list:
- /apps
- /libs
Nothing better than examples
Script resolver
When the resolver is trying to find the script in one of the folders commented above, it will take three things into consideration in order to find the best script match.
It will analyze those resources of the URL:
When the resolver is trying to find the script in one of the folders commented above, it will take three things into consideration in order to find the best script match.
It will analyze those resources of the URL:
- The request method (GET/HEAD/POST… etc…)
- The selectors [URL]/testing.[selector1.selector2].html
- The extension itself in the URL
Creating our application architecture
For us being able to assess this functionality of the Sling script resolver, we would need basically three things.
So, in the first step, we should create folders using the CRXDE Lite IDE (that’s bundled in every AEM installation) in order to match the structure presented below.
For us being able to assess this functionality of the Sling script resolver, we would need basically three things.
- A component that will be used to render our page content
- A template which our page will be based
- The page itself within our CRX content repository
So, in the first step, we should create folders using the CRXDE Lite IDE (that’s bundled in every AEM installation) in order to match the structure presented below.
/apps
/blog1
/components
/page
/templates
So, first, we need to enter in the LITE IDE by entering in the URL http://localhost:4502/crx/de. When the page is loaded, you should be able to see something like this:
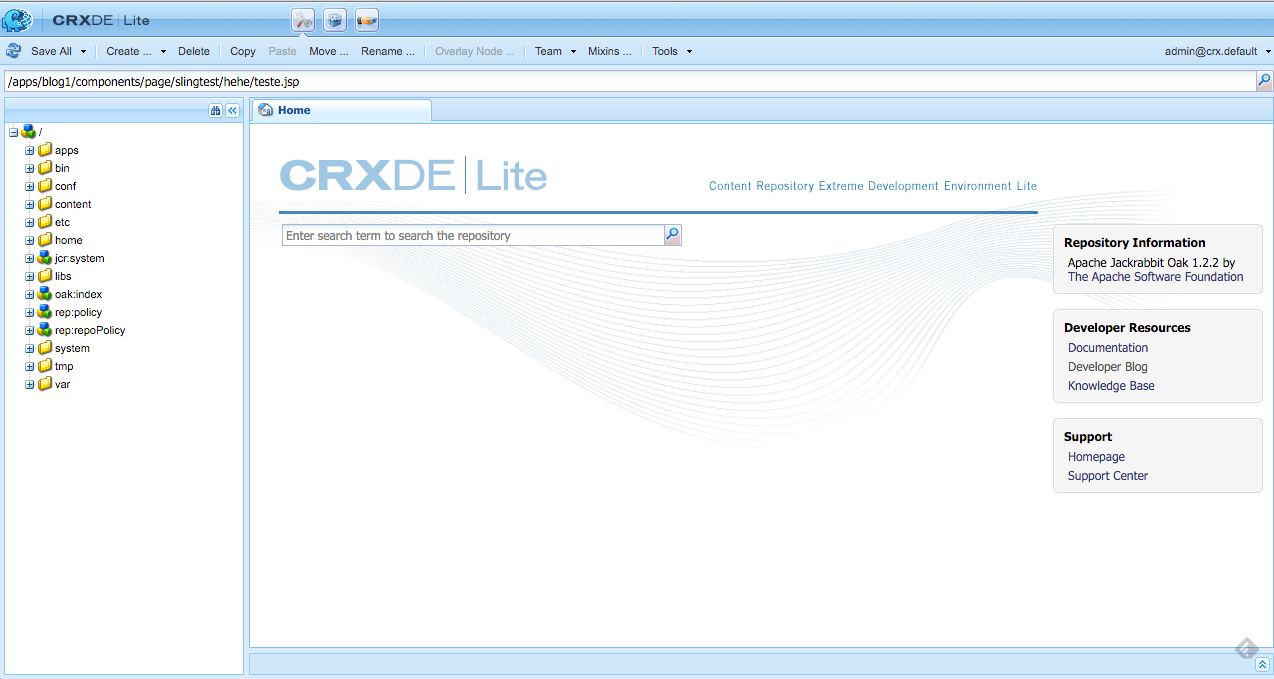
CRXDE Lite
With that open, we should then start creating our folder structure. In order to create a folder in this application, you can click with the right button in the /apps folder and click in creating a new folder, as in the screenshot down below.

Creating a folder
After all the folders are created, you should have a structure like this one:
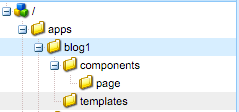
Folder structure
Now, with those folders entirely ready, we can on to our next steps, which the first will be the creation of our component.
Creating our first component
Our component is the responsible by rendering what will be shown for our user, based on the content that is found by the resolution of the URL. As commented previously, this component is found by the resolver by figuring out what is the resource type of the content.
In the Lite IDE, we have all we need in order to quickly create a component, the fact that we can accomplish by using the create menu as we used before for the creation of our folder structure.
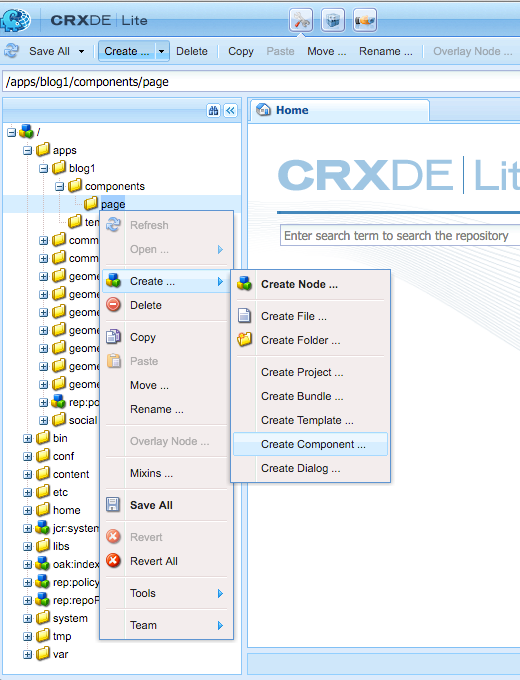
Create a component
When this button is clicked, it will be prompted for us a dialog area where we’ll be able to fill the information which describes our components. For now, the only info that we should fill in the Label (name of the node within the CRX repository) and the Title. Let’s call our component slightest.

Component config
For now, you should click the next button in the dialog until the OK button is available, as it will not be needed to configure the other details of the component for this tutorial, perhaps we can go deep in the component configuration in another post.
With that, our component is successfully created, and we can go on to the creation of our template.
Creating the template
The template is one major part of any AEM application, as it is what will drive the creation of all the content that will be presented for our clients. Any page is based on the templates in order to have its default properties, such as the resource type, that will define which component will render the resource content itself.
The template is one major part of any AEM application, as it is what will drive the creation of all the content that will be presented for our clients. Any page is based on the templates in order to have its default properties, such as the resource type, that will define which component will render the resource content itself.
In order to create a template, the process is similar to the creation of a component; we should just select the template button instead.
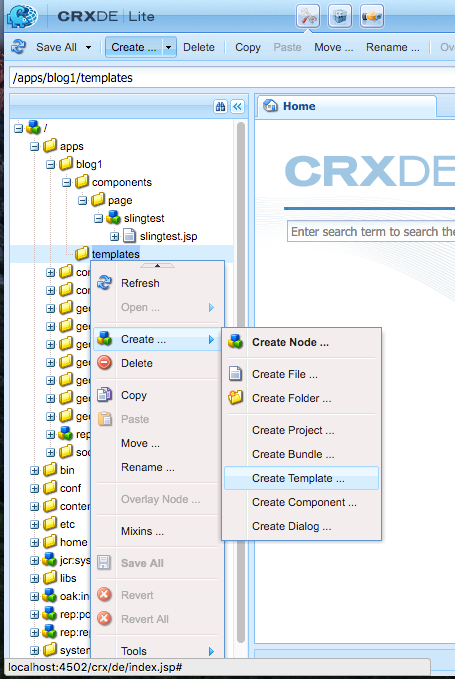
Create template
As we’ve already seen in the component creation, it will be presented a similar dialog where will be able to configure our template. In this dialog, we will fill only three properties, the name, and the title, as before, and also the Resource Type. This part is crucial because it’s the part that will make our template tell all the pages based on it, which component it should direct to render the content.
I’ve commented previously that the Script resolver will try to find the component in two folders, the /apps, and the /libs, so that’s why in the Resource Type we just fill with blog1/components/page/slingtest because the resolver will automatically concatenate the resource type to the default search folders.

Configure Template: part 1
Differently from the creation of components, in the next dialog, there will be a field that will need our attention, which is the Allowed Paths. This field is important because it defines wherein the content repository tree our page can be created. It accepts a regular exception, as we put /content(/.*)?, where we said that we could create the page anywhere in the tree that starts in the /content folder, which is the root directory of all the sites within AEM.
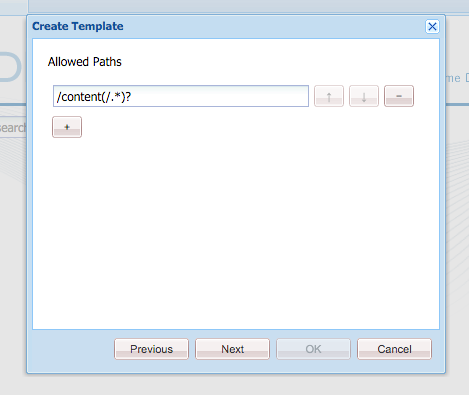
Configure Template: part 2
For the next steps, you can only skip clicking next until the OK button is available.
After this process is accomplished, we finally have our application created, and now we can create our first AEM page (congratz ;D).
Our window to the world: The first page
Now that we have built all the needed parts for our tests, we’ll finally create our first page, but, in order to do so, the first thing that we should do is to access the siteadmin area, by entering this address http://localhost:4502/siteadmin.
When you enter in this part, you should be able to see a screen like this one:
Siteadmin
In this area, you’ll see all the created pages and also will be able to create new ones, basing it in the templates that we’ve created previously.
So, our first step is to build the page based on the template that we created. To do so, please click the New… button and choose New Page…, as in the screenshot.

Siteadmin: New Page
When you finally clicked on this button, a dialog will be prompted for you where you will be able to enter the name of the node that will be within the CRX repository, the title of the page itself, and select the template that it will be based.

Siteadmin: New Page dialog
After we created it and tried to find the node of the Page within the CRX Repository, we will be able to notice that all the properties defined in the template are also copied to the node of the page that was just created.

Page properties
Resolver order
As commented before, there are some aspects of the URL that influence directly in the script resolver, and, to be true, there is an order of preference that the resolver takes into consideration when trying to find the best match for the resource content.
In our component, we can, for example, have more than one .jsp script, so, by doing so, we will let our resolver be able to find the best match along with a wide variety of options.
So, in the first step for this, we should create some new .jsp files within our previously created component, so we can then check for ourselves in practice what is the resolver order that AEM will take.
We need to create some files in the following folder /apps/blog1/components/page/slingtest. Use as an example the slingtest.jsp that was created automatically when we created the component in the first place. We will click two times in each file so we can change the content of the file to it’s name. So for example, if we created the file test.jsp, in its contents it would have test.jsp as well.
For this new part, we should create this list of files.
- GET.jsp
- selector2.jsp
- selector1.jsp
- selector1/selector2.jsp
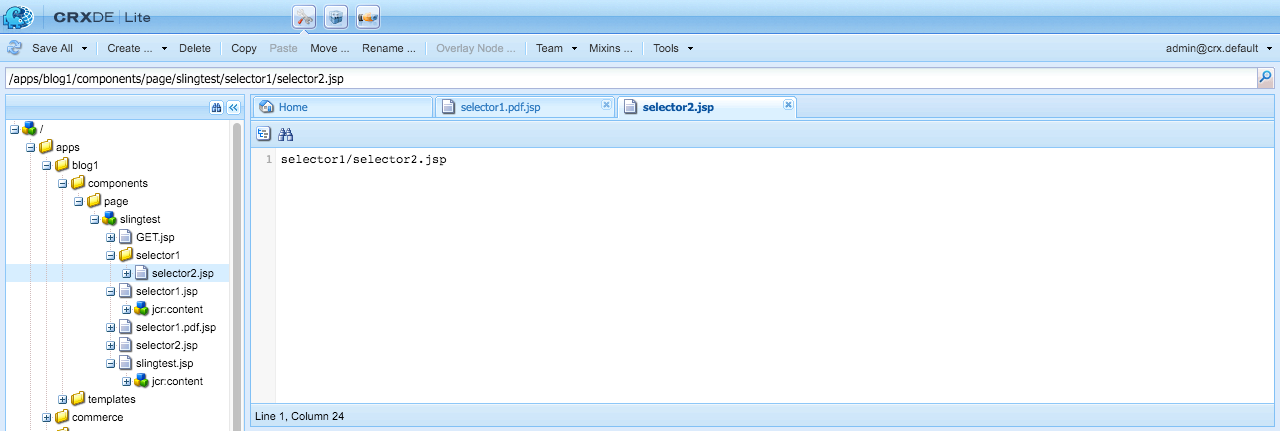
JSP Files
Testing our execution order
Now that we’ve created all the JSP files, the page, and everything else, we can finally test in practice, when we access the URL of our page, which indeed will be scripted that will be rendered.
So, let’s try to access the page that we just created http://localhost:4502/content/testing.html.
What was the page that rendered for you? Perhaps you’re wondering why any of the pages that we’ve created was called and yes, the script that was created by default when the component was created for the first time, the slingtest.jsp.
The reason behind that is the execution order, as there wasn’t any particular file that matches our URL, one of the last files that the resolver tries to look for before triggering an error, is the JSP with the same name of the component, in this case, slingtest. If we deleted this file, there is just one more fallback before triggering an error, which is the [HTTP_METHOD_NAME].jsp. In our case GET.jsp.
If you try to delete the slingtest.jsp file, you will be able to see that the file that now will be called to render the content of the resource will be the GET.jsp. Please, do so.
And if we deleted the GET.jsp as well, what would happen? In fact, there isn’t any apparent error; we would just see a blank screen. But now you know, that if anytime you experience just a blank screen, it can be a problem of your script resolver not finding anything to render.
Using the selectors
One real key point of AEM and Sling is the possibility to tweak our request by adding selectors in our URL. Those selectors have priority when the script resolver is trying to find the script.
For example, if we just had one selector in our URL, like this: http://localhost:4502/testing.selector2.html, the script that would be called instead would be the selector2.jsp.
And if we had more than one selector, like this URL: http://localhost:4502/testing.selector1.selector2.html. What would happen?
Remember that we’ve created a JSP within a folder? In the execution order, if there is a folder with the name of the first (and only the first) selector, it will enter in this folder. So you’re right if you guessed that the one that would be called was selector1/selector2.jsp. You might be wondering that if we didn’t have this folder, what would be the priority of render, the selector1 or selector2? Let’s try to delete the selector1 folder and discover it.
If you guessed selector1, you were right; the first selector will always have the priority.
Summing it up
Basically, that was the things that I’ve wanted to bring up for everyone; I really wish you could make usage of anything.
If there is anything that I can help you out with, please feel free to contact me via mail or any other social network! You can find my contacts in the footer of this blog.
Basically, that was the things that I’ve wanted to bring up for everyone; I really wish you could make usage of anything.
If there is anything that I can help you out with, please feel free to contact me via mail or any other social network! You can find my contacts in the footer of this blog.

No comments:
Post a Comment
If you have any doubts or questions, please let us know.